The information in this Wiki Page applies to Surveyor 2.0 (S20) as found in Trainz Plus. The original refernce material for this document can be found at  Surveyor 2.0 Overview
|
|
This document is still under construction
|
The Surveyor 2.0 World
When you start Trainz in Survayor 2.0 the world presented will look something like the following image, but what you actually see can be highly customised to your own preferences.
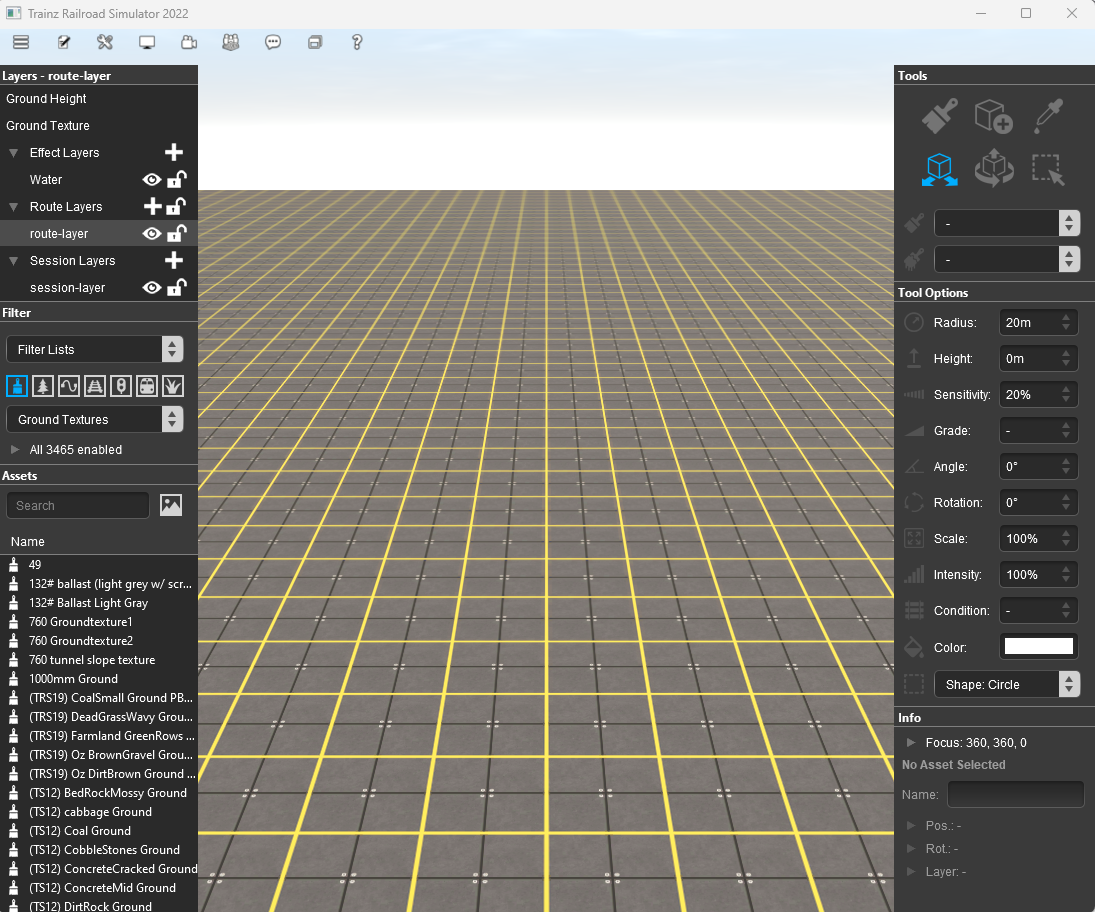
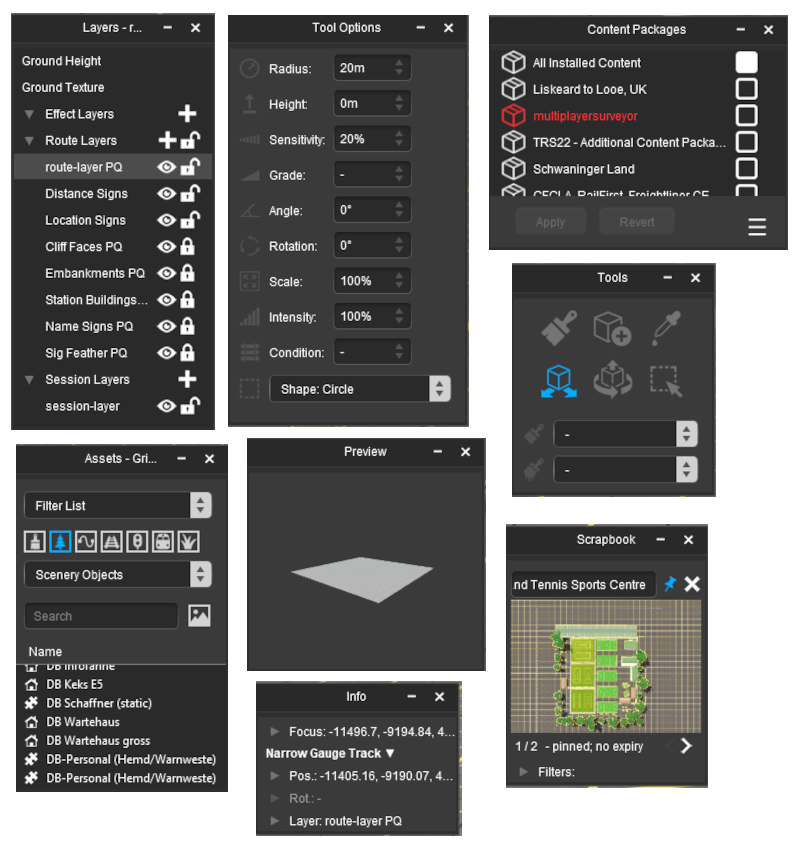
The grey boxes on the left and right of the screen are Palettes, where selections can be made, information displayed and controls set.
| Shown in the image above are 5 Palettes:- |
 |
Assets |
|
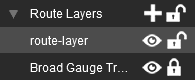
Layers |
|
Info |
|
Tools |
|
Tool Options |
|
|
Not shown in the image above are 3 Palettes because they are currently hidden from view. They are:-
 |
Scrapbook |
|
Asset Preview |
|
Content Packages |
|
|
|
Hiding and Showing Palettes
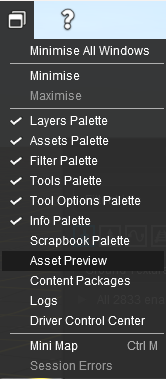
Palettes are hidden and revealed using the Window Menu on the top Surveyor Menu bar.
The 5 visible and 3 hidden Palettes in the screenshot image shown above have had their visibility set by:-
|
|
| Steps: |
 |
open the Window Menu from the menu icons at the top of the screen |
| |
 |
visible palettes have ticks next to their names |
 |
invisible (hidden) palettes have no ticks next to their names |
|
 |
To make a hidden palette visible or to hide a visible palete simply Left click on its name or on the or next to its name |
|
|
Docking and Undocking Palettes
To Undock a palette from its normal position on either side of the screen:-
 |
| Steps: |
|
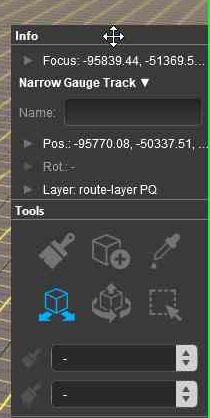
Move the mouse pointer onto the Title Bar of the palette to be undocked. The pointer will take the shape of a 4 headed arrow |
 |
|
Left Click and Drag the palette to any position on the screen |
 |
Release the mouse button |
|
|
|
To reverse the process and dock a palette:-
Resizing Palettes
Only palettes that are undocked can be resized.
Closing Palettes
This is the same as hiding a palette. Once a palette has been undocked it can be closed (hidden) by a Left click on its Close  icon. The palette will not be deleted and can be shown again as described above at icon. The palette will not be deleted and can be shown again as described above at  Hiding and Showing Palettes Hiding and Showing Palettes |
The Info Palette
| If the Info Palette is not visible on the screen then refer to Hiding and Showing Palettes at the top of this document. Some Info Palette functions will also require the Assets Palette and the Tool Options Palette.
|
|
| This palette can be easily overlooked but it has some very useful features:- |
|
providing precise data and control over the "focus" - the position of the cursor |
|
providing precise data and control over the position and orientation of objects (it can be used instead of the Free Move Tool and the Fine Adjustment Tool) |
|
identifying and setting the "home" layer and binding layer of a selected object |
|
used for locking and unlocking a selected objects layer |
|
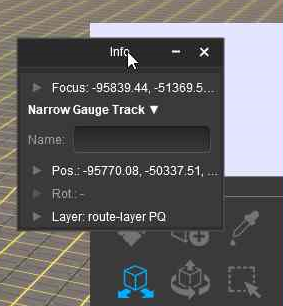
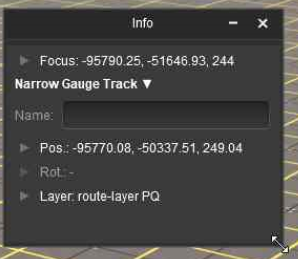
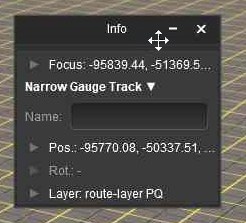
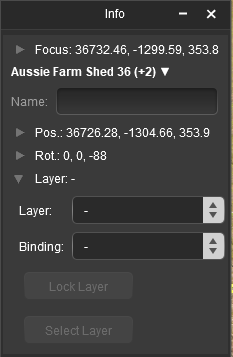
The Info Palette will appear as shown in the image below.
 |
Each of the small arrowhead icons will open the palette to display more information and some controls. |
Focus Info and Controls
The Focus shows the current position and height of the Cursor object. Open up the Focus by Left clicking on its arrowhead icon.
 |
Before changing the cursor position with the Focus controls, set a Bookmark at its current position.
|
|
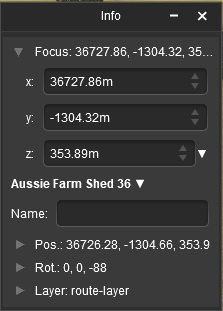 |
The current cursor position is shown in the X, Y and Z text boxes. These values can be edited to move the cursor to a new position but CARE will be needed.
 |
Notes:
If you enter an X or Y value that is "out in empty space" (beyond the edge of a boundary baseboard) then the cursor will be refocussed at a point on the baseboard edge that is the closest to the entered co-ordinates.
|
|
On the right of each box is a pair of Up/Down controls. Left Click and Drag up or down on these to adjust the cursor position in smaller increments down to centimetres
|
Next to the Z co-ordinate is a small white down arrowhead. Left click on the arrow to open its menu.
 |
There is only one item in the sub-menu. Use Height for Brush
Left click on the option to copy the current cursor height (Z) value from the Info Palette to the Tool Options Palette Height entry. |
You must have an object (or objects) selected for a name to be shown and the menu to be available.
 |
If the selected objects are different then a count of the additional objects will be added. The (+2) shown in the object name in the image on the left indicates that "2" additional different objects are in the group of selected objects. The name and position data shown will be for the last selected object. |
Next to the objects name is a small white Down Arrowhead. Left click on the arrowhead to open its menu.
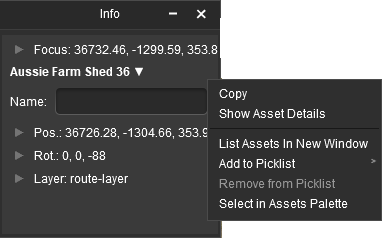 |
The menu options are:-
| Copy |
NOT WORKING (a known bug) - this option copies the objects details as text for pasting into a text editor |
| Show Asset Details |
opens a new window showing the image and description of the selected object |
| List Assets in New Window |
opens up Content Manager and lists all the selected objects |
| Add to Picklist |
adds selected objects to a Picklist |
| Remove from Picklist |
removes selected objects from a Picklist (objects must already be in a Picklist) |
| Select in Assets Palette |
highlights the selected object in the Assets Palette |
|
Position Info and Controls
You must have an object (or objects) selected for the position data to be shown and edited. Open up the position data by Left clicking on its Pos: arrowhead icon.
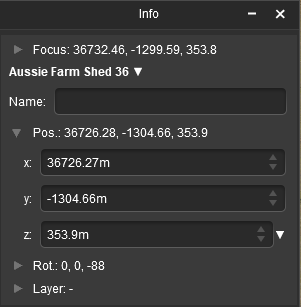 |
The position of the selected object (or the last object if more than one is selected) is shown in the X, Y and Z text boxes. These values can be edited to move the object or objects to a new position but CARE will be needed.
|
Notes:
If you enter an X or Y value that is "out in empty space" (beyond the edge of a boundary baseboard) then the objects will be moved to that position and may vanish from view. The Undo command can be used to reverse the move or the Marquee Tool can be used to add a baseboard under the "floating" objects. |
|
On the right of each box is a pair of Up/Down controls. Left Click and Drag up or down on these to adjust the position in smaller increments down to centimetres
|
Next to the Z co-ordinate is a small white down arrowhead. Left click on the arrow to open its menu.
 |
There is only one item in the sub-menu. Use Height for Brush
Left click on the option to copy the height (Z) value for the selected object from the Info Palette to the Tool Options Palette Height entry. |
Rotation Info and Controls
You must have an object (or objects) selected for the rotation data to be shown and edited. Open up the rotation data by Left clicking on its Rot: arrowhead icon.
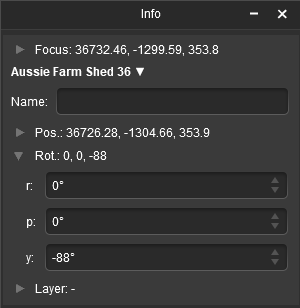 |
The rotational orientation of the selected object (or the last object if more than one is selected) is shown in the R, P and Y text boxes. These values can be edited to rotate the object or objects in 3D space BUT not all objects can be rotated in certain directions.
On the right of each box is a pair of Up/Down controls. Left Click and Drag up or down on these to adjust the rotation angle in increments of 1°.
|
Layer Info and Controls
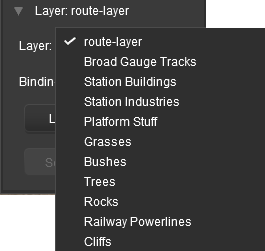
You must have an object (or objects) selected for the layer data to be shown and edited. Open up the layer data by Left clicking on its Layer: arrowhead icon.
|
Notes:
|
|
the Info Palette is best used to change the assignment of individual objects to layers and to set their optional Binding Layer |
|
operations such as creating, deleting, merging, renaming, moving and hiding layers are performed using the Assets Palette |
|
layers can be Locked and Unlocked using the Info Palette or the Assets Palette but the Assets Palette is often the better choice for this |
|
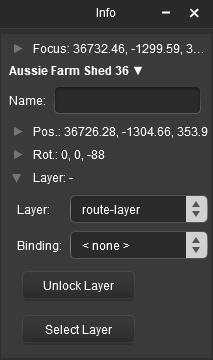 |
This will show the:-
|
current layer assigned to the selected object |
|
its assigned Binding Layer (if any) |
|
the Locked/Unlocked status of the assigned layer |
| |
 Layer is currently Unlocked. Click this button to Lock the layer Layer is currently Unlocked. Click this button to Lock the layer |
| |
 Layer is currently Locked. Click this button to Unlock the layer Layer is currently Locked. Click this button to Unlock the layer |
| |
Using this button will also change the Locked/Unlocked padlock icon shown next to the layer name in the Assets Palette
 |
|
 |
If multiple objects from different layers have been selected then no layer name will be shown in the Layer and Binding boxes. Instead they will be left "blank" as shown in the image on the left.
Both boxes can still be opened to assign layers to objects. |
Assigning Objects to a Different Layer
A selected object or group of selected objects can be assigned to a different layer. If multiple objects have been selected then they do not have to all be in the same layer.
Once a target layer has been selected then the Select Layer button, which sets the Active Layer, may become active.
The Active Layer is the layer used by the Placement Tool when objects are added to a route (or session). This button gives you the opportunity to set the Active Layer to the same layer that you just used to assign to an object. Its use is optional.
You can also set the Active Layer by selecting its name from the list in the Layers Palette. |
 If the Select Layer button is greyed out If the Select Layer button is greyed out |
 |
then the selected object is now assigned to the current Active Layer so there is no need to use this option |
 If it is NOT greyed out If it is NOT greyed out |
 |
then the selected object is now assigned to a layer that is not the current Active Layer. You have the option to Left click on this button to switch the Active Layer to the same layer as the object
|
|
Assigning Objects to a Binding Layer
| The Binding Layer, or Bound Layer as it is also called, is a tool used in the development of a route or session. It allows you to temporarily assign an object to a second layer while it is still in its original layer. The object will then take on the properties (Locked/Unlocked, Hidden/Visible) of both layers. |
| So if the original layer or the binding layer of an object is:- |
|
LOCKED then the object will be LOCKED |
|
HIDDEN then the object will be HIDDEN |
Some examples of using the Binding Layer:-
Example 1: |
| The problem: |
You need to stop an object from being selected so that you can you move other objects on or around it |
| The solution: |
The easiest solution is to use the Layers Palette to create a new empty layer and lock it. Set the Binding Layer of the object to the new locked layer. The object will then be locked so it cannot be selected or moved even though its original layer is unlocked. When the edit has been completed delete the empty locked layer you just created to unlock all its bound objects and remove all their bindings
|
| Example 2: |
| The problem: |
A group of objects (e.g trees) are blocking access to another object. |
| The solution: |
The easiest solution is to use the Layers Palette to create a new empty layer and hide it. Set the Binding Layer of the blocking objects to the new hidden layer. The blocking objects will no longer be visible and cannot be selected even though their original layer is still visible. When the edit has been completed delete the empty hidden layer you just created to make all its bound objects visible and remove all their bindings
|
|
 |
| Steps: To change the assigned binding layer of an object or group of objects:- |
|
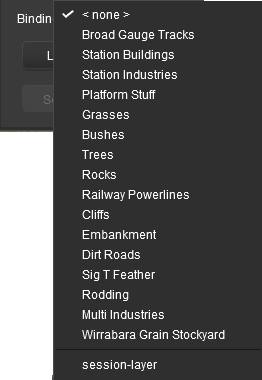
Left click on the Binding drop down box. If the object is already bound to a layer (for a single selected object only) the binding layer will be shown with a in front of its name |
|
Select the Binding layer name from the drop down list |
| The layer reassignment will start the instant the layer is selected |
|
If you see a Debugging Window on the screen as the task is processed, it will inform you when the task has been completed. You can then close the window |
|
|
| As an example, the image below shows what you will see for a single object that has had:- |
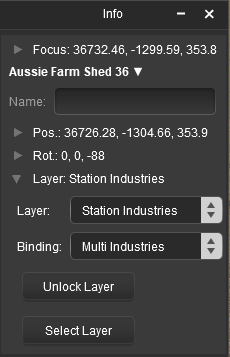 |
|
its assigned layer changed (in the example from "route-layer" to "Station Buildings") |
|
its binding layer set (in the example to "Multi Industries") |
|
the newly assigned layer is not locked so you have the option to lock it |
|
the newly assigned layer is not the Active Layer so you have the option to make it the Active Layer |
|
 |
More information on creating, editing and using Layers can be found on the Trainz Wiki at:-
|
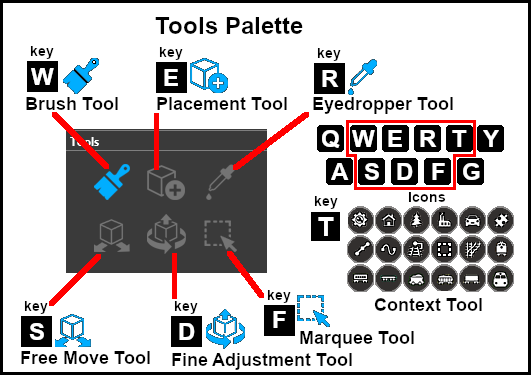
The Tools Palette
| The Tools Palette is at the core of the new interface and takes the place of all the Tool Flyouts that have been the standard for Trainz Surveyor for many years now. Some of the tools are new while others have been given a makeover and new abilities. |
 |
The Context Tool is attached as an icon to a selected or newly placed object. The icon and its Context menu will vary according to the type of object. |
For a detailed description of all the tools in the Tools Palette see the Trainz Wiki page How to Use the Surveyor 2.0 Tools
| Various brush tools make use of the Tool Options Palette, the Assets Palette, the Info Palette, the Layers Palette and the Scrapbook Palette. If a palette required by one of the brush tools is not visible on the screen then refer to Hiding and Showing Palettes at the top of this document.
|
|
The Brush Tool
 |
Keyboard Shortcut: W |
The Brush Tool "paints" the ground height, ground textures, effect layers and scrapbook scenes in a route |
The Placement Tool
 |
Keyboard Shortcut: E |
The Placement Tool adds objects to a route |
The Eyedropper Tool
 |
Keyboard Shortcut: R |
The Eyedropper Tool identifies and selects objects in a route |
|
An Eyedropper is inside all the tools so you can quickly identify any object without having to switch to the Eyedropper Tool and back again.
Just hold down the Alt key as you move your selected tool onto an object to reveal its name. Left click on the object while holding down the key to select it in the Assets Palette list. |
|
The Free Move Tool
 |
Keyboard Shortcut: S |
The Free Move Tool moves objects around a route |
The Fine Adjustment Tool
 |
Keyboard Shortcut: D |
The Fine Adjustment Tool makes 3D adjustments (XYZ position and rotations) to objects in a route |
The Marquee Tool
 |
Keyboard Shortcut: F |
The Marquee Tool selects the content in areas of a route, creates and deletes baseboards and sets their properties. It can also used in creating Scrapbooks |
The Tool Options Palette
This palette is used by the various tools (listed above) to set controls and parameters. For a detailed description of all the options presented by the Tools Palette for the different tools, see the Trainz Wiki page How to Use the Surveyor 2.0 Tools
The Assets Palette
The Layers Palette
The Scrapbook Palette
| This palette manages the Scrapbooks that you have created yourself, installed from other sources (such as the DLS) or came installed with Trainz. It also controls which parts of a scrapbook are pasted or painted into a route. |
|
Notes:
|
| Scrapbooks, when created, will contain:- |
|
Ground Heights |
|
Ground Textures |
|
Effect Layers - if present |
|
Selected Objects - scenery items, splines, track, signals, etc |
| But NOT Rolling Stock (Trains)
|
| Ground heights, textures and effect layers are always included in a scrapbook but you can control which visible objects are added by manually selecting them or using the filter controls in the Assets Palette |
|
|
|
Notes:
|
|
Scrapbooks, when painted or pasted, can contain any combinations of:- |
|
Ground Heights |
|
Ground Textures |
|
Effect Layers |
|
Scenery Objects (Meshes) - individual buildings, trees, signals, etc |
|
Scenery Splines - roads, track, fences, etc |
| You have options that will control which of these data categories are transferred and how they are transferred from the scrapbook into a route. |
|
|
  |
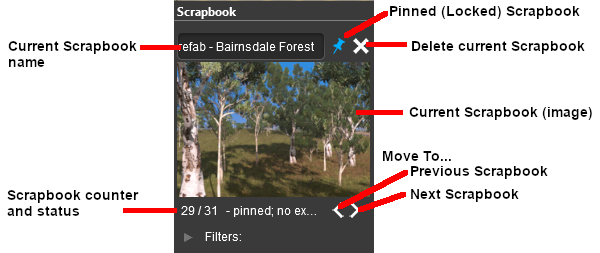
Left click on the pin icon to Lock (blue pin) and Unlock (white pin) the scrapbook. Locked scrapbooks are permanent (but can still be deleted). Unlocked scrapbooks will "expire" (self delete) after 5 days |
|
Left click on the delete icon to delete the current scrapbook - most scrapbooks can be deleted (see Notes: Deleting Built-in Scrapbooks below for the exceptions to this) |
 |
Identifies the currently displayed scrapbook (the first number) and the total number of stored scrapbooks (the second number) |
 |
Left click on the < or > to move forwards or backwards through the stored scrapbooks to select the scrapbook that will be added to the route |
| |
The scrapbook name can be edited. Simply Left click inside the name box to edit or replace the current name. Left click on the image to make the name change permanent and pin (lock) the scrapbook |
|
|
|
Notes: Deleting Built-in Scrapbooks
|
| Some scrapbooks are installed with Trainz and cannot be deleted. These scrapbooks have the label Prefab at the front of their names (you may have to scroll to the front of the name to see it). While they cannot be deleted they can be "disabled" so that they won't appear as an installed scrapbook. Unlocking them will not cause them to "expire" - after 5 days they will just become locked again. |
| Steps: |
|
Open Content Manager and locate the "permanent" scrapbook or scrapbooks.
Search Tips: Name: starts with "Prefab"; Status: is Built-in; Type: is Misc |
|
Highlight (select) the Scrapbook assets |
|
Open the Content menu and select Disable |
| You can reverse this and Enable any or all of these scrapbooks later if you need them. |
|
|
Creating a New Scrapbook
| A new scrapbook can be created by:- |
|
Selecting one or more assets and pressing Ctrl C OR |
|
Drawing a Marquee Selection Area around one or more assets and either:-
|
press Ctrl C OR |
|
open the Trainz Edit Menu and select Cut or Copy |
|
|
|
|
You don't have to use the Marquee Tool to create a new Scrapbook. You can use the Free Move Tool or the Fine Adjustment Tool to select any number of objects and then press Ctrl C . The selected objects, along with the ground height, ground textures, and any effect layers, will be copied into a new Scrapbook |
|
When a new Scrapbook is created by a Cut or Copy , it will appear in the Scrapbook palette with some basic details.
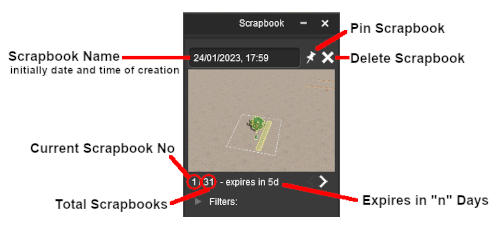 |
| The newly created scrapbook will be given:- |
|
a name consisting of the date and time of its creation |
|
a thumbnail |
|
The thumbnail image will be taken using the current camera POV (point of view). To get a better image adjust the camera position and view to give the best possible shot of the Scrapbook objects before giving the Cut or Copy command
|
|
|
|
a scrapbook number (it will be inserted as №1 scrapbook) |
|
an expiry date which will be set 5 days after its creation - this will countdown each day until 0 when the new scrapbook will be deleted |
|
|
Notes:
Scrapbooks use very little memory so there is no real limit to how many you can store in the palette but finding the one you want will be more difficult as the list grows longer |
|
|
|
Most scrapbooks, old and new, can be deleted at any time by clicking the Delete icon. See Notes: Deleting Built-in Scrapbooks in the section above for the exceptions
Deleting a Scrapbook after it has been pasted does not delete the objects that it pasted into the route |
|
There are two changes that can be made to the new scrapbook:-
|
Give it a name - Left click inside the Name Text Box and type a new name |
|
Make it permanent - Left click the white Pin icon (). The scrapbook will no longer expire but it can still be deleted at any time |
| Pinned scrapbooks are always shown with a blue pin icon and the words "pinned, no expiry" displayed next to their scrapbook № |
|
The Pinning of any scrapbook can be reversed so that it will then expire in 5 days time. Simply Left click the blue pin icon. |
|
|
|
 |
Once a scrapbook has been Pinned it becomes an asset and will appear in Content Manager

The scrapbook can be uploaded to the DLS and saved as a CDP file.
|
You can archive your scrapbooks as CDP files to keep the number of installed scrapbooks to a minimum. If an archived scrapbook is needed then you can use the Import Content Files option in Content Manager to add it to the Scrapbook Palette. It can be deleted from the palette later, when no longer needed. |
|
Painting or Pasting a Scrapbook
Existing Scrapbooks can be painted into a route using the Brush Tool (see the Trainz Wiki page How to Use the Surveyor 2.0 Tools) or Pasted into a route.
| The current Scrapbook can be Pasted into a route at the cursor (the Compass Rose) position by:- |
|
pressing Ctrl V , OR |
|
selecting Paste from the Context Menu of a selected object |
| In both cases the scrapbook contents will be pasted using the original scrapbooks size. It will be pasted inside a Marquee Selection Area that can be moved and resized. The objects that are pasted and how they are pasted is controlled by the current Scrapbook Palette filter settings
|
|
Left click on the arrowhead next to the Filters: label below the scrapbook image to open the scrapbook filter controls. These filters will control which elements in the scrapbook will be added to the route and how thay will be added.
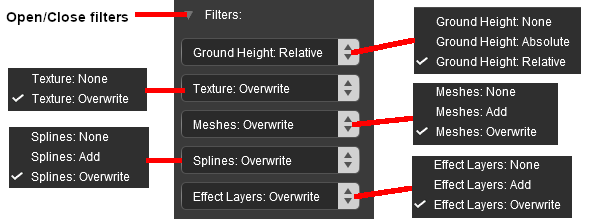
| For example: To paint a scrapbook asset onto a route with certain conditions set:- |
| Ground Height: |
None |
ground height data will not be pasted and the ground heights already in the target area will be used |
| Ground Texture: |
Overwrite |
textures present in the scrapbook will replace those already in the target area |
| Meshes: |
Add |
scenery objects in the scrapbook will be added to those already in the target area |
| Splines: |
Add |
scenery splines in the scrapbook will be added to those already in the target area |
| Effect Layers: |
None |
effect layers in the scrapbook will not be pasted and any already in the target area will be used
|
|
|
|
Scrapbook Painting/Pasting Options |
| What Data to Transfer |
| |
Ground Height |
terrain height(s) used in the scrapbook |
| |
Texture |
textures used in the scrapbook |
| |
Meshes |
scenery objects (e.g. trees, buildings) used in the scrapbook |
| |
Splines |
spline objects used in the scrapbook |
| |
Effect Layers |
effect layers (TurfFX, Clutter) used in the scrapbook |
| How to Transfer the Data |
| |
None |
do not paste this feature |
| |
Add |
add this feature to those already present |
| |
Overwrite |
use this feature to replace those already present |
| For the Ground Height:- |
| |
Absolute |
use the ground heights in the scrapbook to replace the existing ground heights |
| |
Relative |
modify the existing ground heights according to those used in the scrapbook (to ignore the scrapbook ground heights completely select the option None) |
|
|
The Preview Palette
This palette gives a rotating 3D view of a selected asset
The Packages Palette
This palette .
Trainz Wiki
 |
More Tutorials and Guides to Using Trainz
|
This page was created by Trainz user pware in February 2023 and was last updated as shown below.