How to Use Navigation Point Rules (Applications)
The screenshots shown below give examples of how navigation points can be used to control the operation of a session.
User Path Selection
1. The Scenario:
A user controlled train stops at a navigation point in front of a junction and the driver is offered a choice of paths to allow a passing movement by an AI controlled train. Each path is indicated by different sets of navigation points. The path selected will determine other operations such as junction settings and AI train commands.
2. Rules Used:
- Navigation Display Rule creates the navigation point sets.
- Navigation Set Hide/Show Rule to hide and display the navigation point sets.
- Wait on Navigation Point Rule to trigger the message event.
- Navigation Set Clear Rule to manually terminate a navigation point set.
- Message Popup Rule to open a message window on the screen.
- Set Junctions Rule to set and lock junctions.
- Set Signal Extended Rule to set signals.
- Wait Rule to introduce a short delay.
- Driver Schedule Rule to give commands to the AI controlled train.
3. Session Logic:
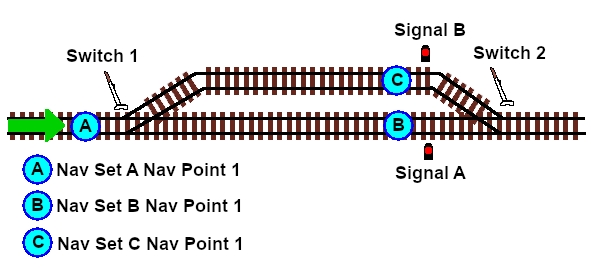 |
Three sets of navigation points are created, one for each location on the map diagram above.
- Set A: at the junction, Point A in the map diagram. The two signals are set to STOP, Switch 2 is locked in position and the user is presented with a choice of using the Main Line or the Loop Line
- Set B: at the end signal on the Main Line. Switch 2 is set to the Loop Line and the AI train is given its instructions to pass on the Loop.
- Set C: at the end signal on the Loop Line. Switch 2 is set to the Main Line and the AI train is given its instructions to pass on the Main.
4. Session Rules Screenshot:
- Creating the Navigation Point Sets
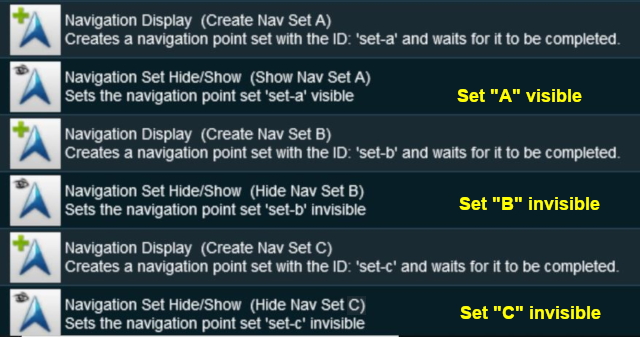 |
Each set is created separately and sets B and C are hidden.
Each navigation point is attached to a track trigger - Point 1 in Set A is attached to a trigger placed in front of Switch 1 in the map diagram.
 |
| Navigation Point Set A. Sets B and C are similar. |
- At Navigation Set A Point 1 - the junction
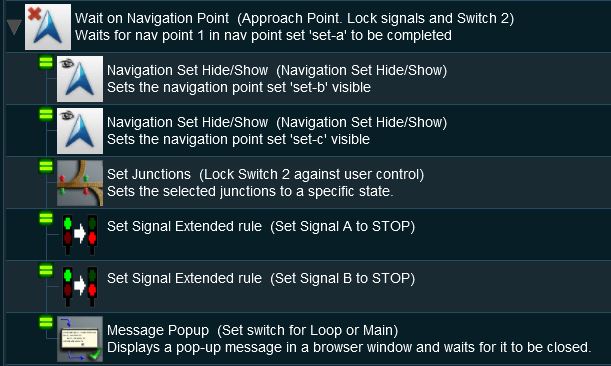 |
- Line 1: Wait on Navigation Point The event is triggered when the consist reaches (and stops at) Navigation Point 1 in Set A.
- Line 2: Navigation Set Hide/Show The Navigation Set B is made visible.
- Line 3: Navigation Set Hide/Show The Navigation Set C is made visible.
- Line 4: Set Junctions The junction Switch 2 is locked against user and AI control.
- Line 5: Set Signals Extended Signal A is set to STOP
- Line 6: Set Signals Extended Signal B is set to STOP
- Line 7: Message Popup A message browser window is shown giving instruction to the user to set Switch 1 to the Loop Line or the Main Line and then move the consist forward to the next signal.
- At Navigation Set B Point 1 - the stop signal on the Main Line
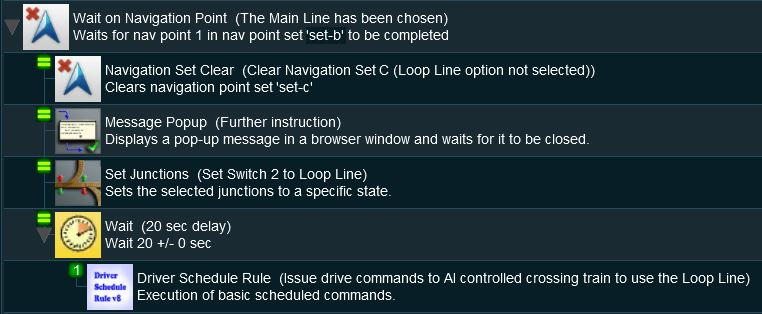 |
- Line 1: Wait on Navigation Point The event is triggered when the consist reaches (and stops at) Navigation Point 1 in Set B.
- Line 2: Navigation Set Clear The Navigation Set C is deleted and its visible Navigation Point disappears from the screen as the Loop Line path was not selected.
- Line 3: Message Popup A message browser window is shown giving instruction to the user to wait until the passing train has cleared Switch 1
- Line 4: Set Junctions The junction Switch 2 is set to the Loop Line but is still locked against user and AI control.
- Line 5: Wait A wait of 20 seconds then ...
- Line 6: Driver Schedule The AI train is given commands to move to the next destination via the Loop Line.
- At Navigation Set C Point 1 - the stop signal on the Loop Line
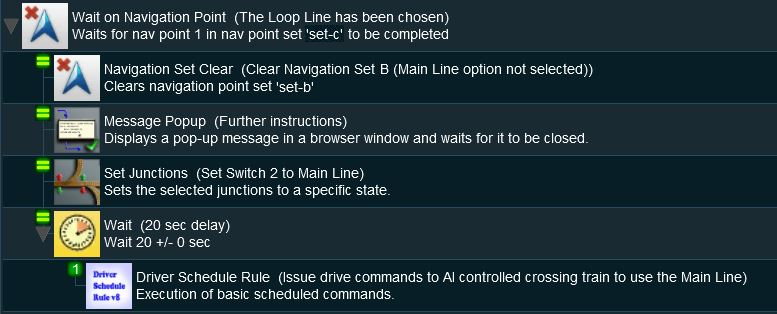 |
- Line 1: Wait on Navigation Point The event is triggered when the consist reaches (and stops at) Navigation Point 1 in Set C.
- Line 2: Navigation Set Clear The Navigation Set C is deleted and its visible Navigation Point disappears from the screen as the Main Line path was not selected.
- Line 3: Message Popup A message browser window is shown giving instruction to the user to wait until the passing train has cleared Switch 1
- Line 4: Set Junctions The junction Switch 2 is set to the Main Line but is still locked against user and AI control.
- Line 5: Wait A wait of 20 seconds then ...
- Line 6: Driver Schedule The AI train is given commands to move to the next destination via the Main Line.