How to Move Your User Data Folder
m |
|||
| Line 32: | Line 32: | ||
<table width=1000> | <table width=1000> | ||
<tr valign="top"> | <tr valign="top"> | ||
| − | <td>When you install '''Trainz''' it will default to installing the program code and the user data on the '''C:''' drive. | + | <td>When you install '''Trainz''' it will default to installing the program code and the user data on the '''C:''' drive. During the install you be given the option of installing on another drive but most users will use the default.<br> |
| − | As you add more data, such as '''DLC''' and '''DLS''' downloads plus create new assets (e.g. routes and sessions) of your own, the size of the '''User Data''' will grow significantly. Several '''GB''' (gigabytes) of data is not unusual for even a modest installation. Eventually, the '''C''' drive may not be large enough to store all the Trainz data plus all the other Windows software and data.<br> | + | As you add more data, such as '''DLC''' and '''DLS''' downloads plus create new assets (e.g. routes and sessions) of your own, the size of the '''User Data''' will grow significantly. Several '''GB''' (gigabytes) of data is not unusual for even a modest installation. Eventually, the '''C:''' drive may not be large enough to store all the Trainz data plus all the other Windows software and data.<br> |
| − | In this situation moving the user data to another attached drive may be the best option.</td> | + | In this situation moving the user data to another attached drive to free up storage space may be the best option.</td> |
| + | </tr> | ||
| + | </table> | ||
| + | <br> | ||
| + | <table width=1000 bgcolor=#000000 cellpadding=2> | ||
| + | <tr valign="top"> | ||
| + | <td> | ||
| + | <table width=996 bgcolor=#ffffb0 cellpadding=2> | ||
| + | <tr valign="top"> | ||
| + | <td width=25>[[image:NotePad.PNG|link=]]</td> | ||
| + | <td><span style="font-size: 17px; font-weight: 700;">Notes:'''</span><br> | ||
| + | ---- | ||
| + | The '''Trainz Wiki Page''' at [[image:WikiLink.PNG|link=]] <span style="text-decoration: underline; font-weight: 700;">[https://online.ts2009.com/mediaWiki/index.php/Help:Moving_Content Moving Content]</span> has a text only description of the process that is described graphically here</td> | ||
| + | </tr> | ||
| + | </table> | ||
| + | </td> | ||
</tr> | </tr> | ||
</table> | </table> | ||
| Line 44: | Line 59: | ||
<table width=1000> | <table width=1000> | ||
<tr valign="top"> | <tr valign="top"> | ||
| − | <td colspan=2><span style="font-weight: 700; font-size: | + | <td colspan=2><span style="font-weight: 700; font-size: 17px;">Steps:</span></td> |
</tr> | </tr> | ||
<tr valign="top"> | <tr valign="top"> | ||
| Line 53: | Line 68: | ||
<td><span style="font-weight: 700; font-size: 17px; color: white; background-color: red;"> 2 </span></td> | <td><span style="font-weight: 700; font-size: 17px; color: white; background-color: red;"> 2 </span></td> | ||
<td><span style="font-weight: 700; font-size: 15px;">Open Trainz Settings</span><br> | <td><span style="font-weight: 700; font-size: 15px;">Open Trainz Settings</span><br> | ||
| − | From the '''Trainz Launcher''' select | + | From the '''Trainz Launcher''' select <span style="font-weight: 700; font-size: 15px; color: white; background-color: black;"> Trainz Settings </span><br> |
[[image:MoveUserData01.png|link=]]<br><br></td> | [[image:MoveUserData01.png|link=]]<br><br></td> | ||
</tr> | </tr> | ||
| Line 59: | Line 74: | ||
<td><span style="font-weight: 700; font-size: 17px; color: white; background-color: red;"> 3 </span></td> | <td><span style="font-weight: 700; font-size: 17px; color: white; background-color: red;"> 3 </span></td> | ||
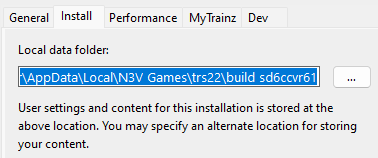
<td><span style="font-weight: 700; font-size: 15px;">Open Install</span><br> | <td><span style="font-weight: 700; font-size: 15px;">Open Install</span><br> | ||
| − | <span style="font-weight: 700; font-size: 15px; background-color: lightcyan;"> Left Click </span> on the <span style="font-weight: | + | <span style="font-weight: 700; font-size: 15px; background-color: lightcyan;"> Left Click </span> on the <span style="font-weight: 700; font-size: 15px;">Install</span> tab<br> |
[[image:MoveUserData02.png|link=]]<br> | [[image:MoveUserData02.png|link=]]<br> | ||
This will display the drive, folder and filename of the current '''User Data Folder''' which will be shown under the label '''Local data folder'''<br> | This will display the drive, folder and filename of the current '''User Data Folder''' which will be shown under the label '''Local data folder'''<br> | ||
| Line 67: | Line 82: | ||
<td><span style="font-weight: 700; font-size: 17px; color: white; background-color: red;"> 4 </span></td> | <td><span style="font-weight: 700; font-size: 17px; color: white; background-color: red;"> 4 </span></td> | ||
<td><span style="font-weight: 700; font-size: 15px;">Copy the Folder Address</span><br> | <td><span style="font-weight: 700; font-size: 15px;">Copy the Folder Address</span><br> | ||
| − | <span style="font-weight: 700; font-size: 15px; background-color: lightcyan;"> Left Click </span> inside the box containing the address details then highlight and copy (press the <span style="font-weight: 700; font-size: 15px;"><span style="color: white; background-color: black;"> Ctrl </span> + <span style="color: white; background-color: black;"> A </span></span> keys then the <span style="font-weight: 700; font-size: 15px;"><span style="color: white; background-color: black;"> Ctrl </span> + <span style="color: white; background-color: black;"> C </span></span> keys). The address will be copied to your systems clipboard. Do not close the Trainz Launcher Settings window as you will need it again ( | + | <span style="font-weight: 700; font-size: 15px; background-color: lightcyan;"> Left Click </span> inside the box containing the address details then highlight and copy (press the <span style="font-weight: 700; font-size: 15px;"><span style="color: white; background-color: black;"> Ctrl </span> + <span style="color: white; background-color: black;"> A </span></span> keys then the <span style="font-weight: 700; font-size: 15px;"><span style="color: white; background-color: black;"> Ctrl </span> + <span style="color: white; background-color: black;"> C </span></span> keys). The address will be copied to your systems clipboard. |
| − | + | <table> | |
| + | <tr valign="top"> | ||
| + | <td>[[image:MoveUserData04.png|link=]]</td> | ||
| + | <td> | ||
| + | <table bgcolor=#000000 cellpadding=2> | ||
| + | <tr valign="top"> | ||
| + | <td> | ||
| + | <table bgcolor=#ffffb0 cellpadding=2> | ||
| + | <tr valign="top"> | ||
| + | <td width=25>[[image:NotePad.PNG|link=]]</td> | ||
| + | <td>Do not close the '''Trainz Launcher Settings''' window as you will need it again ('''Step''' <span style="font-weight: 700; font-size: 17px; color: white; background-color: red;"> 11 </span> below)</td> | ||
| + | </tr> | ||
| + | </table> | ||
| + | </td> | ||
| + | </tr> | ||
| + | </table> | ||
| + | </td> | ||
| + | </tr> | ||
| + | </table> | ||
| + | <br><br> | ||
| + | </td> | ||
</tr> | </tr> | ||
<tr valign="top"> | <tr valign="top"> | ||
<td><span style="font-weight: 700; font-size: 17px; color: white; background-color: red;"> 5 </span></td> | <td><span style="font-weight: 700; font-size: 17px; color: white; background-color: red;"> 5 </span></td> | ||
| − | <td><span style="font-weight: | + | <td><span style="font-weight: 700; font-size: 15px;">Open Windows File Explorer</span><br> |
| − | In '''Windows 10''' and '''11''' you will find the '''File Explorer''' on the '''Task Bar''' at the bottom of the screen<br> | + | In '''Windows 10''' and '''11''' you will find the '''File Explorer''' on the '''Task Bar''' at the bottom of the screen.<br> |
| − | [[image:MoveUserData05.png|link=]]<br><br></td> | + | [[image:MoveUserData05.png|link=]]<br> |
| + | <span style="font-weight: 700; font-size: 15px; background-color: lightcyan;"> Left Click </span> on the folder icon to launch '''File Explorer'''<br><br></td> | ||
</tr> | </tr> | ||
<tr valign="top"> | <tr valign="top"> | ||
<td><span style="font-weight: 700; font-size: 17px; color: white; background-color: red;"> 6 </span></td> | <td><span style="font-weight: 700; font-size: 17px; color: white; background-color: red;"> 6 </span></td> | ||
| − | <td><span style="font-weight: 700; font-size: 15px;">Paste the Folder Address into Explorer</span>< | + | <td> |
| − | <span style="font-weight: 700; font-size: 15px; background-color: lightcyan;"> Left Click </span> in the '''File Explorer Address Bar'''<br> | + | <table> |
| − | [[image:MoveUserData06.png|link=]]< | + | <tr valign="top"> |
| − | + | <td><span style="font-weight: 700; font-size: 15px;">Paste the Folder Address into File Explorer</span> | |
| − | [[image:MoveUserData07.png|link=]]<br>< | + | <table> |
| − | + | <tr valign="top"> | |
| + | <td><span style="font-weight: 700; font-size: 15px; background-color: lightcyan;"> Left Click </span> in the '''File Explorer Address Bar'''<br> | ||
| + | [[image:MoveUserData06.png|link=]]</td> | ||
| + | <td><br> | ||
| + | This will highlight the current address<br> | ||
| + | [[image:MoveUserData07.png|link=]]<br></td> | ||
| + | </tr> | ||
| + | </table> | ||
| + | Then paste (press the <span style="font-weight: 700; font-size: 15px;"><span style="color: white; background-color: black;"> Ctrl </span> + <span style="color: white; background-color: black;"> V </span></span> keys) the sddress of the '''User Data Folder''' stored in your clipboard into the '''File Explorer Address Bar'''<br> | ||
[[image:MoveUserData08.png|link=]]<br> | [[image:MoveUserData08.png|link=]]<br> | ||
The contents of the folder will be shown. These are the folders and files that will be moved to another location<br><br></td> | The contents of the folder will be shown. These are the folders and files that will be moved to another location<br><br></td> | ||
| + | </tr> | ||
| + | </table> | ||
| + | </td> | ||
</tr> | </tr> | ||
<tr valign="top"> | <tr valign="top"> | ||
<td><span style="font-weight: 700; font-size: 17px; color: white; background-color: red;"> 7 </span></td> | <td><span style="font-weight: 700; font-size: 17px; color: white; background-color: red;"> 7 </span></td> | ||
<td><span style="font-weight: 700; font-size: 15px;">Copy the Folders and Files</span><br> | <td><span style="font-weight: 700; font-size: 15px;">Copy the Folders and Files</span><br> | ||
| − | <span style="font-weight: 700; font-size: 15px; background-color: lightcyan;"> Left Click </span> on one of the items shown then highlight and copy (press the <span style="font-weight: 700; font-size: 15px;"><span style="color: white; background-color: black;"> Ctrl </span> + <span style="color: white; background-color: black;"> A </span></span> keys then the <span style="font-weight: 700; font-size: 15px;"><span style="color: white; background-color: black;"> Ctrl </span> + <span style="color: white; background-color: black;"> C </span></span> keys) all the folders and files shown<br> | + | <span style="font-weight: 700; font-size: 15px; background-color: lightcyan;"> Left Click </span> on one of the items (a file or a folder) shown in the list then highlight and copy (press the <span style="font-weight: 700; font-size: 15px;"><span style="color: white; background-color: black;"> Ctrl </span> + <span style="color: white; background-color: black;"> A </span></span> keys then the <span style="font-weight: 700; font-size: 15px;"><span style="color: white; background-color: black;"> Ctrl </span> + <span style="color: white; background-color: black;"> C </span></span> keys) all the folders and files shown<br> |
[[image:MoveUserData09.png|link=]]<br> | [[image:MoveUserData09.png|link=]]<br> | ||
| − | This will copy the folder and file locations into your system clipboard.<br><br></td> | + | This will copy all the folder and file locations into your system clipboard.<br><br></td> |
</tr> | </tr> | ||
<tr valign="top"> | <tr valign="top"> | ||
| Line 132: | Line 179: | ||
<td><span style="font-weight: 700; font-size: 17px; color: white; background-color: red;"> 10 </span></td> | <td><span style="font-weight: 700; font-size: 17px; color: white; background-color: red;"> 10 </span></td> | ||
<td><span style="font-weight: 700; font-size: 15px;">Copy the New Folder Address</span><br> | <td><span style="font-weight: 700; font-size: 15px;">Copy the New Folder Address</span><br> | ||
| − | <span style="font-weight: 700; font-size: 15px; background-color: lightcyan;"> Left Click </span> in the '''File Explorer Address Bar''' then highlight and copy (press the <span style="font-weight: 700; font-size: 15px;"><span style="color: white; background-color: black;"> Ctrl </span> + <span style="color: white; background-color: black;"> A </span></span> keys then the <span style="font-weight: 700; font-size: 15px;"><span style="color: white; background-color: black;"> Ctrl </span> + <span style="color: white; background-color: black;"> C </span></span> keys) the new folder address you | + | <span style="font-weight: 700; font-size: 15px; background-color: lightcyan;"> Left Click </span> in the '''File Explorer Address Bar''' then highlight and copy (press the <span style="font-weight: 700; font-size: 15px;"><span style="color: white; background-color: black;"> Ctrl </span> + <span style="color: white; background-color: black;"> A </span></span> keys then the <span style="font-weight: 700; font-size: 15px;"><span style="color: white; background-color: black;"> Ctrl </span> + <span style="color: white; background-color: black;"> C </span></span> keys) into your system clipboard the new folder address you created for the user data<br> |
[[image:MoveUserData13.png|link=]]<br><br></td> | [[image:MoveUserData13.png|link=]]<br><br></td> | ||
</tr> | </tr> | ||
| Line 140: | Line 187: | ||
<table> | <table> | ||
<tr valign="top"> | <tr valign="top"> | ||
| − | <td>Return to the '''Trainz Launcher Install Settings Window'''. | + | <td>Return to the '''Trainz Launcher Install Settings Window'''. |
| − | < | + | <table> |
| − | + | ||
| − | + | ||
| − | + | ||
| − | + | ||
<tr valign="top"> | <tr valign="top"> | ||
| − | <td | + | <td> |
| − | + | ||
<table> | <table> | ||
<tr valign="top"> | <tr valign="top"> | ||
| − | <td> | + | <td width=25>[[image:DotPoint1Blue.png|link=]]</td> |
| − | <td>[[image: | + | <td><span style="font-weight: 700; font-size: 15px; background-color: lightcyan;"> Left Click </span> in the '''User Data Folder''' address box</td> |
| + | </tr> | ||
| + | <tr valign="top"> | ||
| + | <td>[[image:DotPoint2Blue.png|link=]]</td> | ||
| + | <td>highlight (press the <span style="font-weight: 700; font-size: 15px;"><span style="color: white; background-color: black;"> Ctrl </span> + <span style="color: white; background-color: black;"> A </span></span> keys) the address currently shown and press the <span style="font-weight: 700; font-size: 15px; color: white; background-color: black;"> Delete </span> key</td> | ||
| + | </tr> | ||
| + | <tr valign="top"> | ||
| + | <td>[[image:DotPoint3Blue.png|link=]]</td> | ||
| + | <td>paste (press the <span style="font-weight: 700; font-size: 15px;"><span style="color: white; background-color: black;"> Ctrl </span> + <span style="color: white; background-color: black;"> V </span></span> keys) the new folder address you stored in your system clipboard into the '''User Data Folder''' box</td> | ||
</tr> | </tr> | ||
</table> | </table> | ||
| − | |||
</td> | </td> | ||
| + | <td width=390>[[image:MoveUserData14.png|link=]]</td> | ||
| + | </tr> | ||
| + | </table> | ||
| + | </td> | ||
| + | </tr> | ||
| + | </table> | ||
| + | <br></td> | ||
| + | </tr> | ||
| + | <tr valign="top"> | ||
| + | <td><span style="font-weight: 700; font-size: 17px; color: white; background-color: red;"> 12 </span></td> | ||
| + | <td><span style="font-weight: 700; font-size: 15px;">Close the '''Trainz Settings''' Window</span><br> | ||
| + | You will be given a message asking for a restart.<br> | ||
| + | [[image:MoveUserData15.png|link=]]<br> | ||
| + | <span style="font-weight: 700; font-size: 15px; background-color: lightcyan;"> Left Click </span> <span style="font-weight: 700; font-size: 15px; color: white; background-color: black;"> OK </span> to acknowledge it.<br><br></td> | ||
</tr> | </tr> | ||
<tr valign="top"> | <tr valign="top"> | ||
<td><span style="font-weight: 700; font-size: 17px; color: white; background-color: red;"> 13 </span></td> | <td><span style="font-weight: 700; font-size: 17px; color: white; background-color: red;"> 13 </span></td> | ||
<td><span style="font-weight: 700; font-size: 15px;">Close the Trainz Launcher</span><br> | <td><span style="font-weight: 700; font-size: 15px;">Close the Trainz Launcher</span><br> | ||
| − | + | Dropping you back to the Windows main screen.<br><br></td> | |
</tr> | </tr> | ||
<tr valign="top"> | <tr valign="top"> | ||
| Line 173: | Line 236: | ||
<tr valign="top"> | <tr valign="top"> | ||
<td>[[image:PencilTips.PNG|link=]]</td> | <td>[[image:PencilTips.PNG|link=]]</td> | ||
| − | <td>It is '''recommended''' that you perform a '''DBR''' (Database Repair) before starting '''Trainz'''.</td> | + | <td>It is '''recommended''' that you perform a '''DBR''' (Database Repair) before starting '''Trainz'''.<br> |
| + | |||
| + | The '''Trainz Wiki Page [[image:WikiLink.PNG|link=]] [[#How_to_Perform_Database_Repairs|How to Perform Database Repairs]]''' describes the process</td> | ||
</tr> | </tr> | ||
</table> | </table> | ||
| Line 179: | Line 244: | ||
</tr> | </tr> | ||
</table> | </table> | ||
| + | <br> | ||
</td> | </td> | ||
</tr> | </tr> | ||
Revision as of 15:49, 1 November 2023
The information in this Wiki Page applies to T:ANE, TRS19, Trainz Plus and TRS22. It describes how to move your user data folder to a new location.
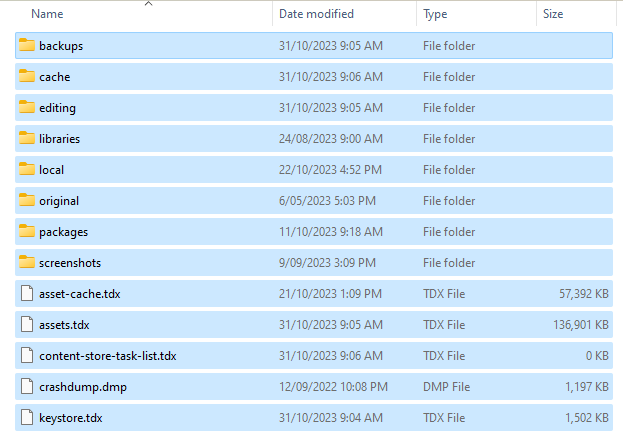
| The User Data Folder contains all the assets that came installed with your version of Trainz plus those that you have downloaded or have created yourself. This includes all routes and sessions | |
| This folder is created when Trainz is installed and is located (in Windows) on the C:\ drive in the Users\AppData folder. The AppData folder is normally a hidden folder | |
| The folder can be moved to another location such as a different drive BUT Trainz must know ehere to find the new User Data Folder |
Why Move the User Data Folder?
| When you install Trainz it will default to installing the program code and the user data on the C: drive. During the install you be given the option of installing on another drive but most users will use the default. As you add more data, such as DLC and DLS downloads plus create new assets (e.g. routes and sessions) of your own, the size of the User Data will grow significantly. Several GB (gigabytes) of data is not unusual for even a modest installation. Eventually, the C: drive may not be large enough to store all the Trainz data plus all the other Windows software and data. |
|
Moving the User Data
| Steps: | ||||||||||
| 1 | Start Trainz |
|||||||||
| 2 | Open Trainz Settings From the Trainz Launcher select Trainz Settings 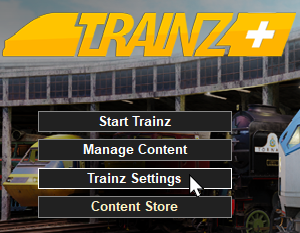 |
|||||||||
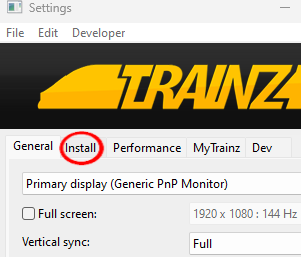
| 3 | Open Install Left Click on the Install tab 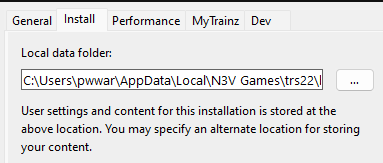 |
|||||||||
| 4 | Copy the Folder Address Left Click inside the box containing the address details then highlight and copy (press the Ctrl + A keys then the Ctrl + C keys). The address will be copied to your systems clipboard.
|
|||||||||
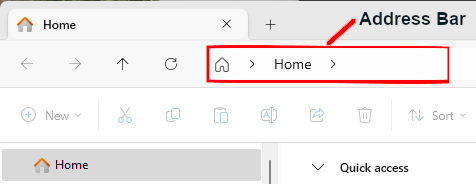
| 5 | Open Windows File Explorer In Windows 10 and 11 you will find the File Explorer on the Task Bar at the bottom of the screen. |
|||||||||
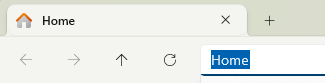
| 6 |
|
|||||||||
| 7 | Copy the Folders and Files Left Click on one of the items (a file or a folder) shown in the list then highlight and copy (press the Ctrl + A keys then the Ctrl + C keys) all the folders and files shown |
|||||||||
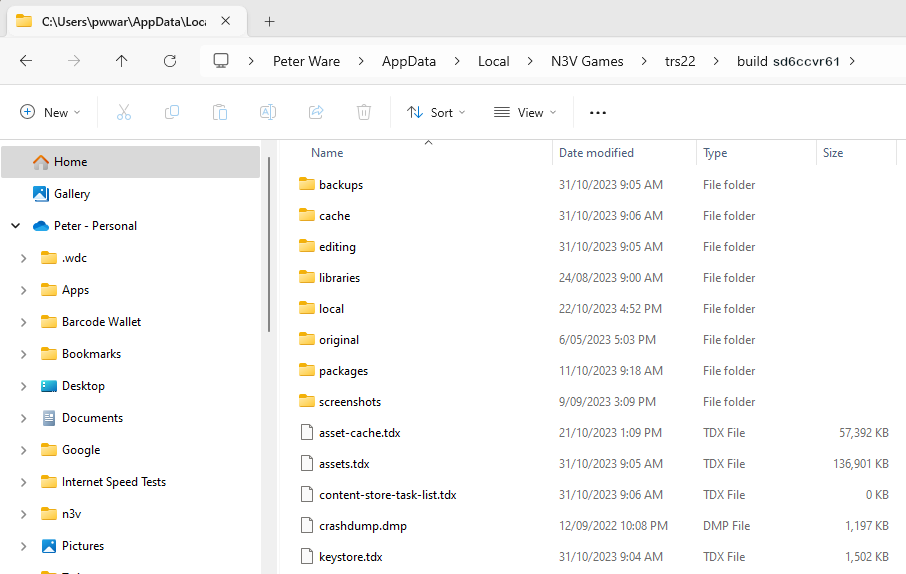
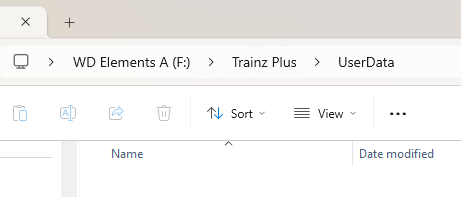
| 8 | Navigate to the New Folder Location In File Explorer navigate to the drive and/or folder where the User Data Folder will be placed.
|
|||||||||
| 9 | Paste the Copied Files and Folders into the Destination Left Click in the empty File Explorer Display Area and paste (press the Ctrl + V keys) the copied files and folders into their new location - this may take some time depending on how much data you have. As the files and folders are copied across they will appear in the File Explorer display window |
|||||||||
| 10 | Copy the New Folder Address Left Click in the File Explorer Address Bar then highlight and copy (press the Ctrl + A keys then the Ctrl + C keys) into your system clipboard the new folder address you created for the user data 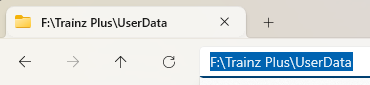 |
|||||||||
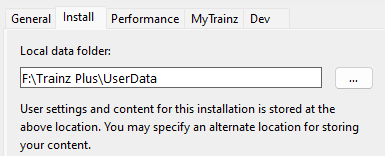
| 11 | Paste the Address into Trainz Settings
|
|||||||||
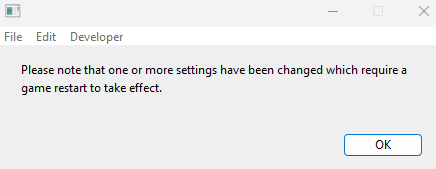
| 12 | Close the Trainz Settings Window You will be given a message asking for a restart. |
|||||||||
| 13 | Close the Trainz Launcher Dropping you back to the Windows main screen. |
|||||||||
| 14 | Restart Trainz Launcher You may get a dialogue asking you to set your display options (Ultra, etc). If so select one to suit.
|
|||||||||
| 15 | Start Trainz |
|||||||||

|
Trainz Wiki
 |
More Tutorials and Guides to Using Trainz |
This page was created by Trainz user pware in November 2023 and was last updated as shown below.