HowTo/Export Blender FBX Animation
(First version of complete rewrite for Blender 2.80. Needs review.) |
(Updated to Blender 4. Example 2 still needs updating.) |
||
| (6 intermediate revisions by 3 users not shown) | |||
| Line 1: | Line 1: | ||
| − | |||
| − | |||
| − | |||
=Overview= | =Overview= | ||
| − | This page describes a process for exporting animated meshes from Blender to the [[FBX file format]]. It is intended for new content creators or those more experienced who need to migrate from older versions of Blender and Trainz animation. | + | This page describes a process for exporting simple animated meshes from Blender to the [[FBX file format]]. It is intended for new content creators or those more experienced who need to migrate from older versions of Blender and Trainz animation. |
You should be familiar with Blender FBX export as described here [[HowTo/Export from Blender using FBX]]<br> | You should be familiar with Blender FBX export as described here [[HowTo/Export from Blender using FBX]]<br> | ||
| − | This tutorial is for Trainz Build | + | This tutorial is for Trainz Build 5.3 and Blender 4.n. However, it should work for Trainz Build 4.6 and up. |
==Trainz Animation== | ==Trainz Animation== | ||
| − | In Blender you can animate meshes but that animation is not recognised by Trainz. Trainz only recognises animation helper objects that it calls bones. A bone, for Trainz purposes, is an animated helper object using a "b.r." | + | In Blender you can animate meshes but that animation is not recognised by Trainz. Trainz only recognises animation helper objects that it calls bones. A bone, for Trainz purposes, is an animated helper object using a "b.r." prefix. |
Meshes are attached to bones in a parent-child relationship where the child is the mesh. When the parent bone moves in 3D space, the child mesh moves with it. In Trainz you cannot see the animated bones but you can see the mesh. | Meshes are attached to bones in a parent-child relationship where the child is the mesh. When the parent bone moves in 3D space, the child mesh moves with it. In Trainz you cannot see the animated bones but you can see the mesh. | ||
| − | Animation helpers in Blender can be armatures or empties. Lattices cannot be used since FBX doesn't recognise them. | + | Animation helpers in Blender can be armatures or empties. Lattices cannot be used since the standard FBX exporter doesn't recognise them. |
=Examples= | =Examples= | ||
Here are a number of example animations. Each example is provided with source files but only the first example is fully explained. | Here are a number of example animations. Each example is provided with source files but only the first example is fully explained. | ||
| Line 17: | Line 14: | ||
===Load Example 1=== | ===Load Example 1=== | ||
:* On your computer, create a project folder called "anim_example_1" or whatever name suits you. | :* On your computer, create a project folder called "anim_example_1" or whatever name suits you. | ||
| − | :* Download the source files from here: [[File:Ex1 | + | :* Download the source files from here: [[File:B4 Anim Ex1 Source.zip]] |
:* The source file is in zip format so extract it into the project folder. The source includes: | :* The source file is in zip format so extract it into the project folder. The source includes: | ||
| − | + | example1_B4_start.blend; | |
| − | + | example1_B4_completed.blend; | |
ex1_albedo.png | ex1_albedo.png | ||
ex1_albedo.texture.txt | ex1_albedo.texture.txt | ||
| Line 29: | Line 26: | ||
thumbnail_0.jpg | thumbnail_0.jpg | ||
config.txt | config.txt | ||
| − | :* The config.txt is complete | + | :* The config.txt is complete except for the KUID where you add one of your own. The Trainz Build is set to 5.3. You can use 4.6 if required. |
| − | :* Open the | + | :* Open the ex1_B4_example.blend Blender source file in Blender 4. It should look similar to the following. If the sphere is a pink/purple colour then that means Blender can't find the material textures. You should be able to correct that adding them to your Blender file location and reloading the textures withing Blender. |
| − | [[File: | + | :* Save the file as "ex1B4_working.blend". |
| − | : | + | [[File:Ex1B4 start.jpg|1200px|thumb|left|The Start Layout]] |
| + | |||
| + | <table bgcolor=#000000 width=1200 cellpadding=2> | ||
| + | <tr valign="top"> | ||
| + | <td> | ||
| + | <table bgcolor=#ffffb0 cellpadding=2> | ||
| + | <tr valign="top"> | ||
| + | <td>[[image:NotePad.PNG|link=]]</td> | ||
| + | <td>The model is a simple UV ball with a painted metal material the author created in Substance Painter. It looks like a planet, but not Earth, with a lot of shiny water and snow covered land. In game it will look like a metal ball with chipped paint. In the top right pane you can see the scene collection which has two Level of Detail (LOD) collections and an Animation collection. The mesh names with the LOD#n complies with the requirements for building a config.txt using the N3V utilities. In this instance the LOD1 meshes are hidden. | ||
| + | At the bottom right you can see the material setup. You can also observe the material (PBRMetal) in the Shading Editor as a node setup. | ||
| + | The image shows reflections of trees due to a background image. | ||
| + | Blender has almost infinite permutations of layouts, colours, size, etc. Don't be concerned if yours isn't the same as the image. | ||
| + | </td> | ||
| + | </tr> | ||
| + | </table> | ||
| + | </td> | ||
| + | </tr> | ||
| + | </table> | ||
| + | |||
| + | |||
===Add the Trainz Animation Helper=== | ===Add the Trainz Animation Helper=== | ||
:* Position the Blender cursor at World Origin (0,0,0). Press Shift S to bring up the Snap menu and select Cursor to World Origin. | :* Position the Blender cursor at World Origin (0,0,0). Press Shift S to bring up the Snap menu and select Cursor to World Origin. | ||
:* Add an empty at the cursor location. Use menu Add->Empty->Arrows. Shift A should also work. | :* Add an empty at the cursor location. Use menu Add->Empty->Arrows. Shift A should also work. | ||
| − | :* Double click on the new Empty in the Properties Editor and rename it to "b.r.main". | + | :* Double click on the new Empty in the Properties Editor and rename it to "b.r.main". The name used is not important but the prefix "b.r." is important. The convention is to use b.r.main or b.r.base. |
:* Move the b.r.main helper into the Animation collection. You can either drag and drop it in the Properties Window or the menu Object->Collection->Move to Collection. Having a collection name Animation makes it easier to export different LOD meshes. | :* Move the b.r.main helper into the Animation collection. You can either drag and drop it in the Properties Window or the menu Object->Collection->Move to Collection. Having a collection name Animation makes it easier to export different LOD meshes. | ||
===Animate the Trainz Helper=== | ===Animate the Trainz Helper=== | ||
| − | :* Change to the Animation Workspace and ensure the b.r.main object is selected. | + | :* Change to the Animation Workspace and ensure the b.r.main object is selected. |
| − | [[ | + | :* Open the SideBar (N key) in the 3D Editor, if not already open, and select the Item tab. This shows the location, rotation, and scale of the current object. In this case it should be the b.r.main empty. |
| + | :* For this project the location and rotation values should be zero and the scale values should be 1.0. If the values are wrong then press Ctrl A and reset whatever needs changing. | ||
| + | |||
| + | <table bgcolor=#000000 width=1200 cellpadding=2> | ||
| + | <tr valign="top"> | ||
| + | <td> | ||
| + | <table bgcolor=#ffffb0 cellpadding=2> | ||
| + | <tr valign="top"> | ||
| + | <td>[[image:NotePad.PNG|link=]]</td> | ||
| + | <td>As you develop more advanced animation models the location values will be different. Generally, at the start of an animation the Rotation values will also be zero but this isn't mandatory. | ||
| + | The Scale values can cause all sorts of issues in animation and need to be checked at the start of the project. Scaling can be part of the animation although for most models in Trainz the scaling is mostly fixed. But you can animate scaling if that is a solution. Note scaling does affect material/texture mapping as the textures applied to a model will be stretched or shrunk with the scaling. | ||
| + | If you run into problems with animation check that the scaling is correct at the start of the animation cycle. | ||
| + | </td> | ||
| + | </tr> | ||
| + | </table> | ||
| + | </td> | ||
| + | </tr> | ||
| + | </table> | ||
| + | |||
:* For animation we use keyframes (aka frames) to manage our animation. Trainz operates animations at 30 frames per second (fps) and, as we want to run this animation for two seconds, the End Frame in Timeline should be 60. Make sure the Start Frame is 1 and the Current Keyframe is 1. See the following image. | :* For animation we use keyframes (aka frames) to manage our animation. Trainz operates animations at 30 frames per second (fps) and, as we want to run this animation for two seconds, the End Frame in Timeline should be 60. Make sure the Start Frame is 1 and the Current Keyframe is 1. See the following image. | ||
| − | [[File: | + | |
| + | <table><tr><td>[[File:Blender402 anim example1 view1.jpg|1200px|thumb|left|B.R.Main]]</td></tr></table> | ||
| + | |||
:* Select the b.r.main helper if not already selected. | :* Select the b.r.main helper if not already selected. | ||
:* For the start of our animation we need to set the rotation of our helper to be at 0 (zero) degrees. For this example we can just leave the helper as Blender placed it.. | :* For the start of our animation we need to set the rotation of our helper to be at 0 (zero) degrees. For this example we can just leave the helper as Blender placed it.. | ||
| − | :* Press the I key and select Rotation. This creates a frame with just rotation data which, in this case, is 0. | + | :* Press the I key and select Rotation. This creates a frame with just rotation data which, in this case, is 0. In the Animation Editor a number of changes will become visible. |
| − | :* Change the Current frame in Timeline to the last keyframe ( | + | ::: The Rotation fields in the Transform will change colour. In the image below they are yellow but the colour depends on the Blender theme in use. |
| − | :* At the end of our animation we want the helper to have completed one full rotation of 360 degrees so select the helper and, in the Properties Window->Context, change the Z Rotation value to 360. The result should look like the following: | + | ::: A keyframe indicator appears in the Timeline Window at the bottom of the Blender screen. |
| − | [[File:Setting the rotation.jpg|600px]] | + | ::: Entries also appear in the Dope Sheet and Graph Editors. In simple animations you are unlikely to use those editors but be aware they exist. |
| − | : | + | :* Change the Current frame in Timeline to the last keyframe (60). You can click on frame 60 in Timeline, manually change the current frame number or use the "Jump to end" icon in Timeline. |
| + | :* At the end of our animation we want the helper to have completed one full rotation of 360 degrees so select the helper and, in the Properties Window->Context, change the Z Rotation value to 360, and press the I key and select Rotation againi. The result should look like the following: | ||
| + | <table><tr><td>[[File:Setting the rotation to 360.jpg|600px|thumb|left|Setting the rotation]][[File:Rotation set to 360.jpg|600px|thumb|right|Rotation set to 360]]</td></tr></table> | ||
:* Test out the animation by clicking on the Forward and Reverse icons in Timeline. When finished reset the animation by stopping it first and then selecting the Start Endpoint icon. Note that the sphere is not moving yet. | :* Test out the animation by clicking on the Forward and Reverse icons in Timeline. When finished reset the animation by stopping it first and then selecting the Start Endpoint icon. Note that the sphere is not moving yet. | ||
===Review=== | ===Review=== | ||
So far we have created the helper with a name that Trainz will recognise for animation. We have set the animation to compete one full circle in the Z axis in 60 keyframes and, since we are using 30fps, the animation will run for 2 seconds. | So far we have created the helper with a name that Trainz will recognise for animation. We have set the animation to compete one full circle in the Z axis in 60 keyframes and, since we are using 30fps, the animation will run for 2 seconds. | ||
| − | The use of the value 360 is somewhat of a trick to make sure that Blender animates the helper through 360 degrees. Although 360 is essentially the same as 0, if you left it at 0 then no animation would take place even though | + | The use of the value 360 is somewhat of a trick to make sure that Blender animates the helper through 360 degrees. Although 360 is essentially the same as 0, if you left it at 0 then no animation would take place even though keyframes exist. Try a zero value and see what happens or rather what doesn't happen. |
Using the value of 360 means that the helper will rotate 360 degrees in the anti-clockwise direction. If you want clockwise motion then change the value to -360. | Using the value of 360 means that the helper will rotate 360 degrees in the anti-clockwise direction. If you want clockwise motion then change the value to -360. | ||
===Smoothing the Animation=== | ===Smoothing the Animation=== | ||
| Line 61: | Line 99: | ||
:* In the Graph Editor or the Dope Sheet Editor, select menu Channel>Extrapolation Mode>Linear Extrapolation. | :* In the Graph Editor or the Dope Sheet Editor, select menu Channel>Extrapolation Mode>Linear Extrapolation. | ||
:* Run the animation again and there should be no pauses. | :* Run the animation again and there should be no pauses. | ||
| − | [[File:Linear extrapolation.jpg|800px]]<br> | + | <table><tr><td>[[File:Linear extrapolation.jpg|800px]]<br></td></tr></table> |
For more information on Blender animation channel extrapolation see [https://docs.blender.org/manual/en/latest/editors/graph_editor/fcurves/introduction.html Introduction to FCurves] | For more information on Blender animation channel extrapolation see [https://docs.blender.org/manual/en/latest/editors/graph_editor/fcurves/introduction.html Introduction to FCurves] | ||
| − | === | + | ===Parenting the mesh objects=== |
:* As stated earlier you cannot animate the meshes directly but you can make them follow the animation helper. We do this by making the mesh a child of the helper. | :* As stated earlier you cannot animate the meshes directly but you can make them follow the animation helper. We do this by making the mesh a child of the helper. | ||
| − | :* There are two meshes to animated: the LOD0 and LOD1 meshes. | + | :* There are two meshes to be animated: the LOD0 and LOD1 meshes. |
:* Enable viewing of both the LOD0 and LOD1 mesh by ticking the two collections. | :* Enable viewing of both the LOD0 and LOD1 mesh by ticking the two collections. | ||
| − | :* Select the objects sphere_lod0, sphere_lod1 and finally b.r.main. The | + | :* Select the objects sphere_lod0, sphere_lod1 and finally b.r.main. The helper bone (empty) must be selected last. |
:* In the 3D window, press Ctrl P>Object (Keep Transform). | :* In the 3D window, press Ctrl P>Object (Keep Transform). | ||
:* Test the animation by starting the animation and showing or hiding the two mesh objects. | :* Test the animation by starting the animation and showing or hiding the two mesh objects. | ||
:* Save your work. | :* Save your work. | ||
| + | <table><tr><td>[[File:Parenting the mesh.jpg|1200px|thumb|left|Parenting the mesh]]</td></tr></table> | ||
| + | <table bgcolor=#000000 width=1000 cellpadding=2> | ||
| + | <tr valign="top"> | ||
| + | <td> | ||
| + | <table bgcolor=#ffffb0 cellpadding=2> | ||
| + | <tr valign="top"> | ||
| + | <td>[[image:NotePad.PNG|link=]]</td> | ||
| + | <td>The picture above shows the action of parenting the two mesh objects (sphere_lod0n and sphere_lod1n) to the bone (b.r.main). The following image shows the result. | ||
| + | The two meshes are still in their LOD collections but are also shown as children of b.r.main in the Animation collection but in a light grey. They are not actually part of the animation collection. | ||
| + | </td> | ||
| + | </tr> | ||
| + | </table> | ||
| + | </td> | ||
| + | </tr> | ||
| + | </table> | ||
| + | <table><tr><td>[[File:After parenting.jpg|1000px|thumb|left|After parenting]]</td></tr></table> | ||
===Exporting the Animation=== | ===Exporting the Animation=== | ||
| − | The animation data for the helper(s) as well as the parent/child relationships are exported within the FBX file. The Trainz FBX importer will extract the animation data and store it in a KIN file. Since we have two LOD meshes this means that the importer will create two KIN files but with slightly different names. As the animation is the same for both meshes you can | + | The animation data for the helper(s) as well as the parent/child relationships are exported within the FBX file. The Trainz FBX importer will extract the animation data and store some of it in the Trainzmesh file but the actual animation data in a KIN file. Since we have two LOD meshes this means that the importer will create two KIN files but with slightly different names. As the animation is the same for both meshes you can just use one of the KIN files and delete the other.<br> |
| − | Blender's FBX exporter will export each animation channel it finds and this can result in multiple KIN files for each mesh. This doesn't work | + | Blender's FBX exporter will export each animation channel it finds and this can result in multiple KIN files for each mesh. This doesn't work in Trainz. The solution is to use what is called a baked animation where all the channels and keyframes are "baked" together. Baking also causes every frame to be exported even though the source may only specify two keyframes, as in our example. |
| − | ====Exporting LOD0 Animation==== | + | |
| + | ====Exporting the LOD0 Animation==== | ||
:* Disable viewing of the LOD1 meshes by unclicking the LOD1 collection. | :* Disable viewing of the LOD1 meshes by unclicking the LOD1 collection. | ||
:* Enable both the LOD0 and Animation collections. | :* Enable both the LOD0 and Animation collections. | ||
:* In the 3D Editor select all objects using the A key. You may need to press it twice. | :* In the 3D Editor select all objects using the A key. You may need to press it twice. | ||
| − | [[File:Exporting | + | <table><tr><td>[[File:Exporting lod0.jpg|800px|thumb|Exporting LOD0]]</td></tr></table> |
:* Go to the File menu and select Export>FBX. | :* Go to the File menu and select Export>FBX. | ||
| − | :* The | + | :* The list of options for export is quite long so they are displayed here in two images. |
| − | :* | + | <table><tr><td>[[File:FBX export settings1.jpg|500px|thumb|left|Export settings 1]][[File:FBX export settings2.jpg|500px|thumb|right|Export settings 2]]</td></tr></table> |
| − | :* | + | :* The options shown in these images should work for most exports. Some comments: |
| − | :* | + | :* You can make presets of those settings you use most. The author has one for animation, one for mesh only, and one for mesh and empties. The last is used for meshes with attachments. Presets are very useful. |
| − | :* | + | :* The Path Mode and Batch Mode can be left with default values. They may be useful for exporting models with multiple LODs but the author hasn't tried that. |
| − | :* | + | :* Include: The Limit to section may be something you could consider changing depending on preferences. The author prefers Selected Objects but the other values may suit you better. |
| − | : | + | :* Include: The Object Types is important. The author works with both empties and armatures for animation so the values are set as shown. You could disable armatures if not being used. |
| − | :* | + | :* Transform: The Scale value and the Apply Scalings are related. Some authors like to use different values to get the same result but the values shown will work. |
| − | :* | + | :* Transform: The Forward and Up are also related so if you change one then the other may change as well. Y Forward and Z up are correct for Trainz. |
| − | :* | + | :* Geometry: These values will work. Applying modifiers and Triangulating faces is something you may wish to change. This is the author's preferred set. |
| − | : | + | :* Armature: The effect of changing these values has not been tested so just use the default values. |
| − | + | :* Bake Animation: This must be ticked and the other values left unchecked. Leave the Sampling Rate and Simplify as 1.0. | |
| − | + | :* In the output filename space enter ex1_lod0.fbx and click on the Export FBX icon. | |
| − | :* In the output filename space enter ex1_lod0.fbx and click on the Export FBX icon | + | |
| − | ====Exporting LOD1 Animation==== | + | ====Exporting the LOD1 Animation==== |
:* Uncheck the LOD0 collection. | :* Uncheck the LOD0 collection. | ||
:* Check the LOD1 collection. | :* Check the LOD1 collection. | ||
:* Leave the Animation collection checked. | :* Leave the Animation collection checked. | ||
:* Repeat the LOD0 process only changing the output name to ex1_lod1.fbx. You shouldn't need to change any of the export settings unless you restarted Blender. | :* Repeat the LOD0 process only changing the output name to ex1_lod1.fbx. You shouldn't need to change any of the export settings unless you restarted Blender. | ||
| − | + | ||
===Setting up the Asset in Trainz=== | ===Setting up the Asset in Trainz=== | ||
| − | The FBX file contains both the mesh and the b.r.main empty plus the animation data. When the FBX file is imported into Trainz, an animation file (KIN) is created in addition to the Trainzmesh file. | + | :* The FBX file contains both the mesh and the b.r.main empty plus the animation data. When the FBX file is imported into Trainz, an animation file (KIN) is created in addition to the Trainzmesh file. |
| − | The name of the kin file depends on the options chosen within the Export FBX->Animation panel. If you choose the Baked Animation option, then the kin filename will be the mesh name plus “_scene.kin”. In this instance, the kin filenames will be “ex1_lod0_scene.kin” and “ex1_lod1_scene.kin”. | + | :* The name of the kin file depends on the options chosen within the Export FBX->Animation panel. If you choose the Baked Animation option, then the kin filename will be the mesh name plus “_scene.kin”. In this instance, the kin filenames will be “ex1_lod0_scene.kin” and “ex1_lod1_scene.kin”. |
====Config.txt==== | ====Config.txt==== | ||
| − | + | :* Create your config.txt. You can either use the config.txt provided with this tutorial remembering to change the KUID to suit one of yours, or create a config.txt from scratch or maybe use the N3V utility program at [[https://contentcreation.trainzsimulator.com/trainz-content-utilities-1-0-2/|N3V Content Utilities]]. | |
| − | For this asset the mesh table will look like this | + | :* For this asset the mesh table will look like this. Note that the kin file for LOD1 uses the LOD0 kin file. |
| − | + | ||
| − | mesh-table { | + | mesh-table { |
| − | + | lod_0 { | |
| − | + | mesh "ex1_lod0.trainzmesh" | |
| − | + | auto-create 1 | |
| − | + | lod-level 0 | |
| − | + | anim "ex1_lod0_scene.kin" | |
| − | animation-loop-speed 1.00 | + | animation-loop-speed 1.00 |
| + | } | ||
| + | lod_1 { | ||
| + | mesh "ex1_lod0.trainzmesh" | ||
| + | auto-create 1 | ||
| + | lod-level 1 | ||
| + | anim "ex1_lod0_scene.kin" | ||
| + | animation-loop-speed 1.00 | ||
| + | } | ||
} | } | ||
| − | + | ||
| − | + | ||
| − | + | ====Committing and updating the asset==== | |
| − | + | :* Getting the asset to work in game is often a two part process. The first commit will create the Trainzmesh and KIN files and a second pass may be needed to correct filenames in the config.txt. | |
| − | + | :* Commit the asset to Trainz. | |
| − | + | :* Open the asset for editing. If it failed the commit it will already be open. | |
| − | + | :* Check the names of the Trainzmesh and KIN files produced. If necessary, change the config.txt mesh-table to suit the correct names. | |
| − | + | :* If you intend to use the LOD0 KIN file then you can delete the LOD1 version. | |
| − | </ | + | :* Commit the asset again. Hopefully, there should be no errors. |
| + | |||
| + | ====Warnings on commit==== | ||
| + | :* You may get these warnings on the first export/import into Trainz. They can be ignored. | ||
| + | <table><tr><td>[[File:B4 anim ex1 export warnings.jpg|600px]]</td></tr></table> | ||
===Asset in game=== | ===Asset in game=== | ||
| + | This is the asset in game. Remember that animation will only work in Driver mode.<br> | ||
| + | The ball revolves at a constant rate. You can change the rotation speed in the config.txt using the animation-loop-speed tag. | ||
| + | <table><tr><td>[[File:Ex1 in game.jpg|600px]]</td></tr></table> | ||
| + | <br> | ||
| + | ===Adding the animation as an animation effect=== | ||
| + | |||
| + | ====Original author's comments==== | ||
| + | This tutorial was altered by another user to use an animated effect in an effects container. While this is useful, it is a bit more advanced than the intent of this tutorial so the orignal author has moved the changes here and the original tutorial structure restored. | ||
| + | |||
| + | ====Animated Effects==== | ||
| + | An animated effect can be useful if using script to control the animation as there are more options for animation control. Instead of being located in the main mesh-table, the animated object is located in an Effects container as described here: [[Animation_Effect]]. | ||
| + | You can find the animation effect version of this tutorial at [[File:Tutorial_Rebuild_Blender_Rotatating_Earth.zip|Example 1: Tutorial Rebuild Blender Rotatating Earth]] | ||
| + | |||
| + | |||
| + | ==Example 2 - Four revolving cogs== | ||
| + | (This example needs to be updated and validated) | ||
| + | This example shows four meshed cogs rotating together. The rotation of the cogs is controlled by four armatures and an empty is used as a parent bone. | ||
| + | Each cog has its own armature and two rotate clockwise and the other two rotate anticlockwise.<br /> | ||
| + | There are two Blender files provided: one incomplete and one complete. <br /> | ||
| + | The starting file has the four cogs UV mapped and linked to a Trainz PBR material. An armature is positioned at the centre of each cog. The four cogs are grouped into a LOD0 collection and the four armatures are grouped into an Animation collection. There is also a LOD1 collection but it is empty.<br /> | ||
| + | Your task is to add the animation, duplicate the meshes into LOD1 and export to Trainz. Not everything is explained in detail but if you have completed Example 1 then that will help. | ||
| + | [[File:4 cogs in Blender.jpg|800px]] | ||
| + | ===Source Files=== | ||
| + | The source files can be downloaded here [[File:ex2_export.zip]]. The source includes: | ||
| + | ex2_start.blend; | ||
| + | ex2_complete.blend; | ||
| + | cogs_albedo.png | ||
| + | cogs_albedo.texture.txt | ||
| + | cogs_normal.png | ||
| + | cogs_normal.texture.txt | ||
| + | cogs_parameter.png | ||
| + | cogs_parameter.texture.txt | ||
| + | $screenshot$.jpg | ||
| + | config.txt | ||
| + | |||
| + | Updated and rebuilded tutorial files: [[File:Tutorial_Rebuild_Blender_Four_Cogs.zip|Example 2: Tutorial Rebuild Blender Four Cogs]] | ||
| + | Beside some adjustments the main update was to move, add and amend animation tags to a effects sub container. | ||
| + | Informations about Blender 3.x fbx export settings as picture one will find in [[Prequel Blender to Trainz|Prequel for this tutorial series: Blender to Trainz (with the full script)]] | ||
| + | |||
| + | ===Things you need to do=== | ||
| + | ====Saving==== | ||
| + | :* Save often. Animation can be tricky so always save when you have reached a critical point. | ||
| + | ====Animate the cogs==== | ||
| + | :* Set the animation range to 120 frames, start frame 1, and the current frame 1. | ||
| + | :* Make the four cog armatures children of the root animation helper b.r.base. | ||
| + | :* For each cog: | ||
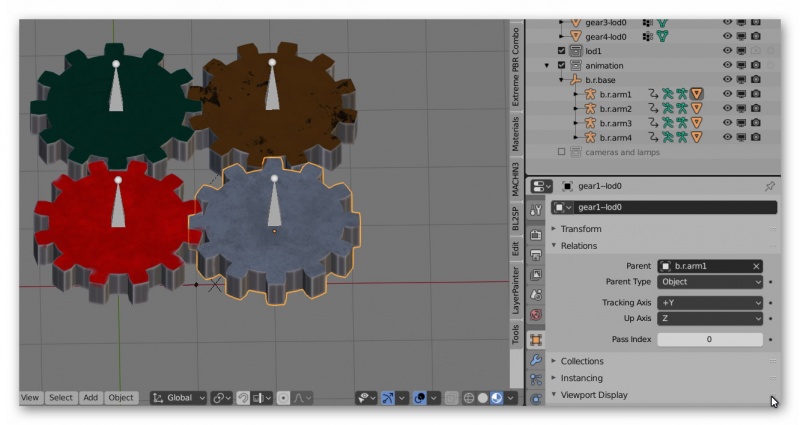
| + | :** Make the cog mesh a child of its armature. Blender 2.8 seems to be a bit unreliable for this action so make sure the correct parent is applied. You can see this in the Properties Editor, Context Panel->Relations. The parent type should be object.[[File:Checking the cog parent.jpg|800px]] | ||
| + | :** Create five keyframes for each armature as detailed in the table below: | ||
| + | ::::{| class="wikitable" | ||
| + | ! width=15% | Armature | ||
| + | ! width=15% | Keyframe<br />1 | ||
| + | ! width=15% | Keyframe<br />30 | ||
| + | ! width=15% | Keyframe<br />60 | ||
| + | ! width=15% | Keyframe<br />90 | ||
| + | ! width=15% | Keyframe<br />90 | ||
| + | |- | ||
| + | | <center>1</center> | ||
| + | | <center>0</center> | ||
| + | | <center>-90</center> | ||
| + | | <center>-180</center> | ||
| + | | <center>-270</center> | ||
| + | | <center>-360</center> | ||
| + | |- | ||
| + | | <center>2</center> | ||
| + | | <center>0</center> | ||
| + | | <center>90</center> | ||
| + | | <center>180</center> | ||
| + | | <center>270</center> | ||
| + | | <center>360</center> | ||
| + | |- | ||
| + | | <center>3</center> | ||
| + | | <center>0</center> | ||
| + | | <center>-90</center> | ||
| + | | <center>-180</center> | ||
| + | | <center>-270</center> | ||
| + | | <center>-360</center> | ||
| + | |- | ||
| + | | <center>4</center> | ||
| + | | <center>0</center> | ||
| + | | <center>90</center> | ||
| + | | <center>180</center> | ||
| + | | <center>270</center> | ||
| + | | <center>360</center> | ||
| + | |} | ||
| + | :* Run the animation and check that the cogs rotate in the correct direction and mesh with each other. If this doesn't look right then you may have to fall back to a saved version or even the starting version. | ||
| + | :* For each cog: | ||
| + | :**Make a copy. (Shift D) | ||
| + | :**Move the copy to the LOD1 collection. (M key) | ||
| + | :**Rename the copy to "gearx-lod1" where "x" is the gear number. | ||
| + | :**Add a Decimate modifier. The Planar option with an angle of 10 will reduce the number of polys to a usable number. There is no need to apply the modifier since the exporter will do that on export. | ||
| + | :*Hide the LOD1 collection and run the animation again. This will show the LOD1 meshes animating. | ||
| + | |||
| + | ====Export==== | ||
| + | :*Select each LOD collection in turn and, together with the Animation collection, export to files called "cogs_lod0.fbx" and "cogs_lod1.fbx". For this export you must select Empty, Armature, and Mesh. | ||
| + | ===Asset in Game=== | ||
| + | [[file:cogs_in_game.jpg]] | ||
| − | |||
| + | ==Example 3 - coming soon(ish)== | ||
=Animation warnings and errors= | =Animation warnings and errors= | ||
| Line 141: | Line 304: | ||
| style="border:1px solid gray;font-weight:normal;"|! ... Skipping one or more lines with the same contents | | style="border:1px solid gray;font-weight:normal;"|! ... Skipping one or more lines with the same contents | ||
| style="border:1px solid gray;font-weight:normal;"|This is an ASSIMP message and can be ignored. | | style="border:1px solid gray;font-weight:normal;"|This is an ASSIMP message and can be ignored. | ||
| + | |- | ||
| + | | style="border:1px solid gray;font-weight:normal;"|! ... T2776: FBX: animation is applied to multiple targets | ||
| + | | style="border:1px solid gray;font-weight:normal;"| Might be caused by armatures, where the bones does not have names starting with "b.r.". The armature object itself does not need to have a "b.r." prefix in its name, however. | ||
|} | |} | ||
| − | |||
Latest revision as of 15:09, 10 January 2024
[edit] Overview
This page describes a process for exporting simple animated meshes from Blender to the FBX file format. It is intended for new content creators or those more experienced who need to migrate from older versions of Blender and Trainz animation.
You should be familiar with Blender FBX export as described here HowTo/Export from Blender using FBX
This tutorial is for Trainz Build 5.3 and Blender 4.n. However, it should work for Trainz Build 4.6 and up.
[edit] Trainz Animation
In Blender you can animate meshes but that animation is not recognised by Trainz. Trainz only recognises animation helper objects that it calls bones. A bone, for Trainz purposes, is an animated helper object using a "b.r." prefix. Meshes are attached to bones in a parent-child relationship where the child is the mesh. When the parent bone moves in 3D space, the child mesh moves with it. In Trainz you cannot see the animated bones but you can see the mesh. Animation helpers in Blender can be armatures or empties. Lattices cannot be used since the standard FBX exporter doesn't recognise them.
[edit] Examples
Here are a number of example animations. Each example is provided with source files but only the first example is fully explained.
[edit] Example 1 - A Revolving Sphere
This example is a very basic animation of a sphere using an empty as the animation helper. The Blender file consists of a sphere located at grid centre and at elevation 2 (metres). The sphere has a PBR material and a simple UV map. Your task is add the animation helper, add the rotation animation, export to FBX and import into Trainz.
[edit] Load Example 1
- On your computer, create a project folder called "anim_example_1" or whatever name suits you.
- Download the source files from here: File:B4 Anim Ex1 Source.zip
- The source file is in zip format so extract it into the project folder. The source includes:
  example1_B4_start.blend;
  example1_B4_completed.blend;
  ex1_albedo.png
  ex1_albedo.texture.txt
  ex1_normal.png
  ex1_normal.texture.txt
  ex1_parameter.png
  ex1_parameter.texture.txt
  thumbnail_0.jpg
  config.txt
- The config.txt is complete except for the KUID where you add one of your own. The Trainz Build is set to 5.3. You can use 4.6 if required.
- Open the ex1_B4_example.blend Blender source file in Blender 4. It should look similar to the following. If the sphere is a pink/purple colour then that means Blender can't find the material textures. You should be able to correct that adding them to your Blender file location and reloading the textures withing Blender.
- Save the file as "ex1B4_working.blend".

|
[edit] Add the Trainz Animation Helper
- Position the Blender cursor at World Origin (0,0,0). Press Shift S to bring up the Snap menu and select Cursor to World Origin.
- Add an empty at the cursor location. Use menu Add->Empty->Arrows. Shift A should also work.
- Double click on the new Empty in the Properties Editor and rename it to "b.r.main". The name used is not important but the prefix "b.r." is important. The convention is to use b.r.main or b.r.base.
- Move the b.r.main helper into the Animation collection. You can either drag and drop it in the Properties Window or the menu Object->Collection->Move to Collection. Having a collection name Animation makes it easier to export different LOD meshes.
[edit] Animate the Trainz Helper
- Change to the Animation Workspace and ensure the b.r.main object is selected.
- Open the SideBar (N key) in the 3D Editor, if not already open, and select the Item tab. This shows the location, rotation, and scale of the current object. In this case it should be the b.r.main empty.
- For this project the location and rotation values should be zero and the scale values should be 1.0. If the values are wrong then press Ctrl A and reset whatever needs changing.
|
- For animation we use keyframes (aka frames) to manage our animation. Trainz operates animations at 30 frames per second (fps) and, as we want to run this animation for two seconds, the End Frame in Timeline should be 60. Make sure the Start Frame is 1 and the Current Keyframe is 1. See the following image.
 |
- Select the b.r.main helper if not already selected.
- For the start of our animation we need to set the rotation of our helper to be at 0 (zero) degrees. For this example we can just leave the helper as Blender placed it..
- Press the I key and select Rotation. This creates a frame with just rotation data which, in this case, is 0. In the Animation Editor a number of changes will become visible.
- The Rotation fields in the Transform will change colour. In the image below they are yellow but the colour depends on the Blender theme in use.
- A keyframe indicator appears in the Timeline Window at the bottom of the Blender screen.
- Entries also appear in the Dope Sheet and Graph Editors. In simple animations you are unlikely to use those editors but be aware they exist.
- Change the Current frame in Timeline to the last keyframe (60). You can click on frame 60 in Timeline, manually change the current frame number or use the "Jump to end" icon in Timeline.
- At the end of our animation we want the helper to have completed one full rotation of 360 degrees so select the helper and, in the Properties Window->Context, change the Z Rotation value to 360, and press the I key and select Rotation againi. The result should look like the following:
  |
- Test out the animation by clicking on the Forward and Reverse icons in Timeline. When finished reset the animation by stopping it first and then selecting the Start Endpoint icon. Note that the sphere is not moving yet.
[edit] Review
So far we have created the helper with a name that Trainz will recognise for animation. We have set the animation to compete one full circle in the Z axis in 60 keyframes and, since we are using 30fps, the animation will run for 2 seconds. The use of the value 360 is somewhat of a trick to make sure that Blender animates the helper through 360 degrees. Although 360 is essentially the same as 0, if you left it at 0 then no animation would take place even though keyframes exist. Try a zero value and see what happens or rather what doesn't happen. Using the value of 360 means that the helper will rotate 360 degrees in the anti-clockwise direction. If you want clockwise motion then change the value to -360.
[edit] Smoothing the Animation
While watching the animation you may have noticed that the animation pauses briefly between the end and restart of the animation. There is no time gap but this indicates that the animation is not following a linear path but one using an "F curve". These pauses may be noticeable in game except for bogie animations where the animation is dynamically managed by the game engine. Within Blender this characteristic is known as the extrapolation mode of the animation channel. By default Blender uses an F curve that resembles a Bezier curve. For many Trainz animations you may want a continuous animation and that means the Linear Extrapolation. Note that there is a Constant Animation but that may not give the same result as it essentially freezes the animation between keyframes.
- Change the workspace to Animation if not there already.
- In the Graph Editor or the Dope Sheet Editor, select menu Channel>Extrapolation Mode>Linear Extrapolation.
- Run the animation again and there should be no pauses.
 |
For more information on Blender animation channel extrapolation see Introduction to FCurves
[edit] Parenting the mesh objects
- As stated earlier you cannot animate the meshes directly but you can make them follow the animation helper. We do this by making the mesh a child of the helper.
- There are two meshes to be animated: the LOD0 and LOD1 meshes.
- Enable viewing of both the LOD0 and LOD1 mesh by ticking the two collections.
- Select the objects sphere_lod0, sphere_lod1 and finally b.r.main. The helper bone (empty) must be selected last.
- In the 3D window, press Ctrl P>Object (Keep Transform).
- Test the animation by starting the animation and showing or hiding the two mesh objects.
- Save your work.
 |
|
 |
[edit] Exporting the Animation
The animation data for the helper(s) as well as the parent/child relationships are exported within the FBX file. The Trainz FBX importer will extract the animation data and store some of it in the Trainzmesh file but the actual animation data in a KIN file. Since we have two LOD meshes this means that the importer will create two KIN files but with slightly different names. As the animation is the same for both meshes you can just use one of the KIN files and delete the other.
Blender's FBX exporter will export each animation channel it finds and this can result in multiple KIN files for each mesh. This doesn't work in Trainz. The solution is to use what is called a baked animation where all the channels and keyframes are "baked" together. Baking also causes every frame to be exported even though the source may only specify two keyframes, as in our example.
[edit] Exporting the LOD0 Animation
- Disable viewing of the LOD1 meshes by unclicking the LOD1 collection.
- Enable both the LOD0 and Animation collections.
- In the 3D Editor select all objects using the A key. You may need to press it twice.
 |
- Go to the File menu and select Export>FBX.
- The list of options for export is quite long so they are displayed here in two images.
  |
- The options shown in these images should work for most exports. Some comments:
- You can make presets of those settings you use most. The author has one for animation, one for mesh only, and one for mesh and empties. The last is used for meshes with attachments. Presets are very useful.
- The Path Mode and Batch Mode can be left with default values. They may be useful for exporting models with multiple LODs but the author hasn't tried that.
- Include: The Limit to section may be something you could consider changing depending on preferences. The author prefers Selected Objects but the other values may suit you better.
- Include: The Object Types is important. The author works with both empties and armatures for animation so the values are set as shown. You could disable armatures if not being used.
- Transform: The Scale value and the Apply Scalings are related. Some authors like to use different values to get the same result but the values shown will work.
- Transform: The Forward and Up are also related so if you change one then the other may change as well. Y Forward and Z up are correct for Trainz.
- Geometry: These values will work. Applying modifiers and Triangulating faces is something you may wish to change. This is the author's preferred set.
- Armature: The effect of changing these values has not been tested so just use the default values.
- Bake Animation: This must be ticked and the other values left unchecked. Leave the Sampling Rate and Simplify as 1.0.
- In the output filename space enter ex1_lod0.fbx and click on the Export FBX icon.
[edit] Exporting the LOD1 Animation
- Uncheck the LOD0 collection.
- Check the LOD1 collection.
- Leave the Animation collection checked.
- Repeat the LOD0 process only changing the output name to ex1_lod1.fbx. You shouldn't need to change any of the export settings unless you restarted Blender.
[edit] Setting up the Asset in Trainz
- The FBX file contains both the mesh and the b.r.main empty plus the animation data. When the FBX file is imported into Trainz, an animation file (KIN) is created in addition to the Trainzmesh file.
- The name of the kin file depends on the options chosen within the Export FBX->Animation panel. If you choose the Baked Animation option, then the kin filename will be the mesh name plus “_scene.kin”. In this instance, the kin filenames will be “ex1_lod0_scene.kin” and “ex1_lod1_scene.kin”.
[edit] Config.txt
- Create your config.txt. You can either use the config.txt provided with this tutorial remembering to change the KUID to suit one of yours, or create a config.txt from scratch or maybe use the N3V utility program at [Content Utilities].
- For this asset the mesh table will look like this. Note that the kin file for LOD1 uses the LOD0 kin file.
 mesh-table {
   lod_0 {
     mesh                                  "ex1_lod0.trainzmesh"
     auto-create                           1
     lod-level                             0
     anim                                  "ex1_lod0_scene.kin"
     animation-loop-speed                  1.00
   }
   lod_1 {
     mesh                                  "ex1_lod0.trainzmesh"
     auto-create                           1
     lod-level                             1
     anim                                  "ex1_lod0_scene.kin"
     animation-loop-speed                  1.00
   }
 }
[edit] Committing and updating the asset
- Getting the asset to work in game is often a two part process. The first commit will create the Trainzmesh and KIN files and a second pass may be needed to correct filenames in the config.txt.
- Commit the asset to Trainz.
- Open the asset for editing. If it failed the commit it will already be open.
- Check the names of the Trainzmesh and KIN files produced. If necessary, change the config.txt mesh-table to suit the correct names.
- If you intend to use the LOD0 KIN file then you can delete the LOD1 version.
- Commit the asset again. Hopefully, there should be no errors.
[edit] Warnings on commit
- You may get these warnings on the first export/import into Trainz. They can be ignored.
 |
[edit] Asset in game
This is the asset in game. Remember that animation will only work in Driver mode.
The ball revolves at a constant rate. You can change the rotation speed in the config.txt using the animation-loop-speed tag.
 |
[edit] Adding the animation as an animation effect
[edit] Original author's comments
This tutorial was altered by another user to use an animated effect in an effects container. While this is useful, it is a bit more advanced than the intent of this tutorial so the orignal author has moved the changes here and the original tutorial structure restored.
[edit] Animated Effects
An animated effect can be useful if using script to control the animation as there are more options for animation control. Instead of being located in the main mesh-table, the animated object is located in an Effects container as described here: Animation_Effect. You can find the animation effect version of this tutorial at File:Tutorial Rebuild Blender Rotatating Earth.zip
[edit] Example 2 - Four revolving cogs
(This example needs to be updated and validated)
This example shows four meshed cogs rotating together. The rotation of the cogs is controlled by four armatures and an empty is used as a parent bone.
Each cog has its own armature and two rotate clockwise and the other two rotate anticlockwise.
There are two Blender files provided: one incomplete and one complete.
The starting file has the four cogs UV mapped and linked to a Trainz PBR material. An armature is positioned at the centre of each cog. The four cogs are grouped into a LOD0 collection and the four armatures are grouped into an Animation collection. There is also a LOD1 collection but it is empty.
Your task is to add the animation, duplicate the meshes into LOD1 and export to Trainz. Not everything is explained in detail but if you have completed Example 1 then that will help.

[edit] Source Files
The source files can be downloaded here File:Ex2 export.zip. The source includes:
  ex2_start.blend;
  ex2_complete.blend;
  cogs_albedo.png
  cogs_albedo.texture.txt
  cogs_normal.png
  cogs_normal.texture.txt
  cogs_parameter.png
  cogs_parameter.texture.txt
  $screenshot$.jpg
  config.txt
 Updated and rebuilded tutorial files: File:Tutorial Rebuild Blender Four Cogs.zip
 Beside some adjustments the main update was to move, add and amend animation tags to a effects sub container.
 Informations about Blender 3.x fbx export settings as picture one will find in Prequel for this tutorial series: Blender to Trainz (with the full script)
[edit] Things you need to do
[edit] Saving
- Save often. Animation can be tricky so always save when you have reached a critical point.
[edit] Animate the cogs
- Set the animation range to 120 frames, start frame 1, and the current frame 1.
- Make the four cog armatures children of the root animation helper b.r.base.
- For each cog:
- Make the cog mesh a child of its armature. Blender 2.8 seems to be a bit unreliable for this action so make sure the correct parent is applied. You can see this in the Properties Editor, Context Panel->Relations. The parent type should be object.
- Create five keyframes for each armature as detailed in the table below:
- Make the cog mesh a child of its armature. Blender 2.8 seems to be a bit unreliable for this action so make sure the correct parent is applied. You can see this in the Properties Editor, Context Panel->Relations. The parent type should be object.

Armature Keyframe
1Keyframe
30Keyframe
60Keyframe
90Keyframe
901 0 -90 -180 -270 -360 2 0 90 180 270 360 3 0 -90 -180 -270 -360 4 0 90 180 270 360
- Run the animation and check that the cogs rotate in the correct direction and mesh with each other. If this doesn't look right then you may have to fall back to a saved version or even the starting version.
- For each cog:
- Make a copy. (Shift D)
- Move the copy to the LOD1 collection. (M key)
- Rename the copy to "gearx-lod1" where "x" is the gear number.
- Add a Decimate modifier. The Planar option with an angle of 10 will reduce the number of polys to a usable number. There is no need to apply the modifier since the exporter will do that on export.
- Hide the LOD1 collection and run the animation again. This will show the LOD1 meshes animating.
[edit] Export
- Select each LOD collection in turn and, together with the Animation collection, export to files called "cogs_lod0.fbx" and "cogs_lod1.fbx". For this export you must select Empty, Armature, and Mesh.
[edit] Asset in Game

[edit] Example 3 - coming soon(ish)
[edit] Animation warnings and errors
| Warning/Error | Help/Explanation |
|---|---|
| ! ... T14120: Simplified dummy tracks with just one key. | Not sure what this warning is about but the animation is OK. |
| ! ... Skipping one or more lines with the same contents | This is an ASSIMP message and can be ignored. |
| ! ... T2776: FBX: animation is applied to multiple targets | Might be caused by armatures, where the bones does not have names starting with "b.r.". The armature object itself does not need to have a "b.r." prefix in its name, however. |