HowTo/Export from Blender using FBX
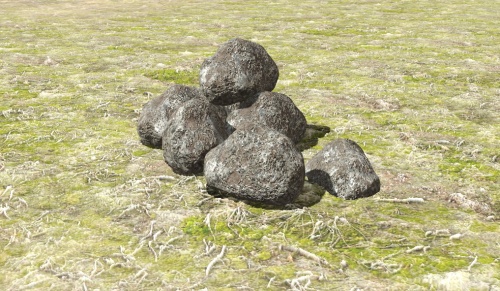
This page describes how to export a simple rock model from Blender into the FBX file format for use in Trainz as a scenery object. The model uses a Level of Detail (LOD) system suitable for scenery objects.
Some knowledge of Blender would be useful.
A Blender rock mesh is provided along with three PBR textures suitable for creating a PBRMetal material.
Asset Creation Workflow
The basic workflow is:
- Create your mesh.
- Create a UV map for mapping mesh polygons to a texture.
- Create and apply a Trainz material including textures.
- Create additional lower polygon meshes to be used as Level of Detail (LOD) meshes.
- Create a config.txt file that identifies your model, its type, a mesh definition, and a description including an image (thumbnail) of the model.
- Export the model to an FBX file.
- Add model textures and texture definition files so Trainz knows how to use those textures.
- Import the model into Trainz. During import Trainz will create Trainzmesh mesh file for each FBX file.
The first two steps have been done for you.
Project files
A project file File:Blender320-project.zip is provided in zip format. The file contains:
- A Blender named my_rock_blender320_start.blend. This Blender model has two meshes. One very high polygon mesh used only to bake a normal map and a much smaller mesh that will be the first LOD level (LOD 0).
- Three PBR textures and their texture description files:
- rockmat-albedo.png, rockmat-albedo.texture.txt
- rockmat-parameter.png, rockmat-parameter.texture.txt
- rockmat-normal.png, rockmat-normal.texture.txt
- A config.txt. You will need to add your own kuid.
- A thumbnail image.
- A Blender file named my_rock_blender320_final.blend. This is the end result ready for export.
Adding the Material, creating LOD meshes, and Exporting
Load Your Model
- Create a suitable working folder on your computer. You might call it "FBX_export_example_1".
- Unpack the project file File:Blender320-project.zip into your working folder.
- Start Blender, load the start Blender file and then save it as "rock_working.blend".
What's in the model?
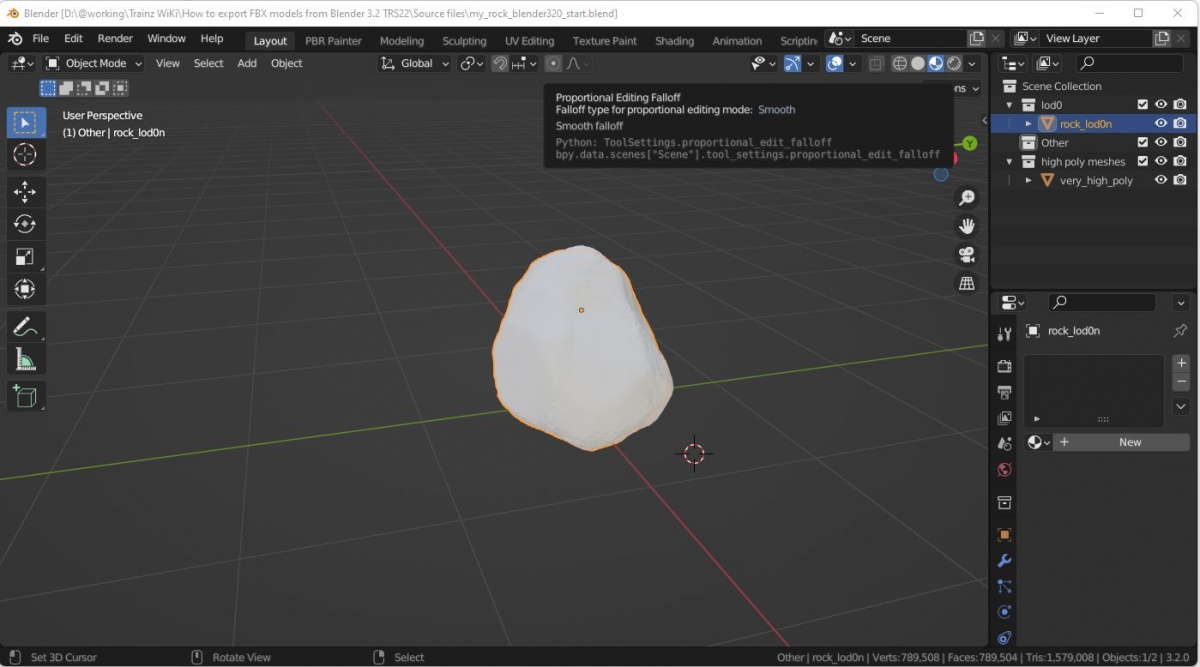
On opening the Blender file you will be in Layout mode with an untextured rock mesh. In the Scene Collection panel there are three
Blender collections: "high poly meshes", "Other", and "lod0.
The very high poly mesh version has 1.5 million triangles and is unsuitable for export as a Trainz mesh but it is suitable for baking normal maps for a lower poly mesh. We will not use it so hide it by unchecking the white box to the right of the high poly meshes collection.
You can also uncheck the Other collection. That can be useful for hiding lamps and cameras.
The lod0 collection contains the main mesh we will work with so make sure it is checked and visible. If you look at the bottom right of the screen it should show Tris 6,144. This count is a bit high for a rock so Level of Detail (LOD) meshes are required.
Task 1 - Create a Trainz material
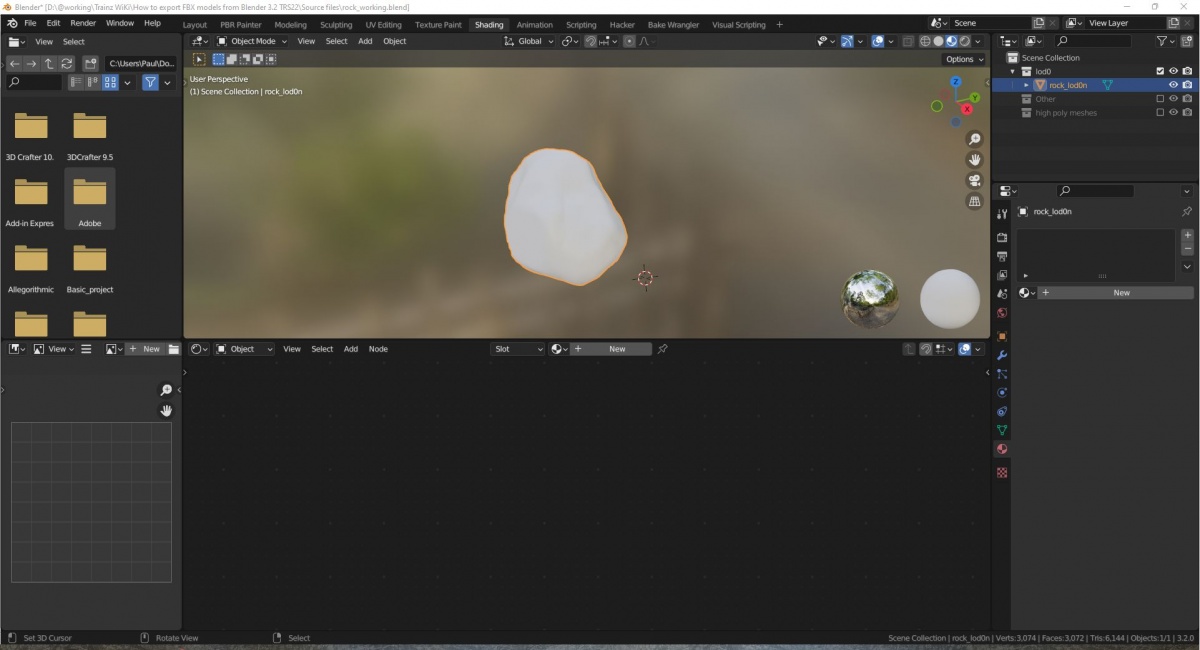
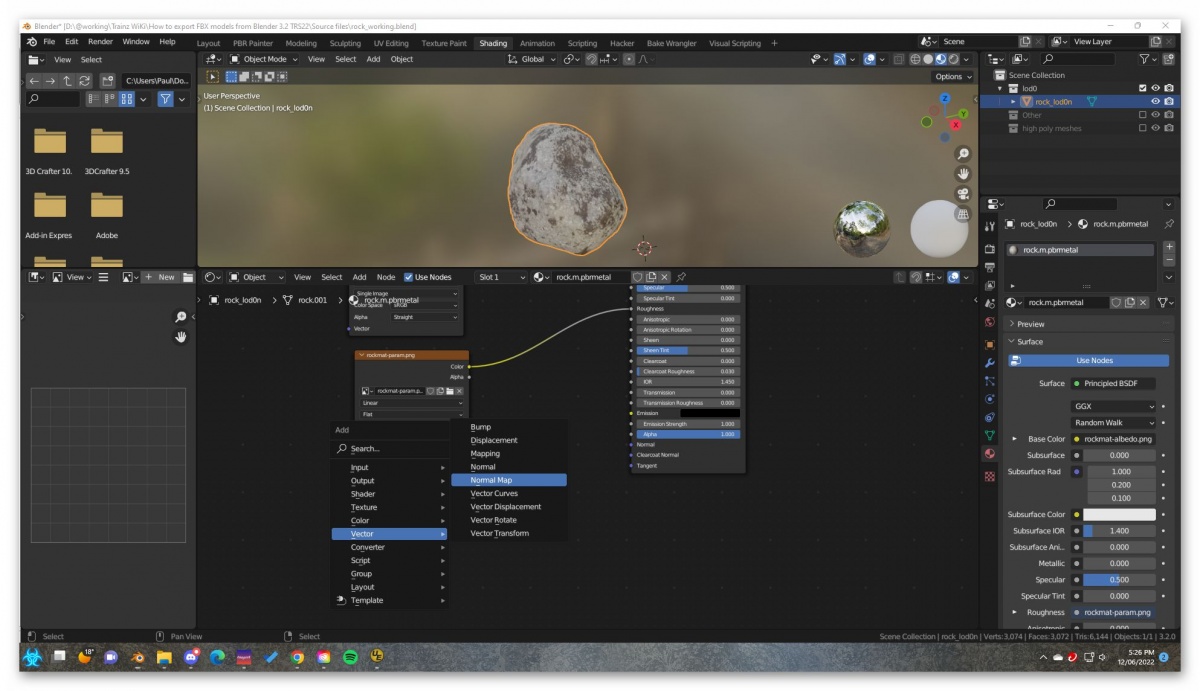
- Make sure the "rock_lod0n" mesh is selected and no others visible. Change to the Shading mode by clicking on the Shading tab at the top of the screen.
- In the Properties Editor, which is at the bottom right, create a new material. Click on the material name and change it to "rock.m.pbrmetal".
|
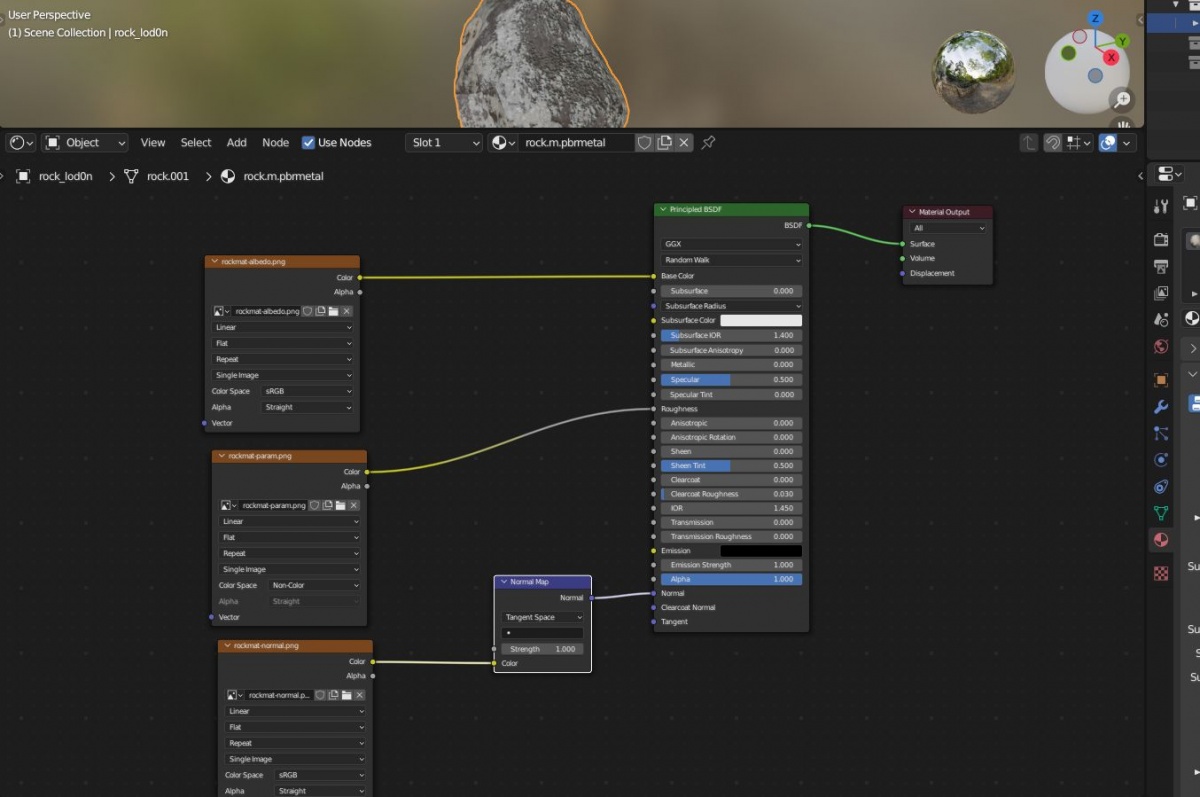
For a Trainz PBRMetal material we need to provide an albedo (base colour) texture, a set of parameters textures (emissive, ambient occlusion, roughness and metallicity) combined in one file, and a normals texture.
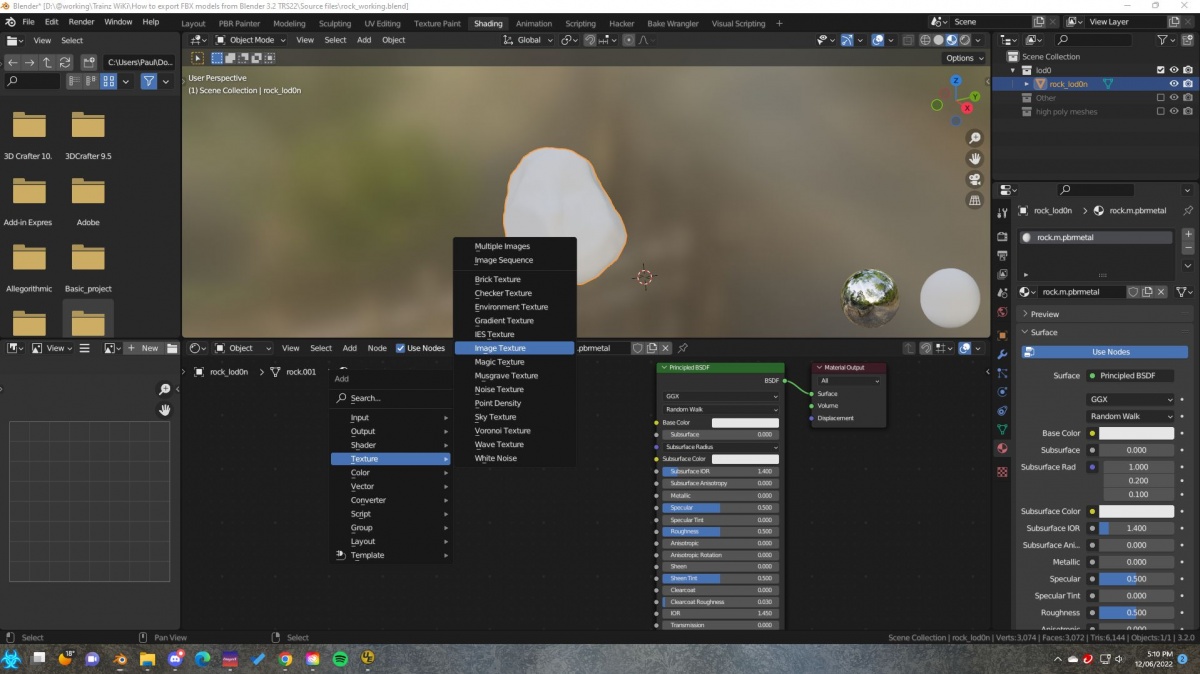
- Within the shader editor press Shift A and create an Image Texture node as shown below.
- Click on the Color output and drag the connection across to the Base Color input of the shader node. If you connect to the wrong input then disconnect by clicking on the input end of the link which is on the left side.
- Back in the Image Texture node use the Open dialog and find the file "rockmat-albedo.png". The rock will now show the base colours.
- Create another Image Texture node and connect it to the Roughness input of the shader node.
- Load the file "rockmat-param.png" into the node.
- Change the image texture node Color Space to non-color as the texture doesn't actually contain colour information.
|
Now we add the normal map but we need an additional node to provide additional information.
- Using Shift A, add a Vector->Normal Map node and connect it to the Normal input of the shader node.
- Using Shift A, add a Vector->Normal Map node and connect it to the Normal input of the shader node.
- Add another Image Texture node, connect it to the Normal Map node and load the "rockmat-normal.png" texture.
- Your material, in the Shader Editor, should look like the following:
Now is a good time to save your Blender file.
Task 2 - Create lower poly LOD versions
The rock_lod0n mesh is 6144 triangles and needs to be reduced to less than 300 triangles for the lowest polygon mesh.
In TS19 and later versions, you can dictate the distance at which LOD levels swap out and also the distance the mesh is not rendered at all. This is independent of any draw distance a user may apply although Trainz will use the lowest draw distance of the two schemes.
Each lower poly mesh must be at least 20% fewer polys than the previous mesh but to get down to 300 polys using just 20% would take quite a few levels. So, it is recommended that 20% be applied only for the first LOD change and a more agressive reduction after that.
In this asset we will aim for levels like this:
| LOD Level | Triangles | Distance |
|---|---|---|
| LOD0 | 6144 | 0 to 100 metres |
| LOD1 | 4900 | 100 to 300 metres |
| LOD2 | 1000 | 300 to 600 metres |
| LOD3 | 250 | 600 to 5000 metres |
| No render beyond 5000 metres |
Creating the LOD1 mesh
- If you haven't done so, save now.
- In the Outliner Editor (top right) select the LOD0 collection.
- Right click and select Duplicate Selection. This duplicates both the collection and meshes in the collection.
- Rename the collection to LOD1 and rename the mesh to rock_lod1n. There is no rename action in the drop down menu but double clicking on the name will allow a change.
- Hide the LOD0 collection by unchecking the box to the right of the collection name. This hides the entire collection.
- In the Properties Editor, select the Modifiers tab which is the spanner icon. There should be no modifiers listed.
- Click on Add Modifier and select the Decimate option.
- The Decimate modifier has basically three options: Collapse, Un-Subdivide, and Planar. Generally, it is best to use the Collapse option but sometimes you can get a better result with Planar. The poly count is a face count that is most likely the number of quads (4 sided polygon) so the number of triangles would be twice that number. This isn't always correct and depends on the mesh topology. It should be close enough for our purposes.
- For LOD1 we want a maximum of 4900 triangles (2450 faces) so use a Ratio value of 0.54 that gives a result of 2425 faces. This value may need to be tweaked if the actual value seen by Trainz is higher and therefore breaks the 20% rule.
- Do not apply the modifier as this is a non destructive setting and may need to be changed. The modifier will be applied on export.
- Save your work and we will move onto LOD2.
Creating the LOD2 mesh
- This time select the LOD1 collection, make a duplicate and rename the collection to LOD2 and the mesh to rock_lod2n. You could have duplicated LOD0 instead but this way we alrady have a decimate modifier.
- Hide the LOD0 and LOD1 collections if not already hidden.
- This time we want to reduce the triangle count to 1000 (face count 500) so a more agressive reduction is required.
- Try a Ratio value of 0.08 which gives quite a good result for a face count of 473.
- If you want to compare LOD versions you can show/hide the other LOD collections but make sure you are left working on the correct mesh.
- Save your work and we will move onto the final LOD - LOD3.
Creating the LOD3 mesh
- Duplicate the LOD2 collection and rename the collection to LOD3 and the mesh to rock_lod3n.
- Hide all collections except LOD3.
- Change the Decimate Ration value to 0.017 that results in 102 faces (204 triangles). Our rock is now looking a bit pointy in places but remember this will only be shown at 600+ metres.
- Save your work.
|
|
Exporting our model
- Repeat for each LOD collection
- Select the next LOD collection and hide all the others.
- Select the mesh for this LOD - e.g. rock_lod0n.
- From the top menu select File->Export->FBX.
- Change the output name, at the bottom of the dialog box, to the name of the mesh - e.g. rock_lod0n.fbx.
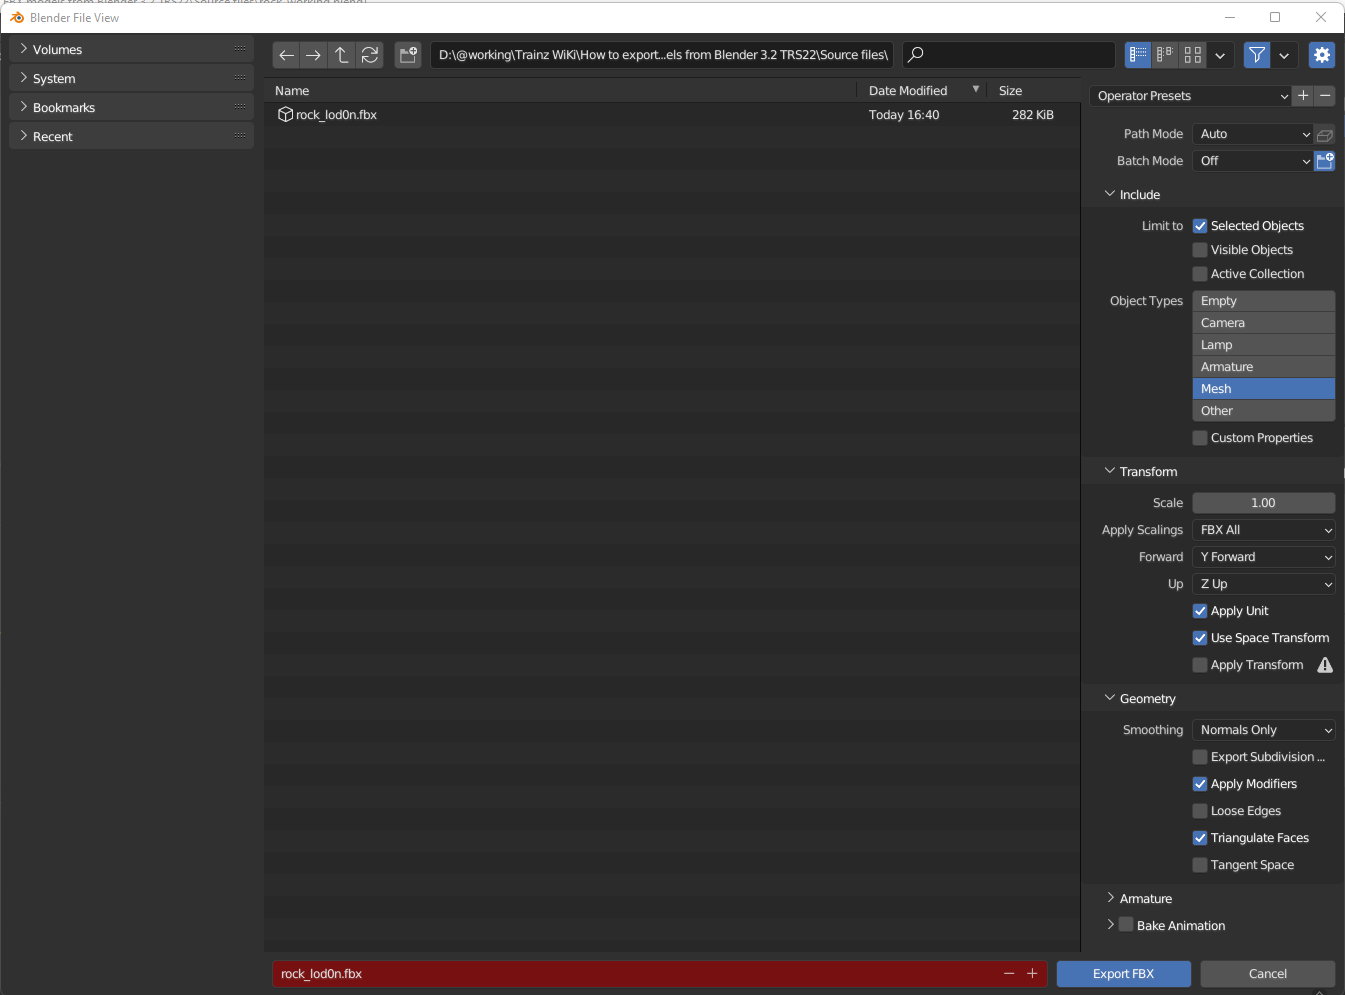
- Change the export settings to the same as this image.
- Repeat for each LOD collection
For this export we use:
| Include | Selected Objects |
|---|---|
| Object Types | Mesh only |
| Transform -> Scale | 1.00 |
| Apply Scalings | FBX All |
| Forward | Y Forward |
| Up | Z Up |
| Apply Unit | Ticked |
| Use Space Transform | Ticked |
| Geometry-> Apply Modifiers | Ticked |
| Triangulate Faces | Ticked |
You can ignore the animation settings (armature and Bake Animation).
- Click on the Export FBX button at the top right. The mesh will be exported.
|
|
Importing into Trainz
Getting organised
- Create a folder called "export" within your working folder. While not necessary it is convenient to have all the files Trainz needs to construct the asset.
FBX conversion to Trainzmesh format
While the FBX format is convenient for mesh creation and developing materials and textures, Trainz needs a conversion to a format that can be easily loaded by the game engine.
When you submit your asset into Trainz, Trainz will convert all the FBX files to Trainzmesh files using the same filename but changing the suffix. So a file called "rock_lod0n.fbx" will become "rock_lod0n.trainzmesh".
This means that your asset configuration in the config.txt file must refer to Trainzmesh files rather than FBX files.
Config.txt
For this asset we are creating a kind "scenery" asset and the config.txt will use mesh-table LOD together with a mesh-table-lod-transition-distances tag.
As explained earlier, the mesh-table-lod-transition-distances tag will control the distances at which the meshes changes and when they are no longer rendered.
A config.txt is provided in the project files although you will need to provide your own kuid. This is part of the config.txt.
kind                                      "scenery"
kuid                                      Note: supply your own kuid here
trainz-build                              "4.6"
category-class                            "HM"
category-region                           "00"
category-era                              "2010s;2020s"
mesh-table {
  lod0n {
    mesh                                  "rock_lod0n.trainzmesh"
    auto-create                           1
    lod-level                             0
    mesh-season                           0
  }
  lod1n {
    mesh                                  "rock_lod1n.trainzmesh"
    auto-create                           1
    lod-level                             1
    mesh-season                           0
  }
  lod2n {
    mesh                                  "rock_lod2n.trainzmesh"
    auto-create                           1
    lod-level                             2
    mesh-season                           0
  }
  lod3n {
    mesh                                  "rock_lod3n.trainzmesh"
    auto-create                           1
    lod-level                             3
    mesh-season                           0
  }
}
mesh-table-lod-transition-distances       100,300,600,5000
The trainz-build should be 4.6 or above.
The mesh table identifies the four meshes used in the asset plus the LOD level.
The mesh-table-lod-transition-distances identifies the distance at which the mesh changes to the next lower polygon mesh. You can change these if you want to experiment.
Texture.txt files
You can provide your own texture.txt files (advisable) or let the commit process create them for you.
Committing the asset
- Commit the asset by dragging the folder onto CM. Assuming the commit is error free, open the asset for edit in explorer and see what Trainz has created.
You will get a warning like "...shading node not recognized:Phong". Trainz doesn't use the exported shader anyway so you can ignore the warning.
The trainzmesh files should be as described above. The FBX files will also be present so you may want to delete those if you are ready to upload your asset to the DLS or elsewhere. If you delete the FBX files, then you will need to commit the asset again. Since the trainzmesh files already exist no FBX conversion is carried out.
About the boulder asset
The material used for this asset was created within Substance Painter which is a powerful PBR material and texture creation tool.
You can make your own PBR textures within Blender but that is beyond the scope of this tutorial. There are several payware Blender addons that can create quite good textures, One worth looking at is PBR Painter and the Trainz user Cayden has been promoting that for Trainz use. Search for the PBR Painter thread on the Trainz forums.
Animation
If you are interested in animation for Blender, see How to export Blender FBX animation.
Some tips for exporting
- Triangulate (convert to three sided polygons) before export. You can do this per mesh by using the triangulate command (Ctrl T) in mesh edit mode. Or you can add a triangulate modifier to the mesh in mesh object mode. The modifier method is preferred since keeping meshes in multi sided polygons help with editing.
- Make sure you only have one UV map per mesh. Trainz doesn't seem to like more than one UV map.
- Unapplied mesh scaling can cause issues including island distortment in the UV editor. Apply any scaling before export.
- FBX does not support double sided meshes so you will need to create a metadata file as described at FBX file format#Mesh Metadata Files. Note that this is done per material. i.e. you cannot have the same material for single sided and double sided meshes.
FBX to Trainzmesh Conversion Warnings and Errors
Errors and warnings starting with a T, such as T16128, are errors ouput by the ASSIMP converter and are not output by the Trainz FBX importer. Errors or warnings starting with VE are generated by Trainz. See Asset_Validation.
| Warning/Error | Help/Explanation |
|---|---|
| Warning: T16080: ...shading mode not recognised: Phong | You can ignore this warning |
| Warn, T15808: FBX-DOM (TOK_KEY, offset 0xnnnn) source object for connection does not exist | You can ignore this warning |
| Error: Unable to determine vertex format | This can be caused by having multiple UV maps for the same mesh. For example, baking a painted mesh to a bake mesh requires two UV maps. Remove old maps before exporting. If you wish to keep those maps, back up the Blender file and then delete the extra maps |
| Error, T5268 or T9068, Failed to triangulate polygon (no ear found). Probably not a simple polygon. | Try triangulating the mesh, or meshes, using Ctrl T (quads to tris). If the error continues, try using the Triangulate modifier. This problem is known to occur when using modifiers that may produce ngons on export. |
| T16128: FindInvalidDataProcess fails on mesh uvcoords: All vectors are identical" | Possibly caused by having one or more UV islands collapsed to one pixel. |
Additional tutorial and Blender help resources
- An additional video tutorial can be found at Exporting basic Cube from Blender with PBR Materials. That tutorial uses Substance Painter to create the PBR materials.
- Paul Hobbs' Blender tutorial for creating a steam locomotive. [1] The tutorial is quite complex so start with some simple assets like houses or buildings first.
- How to solve Blender modelling problems
