How to Use Track Priority Markers
The information in this Wiki Page applies to both TANE and TRS19.
Contents |
What are Track Priority Markers?
| In Summary: | |
| Track priority markers are purple coloured track markers that are invisible in Driver Mode but visible in Surveyor Mode. They are used to direct specific trains through the track section where they are placed | |
| Track priority markers are NOT a substitute for Driver Commands or Interlocking Towers | |
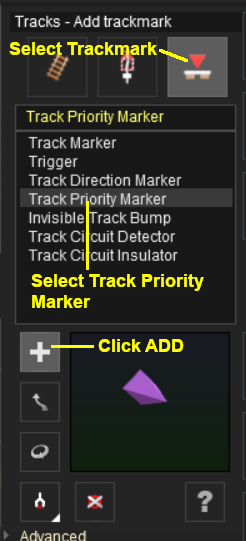
Adding a Track Priority Marker
 |
|
||||||

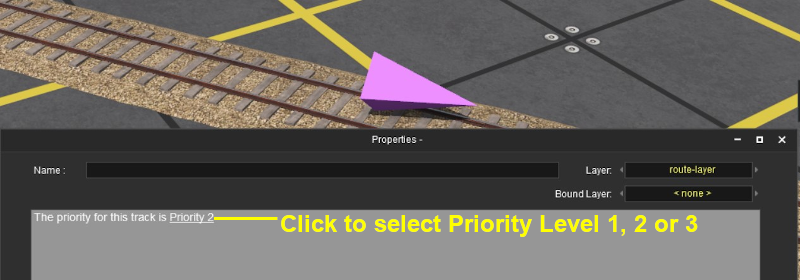
| Priority values have no set meanings but can be assigned to specific trains to force them through selected sections of track (the track sections are defined as between consecutive junction point sets) |
Assigning Priority Levels to Trains
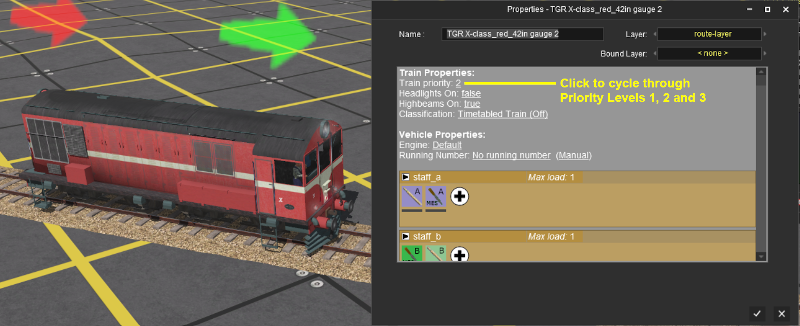
Each locomotive can be assigned a priority level of 1, 2 or 3. Priority 2 is the default level. Again, these values have no set meaning beyond what you decide they will mean.
For example you could assign priority 1 to express trains and 3 to slow general freight stopping trains.
Priority Marker Operation
| Main Points: | |
| Priority Track Markers only work on AI controlled trains. They have no effect on manually controlled trains | |
| Priority Track Markers fool an AI train that has the same priority level into thinking that the path containing the marker is the shortest possible path, even when it is not | |
| If the priority level of the AI train does not match the priority level of the marker, then the AI will ignore the marker and select its own path which may be the one containing the priority marker | |
| If the specified path is blocked (e.g. by another train), then the AI will ignore the Priority Track Marker and find another path | |
| The direction that the Priority Track Marker is pointing has NO effect on its operation | |
Consider the situation represented in the diagrams below.
In Figure 1 three trains - Red, Green, Yellow - have been given priority levels of 1, 2 and 3 as shown. Each is given the driver command Drive to Trackmark or Navigate to Trackmark. If no Priority Track Markers have been placed then all three will take the shortest path assuming there are no blockages.

Figure 1
In Figure 2 below, a Priority Track Marker has been placed on the top loop line and has been given a priority level of 1. All three trains have been given the driver command Drive to Trackmark or Navigate to Trackmark. The result will be that the red train will now take the Priority 1 path while the green and yellow trains are unaffected.

Figure 2
In Figure 3 below, a Priority Track Marker has been placed on the lower loop line and has been given a priority level of 3. All three trains have been given the driver command Drive to Trackmark or Navigate to Trackmark. The result will be that the yellow train will now take the Priority 3 path while the red and green trains are unaffected.

Figure 3
In Figure 4 below, two Priority Track Markers have been placed - one on the upper loop and the other on the lower loop - and set as shown. All three trains have been given the driver command Drive to Trackmark or Navigate to Trackmark. The result will be that the red and yellow trains will take their respective loop paths while the green train is unaffected.

Figure 4
In Figure 5 below, two Priority Track Markers have been placed on the lower loop line and set as shown. All three trains have been given the driver command Drive to Trackmark or Navigate to Trackmark. The result will be that the green and yellow trains will take the lower loop path while the red train is unaffected.

Figure 5
In Figure 6 below, Priority Track Markers have been placed on the both loop lines and set as shown. All three trains have been given the driver command Drive to Trackmark or Navigate to Trackmark. The result will be that no AI controlled trains will take the centre loop path. Remember that the Default Priority Level of every train is 2.

Figure 6
The exception, shown in Figure 7 below, will occur when one or more of the Priority Track Marker paths have been blocked by a consist under AI or manual control. If all three trains have been given the driver command Drive to Trackmark or Navigate to Trackmark then only the red train will take its assigned path. The green and yellow trains will take the next available free path.

Figure 7
Modifying Train Priority Levels
You can alter the Priority Level of a train during the running of a driver session.
![]() Manually in Driver Mode
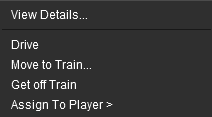
Manually in Driver Mode
This can be done "on the fly" using the mouse.
|
|
|||||||
![]() Using a Driver Command
Using a Driver Command
This can be done in Surveyor in the session Driver Setup Rule or by adding a driver command to the command bar in Driver.
 Insert the driver command Priorityz into the driver command bar and configure it to set the new level.
Information on the command can be found on the Trainz Wiki at:-
Trainz Wiki
 |
More Tutorials and Guides to Using Trainz |