 |
Keyboard Shortcut: R |
The Eyedropper Tool is used to identify objects that are in the route. The objects can be textures, effect layers, scenery, rolling stock, track. track equipment, and splines.
This tool uses the Assets Palette. If this palette is not visible on the screen then refer to  Notes: Palettes at the top of this document. Notes: Palettes at the top of this document.
|
|
Quick Steps
 With the Eyedropper Tool selected, move the mouse pointer (which will now be an eyedropper symbol) onto any object in view. With the Eyedropper Tool selected, move the mouse pointer (which will now be an eyedropper symbol) onto any object in view.

 |
|
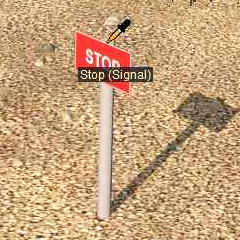
The object will be identified by its object name appearing in a ToolTip below the mouse pointer (image shown left).
Leave the mouse pointer in place for a few seconds and additional information about the object will be shown, its <kuid> code and Author (image shown below left).
|
|
 Left click on the object to select it in the Filter List. Left click on the object to select it in the Filter List.
 |
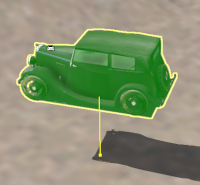
The type of object and its name will be automatically selected in all the Asset Palette filters as shown in the image left.
The object is now ready for use by the Placement Tool |
|
|
|
Narrowing the Search
Sometimes (or often) a scene will be too crowded with different scenery objects to be able to use the Eyedropper Tool to easily select a single object. In these cases additional options are available to help "remove the clutter".
At the top of the Assets Palette is a drop down box which controls how the Eyedropper Tool works with the filters that you set.
 |
The drop down box will provide three options:-
- Filter List
- Filter Selection
- Filter Visibility
|
 |
|
These options work with the Asset Filters to help narrow the search for a specific object or type of object that is in the route.
| Filter List |
this option will have no effect on the operation of the Eyedropper Tool or on the objects displayed on the screen. It is the default setting and any selections made with the eyedropper will be shown in the Assets Palette as described in the section Quick Steps above. |
| Filter Selection |
this option will restrict the Eyedropper Tool to only working on those objects that are in the filtered list. Objects that are not in the filtered list cannot be selected and will not have their details (name, <kuid>, author) displayed on the screen. |
| Filter Visibility |
this option will hide all objects that are not in the filtered list. The only exceptions are Ground Textures and Effect Layers which will be visible but, unless they are also in the filtered list, cannot be selected. |
|
As an example the following images show the progressive application of a Visibility Filter.
The Free Move Tool
 |
Keyboard Shortcut: S |
|
The Free Move Tool is used to move objects around the route in the XY (horizontal) directions only.
This tool uses the Tool Options Palette and the Info Palette (to display data only). If these palettes are not visible on the screen then refer to  Notes: Palettes at the top of this document. Notes: Palettes at the top of this document.
|
|
For Scenery Mesh Objects
Individual "non-spline" scenery objects that are not attached to track are often referred to in Trainz terminology as Scenery Mesh Objects.
Moving a Scenery Mesh Object
Set the Height for a Scenery Mesh Object
When placed in a route by the Placement Tool a scenery object will take the height of the terrain as its set height. It will be fixed to the terrain so when you move it around it will always be at the same height as the terrain it is over.
This can be changed to fix the object to a set height above or below the terrain.
 |
More Height Options .. |
|
| You can also set an objects height using the:- |
 |
Tool Options Palette height value and the objects Context Menu Apply Height option |
 |
Fine Adjustment Tool |
 |
objects Z value in the Info Palette |
|
Mesh Object Context Menu
A selected scenery object, or a group of selected scenery objects, will have a Context Icon with a Context Menu. The icon design will vary between object types. Multiple objects can be selected by holding down the Shift key while Left clicking on each object.
To open an objects Context menu either:-
- Left click the Context Icon, OR
- Press the T key
 |
| Cut |
remove the selected object or objects and move them into the Scrapbook |
| Copy |
copy the selected object or objects and place them into the Scrapbook |
| Paste |
paste the contents of the current Scrapbook |
| Delete |
delete the selected objects. It has the same effect as pressing the Delete key |
| Replace Object with Selected Asset |
the highlighted object will be replaced with the asset currently selected in the Assets Palette |
| Paint Under Selected |
the texture selected in the Assets Palette will be painted under the highlighted object. The Tool Options for the Brush Tool (Size and Sensitivity) will control how the texture is applied |
| Smooth Ground Under Selected |
changes the height of the terrain under the object to match the set height of the object. If multiple objects at different heights have been selected then the terrain height will be set to match the height of the lowest object |
| Settle on Ground |
sets the height of the objects to match the height of the terrain beneath them ("drops them back to earth") |
| Apply Height |
sets the height of the objects to the value in the Tool Options Height text box |
| Reset Object Rotation |
resets the rotation angle of the objects to their default values |
| Randomise Object Rotation |
applies a random rotation angle to each object |
| Select in Assets Palette |
identifies the selected object in the Asset Palette like the Eyedropper Tool |
| Edit Properties |
opens the Properties window of the selected object |
|
|
For Track Objects
Track Objects (signals, switches, speed signs, etc) are always attached to an existing track. They can be moved ("dragged") to new positions along the track and in Surveyor Classic that was the limit of their freedom of movement. Surveyor 2.0 brings additional freedoms of movement.
Using the Free Move Tool track objects can be positioned off the track to the left or right. Using the Fine Attachment Tool track objects can also be positioned above and below the track.
 |
 |
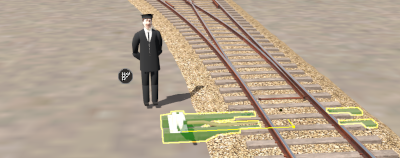
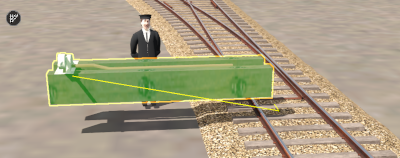
| Throw Lever track object in its original position |
After being moved left with the Free Move Tool |
The track object is still attached to the track as indicated by the yellow line connecting it to its "anchor point" (the yellow dot above the black spline endpoint dot).
It can still be moved along the track with the Free Move Tool by grabbing its anchor point with the mouse.
Track objects can be quickly returned to their anchor points:-
 |
Open the track objects Context Menu (click the icon or press the T key) |
 |
Select the option Reattach to Track |
Track objects can also be rotated to the opposite side of the track.
 |
 |
Open the track objects Context Menu (click the icon or press the T key) |
 |
Select the option Rotate Trackside |
| The track object will be swapped to the opposite side of the track. Its distance from its anchor point will not be altered. |
|
For Spline Objects (Including Track)
Scenery splines and track splines are defined by their endpoints. Splines are usually added to a route as a series of joined segments linked at the endpoints. Moving a spline can involve moving:-
- an endpoint, OR
- a segment, OR
- multiple segments including the whole length of the spline
Moving Spline Endpoints
To move an individual spline endpoint:-
Moving Spline Segments
Splines are frequently made of multiple segments joined together. You can easily move a spline by moving its segments, individually or as a group.

To move an individual segment or multiple segments:-
 |
| IF you are going to select and move more than one spline segment, then:- |
 |
hold the Shift key down and individually Left click between the endpoints on each additional segment.
The last segment that you click will have a Temporary Spline Point added.
 |
To select ALL the segments in a spline, Dbl-Left click on a segment
The segment you double click will have a Temporary Spline Point added |
|
|
|
 |
Use the mouse (Left button held down) to drag the Temporary Spline Point in any horizontal (XY) direction.
If you had selected:-
- only a single spline segment then only that segment will be moved and the adjacent segments that were not selected will have their positions "adjusted"
- multiple spline segments then those segments will be moved and the adjacent segments that were not selected will have their positions "adjusted"
- all the segments then ALL the segments will be moved
|
Spline Object Context Menu
 |
Splines have two separate Context Icons that lead to two slightly different Context Menus. One icon and menu is for each endpoint and another icon and menu for the spline segment.
So a spline segment will have three Context Icons - one for each endpoint and one for the segment itself.
Left click on an icon to open its Context Menu. |
 Endpoint Context Menu Endpoint Context Menu
 |
 Segment Context Menu Segment Context Menu
 |
| Cut |
remove the segment or segments and move them into the Scrapbook |
| Copy |
copy the segment or segments and place them into the Scrapbook |
| Paste |
paste the contents of the current Scrapbook |
| Delete |
delete the segment, segments or endpoint. It has the same effect as pressing the Delete key |
| Replace Spline with Selected Asset |
the highlighted spline will be replaced with the asset currently selected in the Assets Palette |
| Paint Under Selected |
the texture selected in the Assets Palette will be painted under the highlighted spline segments. The Tool Options for the Brush Tool (Size and Sensitivity) will control how the texture is applied |
| Smooth Ground Under Selected |
changes the height of the terrain under the segment or segments to match the set height of the spline (does not work on endpoints) |
| Settle on Ground |
sets the height of the segment, segments or endpoint to match the height of the terrain beneath them ("drops them back to earth"). When used on segments the spline will follow the height changes of the terrain |
| Apply Height (to this Spline Endpoint) |
sets the height of the segment, segments or endpoint to the value in the Tool Options Height text box |
| Apply Grade to this Spline Endpoint |
sets the height of the endpoint to give a Grade to the surrounding segments that matches the value in the Tool Options Grade text box |
| Straighten Spline |
forces a straight line (as far as possible) between the endpoints of a single segment. This option will be ticked if the segment has already been straightened |
| Separate Splines |
breaks the spline into two separate splines at the endpoint |
| Merge Splines |
removes the selected endpoint and merges the segments on both sides into one segment. The two segments can also be joined by selecting and deleting the endpoint with the Delete key |
| Insert Spline Point Here |
inserts a new endpoint in a segment at the point where it was clicked. This will create a new segment at the endpoint |
| Select in Assets Palette |
identifies the selected spline in the Asset Palette like the Eyedropper Tool |
| Edit Properties |
opens the Properties window of the selected spline |
|
The Fine Adjustment Tool
 |
Keyboard Shortcut: D |
|
The Fine Adjustment Tool is used to make fine adjustments (XYZ axis, rotation, tilt) to objects in the route.
This tool uses the Info Palette. If this palette is not visible on the screen then refer to  Notes: Palettes at the top of this document. Notes: Palettes at the top of this document.
|
|
The Marquee Tool
 |
Keyboard Shortcut: F |
|
The Marquee Tool is used to select areas of the route.
This tool uses the Scrapbook Palette. If this palette is not visible on the screen then refer to  Notes: Palettes at the top of this document. Notes: Palettes at the top of this document.
|
|
The Info Palette
This palette can be easily overlooked but it has some very useful features.
Its uses are:-
- to display precise data on the "focus" - the position of the cursor
- to display precise data on the position and attitude of a selected object
- to allow precise control over the position and attitude of a selected object (i.e. it can be used instead of the Free Move Tool and the Fine Adjustment Tool)
- to change the "home" layer and binding layer of a selected object
- to lock and unlock layers
Trainz Wiki
 |
More Tutorials and Guides to Using Trainz
|
This page was created by Trainz user pware in January 2023 and was last updated as shown below.
|
|


