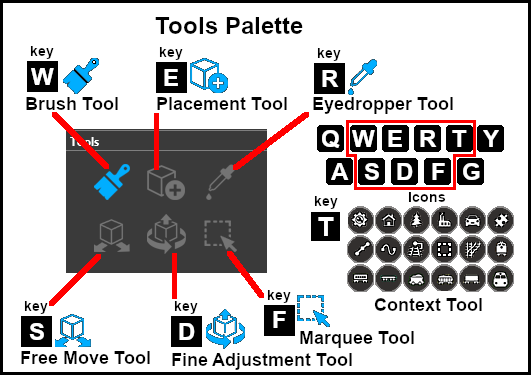
How to Use S20 Tools
m |
(re-organised navigation icon controls) |
||
| Line 1: | Line 1: | ||
| − | The information in this Wiki Page applies to '''Surveyor 2.0 (S20)''' as found in '''Trainz Plus'''. The original reference material for this document can be found at [[image:WikiLink.PNG|link=]] '''[https://docs.trainzsimulator.com/v1/docs/surveyor20 Surveyor 2.0 Overview]'''<br> | + | The information in this Wiki Page applies to '''Surveyor 2.0 (S20)''' as found in '''Trainz Plus'''. The original reference material for this document can be found at [[image:WikiLink.PNG|link=]] '''[https://docs.trainzsimulator.com/v1/docs/surveyor20 Surveyor 2.0 Overview]''' |
| − | + | <br> | |
<table> <!-- BEGIN Nav Buttons Table --> | <table> <!-- BEGIN Nav Buttons Table --> | ||
<tr valign="top"> | <tr valign="top"> | ||
| Line 242: | Line 242: | ||
</table> | </table> | ||
<br> | <br> | ||
| − | <table> <!-- BEGIN Nav Buttons Table --> | + | <table width=1000> <!-- BEGIN Nav Buttons Table --> |
<tr valign="top"> | <tr valign="top"> | ||
| − | <td width= | + | <td width=629><span id="stepS20vS10"></span> |
| + | ='''Surveyor 2.0 vs Surveyor Classic'''= | ||
| + | </td> | ||
| + | <td width=50> </td> | ||
| + | <td width=50> </td> | ||
<td width=46>[[image:BackToTop.png|link=#top|alt=Top|Top]]</td> | <td width=46>[[image:BackToTop.png|link=#top|alt=Top|Top]]</td> | ||
<td width=75> </td> | <td width=75> </td> | ||
| Line 251: | Line 255: | ||
</tr> | </tr> | ||
</table> <!-- END Nav Buttons Table --> | </table> <!-- END Nav Buttons Table --> | ||
| − | |||
| − | |||
<table width=1000 cellpadding=2 bgcolor="lightcyan"> | <table width=1000 cellpadding=2 bgcolor="lightcyan"> | ||
| Line 348: | Line 350: | ||
</tr> | </tr> | ||
</table> | </table> | ||
| − | + | <br> | |
| − | <table> <!-- BEGIN Nav Buttons Table --> | + | <table width=1000> <!-- BEGIN Nav Buttons Table --> |
<tr valign="top"> | <tr valign="top"> | ||
| − | <td width=729><span id="stepTools"></span> | + | <td width=729><span id="stepTools"></span> |
| + | ='''The Tools Palette'''= | ||
| + | </td> | ||
<td width=46>[[image:BackToTop.png|link=#top|alt=Top|Top]]</td> | <td width=46>[[image:BackToTop.png|link=#top|alt=Top|Top]]</td> | ||
<td width=75>[[image:NextUp.png|link=#stepS20vS10|alt=Next Up|Next Up]]</td> | <td width=75>[[image:NextUp.png|link=#stepS20vS10|alt=Next Up|Next Up]]</td> | ||
| Line 358: | Line 362: | ||
</tr> | </tr> | ||
</table> <!-- END Nav Buttons Table --> | </table> <!-- END Nav Buttons Table --> | ||
| − | |||
| − | |||
<table width=1000 bgcolor="lightcyan" cellpadding=2> | <table width=1000 bgcolor="lightcyan" cellpadding=2> | ||
| Line 451: | Line 453: | ||
</table> | </table> | ||
<br> | <br> | ||
| − | <table> <!-- BEGIN Nav Buttons Table --> | + | <table width=1000> <!-- BEGIN Nav Buttons Table --> |
<tr valign="top"> | <tr valign="top"> | ||
| − | <td width= | + | <td width=629><span id="stepBrush"></span> |
| + | ='''The Brush Tool'''= | ||
| + | </td> | ||
| + | <td width=50>[[image:SkipDown.png|link=#skip Ground Height]]</td> | ||
| + | <td width=50> </td> | ||
<td width=46>[[image:BackToTop.png|link=#top|alt=Top|Top]]</td> | <td width=46>[[image:BackToTop.png|link=#top|alt=Top|Top]]</td> | ||
<td width=75>[[image:NextUp.png|link=#stepTools|alt=Next Up|Next Up]]</td> | <td width=75>[[image:NextUp.png|link=#stepTools|alt=Next Up|Next Up]]</td> | ||
| Line 460: | Line 466: | ||
</tr> | </tr> | ||
</table> <!-- END Nav Buttons Table --> | </table> <!-- END Nav Buttons Table --> | ||
| + | <br> | ||
| − | |||
| − | |||
| − | |||
| − | |||
| − | |||
| − | |||
| − | |||
<table width=1000> | <table width=1000> | ||
<tr valign="top"> | <tr valign="top"> | ||
| Line 532: | Line 532: | ||
</table> | </table> | ||
<br> | <br> | ||
| − | + | <table width=1000> <!-- BEGIN Section Nav Buttons --> | |
| − | <table width= | + | |
<tr valign="top"> | <tr valign="top"> | ||
| − | <td width=50>[[image:SkipDown.png|link=#Ground Texture]]</td> | + | <td width=629><span id="skip Ground Height"></span> |
| + | =='''Ground Height'''== | ||
| + | </td> | ||
| + | <td width=50>[[image:SkipDown.png|link=#skip Ground Texture]]</td> | ||
<td width=50>[[image:SkipUp.png|link=#stepBrush]]</td> | <td width=50>[[image:SkipUp.png|link=#stepBrush]]</td> | ||
| + | <td width=271> </td> | ||
</tr> | </tr> | ||
</table> <!-- END Section Nav Buttons --> | </table> <!-- END Section Nav Buttons --> | ||
| + | |||
<table width=1000 bgcolor="lightcyan"> | <table width=1000 bgcolor="lightcyan"> | ||
<tr> | <tr> | ||
| Line 790: | Line 794: | ||
</table> | </table> | ||
<br> | <br> | ||
| − | + | <table width=1000> <!-- BEGIN Section Nav Buttons --> | |
| − | + | ||
| − | <table width= | + | |
<tr valign="top"> | <tr valign="top"> | ||
| − | <td width=50>[[image:SkipDown.png|link=#Scrapbook Data]]</td> | + | <td width=629><span id="skip Ground Texture"></span> |
| − | <td width=50>[[image:SkipUp.png|link=#Ground Height]]</td> | + | =='''Ground Texture'''== |
| + | </td> | ||
| + | <td width=50>[[image:SkipDown.png|link=#skip Scrapbook Data]]</td> | ||
| + | <td width=50>[[image:SkipUp.png|link=#skip Ground Height]]</td> | ||
| + | <td width=271> </td> | ||
</tr> | </tr> | ||
</table> <!-- END Section Nav Buttons --> | </table> <!-- END Section Nav Buttons --> | ||
| + | |||
<table width=1000 bgcolor="lightcyan"> | <table width=1000 bgcolor="lightcyan"> | ||
<tr> | <tr> | ||
| Line 1,038: | Line 1,045: | ||
</table> | </table> | ||
<br> | <br> | ||
| − | + | <table width=1000> <!-- BEGIN Section Nav Buttons --> | |
| − | + | ||
| − | <table width= | + | |
<tr valign="top"> | <tr valign="top"> | ||
| − | <td width=50>[[image:SkipDown.png|link=#Effect Layers]]</td> | + | <td width=629><span id="skip Scrapbook Data"></span> |
| − | <td width=50>[[image:SkipUp.png|link=#Ground Texture]]</td> | + | =='''Scrapbook Data'''== |
| + | </td> | ||
| + | <td width=50>[[image:SkipDown.png|link=#skip Effect Layers]]</td> | ||
| + | <td width=50>[[image:SkipUp.png|link=#skip Ground Texture]]</td> | ||
| + | <td width=271> </td> | ||
</tr> | </tr> | ||
</table> <!-- END Section Nav Buttons --> | </table> <!-- END Section Nav Buttons --> | ||
| + | |||
<table width=1000 bgcolor="lightcyan"> | <table width=1000 bgcolor="lightcyan"> | ||
<tr> | <tr> | ||
| Line 1,747: | Line 1,757: | ||
</table> | </table> | ||
<br> | <br> | ||
| − | + | <table width=1000> <!-- BEGIN Section Nav Buttons --> | |
| − | <table width= | + | |
<tr valign="top"> | <tr valign="top"> | ||
| − | <td width=50>[[image:SkipDown.png|link=#Edit Effect Layers...]]</td> | + | <td width=629><span id="skip Effect Layers"></span> |
| − | <td width=50>[[image:SkipUp.png|link=#Scrapbook Data]]</td> | + | =='''Effect Layers'''== |
| + | </td> | ||
| + | <td width=50>[[image:SkipDown.png|link=#skip Edit Effect Layers...]]</td> | ||
| + | <td width=50>[[image:SkipUp.png|link=#skip Scrapbook Data]]</td> | ||
| + | <td width=271> </td> | ||
</tr> | </tr> | ||
</table> <!-- END Section Nav Buttons --> | </table> <!-- END Section Nav Buttons --> | ||
| + | |||
<table width=1000 bgcolor="lightcyan"> | <table width=1000 bgcolor="lightcyan"> | ||
<tr> | <tr> | ||
| Line 2,260: | Line 2,274: | ||
</table> | </table> | ||
<br> | <br> | ||
| − | + | <table width=1000> <!-- BEGIN Section Nav Buttons --> | |
| − | + | ||
| − | <table width= | + | |
<tr valign="top"> | <tr valign="top"> | ||
| + | <td width=629><span id="skip Edit Effect Layers..."></span> | ||
| + | =='''Edit Effect Layers...'''== | ||
| + | </td> | ||
<td width=50>[[image:SkipDown.png|link=#stepPlacement]]</td> | <td width=50>[[image:SkipDown.png|link=#stepPlacement]]</td> | ||
| − | <td width=50>[[image:SkipUp.png|link=#Effect Layers]]</td> | + | <td width=50>[[image:SkipUp.png|link=#skip Effect Layers]]</td> |
| + | <td width=271> </td> | ||
</tr> | </tr> | ||
</table> <!-- END Section Nav Buttons --> | </table> <!-- END Section Nav Buttons --> | ||
| + | |||
When this '''Target''' is selected, the '''Edit Effect Layer''' dialogue box will appear. This is the same as selecting <span style="font-weight: 700; font-size: 15px; color: white; background-color: black;"> Edit Effect Layers ... </span> from the [[image:SurveyorEditIcon.png|link=]] '''Surveyor Edit Menu'''. | When this '''Target''' is selected, the '''Edit Effect Layer''' dialogue box will appear. This is the same as selecting <span style="font-weight: 700; font-size: 15px; color: white; background-color: black;"> Edit Effect Layers ... </span> from the [[image:SurveyorEditIcon.png|link=]] '''Surveyor Edit Menu'''. | ||
| Line 2,305: | Line 2,322: | ||
</table> | </table> | ||
<br> | <br> | ||
| − | <table> <!-- BEGIN Nav Buttons Table --> | + | <table width=1000> <!-- BEGIN Nav Buttons Table --> |
<tr valign="top"> | <tr valign="top"> | ||
| − | <td width= | + | <td width=629><span id="stepPlacement"></span> |
| − | <td width=50>[[image: | + | ='''The Placement Tool'''= |
| − | <td width= | + | </td> |
| + | <td width=50>[[image:SkipDown.png|link=#skip Placing a Scenery Mesh Object]]</td> | ||
| + | <td width=50>[[image:SkipUp.png|link=#skip Edit Effect Layers...]]</td> | ||
<td width=46>[[image:BackToTop.png|link=#top|alt=Top|Top]]</td> | <td width=46>[[image:BackToTop.png|link=#top|alt=Top|Top]]</td> | ||
<td width=75>[[image:NextUp.png|link=#stepBrush|alt=Next Up|Top]]</td> | <td width=75>[[image:NextUp.png|link=#stepBrush|alt=Next Up|Top]]</td> | ||
| Line 2,316: | Line 2,335: | ||
</tr> | </tr> | ||
</table> <!-- END Nav Buttons Table --> | </table> <!-- END Nav Buttons Table --> | ||
| + | <br> | ||
| − | |||
| − | |||
| − | |||
| − | |||
| − | |||
| − | |||
| − | |||
<table width=1000> | <table width=1000> | ||
<tr valign="top"> | <tr valign="top"> | ||
| Line 2,406: | Line 2,419: | ||
</tr> | </tr> | ||
</table> | </table> | ||
| − | |||
The first step is to identify and select the particular object that you want to add to the route.<br> | The first step is to identify and select the particular object that you want to add to the route.<br> | ||
| − | + | <br> | |
| − | + | <table width=1000> <!-- BEGIN Section Nav Buttons --> | |
| − | <table width= | + | |
<tr valign="top"> | <tr valign="top"> | ||
| − | <td width=50>[[image:SkipDown.png|link=#Placing a Scenery or Track Spline]]</td> | + | <td width=629><span id="skip Placing a Scenery Mesh Object"></span> |
| + | =='''Placing a Scenery Mesh Object'''== | ||
| + | </td> | ||
| + | <td width=50>[[image:SkipDown.png|link=#skip Placing a Scenery or Track Spline]]</td> | ||
<td width=50>[[image:SkipUp.png|link=#stepPlacement]]</td> | <td width=50>[[image:SkipUp.png|link=#stepPlacement]]</td> | ||
| + | <td width=271> </td> | ||
</tr> | </tr> | ||
</table> <!-- END Section Nav Buttons --> | </table> <!-- END Section Nav Buttons --> | ||
| + | |||
<table bgcolor="lightcyan" width=1000 cellpadding=2> | <table bgcolor="lightcyan" width=1000 cellpadding=2> | ||
<tr> | <tr> | ||
| Line 2,675: | Line 2,691: | ||
</table> | </table> | ||
<br> | <br> | ||
| − | + | <table width=1000> <!-- BEGIN Section Nav Buttons --> | |
| − | + | ||
| − | <table width= | + | |
<tr valign="top"> | <tr valign="top"> | ||
| − | <td width=50>[[image:SkipDown.png|link=#Placing Track Objects]]</td> | + | <td width=629><span id="skip Placing a Scenery or Track Spline"></span> |
| − | <td width=50>[[image:SkipUp.png|link=#Placing a Scenery Mesh Object]]</td> | + | =='''Placing a Scenery or Track Spline'''== |
| + | </td> | ||
| + | <td width=50>[[image:SkipDown.png|link=#skip Placing Track Objects]]</td> | ||
| + | <td width=50>[[image:SkipUp.png|link=#skip Placing a Scenery Mesh Object]]</td> | ||
| + | <td width=271> </td> | ||
</tr> | </tr> | ||
</table> <!-- END Section Nav Buttons --> | </table> <!-- END Section Nav Buttons --> | ||
| + | |||
<table width=1000 bgcolor="lightcyan" cellpadding=2> | <table width=1000 bgcolor="lightcyan" cellpadding=2> | ||
<tr> | <tr> | ||
| Line 2,869: | Line 2,888: | ||
</table> | </table> | ||
<br> | <br> | ||
| − | + | <table width=1000> <!-- BEGIN Section Nav Buttons --> | |
| − | + | ||
| − | <table width= | + | |
<tr valign="top"> | <tr valign="top"> | ||
| − | <td width=50>[[image:SkipDown.png|link=#Placement Tool Options]]</td> | + | <td width=629><span id="skip Placing Track Objects"></span> |
| − | <td width=50>[[image:SkipUp.png|link=#Placing a Scenery or Track Spline]]</td> | + | =='''Placing Track Objects'''== |
| + | </td> | ||
| + | <td width=50>[[image:SkipDown.png|link=#skip Placement Tool Options]]</td> | ||
| + | <td width=50>[[image:SkipUp.png|link=#skip Placing a Scenery or Track Spline]]</td> | ||
| + | <td width=271> </td> | ||
</tr> | </tr> | ||
</table> <!-- END Section Nav Buttons --> | </table> <!-- END Section Nav Buttons --> | ||
| + | |||
<table width=1000 bgcolor="lightcyan" cellpadding=2> | <table width=1000 bgcolor="lightcyan" cellpadding=2> | ||
<tr> | <tr> | ||
| Line 2,985: | Line 3,007: | ||
</table> | </table> | ||
<br> | <br> | ||
| − | + | <table width=1000> <!-- BEGIN Section Nav Buttons --> | |
| − | <table width= | + | |
<tr valign="top"> | <tr valign="top"> | ||
| − | <td width=50>[[image:SkipDown.png|link=#Placement Tool Options]]</td> | + | <td width=629><span id="skip Placing Rolling Stock Objects"></span> |
| − | <td width=50>[[image:SkipUp.png|link=#Placing Track Objects]]</td> | + | =='''Placing Rolling Stock Objects'''== |
| + | </td> | ||
| + | <td width=50>[[image:SkipDown.png|link=#skip Placement Tool Options]]</td> | ||
| + | <td width=50>[[image:SkipUp.png|link=#skip Placing Track Objects]]</td> | ||
| + | <td width=271> </td> | ||
</tr> | </tr> | ||
</table> <!-- END Section Nav Buttons --> | </table> <!-- END Section Nav Buttons --> | ||
| + | |||
<table width=1000 bgcolor="lightcyan" cellpadding=2> | <table width=1000 bgcolor="lightcyan" cellpadding=2> | ||
<tr> | <tr> | ||
| Line 3,065: | Line 3,091: | ||
</table> | </table> | ||
<br> | <br> | ||
| − | + | <table width=1000> <!-- BEGIN Section Nav Buttons --> | |
| − | + | ||
| − | <table width= | + | |
<tr valign="top"> | <tr valign="top"> | ||
| − | <td width=50>[[image:SkipDown.png|link=#Deleting Placed Objects]]</td> | + | <td width=629><span id="skip Placement Tool Options"></span> |
| − | <td width=50>[[image:SkipUp.png|link=#Placing Rolling Stock Objects]]</td> | + | =='''Placement Tool Options'''== |
| + | </td> | ||
| + | <td width=50>[[image:SkipDown.png|link=#skip Deleting Placed Objects]]</td> | ||
| + | <td width=50>[[image:SkipUp.png|link=#skip Placing Rolling Stock Objects]]</td> | ||
| + | <td width=271> </td> | ||
</tr> | </tr> | ||
</table> <!-- END Section Nav Buttons --> | </table> <!-- END Section Nav Buttons --> | ||
| + | |||
<table bgcolor=#000000 width=1000 cellpadding=2> | <table bgcolor=#000000 width=1000 cellpadding=2> | ||
<tr valign="top"> | <tr valign="top"> | ||
| Line 3,270: | Line 3,299: | ||
</table> | </table> | ||
<br> | <br> | ||
| − | + | <table width=1000> <!-- BEGIN Section Nav Buttons --> | |
| − | + | ||
| − | <table width= | + | |
<tr valign="top"> | <tr valign="top"> | ||
| + | <td width=629><span id="skip Deleting Placed Objects"></span> | ||
| + | =='''Deleting Placed Objects'''== | ||
| + | </td> | ||
<td width=50>[[image:SkipDown.png|link=#stepEyedropper]]</td> | <td width=50>[[image:SkipDown.png|link=#stepEyedropper]]</td> | ||
| − | <td width=50>[[image:SkipUp.png|link=#Placement Tool Options]]</td> | + | <td width=50>[[image:SkipUp.png|link=#skip Placement Tool Options]]</td> |
| + | <td width=271> </td> | ||
</tr> | </tr> | ||
</table> <!-- END Section Nav Buttons --> | </table> <!-- END Section Nav Buttons --> | ||
| + | |||
<table width=900> | <table width=900> | ||
<tr valign="top"> | <tr valign="top"> | ||
| Line 3,355: | Line 3,387: | ||
</table> | </table> | ||
<br> | <br> | ||
| − | <table> <!-- BEGIN Nav Buttons Table --> | + | <table width=1000> <!-- BEGIN Nav Buttons Table --> |
<tr valign="top"> | <tr valign="top"> | ||
| − | <td width= | + | <td width=629><span id="stepEyedropper"></span> |
| − | <td width=50>[[image: | + | ='''The Eyedropper Tool'''= |
| − | <td width= | + | </td> |
| + | <td width=50>[[image:SkipDown.png|link=#skip Quick Steps]]</td> | ||
| + | <td width=50>[[image:SkipUp.png|link=#skip Deleting Placed Objects]]</td> | ||
<td width=46>[[image:BackToTop.png|link=#top|alt=Top|Top]]</td> | <td width=46>[[image:BackToTop.png|link=#top|alt=Top|Top]]</td> | ||
<td width=75>[[image:NextUp.png|link=#stepPlacement|alt=Next Up|Top]]</td> | <td width=75>[[image:NextUp.png|link=#stepPlacement|alt=Next Up|Top]]</td> | ||
| Line 3,367: | Line 3,401: | ||
</table> <!-- END Nav Buttons Table --> | </table> <!-- END Nav Buttons Table --> | ||
| − | |||
| − | |||
| − | |||
| − | |||
| − | |||
| − | |||
| − | |||
<table width=1000> | <table width=1000> | ||
<tr valign="top"> | <tr valign="top"> | ||
| Line 3,460: | Line 3,487: | ||
</table> | </table> | ||
<br> | <br> | ||
| − | + | <table width=1000> <!-- BEGIN Section Nav Buttons --> | |
| − | + | ||
| − | <table width= | + | |
<tr valign="top"> | <tr valign="top"> | ||
| − | <td width=50>[[image:SkipDown.png|link=#Narrowing the Search]]</td> | + | <td width=629><span id="skip Quick Steps"></span> |
| + | =='''Quick Steps'''== | ||
| + | </td> | ||
| + | <td width=50>[[image:SkipDown.png|link=#skip Narrowing the Search]]</td> | ||
<td width=50>[[image:SkipUp.png|link=#stepEyedropper]]</td> | <td width=50>[[image:SkipUp.png|link=#stepEyedropper]]</td> | ||
| + | <td width=271> </td> | ||
</tr> | </tr> | ||
</table> <!-- END Section Nav Buttons --> | </table> <!-- END Section Nav Buttons --> | ||
| + | |||
[[image:DotPoint1.JPG|link=]] With the '''Eyedropper Tool''' selected, move the tool pointer (which will now be an eyedropper symbol) onto any object in view.<br> | [[image:DotPoint1.JPG|link=]] With the '''Eyedropper Tool''' selected, move the tool pointer (which will now be an eyedropper symbol) onto any object in view.<br> | ||
| Line 3,498: | Line 3,528: | ||
</table> | </table> | ||
<br> | <br> | ||
| − | + | <table width=1000> <!-- BEGIN Section Nav Buttons --> | |
| − | + | ||
| − | <table width= | + | |
<tr valign="top"> | <tr valign="top"> | ||
| + | <td width=629><span id="skip Narrowing the Search"></span> | ||
| + | =='''Narrowing the Search'''== | ||
| + | </td> | ||
<td width=50>[[image:SkipDown.png|link=#stepFreeMove]]</td> | <td width=50>[[image:SkipDown.png|link=#stepFreeMove]]</td> | ||
| − | <td width=50>[[image:SkipUp.png|link=#Quick Steps]]</td> | + | <td width=50>[[image:SkipUp.png|link=#skip Quick Steps]]</td> |
| + | <td width=271> </td> | ||
</tr> | </tr> | ||
</table> <!-- END Section Nav Buttons --> | </table> <!-- END Section Nav Buttons --> | ||
| + | |||
<table width=1000 bgcolor="lightcyan" cellpadding=2> | <table width=1000 bgcolor="lightcyan" cellpadding=2> | ||
<tr> | <tr> | ||
| Line 3,616: | Line 3,649: | ||
</tr> | </tr> | ||
</table> | </table> | ||
| − | <table> <!-- BEGIN Nav Buttons Table --> | + | <br> |
| + | <table width=1000> <!-- BEGIN Nav Buttons Table --> | ||
<tr valign="top"> | <tr valign="top"> | ||
| − | <td width= | + | <td width=629><span id="stepFreeMove"></span> |
| − | <td width=50>[[image: | + | ='''The Free Move Tool'''= |
| − | <td width= | + | </td> |
| + | <td width=50>[[image:SkipDown.png|link=#skip Free Move: Scenery Mesh Objects]]</td> | ||
| + | <td width=50>[[image:SkipUp.png|link=#skip Narrowing the Search]]</td> | ||
<td width=46>[[image:BackToTop.png|link=#top|alt=Top|Top]]</td> | <td width=46>[[image:BackToTop.png|link=#top|alt=Top|Top]]</td> | ||
<td width=75>[[image:NextUp.png|link=#stepEyedropper|alt=Next Up|Top]]</td> | <td width=75>[[image:NextUp.png|link=#stepEyedropper|alt=Next Up|Top]]</td> | ||
| Line 3,628: | Line 3,664: | ||
</table> <!-- END Nav Buttons Table --> | </table> <!-- END Nav Buttons Table --> | ||
| − | |||
| − | |||
| − | |||
| − | |||
| − | |||
| − | |||
| − | |||
<table width=1000> | <table width=1000> | ||
<tr valign="top"> | <tr valign="top"> | ||
| Line 3,699: | Line 3,728: | ||
</table> | </table> | ||
<br> | <br> | ||
| − | + | <table width=1000> <!-- BEGIN Section Nav Buttons --> | |
| − | <table width= | + | |
<tr valign="top"> | <tr valign="top"> | ||
| − | <td width=50>[[image:SkipDown.png|link=#Free Move: Track Objects]]</td> | + | <td width=629><span id="skip Free Move: Scenery Mesh Objects"></span> |
| + | =='''Free Move: Scenery Mesh Objects'''== | ||
| + | </td> | ||
| + | <td width=50>[[image:SkipDown.png|link=#skip Free Move: Track Objects]]</td> | ||
<td width=50>[[image:SkipUp.png|link=#stepFreeMove]]</td> | <td width=50>[[image:SkipUp.png|link=#stepFreeMove]]</td> | ||
| + | <td width=271> </td> | ||
</tr> | </tr> | ||
</table> <!-- END Section Nav Buttons --> | </table> <!-- END Section Nav Buttons --> | ||
| + | |||
<table bgcolor="lightcyan" width=1000 cellpadding=2> | <table bgcolor="lightcyan" width=1000 cellpadding=2> | ||
<tr> | <tr> | ||
| Line 3,943: | Line 3,976: | ||
</table> | </table> | ||
<br> | <br> | ||
| − | + | <table width=1000> <!-- BEGIN Section Nav Buttons --> | |
| − | <table width= | + | |
<tr valign="top"> | <tr valign="top"> | ||
| − | <td width=50>[[image:SkipDown.png|link=#Free Move: Spline Objects (Including Track)]]</td> | + | <td width=629><span id="skip Free Move: Track Objects"></span> |
| − | <td width=50>[[image:SkipUp.png|link=#Free Move: Scenery Mesh Objects]]</td> | + | =='''Free Move: Track Objects'''== |
| + | </td> | ||
| + | <td width=50>[[image:SkipDown.png|link=#skip Free Move: Spline Objects (Including Track)]]</td> | ||
| + | <td width=50>[[image:SkipUp.png|link=#skip Free Move: Scenery Mesh Objects]]</td> | ||
| + | <td width=271> </td> | ||
</tr> | </tr> | ||
</table> <!-- END Section Nav Buttons --> | </table> <!-- END Section Nav Buttons --> | ||
| Line 4,315: | Line 4,351: | ||
</table> | </table> | ||
<br> | <br> | ||
| − | + | <table width=1000> <!-- BEGIN Section Nav Buttons --> | |
| − | <table width= | + | |
<tr valign="top"> | <tr valign="top"> | ||
| − | <td width=50>[[image:SkipDown.png|link=#Free Move: Rolling Stock Objects]]</td> | + | <td width=629><span id="skip Free Move: Spline Objects (Including Track)"></span> |
| − | <td width=50>[[image:SkipUp.png|link=#Free Move: Track Objects]]</td> | + | =='''Free Move: Spline Objects (Including Track)'''== |
| + | </td> | ||
| + | <td width=50>[[image:SkipDown.png|link=#skip Free Move: Rolling Stock Objects]]</td> | ||
| + | <td width=50>[[image:SkipUp.png|link=#skip Free Move: Track Objects]]</td> | ||
| + | <td width=271> </td> | ||
</tr> | </tr> | ||
</table> <!-- END Section Nav Buttons --> | </table> <!-- END Section Nav Buttons --> | ||
| + | |||
<table width=1000 bgcolor="lightcyan" cellpadding=2> | <table width=1000 bgcolor="lightcyan" cellpadding=2> | ||
<tr> | <tr> | ||
| Line 4,813: | Line 4,853: | ||
</table> | </table> | ||
<br> | <br> | ||
| − | + | <table width=1000> <!-- BEGIN Section Nav Buttons --> | |
| − | + | ||
| − | <table width= | + | |
<tr valign="top"> | <tr valign="top"> | ||
| + | <td width=629><span id="skip Free Move: Rolling Stock Objects"></span> | ||
| + | =='''Free Move: Rolling Stock Objects'''== | ||
| + | </td> | ||
<td width=50>[[image:SkipDown.png|link=#stepFineAdjustment]]</td> | <td width=50>[[image:SkipDown.png|link=#stepFineAdjustment]]</td> | ||
| − | <td width=50>[[image:SkipUp.png|link=#Free Move: Spline Objects (Including Track)]]</td> | + | <td width=50>[[image:SkipUp.png|link=#Free Move: skip Spline Objects (Including Track)]]</td> |
| + | <td width=271> </td> | ||
</tr> | </tr> | ||
</table> <!-- END Section Nav Buttons --> | </table> <!-- END Section Nav Buttons --> | ||
| Line 5,313: | Line 5,355: | ||
</tr> | </tr> | ||
</table> | </table> | ||
| − | + | <br> | |
| − | <table> <!-- BEGIN Nav Buttons Table --> | + | <table width=1000> <!-- BEGIN Nav Buttons Table --> |
<tr valign="top"> | <tr valign="top"> | ||
| − | <td width= | + | <td width=629><span id="stepFineAdjustment"></span> |
| − | <td width=50>[[image: | + | ='''The Fine Adjustment Tool'''= |
| − | <td width= | + | </td> |
| + | <td width=50>[[image:SkipDown.png|link=#skip Fine Adjustment: Scenery Mesh Objects]]</td> | ||
| + | <td width=50>[[image:SkipUp.png|link=#skip Free Move: Rolling Stock Objects]]</td> | ||
<td width=46>[[image:BackToTop.png|link=#top|alt=Top|Top]]</td> | <td width=46>[[image:BackToTop.png|link=#top|alt=Top|Top]]</td> | ||
<td width=75>[[image:NextUp.png|link=#stepFreeMove|alt=Next Up|Top]]</td> | <td width=75>[[image:NextUp.png|link=#stepFreeMove|alt=Next Up|Top]]</td> | ||
| Line 5,326: | Line 5,370: | ||
</table> <!-- END Nav Buttons Table --> | </table> <!-- END Nav Buttons Table --> | ||
| − | + | ||
| − | + | ||
| − | + | ||
| − | + | ||
| − | + | ||
| − | + | ||
| − | + | ||
<table width=1000> | <table width=1000> | ||
<tr valign="top"> | <tr valign="top"> | ||
| Line 5,496: | Line 5,534: | ||
</table> | </table> | ||
<br> | <br> | ||
| − | + | <table width=1000> <!-- BEGIN Section Nav Buttons --> | |
| − | + | ||
| − | <table width= | + | |
<tr valign="top"> | <tr valign="top"> | ||
| − | <td width=50>[[image:SkipDown.png|link=#Fine Adjustment: Track Objects]]</td> | + | <td width=629><span id="skip Fine Adjustment: Scenery Mesh Objects"></span> |
| + | =='''Fine Adjustment: Scenery Mesh Objects'''== | ||
| + | </td> | ||
| + | <td width=50>[[image:SkipDown.png|link=#skip Fine Adjustment: Track Objects]]</td> | ||
<td width=50>[[image:SkipUp.png|link=#stepFineAdjustment]]</td> | <td width=50>[[image:SkipUp.png|link=#stepFineAdjustment]]</td> | ||
| + | <td width=271> </td> | ||
</tr> | </tr> | ||
</table> <!-- END Section Nav Buttons --> | </table> <!-- END Section Nav Buttons --> | ||
| Line 5,746: | Line 5,786: | ||
</table> | </table> | ||
<br> | <br> | ||
| − | + | <table width=1000> <!-- BEGIN Section Nav Buttons --> | |
| − | <table width= | + | |
<tr valign="top"> | <tr valign="top"> | ||
| − | <td width=50>[[image:SkipDown.png|link=#Fine Adjustment: Spline Objects (Including Track)]]</td> | + | <td width=629><span id="skip Fine Adjustment: Track Objects"></span> |
| − | <td width=50>[[image:SkipUp.png|link=#Fine Adjustment: Scenery Mesh Objects]]</td> | + | =='''Fine Adjustment: Track Objects'''== |
| + | </td> | ||
| + | <td width=50>[[image:SkipDown.png|link=#skip Fine Adjustment: Spline Objects (Including Track)]]</td> | ||
| + | <td width=50>[[image:SkipUp.png|link=#skip Fine Adjustment: Scenery Mesh Objects]]</td> | ||
| + | <td width=271> </td> | ||
</tr> | </tr> | ||
</table> <!-- END Section Nav Buttons --> | </table> <!-- END Section Nav Buttons --> | ||
| Line 6,157: | Line 6,200: | ||
</table> | </table> | ||
<br> | <br> | ||
| − | + | <table width=1000> <!-- BEGIN Section Nav Buttons --> | |
| − | + | ||
| − | <table width= | + | |
<tr valign="top"> | <tr valign="top"> | ||
| − | <td width=50>[[image:SkipDown.png|link=#Fine Adjustment: Rolling Stock Objects]]</td> | + | <td width=629><span id="skip Fine Adjustment: Spline Objects (Including Track)"></span> |
| − | <td width=50>[[image:SkipUp.png|link=#Fine Adjustment: Track Objects]]</td> | + | =='''Fine Adjustment: Spline Objects (Including Track)'''== |
| + | </td> | ||
| + | <td width=50>[[image:SkipDown.png|link=#skip Fine Adjustment: Rolling Stock Objects]]</td> | ||
| + | <td width=50>[[image:SkipUp.png|link=#skip Fine Adjustment: Track Objects]]</td> | ||
| + | <td width=271> </td> | ||
</tr> | </tr> | ||
</table> <!-- END Section Nav Buttons --> | </table> <!-- END Section Nav Buttons --> | ||
| Line 6,662: | Line 6,707: | ||
</table> | </table> | ||
<br> | <br> | ||
| − | + | <table width=1000> <!-- BEGIN Section Nav Buttons --> | |
| − | + | ||
| − | <table width= | + | |
<tr valign="top"> | <tr valign="top"> | ||
| − | <td width=50>[[image:SkipDown.png|link=#Fine Adjustment: Object Height Problem Solutions]]</td> | + | <td width=629><span id="skip Fine Adjustment: Rolling Stock Objects"></span> |
| − | <td width=50>[[image:SkipUp.png|link=#Fine Adjustment: Spline Objects (Including Track)]]</td> | + | =='''Fine Adjustment: Rolling Stock Objects'''== |
| + | </td> | ||
| + | <td width=50>[[image:SkipDown.png|link=#skip Fine Adjustment: Object Height Problem Solutions]]</td> | ||
| + | <td width=50>[[image:SkipUp.png|link=#skip Fine Adjustment: Spline Objects (Including Track)]]</td> | ||
| + | <td width=271> </td> | ||
</tr> | </tr> | ||
</table> <!-- END Section Nav Buttons --> | </table> <!-- END Section Nav Buttons --> | ||
| Line 7,184: | Line 7,231: | ||
</table> | </table> | ||
<br> | <br> | ||
| − | + | <table width=1000> <!-- BEGIN Section Nav Buttons --> | |
| − | + | ||
| − | <table width= | + | |
<tr valign="top"> | <tr valign="top"> | ||
| + | <td width=629><span id="skip Fine Adjustment: Object Height Problem Solutions"></span> | ||
| + | =='''Fine Adjustment: Object Height Problem Solutions'''== | ||
| + | </td> | ||
<td width=50>[[image:SkipDown.png|link=#stepMarquee]]</td> | <td width=50>[[image:SkipDown.png|link=#stepMarquee]]</td> | ||
| − | <td width=50>[[image:SkipUp.png|link=#Fine Adjustment: Rolling Stock Objects]]</td> | + | <td width=50>[[image:SkipUp.png|link=#skip Fine Adjustment: Rolling Stock Objects]]</td> |
| + | <td width=271> </td> | ||
</tr> | </tr> | ||
</table> <!-- END Section Nav Buttons --> | </table> <!-- END Section Nav Buttons --> | ||
| Line 7,371: | Line 7,420: | ||
</table> | </table> | ||
<br> | <br> | ||
| − | <table> <!-- BEGIN Nav Buttons Table --> | + | <table width=1000> <!-- BEGIN Nav Buttons Table --> |
<tr valign="top"> | <tr valign="top"> | ||
| − | <td width= | + | <td width=629><span id="stepMarquee"></span> |
| + | ='''The Marquee Tool'''= | ||
| + | </td> | ||
| + | <td width=50>[[image:SkipDown.png|link=#The Marquee Tool and the Assets Palette Filter]]</td> | ||
<td width=50>[[image:SkipUp.png|link=#Fine Adjustment: Object Height Problem Solutions]]</td> | <td width=50>[[image:SkipUp.png|link=#Fine Adjustment: Object Height Problem Solutions]]</td> | ||
| − | |||
<td width=46>[[image:BackToTop.png|link=#top|alt=Top|Top]]</td> | <td width=46>[[image:BackToTop.png|link=#top|alt=Top|Top]]</td> | ||
<td width=75>[[image:NextUp.png|link=#stepFineAdjustment|alt=Next Up|Next Up]]</td> | <td width=75>[[image:NextUp.png|link=#stepFineAdjustment|alt=Next Up|Next Up]]</td> | ||
| Line 7,383: | Line 7,434: | ||
</table> <!-- END Nav Buttons Table --> | </table> <!-- END Nav Buttons Table --> | ||
| − | |||
| − | |||
| − | |||
| − | |||
| − | |||
| − | |||
| − | |||
<table width=1000> | <table width=1000> | ||
<tr valign="top"> | <tr valign="top"> | ||
| Line 7,514: | Line 7,558: | ||
</table> | </table> | ||
<br> | <br> | ||
| − | + | <table width=1000> <!-- BEGIN Section Nav Buttons --> | |
| − | + | ||
| − | <table width= | + | |
<tr valign="top"> | <tr valign="top"> | ||
| − | <td width=50>[[image:SkipDown.png|link=#Marquee Anchor Controls]]</td> | + | <td width=629><span id="skip The Marquee Tool and the Assets Palette Filter"></span> |
| + | =='''The Marquee Tool and the Assets Palette Filter'''== | ||
| + | </td> | ||
| + | <td width=50>[[image:SkipDown.png|link=#skip Marquee Anchor Controls]]</td> | ||
<td width=50>[[image:SkipUp.png|link=#stepMarquee]]</td> | <td width=50>[[image:SkipUp.png|link=#stepMarquee]]</td> | ||
| + | <td width=271> </td> | ||
</tr> | </tr> | ||
</table> <!-- END Section Nav Buttons --> | </table> <!-- END Section Nav Buttons --> | ||
| Line 7,570: | Line 7,616: | ||
[[image:MarqueeSelectSplines_S20.png|link=]]<br> | [[image:MarqueeSelectSplines_S20.png|link=]]<br> | ||
<br> | <br> | ||
| − | + | <table width=1000> <!-- BEGIN Section Nav Buttons --> | |
| − | + | ||
| − | <table width= | + | |
<tr valign="top"> | <tr valign="top"> | ||
| − | <td width=50>[[image:SkipDown.png|link=#Marquee Context Menu]]</td> | + | <td width=629><span id="skip Marquee Anchor Controls"></span> |
| − | <td width=50>[[image:SkipUp.png|link=#The Marquee Tool and the Assets Palette Filter]]</td> | + | =='''Marquee Anchor Controls'''== |
| + | </td> | ||
| + | <td width=50>[[image:SkipDown.png|link=#skip Marquee Context Menu]]</td> | ||
| + | <td width=50>[[image:SkipUp.png|link=#skip The Marquee Tool and the Assets Palette Filter]]</td> | ||
| + | <td width=271> </td> | ||
</tr> | </tr> | ||
</table> <!-- END Section Nav Buttons --> | </table> <!-- END Section Nav Buttons --> | ||
| + | |||
The following images demonstrate the effect of using the '''Marquee Anchor Controls''' on the image shown at the top of this section as the starting point.<br> | The following images demonstrate the effect of using the '''Marquee Anchor Controls''' on the image shown at the top of this section as the starting point.<br> | ||
| Line 7,691: | Line 7,740: | ||
</table> | </table> | ||
<br> | <br> | ||
| − | + | <table width=1000> <!-- BEGIN Section Nav Buttons --> | |
| − | + | ||
| − | <table width= | + | |
<tr valign="top"> | <tr valign="top"> | ||
| − | <td width=50>[[image:SkipDown.png|link=#Scrapbook Operations]]</td> | + | <td width=629><span id="skip Marquee Context Menu"></span> |
| − | <td width=50>[[image:SkipUp.png|link=#Marquee Anchor Controls]]</td> | + | =='''Marquee Context Menu'''== |
| + | </td> | ||
| + | <td width=50>[[image:SkipDown.png|link=#skip Scrapbook Operations]]</td> | ||
| + | <td width=50>[[image:SkipUp.png|link=#skip Marquee Anchor Controls]]</td> | ||
| + | <td width=271> </td> | ||
</tr> | </tr> | ||
</table> <!-- END Section Nav Buttons --> | </table> <!-- END Section Nav Buttons --> | ||
| + | |||
<table bgcolor=#000000 cellpadding=2> | <table bgcolor=#000000 cellpadding=2> | ||
<tr valign="top"> | <tr valign="top"> | ||
| Line 7,844: | Line 7,896: | ||
</table> | </table> | ||
<br> | <br> | ||
| − | + | <table width=1000> <!-- BEGIN Section Nav Buttons --> | |
| − | <table width= | + | |
<tr valign="top"> | <tr valign="top"> | ||
| − | <td width=50>[[image:SkipDown.png|link=#Managing Baseboards]]</td> | + | <td width=629><span id="skip Scrapbook Operations"></span> |
| − | <td width=50>[[image:SkipUp.png|link=#Marquee Context Menu]]</td> | + | =='''Scrapbook Operations'''== |
| + | </td> | ||
| + | <td width=50>[[image:SkipDown.png|link=#skip Managing Baseboards]]</td> | ||
| + | <td width=50>[[image:SkipUp.png|link=#skip Marquee Context Menu]]</td> | ||
| + | <td width=271> </td> | ||
</tr> | </tr> | ||
</table> <!-- END Section Nav Buttons --> | </table> <!-- END Section Nav Buttons --> | ||
| + | |||
<table width=1000> | <table width=1000> | ||
<tr valign="top"> | <tr valign="top"> | ||
| Line 8,143: | Line 8,199: | ||
</table> | </table> | ||
<br> | <br> | ||
| − | + | <table width=1000> <!-- BEGIN Section Nav Buttons --> | |
| − | + | ||
| − | <table width= | + | |
<tr valign="top"> | <tr valign="top"> | ||
| + | <td width=629><span id="skip Managing Baseboards"></span> | ||
| + | =='''Managing Baseboards'''== | ||
| + | </td> | ||
<td width=50>[[image:SkipDown.png|link=#stepMass]]</td> | <td width=50>[[image:SkipDown.png|link=#stepMass]]</td> | ||
| − | <td width=50>[[image:SkipUp.png|link=#Scrapbook Operations]]</td> | + | <td width=50>[[image:SkipUp.png|link=#skip Scrapbook Operations]]</td> |
| + | <td width=271> </td> | ||
</tr> | </tr> | ||
</table> <!-- END Section Nav Buttons --> | </table> <!-- END Section Nav Buttons --> | ||
| Line 8,210: | Line 8,268: | ||
</table> | </table> | ||
<br> | <br> | ||
| − | + | <table width=1000> <!-- BEGIN Nav Buttons Table --> | |
| − | <table> <!-- BEGIN Nav Buttons Table --> | + | |
<tr valign="top"> | <tr valign="top"> | ||
| − | <td width= | + | <td width=629><span id="stepMass"></span> |
| + | ='''Mass Object Moves and Clones'''= | ||
| + | </td> | ||
| + | <td width=50>[[image:SkipDown.png|link=#Cloning Objects]]</td> | ||
<td width=50>[[image:SkipUp.png|link=#Managing Baseboards]]</td> | <td width=50>[[image:SkipUp.png|link=#Managing Baseboards]]</td> | ||
| − | |||
<td width=46>[[image:BackToTop.png|link=#top|alt=Top|Top]]</td> | <td width=46>[[image:BackToTop.png|link=#top|alt=Top|Top]]</td> | ||
<td width=75>[[image:NextUp.png|link=#stepMarquee|alt=Next Up|Next Up]]</td> | <td width=75>[[image:NextUp.png|link=#stepMarquee|alt=Next Up|Next Up]]</td> | ||
| Line 8,223: | Line 8,282: | ||
</table> <!-- END Nav Buttons Table --> | </table> <!-- END Nav Buttons Table --> | ||
| − | |||
| − | |||
| − | |||
| − | |||
| − | |||
| − | |||
| − | |||
<table bgcolor=#000000 width=900 cellpadding=2> | <table bgcolor=#000000 width=900 cellpadding=2> | ||
<tr valign="top"> | <tr valign="top"> | ||
| Line 8,413: | Line 8,465: | ||
</table> | </table> | ||
<br> | <br> | ||
| − | + | <table width=1000> <!-- BEGIN Section Nav Buttons --> | |
| − | + | ||
| − | <table width= | + | |
<tr valign="top"> | <tr valign="top"> | ||
| + | <td width=629><span id="skip Cloning Objects"></span> | ||
| + | =='''Cloning Objects'''== | ||
| + | </td> | ||
<td width=50>[[image:SkipDown.png|link=#stepInfo]]</td> | <td width=50>[[image:SkipDown.png|link=#stepInfo]]</td> | ||
<td width=50>[[image:SkipUp.png|link=#stepMass]]</td> | <td width=50>[[image:SkipUp.png|link=#stepMass]]</td> | ||
| + | <td width=271> </td> | ||
</tr> | </tr> | ||
</table> <!-- END Section Nav Buttons --> | </table> <!-- END Section Nav Buttons --> | ||
| + | |||
<table width=1000 bgcolor="lightcyan" cellpadding=2> | <table width=1000 bgcolor="lightcyan" cellpadding=2> | ||
<tr> | <tr> | ||
| Line 8,512: | Line 8,567: | ||
</table> | </table> | ||
<br> | <br> | ||
| − | <table> <!-- BEGIN Nav Buttons Table --> | + | <table width=1000> <!-- BEGIN Nav Buttons Table --> |
<tr valign="top"> | <tr valign="top"> | ||
| − | <td width= | + | <td width=629><span id="stepInfo"></span> |
| + | ='''The Info Palette'''= | ||
| + | </td> | ||
| + | <td width=50>[[image:SkipDown.png|link=#Focus Info and Controls]]</td> | ||
<td width=50>[[image:SkipUp.png|link=#Cloning Objects]]</td> | <td width=50>[[image:SkipUp.png|link=#Cloning Objects]]</td> | ||
| − | |||
<td width=46>[[image:BackToTop.png|link=#top|alt=Top|Top]]</td> | <td width=46>[[image:BackToTop.png|link=#top|alt=Top|Top]]</td> | ||
<td width=75>[[image:NextUp.png|link=#stepMass|alt=Next Up|Next Up]]</td> | <td width=75>[[image:NextUp.png|link=#stepMass|alt=Next Up|Next Up]]</td> | ||
| Line 8,524: | Line 8,581: | ||
</table> <!-- END Nav Buttons Table --> | </table> <!-- END Nav Buttons Table --> | ||
| − | |||
| − | |||
| − | |||
| − | |||
| − | |||
| − | |||
| − | |||
<table width=1000 bgcolor=#000000> | <table width=1000 bgcolor=#000000> | ||
<tr valign="top"> | <tr valign="top"> | ||
| Line 8,634: | Line 8,684: | ||
</table> | </table> | ||
<br> | <br> | ||
| − | + | <table width=1000> <!-- BEGIN Section Nav Buttons --> | |
| − | <table width= | + | |
<tr valign="top"> | <tr valign="top"> | ||
| − | <td width=50>[[image:SkipDown.png|link=#Asset Name Menu]]</td> | + | <td width=629><span id="skip Focus Info and Controls"></span> |
| + | =='''Focus Info and Controls'''== | ||
| + | </td> | ||
| + | <td width=50>[[image:SkipDown.png|link=#skip Asset Name Menu]]</td> | ||
<td width=50>[[image:SkipUp.png|link=#stepInfo]]</td> | <td width=50>[[image:SkipUp.png|link=#stepInfo]]</td> | ||
| + | <td width=271> </td> | ||
</tr> | </tr> | ||
</table> <!-- END Section Nav Buttons --> | </table> <!-- END Section Nav Buttons --> | ||
| Line 8,735: | Line 8,788: | ||
</table> | </table> | ||
<br> | <br> | ||
| − | + | <table width=1000> <!-- BEGIN Section Nav Buttons --> | |
| − | + | ||
| − | <table width= | + | |
<tr valign="top"> | <tr valign="top"> | ||
| − | <td width=50>[[image:SkipDown.png|link=#Position Info and Controls]]</td> | + | <td width=629><span id="skip Asset Name Menu"></span> |
| − | <td width=50>[[image:SkipUp.png|link=#Focus Info and Controls]]</td> | + | =='''Asset Name Menu'''== |
| + | </td> | ||
| + | <td width=50>[[image:SkipDown.png|link=#skip Position Info and Controls]]</td> | ||
| + | <td width=50>[[image:SkipUp.png|link=#skip Focus Info and Controls]]</td> | ||
| + | <td width=271> </td> | ||
</tr> | </tr> | ||
</table> <!-- END Section Nav Buttons --> | </table> <!-- END Section Nav Buttons --> | ||
| Line 8,792: | Line 8,847: | ||
</table> | </table> | ||
<br> | <br> | ||
| − | + | <table width=1000> <!-- BEGIN Section Nav Buttons --> | |
| − | + | ||
| − | <table width= | + | |
<tr valign="top"> | <tr valign="top"> | ||
| − | <td width=50>[[image:SkipDown.png|link=#Rotation Info and Controls]]</td> | + | <td width=629><span id="skip Position Info and Controls"></span> |
| − | <td width=50>[[image:SkipUp.png|link=#Asset Name Menu]]</td> | + | =='''Position Info and Controls'''== |
| + | </td> | ||
| + | <td width=50>[[image:SkipDown.png|link=#skip Rotation Info and Controls]]</td> | ||
| + | <td width=50>[[image:SkipUp.png|link=#skip Asset Name Menu]]</td> | ||
| + | <td width=271> </td> | ||
</tr> | </tr> | ||
</table> <!-- END Section Nav Buttons --> | </table> <!-- END Section Nav Buttons --> | ||
| + | |||
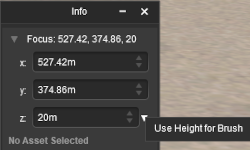
You must have an object (or objects) selected for the position data to be shown and edited. Open up the position data by a <span style="font-weight: 700; font-size: 15px; background-color: lightcyan;">Left Click</span> on its '''Pos:''' arrowhead icon.<br> | You must have an object (or objects) selected for the position data to be shown and edited. Open up the position data by a <span style="font-weight: 700; font-size: 15px; background-color: lightcyan;">Left Click</span> on its '''Pos:''' arrowhead icon.<br> | ||
| Line 8,859: | Line 8,917: | ||
</table> | </table> | ||
<br> | <br> | ||
| − | + | <table width=1000> <!-- BEGIN Section Nav Buttons --> | |
| − | <table width= | + | |
<tr valign="top"> | <tr valign="top"> | ||
| + | <td width=629><span id="skip Rotation Info and Controls"></span> | ||
| + | =='''Rotation Info and Controls'''== | ||
| + | </td> | ||
<td width=50>[[image:SkipDown.png|link=#Layer Info and Controls]]</td> | <td width=50>[[image:SkipDown.png|link=#Layer Info and Controls]]</td> | ||
<td width=50>[[image:SkipUp.png|link=#Position Info and Controls]]</td> | <td width=50>[[image:SkipUp.png|link=#Position Info and Controls]]</td> | ||
| + | <td width=271> </td> | ||
</tr> | </tr> | ||
</table> <!-- END Section Nav Buttons --> | </table> <!-- END Section Nav Buttons --> | ||
| + | |||
You must have an object (or objects) selected for the rotation data to be shown and edited. Open up the rotation data by a <span style="font-weight: 700; font-size: 15px; background-color: lightcyan;">Left Click</span> on its '''Rot:''' arrowhead icon.<br> | You must have an object (or objects) selected for the rotation data to be shown and edited. Open up the rotation data by a <span style="font-weight: 700; font-size: 15px; background-color: lightcyan;">Left Click</span> on its '''Rot:''' arrowhead icon.<br> | ||
| Line 9,007: | Line 9,069: | ||
</table> | </table> | ||
<br> | <br> | ||
| − | + | <table width=1000> <!-- BEGIN Section Nav Buttons --> | |
| − | <table width= | + | |
<tr valign="top"> | <tr valign="top"> | ||
| − | <td width=50>[[image:SkipDown.png|link=#Assigning Objects to a Different Layer]]</td> | + | <td width=629><span id="skip Layer Info and Controls"></span> |
| − | <td width=50>[[image:SkipUp.png|link=#Rotation Info and Controls]]</td> | + | =='''Layer Info and Controls'''== |
| + | </td> | ||
| + | <td width=50>[[image:SkipDown.png|link=#skip Assigning Objects to a Different Layer]]</td> | ||
| + | <td width=50>[[image:SkipUp.png|link=#skip Rotation Info and Controls]]</td> | ||
| + | <td width=271> </td> | ||
</tr> | </tr> | ||
</table> <!-- END Section Nav Buttons --> | </table> <!-- END Section Nav Buttons --> | ||
| Line 9,143: | Line 9,208: | ||
</table> | </table> | ||
<br> | <br> | ||
| − | + | <table width=1000> <!-- BEGIN Section Nav Buttons --> | |
| − | <table width= | + | |
<tr valign="top"> | <tr valign="top"> | ||
| − | <td width=50>[[image:SkipDown.png|link=#Assigning Objects to a Binding Layer]]</td> | + | <td width=629><span id="skip Assigning Objects to a Different Layer"></span> |
| − | <td width=50>[[image:SkipUp.png|link=#Layer Info and Controls]]</td> | + | =='''Assigning Objects to a Different Layer'''== |
| + | </td> | ||
| + | <td width=50>[[image:SkipDown.png|link=#skip Assigning Objects to a Binding Layer]]</td> | ||
| + | <td width=50>[[image:SkipUp.png|link=#skip Layer Info and Controls]]</td> | ||
| + | <td width=271> </td> | ||
</tr> | </tr> | ||
</table> <!-- END Section Nav Buttons --> | </table> <!-- END Section Nav Buttons --> | ||
| + | |||
A selected object or group of selected objects can be assigned to a different layer. If multiple objects have been selected then they '''do not''' have to all be in the same layer.<br> | A selected object or group of selected objects can be assigned to a different layer. If multiple objects have been selected then they '''do not''' have to all be in the same layer.<br> | ||
| Line 9,236: | Line 9,305: | ||
</table> | </table> | ||
<br> | <br> | ||
| − | + | <table width=1000> <!-- BEGIN Section Nav Buttons --> | |
| − | <table width= | + | |
<tr valign="top"> | <tr valign="top"> | ||
| + | <td width=629><span id="skip Assigning Objects to a Binding Layer"></span> | ||
| + | =='''Assigning Objects to a Binding Layer'''== | ||
| + | </td> | ||
<td width=50>[[image:SkipDown.png|link=#bottom]]</td> | <td width=50>[[image:SkipDown.png|link=#bottom]]</td> | ||
| − | <td width=50>[[image:SkipUp.png|link=#Assigning Objects to a Different Layer]]</td> | + | <td width=50>[[image:SkipUp.png|link=#skip Assigning Objects to a Different Layer]]</td> |
| + | <td width=271> </td> | ||
</tr> | </tr> | ||
</table> <!-- END Section Nav Buttons --> | </table> <!-- END Section Nav Buttons --> | ||
| Line 9,453: | Line 9,525: | ||
</table> | </table> | ||
<br> | <br> | ||
| − | <table> <!-- BEGIN Nav Buttons Table --> | + | <table width=1000> <!-- BEGIN Nav Buttons Table --> |
<tr valign="top"> | <tr valign="top"> | ||
| − | <td width= | + | <td width=629><span id="bottom"></span></td> |
| + | <td width=50> </td> | ||
<td width=50>[[image:SkipUp.png|link=#Assigning Objects to a Binding Layer]]</td> | <td width=50>[[image:SkipUp.png|link=#Assigning Objects to a Binding Layer]]</td> | ||
| − | |||
<td width=46>[[image:BackToTop.png|link=#top|alt=Top|Top]]</td> | <td width=46>[[image:BackToTop.png|link=#top|alt=Top|Top]]</td> | ||
<td width=75>[[image:NextUp.png|link=#stepInfo|alt=Next Up|Top]]</td> | <td width=75>[[image:NextUp.png|link=#stepInfo|alt=Next Up|Top]]</td> | ||
Revision as of 18:08, 26 April 2023
The information in this Wiki Page applies to Surveyor 2.0 (S20) as found in Trainz Plus. The original reference material for this document can be found at ![]() Surveyor 2.0 Overview
Surveyor 2.0 Overview
|
||||||||||||||||||||||||||||||||||||||||||||||||||||||||||||||||||||||||||||||||||||||

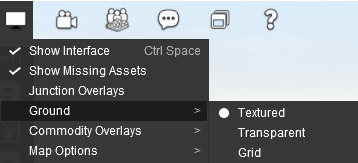
Surveyor 2.0 vs Surveyor Classic |
| Surveyor 2.0 | |||||
| Surveyor 2.0 (or S20) is the new Surveyor interface provided to Trainz Plus Gold and Trainz Plus Standard subscribers as an alternative to Surveyor Classic. Classic is still available as an option in Trainz Plus. S20 is also available in TRS22 for Trainz Plus subscribers only. TRS22 without the subscription will have Surveyor Classic. | |||||
| Whats New | |||||
| a single set of common tools that can be applied to ALL types of objects | |||||
| the ability to select multiple objects of different types that can be manipulated as one with more freedom than was previously possible | |||||
| each object has its own Context Menu that applies specific actions depending on the type of object | |||||
| information and controls in dockable and moveable Palettes that can be hidden when not needed | |||||
| a new Scrapbook asset to store "scenes" that can be pasted anywhere in a route, between routes and shared through the DLS | |||||
a new Marquee Tool that allows:-
|
|||||
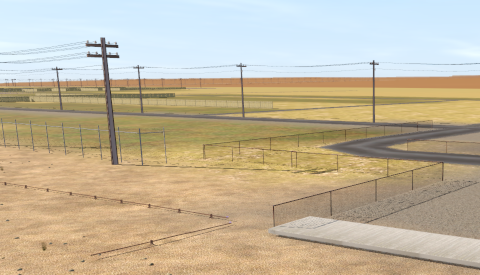
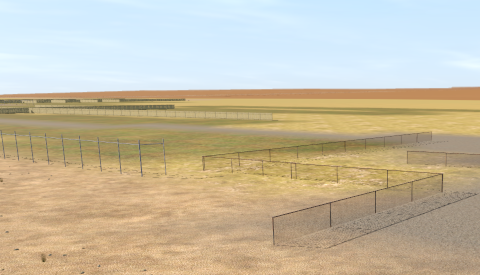
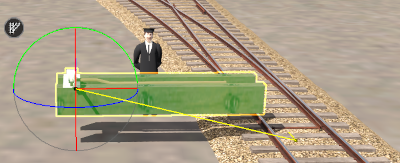
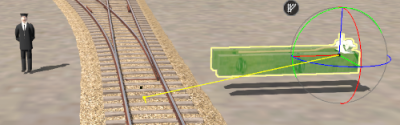
The following screen images help illustrate the change in philosophy that has occurred with the release of the Surveyor 2.0 user interface.
|
||||||
|
||||||
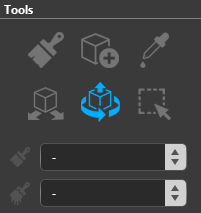
The Tools Palette |
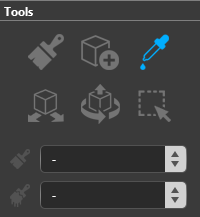
| The Tools Palette is at the core of the new interface and takes the place of all the Tool Flyouts that have been the standard for Trainz Surveyor for many years. Some of the tools are new while others have been given a makeover and new abilities. |
|
|
|||||||||||||||||||||
|
The Brush Tool |
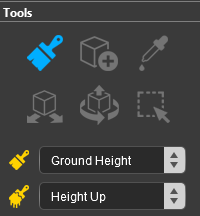
| Keyboard Shortcut: W | The Brush Tool "paints" the ground height, ground textures, effect layers and scrapbook scenes in the Trainz World |
The Brush Tool has two drop down menu lists.
 |
|
|||||||||||||||||||

Ground Height |
| This Brush Target raises or lowers the Ground Surface Height by using a "painting" action |
|
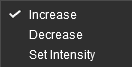
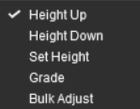
When the Ground Height Target is selected, the second drop down box will give a choice of several brush actions that control how the height is adjusted.
| The actions are:- | ||||||||||||||||||||||
|
 |
|
||||||||||||||||||||
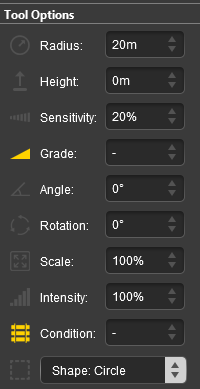
| The active height brush options for each action are shown in the Tool Options Palette with a Gold coloured icon next to their names. Those options that have their icon greyed out will be ignored by the selected action, but they can still be edited. | ||||||||||||||||||||||||||||||||||||
Height Up/Height Down 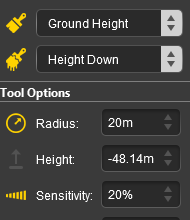 |
Set Height 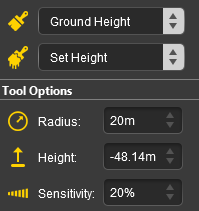 |
Grade  |
|
|||||||||||||||||||||||||||||||||
|
|
||||||||||||||||||||||
Ground Texture |
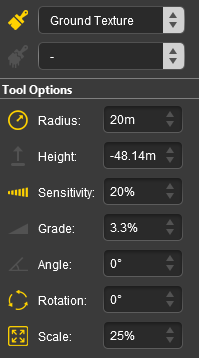
| This tool paints the currently selected Ground Texture (from the Assets Palette) on the ground |
|
When the Ground Texture Target is selected, the second drop down box will be disabled - there are no brush texture actions.
The active texture brush options are shown in the Tool Options Palette with a Gold coloured icon next to their names. Those options that have their icon greyed out will be ignored, but they can still be edited.
|
||||||||||||||||||||||||||||||||||||||||||||||||
|
Default Baseboard Ground Texture
| When a new route is created or a new baseboard is added it will be covered with the Default ground texture for the selected Region. This can be temporarily disabled or permanently changed to a different texture (including to the standard TRS22 grid pattern). | ||||||||||
 |
|
|||||||||
| A more complex solution is to edit an existing Region or create one of your own to add your preferred ground texture (such as the standard TRS22 grid pattern) to each new route you create and every new baseboard that you add. | ||||||||||
 |
Information on creating and editing Region assets can be found on the Trainz Wiki at:- |
Scrapbook Data |
| This tool paints the currently selected Scrapbook (from the Scrapbook Palette) on the ground |
|
|
|
||||||||||||||||||||||||||||||||||
|
||||||||
The Scrapbook Brush Actions
When the Scrapbook Data Target is selected, the second drop down box will give a choice of two brush actions that control how the scrapbook is applied.
| The actions are:- | ||||||||
|
|
|||||||
|
||||||||||||||||||||||
| The active scrapbook brush options are shown in the Tool Options Palette with a Gold coloured icon next to their names. Those options that have their icon greyed out will be ignored, but they can still be edited. | ||||||||||||||||||||||||||||||||||||||||
Scrapbook Brush 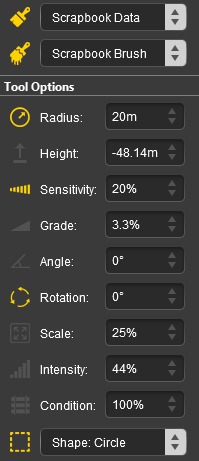 |
Scrapbook Clone 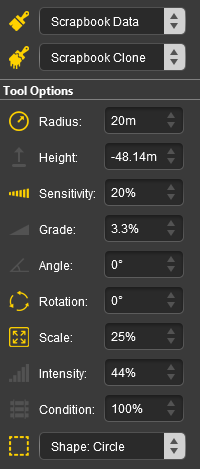 |
|
||||||||||||||||||||||||||||||||||||||
|
|
||||||||||||||||||||||||||||
The Scrapbook Palette
|
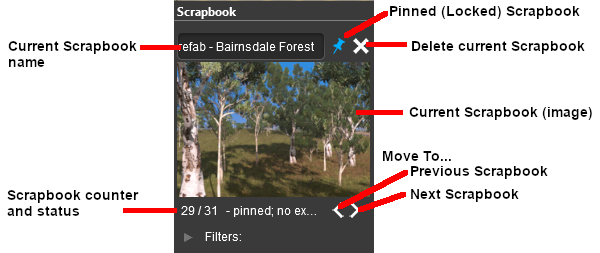
|
|||||||||||||||
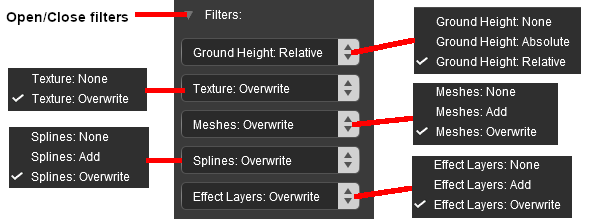
The Scrapbook Filters
|
| Left Click on the arrowhead next to the Filters: label below the scrapbook image to open the scrapbook filter controls. These filters will control which elements in the scrapbook will be added to the route and how they will be added. |
|
|
||||||||||||||||||||||||||||||||||||||||||||||||||||||||||||||||||||||||
|
||||||||
Effect Layers |
| This tool paints a selected Effect Layer onto the ground surface |
|
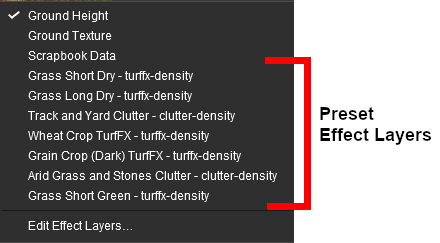
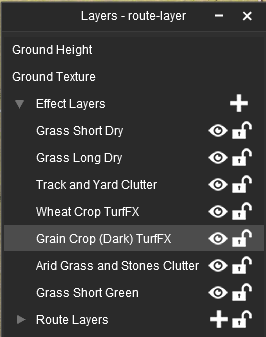
| If the route has Effect Layers installed then they will be listed individually as additional Targets. |
 |
|
||||||||||||
 |
|
|||||||
TurfFX and Clutter 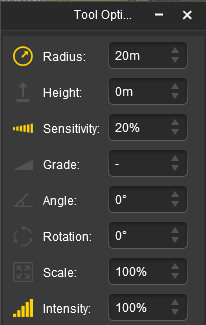 |
Water 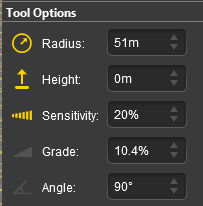 |
|
|||||||||||||||||||||||||
|
|||||||||||||||||||||||||||
|
TurfFX and Clutter Effect Layers
| When a TurfFX or Clutter Effect Layer has been selected as the Target, the second drop down box will give a choice of three actions. The actions are very similar to those found in the Ground Height Target:- |
|||||||||||||||||||
|
 |
|
|||||||||||||||||
|
|
|||||||||||||||
Water Effect Layer
| A Water Effect Layer will cover the entire route. Use the Ground Height Brush to raise or lower the ground to hide and reveal the water where required |
| When a Water Effect Layer has been selected as theTarget, the second drop down box will give a choice of five actions. The actions are identical to those found in the Ground Height Target plus a new action:- |
||||||||||||||||||||||||||||
|
 |
|
||||||||||||||||||||||||||
|
||||||
|
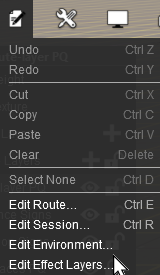
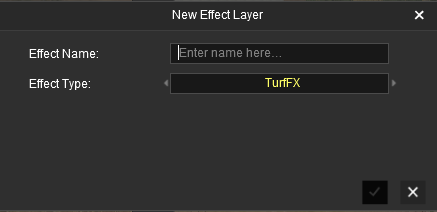
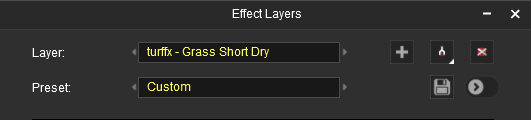
Edit Effect Layers... |
When this Target is selected, the Edit Effect Layer dialogue box will appear. This is the same as selecting Edit Effect Layers ... from the ![]() Surveyor Edit Menu.
Surveyor Edit Menu.
 |
 |
 |
|
|
More information on creating and editing Effect Layers can be found on the Trainz Wiki at:- |
The Placement Tool |
| Keyboard Shortcut: E | The Placement Tool adds objects to a Trainz World |
|
|
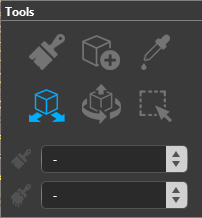
The Placement Tool has no drop down menu lists.
 |
|
||||||||||||||
The first step is to identify and select the particular object that you want to add to the route.
Placing a Scenery Mesh Object |
| Individual "non-spline" scenery objects that are not attached to track are often referred to in Trainz terminology as Scenery Mesh Objects. |
| Steps: To add a Scenery Mesh Object the first step is to identify the exact asset you want to add. Steps |
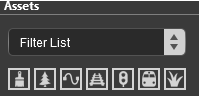
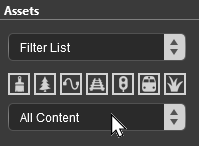
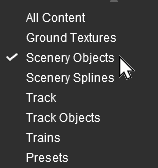
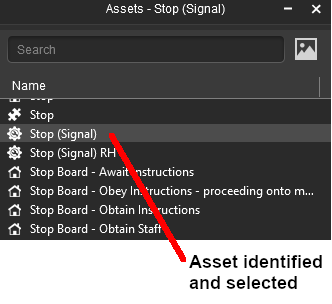
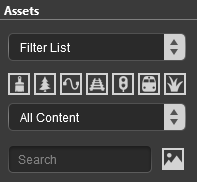
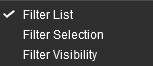
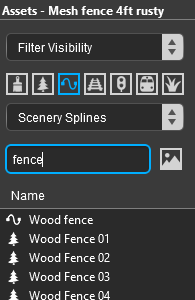
![]() In the Asset Palette either:-
In the Asset Palette either:-
|
OR |
|
OR |
|
||||||||||||||||||||||||||||||
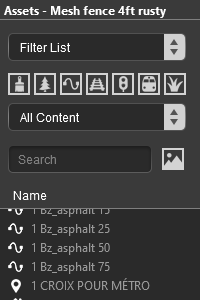
| Optional: To narrow down the filter list type part of the object name into the Search Text Box. For example if you have selected Scenery Objects and want to find "barns", then type "barn" (UPPER/lower case does not matter). |
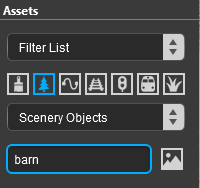 |
This will list all the Scenery Objects containing the text "barn" in their name or description.
|
|||||||||||
|
|
Moving Scenery Mesh Objects
|
|||||||||||||||
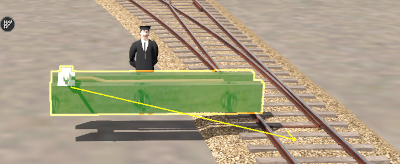
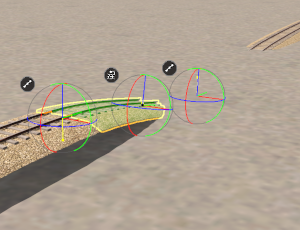
Placing a Scenery or Track Spline |
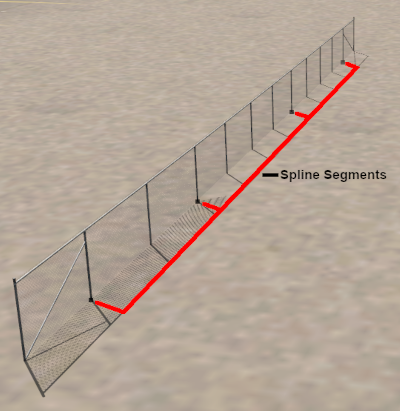
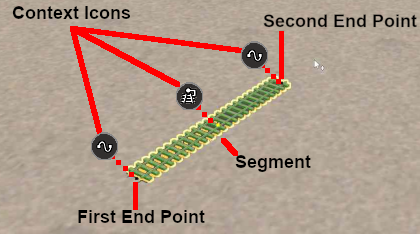
| Scenery splines and track splines are defined by their endpoints. Splines are usually added to a route as a series of joined segments linked at the endpoints. |
| Steps: Start the process of laying a track or spline by identifying and selecting the track or scenery spline as described in steps |
||||||||||||||||||||||
|
OR |
|
||||||||||||||||||||
| Then continue as shown below:- | ||||||||
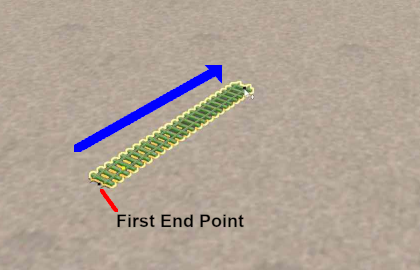 |
Left Click on the spot where the spline will start. This will place the start or first endpoint of the spline. | |||||||
| Move the mouse in the direction you want to lay the spline or track. The spline will follow the mouse wherever you move it. | ||||||||
 |
When you have the tool pointer in the final position for the first spline segment, Left Click again. This will anchor the second spline endpoint. The spline between the two endpoints is the first spline segment.
|
|||||||
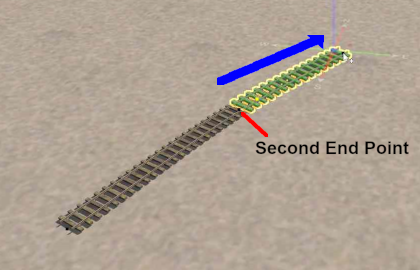 |
Left Click on the new endpoint and move the mouse in the direction you want to continue laying the spline or track. The spline will follow the mouse wherever you move it. | |||||||
|
||||||||
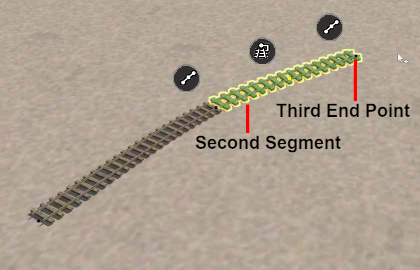 |
When you have the tool pointer in the final position for the second spline segment, Left Click again. This will anchor the third spline endpoint and the Context Icons will move to the new segment. | |||||||
|
||||||||
| Repeat Steps |
||||||||
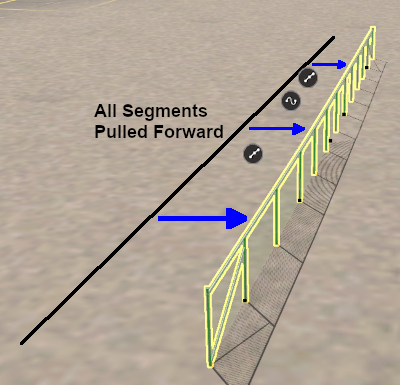
Spline Segment Heights
When you start adding a spline to a route it will always be placed at the height of the terrain regardless of the Tool Options Palette Height setting.
However, you can set the end point heights of any selected segment.
|
||||||||
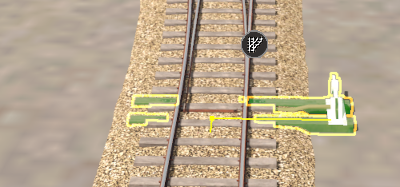
Placing Track Objects |
| Track Objects (e.g. signals, speed signs, switches, etc), both visible and invisible, can only be attached to track splines. |
|
||||||||||
Steps: Follow steps ![]()
![]()
![]() in
in ![]() Placing a Scenery Mesh Object above but in Step
Placing a Scenery Mesh Object above but in Step ![]() select the Track Object filter in the Assets Palette.
select the Track Object filter in the Assets Palette.
|
OR |
|
| Then continue as shown below:- | ||||||
 |
|
|||||
Placing Rolling Stock Objects |
| Rolling Stock Objects (e.g. locomotives, passenger cars and wagons) can only be attached to track splines. |
Steps: Follow steps ![]()
![]()
![]() in
in ![]() Placing a Scenery Mesh Object above but in Step
Placing a Scenery Mesh Object above but in Step ![]() select the Rolling Stock filter in the Assets Palette.
select the Rolling Stock filter in the Assets Palette.
|
OR |
|
| Then continue as shown below:- | ||||||
 |
|
|||||
Placement Tool Options |
|
Placement Mesh Objects Tool Options
 |
 |
In Surveyor 2.0 track objects can be given a height above (or below) the track.
|
|||||||||||
Placement Spline (and Track) Tool Options
Splines have two Placement Tool settings in the Tool Options Palette.
 |
|
||||||||||||||||||
|
||||||||||
|
Deleting Placed Objects |
|
|
||||||||||||||||||||||||||
The Eyedropper Tool |
| Keyboard Shortcut: R | The Eyedropper Tool identifies and selects objects in a Trainz World |
|
|
The Eyedropper Tool has no drop down menu lists.
|
 |
When selected, the Eyedropper Tool will change the tool pointer to an "eyedropper" icon.
|
Quick Steps |
![]() With the Eyedropper Tool selected, move the tool pointer (which will now be an eyedropper symbol) onto any object in view.
With the Eyedropper Tool selected, move the tool pointer (which will now be an eyedropper symbol) onto any object in view.
 |
|
| Left Click on the object name in the Assets Palette filter list to select it (highlighted in blue) and switch control to the Placement Tool |
Narrowing the Search |
| Sometimes (or often) a scene will be too crowded with different scenery objects to be able to use the Eyedropper Tool to easily select a single object. In these cases additional options are available to help "remove the clutter". |
|
At the top of the Assets Palette is a drop down box which controls how the Tool works with the filters that you set.
 |
The drop down box will provide three options:-
|
These options work with the Asset Filters to help narrow the search for a specific object or type of object that is in the route.
|
As an example the following images show the progressive application of a Visibility Filter.
 |
 |
|
 |
 |
|
 |
 |
|
The Free Move Tool |
| Keyboard Shortcut: S | The Free Move Tool moves objects around a Trainz World |
|
The Free Move Tool has no drop down menu lists.
 |
|
||||||||||||
Free Move: Scenery Mesh Objects |
| Individual "non-spline" scenery objects that are not attached to track are often referred to in Trainz terminology as Scenery Mesh Objects. |
Free Move: Move a Mesh Object
 |
|
||||||||||
Free Move: Set the Height of a Mesh Object
|
||||||||||
Free Move: Mesh Object Context Menu
| A selected scenery mesh object, or a group of selected scenery mesh objects, will have a Context Icon that opens a Context Menu. Left Click on the icon or press the T key. The icon design will vary between object types. |
 |
|
Free Move: Track Objects |
| Track Objects (signals, switches, speed signs, markers, etc) are always attached to an existing track. They can be moved to new positions along the track and in Surveyor Classic that was the limit of their movement. Surveyor 2.0 brings a new freedom of movement to track objects. They can be moved away from the track to the left or right as well as above and below the track. The operation of a track object is not affected by these changes. |
Free Move: Move a Track Object
| Track objects can be moved to new positions along the track and to positions closer to the track or further away from the track. |
 |
|
|||||
|
|||||||
Track objects that have been moved away from or closer to the track will still function normally.
Free Move: Set the Height of a Track Object
| Track objects can be raised above and lowered below the track level. |
 Throw Lever track object level with the track |
|
||||||||||||
 After being moved vertically |
|||||||||||||
Free Move: Track Object Context Menu
A selected track mesh object, or a group of selected track mesh objects, will have a Context Icon that opens a Context Menu. The icon design will vary between object types.
|
 |
|
|
Track objects can also be rotated to the opposite side of the track.
 |
|
|||||||||
Free Move: Spline Objects (Including Track) |
| Scenery splines and track splines are defined by their endpoints. Splines are usually added to a route as a series of joined segments linked at the endpoints. |
|
||||||||
Free Move: Move Spline Endpoints
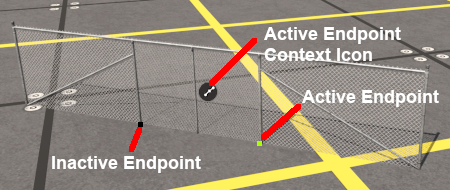 |
|
||||||||||||
Free Move: Move Spline Segments
Splines are frequently made of multiple segments joined together. You can easily move a spline by moving its segments, individually or as a group.
 |
|
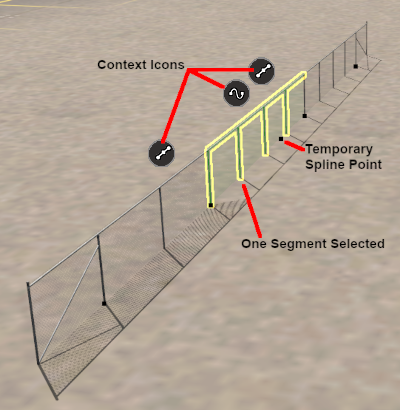 |
|
|||||||||||||||||||
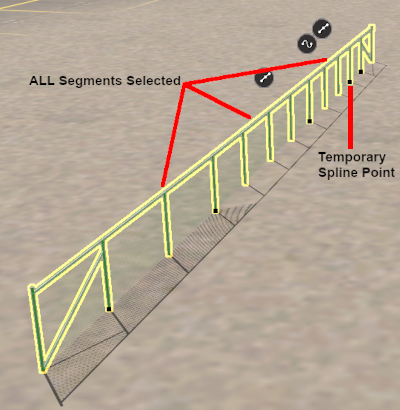 |
|
|||||||||
Left Click and Drag the selected segment(s) in any horizontal direction.
|
|||||||||
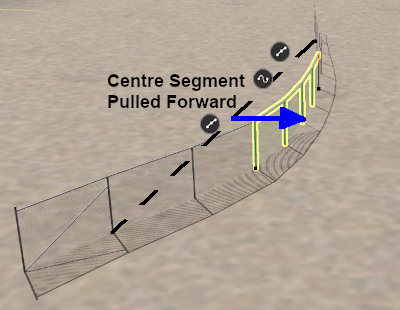 |
 |
Free Move: Spline Object Context Menu
A selected scenery spline object, or a group of selected scenery spline objects, will have a Context Icon that opens a Context Menu. The icon design will vary between object types.
 |
|
||||||||||||
|
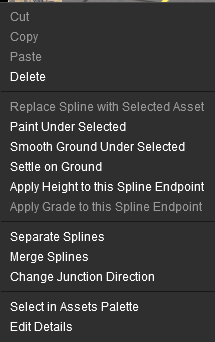 |
 |
|
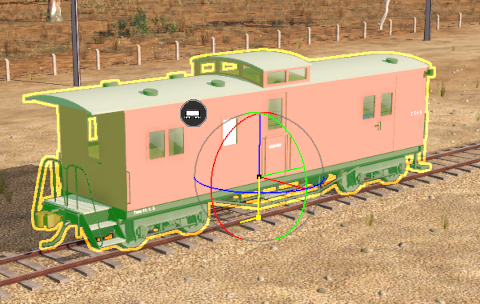
Free Move: Rolling Stock Objects |
| Rolling Stock Objects (locomotives, wagons, etc) can only be moved along the track that they are attached to. If they are moved off the track then they will immediately "snap back" to the nearest track when they are released. |
Free Move: Move Rolling Stock Objects
Use the Free Move tool to move a selected rolling stock object along the track.
|
 |
|
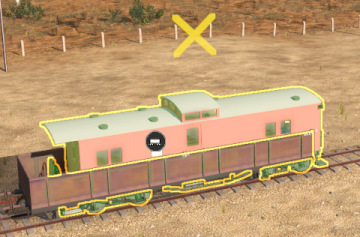
Free Move: Decouple Rolling Stock Objects
| All decoupling operations between Rolling Stock Objects are performed using just a Left Click and Drag. |
|
||||||||||
|
A rolling stock object or objects in the middle of a consist can also be decoupled. This will break the consist into 3 sections.
 |
Select one (Left Click) or more ( Shift + Left Click) rolling stock objects inside a consist | |||||||||||
> |
|
|||||||||||
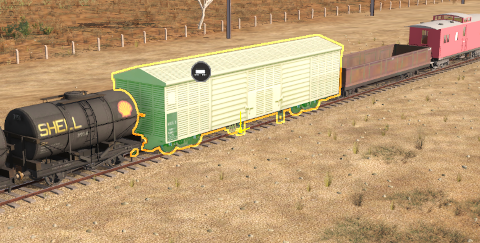
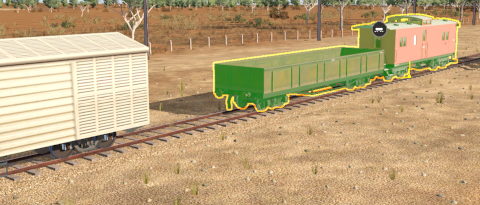
Free Move: Couple Rolling Stock Objects
| All coupling operations between Rolling Stock Objects can be performed using just a Left Click and Drag or through the objects Context Menu. |
![]() Using "Click and Drag"
Using "Click and Drag"
|
||||||||||||||
Consider the following simple situation:-
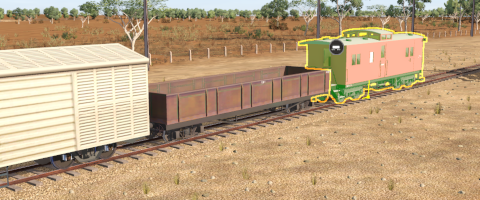
| The guard van (caboose) standing at the rear of a consist has to be coupled to the rear gondola wagon. | |||||||||
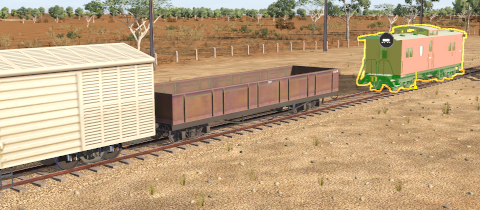 |
|
||||||||
 |
|
||||||||
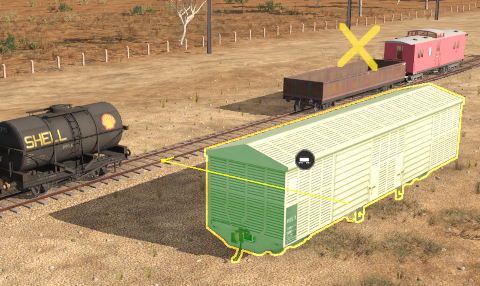
![]() Using the Context Menu
Using the Context Menu
Using the same situation as above, the isolated guard van and the gondola wagon at the end of a consist are to be coupled together.
 |
|
|||||||||||
|
|
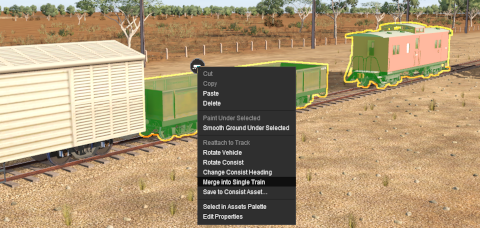
| Using a more complex example involving multiple objects from several different consists. The selected wagons shown below are to form a single consist based on the loco. |
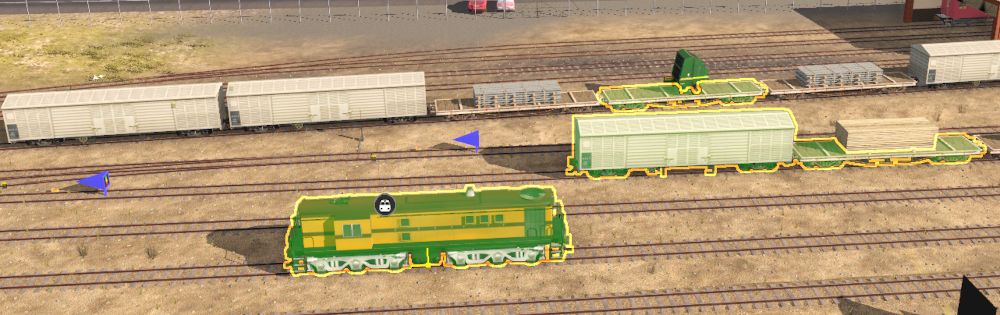 |
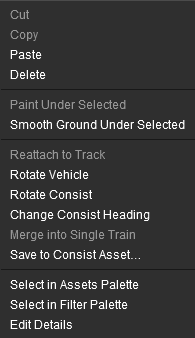
| The loco was the last object to be selected so it has the Context Icon. The Context Menu is opened and the option Merge into Single Train is selected with the result as shown below. |
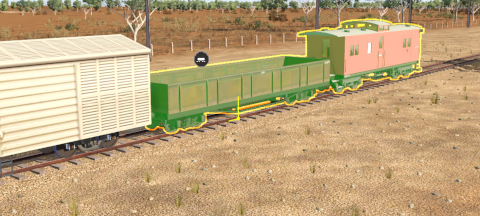
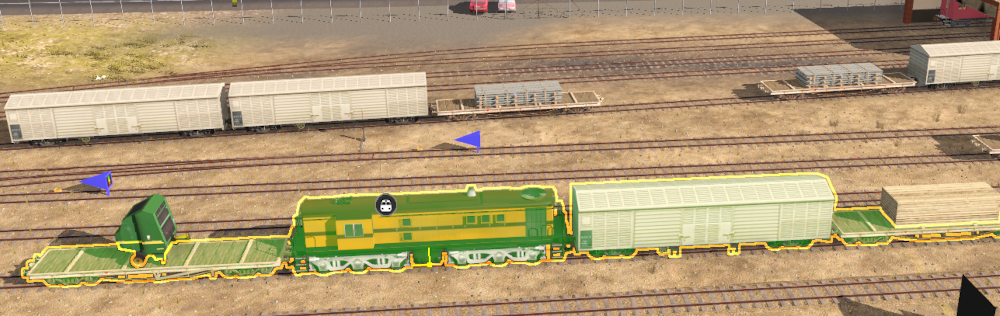 |
| The wagons and loco have been combined into a single consist but not necessarily in a useful order. Left Click and Drag the incorrectly placed vehicles to their correct positions. |
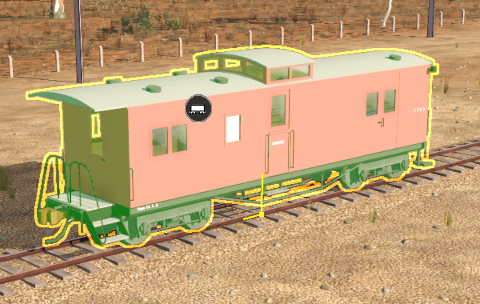
Free Move: Rolling Stock Object Context Menu
A selected rolling stock object, or a group of selected rolling stock objects, will have a Context Icon that opens a Context Menu. The icon design will vary between object types.
|
 |
|
The Fine Adjustment Tool |
| Keyboard Shortcut: D | The Fine Adjustment Tool makes 3D adjustments (position and rotations) to objects in a Trainz World |
|
The Fine Adjustment Tool has no drop down menu lists.
 |
|
||||||||||||
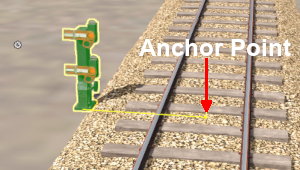
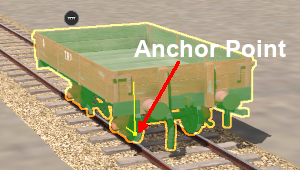
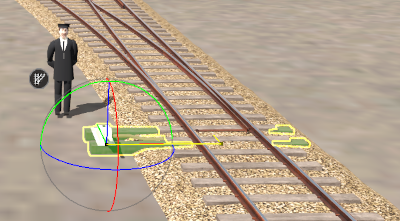
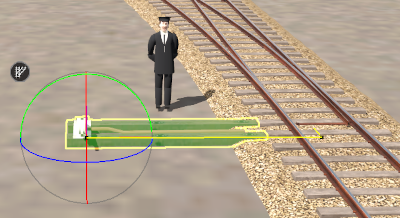
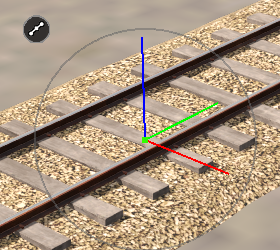
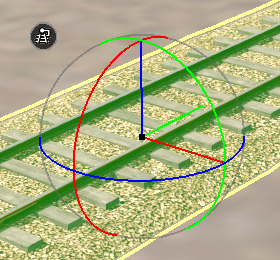
| The most obvious feature of the Fine Adjustment Tool is the 3D Anchor Frame it adds to a selected object. The frame is made of 3 straight and 3 curved coloured lines, called Anchors, which control the position and orientation of an object or a group of objects. |
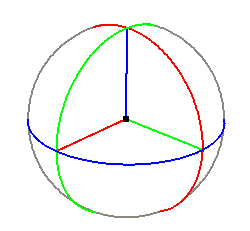 |
The Anchor controls are:-
|
||||||||||||||||||||||||||
|
|||||||
Fine Adjustment: Scenery Mesh Objects |
| Individual "non-spline" scenery objects that are not attached to track are often referred to in Trainz terminology as Scenery Mesh Objects. |
Fine Adjustment: Move a Mesh Object
|
||||||||||
Blue vertical Anchor movement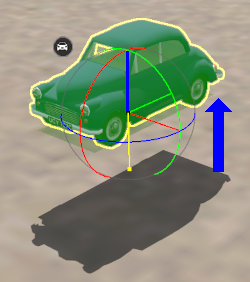 |
Green Anchor rotation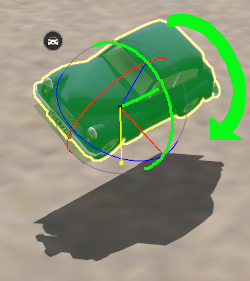 |
Red Anchor rotation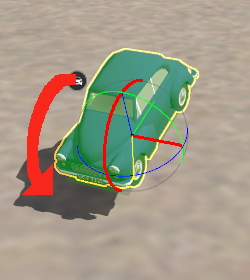 |
Blue Anchor rotation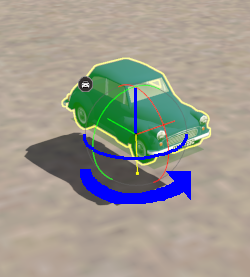 |
|
Fine Adjustment: Mesh Object Context Menu
| A selected scenery mesh object, or a group of selected scenery mesh objects, will have a Context Icon that opens a Context Menu. Left Click on the icon or press the T key. The icon design will vary between object types. |
|
|
Fine Adjustment: Track Objects |
| Track Objects (signals, switches, speed signs, markers, etc) are always attached to an existing track. They can be moved to new positions along the track and in Surveyor Classic that was the limit of their movement. Surveyor 2.0 brings a new freedom of movement to track objects. They can be moved away from the track to the left or right as well as above and below the track. The operation of a track object is not affected by these changes. |
Fine Adjustment: Move a Track Object
| Track objects can be moved to new positions along the track and to positions closer to the track or further away from the track. |
 |
|
|||||||||||||||||
 |
|
|||||||||||||||||
Fine Adjustment: Set the Height of a Track Object
| Track objects can be raised above and lowered below the track level. |
Throw Lever track object level with track |
|
||||||||||||
 After being moved vertically |
|
||||||||||||
Fine Adjustment: Track Object Context Menu
A selected track mesh object, or a group of selected track mesh objects, will have a Context Icon that opens a Context Menu. The icon design will vary between object types.
|
|
|
|
Track objects can also be rotated to the opposite side of the track.
 |
|
|||||||||
Fine Adjustment: Spline Objects (Including Track) |
| Scenery splines and track splines are defined by their endpoints. Splines are usually added to a route as a series of joined segments linked at the endpoints. |
|
||||||||
Fine Adjustment: Move Spline Endpoints
 |
The 3D Anchor Frame shown is for a spline endpoint.
|
|||||||||||||||
Fine Adjustment: Move Spline Segments
|
 |
The 3D Anchor Frame shown is for a spline segment.
|
|||||||||||||||
|
 |
Selecting a spline segment with the Fine Adjustment Tool will add a Temporary Endpoint at the point where the segment was clicked.
|
 Segment moved to the right along the Red horizontal Anchor line |
 Segment moved up along the Blue vertical Anchor line |
|
|||
 Segment rotated anti-clockwise around the Blue rotational Anchor arc line |
 Segment rotated clockwise around the Red rotational Anchor arc line |
|
|
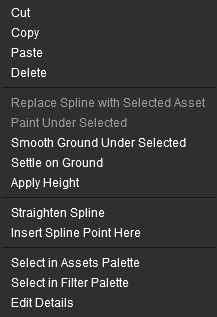
Fine Adjustment: Spline Object Context Menu
A selected scenery spline object, or a group of selected scenery spline objects, will have a Context Icon that opens a Context Menu. The icon design will vary between object types.
|
|
||||||||||||||||||
|
|
|
Fine Adjustment: Rolling Stock Objects |
| Rolling Stock Objects (locomotives, wagons, etc) can only be moved along the track that they are attached to. If they are moved off the track then they will immediately "snap back" to the nearest track when they are released. |
Fine Adjustment: Move Rolling Stock Objects
Use the Fine Adjustment tool to move a selected rolling stock object along the track.
|
 |
|
|
||||||
Fine Adjustment: Decouple Rolling Stock Objects
| All decoupling operations between Rolling Stock Objects are performed using just a Left Click and Drag. |
|
||||||||||
|
A rolling stock object or objects in the middle of a consist can also be decoupled. This will break the consist into 3 sections.
|
Select one (Left Click) or more ( Shift + Left Click) rolling stock objects inside a consist | |||||||||||
| > |
|
|||||||||||
Fine Adjustment: Couple Rolling Stock Objects
| All coupling operations between Rolling Stock Objects can be performed using just a Left Click and Drag or through the objects Context Menu. |
![]() Using "Click and Drag"
Using "Click and Drag"
|
||||||||||||||
Consider the following simple situation:-
| The guard van (caboose) standing at the rear of a consist has to be coupled to the rear gondola wagon. | |||||||||
|
|
||||||||
|
|
||||||||
![]() Using the Context Menu
Using the Context Menu
Using the same situation as above, the isolated guard van and the gondola wagon at the end of a consist are to be coupled together.
|
|
|||||||||||
|
|
| Using a more complex example involving multiple objects from several different consists. The selected wagons shown below are to form a single consist based on the loco. |
|
| The loco was the last object to be selected so it has the Context Icon. The Context Menu is opened and the option Merge into Single Train is selected with the result as shown below. |
|
| The wagons and loco have been combined into a single consist but not necessarily in a useful order. Left Click and Drag the incorrectly placed vehicles to their correct positions. |
Fine Adjustment: Rolling Stock Object Context Menu
A selected rolling stock object, or a group of selected rolling stock objects, will have a Context Icon that opens a Context Menu. The icon design will vary between object types.
|
|
|
Fine Adjustment: Object Height Problem Solutions |
|
|||||||||||
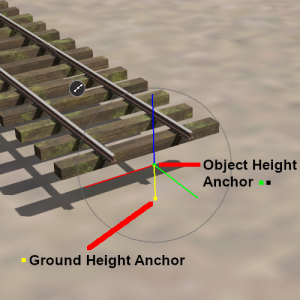 |
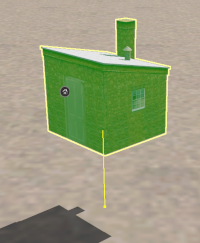
Object Height Above Ground Height
|
|||||||||||||
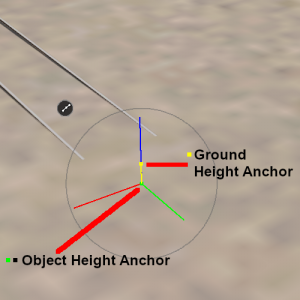 |
Object Height Below Ground Height
|
|||||||||||||
 |
Where this method fails is when the height difference between the two Anchor points exceeds the length of the Blue vertical Anchor line so the Ground Height Anchor or the Object Height Anchor is at the very top of the Anchor line. Once it is in that position the Object Height Anchor can no longer be moved up or down because there is no vertical Anchor line to grab.
|
||||||||
A more complex alternative method is to use the Surveyor Compass Rose, the Info Palette and the Tool Options Palette.
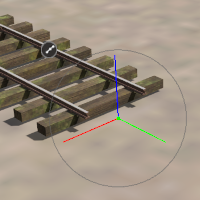
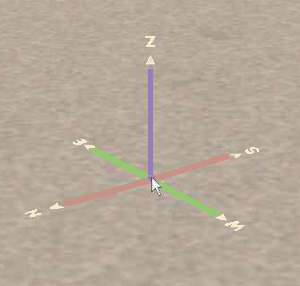 The Surveyor Compass Rose |
|
|||||||||||||||||
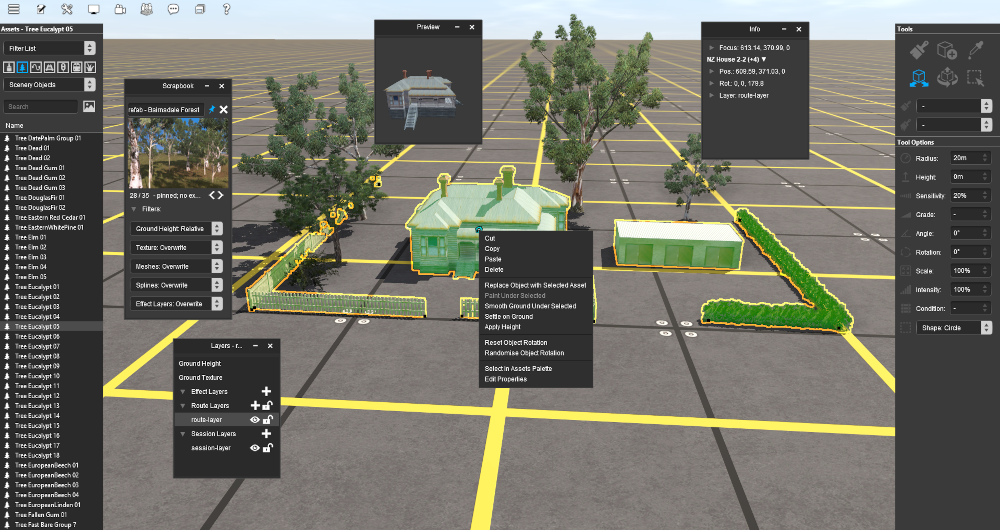
The Marquee Tool |
| Keyboard Shortcut: F | The Marquee Tool selects and copies the objects, deletes baseboards, adds new baseboards and sets their properties in a Trainz World |
|
The Marquee Tool has no drop down menu lists.
 |
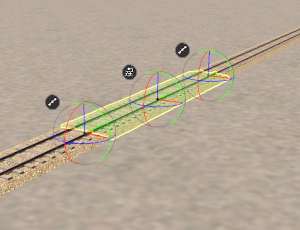
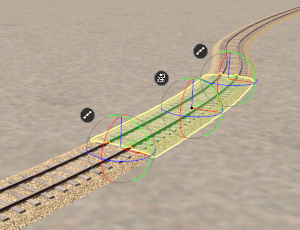
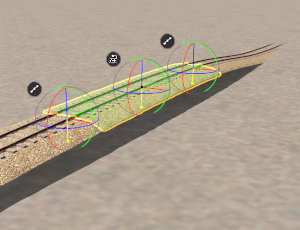
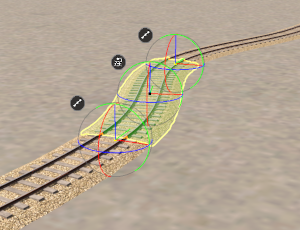
|
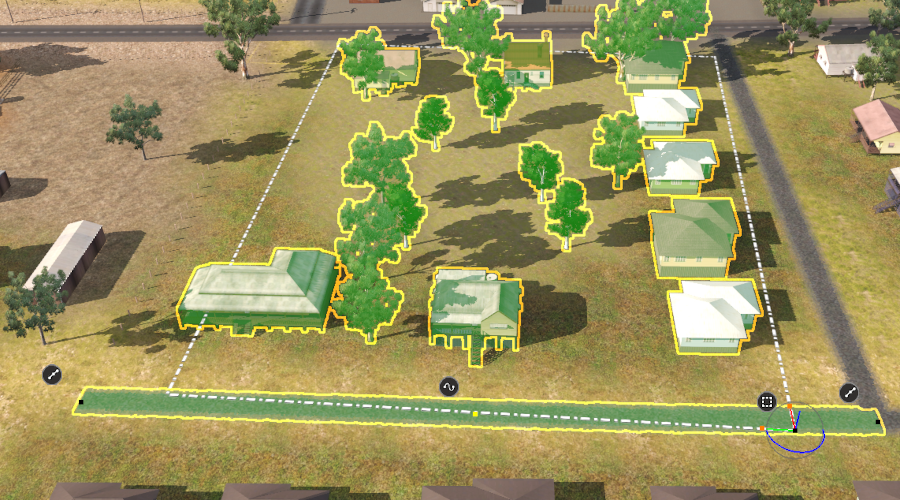
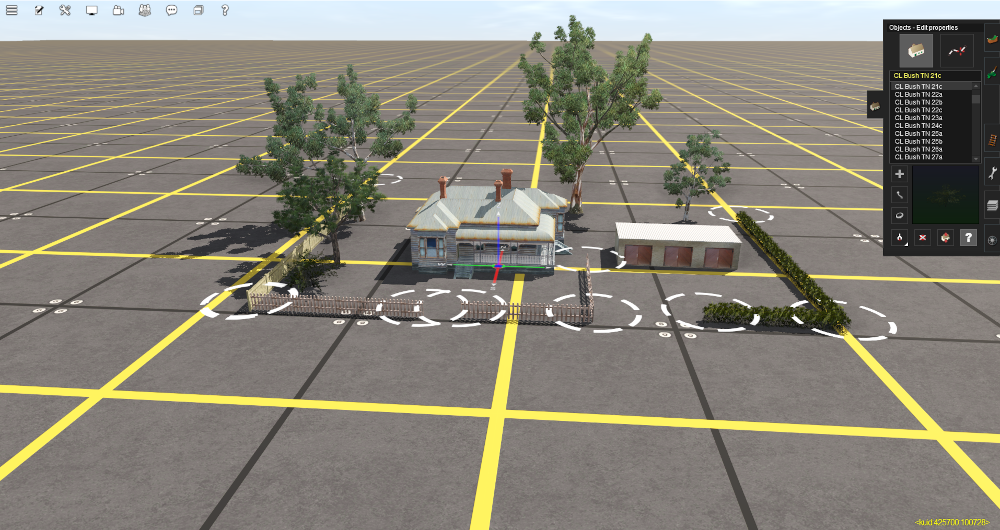
| In the image above:- | |
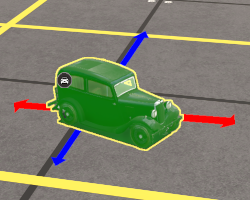
| a road spline at the bottom and a house at the lower left of the Marquee Selection Area have been overlain by the drawn rectangle so they have been included in the selection. | |
| the Marquee Selection Area was drawn from the top left to the bottom right which places the Marquee Context Icon at the bottom right of the rectangle. | |
| the bottom right of the Marquee Selection Area also has a 3D Anchor Frame. | |
| The road spline was the last object that was included in the selection area so its Context Icons are also present. | |
Not shown in the image, because they are not highlighted, are the Ground Heights, Ground Textures and Effect Layers that are also included in the Marquee Selection Area.
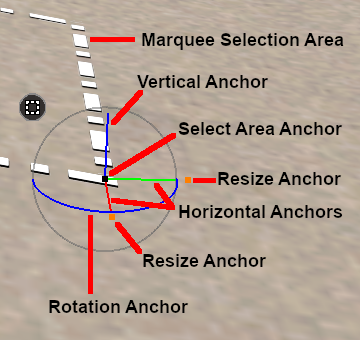 |
The Marquee Selection Area 3D Anchor Frame has some similarities to the one used with the Fine Adjustment Tool.
|
|
||||||
The Marquee Tool and the Assets Palette Filter |
| The Assets Palette filter tools can be used to restrict the objects selected by the Marquee Tool. |
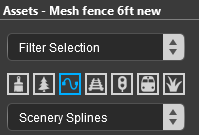 |
|
|||||||||||||
Using the Filters shown above, the Marquee Selection Area only selects scenery spline objects.
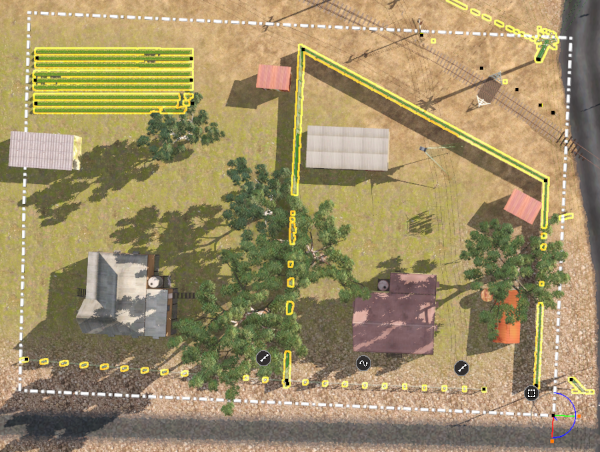
Marquee Anchor Controls |
The following images demonstrate the effect of using the Marquee Anchor Controls on the image shown at the top of this section as the starting point.
Horizontal Anchor Shift
|
||||||||
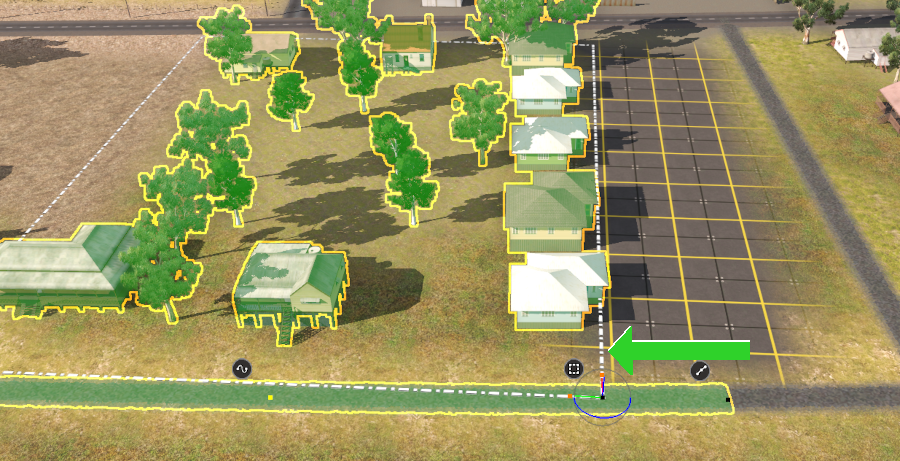
Rotational Anchor Shift
|
||||||||
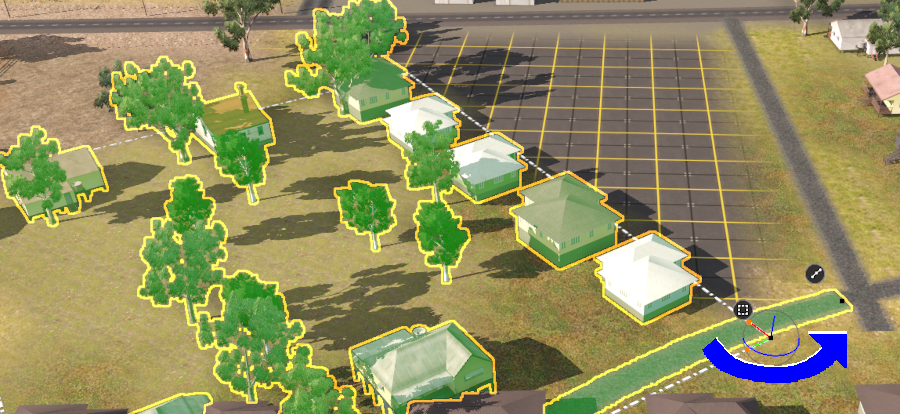
Vertical Anchor Shift
|
||||||||
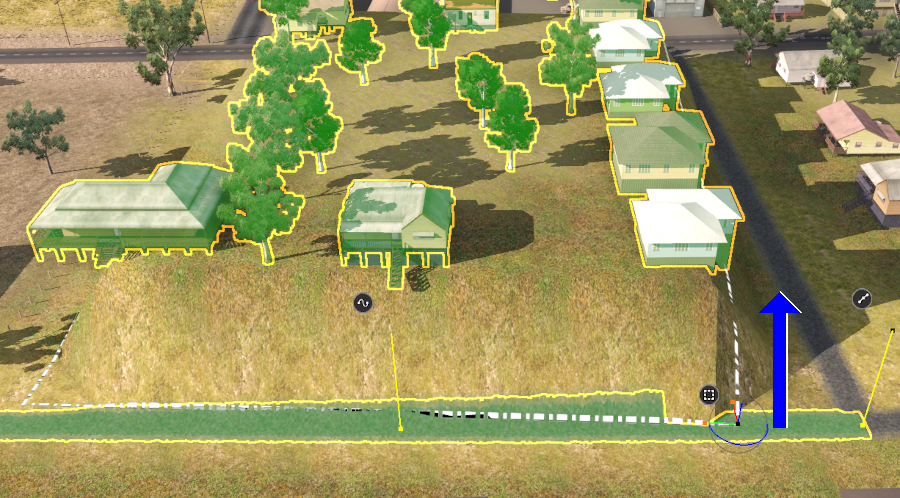
|
|||||||||||||
Marquee Context Menu |
|
|
||||||||||||||||||||||||||||||||||||
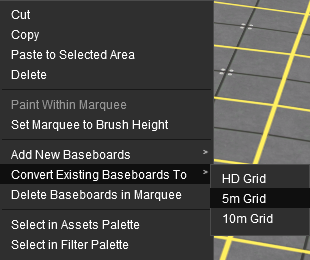
Scrapbook Operations |
|
|
||||||||||||||||||||||||||||||||||
Once an area has been marked out by the Marquee Tool a number of options become available.
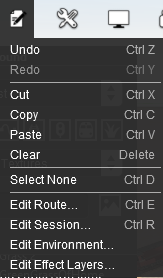 |
|
|||||||||||||
Adding a New Scrapbook
The Cut and Copy Scrapbook operations are also found in the Marquee Context Menu (see the Marquee Context Menu section above).
|
When a new Scrapbook is created by a Cut or Copy , it will appear in the Scrapbook palette with some basic details.
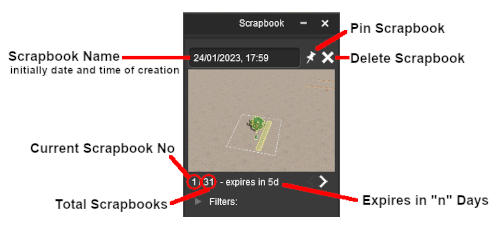 |
|
|||||||||||||||
|
|
|
 |
||||||||||
Once a scrapbook has been Pinned it becomes an asset and will appear in Content Manager

The scrapbook can be uploaded to the DLS and saved as a CDP file.
|
Managing Baseboards |
| The Marquee is a powerful tool for adding, deleting and changing the properties of multiple baseboards |
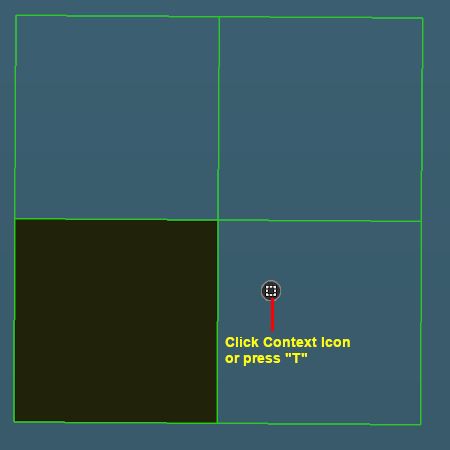 |
|
|||||||||||||||||||
Mass Object Moves and Clones |
|
Selecting and Moving Multiple Objects
Multiple objects can be selected and moved with the Free Move Tool and the Fine Adjustment Tool.
|
|
||||||||||||
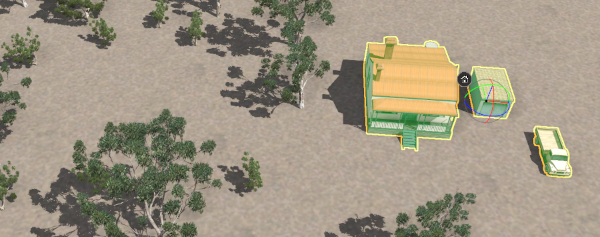 |
|
||||||||||
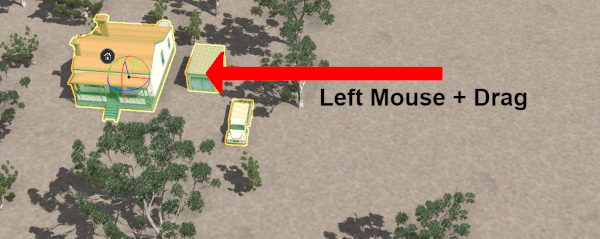 |
|
||||||||||
Selecting Multiple Identical Objects
You can quickly select all nearby identical objects by a Double Left Click on an object.
|
| A forest of many different trees. Only one has been selected. | Double Left Click on a tree to select all the identical trees in the forest. |
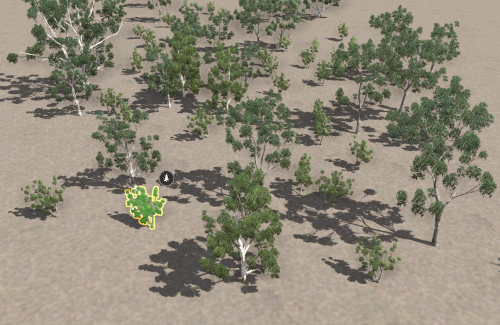 |
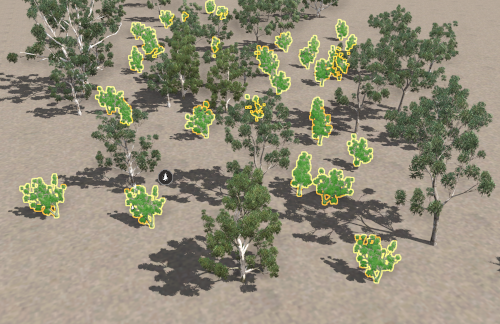 |
|
Cloning Objects |
| You can easily clone single and multiple selected objects. If you have selected a group of objects they do not have to be the same type - you can select scenery objects and scenery splines. |
|
|
|||||||||||
|
|||||||||
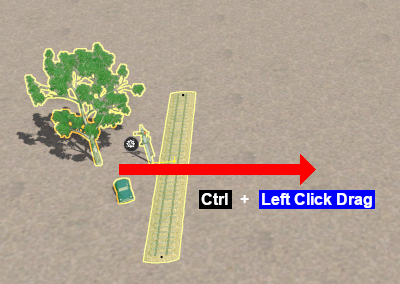
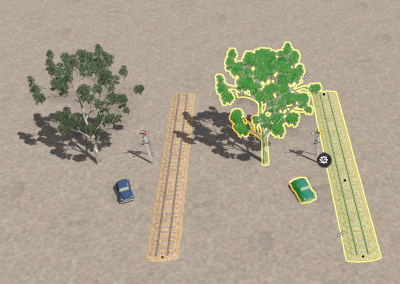
The Info Palette |
|
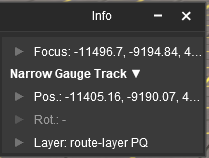 |
|
||||||||||
The components of the Info Palette are identified in the image below.
 |
Each of the small arrowhead icons will open the palette to display more information and some controls. |
|
||||||||||||||||||
Focus Info and Controls |
| The Focus shows the current position and height of the Cursor object. |
Open up the Focus by a Left Click on its arrowhead icon.
|
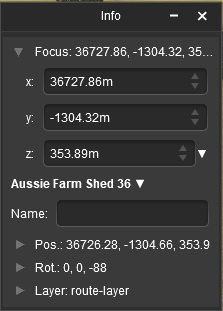 |
|
|
Next to the z co-ordinate is a small white down arrowhead. Left Click on the arrowhead to open its menu.
 |
There is only one option in the sub-menu. Use Height for Brush
|
Asset Name Menu |
You must have an object (or objects) selected for a name to be shown and for this menu to be available.
| If more than one object has been selected then the name and position data shown will be for the last selected object. If different objects (with different kuid codes) have been selected then a count of the additional objects will be added. The (+2) shown in the object name in the image on the left indicates that 2 additional different objects are in the group of selected objects. |
Next to the objects name is a small white Down Arrowhead. Left Click on the arrowhead to open its menu.
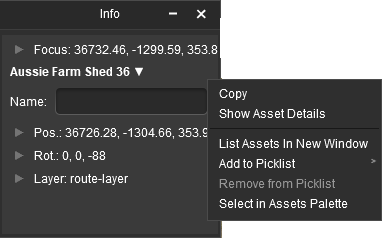 |
The menu options are:-
|
Position Info and Controls |
You must have an object (or objects) selected for the position data to be shown and edited. Open up the position data by a Left Click on its Pos: arrowhead icon.
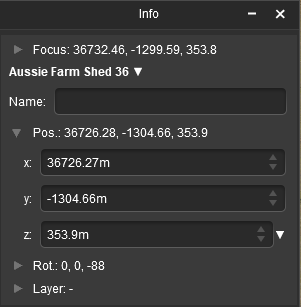 |
The position of the selected object (or the last object if more than one is selected) is shown in the x, y and z text boxes. These values can be edited to move the object or objects to a new position but CARE will be needed.
|
Next to the z co-ordinate is a small white down arrowhead. Left Click on the arrowhead to open its menu.
 |
There is only one option in the sub-menu. Use Height for Brush
|
Rotation Info and Controls |
You must have an object (or objects) selected for the rotation data to be shown and edited. Open up the rotation data by a Left Click on its Rot: arrowhead icon.
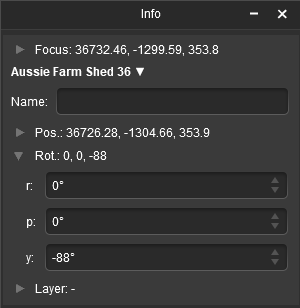 |
The rotational orientation of the selected object (or the last object if more than one is selected) is shown in the r, p and y text boxes (the letters stand for Roll, Pitch and Yaw). These values can be edited to rotate the object or objects in 3D space BUT not all objects can be rotated in certain directions.
|
|
|||||||||||||||||||||||||||||||||||
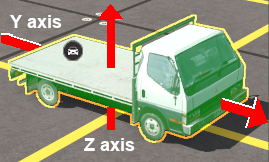
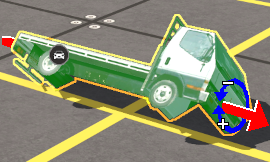
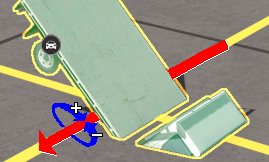
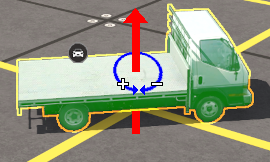
Layer Info and Controls |
You must have an object (or objects) selected for the layer data to be shown and edited. Open up the layer data by a Left Click on its Layer: arrowhead icon.
|
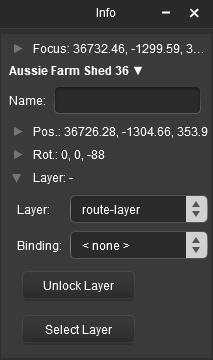 |
This will show the:-
|
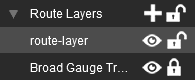
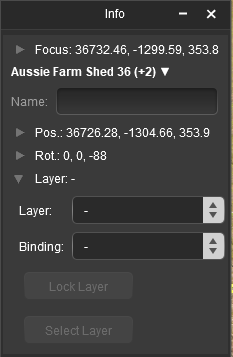 |
If multiple objects from different layers have been selected then no layer name will be shown in the Layer and Binding boxes. Instead they will be left "blank" as shown in the image on the left. Both boxes can still be opened to assign layers to objects.
|
Assigning Objects to a Different Layer |
A selected object or group of selected objects can be assigned to a different layer. If multiple objects have been selected then they do not have to all be in the same layer.
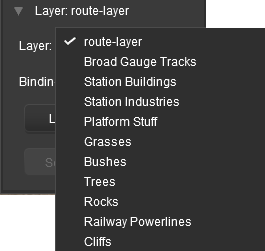 |
|
|||||||||||
Once a target layer has been selected then the Select Layer button, which sets the Active Layer, may become active.
|
|
||||||||
Assigning Objects to a Binding Layer |
| The Binding Layer, or Bound Layer as it is also called, is a tool used in the development of a route or session. It allows you to temporarily assign an object to a second layer while it is still in its original layer. The object will then take on the properties (Locked or Unlocked, Hidden or Visible) of both layers. |
|
|
|||||||||||||||||||||||||||||||||||||||||||||||
|
||||||||||||
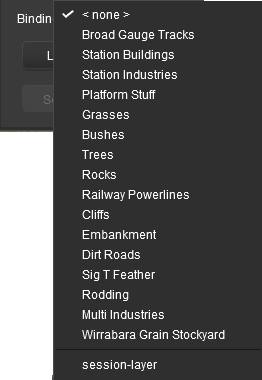 |
|
|||||||||||
| As an example, the image below shows what you will see for a single object that has had:- | |||||||||
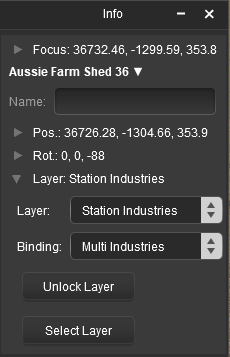 |
|
||||||||
|
More information on creating, editing and using Layers can be found on the Trainz Wiki at:- |
Trainz Wiki
 |
More Tutorials and Guides to Using Trainz |
This page was created by Trainz user pware in January 2023 and was last updated as shown below.