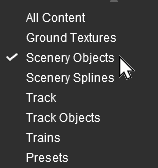
How to Use S20 Tools
m (→Fine Adjustment: Heights) |
m |
||
| Line 2,102: | Line 2,102: | ||
<tr valign="top"> | <tr valign="top"> | ||
<td>[[image:Cblue.png|link=]]</td> | <td>[[image:Cblue.png|link=]]</td> | ||
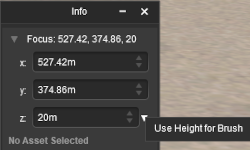
| − | <td> | + | <td>enter a value in the objects <span style="font-size: 15px; font-weight: 700; color: white; background-color: black;"> Z </span> (height) setting in the '''Info Palette'''. This can be used to set the height to '''mm''' accuracy (see [[image:PageLink.PNG|link=]] '''[[#The Info Palette|The Info Palette]]''' below).</td> |
</tr> | </tr> | ||
</table> | </table> | ||
| Line 2,189: | Line 2,189: | ||
<tr valign="top"> | <tr valign="top"> | ||
<td>[[image:Bblue.png|link=]]</td> | <td>[[image:Bblue.png|link=]]</td> | ||
| − | <td> | + | <td>selecting the <span style="font-size: 15px; font-weight: 700; color: white; background-color: black;"> Apply Height </span> option from the objects '''Context Menu''' to apply an existing height value, <span style="font-size: 15px; font-weight: 700;">OR</span></td> |
</tr> | </tr> | ||
<tr valign="top"> | <tr valign="top"> | ||
| Line 2,313: | Line 2,313: | ||
</tr> | </tr> | ||
</table> <!-- END Nav Buttons Table --> | </table> <!-- END Nav Buttons Table --> | ||
| − | |||
='''The Eyedropper Tool'''= | ='''The Eyedropper Tool'''= | ||
| Line 2,673: | Line 2,672: | ||
<tr valign="top"> | <tr valign="top"> | ||
<td>[[image:Ablue.png|link=]]</td> | <td>[[image:Ablue.png|link=]]</td> | ||
| − | <td> | + | <td>enter a value in the '''Tool Options Palette''' <span style="font-size: 15px; font-weight: 700; color: white; background-color: black;"> Height </span> setting, <span style="font-size: 15px; font-weight: 700;">OR</span></td> |
</tr> | </tr> | ||
<tr valign="top"> | <tr valign="top"> | ||
| Line 2,681: | Line 2,680: | ||
<tr valign="top"> | <tr valign="top"> | ||
<td>[[image:Cblue.png|link=]]</td> | <td>[[image:Cblue.png|link=]]</td> | ||
| − | <td> | + | <td>enter a value in the objects <span style="font-size: 15px; font-weight: 700; color: white; background-color: black;"> Z </span> (height) setting in the '''Info Palette'''. This can be used to set the height to '''mm''' accuracy (see [[image:PageLink.PNG|link=]] '''[[#The Info Palette|The Info Palette]]''' below).</td> |
</tr> | </tr> | ||
</table> | </table> | ||
| Line 2,794: | Line 2,793: | ||
</table> | </table> | ||
<br> | <br> | ||
| − | |||
=='''Free Move: Track Objects'''== | =='''Free Move: Track Objects'''== | ||
| Line 3,186: | Line 3,184: | ||
</table> | </table> | ||
<br> | <br> | ||
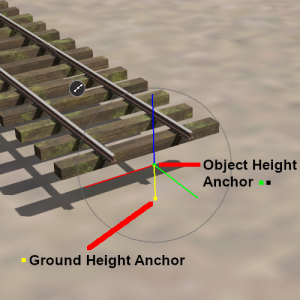
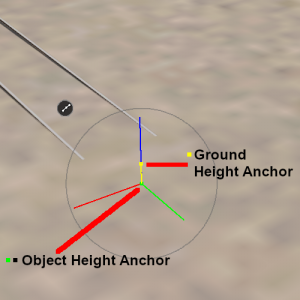
| + | <span style="font-weight: 700; font-size: 17px; color: white; background-color: blue;"> Spline Height Adjustment </span><br> | ||
| + | |||
| + | <table width=600 bgcolor=#000000 cellpadding=2> | ||
| + | <tr valign="top"> | ||
| + | <td> | ||
| + | <table width=596 bgcolor=#ffffff cellpadding=2> | ||
| + | <tr valign="top"> | ||
| + | <td colspan=2><span style="font-weight: 700; font-size: 15px;;">Steps:</span> To det the height of a spline endpoint or segment:- | ||
| + | <table> | ||
| + | <tr valign="top"> | ||
| + | <td>[[image:Ablue.png|link=]]</td> | ||
| + | <td>enter a value in the '''Tool Options Palette''' <span style="font-size: 15px; font-weight: 700; color: white; background-color: black;"> Height </span> setting, <span style="font-size: 15px; font-weight: 700;">OR</span></td> | ||
| + | </tr> | ||
| + | <tr valign="top"> | ||
| + | <td>[[image:Bblue.png|link=]]</td> | ||
| + | <td>select the <span style="font-size: 15px; font-weight: 700; color: white; background-color: black;"> Apply Height </span> option from the objects '''Context Menu''' to apply an existing height value, <span style="font-size: 15px; font-weight: 700;">OR</span></td> | ||
| + | </tr> | ||
| + | <tr valign="top"> | ||
| + | <td>[[image:Cblue.png|link=]]</td> | ||
| + | <td>enter a value in the objects <span style="font-size: 15px; font-weight: 700; color: white; background-color: black;"> Z </span> (height) setting in the '''Info Palette'''. This can be used to set the height to '''mm''' accuracy (see [[image:PageLink.PNG|link=]] '''[[#The Info Palette|The Info Palette]]''' below).</td> | ||
| + | </tr> | ||
| + | </table> | ||
| + | </td> | ||
| + | </tr> | ||
| + | <tr valign="top"> | ||
| + | <td colspan=2>The object will be moved to the set height above (or below) the terrain.</td> | ||
| + | </tr> | ||
| + | </table> | ||
| + | </td> | ||
| + | </tr> | ||
| + | </table> | ||
| + | </td> | ||
| + | </tr> | ||
| + | </table> | ||
| + | <br> | ||
| + | |||
| + | |||
| + | |||
<span style="font-weight: 700; font-size: 17px; color: white; background-color: blue;"> Spline Object Context Menu </span><br> | <span style="font-weight: 700; font-size: 17px; color: white; background-color: blue;"> Spline Object Context Menu </span><br> | ||
| Line 5,766: | Line 5,802: | ||
---- | ---- | ||
[[Category:How-to guides]] | [[Category:How-to guides]] | ||
| − | |||
| − | |||
Revision as of 12:05, 5 February 2023
The information in this Wiki Page applies to Surveyor 2.0 (S20) as found in Trainz Plus. The original refernce material for this document can be found at ![]() Surveyor 2.0 Overview
Surveyor 2.0 Overview
|
|
||||||||||||||||||||||||||||||||||||||||||||||||||||||||||||
|
Surveyor 2.0 vs Surveyor Classic
| Surveyor 2.0 | |||||
| Surveyor 2.0 (or S20) is the new Surveyor interface provided to Trainz Plus Gold and Trainz Plus Standard subscribers as an alternative to Surveyor Classic. Classic is still available as an option to subscribers. | |||||
| Whats New | |||||
| a single set of common tools that can be applied to ALL types of objects | |||||
| the ability to select multiple objects of different types that can be manipulated as one with more freedom than was previously possible | |||||
| each object has its own Context Menu that applies specific actions depending on the type of object | |||||
| information and controls in dockable and moveable Palettes that can be hidden when not needed | |||||
| a new Scrapbook asset to store "scenes" that can be pasted anywhere in a route, between routes and shared through the DLS | |||||
a new Marquee Tool that allows:-
|
|||||
The following screen images help illustrate the change in philosophy that has occurred with the release of the Surveyor 2.0 user interface.
|
||||||
|
||||||
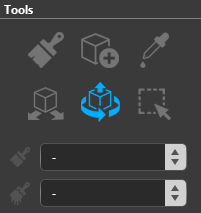
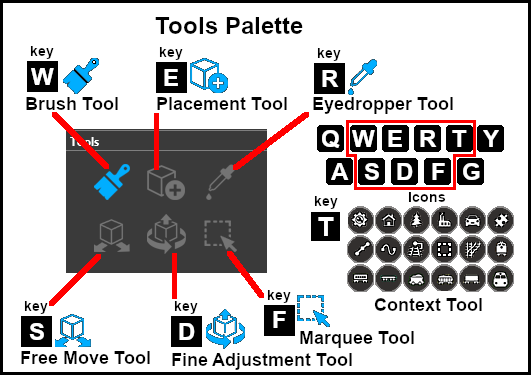
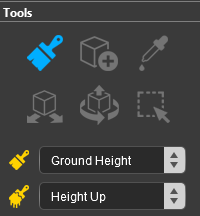
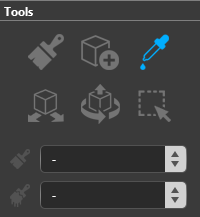
The Tools Palette
The Tools Palette is at the core of the new interface and takes the place of all the Tool Flyouts that have been the standard for Trainz Surveyor for many years now. Some of the tools are new while others have been given new abilities.
|
|
|||||||||||||||||||||
|
The Brush Tool
| Keyboard Shortcut: W | The Brush Tool "paints" the ground height, ground textures, effect layers and scrapbook scenes in a route |
The Brush Tool has two drop down menu lists.
 |
|
|||||||||||||||||||

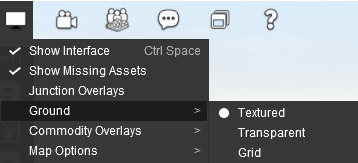
Ground Height
|
When the Ground Height Target is selected, the second drop down box will give a choice of several Ground Height actions.
| The actions are:- | |||||||||
|
 |
||||||||
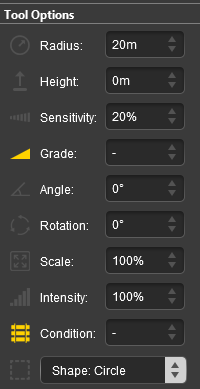
| The brush tool options for each action are shown in the Tool Options Palette with a Gold coloured icon next to their names. Those options that have their icon greyed out will be ignored by the selected action, but they can still be edited. | ||||||||||||||||||||||||||||||||||||
Height Up/Height Down 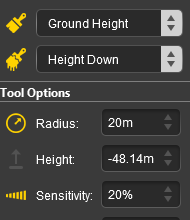 |
Set Height 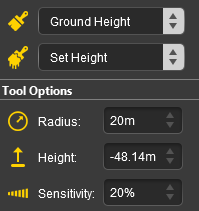 |
Grade  |
|
|||||||||||||||||||||||||||||||||
|
||||||||||||
|
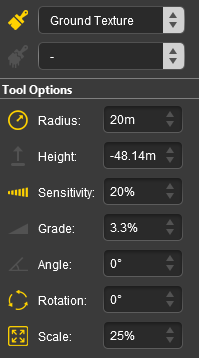
Ground Texture
|
When the Ground Texture Target is selected, the second drop down box will be disabled - there are no brush texture actions.
The brush tool options for each action are shown in the Tool Options Palette with a Gold coloured icon next to their names. Those options that have their icon greyed out will be ignored, but they can still be edited.
When a new route is created or a new baseboard is added it will be covered with the Default ground texture for the selected Region. This can be temporarily disabled or permanently changed to a different texture (including to the standard TRS19 grid pattern).
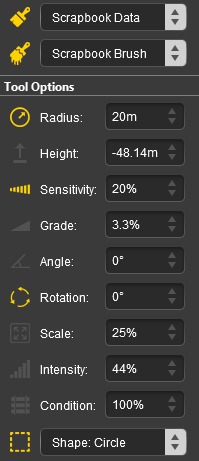
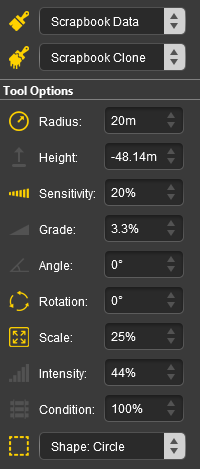
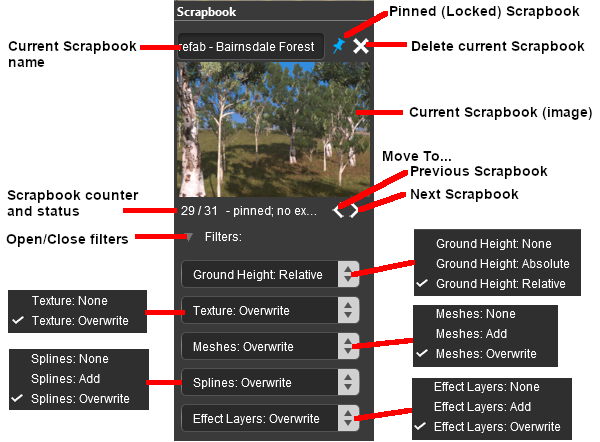
Scrapbook Data
When the Scrapbook Data Target is selected, the second drop down box will give a choice of two actions.
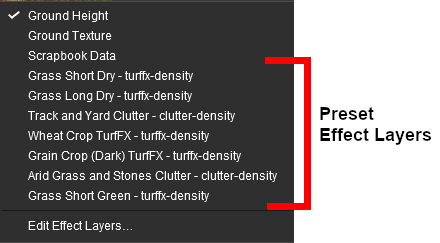
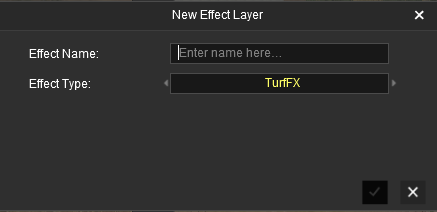
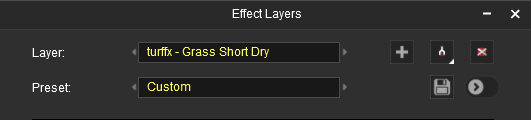
Effect LayersIf the route has Effect Layers installed then they will be listed individually as additional Targets.
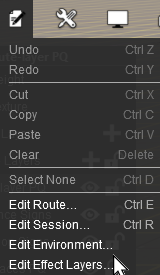
Edit Effect Layers...When this Target is selected, the Edit Effect Layers options will appear. This is the same as selecting Edit Effect Layers ... from the Trainz Edit Menu.
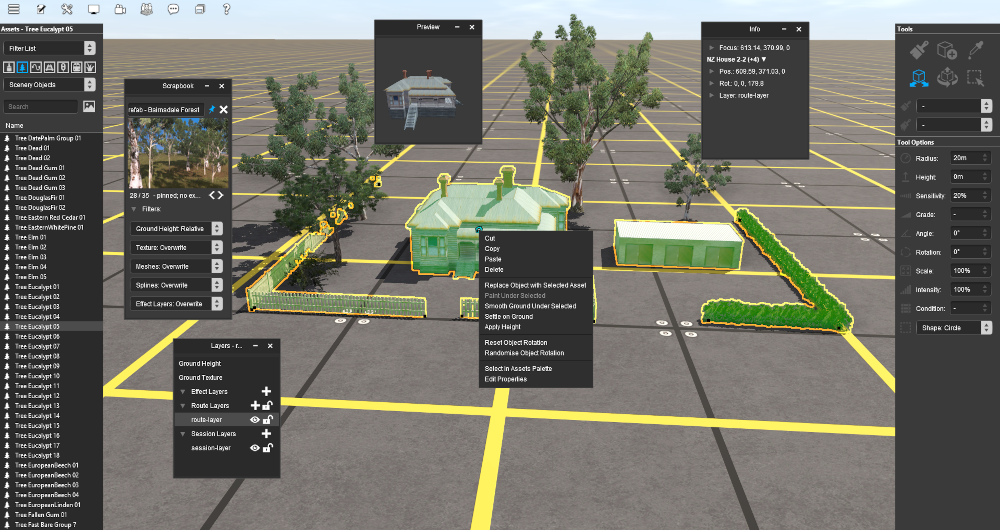
The Placement Tool
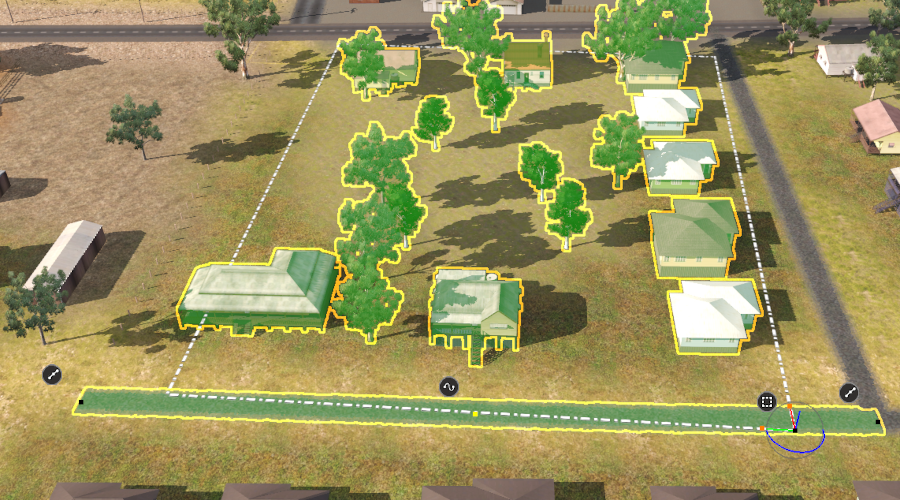
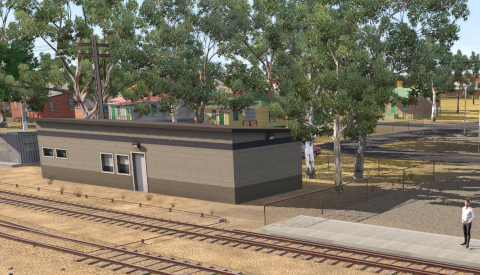
Placing a Scenery Mesh ObjectIndividual "non-spline" scenery objects that are not attached to track are often referred to in Trainz terminology as Scenery Mesh Objects .
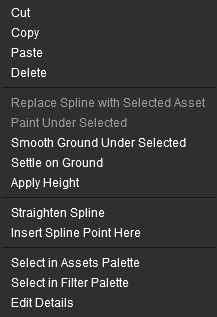
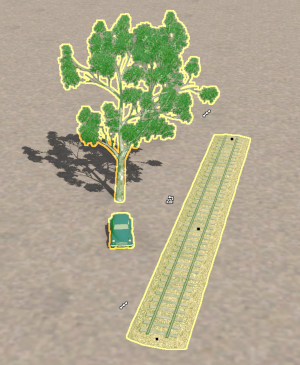
Placing a Scenery or Track SplineStart the process of laying a track or spline by identifying and selecting the track or scenery spline as described in steps
When you start adding a spline to a route it will always be placed at the height of the terrain regardless of the Tool Options Height setting. However, you can set the height of the last segment that was added or of any selected segment.
Placing Track Objects
Placement Tool OptionsThe Tool Options Palette Height setting for Scenery Mesh Objects, Scenery Splines, Track Splines and Track Objects when using the Placement Tool does not always show a gold coloured icon which indicates an "active" control setting but the setting is active.
Spline (Scenery and Track) Tool Options
Deleting Placed Objects
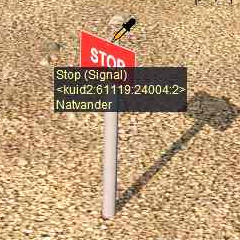
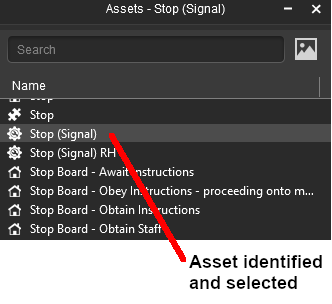
The Eyedropper Tool
Quick Steps
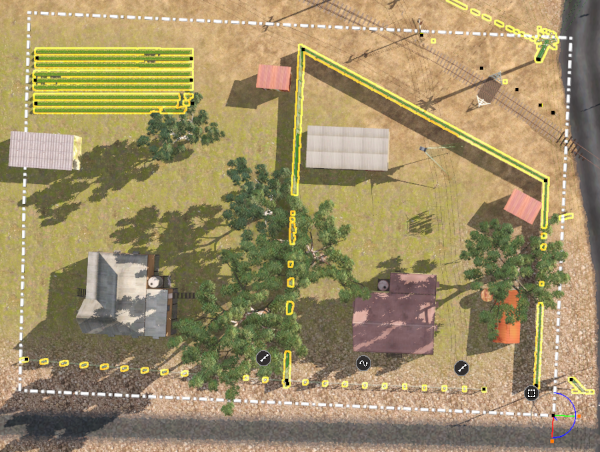
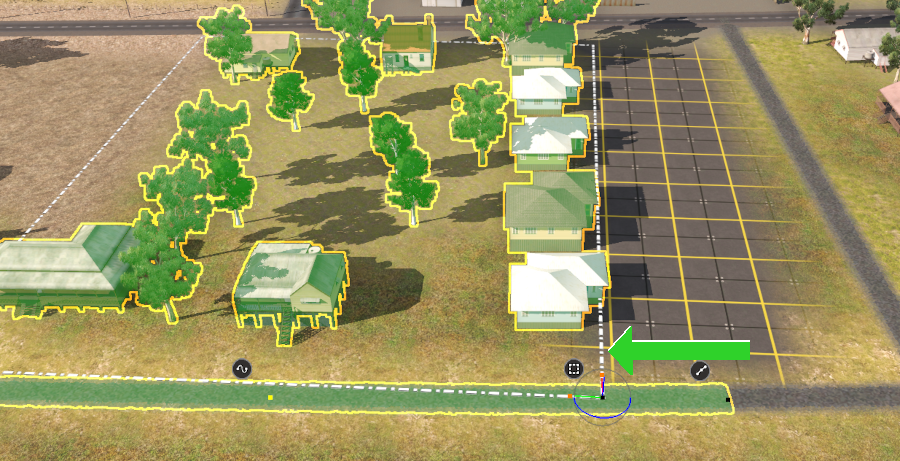
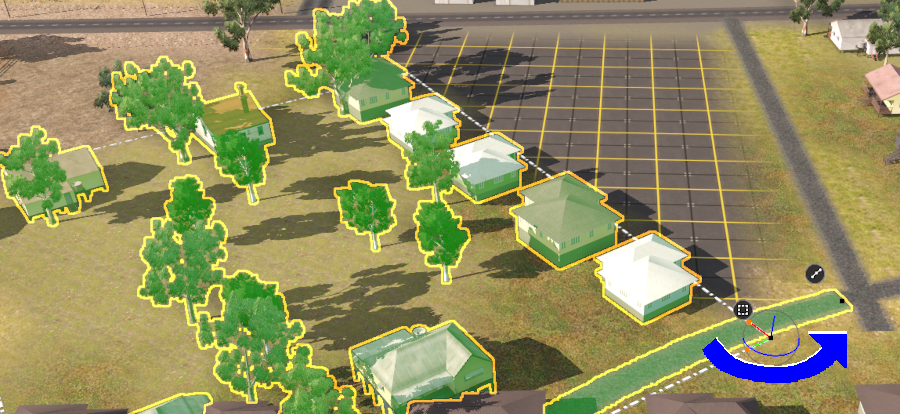
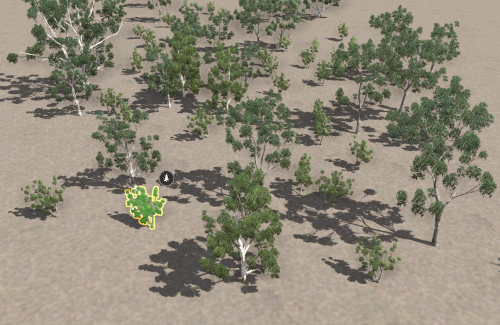
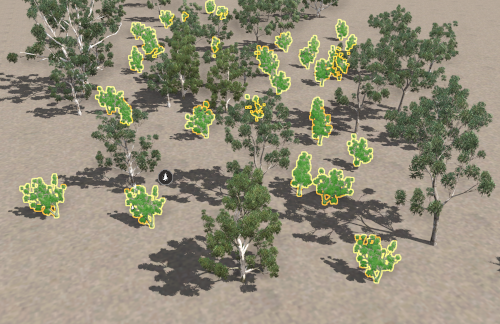
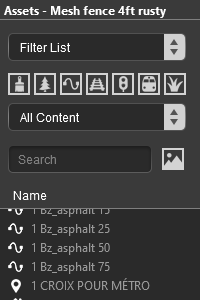
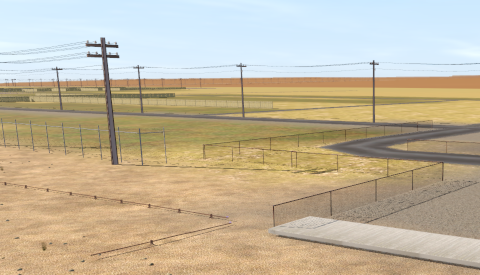
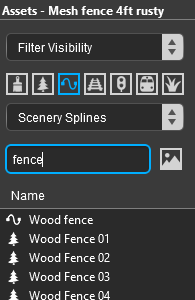
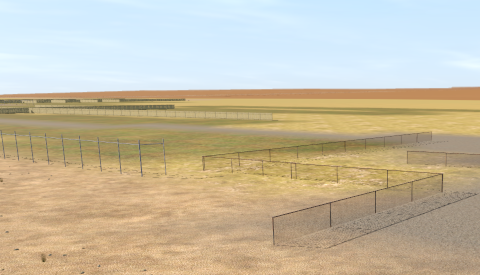
Narrowing the SearchSometimes (or often) a scene will be too crowded with different scenery objects to be able to use the Eyedropper Tool to easily select a single object. In these cases additional options are available to help "remove the clutter".
As an example the following images show the progressive application of a Visibility Filter.
The Free Move Tool
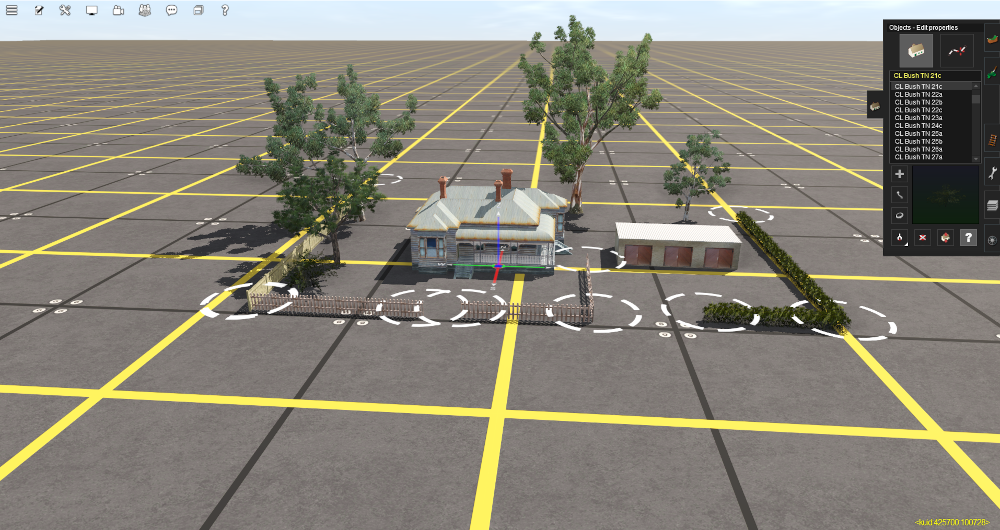
Free Move: Scenery Mesh ObjectsIndividual "non-spline" scenery objects that are not attached to track are often referred to in Trainz terminology as Scenery Mesh Objects .
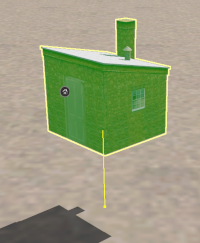
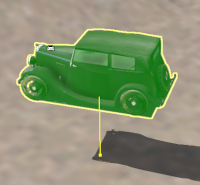
When placed in a route by the Placement Tool a scenery object will take the height of the terrain as its set height. It will be fixed to the terrain so when you move it around it will always be at the same height as the terrain it is over. This can be changed to fix the object to a set height above or below the terrain.
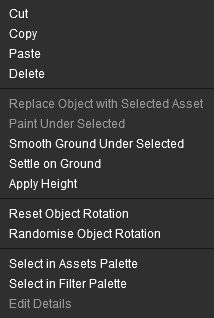
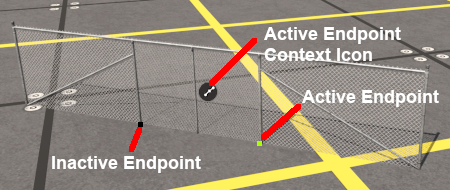
A selected scenery object, or a group of selected scenery objects, will have a Context Icon that opens a Context Menu. The icon design will vary between object types.
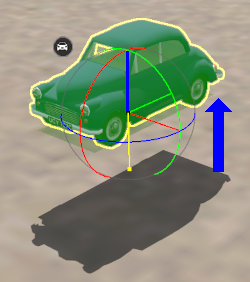
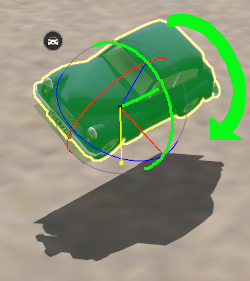
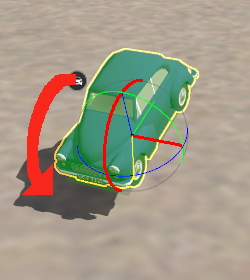
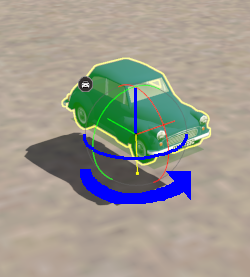
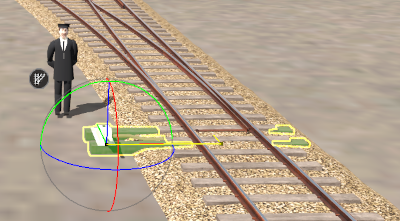
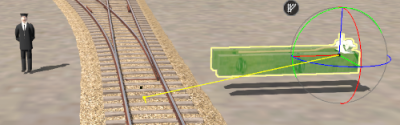
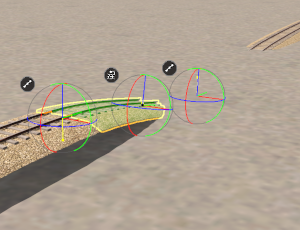
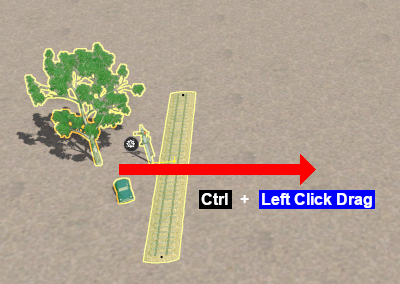
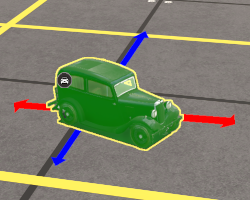
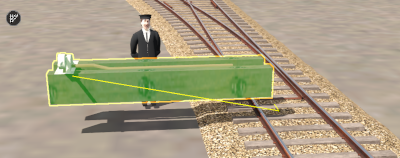
Free Move: Track ObjectsTrack Objects (signals, switches, speed signs, etc) are always attached to an existing track. They can be moved to new positions along the track and in Surveyor Classic that was the limit of their movement. Surveyor 2.0 brings a new freedom of movement to track objects. They can be moved away from the track to the left or right as well as above and below the track. The operation of a track object is not affected by these changes.
The track object can still be moved along the track with the Free Move Tool.
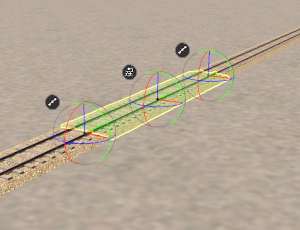
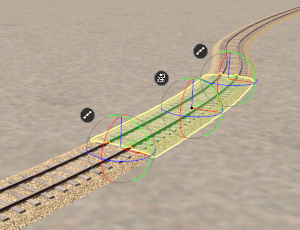
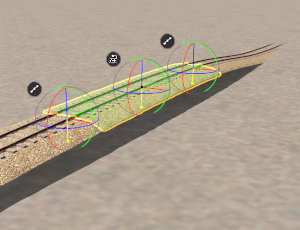
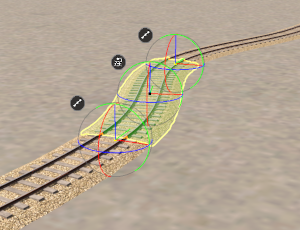
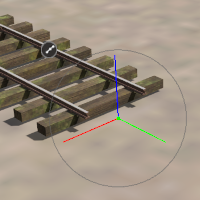
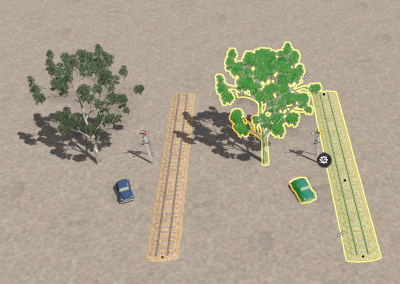
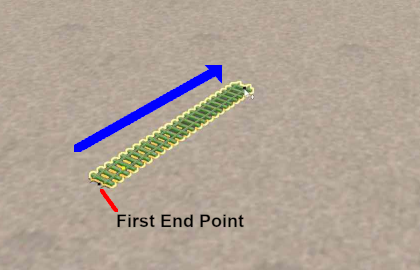
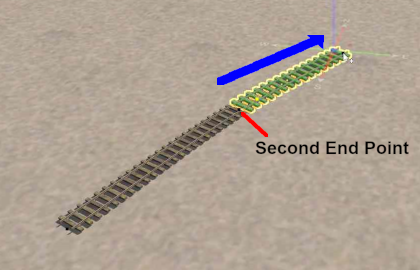
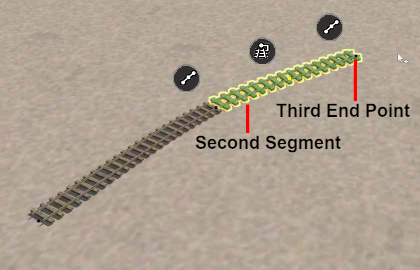
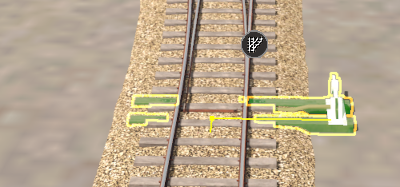
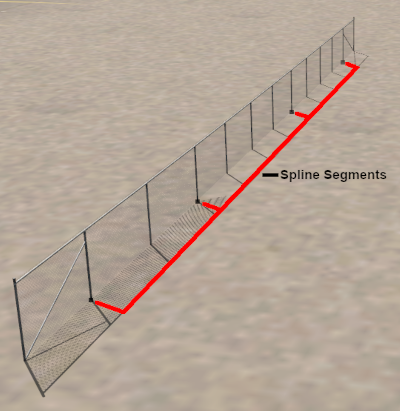
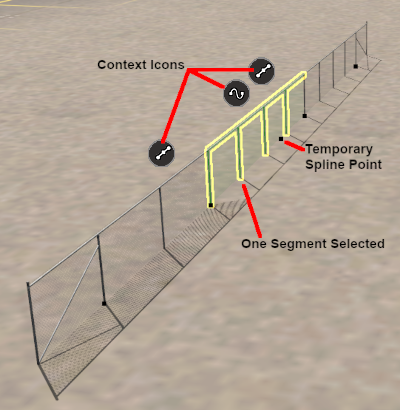
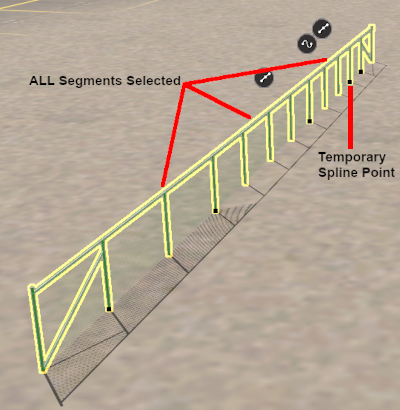
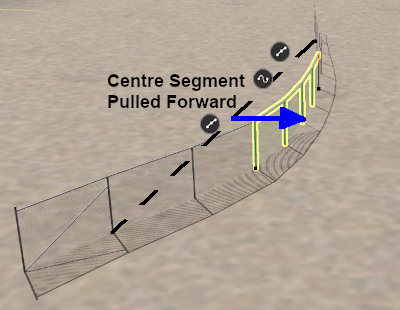
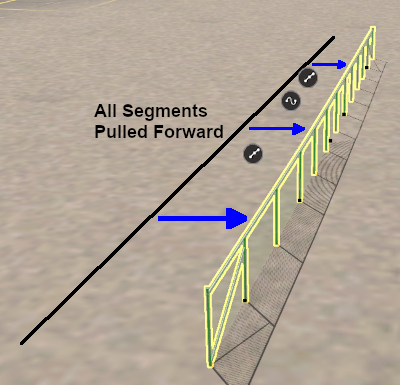
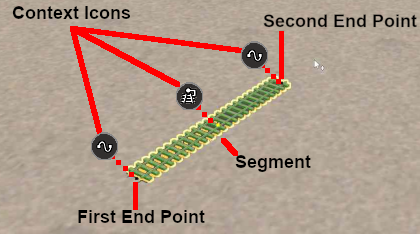
Free Move: Spline Objects (Including Track)Scenery splines and track splines are defined by their endpoints. Splines are usually added to a route as a series of joined segments linked at the endpoints.
Splines are frequently made of multiple segments joined together. You can easily move a spline by moving its segments, individually or as a group.
|
||||||||||||||||||||||||||||||||||||||||||||||||||||||||||||||||||||||||||||||||||||||||||||||||||||||||||||||||||||||||||||||||||||||||||||||||||||||||||||||||||||||||||||||||||||||||||||||||||||||||||||||||||||||||||||||||||||||||||||||||||||||||||||||||||||||||||||||||||||||||||||||||||||||||||||||||||||||||||||||||||||||||||||||||||||||||||||||||||||||||||||||||||||||||||||||||||||||||||||||||||||||||||||||||||||||||||||||||||||||||||||||||||||||||||||||||||||||||||||||||||||||||||||||||||||||||||||||||||||||||||||||||||||||||||||||||||||||||||||||||||||||||||||||||||||||||||||||||||||||||||||||||||||||||||||||||||||||||||||||||||||||||||||||||||||||||||||||||||||||||||||||||||||||||||||||||||||||||||||||||||||||||||||||||||||||||||||||||||||||||||||||||||||||||||||||||||||||||||||||||||||||||||||||||||||||


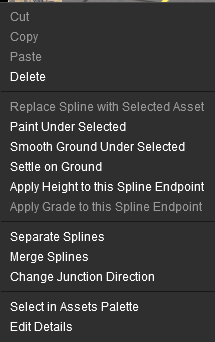
Spline Object Context Menu
 |
|
||||||||||||
Left click on an icon to open its Context Menu.
The Fine Adjustment Tool
Fine Adjustment: Scenery Mesh ObjectsIndividual "non-spline" scenery objects that are not attached to track are often referred to in Trainz terminology as Scenery Mesh Objects .
Fine Adjustment: Track ObjectsTrack Objects (signals, switches, speed signs, etc) are always attached to an existing track. They can be moved to new positions along the track and in Surveyor Classic that was the limit of their movement. Surveyor 2.0 brings a new freedom of movement to track objects. They can be moved away from the track to the left or right as well as above and below the track. The operation of a track object is not affected by these changes.
Fine Adjustment: Spline Objects (Including Track)Scenery splines and track splines are defined by their endpoints. Splines are usually added to a route as a series of joined segments linked at the endpoints.
Fine Adjustment: Heights
The Marquee Tool
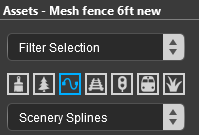
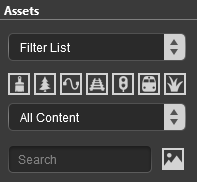
Using the Assets Palette Filter The Assets Palette filter tools can be used to restrict the objects selected by the Marquee Tool.
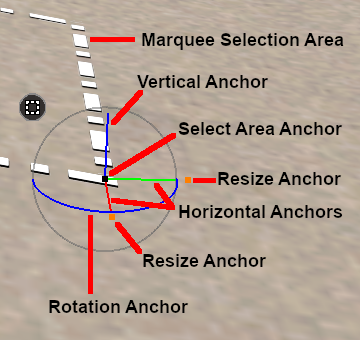
Marquee Anchor Controls
Horizontal Anchor Shift
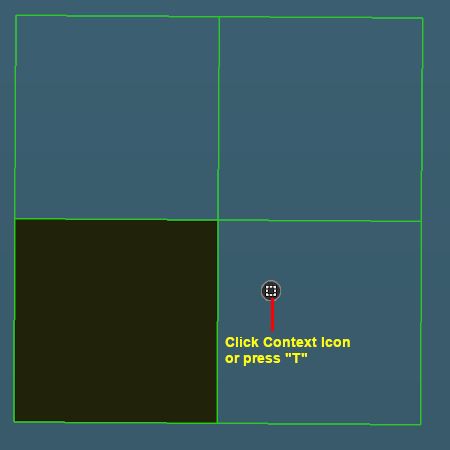
Marquee Context MenuLeft click on the Marquee Context Icon or press the T key to open the Context Menu for the Marquee.
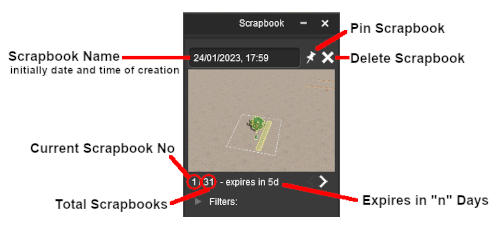
Scrapbook Operations
The Cut and Copy Scrapbook operations are also found in the Marquee Context Menu (see the Marquee Context Menu section above).
The scrapbook can be uploaded to the DLS and saved as a CDP file.
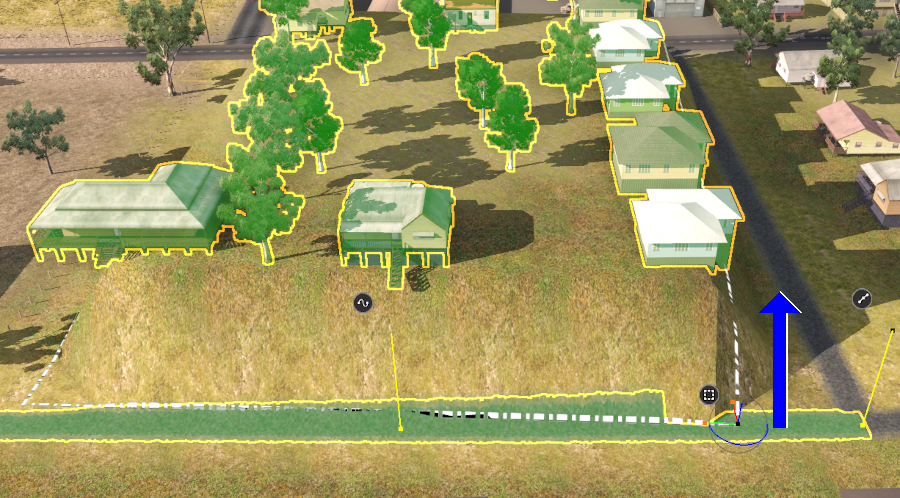
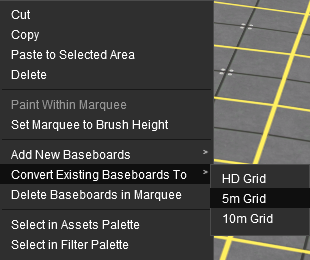
Managing BaseboardsThe Marquee is a powerful tool for adding, deleting and changing the properties of multiple baseboards.
Mass Object Moves and ClonesBoth the Free Move Tool and the Fine Adjustment Tool can move and clone (copy) single and multiple objects. The Marquee Tool can also move and clone objects but will include Ground Height, Ground Textures and Effect Layers in the cloning and moving operations. Selecting and Moving Multiple ObjectsMultiple objects can be selected and moved with the Free Move Tool and the Fine Adjustment Tool.
You can quickly select all nearby identical objects by a Double-LeftClick on an object.
Cloning ObjectsYou can easily clone single and multiple selected objects. If you have selected a group of objects they do not have to be the same type - you can select scenery objects and scenery splines.
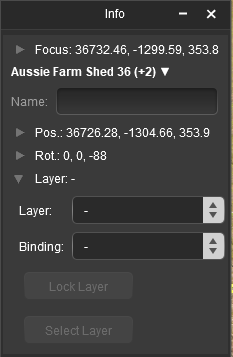
The Info Palette
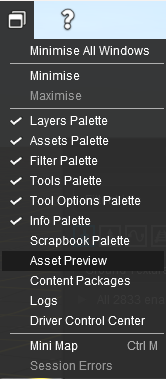
This palette can be easily overlooked but it has some very useful features.
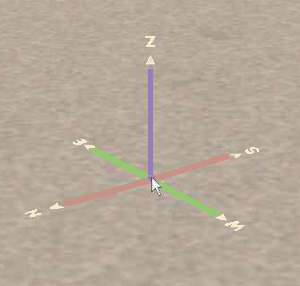
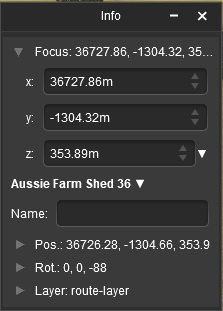
Focus Info and ControlsThe Focus shows the current position and height of the Cursor object. Open up the Focus by Left clicking on its arrowhead icon.
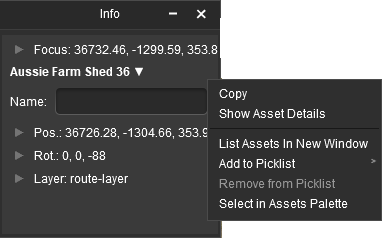
Asset Name MenuYou must have an object (or objects) selected for a name to be shown and the menu to be available.
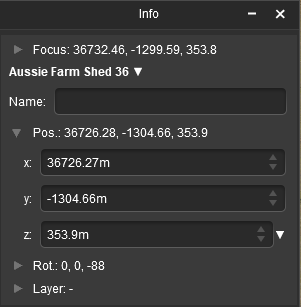
Position Info and ControlsYou must have an object (or objects) selected for the position data to be shown and edited. Open up the position data by Left clicking on its Pos: arrowhead icon.
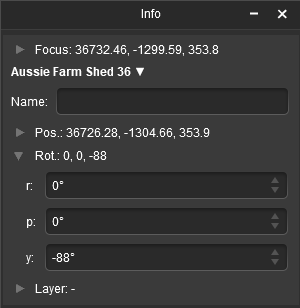
Rotation Info and ControlsYou must have an object (or objects) selected for the rotation data to be shown and edited. Open up the rotation data by Left clicking on its Rot: arrowhead icon.
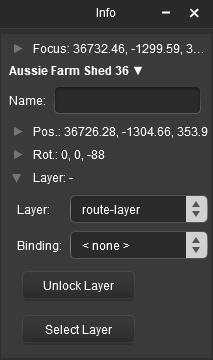
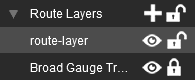
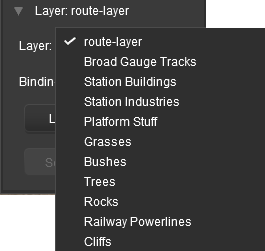
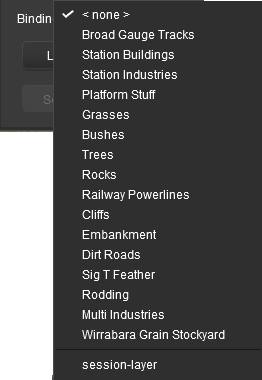
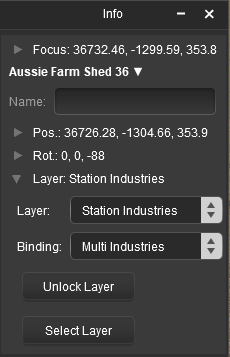
Layer Info and ControlsYou must have an object (or objects) selected for the layer data to be shown and edited. Open up the layer data by Left clicking on its Layer: arrowhead icon.
Assigning Objects to a Different LayerA selected object or group of selected objects can be assigned to a different layer. If multiple objects have been selected then they do not have to all be in the same layer.
The Active Layer is the layer used by the Placement Tool when objects are added to a route (or session). This button gives you the opportunity to set the Active Layer to the same layer that you just used to assign to an object. Its use is optional. You can also set the Active Layer by selecting its name from the layer list in the Assets Palette.
Assigning Objects to a Binding LayerThe Binding Layer, or Bound Layer as it is also called, is a tool used in the development of a route or session. It allows you to temporarily assign an object to a second layer while it is still in its original layer. The object will then take on the properties (Locked/Unlocked, Hidden/Visible) of both layers.
Some examples of using the Binding Layer:-
Trainz Wiki
This page was created by Trainz user pware in January 2023 and was last updated as shown below. |
|||||||||||||||||||||||||||||||||||||||||||||||||||||||||||||||||||||||||||||||||||||||||||||||||||||||||||||||||||||||||||||||||||||||||||||||||||||||||||||||||||||||||||||||||||||||||||||||||||||||||||||||||||||||||||||||||||||||||||||||||||||||||||||||||||||||||||||||||||||||||||||||||||||||||||||||||||||||||||||||||||||||||||||||||||||||||||||||||||||||||||||||||||||||||||||||||||||||||||||||||||||||||||||||||||||||||||||||||||||||||||||||||||||||||||||||||||||||||||||||||||||||||||||||||||||||||||||||||||||||||||||||||||||||||||||||||||||||||||||||||||||||||||||||||||||||||||||||||||||||||||||||||||||||||||||||||||||||||||||||||||||||||||||||||||||||||||||||||||||||||||||||||||||||||||||||||||||||||||||||||||||||||||||||||||||||||||||||||||||||||||||||||||||||||||||||||||||||||||||||||||||||||||||||||||||||