How to Use S20 Tools
(→Marquee Context Menu) |
|||
| Line 7: | Line 7: | ||
<table> <!-- BEGIN Nav Buttons Table --> | <table> <!-- BEGIN Nav Buttons Table --> | ||
<tr valign="top"> | <tr valign="top"> | ||
| − | <td width=729><span id="stepTools"></span>& | + | <td width=729><span id="stepTools"></span> </td> |
<td width=46>[[file:BackToTop.png|link=#top|alt=Top|Top]]</td> | <td width=46>[[file:BackToTop.png|link=#top|alt=Top|Top]]</td> | ||
| − | <td width=75>& | + | <td width=75> </td> |
<td width=75>[[file:NextDown.png|link=#stepBrush|alt=Next Down|Next Down]]</td> | <td width=75>[[file:NextDown.png|link=#stepBrush|alt=Next Down|Next Down]]</td> | ||
<td width=75>[[file:BackToBottom.png|link=#bottom|alt=Bottom|Bottom]]</td> | <td width=75>[[file:BackToBottom.png|link=#bottom|alt=Bottom|Bottom]]</td> | ||
| Line 78: | Line 78: | ||
<table> <!-- BEGIN Nav Buttons Table --> | <table> <!-- BEGIN Nav Buttons Table --> | ||
<tr valign="top"> | <tr valign="top"> | ||
| − | <td width=729><span id="stepBrush"></span>& | + | <td width=729><span id="stepBrush"></span> </td> |
<td width=46>[[file:BackToTop.png|link=#top|alt=Top|Top]]</td> | <td width=46>[[file:BackToTop.png|link=#top|alt=Top|Top]]</td> | ||
<td width=75>[[file:NextUp.png|link=#stepTools|alt=Next Up|Next Up]]</td> | <td width=75>[[file:NextUp.png|link=#stepTools|alt=Next Up|Next Up]]</td> | ||
| Line 161: | Line 161: | ||
<table width=896 bgcolor=#ffffff> | <table width=896 bgcolor=#ffffff> | ||
<tr valign="top"> | <tr valign="top"> | ||
| − | <td>This brush tool uses the '''Tool Options Palette'''. If this palette is not visible on the screen then refer to [[image:PageLink.PNG|link=]]& | + | <td>This brush tool uses the '''Tool Options Palette'''. If this palette is not visible on the screen then refer to [[image:PageLink.PNG|link=]] '''[[#Notes_Palettes|Notes: Palettes]]''' at the top of this document. |
</td> | </td> | ||
</tr> | </tr> | ||
| Line 327: | Line 327: | ||
<table width=896 bgcolor=#ffffff> | <table width=896 bgcolor=#ffffff> | ||
<tr valign="top"> | <tr valign="top"> | ||
| − | <td>This brush tool uses the '''Tool Options Palette'''. If this palette is not visible on the screen then refer to [[image:PageLink.PNG|link=]]& | + | <td>This brush tool uses the '''Tool Options Palette'''. If this palette is not visible on the screen then refer to [[image:PageLink.PNG|link=]] '''[[#Notes_Palettes|Notes: Palettes]]''' at the top of this document. |
</td> | </td> | ||
</tr> | </tr> | ||
| Line 802: | Line 802: | ||
<table> <!-- BEGIN Nav Buttons Table --> | <table> <!-- BEGIN Nav Buttons Table --> | ||
<tr valign="top"> | <tr valign="top"> | ||
| − | <td width=729><span id="stepPlacement"></span>& | + | <td width=729><span id="stepPlacement"></span> </td> |
<td width=46>[[file:BackToTop.png|link=#top|alt=Top|Top]]</td> | <td width=46>[[file:BackToTop.png|link=#top|alt=Top|Top]]</td> | ||
<td width=75>[[file:NextUp.png|link=#stepBrush|alt=Next Up|Top]]</td> | <td width=75>[[file:NextUp.png|link=#stepBrush|alt=Next Up|Top]]</td> | ||
| Line 826: | Line 826: | ||
<table width=896 bgcolor=#ffffff> | <table width=896 bgcolor=#ffffff> | ||
<tr valign="top"> | <tr valign="top"> | ||
| − | <td>This tool uses the '''Assets Palette'''. If this palette is not visible on the screen then refer to [[image:PageLink.PNG|link=]]& | + | <td>This tool uses the '''Assets Palette'''. If this palette is not visible on the screen then refer to [[image:PageLink.PNG|link=]] '''[[#Notes_Palettes|Notes: Palettes]]''' at the top of this document. |
</td> | </td> | ||
</tr> | </tr> | ||
| Line 856: | Line 856: | ||
<tr valign="top"> | <tr valign="top"> | ||
<td width=15>[[image:DotPoint.JPG|15px|link=]]</td> | <td width=15>[[image:DotPoint.JPG|15px|link=]]</td> | ||
| − | <td>using the [[image:PageLink.PNG|link=]]& | + | <td>using the [[image:PageLink.PNG|link=]] '''[[#The Free Move Tool|Free Move Tool]]'''</td> |
</tr> | </tr> | ||
<tr valign="top"> | <tr valign="top"> | ||
<td width=15>[[image:DotPoint.JPG|15px|link=]]</td> | <td width=15>[[image:DotPoint.JPG|15px|link=]]</td> | ||
| − | <td>using the [[image:PageLink.PNG|link=]]& | + | <td>using the [[image:PageLink.PNG|link=]] '''[[#The Fine Adjustment Tool|Fine Adjustment Tool]]'''</td> |
</tr> | </tr> | ||
<tr valign="top"> | <tr valign="top"> | ||
<td>[[image:DotPoint.JPG|15px|link=]]</td> | <td>[[image:DotPoint.JPG|15px|link=]]</td> | ||
| − | <td>editing its <span style="font-size: 15px; font-weight: 700; color: white; background-color: black;"> X </span> <span style="font-size: 15px; font-weight: 700; color: white; background-color: black;"> Y </span> <span style="font-size: 15px; font-weight: 700; color: white; background-color: black;"> Z </span> values in [[image:PageLink.PNG|link=]]& | + | <td>editing its <span style="font-size: 15px; font-weight: 700; color: white; background-color: black;"> X </span> <span style="font-size: 15px; font-weight: 700; color: white; background-color: black;"> Y </span> <span style="font-size: 15px; font-weight: 700; color: white; background-color: black;"> Z </span> values in [[image:PageLink.PNG|link=]] '''[[#The Info Palette|The Info Palette]]'''</td> |
</tr> | </tr> | ||
<tr valign="top"> | <tr valign="top"> | ||
| Line 1,358: | Line 1,358: | ||
<table> <!-- BEGIN Nav Buttons Table --> | <table> <!-- BEGIN Nav Buttons Table --> | ||
<tr valign="top"> | <tr valign="top"> | ||
| − | <td width=729><span id="stepEyedropper"></span>& | + | <td width=729><span id="stepEyedropper"></span> </td> |
<td width=46>[[file:BackToTop.png|link=#top|alt=Top|Top]]</td> | <td width=46>[[file:BackToTop.png|link=#top|alt=Top|Top]]</td> | ||
<td width=75>[[file:NextUp.png|link=#stepPlacement|alt=Next Up|Top]]</td> | <td width=75>[[file:NextUp.png|link=#stepPlacement|alt=Next Up|Top]]</td> | ||
| Line 1,382: | Line 1,382: | ||
<table width=896 bgcolor=#ffffff> | <table width=896 bgcolor=#ffffff> | ||
<tr valign="top"> | <tr valign="top"> | ||
| − | <td>This tool uses the '''Assets Palette'''. If this palette is not visible on the screen then refer to [[image:PageLink.PNG|link=]]& | + | <td>This tool uses the '''Assets Palette'''. If this palette is not visible on the screen then refer to [[image:PageLink.PNG|link=]] '''[[#Notes_Palettes|Notes: Palettes]]''' at the top of this document. |
</td> | </td> | ||
</tr> | </tr> | ||
| Line 1,548: | Line 1,548: | ||
<table> <!-- BEGIN Nav Buttons Table --> | <table> <!-- BEGIN Nav Buttons Table --> | ||
<tr valign="top"> | <tr valign="top"> | ||
| − | <td width=729><span id="stepFreeMove"></span>& | + | <td width=729><span id="stepFreeMove"></span> </td> |
<td width=46>[[file:BackToTop.png|link=#top|alt=Top|Top]]</td> | <td width=46>[[file:BackToTop.png|link=#top|alt=Top|Top]]</td> | ||
<td width=75>[[file:NextUp.png|link=#stepEyedropper|alt=Next Up|Top]]</td> | <td width=75>[[file:NextUp.png|link=#stepEyedropper|alt=Next Up|Top]]</td> | ||
| Line 1,572: | Line 1,572: | ||
<table width=896 bgcolor=#ffffff> | <table width=896 bgcolor=#ffffff> | ||
<tr valign="top"> | <tr valign="top"> | ||
| − | <td>This tool uses the '''Tool Options Palette''' and the '''Info Palette''' (to display data only). If these palettes are not visible on the screen then refer to [[image:PageLink.PNG|link=]]& | + | <td>This tool uses the '''Tool Options Palette''' and the '''Info Palette''' (to display data only). If these palettes are not visible on the screen then refer to [[image:PageLink.PNG|link=]] '''[[#Notes_Palettes|Notes: Palettes]]''' at the top of this document. |
</td> | </td> | ||
</tr> | </tr> | ||
| Line 1,602: | Line 1,602: | ||
<tr valign="top"> | <tr valign="top"> | ||
<td width=15>[[image:DotPoint.JPG|15px|link=]]</td> | <td width=15>[[image:DotPoint.JPG|15px|link=]]</td> | ||
| − | <td>using the [[image:PageLink.PNG|link=]]& | + | <td>using the [[image:PageLink.PNG|link=]] '''[[#The Fine Adjustment Tool|Fine Adjustment Tool]]'''</td> |
</tr> | </tr> | ||
<tr valign="top"> | <tr valign="top"> | ||
<td>[[image:DotPoint.JPG|15px|link=]]</td> | <td>[[image:DotPoint.JPG|15px|link=]]</td> | ||
| − | <td>editing its <span style="font-size: 15px; font-weight: 700; color: white; background-color: black;"> X </span> <span style="font-size: 15px; font-weight: 700; color: white; background-color: black;"> Y </span> <span style="font-size: 15px; font-weight: 700; color: white; background-color: black;"> Z </span> values in [[image:PageLink.PNG|link=]]& | + | <td>editing its <span style="font-size: 15px; font-weight: 700; color: white; background-color: black;"> X </span> <span style="font-size: 15px; font-weight: 700; color: white; background-color: black;"> Y </span> <span style="font-size: 15px; font-weight: 700; color: white; background-color: black;"> Z </span> values in [[image:PageLink.PNG|link=]] '''[[#The Info Palette|The Info Palette]]'''</td> |
</tr> | </tr> | ||
<tr valign="top"> | <tr valign="top"> | ||
| Line 2,276: | Line 2,276: | ||
<table> <!-- BEGIN Nav Buttons Table --> | <table> <!-- BEGIN Nav Buttons Table --> | ||
<tr valign="top"> | <tr valign="top"> | ||
| − | <td width=729><span id="stepFineAdjustment"></span>& | + | <td width=729><span id="stepFineAdjustment"></span> </td> |
<td width=46>[[file:BackToTop.png|link=#top|alt=Top|Top]]</td> | <td width=46>[[file:BackToTop.png|link=#top|alt=Top|Top]]</td> | ||
<td width=75>[[file:NextUp.png|link=#stepFreeMove|alt=Next Up|Top]]</td> | <td width=75>[[file:NextUp.png|link=#stepFreeMove|alt=Next Up|Top]]</td> | ||
| Line 2,317: | Line 2,317: | ||
<tr valign="top"> | <tr valign="top"> | ||
<td width=15>[[image:DotPoint.JPG|15px|link=]]</td> | <td width=15>[[image:DotPoint.JPG|15px|link=]]</td> | ||
| − | <td>using the [[image:PageLink.PNG|link=]]& | + | <td>using the [[image:PageLink.PNG|link=]] '''[[#The Free Move Tool|Free Move Tool]]'''</td> |
</tr> | </tr> | ||
<tr valign="top"> | <tr valign="top"> | ||
<td>[[image:DotPoint.JPG|15px|link=]]</td> | <td>[[image:DotPoint.JPG|15px|link=]]</td> | ||
| − | <td>editing its <span style="font-size: 15px; font-weight: 700; color: white; background-color: black;"> X </span> <span style="font-size: 15px; font-weight: 700; color: white; background-color: black;"> Y </span> <span style="font-size: 15px; font-weight: 700; color: white; background-color: black;"> Z </span> <span style="font-size: 15px; font-weight: 700; color: white; background-color: black;"> R </span> <span style="font-size: 15px; font-weight: 700; color: white; background-color: black;"> P </span> <span style="font-size: 15px; font-weight: 700; color: white; background-color: black;"> Y </span> values in [[image:PageLink.PNG|link=]]& | + | <td>editing its <span style="font-size: 15px; font-weight: 700; color: white; background-color: black;"> X </span> <span style="font-size: 15px; font-weight: 700; color: white; background-color: black;"> Y </span> <span style="font-size: 15px; font-weight: 700; color: white; background-color: black;"> Z </span> <span style="font-size: 15px; font-weight: 700; color: white; background-color: black;"> R </span> <span style="font-size: 15px; font-weight: 700; color: white; background-color: black;"> P </span> <span style="font-size: 15px; font-weight: 700; color: white; background-color: black;"> Y </span> values in [[image:PageLink.PNG|link=]] '''[[#The Info Palette|The Info Palette]]'''</td> |
</tr> | </tr> | ||
<tr valign="top"> | <tr valign="top"> | ||
| Line 2,934: | Line 2,934: | ||
<table> <!-- BEGIN Nav Buttons Table --> | <table> <!-- BEGIN Nav Buttons Table --> | ||
<tr valign="top"> | <tr valign="top"> | ||
| − | <td width=729><span id="stepMarquee"></span>& | + | <td width=729><span id="stepMarquee"></span> </td> |
<td width=46>[[file:BackToTop.png|link=#top|alt=Top|Top]]</td> | <td width=46>[[file:BackToTop.png|link=#top|alt=Top|Top]]</td> | ||
<td width=75>[[file:NextUp.png|link=#stepFineAdjustment|alt=Next Up|Top]]</td> | <td width=75>[[file:NextUp.png|link=#stepFineAdjustment|alt=Next Up|Top]]</td> | ||
| Line 2,958: | Line 2,958: | ||
<table width=896 bgcolor=#ffffff> | <table width=896 bgcolor=#ffffff> | ||
<tr valign="top"> | <tr valign="top"> | ||
| − | <td>This tool uses the '''Scrapbook Palette'''. If this palette is not visible on the screen then refer to [[image:PageLink.PNG|link=]]& | + | <td>This tool uses the '''Scrapbook Palette'''. If this palette is not visible on the screen then refer to [[image:PageLink.PNG|link=]] '''[[#Notes_Palettes|Notes: Palettes]]''' at the top of this document. |
</td> | </td> | ||
</tr> | </tr> | ||
| Line 3,000: | Line 3,000: | ||
<tr valign="top"> | <tr valign="top"> | ||
<td width=15>[[image:DotPoint.JPG|link=]]</td> | <td width=15>[[image:DotPoint.JPG|link=]]</td> | ||
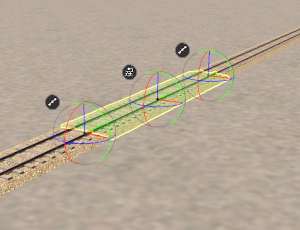
| − | <td>the <span style="font-weight: 700; font-size: 15px; color: white; background-color: green;"> Green </span> and <span style="font-weight: 700; font-size: 15px; color: white; background-color: red;"> Red </span> horizontal Anchors will move the Marquee and all its scenery assets in the Anchor direction. This move does not include '''Ground Heights''', '''Ground Textures''' and '''Effect Layers'''.</td> | + | <td>the <span style="font-weight: 700; font-size: 15px; color: white; background-color: green;"> Green </span> and <span style="font-weight: 700; font-size: 15px; color: white; background-color: red;"> Red </span> horizontal Anchors will move the Marquee and all its scenery assets in the Anchor direction. This move does not include '''Ground Heights''', '''Ground Textures''' and '''Effect Layers'''. See [[image:PageLink.PNG|link=]] '''[[#Marquee_Anchor_Controls|Marquee Anchor Controls]]''' below for more details</td> |
</tr> | </tr> | ||
<tr valign="top"> | <tr valign="top"> | ||
<td>[[image:DotPoint.JPG|link=]]</td> | <td>[[image:DotPoint.JPG|link=]]</td> | ||
| − | <td>the <span style="font-weight: 700; font-size: 15px; color: white; background-color: blue;"> Blue </span> rotational Anchor will rotate the Marquee with all its scenery assets (not including '''Ground Heights''', '''Ground Textures''' and '''Effect Layers''') in the direction of the rotation movement</td> | + | <td>the <span style="font-weight: 700; font-size: 15px; color: white; background-color: blue;"> Blue </span> rotational Anchor will rotate the Marquee with all its scenery assets (not including '''Ground Heights''', '''Ground Textures''' and '''Effect Layers''') in the direction of the rotation movement. See [[image:PageLink.PNG|link=]] '''[[#Marquee_Anchor_Controls|Marquee Anchor Controls]]''' below for more details</td> |
</tr> | </tr> | ||
<tr valign="top"> | <tr valign="top"> | ||
| Line 3,023: | Line 3,023: | ||
</table> | </table> | ||
<br> | <br> | ||
| + | |||
=='''Scrapbook Operations'''== | =='''Scrapbook Operations'''== | ||
| Line 3,046: | Line 3,047: | ||
<tr valign="top"> | <tr valign="top"> | ||
<td><span style="font-weight: 700; font-size: 15px; color: white; background-color: black;"> Paste </span></td> | <td><span style="font-weight: 700; font-size: 15px; color: white; background-color: black;"> Paste </span></td> | ||
| − | <td>the contents of the current '''Scrapbook''' will be pasted into the route at the cursor (focus) point. Which contents will be pasted and how they will be pasted are controlled by the '''Filters''' in the '''Scrapbook Palette''' (see [[image:PageLink.PNG|link=]]& | + | <td>the contents of the current '''Scrapbook''' will be pasted into the route at the cursor (focus) point. Which contents will be pasted and how they will be pasted are controlled by the '''Filters''' in the '''Scrapbook Palette''' (see [[image:PageLink.PNG|link=]] '''[[#Scrapbook_Data|Scrapbook Data]]''' for more details). This option will always be available with and without a Marqee area being marked if there is a scrapbook available to be pasted.</td> |
</tr> | </tr> | ||
</table> | </table> | ||
| Line 3,065: | Line 3,066: | ||
</table> | </table> | ||
<br> | <br> | ||
| − | |||
=='''Marquee Context Menu'''== | =='''Marquee Context Menu'''== | ||
| Line 3,087: | Line 3,087: | ||
<tr valign="top"> | <tr valign="top"> | ||
<td><span style="font-weight: 700; font-size: 15px; color: white; background-color: black;"> Paste to Selected Area </span></td> | <td><span style="font-weight: 700; font-size: 15px; color: white; background-color: black;"> Paste to Selected Area </span></td> | ||
| − | <td>the contents of the current '''Scrapbook''' will be pasted into the Marquee area. Which contents will be pasted and how they will be pasted are controlled by the '''Filters''' in the '''Scrapbook Palette''' (see [[image:PageLink.PNG|link=]]& | + | <td>the contents of the current '''Scrapbook''' will be pasted into the Marquee area. Which contents will be pasted and how they will be pasted are controlled by the '''Filters''' in the '''Scrapbook Palette''' (see [[image:PageLink.PNG|link=]] '''[[#Scrapbook_Data|Scrapbook Data]]''' for more details). This option will always be available with and without a Marqee area being marked if there is a scrapbook available to be pasted.</td> |
</tr> | </tr> | ||
</table> | </table> | ||
| Line 3,119: | Line 3,119: | ||
</table> | </table> | ||
<br> | <br> | ||
| + | <span style="font-weight: 700; font-size: 15px;">This section is still under construction</span> | ||
| + | <br> | ||
| + | =='''Marquee Anchor Controls'''== | ||
| + | <br> | ||
| + | |||
| + | |||
<span style="font-weight: 700; font-size: 15px;">This section is still under construction</span> | <span style="font-weight: 700; font-size: 15px;">This section is still under construction</span> | ||
<br> | <br> | ||
| Line 3,177: | Line 3,183: | ||
<table> <!-- BEGIN Nav Buttons Table --> | <table> <!-- BEGIN Nav Buttons Table --> | ||
<tr valign="top"> | <tr valign="top"> | ||
| − | <td width=729><span id="bottom"></span>& | + | <td width=729><span id="bottom"></span> </td> |
<td width=46>[[file:BackToTop.png|link=#top|alt=Top|Top]]</td> | <td width=46>[[file:BackToTop.png|link=#top|alt=Top|Top]]</td> | ||
<td width=75>[[file:NextUp.png|link=#stepMarquee|alt=Next Up|Top]]</td> | <td width=75>[[file:NextUp.png|link=#stepMarquee|alt=Next Up|Top]]</td> | ||
| − | <td width=75>& | + | <td width=75> </td> |
| − | <td width=75>& | + | <td width=75> </td> |
</tr> | </tr> | ||
</table> <!-- END Nav Buttons Table --> | </table> <!-- END Nav Buttons Table --> | ||
Revision as of 15:37, 17 January 2023
The information in this Wiki Page applies to Surveyor 2.0 (S20) as found in Trainz Plus.
This document is still being written
Contents |
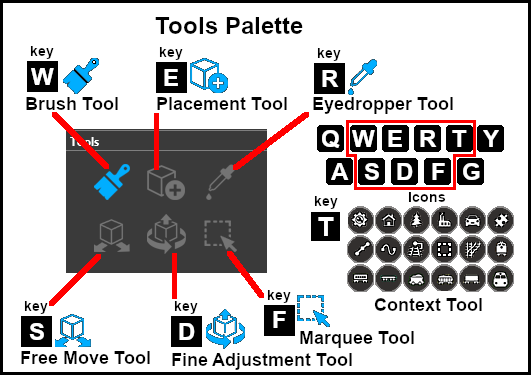
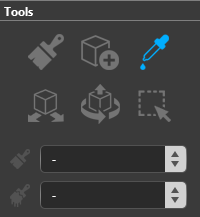
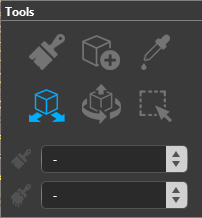
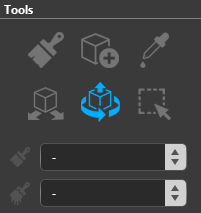
The Tools Palette
 |
|
|||||||||||||||||
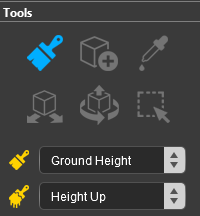
The Brush Tool
| Keyboard Shortcut: W | The Brush Tool "paints" the terrain, ground textures, effect layers and scrapbook scenes in a route |
When selected, the Brush Tool has two drop down menu lists.
 |
|
|||||||||||||||||||

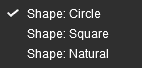
Ground Height
|
When the Ground Height Target is selected, the second drop down box will give a choice of several Ground Height tools.
| The choices are:- | |||||||||
|
 |
||||||||
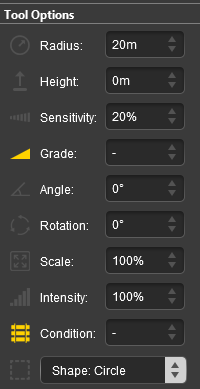
| The available brush tool options are shown in the Tool Options Palette with a Gold coloured icon next to their names. Those options that have their icon greyed out will be ignored, but they can still be edited. | ||||||||||||||||||||||||||||||||||||
Height Up/Height Down 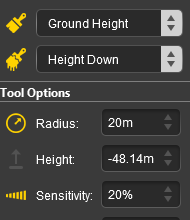 |
Set Height 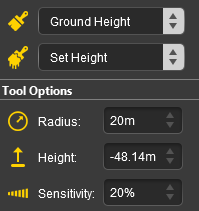 |
Grade  |
|
|||||||||||||||||||||||||||||||||
|
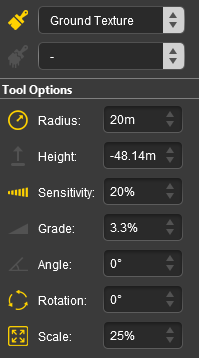
Ground Texture
|
When the Ground Texture Target is selected, the second drop down box will be disabled - there are no brush texture tool choices.
The available brush tool options are shown in the Tool Options Palette with a Gold coloured icon next to their names. Those options that have their icon greyed out will be ignored, but they can still be edited.
 |
|
||||||||||||||||||||||||||||
|
Scrapbook Data
|
|
The Scrapbook Brush
When the Scrapbook Data Target is selected, the second drop down box will give a choice of two Scrapbook Data tools.
| The choices are:- | |||||
|
|||||
|
| The available brush tool options are shown in the Tool Options Palette with a Gold coloured icon next to their names. Those options that have their icon greyed out will be ignored, but they can still be edited. | |||||||||||||||||||||||||||||||
Scrapbook Brush 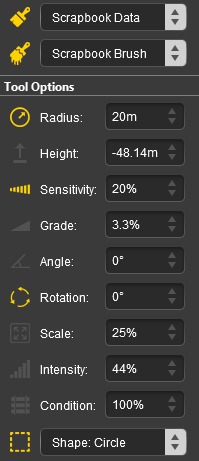 |
Scrapbook Clone 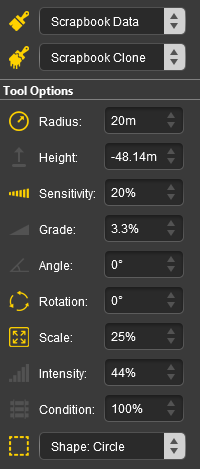 |
|
|||||||||||||||||||||||||||||
|
The Scrapbook Palette 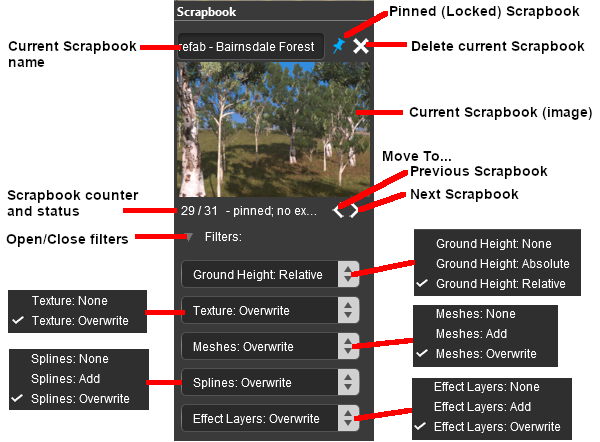 |
|
|||||||||||||||||||||||||||||||||||||||||||
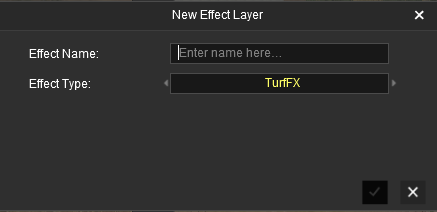
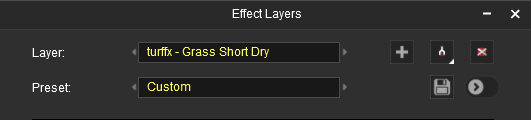
Effect Layers
If the route has preset Effect Layers installed then they will be listed individually as additional Targets.
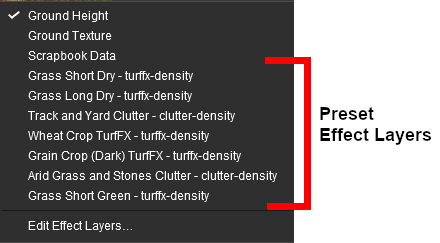 |
To paint with an Effect Layer simply select one from the list and start painting. The Brush Tool Options settings Radius and Sensitivity will control how the Effect Layer is applied.
|
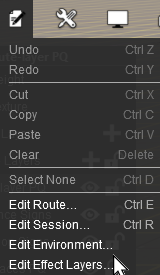
Edit Effect Layers...
When this Target is selected, the Edit Effect Layers options will appear. This is the same as selecting Edit Effect Layers ... from the Trainz Edit Menu.
 |
 |
 |
 |
More information on creating and editing Effect Layers can be found on the Trainz Wiki at:- |
The Placement Tool
| Keyboard Shortcut: E | The Placement Tool adds objects to a route |
|
When selected, the Placement Tool has no drop down menu lists.
 |
|
|||||||||||||||
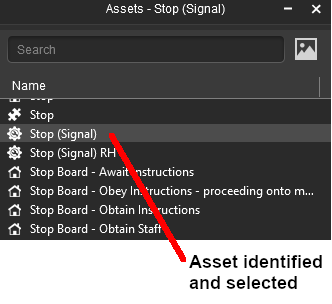
The first step is to identify and select the particular object that you want to add to the route.
Placing a Scenery Mesh Object
Individual "non-spline" scenery objects that are not attached to track are often referred to in Trainz terminology as Scenery Mesh Objects .
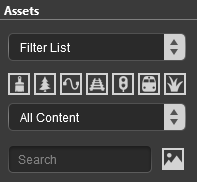
![]() In the Asset Palette either:-
In the Asset Palette either:-
|
OR |
|
|
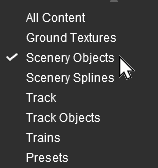
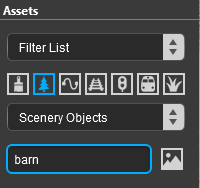
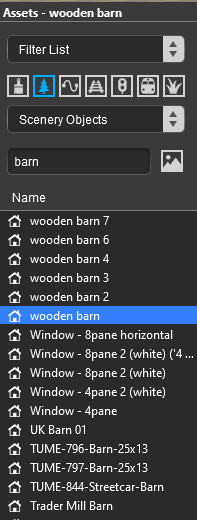
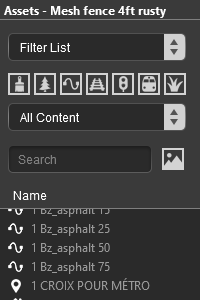
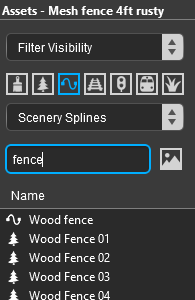
| To narrow down the filter list type part of the object name into the Search Text Box. For example if you have selected Scenery Objects and want to find "barns", then type "barn" (UPPER/lower case does not matter). |
 |
|
|
|
Placing a Scenery or Track Spline
Start the process of laying a track or spline by identifying and selecting the spline as described in steps ![]() to
to ![]() above. Then continue by following the steps listed below.
above. Then continue by following the steps listed below.
 |
"Click on the spot" as shown in Step |
|
| Move the mouse in the direction you want to lay the spline or track. The spline will follow the mouse wherever you move it. | ||
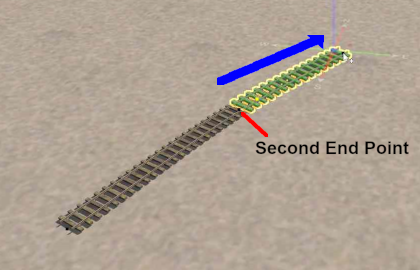
 |
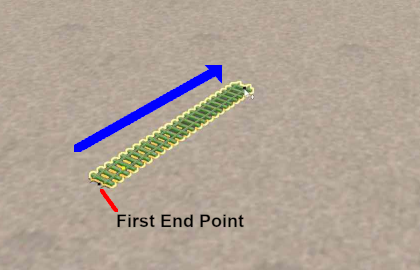
When you have the pointer in the final position for the first spline segment, Left click the mouse. This will anchor the second spline endpoint. The spline between the two endpoints is the first spline segment.
|
|
 |
Left click on the new endpoint and move the mouse in the direction you want to continue laying the spline or track. The spline will follow the mouse wherever you move it. | |
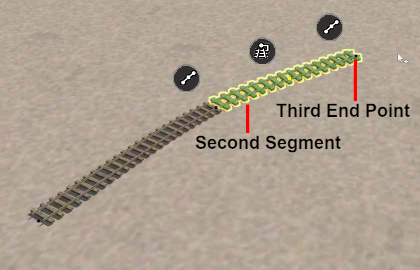 |
When you have the pointer in the final position for the second spline segment, Left click the mouse. This will anchor the third spline endpoint and produce new Context Icons for the second segment. | |
| Repeat Steps |
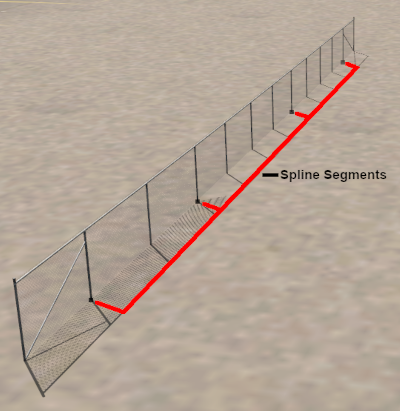
Spline Segment Heights
When you start adding a spline to a route it will always be placed at the height of the terrain regardless of the Tool Options Height setting.
However, you can set the height of the last segment that was added and this will set the height of all the segments added from that point.
|
||||||||
Placement Tool Options
The Tool Options Palette Height setting for Scenery Mesh Objects, Scenery Splines and Track Splines when using the Placement Tool does not show a gold coloured icon which indicates an "active" control setting but the setting is active.
Mesh Object Tool Options
 |
 |
|
|||||||||
Spline Tool Options
Splines have two Placement Tool settings in the Tool Options Palette.
 |
|
||||||||||||||||||||||||
|
Deleting Placed Objects
To delete objects either:-
|
OR |
|
|||||||||||||||||||||||||
The Eyedropper Tool
| Keyboard Shortcut: R | The Eyedropper Tool identifies and selects objects in a route |
|
When selected, the Eyedropper Tool has no drop down menu lists.
Quick Steps
![]() With the Eyedropper Tool selected, move the mouse pointer (which will now be an eyedropper symbol) onto any object in view.
With the Eyedropper Tool selected, move the mouse pointer (which will now be an eyedropper symbol) onto any object in view.
  |
|
Narrowing the Search
Sometimes (or often) a scene will be too crowded with different scenery objects to be able to use the Eyedropper Tool to easily select a single object. In these cases additional options are available to help "remove the clutter".
At the top of the Assets Palette is a drop down box which controls how the Eyedropper Tool works with the filters that you set.
 |
The drop down box will provide three options:-
|
These options work with the Asset Filters to help narrow the search for a specific object or type of object that is in the route.
|
As an example the following images show the progressive application of a Visibility Filter.
 |
 |
|
 |
 |
|
 |
 |
|
The Free Move Tool
| Keyboard Shortcut: S | The Free Move Tool moves objects around a route |
|
When selected, the Free Move Tool has no drop down menu lists.
 |
|
|||||||||||||
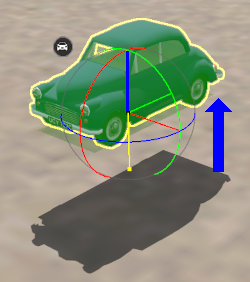
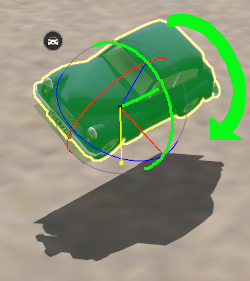
For Scenery Mesh Objects
Individual "non-spline" scenery objects that are not attached to track are often referred to in Trainz terminology as Scenery Mesh Objects.
Moving a Scenery Mesh Object
 |
|
||||||||||||
Set the Height for a Scenery Mesh Object
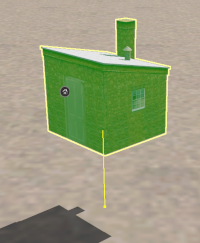
When placed in a route by the Placement Tool a scenery object will take the height of the terrain as its set height. It will be fixed to the terrain so when you move it around it will always be at the same height as the terrain it is over.
This can be changed to fix the object to a set height above or below the terrain.
 |
|
|||||||||
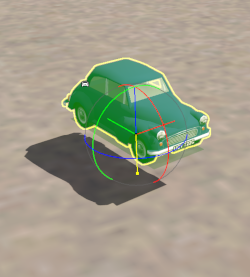
Mesh Object Context Menu
A selected scenery object, or a group of selected scenery objects, will have a Context Icon that opens a Context Menu. The icon design will vary between object types.
|
Mesh Object Context Menu  |
|
For Track Objects
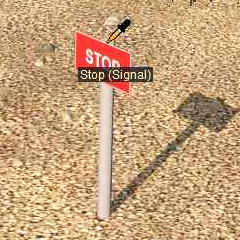
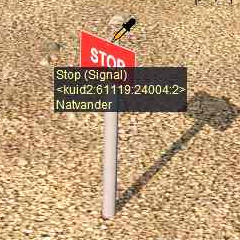
Track Objects (signals, switches, speed signs, etc) are always attached to an existing track. They can be moved to new positions along the track and in Surveyor Classic that was the limit of their movement.
Surveyor 2.0 brings a new freedom of movement to track objects. They can be moved away from the track to the left or right as well as above and below the track. The operation of a track object is not affected by these changes.
 Throw Lever track object in its original position |
|
|||||||||||||||||||||||||||
 After being moved left with the Free Move Tool and up with the Height setting in the Tool Options Palette |
||||||||||||||||||||||||||||
The track object can still be moved along the track with the Free Move Tool.
|
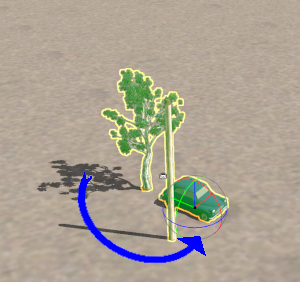
Track objects can also be rotated to the opposite side of the track.
 |
|
|||||||||
For Spline Objects (Including Track)
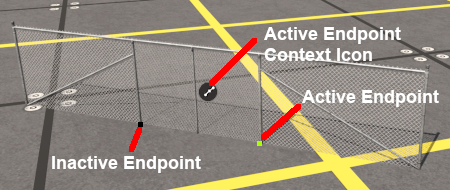
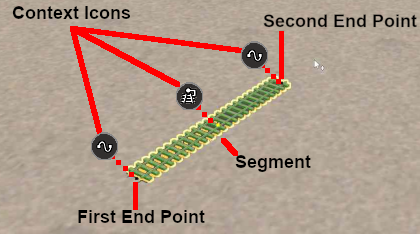
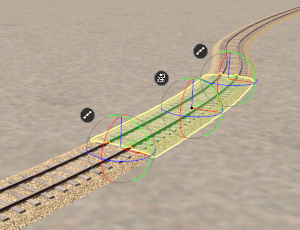
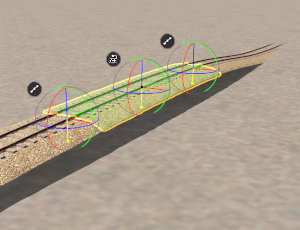
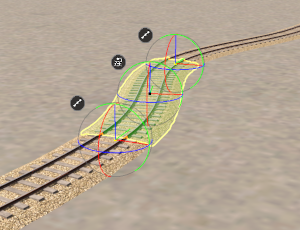
Scenery splines and track splines are defined by their endpoints. Splines are usually added to a route as a series of joined segments linked at the endpoints.
|
||||||||
Moving Spline Endpoints
 |
|
||||||||||||
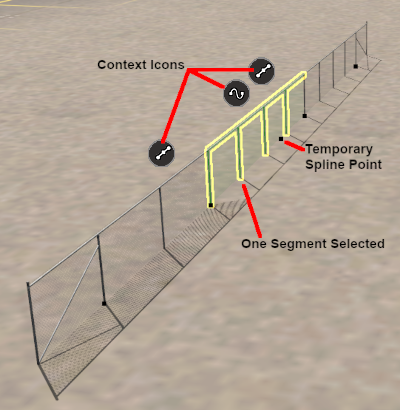
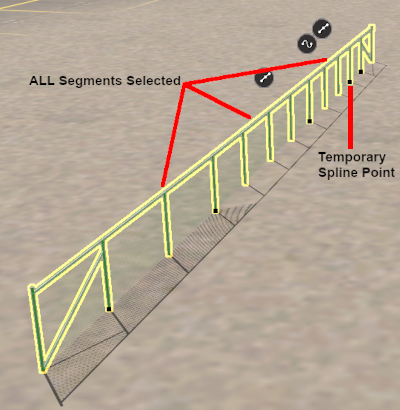
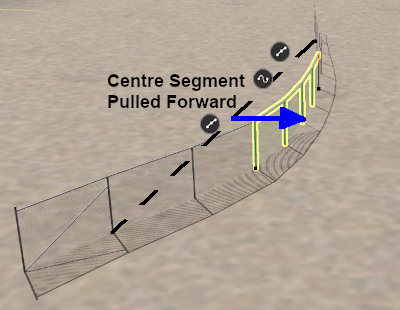
Moving Spline Segments
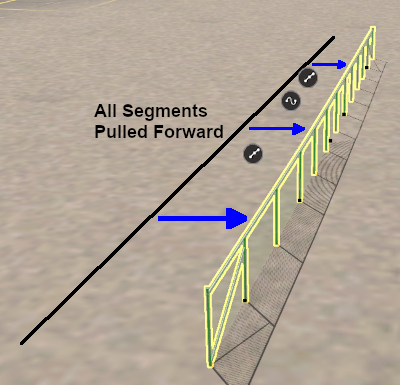
Splines are frequently made of multiple segments joined together. You can easily move a spline by moving its segments, individually or as a group.
 |
|
 |
|
||||||||||||
 |
|
|||||||||
Use the mouse (Left button held down) to drag the selected segment(s) in any horizontal direction.
|
|||||||||
 |
 |
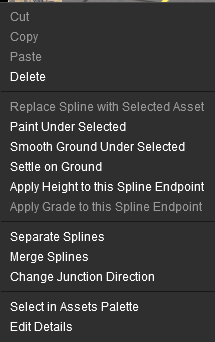
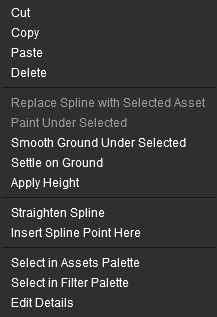
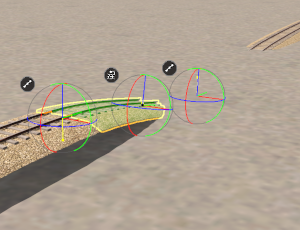
Spline Object Context Menu
 |
|
|||||||||
Left click on an icon to open its Context Menu.
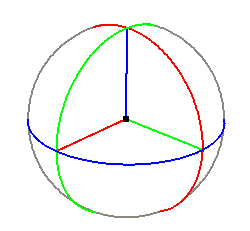
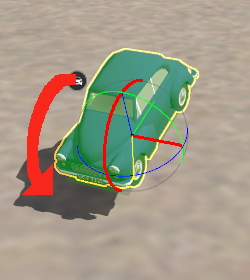
The Fine Adjustment Tool
When selected, the Fine Adjustment Tool has no drop down menu lists.
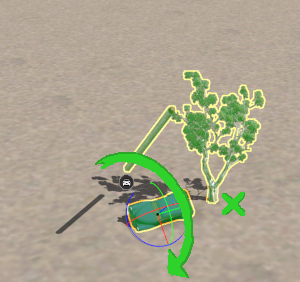
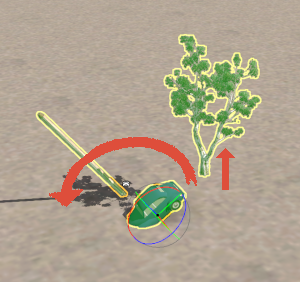
For Scenery Mesh ObjectsIndividual "non-spline" scenery objects that are not attached to track are often referred to in Trainz terminology as Scenery Mesh Objects . You can move the objects freely in the horizontal plane by using a Left "click and drag" anywhere on the selected object except on an Anchor.
Multiple objects can be selected with the Fine Adjustment Tool.
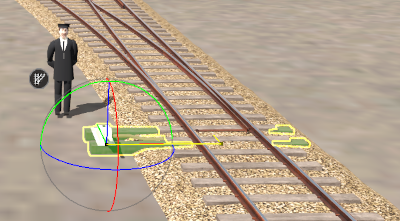
For Track ObjectsTrack Objects (signals, switches, speed signs, etc) are always attached to an existing track. They can be moved to new positions along the track and in Surveyor Classic that was the limit of their movement. Surveyor 2.0 brings a new freedom of movement to track objects. They can be moved away from the track to the left or right as well as above and below the track. The operation of a track object is not affected by these changes.
For Spline Objects (Including Track)Scenery splines and track splines are defined by their endpoints. Splines are usually added to a route as a series of joined segments linked at the endpoints.
|
|||||||||||||||||||||||||||||||||||||||||||||||||||||||||||||||||||||||||||||||||||||||||||||||||||||||||||||||||||||||||||||||||||||||||||||||||||||||||||||||||||||||||||||||||||||||||||||||||||||||||||||||||||||||||||||||||||||||||||||||||||
|
The Marquee Tool
| Keyboard Shortcut: F | The Marquee Tool selects areas of a route |
|
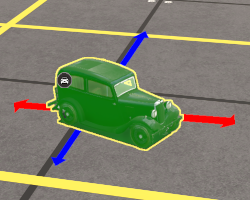
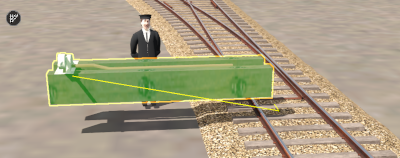
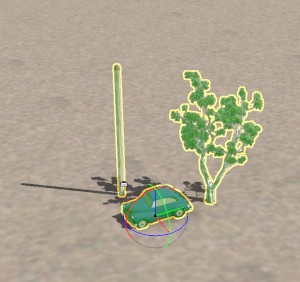
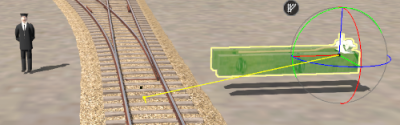
The Marquee Tool draws out a rectangular area on the route. Any objects (including Heights, Textures and Effect Layers) that are in the area or touched by the boundary of the Marquee area will be selected.
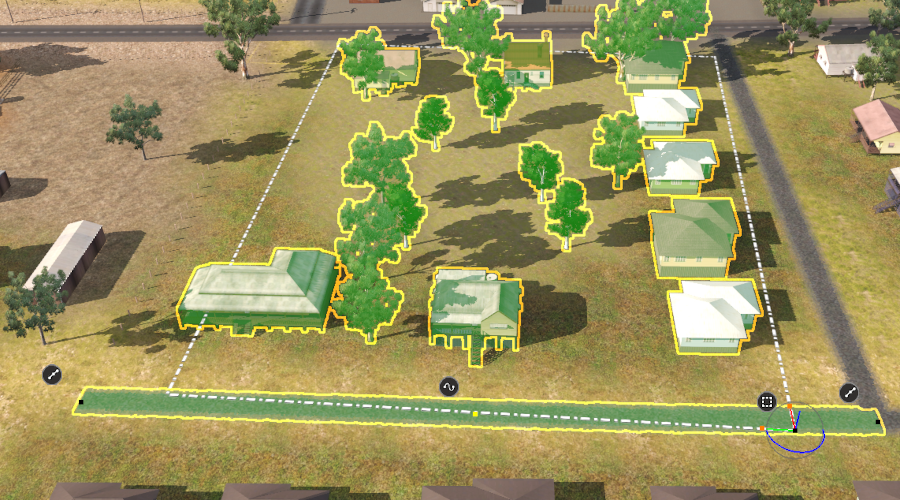
| In the image above:- | |
| a road spline at the bottom of the Marquee area and a house at the lower left have been overlain by the Marquee rectangle so they have been included in the selection. | |
| the rectangle area was drawn from the top left to the bottom right which places the Marquee Context Icon at the bottom right of the rectangle. | |
| the bottom right of the rectangle also has a 3D Anchor Frame similar to the one used by the Fine Adjustment Tool. | |
| The road spline was the last object that was included in the selection area so its Context Icons are also present. | |
Not shown in the image, because they are not highlighted, are the Ground Heights, Ground Textures and Effect Layers inside the rectangle that are also included in the Marquee selection.
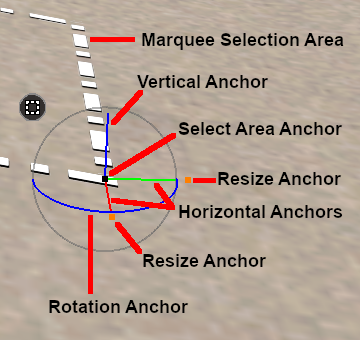 |
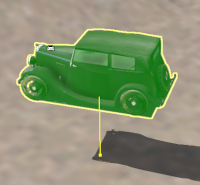
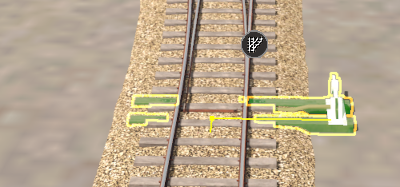
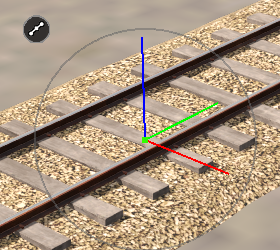
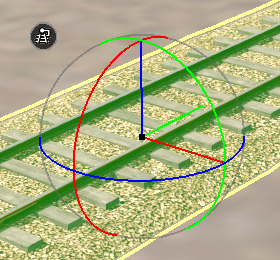
The final corner (at the end of the click and drag that created the Marquee selection area) is the 3D Anchor Frame. It has some similarities to the one used with the Fine Adjustment Tool.
|
Scrapbook Operations
Once an area has been marked out by the Marquee Tool a number of options become available.
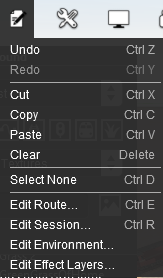 |
The Trainz Edit Menu will show some additional options:-
|
Marquee Context Menu
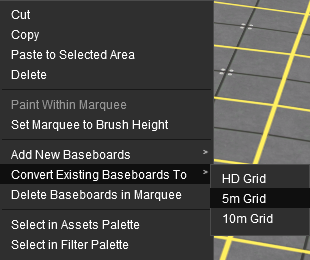 |
|
| Paint Within Marquee | the currently selected Ground Texture will be painted into the Marquee area using the Radius and Sensitivity settings in the Brush Tool Options. If no texture has been selected in the Assets Palette then this option will be greyed out. |
| Set Marquee to Brush Height | the Ground Height in the Marquee area will be set using the Height setting in the Brush Tool Options. |
| Convert Baseboards#160;to To | the entire baseboard where the Marquee selection area is located will be converted to a 4 metre or a 10 metre grid size (select one from the sub menu). The 5 metre grid gives a more accurate ground shape but it uses 4x as much memory. |
This section is still under construction
Marquee Anchor Controls
This section is still under construction
The Info Palette
This palette can be easily overlooked but it has some very useful features.
| Its uses are:- | |
| to display precise data on the "focus" - the position of the cursor | |
| to display precise data on the position and attitude of a selected object | |
| to allow precise control over the position and attitude of a selected object (i.e. it can be used instead of the Free Move Tool and the Fine Adjustment Tool) | |
| to change the "home" layer and binding layer of a selected object | |
| to lock and unlock layers | |
This section is still under construction
|
Trainz Wiki
 |
More Tutorials and Guides to Using Trainz |
This page was created by Trainz user pware in January 2023 and was last updated as shown below.