How to Use S20 Tools

From TrainzOnline
(Difference between revisions)
Jump to: navigation, search
m (The Free Move Tool)
(Placing a Scenery or Track Spline)
Line 822: Line 822:
 
=='''Placing a Scenery or Track Spline'''==
 
=='''Placing a Scenery or Track Spline'''==
  
 +
<span style="font-weight: 700; font-size: 17px; color: white; background-color: blue;">&#160;Adding a Spline&#160;</span><br>
 +
<br>
 
To start the process of laying a track or spline, follow the steps listed above for placing a scenery mesh object.<br>
 
To start the process of laying a track or spline, follow the steps listed above for placing a scenery mesh object.<br>
  
Line 854: Line 856:
 
<td>[[image:DotPoint6.JPG|link=]]</td>
 
<td>[[image:DotPoint6.JPG|link=]]</td>
 
<td>Repeat '''Steps''' [[image:DotPoint4.JPG|link=]] and [[image:DotPoint5.JPG|link=]] above to continue laying the spline.</td>
 
<td>Repeat '''Steps''' [[image:DotPoint4.JPG|link=]] and [[image:DotPoint5.JPG|link=]] above to continue laying the spline.</td>
 +
</tr>
 +
</table>
 +
<br>
 +
<span style="font-weight: 700; font-size: 17px; color: white; background-color: blue;">&#160;Spline Tool Options&#160;</span><br>
 +
<br>
 +
Splines have two '''Placement Tool''' settings in the '''Tool Options Palette'''.
 +
 +
<table width=900>
 +
<tr valign="top">
 +
<td width=200>[[image:PlacementSplineTools_S20.png|link=]]</td>
 +
<td>
 +
<table bgcolor=#000000 width=700 cellpadding=2>
 +
<tr valign="top">
 +
<td>
 +
<table bgcolor=#ffffff width=696 cellpadding=2>
 +
<tr valign="top">
 +
<td width=90><span style="font-size: 15px; font-weight: 700; color: gold; background-color: black;">&#160;Grade&#160;</span></td>
 +
<td>spline gradient (see '''Notes:''' below). The finishing '''end point''' of each spline segment will be set higher (for a '''positive''' grade) or lower (for a '''negative''' garde) than the starting '''end point'''</td>
 +
</tr>
 +
<tr valign="top">
 +
<td colspan=2>
 +
<table bgcolor=#ffffb0>
 +
<tr valign="top">
 +
<td width=90 align="right">'''Range:'''&#160;</td>
 +
<td width=696>0% (flat) to &#177;100% (steep but '''not''' vertical)</td>
 +
</tr>
 +
</table>
 +
</td>
 +
</tr>
 +
<tr valign="top">
 +
<td width=90><span style="font-size: 15px; font-weight: 700; color: gold; background-color: black;">&#160;Condition&#160;</span></td>
 +
<td>this applies to '''Track Spline''' objects and sets the track '''condition''' (or "ride comfort") for each segment</td>
 +
</tr>
 +
<tr valign="top">
 +
<td colspan=2>
 +
<table bgcolor=#ffffb0>
 +
<tr valign="top">
 +
<td width=90 align="right">'''Range:'''&#160;</td>
 +
<td width=696>1% (terrible track condition) to 100% (perfect track condition)<br>
 +
 +
the '''Track Condition''' can also be set for each track segment in its '''Context Menu''' <span style="font-size: 15px; font-weight: 700; color: white; background-color: black;">&#160;Edit&#160;Properties&#160;</span> option</td>
 +
</tr>
 +
</table>
 +
</td>
 +
</tr>
 +
</table>
 +
</td>
 +
</tr>
 +
</table>
 +
<br>
 +
<table bgcolor=#000000 width=700 cellpadding=2>
 +
<tr valign="top">
 +
<td>
 +
<table bgcolor=#ffffb0 width=696 cellpadding=2>
 +
<tr valign="top">
 +
<td>[[image:NotePad.PNG|link=]]</td>
 +
<td><span style="font-size: 17px; font-weight: 700;">Notes:'''</span><br>
 +
----
 +
</td>
 +
</tr>
 +
<tr valign="top">
 +
<td>&#160;</td>
 +
<td>The <span style="font-size: 15px; font-weight: 700; color: gold; background-color: black;">&#160;Grade&#160;</span> may cause some confusion. It is defined as '''vertical rise''' divided by '''horizontal distance''' converted to a percentage figure. So a grade of 100% (the maximum allowed) would mean a gradient formed by both measurements having the same value (e.g. a rise of 50m over a distance of 50m). A vertical grade (such as up a cliff face) would have an infinite grade which is currently impossible in Surveyor.</td>
 +
</tr>
 +
</table>
 +
</td>
 +
</tr>
 +
</table>
 +
</td>
 
</tr>
 
</tr>
 
</table>
 
</table>

Revision as of 20:17, 10 January 2023

The information in this Wiki Page applies to Surveyor 2.0 (S20) as found in Trainz Plus.

This document is  under development 

Contents

In Summary:
DotPoint.JPG
DotPoint.JPG
  Top   Next Down Bottom

The Tools Palette

Tools and keymap for S20

NotePad.PNG Notes: Palettes

If the Tools Palette is not shown on the screen, then:-

Windows Menu
1. open the Window Menu from the menu icons at the top of the screen
 
  • visible palettes with have ticks next to their names
2. Left click on the item Tools Palette
 
  • this will add a tick and make the Tools Palette visible
3. make sure that the Tool Options Palette is also visible

The Brush Tool

S20 BrushToolIcon.png Keyboard Shortcut:  W 

The Brush Tool is used for painting the route. It can:-

  • adjust the height of the terrain
  • add ground textures
  • add Effect Layers
  • add Scrapbook scenes

When selected, the Brush Tool will show two drop down menu lists.

Brush Tools
The first drop down menu will set the Brush Target, the type of brush.
The Targets are:-
  • Ground Height
  • Ground Texture
  • Scrapbook Data
  • <List of Effect Layers>
  • Edit Effect Layers
BrushToolsGroundOptions S20.png
NotePad.PNG If you have any Effect Layers then they will appear as Targets in this drop down list. Select an Effect Layer to use the brush to paint with that effect.


Ground Height

This brush tool uses the Tool Options Palette. If this palette is not visible on the screen then refer to PageLink.PNG Notes: Palettes at the top of this document.

When the Ground Height Target is selected, the second drop down box will give a choice of several Ground Height tools.
The choices are:-
  • Height Up
  • Height Down
  • Set Height
  • Grade
BrushToolsHeightOptions S20.png
The available brush tool options are shown in the Tool Options Palette with a  Gold  coloured icon next to their names. Those options that have their icon greyed out will be ignored, but they can still be edited.
 Height Up/Height Down 
Up/Down brush options
 Set Height 
Height brush options
 Grade 
Grade brush options

 Radius  the brush radius (metres) - see Notes: below
Range:  5m and above
 Height  the brush height (metres)
Range:  -3000m to 3000m
 Sensitivity  the rate at which the height changes
Range:  1% (very slowly) to 100% (very fast)
 Grade  slope gradient - see Notes: below
Range:  0% = flat ("Plateau" in Classic) to
  ±100% = steep (but not vertical)
 Angle  grade direction (compass degrees)
Range:  0° (North) to ±359°
a negative value reverses the grade
NotePad.PNG Notes:

DotPoint.JPG Unlike Surveyor Classic, there appears to be no upper limit to the brush  Radius . Brushes of hundreds of metres (even kilometres) in size are possible. However, if you are using the brush to set an entire baseboard, or many baseboards, to a specific height then the Marquee Tool may be a better choice.
DotPoint.JPG The  Grade  may cause some confusion. It is defined as height (vertical) over distance (horizontal) converted to a percentage figure. So a grade of 100% (the maximum allowed) would mean a slope formed by the height and distance both being the same value (e.g. a height increase of 50m over a distance of 50m). A vertical slope (a cliff) would have an infinite grade which is currently impossible in Surveyor.


Ground Texture

This brush tool uses the Tool Options Palette. If this palette is not visible on the screen then refer to PageLink.PNG Notes: Palettes at the top of this document.

When the Ground Texture Target is selected, the second drop down box will be disabled - there are no brush texture tool choices.

The available brush tool options are shown in the Tool Options Palette with a  Gold  coloured icon next to their names. Those options that have their icon greyed out will be ignored, but they can still be edited.

Texture brush options
 Radius  the brush radius (metres) - see Notes: below
Range:  5m and above
 Sensitivity  texture transparency
Range:  1% = almost transparent to
  100% = solid (opaque)
 Rotation  initial rotation angle - see Notes: below
Range:  0° to ±360° (larger angles can be entered)
 Scale  the texture pattern scaling factor
Range:  0.01% = smallest to 100% = full size
NotePad.PNG Notes:

DotPoint.JPG Unlike Surveyor Classic, there appears to be no upper limit to the brush  Radius . Brushes of hundreds of metres (even kilometres) in size are possible. If you are using the brush to paint an entire baseboard, or many baseboards, then the Marquee Tool will be quicker but it will not give the options of changing the scale and rotation.
DotPoint.JPG The  Rotation  controls the starting angle for the texture when painting and is often used to avoid pattern repetition. As in Surveyor Classic, holding down the  [  or  ]  keys while painting will continuously change the rotation angle.
Stop.PNG Warning: Changing the rotation angle during painting is not recommended for PBR Textures as this will significantly increase the memory useage (each rotation will load in another copy of the PBR texture).


Scrapbook Data

This brush tool uses both the Tool Options Palette and the Scrapbook Palette. If these palettes are not visible on the screen then refer to PageLink.PNG Notes: Palettes at the top of this document.

NotePad.PNG The scrapbook contents can also be directly Pasted into a route from the Context Menu of a scenery asset. See PageLink.PNG The Free Move Tool for more details.


 The Scrapbook Brush 

When the Scrapbook Data Target is selected, the second drop down box will give a choice of two Scrapbook Data tools.

The choices are:-
  • Scrapbook Brush
  • Scrapbook Clone
BrushToolsScrapbookOptions S20.png


 Scrapbook Brush  will resize the scrapbook contents to fit the selected brush shape and size.
  • If the brush is small then the scrapbook contents will be compressed closer together
  • If the brush is large then the contents will be spaced further apart
  • Every Left Click will paste another complete scrapbook copy
  • The Scale control in the Tool Options Palette is ignored.
 Scrapbook Clone  will paste the scrapbook at its original size - subject to the Scale setting.
  • If the brush is the same size as the original scrapbook then a single exact copy will be pasted
  • If the brush is smaller than the original scrapbook size then only the central part of the scrapbook will be revealed and more will be added when the brush is moved around until the "painted" area reaches the size of the original. Further painting will clone or tile the scrapbook contents
  • If the brush is larger than the original scrapbook size then the contents will be cloned or tiled to fill the set brush size
  • The Scale control is not ignored but selecting extremes (e.g. a very large brush and a very small scale value) can cause problems (e.g. system "lockup" while it attempts to scale and clone the scrapbook contents)


The available brush tool options are shown in the Tool Options Palette with a  Gold  coloured icon next to their names. Those options that have their icon greyed out will be ignored, but they can still be edited.
 Scrapbook Brush 
Brush options
 Scrapbook Clone 
Clone options

 Radius  the brush radius (metres) - see Notes: below
Range:  5m and above
 Rotation  initial rotation angle (degrees) - see Notes: below
Range:  0° to ±360° (larger angles can be entered)
 Scale  the scrapbook scaling factor
Range:  0.01% = smallest to 100% = full size
 Shape  brush shape
Options:  BrushToolsScrapShapes S20.png Circle and Square will set the brush to the selected shape
  Natural will set the brush to the same shape as the Marquee that created the scrapbook, which may be rectangular. The Radius setting will set the relative brush dimensions
NotePad.PNG Notes:

DotPoint.JPG Unlike Surveyor Classic, there appears to be no upper limit to the brush  Radius . Brushes of hundreds of metres (even kilometres) in size are possible.
DotPoint.JPG The  Rotation  controls the starting angle for pasting the scrapbook objects. In Surveyor Classic you could only rotate and paste in 90° increments. In S20 you can rotate and paste at any angle.


 The Scrapbook Palette 
Scrapbook palette tools

 Scrapbook Pasting Options 
 What Features to Paste 
    Ground Height  terrain height(s) used in the scrapbook
    Texture  textures used in the scrapbook
    Meshes  scenery objects (e.g. trees, buildings) used in the scrapbook
    Splines  spline objects used in the scrapbook
    Effect Layers  effect layers (TurfFX, Clutter) used in the scrapbook
 How to Paste Each Feature
    None  do not paste this feature
    Add  add this feature to those already present
    Overwrite  use this feature to replace those already present
For the Ground Height feature:-
    Absolute  use the ground heights in the scrapbook to replace the existing ground heights
    Relative  modify the existing ground heights according to those used in the scrapbook (to ignore the scrapbook ground heights completely select the option None)


Edit Effect Layers...

When this Target is selected, the Edit Effect Layers options will appear. This is the same as selecting Edit Effect Layers ... from the Trainz Edit Menu.

Open effect layers
  • If no Effect Layers are present then you can create a new one
New effect layer
  • If Effect Layers are present then select one to edit
Edit effect alyers


LinkWiki.PNG

More information on creating and editing Effect Layers can be found on the Trainz Wiki at:-


  Top Next Up Next Down Bottom

The Placement Tool

S20 PlacementToolIcon.png Keyboard Shortcut:  E 

The Placement Tool is used to add objects to the route.

This tool uses the Assets Palette. If this palette is not visible on the screen then refer to PageLink.PNG Notes: Palettes at the top of this document.

The first step is to identify and select the particular object that you want to add to the route.

Placing a Scenery Mesh Object

Individual "non-spline" scenery objects that are not attached to track are often referred to in Trainz terminology as Scenery Mesh Objects.

DotPoint1.JPG In the Asset Palette either:-

Ablue.png Left click on an object selection icon

Filter Icons

GroundTextureFilter S20.png all ground textures
SceneryMeshFilter S20.png all non-spline scenery objects
ScenerySplineFilter S20.png all spline scenery objects
TrackSplineFilter S20.png all track spline objects
TrackMeshFilter S20.png all track objects (signals, etc)
TrainFilter S20.png all rolling stock
PresetFilter S20.png all Effect Layer presets
OR
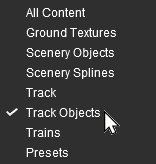
Bblue.png Left click the Content Drop-down Box

Filter List
Then select Track Objects
Track Objects

PencilTips.PNG  Shortcut 

If you already have the same object placed in your route then:-

  1. select the Eyedropper Tool in the Tools Palette (or press the  R  key)
  2. Left click on the existing object object

This will instantly select that particular object in the filter list.

Jump to Step DotPoint5.JPG below.


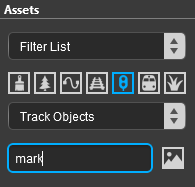
DotPoint2.JPG To narrow down the filter list type part of the object name into the Search Text Box. For example if you have selected Track Objects and want to find "Trackmarks", then type "mark" (UPPER/lower case does not matter).

Text search
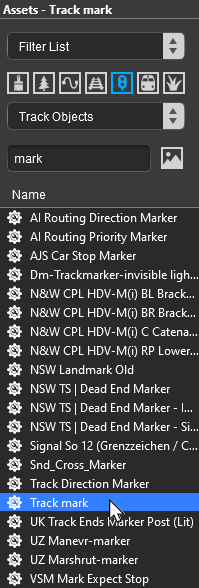
DotPoint3.JPG This will list all the Track Objects containing the text "mark" in the filter list.
Filtered list DotPoint4.JPG Select the item Track Mark.

If you are not sure about an object then double-click on the name to bring up its image and description.
DotPoint5.JPG The final step is to place the selected object into the route.
  1. Click the Placement Tool or press the  E  key
  2. Click on the spot where you want to place the object
NotePad.PNG The Placement Tool will remain on and active until another tool has been selected. So everytime you click another copy of the object (or another object if you change your selection) will be added to the route.


Placing a Scenery or Track Spline

 Adding a Spline 

To start the process of laying a track or spline, follow the steps listed above for placing a scenery mesh object.

PlacementTrack1 S20.png DotPoint1.JPG "Click on the spot" as shown in Step DotPoint5.JPG above to place the start or first end point of the spline.
DotPoint2.JPG Move the mouse in the direction you want to lay the spline or track. The spline will follow the mouse wherever you move it.
PlacementTrack2 S20.png DotPoint3.JPG When you have the pointer in the final position for the first spline segment, Left click the mouse. This will anchor the second spline end point. The spline between the two end points is the first spline segment.


The spline segment will now have three Context Icons, one for each end point and one for the spline segment.
PlacementTrack3 S20.png DotPoint4.JPG Left click on the new end point and move the mouse in the direction you want to continue laying the spline or track. The spline will follow the mouse wherever you move it.
PlacementTrack4 S20.png DotPoint5.JPG When you have the pointer in the final position for the second spline segment, Left click the mouse. This will anchor the third spline end point and produce new Context Icons for the second segment.
DotPoint6.JPG Repeat Steps DotPoint4.JPG and DotPoint5.JPG above to continue laying the spline.


 Spline Tool Options 

Splines have two Placement Tool settings in the Tool Options Palette.

PlacementSplineTools S20.png
 Grade  spline gradient (see Notes: below). The finishing end point of each spline segment will be set higher (for a positive grade) or lower (for a negative garde) than the starting end point
Range:  0% (flat) to ±100% (steep but not vertical)
 Condition  this applies to Track Spline objects and sets the track condition (or "ride comfort") for each segment
Range:  1% (terrible track condition) to 100% (perfect track condition)
the Track Condition can also be set for each track segment in its Context Menu  Edit Properties  option


NotePad.PNG Notes:

  The  Grade  may cause some confusion. It is defined as vertical rise divided by horizontal distance converted to a percentage figure. So a grade of 100% (the maximum allowed) would mean a gradient formed by both measurements having the same value (e.g. a rise of 50m over a distance of 50m). A vertical grade (such as up a cliff face) would have an infinite grade which is currently impossible in Surveyor.


Deleting an Asset


NotePad.PNG Notes:

To delete an object:-

  • if the object is not already selected (highlighted in green) then:-
    1. select either the:-
      • Free Move Tool (or press  S ) or
      • Fine Adjustment Tool (or press  D )
    2. Left click on the object to be deleted
  • press the  Delete  key


The Eyedropper Tool

S20 DropperToolIcon.png Keyboard Shortcut:  R 


The Eyedropper Tool is used to identify objects that are in the route. The objects can be textures, effect layers, scenery, rolling stock, track. track equipment, and splines.

This tool uses the Assets Palette. If this palette is not visible on the screen then refer to PageLink.PNG Notes: Palettes at the top of this document.

Quick Steps

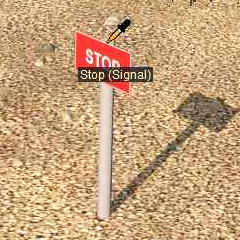
DotPoint1.JPG With the Eyedropper Tool selected, move the mouse pointer (which will now be an eyedropper symbol) onto any object in view.

Eyedropper

Eyedropper

The object will be identified by its object name appearing in a  ToolTip  below the mouse pointer (image shown left).

Leave the mouse pointer in place for a few seconds and additional information about the object will be shown, its <kuid> code and Author (image shown below left).


DotPoint2.JPG Left click on the object to select it in the Filter List.

Asset filter set by the Eyedropper in S20
The type of object and its name will be automatically selected in all the Asset Palette filters as shown in the image left.


The object is now ready for use by the Placement Tool

Narrowing the Search

Sometimes (or often) a scene will be too crowded with different scenery objects to be able to use the Eyedropper Tool to easily select a single object. In these cases additional options are available to help "remove the clutter".

At the top of the Assets Palette is a drop down box which controls how the Eyedropper Tool works with the filters that you set.

Assets palette The drop down box will provide three options:-
  • Filter List
  • Filter Selection
  • Filter Visibility
AssetsPaletteFilterOptions S20.png


These options work with the Asset Filters to help narrow the search for a specific object or type of object that is in the route.

 Filter List  this option will have no effect on the operation of the Eyedropper Tool or on the objects displayed on the screen. It is the default setting and any selections made with the eyedropper will be shown in the Assets Palette as described in the section Quick Steps above.
 Filter Selection  this option will restrict the Eyedropper Tool to only working on those objects that are in the filtered list. Objects that are not in the filtered list cannot be selected and will not have their details (name, <kuid>, author) displayed on the screen.
 Filter Visibility  this option will hide all objects that are not in the filtered list. The only exceptions are Ground Textures and Effect Layers which will be visible but, unless they are also in the filtered list, cannot be selected.

As an example the following images show the progressive application of a Visibility Filter.

AssetFilterScene1 S20.png AssestFilteredScene1.png

DotPoint1Blue.png No filter has been applied.

All the objects are visible on the Surveyor screen.

ALL objects can be selected by the Eyedropper Tool

AssetFilterScene2 S20.png AssestFilteredScene2.png

DotPoint2Blue.png The Visibility Filter option has been applied and the filtered list has been set to display only Scenery Splines.

All objects except Scenery Splines, Ground Textures and Effect Layers are now hidden.

Only Scenery Splines can be selected by the Eyedropper Tool.

AssetFilterScene3 S20.png AssestFilteredScene3.png

DotPoint3Blue.png An additional filter has been applied. The word "fence" has been added to the search text box.

All Scenery Splines that do not have the text "fence" in their names have now been hidden.

Only the remaining visible Scenery Splines can be selected by the Eyedropper Tool.

  Top Next Up Next Down Bottom

The Free Move Tool

S20 FreeMoveToolIcon.png Keyboard Shortcut:  S 

The Free Move Tool is used to move objects around the route in the XY (horizontal) directions only.

This tool uses the Tool Options Palette and the Info Palette (to display data only). If these palettes are not visible on the screen then refer to PageLink.PNG Notes: Palettes at the top of this document.

For Scenery Mesh Objects

Individual "non-spline" scenery objects that are not attached to track are often referred to in Trainz terminology as Scenery Mesh Objects.

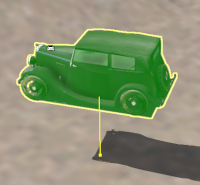
 Moving a Scenery Mesh Object 

FreeMoveToolCar S20.png
DotPoint1.JPG Select the Free Move Tool.
DotPoint2.JPG Select (Left click on) the object.
DotPoint3.JPG Use the mouse (Left button held down) to drag the object in any horizontal (XY) direction.


NotePad.PNG When moving a scenery object, its height will be fixed to the terrain height.


 Set the Height for a Scenery Mesh Object 

When placed in a route by the Placement Tool a scenery object will take the height of the terrain as its set height. It will be fixed to the terrain so when you move it around it will always be at the same height as the terrain it is over.

This can be changed to fix the object to a set height above or below the terrain.

FreeMoveMeshObjectSetAboveGround S20.png
DotPoint1.JPG With the scenery object selected, enter a height value into the Tool Options  Height  text box
DotPoint2.JPG Hit the  Enter  key
The scenery object will now be fixed at the entered height above (or below) the terrain as it is moved around


 Mesh Object Context Menu 

A selected scenery object, or a group of selected scenery objects, will have a Context Icon with a Context Menu. The icon design will vary between object types. Multiple objects can be selected by holding down the  Shift  key while Left clicking on each object.

To open an objects Context menu either:-

  • Left click the Context Icon, or
  • Press the  T  key
ContextMenuMeshObject S20.png
 Cut  remove the selected object or objects and move them into the Scrapbook
 Copy  copy the selected object or objects and place them into the Scrapbook
 Paste  paste the contents of the current Scrapbook next to the selected object
 Delete  delete the selected objects. It has the same effect as pressing the  Delete  key
 Smooth Ground Under Selected  changes the height of the terrain under the object to match the set height of the object. If multiple objects at different heights have been selected then the terrain height will be set to match the height of the lowest object
 Settle on Ground  sets the height of the objects to match the height of the terrain beneath them ("drops them back to earth")
 Apply Height  sets the height of the objects to the value in the Tool Options  Height  text box
 Reset Object Rotation  resets the rotation angle of the objects to their default values
 Randomise Object Rotation  applies a random rotation angle to each object
 Select in Assets Palette  identifies the selected object in the Asset Palette like the Eyedropper Tool. If multiple different objects have been selected then the object with the Context Icon will be identified
 Edit Properties  opens the Properties window of the selected object


For Spline Objects (Including Track)

Scenery splines and track splines are defined by their end points. Splines are usually added to a route as a series of joined segments linked at the end points. Moving a spline can involve moving:-

  • an end point,
  • a segment, or
  • multiple segments including the whole length of the spline


 Moving Spline End Points 

To move an individual spline end point:-

FreeMoveToolSpline S20.png
DotPoint1.JPG Select the Free Move Tool.
DotPoint2.JPG Select (Left click on) the spline end point to be moved. This will be shown as green meaning active. Inactive spline end points are shown as black.
DotPoint3.JPG Use the mouse (Left button held down) to drag the spline end point in any horizontal (XY) direction.


NotePad.PNG The spline end point will be fixed at its original height.


 Moving Spline Segments 

Splines are frequently made of multiple segments joined together. You can easily move a spline by moving its segments, individually or as a group.

spline made of 3 joined segments

To move an individual segment or multiple segments:-

FreeMoveSplineSegmentSelected S20.png
DotPoint1.JPG Select the Free Move Tool.
DotPoint2.JPG Select (Left click on) the spline segment to be moved - click anywhere between the two spline end points on the segment.


The selected segment will be highlighted in green.

The segment that you clicked will have a Temporary Spline Point inserted at the location where you clicked.


FreeMoveSplineSegmentsAllSelected S20.png
IF you are going to select and move more than one spline segment, then:-
DotPoint3.JPG hold the  Shift  key down and individually Left click between the end points on each additional segment.


The last segment that you click will have a Temporary Spline Point added.

PencilTips.PNG To select ALL the segments in a spline, Dbl-Left click on a segment


The segment you double click will have a Temporary Spline Point added


DotPoint4.JPG Use the mouse (Left button held down) to drag the Temporary Spline Point in any horizontal (XY) direction.

If you had selected:-

  • only a single spline segment then only that segment will be moved and the adjacent segments that were not selected will have their positions "adjusted"
  • multiple spline segments then those segments will be moved and the adjacent segments that were not selected will have their positions "adjusted"
  • all the segments then ALL the segments will be moved
FreeMoveSplineSegmentSelectedMoved S20.png FreeMoveSplineSegmentsAllSelectedMoved S20.png


 Set the Height for a Spline Object 


 Spline Object Context Menu 


  Top Next Up Next Down Bottom


The Fine Adjustment Tool

S20 FineAdjustmentToolIcon.png Keyboard Shortcut:  D 

The Fine Adjustment Tool is used to make fine adjustments (XYZ axis, rotation, tilt) to objects in the route.

This tool does not need any other palettes. None of the controls in the Tool Options Palette are active. However it will display position data in the Info Palette. If this palette is not visible on the screen then refer to PageLink.PNG Notes: Palettes at the top of this document.

  Top Next Up   Bottom

The Marquee Tool

S20 MarqueeToolIcon.png Keyboard Shortcut:  F 

The Marquee Tool is used to select areas of the route.

This tool does not need any other palettes.


  Top Next Up    


Trainz Wiki

TrainzWiki.png

More Tutorials and Guides to Using Trainz


This page was created by Trainz user pware in January 2023 and was last updated as shown below.


Personal tools