SAR Scenario Terowie Shunter V1
(Created page with "<!-- V1.0 --> <table width=1000> <!-- BEGIN Title table --> <tr valign="top"> <td width=50 align="left">[[image:ArrowLeftBtn.png|link=SAR Scenario Gladstone Shunter|30p...") |
m |
||
| Line 2: | Line 2: | ||
<table width=1000> <!-- BEGIN Title table --> | <table width=1000> <!-- BEGIN Title table --> | ||
<tr valign="top"> | <tr valign="top"> | ||
| − | <td width=50 align="left">[[image:ArrowLeftBtn.png|link=SAR Scenario Gladstone | + | <td width=50 align="left">[[image:ArrowLeftBtn.png|link=SAR Scenario Gladstone Shunter_V1|30px]]</td> |
<td width=900 align="center"><span style="font-size: 21px; font-weight: 700;"> <span style="background-color: black; color: white;"> 14 </span> <span style="background-color: black; color: white;"> Terowie Shunter </span></span></td> | <td width=900 align="center"><span style="font-size: 21px; font-weight: 700;"> <span style="background-color: black; color: white;"> 14 </span> <span style="background-color: black; color: white;"> Terowie Shunter </span></span></td> | ||
| − | <td width=50 align="right">[[image:ArrowRightBtn.png|link=SAR Scenario Quorn | + | <td width=50 align="right">[[image:ArrowRightBtn.png|link=SAR Scenario Quorn Shunter_V1|30px]]</td> |
</tr> | </tr> | ||
<tr valign="top"> | <tr valign="top"> | ||
| − | <td align="center" colspan=3>A scenario in the '''[[SAR Peterborough Base Session]]'''</td> | + | <td align="center" colspan=3>A scenario in the '''[[SAR Peterborough Base Session_V1|SAR Peterborough Base Session]]'''</td> |
</tr> | </tr> | ||
</table> <!-- END Title table --> | </table> <!-- END Title table --> | ||
| Line 42: | Line 42: | ||
<tr valign="top"> | <tr valign="top"> | ||
<td><span style="font-size: 15px; font-weight: 700; color: white; background-color: black;"> Loco: </span></td> | <td><span style="font-size: 15px; font-weight: 700; color: white; background-color: black;"> Loco: </span></td> | ||
| − | <td>'''The [[image:Loco_Roster_Label.png|link=SAR Peterborough Division Loco | + | <td>'''The [[image:Loco_Roster_Label.png|link=SAR Peterborough Division Loco Roster_V1]] has locos available at the <span style="color: white; background-color: black;"> Terowie Loco Depot </span>''' |
| − | *'''[[ | + | *'''[[SAR_Scenario_Rolling_Stock_V1#SAR_T_Class|SAR T 198]]''' |
| − | *'''[[ | + | *'''[[SAR_Scenario_Rolling_Stock_V1#SAR_T_Class|SAR T 231]]''' |
</td> | </td> | ||
</tr> | </tr> | ||
| Line 50: | Line 50: | ||
<td><span style="font-size: 15px; font-weight: 700; color: white; background-color: black;"> Consist: </span></td> | <td><span style="font-size: 15px; font-weight: 700; color: white; background-color: black;"> Consist: </span></td> | ||
<td>To be shunted by the selected loco to/from various locations | <td>To be shunted by the selected loco to/from various locations | ||
| − | *'''[[ | + | *'''[[SAR_Scenario_Rolling_Stock_V1#QR_QLX|QLX Box]]''' vans |
| − | *'''[[ | + | *'''[[SAR_Scenario_Rolling_Stock_V1#QR_MTW|MTW Flat]]''' wagons |
| − | *'''[[ | + | *'''[[SAR_Scenario_Rolling_Stock_V1#TGR_DB|Guard Van]]''' |
</td> | </td> | ||
</tr> | </tr> | ||
| Line 65: | Line 65: | ||
<tr> | <tr> | ||
<td> | <td> | ||
| − | [[Image:Location Index.png|link=SAR | + | [[Image:Location Index.png|link=SAR Index_V1|alt=Location Index|Location Index]] |
</td> | </td> | ||
<td>'''Each location in the layout has a detailed set of track diagrams that provide a variety of useful information'''<br> | <td>'''Each location in the layout has a detailed set of track diagrams that provide a variety of useful information'''<br> | ||
The <span style="font-weight: 700; color: white; background-color: black;"> Getting Started </span> guide below gives a summary of what is available.<br> | The <span style="font-weight: 700; color: white; background-color: black;"> Getting Started </span> guide below gives a summary of what is available.<br> | ||
| − | To display this information click any [[image:Line_Index_Label.png|link= | + | To display this information click any [[image:Line_Index_Label.png|link=SAR_Index_V1|Location Index]] graphic, or go to the bottom of the page for all the session links (all links will open in this window).</td> |
</tr> | </tr> | ||
</table> <!-- END Location Data table --> | </table> <!-- END Location Data table --> | ||
| Line 82: | Line 82: | ||
#* Open the '''Finder Tool''' (press <span style="font-weight: 700; font-size: 15px; color: white; background-color: black;"> Ctrl </span> <span style="font-weight: 700; font-size: 15px; color: white; background-color: black;"> F </span>) and type, in the '''Name''' field, the name of your selected loco, for example '''SAR T 198''' (or just '''T 198''' which should be enough), then click the '''tick''' icon, '''OR''' | #* Open the '''Finder Tool''' (press <span style="font-weight: 700; font-size: 15px; color: white; background-color: black;"> Ctrl </span> <span style="font-weight: 700; font-size: 15px; color: white; background-color: black;"> F </span>) and type, in the '''Name''' field, the name of your selected loco, for example '''SAR T 198''' (or just '''T 198''' which should be enough), then click the '''tick''' icon, '''OR''' | ||
#*Open the '''Driver List''' (bottom left of the screen) and then scroll through the list to find the '''loco name''' ('''SAR T 198''') then click the drivers '''Eye''' icon [[image:Driver_Eye.png|link=]] to take control of the loco | #*Open the '''Driver List''' (bottom left of the screen) and then scroll through the list to find the '''loco name''' ('''SAR T 198''') then click the drivers '''Eye''' icon [[image:Driver_Eye.png|link=]] to take control of the loco | ||
| − | # Take a few moments to get your bearings. Click [[image:Line_Index_Terowie.png|link= | + | # Take a few moments to get your bearings. Click [[image:Line_Index_Terowie.png|link=SAR_Terowie_V1|Terowie Data]] (this link will open in this window) to show the location details and track plans for '''Terowie'''. In each location details page:- |
#*the [[image:Tab_HM_White.png|link=|75px]] tab gives an overall summary of each location with a "potted" history (where available). | #*the [[image:Tab_HM_White.png|link=|75px]] tab gives an overall summary of each location with a "potted" history (where available). | ||
#*the [[image:Tab_TM_Grey.png|link=|75px]] tab reveals the invisible [[image:Trackmark_Right.png|link=|alt=TM|8px]] '''Track Marks''' for '''Drive To''' commands. | #*the [[image:Tab_TM_Grey.png|link=|75px]] tab reveals the invisible [[image:Trackmark_Right.png|link=|alt=TM|8px]] '''Track Marks''' for '''Drive To''' commands. | ||
| Line 102: | Line 102: | ||
<table bgcolor="lightcyan" width=996> <!-- BEGIN Tutorial link table --> | <table bgcolor="lightcyan" width=996> <!-- BEGIN Tutorial link table --> | ||
<tr valign="center"> | <tr valign="center"> | ||
| − | <td width=70 align="right">[[image:SAR Tutorial.png|link=SAR Scenarios | + | <td width=70 align="right">[[image:SAR Tutorial.png|link=SAR Scenarios Tutorial_V1|alt=Tutorial]]</td> |
<td width=750>'''A tutorial on using these scenarios is provided in the link on the left. The link will open in this window'''</td> | <td width=750>'''A tutorial on using these scenarios is provided in the link on the left. The link will open in this window'''</td> | ||
</tr> | </tr> | ||
| Line 185: | Line 185: | ||
</tr> | </tr> | ||
<tr valign="center"> | <tr valign="center"> | ||
| − | <td width=63 align="left">[[image:ArrowLeftBtn.png|link=SAR Scenario Gladstone | + | <td width=63 align="left">[[image:ArrowLeftBtn.png|link=SAR Scenario Gladstone Shunter_V1|30px]]</td> |
| − | <td width=125 align="center">[[image:Session Scenario Index.png|link=SAR Peterborough Base | + | <td width=125 align="center">[[image:Session Scenario Index.png|link=SAR Peterborough Base Session_V1|alt=Scenarios|Scenario Index]]<br>'''[[SAR Peterborough Base Session_V1|Scenario Index]]'''</td> |
| − | <td width=125 align="center">[[Image:Location Index.png|link=SAR | + | <td width=125 align="center">[[Image:Location Index.png|link=SAR Index_V1|alt=Location Index|Location Index]]<br>'''[[SAR Index_V1|Location Index]]'''</td> |
| − | <td width=125 align="center">[[image:SAR Tutorial.png|link=SAR Scenarios | + | <td width=125 align="center">[[image:SAR Tutorial.png|link=SAR Scenarios Tutorial_V1|alt=Tutorial|Drive Tutorial]]<br>'''[[SAR Scenarios Tutorial_V1|Drive Tutorial]]'''</td> |
| − | <td width=125 align="center">[[image:Rolling Stock Index.png|link=SAR Scenario Rolling | + | <td width=125 align="center">[[image:Rolling Stock Index.png|link=SAR Scenario Rolling Stock_V1|alt=Rolling Stock|Rolling Stock List]]<br>'''[[SAR Scenario Rolling Stock_V1|Rolling Stock List]]'''</td> |
| − | <td width=125 align="center">[[image:Loco Index.png|link=SAR Peterborough Division Loco | + | <td width=125 align="center">[[image:Loco Index.png|link=SAR Peterborough Division Loco Roster_V1|alt=Loco Roster|Loco Roster]]<br>'''[[SAR Peterborough Division Loco Roster_V1|Loco Roster]]'''</td> |
| − | <td width=125 align="center">[[image:Industry Index.png|link=SAR Scenario | + | <td width=125 align="center">[[image:Industry Index.png|link=SAR Scenario Industries_V1|alt=Industries|Active Industries]]<br>'''[[SAR Scenario Industries_V1|Active Industries]]'''</td> |
<td width=125 align="center">[[image:BackToTop.png|link=#top|alt=Top|Top]]</td> | <td width=125 align="center">[[image:BackToTop.png|link=#top|alt=Top|Top]]</td> | ||
| − | <td width=62 align="left">[[image:ArrowRightBtn.png|link=SAR Scenario Quorn | + | <td width=62 align="left">[[image:ArrowRightBtn.png|link=SAR Scenario Quorn Shunter_V1|30px]]</td> |
</tr> | </tr> | ||
</table> <!-- END End Links Table --> | </table> <!-- END End Links Table --> | ||
Revision as of 08:42, 11 May 2024
| 14 Terowie Shunter | ||
| A scenario in the SAR Peterborough Base Session | ||
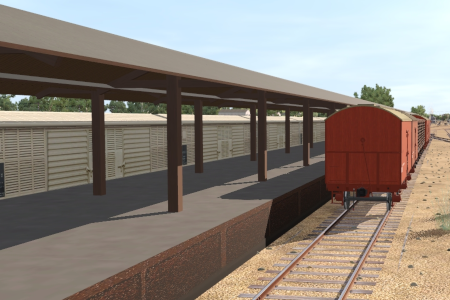
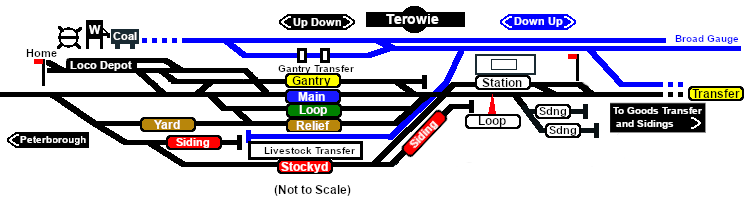
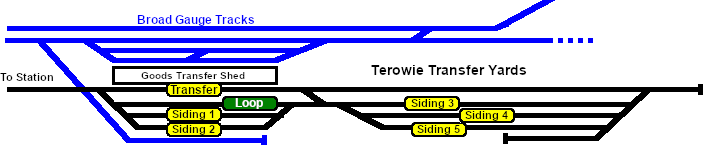
| Shunting operations in Terowie Yard. |
The Historical Bit
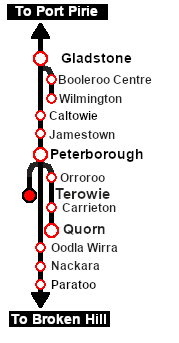
Terowie's only role was as a change of gauge location. Passengers and freight from Adelaide arrived from the south on the broad gauge (5ft 3in) line and were transferred to wagons on the narrow gauge (3ft 6in) line to continue north to Peterborough and onto destinations on the Broken Hill, Trans Continental and Central Australia lines. The reverse arrangement applied to traffic travelling south to Adelaide.
Passengers simply moved from one platform across to another at the station. Goods and livestock were manually moved from wagons of one gauge on one side of a transfer platform to wagons of the other gauge on the other side, or by gantry crane from one train to the other. Much later a bogie exchange system was introduced to help eliminate the manual handling of freight. By 1970 the broad gauge line was extended to Peterborough and the role and importance of Terowie was greatly reduced. By 1988 the line from Adelaide to Peterborough was closed.
 |
|
|
|
Each location in the layout has a detailed set of track diagrams that provide a variety of useful information The Getting Started guide below gives a summary of what is available. |
Getting Started:
|
Tutorial:
|
|
|


| Links: All links will open in this window | ||||||||
 Scenario Index |
 Location Index |
 Drive Tutorial |
 Rolling Stock List |
 Loco Roster |
 Active Industries |
|||
This page was created by Trainz user pware in February 2021 and was last updated as shown below.