How to Perform Database Repairs
m |
|||
| (6 intermediate revisions by one user not shown) | |||
| Line 3: | Line 3: | ||
<td>The information in this Wiki Page applies to '''TANE''', '''TRS19''', '''Trainz Plus''' and '''TRS22'''.<br> | <td>The information in this Wiki Page applies to '''TANE''', '''TRS19''', '''Trainz Plus''' and '''TRS22'''.<br> | ||
| − | This guide will take you through the process of performing manual database repairs and clean database installs. '''Trainz''' will automatically perform database repairs when it detects corruption in the Trainz database but sometimes a manual repair | + | This guide will take you through the process of performing manual database repairs and clean database installs. '''Trainz''' will automatically perform database repairs when it detects corruption in the Trainz database but sometimes a manual repair will be required.</td> |
</tr> | </tr> | ||
</table> | </table> | ||
| + | <table width=1000> | ||
| + | <tr valign="top"> | ||
| + | <td width=375> | ||
__TOC__ | __TOC__ | ||
| + | </td> | ||
| + | <td> | ||
| + | <table cellpadding=2 bgcolor="Aquamarine"> | ||
| + | <tr valign="top"> | ||
| + | <td>[[image:LinkWiki.PNG|link=]]</td> | ||
| + | <td>The section describing how to create a '''Clean Install''' (i.e. containing only '''Base''' and '''Built-in''' assets) has been moved to its own Wiki Page. This can be found at:- | ||
| + | :'''[[How_to_Create_a_Clean_Install|How to Create a Clean Install]]''' | ||
| + | </td> | ||
| + | </tr> | ||
| + | </table> | ||
| + | </td> | ||
| + | </tr> | ||
| + | </table> | ||
| + | <br> | ||
<table width=1000> <!-- BEGIN Nav Buttons Table --> | <table width=1000> <!-- BEGIN Nav Buttons Table --> | ||
<tr valign="top"> | <tr valign="top"> | ||
| Line 201: | Line 218: | ||
<td width=46>[[file:BackToTop.png|link=#top|alt=Top|Top]]</td> | <td width=46>[[file:BackToTop.png|link=#top|alt=Top|Top]]</td> | ||
<td width=75>[[file:NextUp.png|link=#stepHow|alt=Next Up|Next Up]]</td> | <td width=75>[[file:NextUp.png|link=#stepHow|alt=Next Up|Next Up]]</td> | ||
| − | <td width=75> | + | <td width=75> </td> |
<td width=75>[[file:BackToBottom.png|link=#bottom|alt=Bottom|Bottom]]</td> | <td width=75>[[file:BackToBottom.png|link=#bottom|alt=Bottom|Bottom]]</td> | ||
</tr> | </tr> | ||
| Line 305: | Line 322: | ||
<table width=1000> <!-- BEGIN Nav Buttons Table --> | <table width=1000> <!-- BEGIN Nav Buttons Table --> | ||
<tr valign="top"> | <tr valign="top"> | ||
| − | <td width=729><span id=" | + | <td width=729><span id="bottom"></span> </td> |
<td width=46>[[file:BackToTop.png|link=#top|alt=Top|Top]]</td> | <td width=46>[[file:BackToTop.png|link=#top|alt=Top|Top]]</td> | ||
<td width=75>[[file:NextUp.png|link=#stepEDBR|alt=Next Up|Next Up]]</td> | <td width=75>[[file:NextUp.png|link=#stepEDBR|alt=Next Up|Next Up]]</td> | ||
<td width=75> </td> | <td width=75> </td> | ||
| − | <td width=75> | + | <td width=75> </td> |
</tr> | </tr> | ||
</table> <!-- END Nav Buttons Table --> | </table> <!-- END Nav Buttons Table --> | ||
| − | |||
| − | |||
| − | |||
| − | |||
| − | |||
| − | |||
| − | |||
| − | |||
| − | |||
| − | |||
| − | |||
| − | |||
| − | |||
| − | |||
| − | |||
| − | |||
| − | |||
| − | |||
| − | |||
| − | |||
| − | |||
| − | |||
| − | |||
| − | |||
| − | |||
| − | |||
| − | |||
| − | |||
| − | |||
| − | |||
| − | |||
| − | |||
---- | ---- | ||
| − | + | ---- | |
| − | + | ='''Trainz Wiki'''= | |
| − | + | <table width=1000> | |
| − | + | ||
| − | + | ||
| − | + | ||
| − | + | ||
| − | + | ||
| − | + | ||
| − | + | ||
| − | + | ||
| − | + | ||
| − | + | ||
| − | + | ||
| − | + | ||
| − | + | ||
| − | + | ||
| − | + | ||
| − | + | ||
| − | + | ||
| − | + | ||
| − | + | ||
| − | + | ||
| − | + | ||
| − | + | ||
| − | + | ||
| − | <table width=1000 | + | |
<tr valign="top"> | <tr valign="top"> | ||
<td> | <td> | ||
| − | <table width= | + | <table width=500 cellpadding=2 bgcolor=#ffffff> |
| − | + | ||
| − | + | ||
| − | + | ||
| − | + | ||
| − | + | ||
| − | + | ||
| − | + | ||
| − | + | ||
| − | + | ||
| − | + | ||
| − | + | ||
| − | + | ||
| − | + | ||
| − | + | ||
| − | + | ||
| − | + | ||
| − | + | ||
| − | + | ||
| − | + | ||
| − | + | ||
<tr valign="top"> | <tr valign="top"> | ||
| + | <td width=80>[[image:TrainzWiki.png|link=]]</td> | ||
<td> | <td> | ||
| − | < | + | <span style="font-size: 17px;">'''More Tutorials and Guides to Using Trainz'''</span><br> |
| − | + | *'''<span class="plain;s">[http://online.ts2009.com/mediaWiki/index.php/HowTo How to Guides]</span>''' | |
| − | < | + | *'''[[Driver Commands List]]''' |
| − | + | *'''[[Session Rule List with Parameters|Session Rules List (Alphabetical) with Parameters]]''' | |
| − | + | *'''[[Session Rules By Categories With Properties|Session Rules List (Categories) With Parameters]]''' | |
| − | + | ||
| − | + | ||
| − | + | ||
| − | + | ||
| − | + | ||
| − | + | ||
| − | + | ||
</td> | </td> | ||
</tr> | </tr> | ||
</table> | </table> | ||
</td> | </td> | ||
| − | |||
| − | |||
| − | |||
| − | |||
| − | |||
| − | |||
<td> | <td> | ||
| − | <table | + | <table width=500 cellpadding=4 bgcolor="aquamarine"> |
| − | + | ||
| − | + | ||
| − | + | ||
| − | + | ||
| − | + | ||
| − | + | ||
| − | + | ||
| − | + | ||
| − | + | ||
| − | + | ||
| − | + | ||
| − | + | ||
| − | + | ||
| − | + | ||
| − | + | ||
| − | + | ||
| − | + | ||
| − | + | ||
| − | + | ||
| − | + | ||
| − | + | ||
| − | + | ||
| − | + | ||
| − | + | ||
| − | + | ||
| − | + | ||
| − | + | ||
| − | + | ||
| − | + | ||
| − | + | ||
| − | + | ||
| − | + | ||
| − | + | ||
| − | + | ||
| − | + | ||
| − | + | ||
| − | + | ||
| − | + | ||
| − | + | ||
| − | + | ||
| − | + | ||
| − | + | ||
| − | + | ||
| − | + | ||
| − | + | ||
| − | + | ||
| − | + | ||
| − | + | ||
| − | + | ||
| − | + | ||
| − | + | ||
| − | + | ||
| − | + | ||
| − | + | ||
| − | + | ||
| − | + | ||
| − | + | ||
| − | + | ||
| − | + | ||
| − | + | ||
| − | + | ||
| − | + | ||
| − | + | ||
| − | + | ||
| − | + | ||
| − | + | ||
| − | + | ||
| − | + | ||
| − | + | ||
| − | + | ||
| − | + | ||
| − | + | ||
| − | + | ||
| − | + | ||
| − | + | ||
| − | + | ||
| − | + | ||
| − | + | ||
| − | + | ||
| − | + | ||
| − | + | ||
| − | + | ||
| − | + | ||
| − | + | ||
| − | + | ||
| − | + | ||
| − | + | ||
| − | + | ||
| − | + | ||
| − | + | ||
| − | + | ||
| − | + | ||
| − | + | ||
<tr valign="top"> | <tr valign="top"> | ||
| + | <td width=50>[[image:LinkWiki.PNG|link=]]</td> | ||
<td> | <td> | ||
| − | + | <span style="font-size: 17px;">'''Related Links'''</span><br> | |
| − | + | *'''[[How to Create a Clean Install|How to Create a Clean Install and Alternative User Data Folders]]''' | |
| − | + | *'''[[How to Restore Deleted Assets|How to Restore Deleted Assets]]''' | |
| − | + | *'''[[Understand Content Manager Status Labels|Understand Content Manager Status Labels]]''' | |
| − | + | *'''[[Using Content Manager to Update Assets|Using Content Manager to Update Assets]]''' | |
| − | + | ||
| − | + | ||
| − | + | ||
| − | + | ||
| − | + | ||
| − | + | ||
| − | + | ||
| − | + | ||
| − | + | ||
| − | + | ||
| − | + | ||
| − | + | ||
| − | + | ||
| − | + | ||
| − | + | ||
</td> | </td> | ||
</tr> | </tr> | ||
</table> | </table> | ||
| − | |||
| − | |||
| − | |||
| − | |||
| − | |||
| − | |||
| − | |||
| − | |||
| − | |||
| − | |||
| − | |||
| − | |||
| − | |||
| − | |||
| − | |||
| − | |||
| − | |||
| − | |||
| − | |||
| − | |||
| − | |||
| − | |||
| − | |||
| − | |||
| − | |||
| − | |||
</td> | </td> | ||
</tr> | </tr> | ||
</table> | </table> | ||
---- | ---- | ||
| − | This page was created by Trainz user '''<span class=" | + | This page was created by Trainz user '''<span class="plain;s">[http://online.ts2009.com/mediaWiki/index.php/User:Pware pware]</span>''' in January 2019 and was last updated as shown below. |
---- | ---- | ||
[[Category:How-to guides]] | [[Category:How-to guides]] | ||
Latest revision as of 11:19, 27 April 2025
| The information in this Wiki Page applies to TANE, TRS19, Trainz Plus and TRS22. This guide will take you through the process of performing manual database repairs and clean database installs. Trainz will automatically perform database repairs when it detects corruption in the Trainz database but sometimes a manual repair will be required. |
|
|
[edit] What is the "Trainz Database"?
| The Trainz Database contains all the installed assets |
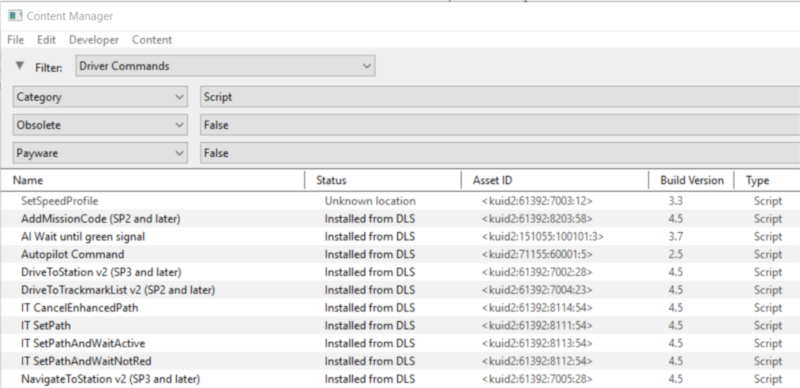
| In the earliest Trainz versions all the assets that came installed with Trainz, or that you installed from the DLS or downloaded as .cdp files, were stored as separate folders on your designated data drive. This made it easy to access the assets for editing and other operations. However the penalty was that each time you started Trainz it had to scan the assets to check their integrity and the more assets you had the longer the startup took. This led to a great many complaints from users.
Today, all installed Trainz assets are added as records in an asset database which has significantly sped up the startup process and has reduced the possibility of accidental data corruption by users. The penalty is that users can no longer access the installed assets by using Windows Explorer. Access to the assets in the database for editing and examination is through the Content Manager program. Because it is a database manager, Content Manager also provides users with many more search, display and management options than were ever previously possible. Each entry in the display shown below is a single record in the Trainz database. Each entry can be easily opened for editing, it can be deleted, copied (cloned) and updated. New assets can be manually created or installed from other sources. |
 |
[edit] Why Would a Database Repair (DBR) Be Needed?
A Quote from N3V
| "In terms of DB repairs, it should only be necessary if the program is updated or crashes. My understanding of the additional repairs are for things that are done outside the program function [i.e. outside of Content Manager and Surveyor] (like manually adding content into the local data folder) so in that case the db repair 'discovers' the new content". |
| When Trainz is operating there is a great deal of database activity going on with records being opened and closed, and data being read and written. Corruption of the data is always possible, particularly if the power supply is interrupted or the program is suddenly terminated (a "crash") while records are open or being written. For this reason, Content Manager comes equipped with automatic and manual database repair tools. |
|
[edit] How to Perform a Database Repair (a DBR)
| A DBR performs a "surface scan" of the database detecting missing content and content errors. It will update your database and can clean up some corrupted data. |
This is the simplest and (usually) the fastest option.
|
||||||||||||
| Steps: | |||||
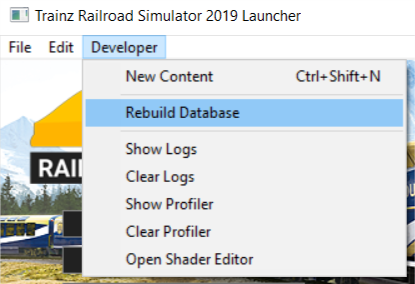
Open the Developer Menu
|
|||||
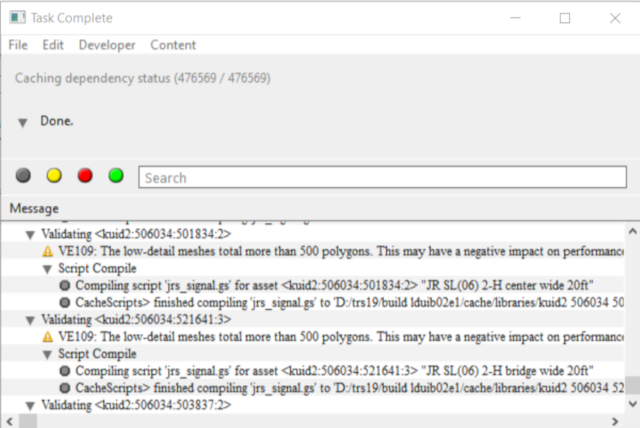
The process will proceed automatically and unaided through a number of steps, only some of which are shown below. The time required for each step will vary enormously (some will take much longer than others) and the total time involved will depend on the number of assets installed, the speed of your system and other factors.
|
||||||||
| The Rebuilding Trainz Asset Database window will disappear if the DBR process has been successfully completed without finding any errors. If errors have been found then the window will remain on the screen to report on the number of errors and warnings. |
[edit] How to Perform an Extended Database Repair (an EDBR)
| An EDBR performs a "deep scan" of the database and checks that the data in every asset conforms to the rules for that type of asset |
|
|
| Steps: | |||||||||||
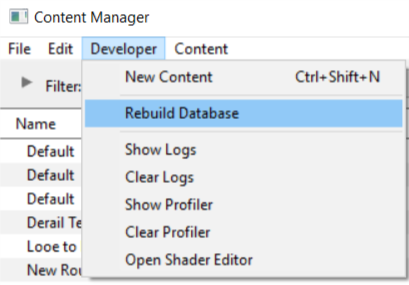
| Open the Developer Menu | |||||||||||
|
|||||||||||
A possible result of an EDBR.
|
|
[edit] Trainz Wiki
|
|
This page was created by Trainz user pware in January 2019 and was last updated as shown below.


