Help:Mobile Driver
(→Decoupling) |
Tonyhilliam (Talk | contribs) |
||
| (9 intermediate revisions by 2 users not shown) | |||
| Line 1: | Line 1: | ||
| + | <div style="float:right;">__TOC__</div> | ||
| + | |||
Driver is the module which allows you to drive and operate trains and explore a "[[Help:Route|Route]]" by selecting (or creating) a "[[Help:Session|Session]]". You can enter Driver by using the [[Help:Mobile Main Menu:Select Route|Select Route]] tile on the main menu. | Driver is the module which allows you to drive and operate trains and explore a "[[Help:Route|Route]]" by selecting (or creating) a "[[Help:Session|Session]]". You can enter Driver by using the [[Help:Mobile Main Menu:Select Route|Select Route]] tile on the main menu. | ||
| Line 8: | Line 10: | ||
[[File:mobile-driver-screen-layout.png|512px]] | [[File:mobile-driver-screen-layout.png|512px]] | ||
| − | The screen layout for Driver is as shown above. | + | The screen layout for Driver is as shown above. Various elements will change slightly during gameplay depending on the state of the simulation, however the overall layout remains consistent. Driving controls are toward the bottom of the screen, camera controls are on the left, the main menu button is on the top left and other utility buttons are on the top right. Each area is discussed in detail below. |
| − | + | ||
| − | + | ||
| − | + | ||
| Line 22: | Line 21: | ||
* "Back to Game" - Dismisses the menu and returns you to the game. | * "Back to Game" - Dismisses the menu and returns you to the game. | ||
* "Options" - Displays the game options dialog. | * "Options" - Displays the game options dialog. | ||
| − | * "Account Details" - Allows editing of the [[Planet Auran]] account details. | + | * "Account Details" - Allows editing of the [[Planet_Auran_account|Planet Auran]] account details. |
* "Achievements" - Shows the list of achievements, including the current progress toward further achievements. | * "Achievements" - Shows the list of achievements, including the current progress toward further achievements. | ||
* "Save Game" - Saves the current Driver Session. Saved sessions may be accessed later from within the [[Mobile-area-driving-select_route|Select Route menu]]. | * "Save Game" - Saves the current Driver Session. Saved sessions may be accessed later from within the [[Mobile-area-driving-select_route|Select Route menu]]. | ||
| Line 30: | Line 29: | ||
=Camera Controls= | =Camera Controls= | ||
| + | == Camera Mode Buttons == | ||
[[File:mobile-driver-camera-controls.png|right|49px]] | [[File:mobile-driver-camera-controls.png|right|49px]] | ||
| − | |||
| − | |||
Depending on the current state of the game, there may be up to three camera control buttons on left side of the screen. These buttons are, from top to bottom: | Depending on the current state of the game, there may be up to three camera control buttons on left side of the screen. These buttons are, from top to bottom: | ||
| Line 58: | Line 56: | ||
You can tap on a train vehicle at any time to attach the camera view to that specific train vehicle. | You can tap on a train vehicle at any time to attach the camera view to that specific train vehicle. | ||
<br clear=all> | <br clear=all> | ||
| − | |||
=Simple Controls= | =Simple Controls= | ||
[[File:mobile-driver-dcc-controls.png|right|53px]] | [[File:mobile-driver-dcc-controls.png|right|53px]] | ||
Simple "DCC" controls. | Simple "DCC" controls. | ||
| − | |||
| + | The "DCC" control mode (also known as "arcade" control mode or "easy" control mode) allows you to control the train by providing a simple forward-backward speed slider on the bottom left of the screen. While the slider thumb is centred, the train will brake and come to a stop. When the slider thumb is moved toward the top of the slider, the train will accelerate forward. When the slider thumb is moved toward the bottom of the slider, the train will accelerate backward. The further from the center the slider is set, the faster the train will move. | ||
| + | |||
| + | A simplified physics model is used while in this control mode, which helps you to focus on the mechanics of the railroad rather than the specifics of driving the train. | ||
| + | |||
| + | |||
| + | <br clear=all> | ||
=Cab Controls= | =Cab Controls= | ||
[[File:mobile-driver-cab-control.png|right|512px]] | [[File:mobile-driver-cab-control.png|right|512px]] | ||
More complicated "cab" controls. | More complicated "cab" controls. | ||
| − | |||
| + | Cab controls provide a realistic set of control levers and apply a realistic physics simulation to your train. This can be harder to master than the "DCC" control mode, however it can be more rewarding as it adds an additional element to the gameplay. | ||
| + | |||
| + | For diesel and diesel/electric locomotives, the controls are as follows, from left to right: | ||
| + | |||
| + | * Reverser (Yellow, Left side of screen) - This lever has three positions: Reverse (bottom), Neutral (middle) and Forward (top). The reverser can only be engaged while the throttle lever is in the neutral position. | ||
| + | * Throttle (Green, Left side of screen) - This lever has a number of notches, with neutral at the bottom and maximum throttle at the top. The reverser should have the appropriate direction selected before you apply the throttle. | ||
| + | * Dynamic Brake (Blue, Right side of screen) - This lever engages the dynamic brake. The off position is at the bottom. The dynamic brake is used to keep the train speed under control while descending a steep grade. | ||
| + | * Train Brake (Red, Right side of screen) - This lever operates the train brake. The release (off) position is at the bottom. The train brake is controlled at the locomotive, and the pressure propagates gradually to the rest of the train. The topmost setting of this lever engages the emergency brake, which stops the train as quickly as possible but which is not recommended for normal operations. | ||
| + | * Independent Brake (Red, Right side of screen) - This lever operates the independent brake. This brake affects the locomotive only. Careful use of the train and independent brakes can allow coupling slack to be built up or removed from the train. | ||
| + | |||
| + | <br clear=all> | ||
=Information Panel= | =Information Panel= | ||
[[File:mobile-driver-info-panel.png|right|260px]] | [[File:mobile-driver-info-panel.png|right|260px]] | ||
An information panel which relays the state of the next signal, the current speed, the current speed limit, approaching limit changes, and the current time or score. | An information panel which relays the state of the next signal, the current speed, the current speed limit, approaching limit changes, and the current time or score. | ||
| − | |||
| + | When approach a restricted speed zone at excessive speed, the speed limit indicator will flash to warn you to slow down. You should attempt to slow the train prior to entering the new speed zone. The indicator will cease flashing once you are at an acceptable speed. It is easy to over-compensate for speed changes- it is often better to make small control changes and let the train settle at the new speed rather than nearly stop the train and then bring it back up to speed. | ||
| + | <br clear=all> | ||
=Decoupling= | =Decoupling= | ||
| Line 84: | Line 97: | ||
1. Tap the user interface mode toggle at the bottom of the screen to cycle interface modes until you see the decouple icon. | 1. Tap the user interface mode toggle at the bottom of the screen to cycle interface modes until you see the decouple icon. | ||
| − | [[File:mobile-driver-ui-mode-switch.png|131px]] | + | :[[File:mobile-driver-ui-mode-switch.png|131px]] |
| + | |||
2. Tap the decouple icon at the bottom right of the screen to enter decouple mode. | 2. Tap the decouple icon at the bottom right of the screen to enter decouple mode. | ||
| − | [[File:mobile-driver-decouple-icon.png]] | + | :[[File:mobile-driver-decouple-icon.png|80px]] |
| + | |||
3. The camera will now rotate to the side of the train, coupling icons will show, and buttons will display at the left and right of the screen to move along the train. Move along the train and tap the appropriate coupler icons to lock or unlock the desired couplers. | 3. The camera will now rotate to the side of the train, coupling icons will show, and buttons will display at the left and right of the screen to move along the train. Move along the train and tap the appropriate coupler icons to lock or unlock the desired couplers. | ||
| − | [[File:mobile-driver-decouple-view.png]] | + | :[[File:mobile-driver-decouple-view.png|512px]] |
| + | |||
4. Tap the decouple icon at the bottom right of the screen to exit decouple mode. Optionally tap the user interface mode toggle to return to the driving controls. | 4. Tap the decouple icon at the bottom right of the screen to exit decouple mode. Optionally tap the user interface mode toggle to return to the driving controls. | ||
Latest revision as of 17:43, 14 August 2014
Contents |
Driver is the module which allows you to drive and operate trains and explore a "Route" by selecting (or creating) a "Session". You can enter Driver by using the Select Route tile on the main menu.
Each Driver Session is set up by the author. A very powerful feature in Trainz is that if you don't like the trains chosen, or want to add or remove objectives, it is a very simple process to edit a session to create a version customized to your particular tastes.
[edit] Screen Layout
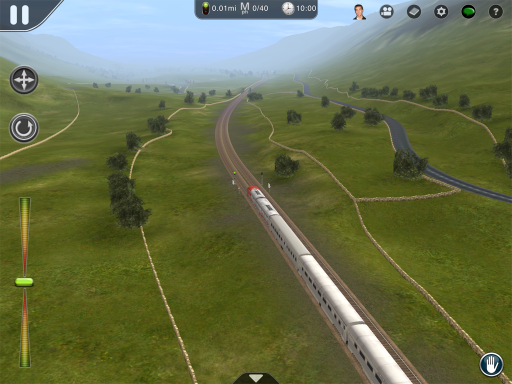
The screen layout for Driver is as shown above. Various elements will change slightly during gameplay depending on the state of the simulation, however the overall layout remains consistent. Driving controls are toward the bottom of the screen, camera controls are on the left, the main menu button is on the top left and other utility buttons are on the top right. Each area is discussed in detail below.
[edit] Driver Main Menu
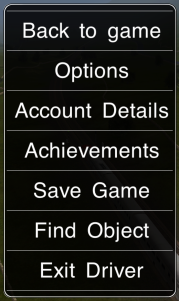
![]() At the top left of the Driver screen is a "pause" icon button, which pauses the game (in single player only) and displays the Driver Main Menu. The following options are available from this menu:
At the top left of the Driver screen is a "pause" icon button, which pauses the game (in single player only) and displays the Driver Main Menu. The following options are available from this menu:
- "Back to Game" - Dismisses the menu and returns you to the game.
- "Options" - Displays the game options dialog.
- "Account Details" - Allows editing of the Planet Auran account details.
- "Achievements" - Shows the list of achievements, including the current progress toward further achievements.
- "Save Game" - Saves the current Driver Session. Saved sessions may be accessed later from within the Select Route menu.
- "Find Object" - Allows you to find a named object on the route.
- "Exit Driver" - Exits the current game and returns to the Main Menu. The game will offer to save any progress made in the current session.
[edit] Camera Controls
[edit] Camera Mode Buttons
Depending on the current state of the game, there may be up to three camera control buttons on left side of the screen. These buttons are, from top to bottom:
- "Move Camera" - Tap this button to enter "move" mode. Drag anywhere on the 3D world to move the camera. If the camera was attached to a train, this will cause the camera to become detached from the train. This button is not available while using an interior camera view. If a lineside camera was active, manually adjusting the camera will swap to a free-roaming view. If the button is held instead of tapped, you can make a quick multi-touch adjustment to camera position without changing modes.
- "Rotate Camera" - Tap this button to enter "rotate" mode. Drag anywhere on the 3D world to rotate the camera without changing the center of focus. If the camera was attached to a train, it will remain attached. This button is not visible while using an interior camera view, as "rotate" mode is always active. If a lineside camera was active, manually adjusting the camera will swap to a free-roaming view. If the button is held instead of tapped, you can make a quick multi-touch adjustment to camera position without changing modes.
- "Return to Train" - Tap this button to return the camera view to the train which you are currently controlling. Where applicable, the train that you are controlling may be adjusted using the Driver Menu (see below.)
[edit] Multitouch Gestures
In both camera adjustment modes, pinching will zoom the camera. At extreme distance, the camera will automatically adjust to face directly downward, and the view will transition between the local 3D view and a "minimap" overview.
In both camera adjustment modes, sliding two fingers vertically will cause the camera to tilt up or down, changing the angle of the horizon.
In the "move" camera mode, rotating two fingers in place on the screen will cause the camera to rotate around its point of focus.
[edit] Camera Views
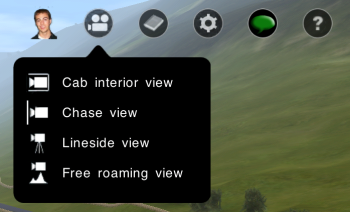
Tapping on the "Camera View" icon button allows selection between the following camera view:
- Cab interior view - View the 3D world from the perspective of the Driver.
- Chase view - Attach the camera to the currently controlled train.
- Lineside view - Automatically select from cameras that are built into the route or session, where applicable. Not all routes and sessions have lineside cameras. Where no lineside cameras are available near the currently controlled train, the game will effectively use "chase view" instead.
- Free roaming view - Adjust the camera position and orientation manually. No attempt is made by the game to keep the currently controlled train in view. This mode is automatically selected whenever a manual adjustment is made which cannot be satisfied by the previously selected camera view. The "return to train" icon button will become visible while in this mode if you have a currently controlled train to return to.
You can tap on a train vehicle at any time to attach the camera view to that specific train vehicle.
[edit] Simple Controls
Simple "DCC" controls.
The "DCC" control mode (also known as "arcade" control mode or "easy" control mode) allows you to control the train by providing a simple forward-backward speed slider on the bottom left of the screen. While the slider thumb is centred, the train will brake and come to a stop. When the slider thumb is moved toward the top of the slider, the train will accelerate forward. When the slider thumb is moved toward the bottom of the slider, the train will accelerate backward. The further from the center the slider is set, the faster the train will move.
A simplified physics model is used while in this control mode, which helps you to focus on the mechanics of the railroad rather than the specifics of driving the train.
[edit] Cab Controls
More complicated "cab" controls.
Cab controls provide a realistic set of control levers and apply a realistic physics simulation to your train. This can be harder to master than the "DCC" control mode, however it can be more rewarding as it adds an additional element to the gameplay.
For diesel and diesel/electric locomotives, the controls are as follows, from left to right:
- Reverser (Yellow, Left side of screen) - This lever has three positions: Reverse (bottom), Neutral (middle) and Forward (top). The reverser can only be engaged while the throttle lever is in the neutral position.
- Throttle (Green, Left side of screen) - This lever has a number of notches, with neutral at the bottom and maximum throttle at the top. The reverser should have the appropriate direction selected before you apply the throttle.
- Dynamic Brake (Blue, Right side of screen) - This lever engages the dynamic brake. The off position is at the bottom. The dynamic brake is used to keep the train speed under control while descending a steep grade.
- Train Brake (Red, Right side of screen) - This lever operates the train brake. The release (off) position is at the bottom. The train brake is controlled at the locomotive, and the pressure propagates gradually to the rest of the train. The topmost setting of this lever engages the emergency brake, which stops the train as quickly as possible but which is not recommended for normal operations.
- Independent Brake (Red, Right side of screen) - This lever operates the independent brake. This brake affects the locomotive only. Careful use of the train and independent brakes can allow coupling slack to be built up or removed from the train.
[edit] Information Panel
An information panel which relays the state of the next signal, the current speed, the current speed limit, approaching limit changes, and the current time or score.
When approach a restricted speed zone at excessive speed, the speed limit indicator will flash to warn you to slow down. You should attempt to slow the train prior to entering the new speed zone. The indicator will cease flashing once you are at an acceptable speed. It is easy to over-compensate for speed changes- it is often better to make small control changes and let the train settle at the new speed rather than nearly stop the train and then bring it back up to speed.
[edit] Decoupling
In order to decouple vehicles from your current train, you must enter decouple mode. This is achieved as follows:
1. Tap the user interface mode toggle at the bottom of the screen to cycle interface modes until you see the decouple icon.
2. Tap the decouple icon at the bottom right of the screen to enter decouple mode.
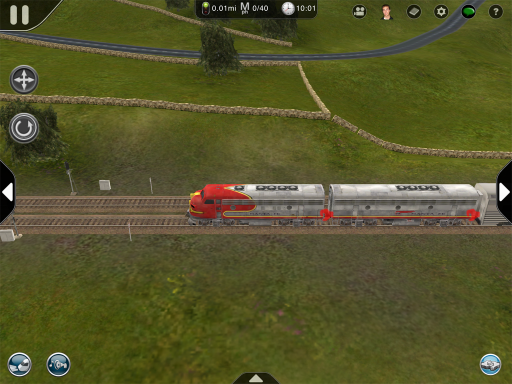
3. The camera will now rotate to the side of the train, coupling icons will show, and buttons will display at the left and right of the screen to move along the train. Move along the train and tap the appropriate coupler icons to lock or unlock the desired couplers.
4. Tap the decouple icon at the bottom right of the screen to exit decouple mode. Optionally tap the user interface mode toggle to return to the driving controls.
Coupler icons which show in grey cannot be adjusted- this may be prevented by the current driving session, or may be the result of a simulated mechanical failure on your train due to excessive driving force.
[edit] QuickDrive
[edit] Changing Drivers
[edit] Other Topics
Select the area within Trainz Mobile you want to explore.
