How to Manage Filters and Picklists
m |
|||
| Line 92: | Line 92: | ||
<tr valign="top"> | <tr valign="top"> | ||
<td width=25>[[image:DotPoint1Blue.png|link=]]</td> | <td width=25>[[image:DotPoint1Blue.png|link=]]</td> | ||
| − | <td><span style="font-weight: 700; font-size: 15px; background-color: lightcyan;">Left Click</span> on the '''Down Arrowhead''' icon | + | <td><span style="font-weight: 700; font-size: 15px; background-color: lightcyan;">Left Click</span> on the '''Down Arrowhead''' icon to the right of the title '''Content Search Filter''' at the top of the window |
<table> | <table> | ||
<tr valign="top"> | <tr valign="top"> | ||
| Line 1,610: | Line 1,610: | ||
<td> | <td> | ||
==<span style="font-weight: 700; font-size: 17px; color: white; background-color: black;"> In Surveyor Classic </span>== | ==<span style="font-weight: 700; font-size: 17px; color: white; background-color: black;"> In Surveyor Classic </span>== | ||
| − | <span style="font-weight: 700; font-size: 17px;">Editing Search Filters | + | <span style="font-weight: 700; font-size: 17px;">Editing Existing Search Filters</span></td> |
</tr> | </tr> | ||
</table> <!-- END Nav Buttons Table --> | </table> <!-- END Nav Buttons Table --> | ||
| + | <table width=1000> | ||
| + | <tr valign="top"> | ||
| + | <td colspan=2><span style="font-weight: 700; font-size: 15px;">Steps:</span> To edit existing search filters in Surveyor Classic:-</td> | ||
| + | </tr> | ||
| + | <tr valign="top"> | ||
| + | <td width=25>[[image:DotPoint1.JPG|link=]]</td> | ||
| + | <td> | ||
| + | <table> | ||
| + | <tr valign="top"> | ||
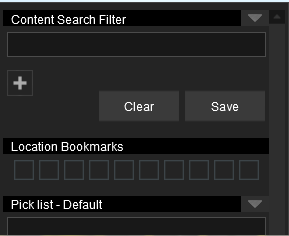
| + | <td>from the '''Surveyor Classic''' screen press <span style="font-weight: 700; font-size: 15px;"><span style="color: white; background-color: black;"> Ctrl </span> + <span style="color: white; background-color: black;"> Shift </span> + <span style="color: white; background-color: black;"> F </span></span> to open the '''Content Search Filter''' | ||
| + | <table> | ||
| + | <tr valign="top"> | ||
| + | <td>[[image:FilterSearchCategory02Saved_S10.png|link=]]</td> | ||
| + | <td> | ||
| + | <br> | ||
| + | <table> | ||
| + | <tr valign="top"> | ||
| + | <td width=25>[[image:DotPoint2.JPG|link=]]</td> | ||
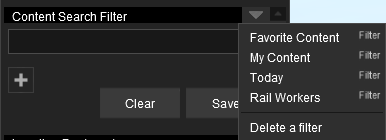
| + | <td><span style="font-weight: 700; font-size: 15px; background-color: lightcyan;">Left Click</span> on the '''Down Arrowhead''' icon to the right of the title '''Content Search Filter''' at the top of the window to list all the filters | ||
| + | <table> | ||
| + | <tr valign="top"> | ||
| + | <td> | ||
| + | <table bgcolor=#ffffb0 cellpadding=2> | ||
| + | <tr valign="top"> | ||
| + | <td width=25>[[image:NotePad.PNG|link=]]</td> | ||
| + | <td><span style="font-size: 17px;">'''Notes:'''</span><br> | ||
| + | ---- | ||
| + | The default (installed) '''Content Search Filters''' plus any that you have created and saved (for example '''Rail Workers''') will appear in the menu list</td> | ||
| + | </tr> | ||
| + | </table> | ||
| + | </td> | ||
| + | </tr> | ||
| + | </table> | ||
| + | </td> | ||
| + | </tr> | ||
| + | </table> | ||
| + | </td> | ||
| + | </tr> | ||
| + | </table> | ||
| + | </td> | ||
| + | </tr> | ||
| + | </table> | ||
| + | </td> | ||
| + | </tr> | ||
| + | </table> | ||
| − | <span style="font-weight: 700; font-size: | + | <table width=1000> |
| − | + | <tr valign="top"> | |
| + | <td width=25>[[image:DotPoint3.JPG|link=]]</td> | ||
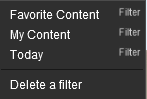
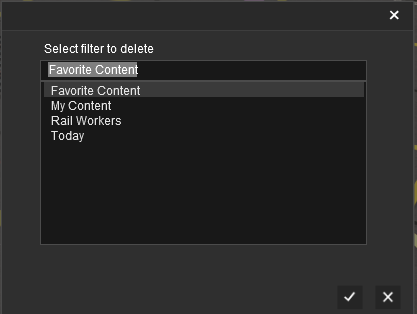
| + | <td>To <span style="font-weight: 700; font-size: 15px;">Delete</span> a filter, select the last option <span style="font-weight: 700; font-size: 15px; color: white; background-color: black;"> Delete a Filter </span> from the popout menu then select the name of the filter to be deleted<br> | ||
| + | [[image:FilterDelete02_S10.png|link=]]<br> | ||
| + | <span style="font-weight: 700; font-size: 15px; background-color: lightcyan;">Left Click</span> on the:- | ||
| + | <table> | ||
| + | <tr valign="top"> | ||
| + | <td>[[image:BulletTick.png|link=]] icon to delete the selected Picklist, <span style="font-weight: 700; font-size: 15px;">OR</span></td> | ||
| + | </tr> | ||
| + | <tr valign="top"> | ||
| + | <td>[[image:BulletCross.png|link=]] icon to cancel the delete operation</td> | ||
| + | </tr> | ||
| + | </table> | ||
| + | </td> | ||
| + | </tr> | ||
| + | </table> | ||
| + | <table width=1000> | ||
| + | <tr valign="top"> | ||
| + | <td width=25>[[image:DotPoint4.JPG|link=]]</td> | ||
| + | <td> | ||
| + | <table> | ||
| + | <tr valign="top"> | ||
| + | <td>To <span style="font-weight: 700; font-size: 15px;">Edit</span> a filter <span style="font-weight: 700; font-size: 15px; background-color: lightcyan;">Left Click</span> on its name in the popup menu list to load it into the '''Content Search Filter'''. You then have the options of:- | ||
| + | <table bgcolor=#0000ff cellpadding=2> | ||
| + | <tr valign="top"> | ||
| + | <td> | ||
| + | <table bgcolor=#ffffff cellpadding=2> | ||
| + | <tr valign="top"> | ||
| + | <td width=25>[[image:Ablue.png|link=]]</td> | ||
| + | <td>'''Adding''' new filter lines - <span style="font-weight: 700; font-size: 15px; background-color: lightcyan;">Left Click</span> on the <span style="font-weight: 700; font-size: 15px; color: white; background-color: black;"> + </span> icon on the line '''above''' where you want to insert the new line</td> | ||
| + | </tr> | ||
| + | <tr valign="top"> | ||
| + | <td>[[image:Bblue.png|link=]]</td> | ||
| + | <td>'''Deleting''' current filter lines - <span style="font-weight: 700; font-size: 15px; background-color: lightcyan;">Left Click</span> on the <span style="font-weight: 700; font-size: 15px; color: white; background-color: black;"> - </span> icon of each line to be deleted | ||
| + | <table bgcolor=#ffffb0 cellpadding=2> | ||
| + | <tr valign="top"> | ||
| + | <td>[[image:NotePad.PNG|link=]]</td> | ||
| + | <td>The <span style="font-weight: 700; font-size: 15px; color: white; background-color: black;"> Clear </span> button will delete all the lines and reset the filter</td> | ||
| + | </tr> | ||
| + | </table> | ||
| + | </td> | ||
| + | </tr> | ||
| + | <tr valign="top"> | ||
| + | <td>[[image:Cblue.png|link=]]</td> | ||
| + | <td>'''Altering''' the content of the current filter lines - <span style="font-weight: 700; font-size: 15px; background-color: lightcyan;">Left Click</span> on each '''data box''' to change its contents. Tips and techniques used in constructing content searches can be found at [[image:PageLink.PNG|link=]] '''[[#SearchLogic|Search Logic]]''' above | ||
| + | <table bgcolor=#ffffb0 cellpadding=2> | ||
| + | <tr valign="top"> | ||
| + | <td width=25>[[image:NotePad.PNG|link=]]</td> | ||
| + | <td>If you edit an existing filter you cannot use the same name when you save the new version, it must be given a different name. You can use <span style="font-weight: 700;">Step: <span style="color: white; background-color: red;"> 3 </span></span> to '''Delete''' the original version. Renaming filters is not a simple process in '''Surveyor Classic'''</td> | ||
| + | </tr> | ||
| + | </table> | ||
| + | </td> | ||
| + | </tr> | ||
| + | </table> | ||
| + | </td> | ||
| + | </tr> | ||
| + | </table> | ||
| + | </td> | ||
| + | </tr> | ||
| + | </table> | ||
| + | </td> | ||
| + | </tr> | ||
| + | </table> | ||
<br> | <br> | ||
<table width=1000> <!-- BEGIN Nav Buttons Table SKIPS NO SECTIONS --> | <table width=1000> <!-- BEGIN Nav Buttons Table SKIPS NO SECTIONS --> | ||
Revision as of 15:05, 14 October 2023
The information in this Wiki Page applies to Trainz Plus and TRS22.
|
Using Existing Search Filters and Picklists |
In Surveyor ClassicUsing Existing Search Filters and Picklists |
| Steps: To use existing filters and Picklists in Surveyor Classic:- | |||||||||||||||||||||||||||||||||
from the Surveyor Classic screen press Ctrl + Shift + F to open the Content Search Filter
|
|||||||||||||||||||||||||||||||||
| select from the following methods to search the assets:-
|
|||||||||||||||||||||||||||||||||

In Surveyor 2.0Using Existing Search Filters and Picklists |
| All Content Search Filter and Picklist tasks are conducted through the Assets Palette in Surveyor 2.0 | |
| The Content Search Filters used in Surveyor 2.0 are created using Content Manager | |
| Surveyor 2.0 is available in Trainz Plus and TRS22 Platinum |
| Steps: To use existing filters and Picklists in Surveyor 2.0:- | ||||
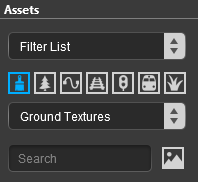
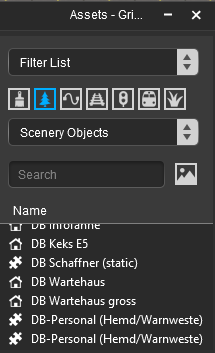
in the Surveyor 2.0 screen locate the Assets Palette
|
||||
Left Click on the data box (showing Ground Textures in the image) or on the double arrowhead as shown on its right to open up its lists of filters. The currently selected filter (Ground Textures in the image) has a
|
In Content ManagerUsing Existing Search Filters and Picklists |
| Steps: To use existing filters and Picklists in Content Manager:- | ||||||||||||||||||
| from the Trainz Launcher select Manage Content | ||||||||||||||||||
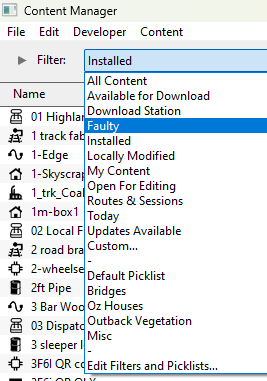
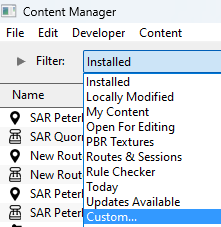
in Content Manager open the Filter drop down box
|
||||||||||||||||||
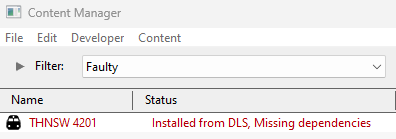
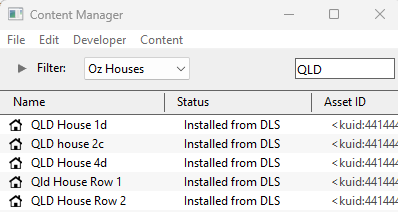
| to use a filter or Picklist Left Click on its name in the list. For example:-
|
||||||||||||||||||
Creating New Search Filters and Picklists |
In Surveyor ClassicCreating New Search Filters and Picklists |
| Steps: To create filters and Picklists in Surveyor Classic:- | ||||||||||||||
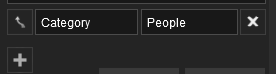
from the Surveyor Classic screen press Ctrl + Shift + F to open the Content Search Filter
|
||||||||||||||
| select from the following methods to create the new search filter or Picklist:-
|
|||||||||||||||||||||||||||||||||||||||||||||||||||||||||||||

In Surveyor 2.0Creating New Search Filters |
| Surveyor 2.0 is available in Trainz Plus and TRS22 Platinum | |
| Step 1 is designed for selection tasks. It can be combined with Step 2 and/or Step 3 to narrow the selection process | |
| Step 2 and Step 3 are suited for searching tasks |
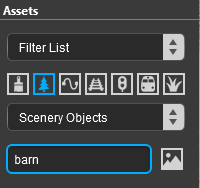
|
| Optional Steps: | |
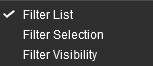
| Asset Display: At the top of the Assets Palette is a Filter Option menu box. This controls how the search filters are applied to the Trainz World shown in the Surveyor Screen. It has no effect on the assets diplayed in the Assets Palette | |
 |
|
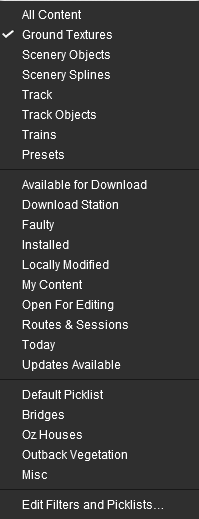
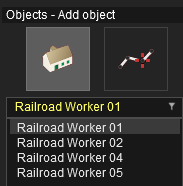
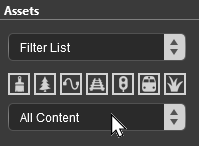
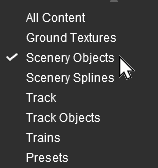
| Asset Selection: The row of Asset Icons and the Drop Down Menu below it identify the type of assets that will be shown in the filter list. This option can be selected by a Left Click on a icon that represents the different types of assets or selecting the type of asset from the drop down list. Options: Choose from:-
|
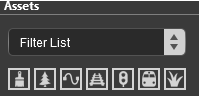
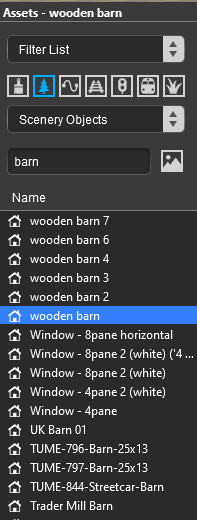
Text Selection: The Search text box allows you to enter a string of text characters that will be used to search the asset names and their descriptions for a match. Those assets that return a positive match, together with a positive asset type, if one has been set, will be shown in the filter name list.
|
||||||||||||||||||
Creating New Picklists |
|
||||
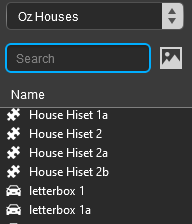
in the Surveyor 2.0 screen locate the Assets Palette
|
||||
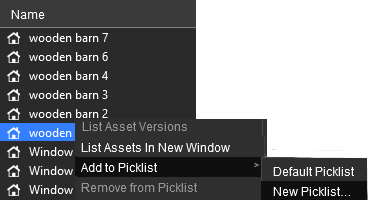
select an asset or object that will be added to the new (yet to be created) Picklist. You cannot create an empty Picklist
|
|||||||||||||||||||||||||||||||||||||||||||
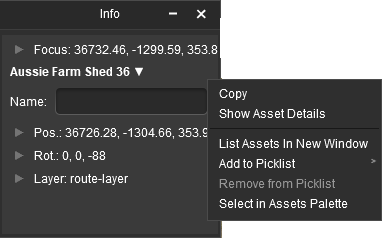
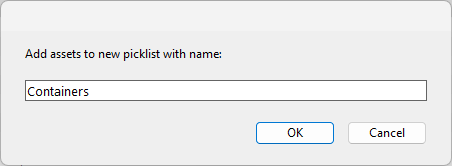
|
|||||||||||||||||||||||||
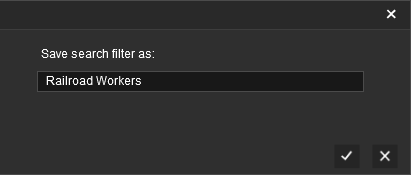
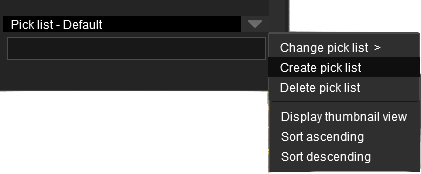
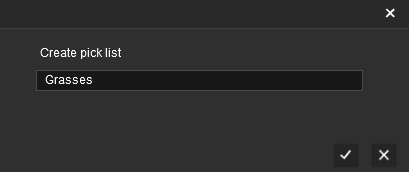
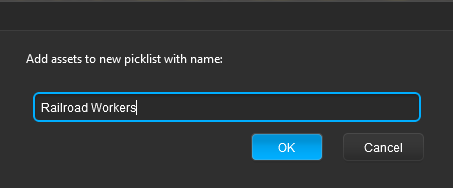
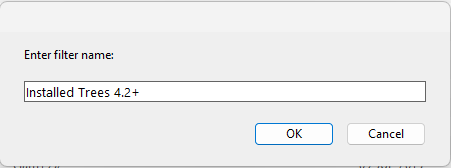
enter a name for the new Picklist and Left Click on:-
|
 |
In Content ManagerCreating New Search Filters |
| Content Search Filters created here can be used in Surveyor 2.0 asset searches |
| Steps: To create filters and Picklists in Content Manager:- | ||||||||||||||||||||||
| from the Trainz Launcher select Manage Content | ||||||||||||||||||||||
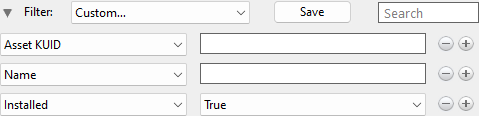
the Default preset filter is Installed which shows all the assets installed in your copy of Trainz. Left Click on the Installed drop down menu box.
|
||||||||||||||||||||||
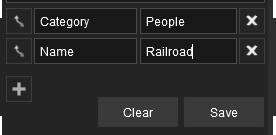
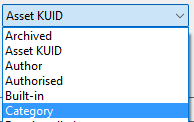
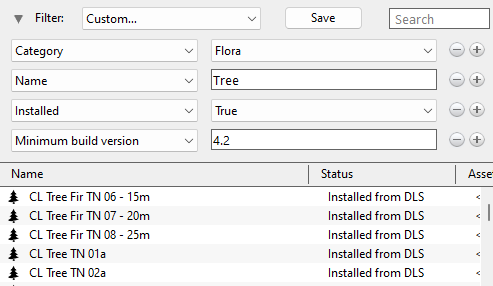
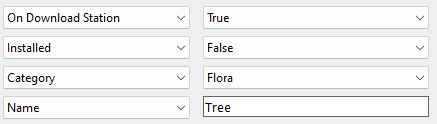
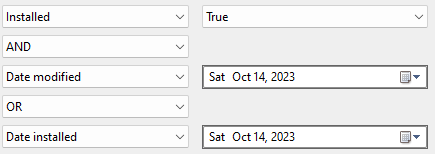
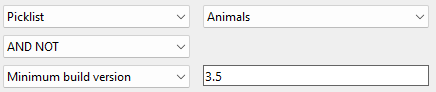
edit/add/delete the filter rows and their contents as required.
|
||||||||||||||||||||||
Save the new Content Search Filter. Left Click on the Save button above the filter lines, then:-
|
||||||||||||||||||||||
|
Creating New Picklists |
| New Picklists are created in Content Manager by using a Content Search Filter to display the assets that you want to add to the new Picklist |
| Steps: To create Picklists in Content Manager:- | |||||||||||
| from the Trainz Launcher select Manage Content | |||||||||||
| select an existing Content Search Filter or Picklist or create a new one that will display at least some of the assets that you want to add to the Picklist. You can change your selected filter or Picklist at any time during the process | |||||||||||
From the displayed list of assets:-
|
|||||||||||
|
|||||||||||

Editing Search Filters and Picklists |
In Surveyor ClassicEditing Existing Search Filters |
| Steps: To edit existing search filters in Surveyor Classic:- | |||||||||
|
|||||||||
| To Delete a filter, select the last option Delete a Filter from the popout menu then select the name of the filter to be deleted
|
|
In Surveyor 2.0Editing Search Filters and Picklists |
Under Construction
In Content ManagerEditing Search Filters and Picklists |
Under Construction
Trainz Wiki
 |
More Tutorials and Guides to Using Trainz |
This page was created by Trainz user pware in January 2020 and was last updated as shown below.