How to Use Environment Tools
m |
(updated appearance + a few additions for Trainz Plus/TRS22) |
||
| Line 10: | Line 10: | ||
</tr> | </tr> | ||
</table> <!-- END Nav Buttons Table --> | </table> <!-- END Nav Buttons Table --> | ||
| − | The information in this Wiki Page applies to '''TANE''', '''TRS19''', '''Trainz Plus''' and '''TRS22'''. A video tutorial specific to setting the environmental controls in '''TRS19''', '''Trainz Plus''' and '''TRS22''' can be found at '''[https://n3vgames.typeform.com/to/y4J2Rl TRS19 Environment and Lighting Tutorial]'''<br> | + | <table width=1000> |
| + | <tr valign="top"> | ||
| + | <td>The information in this Wiki Page applies to '''TANE''', '''TRS19''', '''Trainz Plus''' and '''TRS22'''. A video tutorial specific to setting the environmental controls in '''TRS19''', '''Trainz Plus''' and '''TRS22''' can be found at '''[https://n3vgames.typeform.com/to/y4J2Rl TRS19 Environment and Lighting Tutorial]'''</td> | ||
| + | </tr> | ||
| + | </table> | ||
| + | <br> | ||
<table> | <table> | ||
<tr valign="top"> | <tr valign="top"> | ||
| Line 17: | Line 22: | ||
</td> | </td> | ||
<td> | <td> | ||
| − | <table width=700 cellpadding=2 | + | <table width=700 bgcolor="lightcyan" cellpadding=2> |
<tr valign="top"> | <tr valign="top"> | ||
| − | <td | + | <td width=10>[[image:BlueDot10x10.png|link=]]</td> |
| + | <td><span style="font-size: 17px; font-weight: 700;">In Summary:</span></td> | ||
</tr> | </tr> | ||
<tr valign="top"> | <tr valign="top"> | ||
| − | <td>[[ | + | <td>[[image:BlueDot10x10.png|link=]]</td> |
<td>The Environment Tools are used to set:- | <td>The Environment Tools are used to set:- | ||
*the '''skybox''' - to configure the cloud cover | *the '''skybox''' - to configure the cloud cover | ||
| Line 36: | Line 42: | ||
</tr> | </tr> | ||
<tr valign="top"> | <tr valign="top"> | ||
| − | <td>[[ | + | <td>[[image:BlueDot10x10.png|link=]]</td> |
| − | <td>The '''Time of Day''' is set using Session rules such as [[ | + | <td>The '''Time of Day''' is set using Session rules such as [[image:WikiLink.PNG|link=]] '''[[Session_Rule_List_with_Parameters#Startup_Options_Rule|Startup Option Rule]]''' and [[image:WikiLink.PNG|link=]] '''[[Session_Rule_List_with_Parameters#Time_and_Rate_Rule|Time and Rate Rule]]'''</td> |
| + | </tr> | ||
| + | <tr valign="top"> | ||
| + | <td>[[image:BlueDot10x10.png|link=]]</td> | ||
| + | <td>In '''Trainz Plus''' the '''Time of Day''' can be changed in '''Driver''' using the '''Session Options Palette'''</td> | ||
</tr> | </tr> | ||
</table> | </table> | ||
| Line 46: | Line 56: | ||
<table bgcolor=#ffffb0> | <table bgcolor=#ffffb0> | ||
<tr valign="top"> | <tr valign="top"> | ||
| − | <td>[[ | + | <td>[[image:NotePad.PNG|link=]]</td> |
<td><span style="font-size: 17px;">'''Notes:'''</span><br> | <td><span style="font-size: 17px;">'''Notes:'''</span><br> | ||
---- | ---- | ||
| Line 52: | Line 62: | ||
</tr> | </tr> | ||
<tr valign="top"> | <tr valign="top"> | ||
| − | <td>[[ | + | <td width=10>[[image:DotPoint.JPG|10px|link=]]</td> |
<td>There is no '''Save''' or '''OK''' button on the Environment Tools Window. As soon as you enter or select a setting it will be set. When finished editing simply <span style="font-weight: 700; font-size: 15px; background-color: lightcyan;">Left Click</span> the window '''Off''' button '''BUT make sure you SAVE before exiting Trainz'''</td> | <td>There is no '''Save''' or '''OK''' button on the Environment Tools Window. As soon as you enter or select a setting it will be set. When finished editing simply <span style="font-weight: 700; font-size: 15px; background-color: lightcyan;">Left Click</span> the window '''Off''' button '''BUT make sure you SAVE before exiting Trainz'''</td> | ||
</tr> | </tr> | ||
<tr valign="top"> | <tr valign="top"> | ||
| − | <td>[[ | + | <td>[[image:DotPoint.JPG|10px|link=]]</td> |
<td>Seasons (for those assets that show seasons - e.g. snow, leaf colours, etc) are controlled by the [[image:PageLink.PNG|link=]] '''[[#Set Date|Date]]''', [[image:PageLink.PNG|link=]] '''[[#Set the Snow Altitude|Snow Altitude]]''' (for snow effects) and [[image:PageLink.PNG|link=]] '''[[#World Origin|Location (World Origin)]]''' settings</td> | <td>Seasons (for those assets that show seasons - e.g. snow, leaf colours, etc) are controlled by the [[image:PageLink.PNG|link=]] '''[[#Set Date|Date]]''', [[image:PageLink.PNG|link=]] '''[[#Set the Snow Altitude|Snow Altitude]]''' (for snow effects) and [[image:PageLink.PNG|link=]] '''[[#World Origin|Location (World Origin)]]''' settings</td> | ||
</tr> | </tr> | ||
<tr valign="top"> | <tr valign="top"> | ||
| − | <td>[[ | + | <td>[[image:DotPoint.JPG|10px|link=]]</td> |
<td>The dates at which the seasons change in '''Trainz''' are:- | <td>The dates at which the seasons change in '''Trainz''' are:- | ||
* '''March 1st''' - Southern Hemisphere '''Fall''' (Autumn), Northern Hemisphere '''Spring''' | * '''March 1st''' - Southern Hemisphere '''Fall''' (Autumn), Northern Hemisphere '''Spring''' | ||
| Line 79: | Line 89: | ||
<tr valign="top"> | <tr valign="top"> | ||
<td width=729><span id="stepLoadSave"></span> </td> | <td width=729><span id="stepLoadSave"></span> </td> | ||
| − | <td width=46>[[ | + | <td width=46>[[image:BackToTop.png|link=#top|alt=Top|Top]]</td> |
<td width=75> </td> | <td width=75> </td> | ||
| − | <td width=75>[[ | + | <td width=75>[[image:NextDown.png|link=#stepTool|alt=Next Down|Next Down]]</td> |
| − | <td width=75>[[ | + | <td width=75>[[image:BackToBottom.png|link=#bottom|alt=Bottom|Bottom]]</td> |
</tr> | </tr> | ||
</table> <!-- END Nav Buttons Table --> | </table> <!-- END Nav Buttons Table --> | ||
='''Loading and Saving Environmental Settings'''= | ='''Loading and Saving Environmental Settings'''= | ||
| − | <table | + | <table width=1000 bgcolor="lightcyan" cellpadding=2> |
<tr valign="top"> | <tr valign="top"> | ||
| − | <td>[[image: | + | <td width=10>[[image:BlueDot10x10.png|link=]]</td> |
| − | <td> | + | <td>A newly created '''Route''' will have its environmental settings set to their '''default values'''</td> |
</tr> | </tr> | ||
<tr valign="top"> | <tr valign="top"> | ||
| − | <td>[[image: | + | <td>[[image:BlueDot10x10.png|link=]]</td> |
| − | <td> | + | <td>A newly created '''Session''' will have its environmental settings set to those of the '''Route'''</td> |
</tr> | </tr> | ||
<tr valign="top"> | <tr valign="top"> | ||
| − | <td>[[image: | + | <td>[[image:BlueDot10x10.png|link=]]</td> |
| − | <td>''' | + | <td>Where the '''Route''' and '''Session''' have different saved environmental settings, those in the '''Session''' will be used'''</td> |
</tr> | </tr> | ||
</table> | </table> | ||
| − | |||
| − | |||
| − | |||
| − | |||
<br> | <br> | ||
| − | <span style="font-size: 17px; font-weight:700;">In Sessions</span>< | + | <table width=1000> |
| − | + | <tr valign="top"> | |
| − | + | <td colspan=2><span style="font-size: 17px; font-weight:700;">In Routes</span></td> | |
| − | + | </tr> | |
| + | <tr valign="top"> | ||
| + | <td width=10>[[image:DotPoint.JPG|10px|link=]]</td> | ||
| + | <td>When you create a new '''Route''', or load an existing '''Route''' with NO saved '''Environmental''' settings, then the settings used will be the '''default''' values.</td> | ||
| + | </tr> | ||
| + | <tr valign="top"> | ||
| + | <td>[[image:DotPoint.JPG|10px|link=]]</td> | ||
| + | <td>If you change any of the '''Environmental''' settings of a '''Route''' then you must also edit the '''Route''' (e.g. change or edit a '''Route''' asset or feature) and save it for those settings to become part of the '''Route'''.</td> | ||
| + | </tr> | ||
| + | <tr valign="top"> | ||
| + | <td colspan=2><span style="font-size: 17px; font-weight:700;">In Sessions</span></td> | ||
| + | </tr> | ||
| + | <tr valign="top"> | ||
| + | <td>[[image:DotPoint.JPG|10px|link=]]</td> | ||
| + | <td>When you create a new '''Session''', or load an existing '''Session''' with NO saved '''Environmental''' settings, then the '''Session''' will use the settings that are part of the '''Route'''. These could also be the '''default''' settings.</td> | ||
| + | </tr> | ||
| + | <tr valign="top"> | ||
| + | <td>[[image:DotPoint.JPG|10px|link=]]</td> | ||
| + | <td>When you load an existing '''Session''' with saved '''Environmental''' settings, then the settings from the '''Session''' will take priority over any settings that have been saved in the '''Route'''.</td> | ||
| + | </tr> | ||
| + | <tr valign="top"> | ||
| + | <td>[[image:DotPoint.JPG|10px|link=]]</td> | ||
| + | <td>If you change any of the '''Environmental''' settings of a '''Session''' then you must also edit the '''Session''' (e.g. change or edit a '''Session''' asset or property) and save it for those settings to become part of the '''Session'''.</td> | ||
| + | </tr> | ||
| + | </table> | ||
<br> | <br> | ||
<table bgcolor=#000000> | <table bgcolor=#000000> | ||
| Line 133: | Line 163: | ||
<tr valign="top"> | <tr valign="top"> | ||
<td width=729><span id="stepTool"></span> </td> | <td width=729><span id="stepTool"></span> </td> | ||
| − | <td width=46>[[ | + | <td width=46>[[image:BackToTop.png|link=#top|alt=Top|Top]]</td> |
| − | <td width=75>[[ | + | <td width=75>[[image:NextUp.png|link=#stepLoadSave|alt=Next Up|Next Up]]</td> |
| − | <td width=75>[[ | + | <td width=75>[[image:NextDown.png|link=#stepLighting|alt=Next Down|Next Down]]</td> |
| − | <td width=75>[[ | + | <td width=75>[[image:BackToBottom.png|link=#bottom|alt=Bottom|Bottom]]</td> |
</tr> | </tr> | ||
</table> <!-- END Nav Buttons Table --> | </table> <!-- END Nav Buttons Table --> | ||
| Line 142: | Line 172: | ||
='''The Environment Tool'''= | ='''The Environment Tool'''= | ||
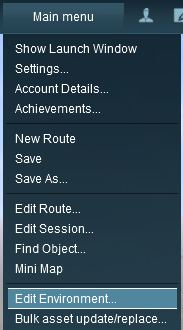
| − | Open the '''Environment Tools Editor''' from the '''Surveyor Main Menu''' in '''TANE''' as shown below left or from the '''Surveyor Edit Menu''' in '''TRS19''' and later versions as shown below right.<br> | + | <table width=1000> |
| + | <tr valign="top"> | ||
| + | <td>Open the '''Environment Tools Editor''' from the '''Surveyor Main Menu''' in '''TANE''' as shown below left or from the '''Surveyor Edit Menu''' in '''TRS19''' and later versions as shown below right.</td> | ||
| + | </tr> | ||
| + | </table> | ||
| + | <br> | ||
<table> | <table> | ||
<tr valign="top"> | <tr valign="top"> | ||
| − | <td>[[ | + | <td>[[image:EnvironmentLaunch.PNG|link=]] </td> |
| − | <td>[[ | + | <td>[[image:EnvironmentEditLaunch.png|link=]] </td> |
<td>In all versions select '''Edit Environment'''</td> | <td>In all versions select '''Edit Environment'''</td> | ||
</tr> | </tr> | ||
| Line 153: | Line 188: | ||
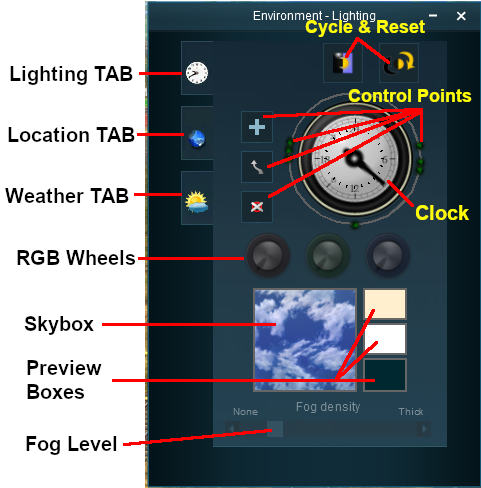
This will open the ''Environment Properties Window'' as shown below. | This will open the ''Environment Properties Window'' as shown below. | ||
| − | <table | + | <table width=1000 bgcolor="lightcyan" cellpadding=2> |
<tr valign="top"> | <tr valign="top"> | ||
| − | <td>[[ | + | <td width=10>[[image:BlueDot10x10.png|link=]]</td> |
<td>'''The Clock Dial shown in this tool does NOT set the game time.''' It sets the times at which lighting conditions change</td> | <td>'''The Clock Dial shown in this tool does NOT set the game time.''' It sets the times at which lighting conditions change</td> | ||
</tr> | </tr> | ||
<tr valign="top"> | <tr valign="top"> | ||
| − | <td>[[ | + | <td width=10>[[image:BlueDot10x10.png|link=]]</td> |
<td>To set the Game Time add the '''[[Session_Rule_List_with_Parameters#Startup_Options_Rule|Startup Options Rule]]''' or the '''[[Session_Rule_List_with_Parameters#Time_and_Rate_Rule|Time and Rate Rule]]''' in the '''[[How_to_Use_Session_Editor|Session Editor]]'''</td> | <td>To set the Game Time add the '''[[Session_Rule_List_with_Parameters#Startup_Options_Rule|Startup Options Rule]]''' or the '''[[Session_Rule_List_with_Parameters#Time_and_Rate_Rule|Time and Rate Rule]]''' in the '''[[How_to_Use_Session_Editor|Session Editor]]'''</td> | ||
</tr> | </tr> | ||
</table> | </table> | ||
| − | <table> | + | <table width=1000> |
<tr valign="bottom"> | <tr valign="bottom"> | ||
| − | <td>[[ | + | <td width=485>[[image:EnvironmentControls.PNG|link=]] |
</td> | </td> | ||
<td> | <td> | ||
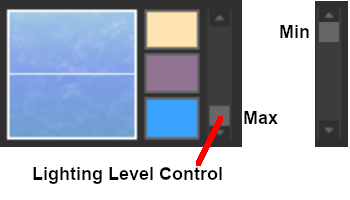
'''TRS19''' and later '''Trainz''' versions have an additional control that adjusts the lighting level, as shown below<br> | '''TRS19''' and later '''Trainz''' versions have an additional control that adjusts the lighting level, as shown below<br> | ||
| − | [[ | + | [[image:EnvironmentControlsTS19.PNG|link=]] |
</td> | </td> | ||
</tr> | </tr> | ||
| Line 177: | Line 212: | ||
<tr valign="top"> | <tr valign="top"> | ||
<td width=729><span id="stepLighting"></span> </td> | <td width=729><span id="stepLighting"></span> </td> | ||
| − | <td width=46>[[ | + | <td width=46>[[image:BackToTop.png|link=#top|alt=Top|Top]]</td> |
| − | <td width=75>[[ | + | <td width=75>[[image:NextUp.png|link=#stepTool|alt=Next Up|Top]]</td> |
| − | <td width=75>[[ | + | <td width=75>[[image:NextDown.png|link=#stepLocation|alt=Next Down|Next Down]]</td> |
| − | <td width=75>[[ | + | <td width=75>[[image:BackToBottom.png|link=#bottom|alt=Bottom|Bottom]]</td> |
</tr> | </tr> | ||
</table> <!-- END Nav Buttons Table --> | </table> <!-- END Nav Buttons Table --> | ||
| Line 186: | Line 221: | ||
='''Lighting'''= | ='''Lighting'''= | ||
| − | <table | + | <table width=1000 bgcolor="lightcyan" cellpadding=2> |
<tr valign="top"> | <tr valign="top"> | ||
| − | <td>[[ | + | <td width=10>[[image:BlueDot10x10.png|link=]]</td> |
<td>The '''Lighting Tools''' control the ambient, sun and water colours. This tool tab is opened by default whenever the '''Environment Editor''' is opened</td> | <td>The '''Lighting Tools''' control the ambient, sun and water colours. This tool tab is opened by default whenever the '''Environment Editor''' is opened</td> | ||
</tr> | </tr> | ||
| Line 194: | Line 229: | ||
==Light and Time== | ==Light and Time== | ||
| − | <table | + | <table width=1000 bgcolor="lightcyan" cellpadding=2> |
<tr valign="top"> | <tr valign="top"> | ||
| − | <td>[[ | + | <td width=10>[[image:BlueDot10x10.png|link=]]</td> |
<td>The dial shown is a 24 hour clock that sets the lighting conditions at selected times of the day and night</td> | <td>The dial shown is a 24 hour clock that sets the lighting conditions at selected times of the day and night</td> | ||
</tr> | </tr> | ||
</table> | </table> | ||
| − | <table> | + | <table width=1000> |
<tr valign="top"> | <tr valign="top"> | ||
| − | <td>[[ | + | <td width=340>[[image:EnvironmentLighting.PNG|link=]]</td> |
| − | <td> | + | <td width=660> |
<table> | <table> | ||
<tr valign="top"> | <tr valign="top"> | ||
| − | <td>[[ | + | <td width=160>[[image:EnvironmentCycle.PNG|link=]]</td> |
| − | <td> | + | <td width=500> |
==='''The Diurnal Cycle'''=== | ==='''The Diurnal Cycle'''=== | ||
<table cellpadding=2 bgcolor=#ffffff> | <table cellpadding=2 bgcolor=#ffffff> | ||
| Line 216: | Line 251: | ||
</tr> | </tr> | ||
<tr valign="top"> | <tr valign="top"> | ||
| − | <td>[[ | + | <td>[[image:Steps.PNG|link=]]</td> |
<td><span style="font-size: 17px;">'''Steps:'''</span><br> | <td><span style="font-size: 17px;">'''Steps:'''</span><br> | ||
*<span style="font-weight: 700; font-size: 15px; background-color: lightcyan;">Left Click</span> on the '''Diurnal Cycle''' button to set the clock running through the full 24 hour cycle in just 30 seconds | *<span style="font-weight: 700; font-size: 15px; background-color: lightcyan;">Left Click</span> on the '''Diurnal Cycle''' button to set the clock running through the full 24 hour cycle in just 30 seconds | ||
| Line 232: | Line 267: | ||
</table> | </table> | ||
==='''The Time of Day'''=== | ==='''The Time of Day'''=== | ||
| − | <table | + | <table width=660 bgcolor="lightcyan" cellpadding=2> |
<tr valign="top"> | <tr valign="top"> | ||
| − | <td>[[ | + | <td width=10>[[image:BlueDot10x10.png|link=]]</td> |
<td>You can select a specific time by dragging the clock pointer arm to the corresponding position on the clock dial.</td> | <td>You can select a specific time by dragging the clock pointer arm to the corresponding position on the clock dial.</td> | ||
</tr> | </tr> | ||
</table> | </table> | ||
| + | |||
<table> | <table> | ||
<tr> | <tr> | ||
| − | <td>[[ | + | <td>[[image:EnvironmentSetDial.PNG|link=]]</td> |
<td>The scene shown in Surveyor will display the lighting conditions that correspond to the time shown on the clock</td> | <td>The scene shown in Surveyor will display the lighting conditions that correspond to the time shown on the clock</td> | ||
</tr> | </tr> | ||
| Line 253: | Line 289: | ||
The ring around the dial contains a number of green dots.<br> | The ring around the dial contains a number of green dots.<br> | ||
| − | <table | + | <table width=1000 bgcolor="lightcyan" cellpadding=2> |
<tr valign="top"> | <tr valign="top"> | ||
| − | <td>[[ | + | <td width=10>[[image:BlueDot10x10.png|link=]]</td> |
<td>Each dot is a '''Control Point''' that sets the specific '''Red''', '''Green''' and '''Blue''' colour values, and other lighting features, at the time shown on the clock</td> | <td>Each dot is a '''Control Point''' that sets the specific '''Red''', '''Green''' and '''Blue''' colour values, and other lighting features, at the time shown on the clock</td> | ||
</tr> | </tr> | ||
</table> | </table> | ||
<br> | <br> | ||
| − | <table> | + | <table width=1000> |
<tr valign="top"> | <tr valign="top"> | ||
| − | <td>[[ | + | <td width=150>[[image:EnvironmentSelectPoint.PNG|link=]]</td> |
<td> | <td> | ||
<table cellpadding=2 bgcolor=#ffffff> | <table cellpadding=2 bgcolor=#ffffff> | ||
| Line 270: | Line 306: | ||
</tr> | </tr> | ||
<tr valign="top"> | <tr valign="top"> | ||
| − | <td>[[ | + | <td>[[image:Steps.PNG|link=]]</td> |
<td><span style="font-size: 17px;">'''Steps:'''</span><br> | <td><span style="font-size: 17px;">'''Steps:'''</span><br> | ||
*<span style="font-weight: 700; font-size: 15px; background-color: lightcyan;">Left Click</span> on one of the green points around the ring | *<span style="font-weight: 700; font-size: 15px; background-color: lightcyan;">Left Click</span> on one of the green points around the ring | ||
| Line 276: | Line 312: | ||
The '''control point''' will be highlighted and the '''RGB Wheels''' will display '''one set''' of '''<span style="text-decoration: underline;">R</span>'''ed '''<span style="text-decoration: underline;">G</span>'''reen and '''<span style="text-decoration: underline;">B</span>'''lue values that have been set at that point | The '''control point''' will be highlighted and the '''RGB Wheels''' will display '''one set''' of '''<span style="text-decoration: underline;">R</span>'''ed '''<span style="text-decoration: underline;">G</span>'''reen and '''<span style="text-decoration: underline;">B</span>'''lue values that have been set at that point | ||
<br> | <br> | ||
| − | [[ | + | [[image:EnvironmentShowRGB.PNG|link=]]</td> |
</tr> | </tr> | ||
<tr> | <tr> | ||
| Line 287: | Line 323: | ||
</table> | </table> | ||
<br> | <br> | ||
| − | <table | + | <table width=1000 bgcolor="lightcyan" cellpadding=2> |
<tr valign="top"> | <tr valign="top"> | ||
| − | <td>[[ | + | <td width=10>[[image:BlueDot10x10.png|link=]]</td> |
| − | <td>'''Each colour value can be altered by dragging its needle point to a new position around the dial.''' Each new position will change the balance between the 3 colours and will alter the lighting displayed in the scene at that particular time.</td> | + | <td>>'''Each colour value can be altered by dragging its needle point to a new position around the dial.''' Each new position will change the balance between the 3 colours and will alter the lighting displayed in the scene at that particular time.</td> |
</tr> | </tr> | ||
</table> | </table> | ||
| Line 301: | Line 337: | ||
<table bgcolor=#ffffb0> | <table bgcolor=#ffffb0> | ||
<tr valign="top"> | <tr valign="top"> | ||
| − | <td>[[ | + | <td>[[image:NotePad.PNG|link=]]</td> |
<td><span style="font-size: 17px;">'''Notes:'''</span><br> | <td><span style="font-size: 17px;">'''Notes:'''</span><br> | ||
---- | ---- | ||
| Line 319: | Line 355: | ||
<table> | <table> | ||
<tr valign="top"> | <tr valign="top"> | ||
| − | <td>[[ | + | <td>[[image:EnvironmentAmbientColour.PNG|link=]]</td> |
<td> | <td> | ||
<table cellpadding=2 bgcolor=#ffffff> | <table cellpadding=2 bgcolor=#ffffff> | ||
| Line 327: | Line 363: | ||
</tr> | </tr> | ||
<tr valign="top"> | <tr valign="top"> | ||
| − | <td>[[ | + | <td>[[image:Steps.PNG|link=]]</td> |
<td><span style="font-size: 17px;">'''Steps:'''</span><br> | <td><span style="font-size: 17px;">'''Steps:'''</span><br> | ||
*<span style="font-weight: 700; font-size: 15px; background-color: lightcyan;">Left Click</span> on the '''control point''' for the time that you want to edit | *<span style="font-weight: 700; font-size: 15px; background-color: lightcyan;">Left Click</span> on the '''control point''' for the time that you want to edit | ||
| Line 350: | Line 386: | ||
<table> | <table> | ||
<tr valign="top"> | <tr valign="top"> | ||
| − | <td>[[ | + | <td>[[image:EnvironmentSunColour.PNG|link=]]</td> |
<td> | <td> | ||
<table cellpadding=2 bgcolor=#ffffff> | <table cellpadding=2 bgcolor=#ffffff> | ||
| Line 358: | Line 394: | ||
</tr> | </tr> | ||
<tr valign="top"> | <tr valign="top"> | ||
| − | <td>[[ | + | <td>[[image:Steps.PNG|link=]]</td> |
<td><span style="font-size: 17px;">'''Steps:'''</span><br> | <td><span style="font-size: 17px;">'''Steps:'''</span><br> | ||
*<span style="font-weight: 700; font-size: 15px; background-color: lightcyan;">Left Click</span> on the '''control point''' for the time that you want to edit | *<span style="font-weight: 700; font-size: 15px; background-color: lightcyan;">Left Click</span> on the '''control point''' for the time that you want to edit | ||
| Line 379: | Line 415: | ||
<br> | <br> | ||
===='''Water Colour'''==== | ===='''Water Colour'''==== | ||
| − | <table bgcolor=#000000 | + | <table width=1000 bgcolor=#000000> |
<tr valign="top"> | <tr valign="top"> | ||
<td> | <td> | ||
| − | <table bgcolor=#ffffb0> | + | <table width=996 bgcolor=#ffffb0> |
<tr valign="top"> | <tr valign="top"> | ||
<td>[[image:NotePad.PNG|link=]]</td> | <td>[[image:NotePad.PNG|link=]]</td> | ||
| − | <td>This '''Water Colour''' control only affects the colour of the water created using the '''Add Water''' tools (for '''Classic''' or '''Legacy Water''') in the '''Topology''' menu ( | + | <td>This '''Water Colour''' control only affects the colour of the water created using the '''Add Water''' tools (for '''Classic''' or '''Legacy Water''') in the '''Topology''' menu (the <span style="font-weight: 700; font-size: 15px; color: white; background-color: black;"> F1 </span> key in '''Surveyor Classic'''). It has no effect on the colour of water created as '''Water Layers''' used in '''TRS19 SP4''' and later versions.</td> |
</tr> | </tr> | ||
</table> | </table> | ||
| Line 392: | Line 428: | ||
</table> | </table> | ||
| − | <table> | + | <table width=1000> |
<tr valign="top"> | <tr valign="top"> | ||
| − | <td>[[ | + | <td width=230>[[image:EnvironmentWaterColour.PNG|link=]]</td> |
<td> | <td> | ||
<table bgcolor=#ff0000> | <table bgcolor=#ff0000> | ||
| Line 401: | Line 437: | ||
<table bgcolor=#fcbcbc> | <table bgcolor=#fcbcbc> | ||
<tr valign="top"> | <tr valign="top"> | ||
| − | <td>[[ | + | <td>[[image:Stop.PNG|link=]]</td> |
<td>'''Water Colour values set for one control point become the values for ALL the control points''' | <td>'''Water Colour values set for one control point become the values for ALL the control points''' | ||
</td> | </td> | ||
| Line 409: | Line 445: | ||
</tr> | </tr> | ||
</table> | </table> | ||
| + | |||
<table cellpadding=2 bgcolor=#ffffff> | <table cellpadding=2 bgcolor=#ffffff> | ||
<tr> | <tr> | ||
| Line 415: | Line 452: | ||
</tr> | </tr> | ||
<tr valign="top"> | <tr valign="top"> | ||
| − | <td>[[ | + | <td>[[image:Steps.PNG|link=]]</td> |
<td colspan=2><span style="font-size: 17px;">'''Steps:'''</span></td> | <td colspan=2><span style="font-size: 17px;">'''Steps:'''</span></td> | ||
</tr> | </tr> | ||
| Line 544: | Line 581: | ||
<table width=996 bgcolor=#ffffe0 cellpadding=2> | <table width=996 bgcolor=#ffffe0 cellpadding=2> | ||
<tr valign="top"> | <tr valign="top"> | ||
| − | <td width="25">[[ | + | <td width="25">[[image:PencilTips.PNG|link=]]</td> |
| − | <td>Setting all three colours to the same values will produce monotones from '''Black''' to '''White''' with 254 different shades of gray between those two tones.<br><br> | + | <td>Setting all three colours to the same values will produce monotones from '''Black''' to '''White''' with 254 different shades of gray between those two tones.<br> |
| − | <table cellpadding=2 | + | <br> |
| + | <table bgcolor="lightcyan" cellpadding=2> | ||
<tr valign="top"> | <tr valign="top"> | ||
| − | <td>[[ | + | <td width=10>[[image:BlueDot10x10.png|link=]]</td> |
<td>You can quickly set all three dials to the exact same value by a <span style="color: white; background-color: black; font-weight: 700; font-size: 15px;"> Shift </span> <span style="font-weight: 700; font-size: 15px; color: blue;">Left Click</span> on a dial position on ''any one of the three dials''.</td> | <td>You can quickly set all three dials to the exact same value by a <span style="color: white; background-color: black; font-weight: 700; font-size: 15px;"> Shift </span> <span style="font-weight: 700; font-size: 15px; color: blue;">Left Click</span> on a dial position on ''any one of the three dials''.</td> | ||
</tr> | </tr> | ||
| Line 558: | Line 596: | ||
<table width=996 bgcolor=#ffffe0 cellpadding=2> | <table width=996 bgcolor=#ffffe0 cellpadding=2> | ||
<tr valign="top"> | <tr valign="top"> | ||
| − | <td width= | + | <td width=332 align="center">'''R = 0; G = 0; B = 0'''</td> |
| − | <td width= | + | <td width=332 align="center">'''R = 128; G = 128; B = 128'''</td> |
| − | <td width= | + | <td width=332 align="center">'''R = 255; G = 255; B = 255'''</td> |
</tr> | </tr> | ||
<tr valign="top"> | <tr valign="top"> | ||
| − | <td>[[ | + | <td align="center">[[image:EnvironmentAmbientColour01.PNG|link=]]</td> |
| − | <td>[[ | + | <td align="center">[[image:EnvironmentAmbientColour02.PNG|link=]]</td> |
| − | <td>[[ | + | <td align="center">[[image:EnvironmentAmbientColour03.PNG|link=]]</td> |
</tr> | </tr> | ||
<tr valign="top"> | <tr valign="top"> | ||
| Line 605: | Line 643: | ||
<tr valign="top"> | <tr valign="top"> | ||
<td align="right"><br>'''Ambient'''<br><br>'''Sun'''</td> | <td align="right"><br>'''Ambient'''<br><br>'''Sun'''</td> | ||
| − | <td align="center">[[ | + | <td align="center">[[image:Environment0600.png|link=]]</td> |
| − | <td align="center">[[ | + | <td align="center">[[image:Environment0700.png|link=]]</td> |
| − | <td align="center">[[ | + | <td align="center">[[image:Environment1000.png|link=]]</td> |
| − | <td align="center">[[ | + | <td align="center">[[image:Environment1200.png|link=]]</td> |
| − | <td align="center">[[ | + | <td align="center">[[image:Environment1800.png|link=]]</td> |
</tr> | </tr> | ||
<tr valign="top"> | <tr valign="top"> | ||
| Line 676: | Line 714: | ||
<table bgcolor=#ffffb0 width=496> | <table bgcolor=#ffffb0 width=496> | ||
<tr valign="top"> | <tr valign="top"> | ||
| − | <td>[[ | + | <td>[[image:BlueMix01.PNG|link=]]</td> |
<td colspan="2">Starting with pure Blue<br> | <td colspan="2">Starting with pure Blue<br> | ||
'''R = 0; G = 0; B = 255'''</td> | '''R = 0; G = 0; B = 255'''</td> | ||
</tr> | </tr> | ||
<tr> | <tr> | ||
| − | <td>[[ | + | <td>[[image:BlueMix02.PNG|link=]]</td> |
<td colspan="2">Add pure Green to make the colour Cyan<br> | <td colspan="2">Add pure Green to make the colour Cyan<br> | ||
'''R = 0; G = 255; B = 255'''</td> | '''R = 0; G = 255; B = 255'''</td> | ||
</tr> | </tr> | ||
<tr> | <tr> | ||
| − | <td>[[ | + | <td>[[image:BlueMix03.PNG|link=]]</td> |
<td colspan="2">Scale back (darken) the Green<br> | <td colspan="2">Scale back (darken) the Green<br> | ||
'''R = 0; G = 155; B = 255'''</td> | '''R = 0; G = 155; B = 255'''</td> | ||
</tr> | </tr> | ||
<tr> | <tr> | ||
| − | <td>[[ | + | <td>[[image:BlueMix04.PNG|link=]]</td> |
<td colspan="2">Scale back a bit more<br> | <td colspan="2">Scale back a bit more<br> | ||
'''R = 0; G = 128; B = 255'''</td> | '''R = 0; G = 128; B = 255'''</td> | ||
</tr> | </tr> | ||
<tr> | <tr> | ||
| − | <td>[[ | + | <td>[[image:BlueMix05.PNG|link=]]</td> |
<td colspan="2">Add some Red<br> | <td colspan="2">Add some Red<br> | ||
'''R = 75; G = 128; B = 255''' | '''R = 75; G = 128; B = 255''' | ||
| Line 709: | Line 747: | ||
==='''TRS19/Trainz Plus/TRS22 Lighting Level Control'''=== | ==='''TRS19/Trainz Plus/TRS22 Lighting Level Control'''=== | ||
| − | In '''TRS19''' and later '''Trainz''' versions users have an additional control that is placed next to the '''Ambient''', '''Sun''' and '''Water''' colour boxes. This sets the overall brightness or lighting level for each control point. | + | <table width=1000> |
| + | <tr valign="top"> | ||
| + | <td>In '''TRS19''' and later '''Trainz''' versions users have an additional control that is placed next to the '''Ambient''', '''Sun''' and '''Water''' colour boxes. This sets the overall brightness or lighting level for each control point.</td> | ||
| + | </tr> | ||
| + | </table> | ||
<br> | <br> | ||
<table> | <table> | ||
<tr valign="top"> | <tr valign="top"> | ||
<td> | <td> | ||
| − | [[ | + | [[image:EnvironmentControlsTS19.PNG|link=]] |
</td> | </td> | ||
<td> | <td> | ||
| Line 723: | Line 765: | ||
</tr> | </tr> | ||
<tr valign="top"> | <tr valign="top"> | ||
| − | <td>[[ | + | <td>[[image:Steps.PNG|link=]]</td> |
<td><span style="font-size: 17px;">'''Steps:'''</span><br> | <td><span style="font-size: 17px;">'''Steps:'''</span><br> | ||
Select a control point, then:- | Select a control point, then:- | ||
| Line 743: | Line 785: | ||
==Resetting the Lighting Conditions== | ==Resetting the Lighting Conditions== | ||
| − | <table | + | <table width=1000 bgcolor="lightcyan" cellpadding=2> |
<tr valign="top"> | <tr valign="top"> | ||
| − | <td>[[ | + | <td width=10>[[image:BlueDot10x10.png|link=]]</td> |
<td>All the lighting colour settings can be reset back to the '''Trainz''' default colours.</td> | <td>All the lighting colour settings can be reset back to the '''Trainz''' default colours.</td> | ||
</tr> | </tr> | ||
| Line 752: | Line 794: | ||
<table> | <table> | ||
<tr valign="top"> | <tr valign="top"> | ||
| − | <td>[[ | + | <td>[[image:EnvironmentReset.PNG|link=]]</td> |
<td> | <td> | ||
<table cellpadding=2 bgcolor=#ffffff> | <table cellpadding=2 bgcolor=#ffffff> | ||
| Line 760: | Line 802: | ||
</tr> | </tr> | ||
<tr valign="top"> | <tr valign="top"> | ||
| − | <td>[[ | + | <td>[[image:Steps.PNG|link=]]</td> |
<td><span style="font-size: 17px;">'''Steps:'''</span><br> | <td><span style="font-size: 17px;">'''Steps:'''</span><br> | ||
*<span style="font-weight: 700; font-size: 15px; background-color: lightcyan;">Left Click</span> on the '''Color Reset''' button, then either:- | *<span style="font-weight: 700; font-size: 15px; background-color: lightcyan;">Left Click</span> on the '''Color Reset''' button, then either:- | ||
| − | **<span style="font-weight: 700; font-size: 15px; background-color: lightcyan;">Left Click</span> on the [[ | + | **<span style="font-weight: 700; font-size: 15px; background-color: lightcyan;">Left Click</span> on the [[image:Tick.PNG|link=]] icon to accept the reset, or |
| − | **<span style="font-weight: 700; font-size: 15px; background-color: lightcyan;">Left Click</span> on the [[ | + | **<span style="font-weight: 700; font-size: 15px; background-color: lightcyan;">Left Click</span> on the [[image:Cross.PNG|link=]] icon to reject the reset</td> |
</tr> | </tr> | ||
<tr> | <tr> | ||
| Line 777: | Line 819: | ||
==Adding a New Control Point== | ==Adding a New Control Point== | ||
| − | <table | + | <table width=1000 bgcolor="lightcyan" cellpadding=2> |
<tr valign="top"> | <tr valign="top"> | ||
| − | <td>[[ | + | <td width=10>[[image:BlueDot10x10.png|link=]]</td> |
<td>'''New control points can be added to the clock dial'''</td> | <td>'''New control points can be added to the clock dial'''</td> | ||
</tr> | </tr> | ||
| Line 786: | Line 828: | ||
<table width=1000> | <table width=1000> | ||
<tr valign="top"> | <tr valign="top"> | ||
| − | <td width=200>[[ | + | <td width=200>[[image:EnvironmentAddControlPoint.PNG|link=]]</td> |
<td> | <td> | ||
<table width=800> | <table width=800> | ||
| Line 795: | Line 837: | ||
</tr> | </tr> | ||
<tr valign="top"> | <tr valign="top"> | ||
| − | <td width=50>[[ | + | <td width=50>[[image:Steps.PNG|link=]]</td> |
<td width=350><span style="font-size: 17px;">'''Steps:'''</span><br> | <td width=350><span style="font-size: 17px;">'''Steps:'''</span><br> | ||
| − | #<span style="font-weight: 700; font-size: 15px; background-color: lightcyan;">Left Click</span> on the '''Add''' button [[ | + | #<span style="font-weight: 700; font-size: 15px; background-color: lightcyan;">Left Click</span> on the '''Add''' button [[image:EnvironmentAddPointButton.PNG|link=]] |
#<span style="font-weight: 700; font-size: 15px; background-color: lightcyan;">Left Click</span> on the ring at the place where the new '''control point''' is to be located | #<span style="font-weight: 700; font-size: 15px; background-color: lightcyan;">Left Click</span> on the ring at the place where the new '''control point''' is to be located | ||
</td> | </td> | ||
| Line 864: | Line 906: | ||
==Deleting a Control point== | ==Deleting a Control point== | ||
| − | <table | + | <table width=1000 bgcolor="lightcyan" cellpadding=2> |
<tr valign="top"> | <tr valign="top"> | ||
| − | <td>[[ | + | <td width=10>[[image:BlueDot10x10.png|link=]]</td> |
<td>Existing '''control points''' can be deleted</td> | <td>Existing '''control points''' can be deleted</td> | ||
</tr> | </tr> | ||
| Line 872: | Line 914: | ||
<table width=1000> | <table width=1000> | ||
<tr valign="top"> | <tr valign="top"> | ||
| − | <td>[[ | + | <td>[[image:EnvironmentDeletePoint.PNG|link=]]</td> |
<td> | <td> | ||
<table width=800> | <table width=800> | ||
| Line 881: | Line 923: | ||
</tr> | </tr> | ||
<tr valign="top"> | <tr valign="top"> | ||
| − | <td width=50>[[ | + | <td width=50>[[image:Steps.PNG|link=]]</td> |
<td width=350><span style="font-size: 17px;">'''Steps:'''</span><br> | <td width=350><span style="font-size: 17px;">'''Steps:'''</span><br> | ||
| − | #<span style="font-weight: 700; font-size: 15px; background-color: lightcyan;">Left Click</span> on the '''Delete''' button [[ | + | #<span style="font-weight: 700; font-size: 15px; background-color: lightcyan;">Left Click</span> on the '''Delete''' button [[image:EnvironmentDeletePointButton.PNG|link=]] |
#<span style="font-weight: 700; font-size: 15px; background-color: lightcyan;">Left Click</span> on the '''control point''' to be deleted | #<span style="font-weight: 700; font-size: 15px; background-color: lightcyan;">Left Click</span> on the '''control point''' to be deleted | ||
</td> | </td> | ||
| Line 919: | Line 961: | ||
==Moving a Control point== | ==Moving a Control point== | ||
| − | <table | + | <table width=1000 bgcolor="lightcyan" cellpadding=2> |
<tr valign="top"> | <tr valign="top"> | ||
| − | <td>[[ | + | <td width=10>[[image:BlueDot10x10.png|link=]]</td> |
| − | <td>Existing '''control points''' can be moved</td> | + | <td>>Existing '''control points''' can be moved</td> |
</tr> | </tr> | ||
</table> | </table> | ||
| Line 928: | Line 970: | ||
<table width=1000> | <table width=1000> | ||
<tr valign="top"> | <tr valign="top"> | ||
| − | <td>[[ | + | <td>[[image:EnvironmentMoveControlPoint.PNG|link=]]</td> |
<td> | <td> | ||
<table width=800> | <table width=800> | ||
| Line 937: | Line 979: | ||
</tr> | </tr> | ||
<tr valign="top"> | <tr valign="top"> | ||
| − | <td width=50>[[ | + | <td width=50>[[image:Steps.PNG|link=]]</td> |
<td width=350><span style="font-size: 17px;">'''Steps:'''</span><br> | <td width=350><span style="font-size: 17px;">'''Steps:'''</span><br> | ||
| − | #<span style="font-weight: 700; font-size: 15px; background-color: lightcyan;">Left Click</span> on the '''Move''' button [[ | + | #<span style="font-weight: 700; font-size: 15px; background-color: lightcyan;">Left Click</span> on the '''Move''' button [[image:EnvironmentMovePointButton.PNG|link=]] |
#<span style="font-weight: 700; font-size: 15px; background-color: lightcyan;">Left Click</span> on the '''control point''' to be moved and either:- | #<span style="font-weight: 700; font-size: 15px; background-color: lightcyan;">Left Click</span> on the '''control point''' to be moved and either:- | ||
::*<span style="font-weight: 700; font-size: 15px; background-color: lightcyan;">Left Click and Drag</span> the point to its new position around the ring, or | ::*<span style="font-weight: 700; font-size: 15px; background-color: lightcyan;">Left Click and Drag</span> the point to its new position around the ring, or | ||
| Line 971: | Line 1,013: | ||
==The Skybox== | ==The Skybox== | ||
| − | <table | + | <table width=1000 bgcolor="lightcyan" cellpadding=2> |
<tr valign="top"> | <tr valign="top"> | ||
| − | <td>[[ | + | <td width=10>[[image:BlueDot10x10.png|link=]]</td> |
<td>The Skybox sets the sky colours in three different regions of the sky at the selected time of day, as shown in the extreme example below</td> | <td>The Skybox sets the sky colours in three different regions of the sky at the selected time of day, as shown in the extreme example below</td> | ||
</tr> | </tr> | ||
</table> | </table> | ||
<br> | <br> | ||
| − | <table> | + | <table width=1000> |
<tr valign="top"> | <tr valign="top"> | ||
| − | <td>[[ | + | <td width=400>[[image:EnvironmentSkyColours.PNG|400px|link=]]</td> |
<td> | <td> | ||
<table bgcolor=#000000> | <table bgcolor=#000000> | ||
| Line 1,004: | Line 1,046: | ||
</tr> | </tr> | ||
<tr valign="top"> | <tr valign="top"> | ||
| − | <td>[[ | + | <td>[[image:Steps.PNG|link=]]</td> |
<td><span style="font-size: 17px;">'''Steps:'''</span><br> | <td><span style="font-size: 17px;">'''Steps:'''</span><br> | ||
#Select a '''control point''' for a specific time of day | #Select a '''control point''' for a specific time of day | ||
| Line 1,036: | Line 1,078: | ||
<table bgcolor=#ffffe0> | <table bgcolor=#ffffe0> | ||
<tr valign="top"> | <tr valign="top"> | ||
| − | <td>[[ | + | <td>[[image:PencilTips.PNG|link=]]</td> |
<td>Do you need an '''Overcast Sky''' for your scene? | <td>Do you need an '''Overcast Sky''' for your scene? | ||
#For each daylight control point set each '''Skybox''' region (top, middle, bottom) to shades of gray (see '''Mixing Colours''' above). | #For each daylight control point set each '''Skybox''' region (top, middle, bottom) to shades of gray (see '''Mixing Colours''' above). | ||
| Line 1,053: | Line 1,095: | ||
==Fog Control== | ==Fog Control== | ||
| − | <table | + | <table width=1000 bgcolor="lightcyan" cellpadding=2> |
<tr valign="top"> | <tr valign="top"> | ||
| − | <td>[[ | + | <td width=10>[[image:BlueDot10x10.png|link=]]</td> |
<td>This controls the level of "fog" in the scene</td> | <td>This controls the level of "fog" in the scene</td> | ||
</tr> | </tr> | ||
| Line 1,069: | Line 1,111: | ||
</tr> | </tr> | ||
<tr valign="top"> | <tr valign="top"> | ||
| − | <td>[[ | + | <td>[[image:Gears.PNG|link=]]</td> |
<td><span style="font-size: 17px;">'''Settings:'''</span><br> | <td><span style="font-size: 17px;">'''Settings:'''</span><br> | ||
| − | [[ | + | [[image:EnvironmentFogSlider.PNG|link=]]<br> |
#Select a '''control point''' for a specific time of day | #Select a '''control point''' for a specific time of day | ||
#Move the slider to the required position | #Move the slider to the required position | ||
| Line 1,116: | Line 1,158: | ||
<tr valign="top"> | <tr valign="top"> | ||
<td width=729><span id="stepLocation"></span> </td> | <td width=729><span id="stepLocation"></span> </td> | ||
| − | <td width=46>[[ | + | <td width=46>[[image:BackToTop.png|link=#top|alt=Top|Top]]</td> |
| − | <td width=75>[[ | + | <td width=75>[[image:NextUp.png|link=#stepLighting|alt=Next Up|Top]]</td> |
| − | <td width=75>[[ | + | <td width=75>[[image:NextDown.png|link=#stepWeather|alt=Next Down|Next Down]]</td> |
| − | <td width=75>[[ | + | <td width=75>[[image:BackToBottom.png|link=#bottom|alt=Bottom|Bottom]]</td> |
</tr> | </tr> | ||
</table> <!-- END Nav Buttons Table --> | </table> <!-- END Nav Buttons Table --> | ||
| Line 1,125: | Line 1,167: | ||
='''Location'''= | ='''Location'''= | ||
| − | <table | + | <table width=1000 bgcolor="lightcyan" cellpadding=2> |
<tr valign="top"> | <tr valign="top"> | ||
| − | <td>[[ | + | <td width=10>[[image:BlueDot10x10.png|link=]]</td> |
<td>The '''Location Tools''' control the geographic and date (season) data for the Route and Session. <span style="font-weight: 700; font-size: 15px; color: blue;">Left Click</span> on the '''Location''' tab icon to open the '''Location Tool Controls'''</td> | <td>The '''Location Tools''' control the geographic and date (season) data for the Route and Session. <span style="font-weight: 700; font-size: 15px; color: blue;">Left Click</span> on the '''Location''' tab icon to open the '''Location Tool Controls'''</td> | ||
</tr> | </tr> | ||
</table> | </table> | ||
| − | <table> | + | <table width=1000> |
<tr valign="top"> | <tr valign="top"> | ||
| − | <td>[[ | + | <td>[[image:EnvironmentLocation.PNG|link=]]</td> |
<td> | <td> | ||
==Set Date== | ==Set Date== | ||
| − | The top section is a standard calendar selection tool that allows you to set the month and the day of the month. The only effect this has in '''Trainz''' is to set, with the geographic coordinates, the season of the year. | + | <table> |
| + | <tr valign="top"> | ||
| + | <td>The top section is a standard calendar selection tool that allows you to set the month and the day of the month. The only effect this has in '''Trainz''' is to set, with the geographic coordinates, the season of the year.</td> | ||
| + | </tr> | ||
| + | </table> | ||
<br> | <br> | ||
<table> | <table> | ||
| Line 1,166: | Line 1,212: | ||
</tr> | </tr> | ||
</table> | </table> | ||
| − | <table bgcolor=#000000 | + | |
| + | <table bgcolor=#000000> | ||
<tr valign="top"> | <tr valign="top"> | ||
<td> | <td> | ||
| Line 1,182: | Line 1,229: | ||
</table> | </table> | ||
<br> | <br> | ||
| − | <table cellpadding=2 | + | <table bgcolor="lightcyan" cellpadding=2> |
<tr valign="top"> | <tr valign="top"> | ||
| − | <td>[[image: | + | <td width=10>[[image:BlueDot10x10.png|link=]]</td> |
<td>'''The entered date can be saved in the Route, the Session or both depending on whether you are editing the Route or the Session or both</td> | <td>'''The entered date can be saved in the Route, the Session or both depending on whether you are editing the Route or the Session or both</td> | ||
</tr> | </tr> | ||
<tr valign="top"> | <tr valign="top"> | ||
| − | <td>[[image: | + | <td>[[image:BlueDot10x10.png|link=]]</td> |
<td>You '''must''' make a change to an object in a '''Route Layer''' or a '''Session Layer''' for the date change to be recorded as part of the Route or the Session (or both) | <td>You '''must''' make a change to an object in a '''Route Layer''' or a '''Session Layer''' for the date change to be recorded as part of the Route or the Session (or both) | ||
</td> | </td> | ||
| Line 1,212: | Line 1,259: | ||
</tr> | </tr> | ||
</table> | </table> | ||
| + | |||
<table width=1000> | <table width=1000> | ||
<tr valign="top"> | <tr valign="top"> | ||
| Line 1,287: | Line 1,335: | ||
The middle section is the '''World Origin Tool''' and sets the geographic location, including the altitude, of the route using a '''World Origin''' marker that is only visible in Surveyor. | The middle section is the '''World Origin Tool''' and sets the geographic location, including the altitude, of the route using a '''World Origin''' marker that is only visible in Surveyor. | ||
<br> | <br> | ||
| − | <table | + | <table width=1000 bgcolor="lightcyan" cellpadding=2> |
<tr valign="top"> | <tr valign="top"> | ||
| − | <td>[[ | + | <td width=10>[[image:BlueDot10x10.png|link=]]</td> |
<td>Setting the '''World Origin''' does NOT set regional features such as which side of the road the cars drive on. Use the '''Route Editor - Region''' setting for that</td> | <td>Setting the '''World Origin''' does NOT set regional features such as which side of the road the cars drive on. Use the '''Route Editor - Region''' setting for that</td> | ||
</tr> | </tr> | ||
<tr valign="top"> | <tr valign="top"> | ||
| − | <td>[[ | + | <td>[[image:BlueDot10x10.png|link=]]</td> |
<td>The '''World Origin''' is always part of a '''Route''', not part of a '''Session'''</td> | <td>The '''World Origin''' is always part of a '''Route''', not part of a '''Session'''</td> | ||
</tr> | </tr> | ||
| Line 1,300: | Line 1,348: | ||
<table width="740"> | <table width="740"> | ||
<tr valign="top"> | <tr valign="top"> | ||
| − | <td>[[ | + | <td>[[image:EnvironmentOriginAdd.PNG|link=]]</td> |
<td> | <td> | ||
<table cellpadding=2 bgcolor=#ffffff> | <table cellpadding=2 bgcolor=#ffffff> | ||
| Line 1,308: | Line 1,356: | ||
</tr> | </tr> | ||
<tr valign="top"> | <tr valign="top"> | ||
| − | <td>[[ | + | <td>[[image:Steps.PNG|link=]]</td> |
<td><span style="font-size: 17px;">'''Steps:'''</span><br> | <td><span style="font-size: 17px;">'''Steps:'''</span><br> | ||
#Move the Surveyor view to the location where you want the marker to be placed | #Move the Surveyor view to the location where you want the marker to be placed | ||
| Line 1,322: | Line 1,370: | ||
</table> | </table> | ||
</td> | </td> | ||
| − | <td>[[ | + | <td>[[image:EnvironmentWorldOrigin.PNG|link=]]<br>The '''World Origin''' marker</td> |
| + | </tr> | ||
| + | </table> | ||
| + | |||
| + | <table width=1000> | ||
| + | <tr valign="top"> | ||
| + | <td>Once it has been placed, the marker can be moved by a <span style="font-weight: 700; font-size: 15px; background-color: lightcyan;">Left Click and Drag</span> or a <span style="font-weight: 700; font-size: 15px; background-color: lightcyan;">Left Click</span>. After adding the marker it should be edited to add geographic data.</td> | ||
</tr> | </tr> | ||
</table> | </table> | ||
| − | |||
<br> | <br> | ||
| − | <table> | + | <table width=1000> |
<tr valign="top"> | <tr valign="top"> | ||
| − | <td>[[ | + | <td>[[image:EnvironmentOriginGo.PNG|link=]]</td> |
<td><span style="font-weight: 700; font-size: 15px; background-color: lightcyan;">Left Click</span> on the '''Go to world origin''' icon to move the Surveyor screen so that it is centred on the '''World Origin''' marker. | <td><span style="font-weight: 700; font-size: 15px; background-color: lightcyan;">Left Click</span> on the '''Go to world origin''' icon to move the Surveyor screen so that it is centred on the '''World Origin''' marker. | ||
</td> | </td> | ||
</tr> | </tr> | ||
</table> | </table> | ||
| − | <table> | + | |
| + | <table width=1000> | ||
<tr valign="top"> | <tr valign="top"> | ||
| − | <td>[[ | + | <td>[[image:EnvironmentOriginEdit.PNG|link=]]</td> |
<td><span style="font-weight: 700; font-size: 15px; background-color: lightcyan;">Left Click</span> on the '''Edit world origin''' icon to set or edit the '''World Origin''' data. See '''Editing the World Origin''' below. | <td><span style="font-weight: 700; font-size: 15px; background-color: lightcyan;">Left Click</span> on the '''Edit world origin''' icon to set or edit the '''World Origin''' data. See '''Editing the World Origin''' below. | ||
</td> | </td> | ||
| Line 1,345: | Line 1,399: | ||
==Editing the World Origin== | ==Editing the World Origin== | ||
| − | <table> | + | <table width=1000> |
<tr valign="top"> | <tr valign="top"> | ||
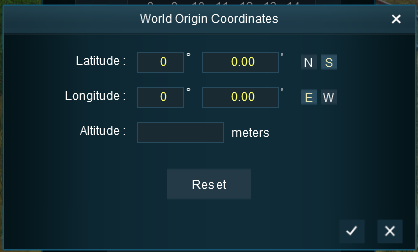
| − | <td>[[ | + | <td>[[image:EnvironmentOriginEditData.PNG|link=]]</td> |
<td>Enter the geographic data for the world origin. | <td>Enter the geographic data for the world origin. | ||
*Latitude and Longitude in degrees and minutes (with seconds added as the decimal fraction of the minutes - '''10'30"''' would be entered as '''10.50''') | *Latitude and Longitude in degrees and minutes (with seconds added as the decimal fraction of the minutes - '''10'30"''' would be entered as '''10.50''') | ||
| Line 1,353: | Line 1,407: | ||
*Altitude in '''metres'''. This, with the '''Snowline''' setting, will affect the appearance of assets that have a snow effect layer | *Altitude in '''metres'''. This, with the '''Snowline''' setting, will affect the appearance of assets that have a snow effect layer | ||
<br> | <br> | ||
| − | <table cellpadding=2 | + | <table bgcolor="lightcyan" cellpadding=2> |
<tr valign="top"> | <tr valign="top"> | ||
| − | <td>[[ | + | <td width=10>[[image:BlueDot10x10.png|link=]]</td> |
<td>The '''Latitude''' determines the sun angle and, with the '''Date''', the '''season''' of the year.</td> | <td>The '''Latitude''' determines the sun angle and, with the '''Date''', the '''season''' of the year.</td> | ||
</tr> | </tr> | ||
<tr valign="top"> | <tr valign="top"> | ||
| − | <td>[[ | + | <td>[[image:BlueDot10x10.png|link=]]</td> |
<td>Setting a high latitude value North or South will NOT change the times of sunrise or sunset. They are fixed at 06:00 and 18:00.</td> | <td>Setting a high latitude value North or South will NOT change the times of sunrise or sunset. They are fixed at 06:00 and 18:00.</td> | ||
</tr> | </tr> | ||
| Line 1,366: | Line 1,420: | ||
The '''Reset''' button sets all values to their defaults. | The '''Reset''' button sets all values to their defaults. | ||
<br> | <br> | ||
| − | <span style="font-weight: 700; font-size: 15px; background-color: lightcyan;">Left Click</span> on the [[ | + | <span style="font-weight: 700; font-size: 15px; background-color: lightcyan;">Left Click</span> on the [[image:Tick.PNG|link=]] icon to accept the entered data<br> |
| − | <span style="font-weight: 700; font-size: 15px; background-color: lightcyan;">Left Click</span> on the [[ | + | <span style="font-weight: 700; font-size: 15px; background-color: lightcyan;">Left Click</span> on the [[image:Cross.PNG|link=]] icon to reject the entered data |
</td> | </td> | ||
</tr> | </tr> | ||
| Line 1,375: | Line 1,429: | ||
==Deleting the World Origin== | ==Deleting the World Origin== | ||
| − | <table | + | <table width=1000 bgcolor="lightcyan" cellpadding=2> |
<tr valign="top"> | <tr valign="top"> | ||
| − | <td>[[ | + | <td width=10>[[image:BlueDot10x10.png|link=]]</td> |
<td>There is no delete button for the '''World Origin''' marker, but you can still delete it</td> | <td>There is no delete button for the '''World Origin''' marker, but you can still delete it</td> | ||
</tr> | </tr> | ||
| Line 1,391: | Line 1,445: | ||
</tr> | </tr> | ||
<tr valign="top"> | <tr valign="top"> | ||
| − | <td width=50>[[ | + | <td width=50>[[image:Steps.PNG|link=]]</td> |
<td><span style="font-size: 17px;">'''Steps:'''</span><br> | <td><span style="font-size: 17px;">'''Steps:'''</span><br> | ||
#Open the '''Objects Tool''' in the Surveyor screen | #Open the '''Objects Tool''' in the Surveyor screen | ||
| Line 1,428: | Line 1,482: | ||
==Traffic Control== | ==Traffic Control== | ||
| − | <table | + | <table width=1000 bgcolor="lightcyan" cellpadding=2> |
<tr valign="top"> | <tr valign="top"> | ||
| − | <td>[[ | + | <td width=10>[[image:BlueDot10x10.png|link=]]</td> |
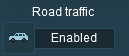
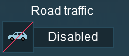
<td>This tool simply turns the road traffic '''ON''' and '''OFF'''</td> | <td>This tool simply turns the road traffic '''ON''' and '''OFF'''</td> | ||
</tr> | </tr> | ||
| Line 1,440: | Line 1,494: | ||
<table bgcolor=#ffffb0> | <table bgcolor=#ffffb0> | ||
<tr valign="top"> | <tr valign="top"> | ||
| − | <td>[[ | + | <td>[[image:NotePad.PNG|link=]]</td> |
<td><span style="font-size: 17px;">'''Notes:'''</span><br> | <td><span style="font-size: 17px;">'''Notes:'''</span><br> | ||
---- | ---- | ||
| Line 1,446: | Line 1,500: | ||
*only works on roads that have been designed to use road traffic (not ''all'' roads support traffic) | *only works on roads that have been designed to use road traffic (not ''all'' roads support traffic) | ||
*does not set the road traffic characteristics - the number and types of vehicles, which side of the road is used. These features are set in the '''Route Editor - Region''' by assigning a '''Region''' to the route. Details on how to create and assign a '''Region''' asset can be found in the | *does not set the road traffic characteristics - the number and types of vehicles, which side of the road is used. These features are set in the '''Route Editor - Region''' by assigning a '''Region''' to the route. Details on how to create and assign a '''Region''' asset can be found in the | ||
| − | ::[[ | + | ::[[image:WikiLink.PNG|link=]] '''[[How_to_Create_a_Region_Asset|Create a Region Asset]]''' Wiki page |
</td> | </td> | ||
</tr> | </tr> | ||
| Line 1,454: | Line 1,508: | ||
</table> | </table> | ||
<br> | <br> | ||
| − | <table> | + | <table width=1000> |
<tr valign="top"> | <tr valign="top"> | ||
| − | <td>[[ | + | <td>[[image:EnvironmentTrafficOn.PNG|link=]]<br><br> |
| − | [[ | + | [[image:EnvironmentTrafficOff.PNG|link=]]</td> |
<td> | <td> | ||
<table cellpadding=2 bgcolor=#eeeeee> | <table cellpadding=2 bgcolor=#eeeeee> | ||
| Line 1,465: | Line 1,519: | ||
</tr> | </tr> | ||
<tr valign="top"> | <tr valign="top"> | ||
| − | <td>[[ | + | <td>[[image:Gears.PNG|link=]]</td> |
<td><span style="font-size: 17px;">'''Settings:'''</span><br> | <td><span style="font-size: 17px;">'''Settings:'''</span><br> | ||
*<span style="font-weight: 700; font-size: 15px; background-color: lightcyan;">Left Click</span> on the car icon to '''enable''' and '''disable''' traffic</td> | *<span style="font-weight: 700; font-size: 15px; background-color: lightcyan;">Left Click</span> on the car icon to '''enable''' and '''disable''' traffic</td> | ||
| Line 1,481: | Line 1,535: | ||
<tr valign="top"> | <tr valign="top"> | ||
<td width=729><span id="stepWeather"></span> </td> | <td width=729><span id="stepWeather"></span> </td> | ||
| − | <td width=46>[[ | + | <td width=46>[[image:BackToTop.png|link=#top|alt=Top|Top]]</td> |
| − | <td width=75>[[ | + | <td width=75>[[image:NextUp.png|link=#stepLocation|alt=Next Up|Top]]</td> |
| − | <td width=75>[[ | + | <td width=75>[[image:NextDown.png|link=#bottom|alt=Next Down|Next Down]]</td> |
| − | <td width=75>[[ | + | <td width=75>[[image:BackToBottom.png|link=#bottom|alt=Bottom|Bottom]]</td> |
</tr> | </tr> | ||
</table> <!-- END Nav Buttons Table --> | </table> <!-- END Nav Buttons Table --> | ||
| Line 1,490: | Line 1,544: | ||
='''Weather and Water'''= | ='''Weather and Water'''= | ||
| − | <table | + | <table width=1000 bgcolor="lightcyan" cellpadding=2> |
<tr valign="top"> | <tr valign="top"> | ||
| − | <td>[[ | + | <td width=10>[[image:BlueDot10x10.png|link=]]</td> |
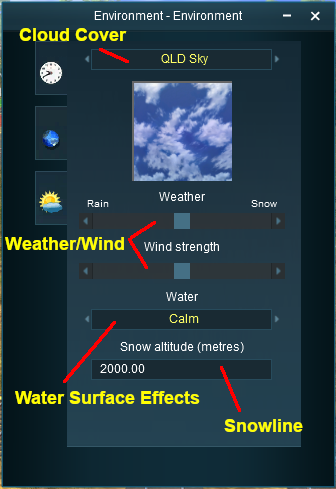
<td>The '''Weather and Water Tools''' control the weather (sky, weather type, wind, snow) and water surface data for the Route and Session. <span style="font-weight: 700; font-size: 15px; color: blue;">Left Click</span> on the '''Weather and Water''' tab icon to open the '''Weather and Water Tool Controls'''</td> | <td>The '''Weather and Water Tools''' control the weather (sky, weather type, wind, snow) and water surface data for the Route and Session. <span style="font-weight: 700; font-size: 15px; color: blue;">Left Click</span> on the '''Weather and Water''' tab icon to open the '''Weather and Water Tool Controls'''</td> | ||
</tr> | </tr> | ||
<tr valign="top"> | <tr valign="top"> | ||
| − | <td>[[ | + | <td>[[image:BlueDot10x10.png|link=]]</td> |
| − | <td>To set the '''Water Colour''', refer to the [[ | + | <td>To set the '''Water Colour''', refer to the [[image:PageLink.PNG|link=]] '''[[#Setting the Lighting Conditions|Setting the Lighting Conditions]]''' section above</td> |
</tr> | </tr> | ||
</table> | </table> | ||
<br> | <br> | ||
| − | <table> | + | <table width=1000> |
<tr valign="top"> | <tr valign="top"> | ||
| − | <td>[[ | + | <td>[[image:EnvironmentEnvironment.PNG|link=]]</td> |
<td> | <td> | ||
==Set the Sky== | ==Set the Sky== | ||
| − | <table cellpadding=2 | + | <table bgcolor="lightcyan" cellpadding=2> |
<tr valign="top"> | <tr valign="top"> | ||
| − | <td>[[ | + | <td width=10>[[image:BlueDot10x10.png|link=]]</td> |
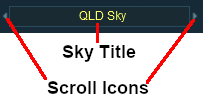
<td>This sets the basic sky and cloud characteristics</td> | <td>This sets the basic sky and cloud characteristics</td> | ||
</tr> | </tr> | ||
| Line 1,515: | Line 1,569: | ||
<table> | <table> | ||
<tr valign="top"> | <tr valign="top"> | ||
| − | <td>[[ | + | <td>[[image:EnvironmentSkyType.PNG|link=]]</td> |
<td> | <td> | ||
<table cellpadding=2 bgcolor=#eeeeee> | <table cellpadding=2 bgcolor=#eeeeee> | ||
| Line 1,523: | Line 1,577: | ||
</tr> | </tr> | ||
<tr valign="top"> | <tr valign="top"> | ||
| − | <td>[[ | + | <td>[[image:Gears.PNG|link=]]</td> |
<td><span style="font-size: 17px;">'''Settings:'''</span><br> | <td><span style="font-size: 17px;">'''Settings:'''</span><br> | ||
*<span style="font-weight: 700; font-size: 15px; background-color: lightcyan;">Left Click</span> on the '''Sky Title''' (Cloud Cover) to select from a drop down list of sky types, or | *<span style="font-weight: 700; font-size: 15px; background-color: lightcyan;">Left Click</span> on the '''Sky Title''' (Cloud Cover) to select from a drop down list of sky types, or | ||
| Line 1,540: | Line 1,594: | ||
==Set the Weather== | ==Set the Weather== | ||
| − | <table cellpadding=2 | + | <table bgcolor="lightcyan" cellpadding=2> |
<tr valign="top"> | <tr valign="top"> | ||
| − | <td>[[ | + | <td width=10>[[image:BlueDot10x10.png|link=]]</td> |
<td>This sets some very basic weather conditions. The set conditions will be constant throughout the running of a Session.</td> | <td>This sets some very basic weather conditions. The set conditions will be constant throughout the running of a Session.</td> | ||
</tr> | </tr> | ||
</table> | </table> | ||
| − | <table | + | <table> |
<tr valign="top"> | <tr valign="top"> | ||
<td> | <td> | ||
| Line 1,556: | Line 1,610: | ||
</tr> | </tr> | ||
<tr valign="top"> | <tr valign="top"> | ||
| − | <td>[[ | + | <td>[[image:Gears.PNG|link=]]</td> |
<td><span style="font-size: 17px;">'''Settings:'''</span><br> | <td><span style="font-size: 17px;">'''Settings:'''</span><br> | ||
| − | [[ | + | [[image:EnvironmentWeatherType.PNG|link=]]<br> |
Move the slider to set the weather between '''Rain''' and '''Snow'''</td> | Move the slider to set the weather between '''Rain''' and '''Snow'''</td> | ||
</tr> | </tr> | ||
| Line 1,578: | Line 1,632: | ||
There are '''Session Rules''' that also control the weather, including changeable weather conditions.<br> | There are '''Session Rules''' that also control the weather, including changeable weather conditions.<br> | ||
| − | Check the Trainz Wiki Session Rules list at [[ | + | Check the Trainz Wiki Session Rules list at [[image:WikiLink.PNG|link=]] '''[[Session_Rules_By_Categories_With_Properties#Weather_Rules|Session Rules - Weather]]''' |
</td> | </td> | ||
</tr> | </tr> | ||
| Line 1,594: | Line 1,648: | ||
==Wind Strength== | ==Wind Strength== | ||
| − | <table | + | <table width=1000 bgcolor="lightcyan" cellpadding=2> |
<tr valign="top"> | <tr valign="top"> | ||
| − | <td>[[ | + | <td width=10>[[image:BlueDot10x10.png|link=]]</td> |
<td>This setting only effects '''SpeedTrees'''</td> | <td>This setting only effects '''SpeedTrees'''</td> | ||
</tr> | </tr> | ||
| Line 1,606: | Line 1,660: | ||
</tr> | </tr> | ||
<tr valign="top"> | <tr valign="top"> | ||
| − | <td>[[ | + | <td>[[image:Gears.PNG|link=]]</td> |
<td><span style="font-size: 17px;">'''Settings:'''</span><br> | <td><span style="font-size: 17px;">'''Settings:'''</span><br> | ||
| − | [[ | + | [[image:EnvironmentWindType.PNG|link=]]<br> |
Move the slider to set the wind strength between zero (left) and maximum (right) | Move the slider to set the wind strength between zero (left) and maximum (right) | ||
</td> | </td> | ||
| Line 1,621: | Line 1,675: | ||
==Set the Water Surface== | ==Set the Water Surface== | ||
| − | <table | + | <table width=1000 bgcolor="lightcyan" cellpadding=2> |
<tr valign="top"> | <tr valign="top"> | ||
| − | <td>[[ | + | <td width=10>[[image:BlueDot10x10.png|link=]]</td> |
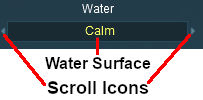
<td>This sets the water surface effects for '''Legacy Water''' only. It does not apply to '''Water Effect Layers'''</td> | <td>This sets the water surface effects for '''Legacy Water''' only. It does not apply to '''Water Effect Layers'''</td> | ||
</tr> | </tr> | ||
| Line 1,630: | Line 1,684: | ||
<table> | <table> | ||
<tr valign="top"> | <tr valign="top"> | ||
| − | <td>[[ | + | <td>[[image:EnvironmentWaterType.PNG|link=]]</td> |
<td> | <td> | ||
<table cellpadding=2 bgcolor=#eeeeee> | <table cellpadding=2 bgcolor=#eeeeee> | ||
| Line 1,638: | Line 1,692: | ||
</tr> | </tr> | ||
<tr valign="top"> | <tr valign="top"> | ||
| − | <td>[[ | + | <td>[[image:Gears.PNG|link=]]</td> |
<td><span style="font-size: 17px;">'''Settings:'''</span><br> | <td><span style="font-size: 17px;">'''Settings:'''</span><br> | ||
*<span style="font-weight: 700; font-size: 15px; background-color: lightcyan;">Left Click</span> on the '''Water Surface''' to select from a drop down list of surface effects, or | *<span style="font-weight: 700; font-size: 15px; background-color: lightcyan;">Left Click</span> on the '''Water Surface''' to select from a drop down list of surface effects, or | ||
| Line 1,655: | Line 1,709: | ||
==Set the Snow Altitude== | ==Set the Snow Altitude== | ||
| − | <table | + | <table width=1000 bgcolor="lightcyan" cellpadding=2> |
<tr valign="top"> | <tr valign="top"> | ||
| − | <td>[[ | + | <td width=10>[[image:BlueDot10x10.png|link=]]</td> |
| − | <td>This sets the altitude at which objects with snow effects will display | + | <td>This sets the altitude at which objects built with snow effects will display snow. It has no effect on objects created without this feature</td> |
</tr> | </tr> | ||
</table> | </table> | ||
| Line 1,671: | Line 1,725: | ||
</tr> | </tr> | ||
<tr valign="top"> | <tr valign="top"> | ||
| − | <td>[[ | + | <td>[[image:Gears.PNG|link=]]</td> |
<td><span style="font-size: 17px;">'''Settings:'''</span><br> | <td><span style="font-size: 17px;">'''Settings:'''</span><br> | ||
| − | [[ | + | [[image:EnvironmentSnowAltitude.PNG|link=]]<br> |
Enter the altitude, in metres, at which snow can appear.</td> | Enter the altitude, in metres, at which snow can appear.</td> | ||
</tr> | </tr> | ||
| Line 1,716: | Line 1,770: | ||
<tr valign="top"> | <tr valign="top"> | ||
<td width=729><span id="bottom"></span> </td> | <td width=729><span id="bottom"></span> </td> | ||
| − | <td width=46>[[ | + | <td width=46>[[image:BackToTop.png|link=#top|alt=Top|Top]]</td> |
| − | <td width=75>[[ | + | <td width=75>[[image:NextUp.png|link=#stepWeather|alt=Next Up|Top]]</td> |
<td width=75> </td> | <td width=75> </td> | ||
<td width=75> </td> | <td width=75> </td> | ||
| Line 1,727: | Line 1,781: | ||
<table cellpadding=2 bgcolor=#ffffff> | <table cellpadding=2 bgcolor=#ffffff> | ||
<tr valign="top"> | <tr valign="top"> | ||
| − | <td>[[ | + | <td>[[image:TrainzWiki.png|link=]]</td> |
<td> | <td> | ||
<span style="font-size: 17px;">'''More Tutorials and Guides to Using Trainz'''</span><br> | <span style="font-size: 17px;">'''More Tutorials and Guides to Using Trainz'''</span><br> | ||
Revision as of 21:12, 21 August 2023
| The information in this Wiki Page applies to TANE, TRS19, Trainz Plus and TRS22. A video tutorial specific to setting the environmental controls in TRS19, Trainz Plus and TRS22 can be found at TRS19 Environment and Lighting Tutorial |
|
|
Loading and Saving Environmental Settings
| A newly created Route will have its environmental settings set to their default values | |
| A newly created Session will have its environmental settings set to those of the Route | |
| Where the Route and Session have different saved environmental settings, those in the Session will be used |
| In Routes | |
| When you create a new Route, or load an existing Route with NO saved Environmental settings, then the settings used will be the default values. | |
| If you change any of the Environmental settings of a Route then you must also edit the Route (e.g. change or edit a Route asset or feature) and save it for those settings to become part of the Route. | |
| In Sessions | |
| When you create a new Session, or load an existing Session with NO saved Environmental settings, then the Session will use the settings that are part of the Route. These could also be the default settings. | |
| When you load an existing Session with saved Environmental settings, then the settings from the Session will take priority over any settings that have been saved in the Route. | |
| If you change any of the Environmental settings of a Session then you must also edit the Session (e.g. change or edit a Session asset or property) and save it for those settings to become part of the Session. | |
|
The Environment Tool
| Open the Environment Tools Editor from the Surveyor Main Menu in TANE as shown below left or from the Surveyor Edit Menu in TRS19 and later versions as shown below right. |
 |
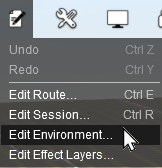 |
In all versions select Edit Environment |
This will open the Environment Properties Window as shown below.
| The Clock Dial shown in this tool does NOT set the game time. It sets the times at which lighting conditions change | |
| To set the Game Time add the Startup Options Rule or the Time and Rate Rule in the Session Editor |
|
TRS19 and later Trainz versions have an additional control that adjusts the lighting level, as shown below |
Lighting
| The Lighting Tools control the ambient, sun and water colours. This tool tab is opened by default whenever the Environment Editor is opened |
Light and Time
| The dial shown is a 24 hour clock that sets the lighting conditions at selected times of the day and night |
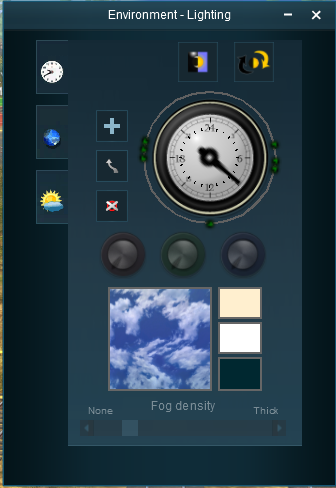 |
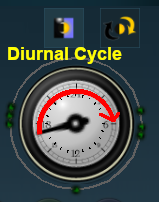
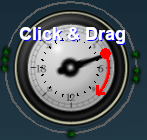
The Time of Day
|
||||||||||||

Setting the Lighting Conditions
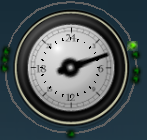
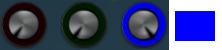
Colour Control Points
The ring around the dial contains a number of green dots.
| Each dot is a Control Point that sets the specific Red, Green and Blue colour values, and other lighting features, at the time shown on the clock |
 |
|
||||||
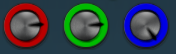
| >Each colour value can be altered by dragging its needle point to a new position around the dial. Each new position will change the balance between the 3 colours and will alter the lighting displayed in the scene at that particular time. |
Types of Lighting
|
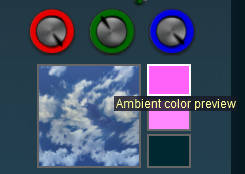
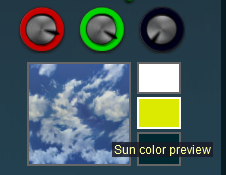
The 3 boxes below the colour wheels and next to the Sky box show the colour effects created for each type of lighting at the selected time.
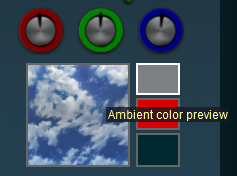
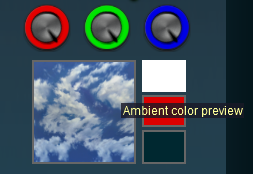
Ambient Colour
 |
|
||||||
Sun Colour
 |
|
||||||
Water Colour
|
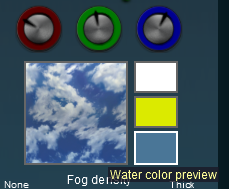 |
|
|||||||||||||||||||||||||||||
Water Effect Layer
| In TRS19 SP4 and later a new method of adding water to a route was introduced - as an Effect Layer. The original method, now called Legacy Water, can still be used in a route but it is NOT recommended that both water methods (Legacy and Effect Layer) are used in the same route. |
TRS19 SP4
The water colour for the Water Effect Layer is set by altering the colour for the Top Skybox.
|
||||||||||
See ![]() The Skybox below for more details.
The Skybox below for more details.
Trainz Plus and TRS22
| The major changes to water introduced in these versions are:- | |
| multiple water layers can be added to a route | |
| each water layer has its own colour built into its properties (i.e. not part of the Skybox colours) | |
Mixing Colours
|
|
||||||||||||||||

|
||||||||||||||||||||||||||||||||||||||||||||||||||||||||


|
|||||||||||||||||


TRS19/Trainz Plus/TRS22 Lighting Level Control
| In TRS19 and later Trainz versions users have an additional control that is placed next to the Ambient, Sun and Water colour boxes. This sets the overall brightness or lighting level for each control point. |
|
|
|
||||||
Resetting the Lighting Conditions
| All the lighting colour settings can be reset back to the Trainz default colours. |
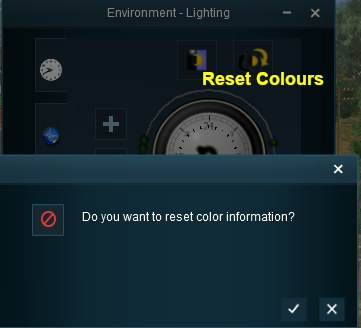 |
|
||||||
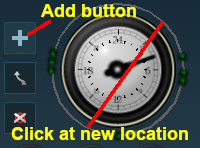
Adding a New Control Point
| New control points can be added to the clock dial |
 |
|
|||||||||
|
|
||||||||||
|
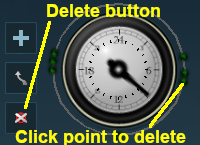
Deleting a Control point
| Existing control points can be deleted |
 |
|
|||||||||
|
|
||||||||||
Moving a Control point
| >Existing control points can be moved |
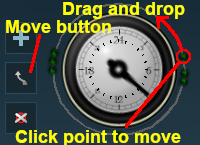 |
|
|||||||||
The Skybox
| The Skybox sets the sky colours in three different regions of the sky at the selected time of day, as shown in the extreme example below |
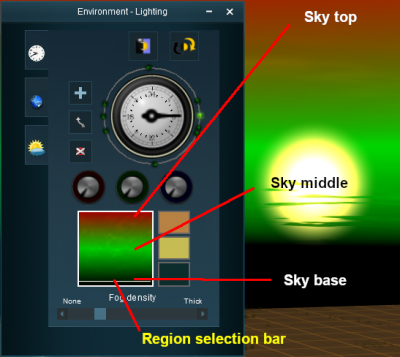 |
|
|||||||||||||||
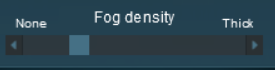
Fog Control
| This controls the level of "fog" in the scene |
|
|
|||||||||||||
Location
| The Location Tools control the geographic and date (season) data for the Route and Session. Left Click on the Location tab icon to open the Location Tool Controls |
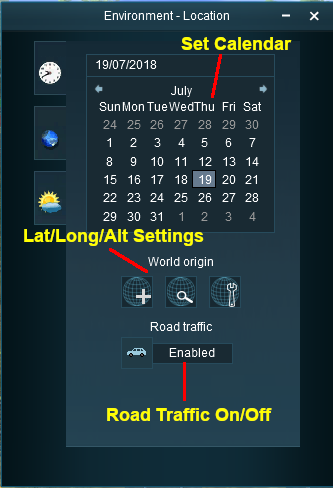 |
Set Date
|
|||||||||||||||||||
|
|
||||||||||||||
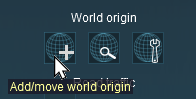
Set World Origin
The middle section is the World Origin Tool and sets the geographic location, including the altitude, of the route using a World Origin marker that is only visible in Surveyor.
| Setting the World Origin does NOT set regional features such as which side of the road the cars drive on. Use the Route Editor - Region setting for that | |
| The World Origin is always part of a Route, not part of a Session |
 |
|
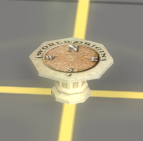 The World Origin marker |
||||||
| Once it has been placed, the marker can be moved by a Left Click and Drag or a Left Click. After adding the marker it should be edited to add geographic data. |
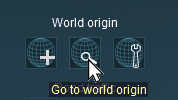 |
Left Click on the Go to world origin icon to move the Surveyor screen so that it is centred on the World Origin marker. |
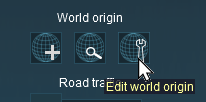 |
Left Click on the Edit world origin icon to set or edit the World Origin data. See Editing the World Origin below. |
Editing the World Origin
 |
Enter the geographic data for the world origin.
|
Deleting the World Origin
| There is no delete button for the World Origin marker, but you can still delete it |
|
|
|||||||||
Traffic Control
| This tool simply turns the road traffic ON and OFF |
|
  |
|
||||||
Weather and Water
| The Weather and Water Tools control the weather (sky, weather type, wind, snow) and water surface data for the Route and Session. Left Click on the Weather and Water tab icon to open the Weather and Water Tool Controls | |
| To set the Water Colour, refer to the |
 |
Set the Sky
The box below the sky title will give a preview of the selected sky. Set the Weather
|
|||||||||||||||||||||||
Wind Strength
| This setting only effects SpeedTrees |
|
|
|
| Settings:
|
|
|
|
|
Set the Water Surface
| This sets the water surface effects for Legacy Water only. It does not apply to Water Effect Layers |
 |
|
||||||
Set the Snow Altitude
| This sets the altitude at which objects built with snow effects will display snow. It has no effect on objects created without this feature |
|
| ||||||||||||||
Trainz Wiki
 |
More Tutorials and Guides to Using Trainz |
This page was created by Trainz user pware in July 2018 and was last updated as shown below.