How to Use Environment Tools
m |
m |
||
| Line 6: | Line 6: | ||
</td> | </td> | ||
<td width=700> | <td width=700> | ||
| − | <table cellpadding= | + | <table cellpadding=2 bgcolor=#c1e7e7> |
<tr valign="top"> | <tr valign="top"> | ||
<td colspan=2><span style="font-size: 17px; font-weight: 700;">In Summary:</span></td> | <td colspan=2><span style="font-size: 17px; font-weight: 700;">In Summary:</span></td> | ||
| Line 42: | Line 42: | ||
<tr valign="top"> | <tr valign="top"> | ||
<td>[[file:DotPoint.JPG|link=]]</td> | <td>[[file:DotPoint.JPG|link=]]</td> | ||
| − | <td>There is no '''Save''' or '''OK''' button on the Environment Tools Window. As soon as you enter or select a setting it will be set. When finished editing simply | + | <td>There is no '''Save''' or '''OK''' button on the Environment Tools Window. As soon as you enter or select a setting it will be set. When finished editing simply <span style="font-weight: 700; font-size: 15px; background-color: lightcyan;">Left Click</span> the window '''Off''' button '''BUT make sure you SAVE before exiting Trainz'''</td> |
</tr> | </tr> | ||
<tr valign="top"> | <tr valign="top"> | ||
| Line 76: | Line 76: | ||
='''Loading and Saving Environmental Settings'''= | ='''Loading and Saving Environmental Settings'''= | ||
| − | <table cellpadding= | + | <table cellpadding=2 bgcolor=#c1e7e7> |
<tr valign="top"> | <tr valign="top"> | ||
<td>[[image:DotPoint.JPG|link=]]</td> | <td>[[image:DotPoint.JPG|link=]]</td> | ||
| Line 142: | Line 142: | ||
This will open the ''Environment Properties Window'' as shown below. | This will open the ''Environment Properties Window'' as shown below. | ||
| − | <table cellpadding= | + | <table cellpadding=2 bgcolor=#c1e7e7> |
<tr valign="top"> | <tr valign="top"> | ||
<td>[[file:DotPoint.JPG|link=]]</td> | <td>[[file:DotPoint.JPG|link=]]</td> | ||
| Line 175: | Line 175: | ||
='''Lighting'''= | ='''Lighting'''= | ||
| − | <table cellpadding= | + | <table cellpadding=2 bgcolor=#c1e7e7> |
<tr valign="top"> | <tr valign="top"> | ||
<td>[[file:DotPoint.JPG|link=]]</td> | <td>[[file:DotPoint.JPG|link=]]</td> | ||
| Line 183: | Line 183: | ||
==Light and Time== | ==Light and Time== | ||
| − | <table cellpadding= | + | <table cellpadding=2 bgcolor=#c1e7e7> |
<tr valign="top"> | <tr valign="top"> | ||
<td>[[file:DotPoint.JPG|link=]]</td> | <td>[[file:DotPoint.JPG|link=]]</td> | ||
| Line 199: | Line 199: | ||
<td> | <td> | ||
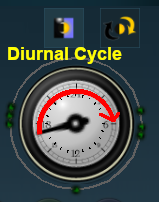
==='''The Diurnal Cycle'''=== | ==='''The Diurnal Cycle'''=== | ||
| − | <table cellpadding= | + | <table cellpadding=2 bgcolor=#ffffff> |
<tr> | <tr> | ||
<td colspan="2"> | <td colspan="2"> | ||
| Line 207: | Line 207: | ||
<td>[[file:Steps.PNG|link=]]</td> | <td>[[file:Steps.PNG|link=]]</td> | ||
<td><span style="font-size: 17px;">'''Steps:'''</span><br> | <td><span style="font-size: 17px;">'''Steps:'''</span><br> | ||
| − | *Click the '''Diurnal Cycle''' button to set the clock running through the full 24 hour cycle in just 30 seconds | + | *<span style="font-weight: 700; font-size: 15px; background-color: lightcyan;">Left Click</span> on the '''Diurnal Cycle''' button to set the clock running through the full 24 hour cycle in just 30 seconds |
| − | *Click it again to stop the cycle | + | *<span style="font-weight: 700; font-size: 15px; background-color: lightcyan;">Left Click</span> on it again to stop the cycle |
</td> | </td> | ||
</tr> | </tr> | ||
| Line 221: | Line 221: | ||
</table> | </table> | ||
==='''The Time of Day'''=== | ==='''The Time of Day'''=== | ||
| − | <table cellpadding= | + | <table cellpadding=2 bgcolor=#c1e7e7> |
<tr valign="top"> | <tr valign="top"> | ||
<td>[[file:DotPoint.JPG|link=]]</td> | <td>[[file:DotPoint.JPG|link=]]</td> | ||
| Line 242: | Line 242: | ||
The ring around the dial contains a number of green dots.<br> | The ring around the dial contains a number of green dots.<br> | ||
| − | <table cellpadding= | + | <table cellpadding=2 bgcolor=#c1e7e7> |
<tr valign="top"> | <tr valign="top"> | ||
<td>[[file:DotPoint.JPG|link=]]</td> | <td>[[file:DotPoint.JPG|link=]]</td> | ||
| Line 253: | Line 253: | ||
<td>[[file:EnvironmentSelectPoint.PNG|link=]]</td> | <td>[[file:EnvironmentSelectPoint.PNG|link=]]</td> | ||
<td> | <td> | ||
| − | <table cellpadding= | + | <table cellpadding=2 bgcolor=#ffffff> |
<tr> | <tr> | ||
<td colspan="2"> | <td colspan="2"> | ||
| Line 261: | Line 261: | ||
<td>[[file:Steps.PNG|link=]]</td> | <td>[[file:Steps.PNG|link=]]</td> | ||
<td><span style="font-size: 17px;">'''Steps:'''</span><br> | <td><span style="font-size: 17px;">'''Steps:'''</span><br> | ||
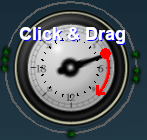
| − | * | + | *<span style="font-weight: 700; font-size: 15px; background-color: lightcyan;">Left Click</span> on one of the green points around the ring |
*The clock dial will immediately point to the selected dot and time | *The clock dial will immediately point to the selected dot and time | ||
The '''control point''' will be highlighted and the '''RGB Wheels''' will display '''one set''' of '''<span style="text-decoration: underline;">R</span>'''ed '''<span style="text-decoration: underline;">G</span>'''reen and '''<span style="text-decoration: underline;">B</span>'''lue values that have been set at that point | The '''control point''' will be highlighted and the '''RGB Wheels''' will display '''one set''' of '''<span style="text-decoration: underline;">R</span>'''ed '''<span style="text-decoration: underline;">G</span>'''reen and '''<span style="text-decoration: underline;">B</span>'''lue values that have been set at that point | ||
| Line 276: | Line 276: | ||
</table> | </table> | ||
<br> | <br> | ||
| − | <table cellpadding= | + | <table cellpadding=2 bgcolor=#c1e7e7> |
<tr valign="top"> | <tr valign="top"> | ||
<td>[[file:DotPoint.JPG|link=]]</td> | <td>[[file:DotPoint.JPG|link=]]</td> | ||
| Line 310: | Line 310: | ||
<td>[[file:EnvironmentAmbientColour.PNG|link=]]</td> | <td>[[file:EnvironmentAmbientColour.PNG|link=]]</td> | ||
<td> | <td> | ||
| − | <table cellpadding= | + | <table cellpadding=2 bgcolor=#ffffff> |
<tr> | <tr> | ||
<td colspan="2"> | <td colspan="2"> | ||
| Line 318: | Line 318: | ||
<td>[[file:Steps.PNG|link=]]</td> | <td>[[file:Steps.PNG|link=]]</td> | ||
<td><span style="font-size: 17px;">'''Steps:'''</span><br> | <td><span style="font-size: 17px;">'''Steps:'''</span><br> | ||
| − | *Click on the '''control point''' for the time that you want to edit | + | *<span style="font-weight: 700; font-size: 15px; background-color: lightcyan;">Left Click</span> on the '''control point''' for the time that you want to edit |
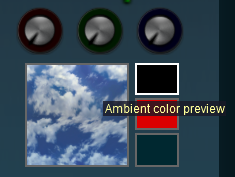
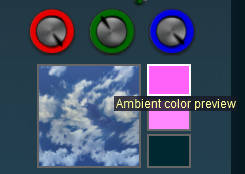
| − | *Click on the top box of the three. This is the '''Ambient Colour''' | + | *<span style="font-weight: 700; font-size: 15px; background-color: lightcyan;">Left Click</span> on the top box of the three. This is the '''Ambient Colour''' |
*The dials will show the '''RGB''' values for the '''Ambient Colour''' at the selected time | *The dials will show the '''RGB''' values for the '''Ambient Colour''' at the selected time | ||
*The '''Ambient color preview''' box will show the colour produced by the '''RGB''' settings | *The '''Ambient color preview''' box will show the colour produced by the '''RGB''' settings | ||
*You can then change the '''RGB''' settings for the '''Ambient Colour''' by either:- | *You can then change the '''RGB''' settings for the '''Ambient Colour''' by either:- | ||
| − | :* | + | :*<span style="font-weight: 700; font-size: 15px; background-color: lightcyan;">Left Click and Drag</span> the pointers to new positions on the coloured rims of each dial, or |
| − | :* | + | :*a <span style="font-weight: 700; font-size: 15px; background-color: lightcyan;">Left Click</span> on a new position on the coloured rims of each dial |
</td> | </td> | ||
</tr> | </tr> | ||
| Line 341: | Line 341: | ||
<td>[[file:EnvironmentSunColour.PNG|link=]]</td> | <td>[[file:EnvironmentSunColour.PNG|link=]]</td> | ||
<td> | <td> | ||
| − | <table cellpadding= | + | <table cellpadding=2 bgcolor=#ffffff> |
<tr> | <tr> | ||
<td colspan="2"> | <td colspan="2"> | ||
| Line 349: | Line 349: | ||
<td>[[file:Steps.PNG|link=]]</td> | <td>[[file:Steps.PNG|link=]]</td> | ||
<td><span style="font-size: 17px;">'''Steps:'''</span><br> | <td><span style="font-size: 17px;">'''Steps:'''</span><br> | ||
| − | *Click on the '''control point''' for the time that you want to edit | + | *<span style="font-weight: 700; font-size: 15px; background-color: lightcyan;">Left Click</span> on the '''control point''' for the time that you want to edit |
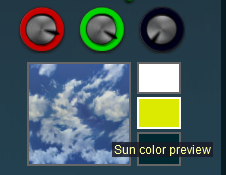
| − | *Click on the middle box of the three. This is the '''Sun Colour''' | + | *<span style="font-weight: 700; font-size: 15px; background-color: lightcyan;">Left Click</span> on the middle box of the three. This is the '''Sun Colour''' |
*The dials will show the '''RGB''' values for the '''Sun Colour''' at the selected time | *The dials will show the '''RGB''' values for the '''Sun Colour''' at the selected time | ||
*The '''Sun color preview''' box will show the colour produced by the '''RGB''' settings | *The '''Sun color preview''' box will show the colour produced by the '''RGB''' settings | ||
*You can then change the '''RGB''' settings for the '''Sun Colour''' by either:- | *You can then change the '''RGB''' settings for the '''Sun Colour''' by either:- | ||
| − | :* | + | :*<span style="font-weight: 700; font-size: 15px; background-color: lightcyan;">Left Click and Drag</span> the pointers to new positions on the coloured rims of each dial, or |
| − | :* | + | :*<span style="font-weight: 700; font-size: 15px; background-color: lightcyan;">Left Click</span> on a new position on the coloured rims of each dial |
</td> | </td> | ||
</tr> | </tr> | ||
| Line 409: | Line 409: | ||
</tr> | </tr> | ||
</table> | </table> | ||
| − | <table cellpadding= | + | <table cellpadding=2 bgcolor=#ffffff> |
<tr> | <tr> | ||
<td colspan="2"> | <td colspan="2"> | ||
| Line 417: | Line 417: | ||
<td>[[file:Steps.PNG|link=]]</td> | <td>[[file:Steps.PNG|link=]]</td> | ||
<td><span style="font-size: 17px;">'''Steps:'''</span><br> | <td><span style="font-size: 17px;">'''Steps:'''</span><br> | ||
| − | *Click on any time '''control point''' | + | *<span style="font-weight: 700; font-size: 15px; background-color: lightcyan;">Left Click</span> on any time '''control point''' |
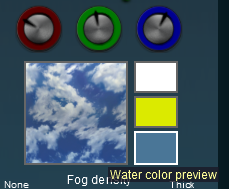
| − | *Click on the bottom box of the three. This is the '''Water Colour''' | + | *<span style="font-weight: 700; font-size: 15px; background-color: lightcyan;">Left Click</span> on the bottom box of the three. This is the '''Water Colour''' |
*The dials will show the '''RGB''' values for the '''Water Colour''' | *The dials will show the '''RGB''' values for the '''Water Colour''' | ||
*The '''Water color preview''' box will show the colour produced by the '''RGB''' settings | *The '''Water color preview''' box will show the colour produced by the '''RGB''' settings | ||
*You can then change the '''RGB''' settings for the '''Water Colour''' by either:- | *You can then change the '''RGB''' settings for the '''Water Colour''' by either:- | ||
| − | :* | + | :*<span style="font-weight: 700; font-size: 15px; background-color: lightcyan;">Left Click and Drag</span> the pointers to new positions on the coloured rims of each dial, or |
| − | :* | + | :*<span style="font-weight: 700; font-size: 15px; background-color: lightcyan;">Left Click</span> on a new position on the coloured rims of each dial |
</td> | </td> | ||
</tr> | </tr> | ||
| Line 448: | Line 448: | ||
<td><span style="font-size: 17px;">'''Steps:'''</span><br> | <td><span style="font-size: 17px;">'''Steps:'''</span><br> | ||
#Select a '''time control point''' for a specific time of day | #Select a '''time control point''' for a specific time of day | ||
| − | #Click in the top region of the Skybox - a while line or bar will appear across the region | + | #<span style="font-weight: 700; font-size: 15px; background-color: lightcyan;">Left Click</span> in the top region of the Skybox - a while line or bar will appear across the region |
#Set the '''RGB''' color wheels for the '''Top Skybog''' region for the selected time | #Set the '''RGB''' color wheels for the '''Top Skybog''' region for the selected time | ||
#Repeat for each '''time control point''' as required (the '''Water Effect Layer''' can have its colour changed at different times of the day/night) | #Repeat for each '''time control point''' as required (the '''Water Effect Layer''' can have its colour changed at different times of the day/night) | ||
| Line 485: | Line 485: | ||
<td width="25">[[file:PencilTips.PNG|link=]]</td> | <td width="25">[[file:PencilTips.PNG|link=]]</td> | ||
<td>Setting all three colours to the same values will produce monotones from '''Black''' to '''White''' with 254 different shades of gray between those two tones.<br><br> | <td>Setting all three colours to the same values will produce monotones from '''Black''' to '''White''' with 254 different shades of gray between those two tones.<br><br> | ||
| − | <table cellpadding= | + | <table cellpadding=2 bgcolor=#c1e7e7> |
<tr valign="top"> | <tr valign="top"> | ||
<td>[[file:DotPoint.JPG|link=]]</td> | <td>[[file:DotPoint.JPG|link=]]</td> | ||
| − | <td>You can quickly set all three dials to the exact same value by | + | <td>You can quickly set all three dials to the exact same value by a <span style="color: white; background-color: black; font-weight: 700; font-size: 15px;"> Shift </span> <span style="font-weight: 700; font-size: 15px; background-color: lightcyan;">Left Click</span> on a dial position on ''any one of the three dials''.</td> |
</tr> | </tr> | ||
</table> | </table> | ||
| Line 495: | Line 495: | ||
</tr> | </tr> | ||
</table> | </table> | ||
| − | <table cellpadding= | + | <table cellpadding=2 bgcolor=#ffffe0 width=900> |
<tr valign="top"> | <tr valign="top"> | ||
<td width=300 align="center">'''R = 0; G = 0; B = 0'''</td> | <td width=300 align="center">'''R = 0; G = 0; B = 0'''</td> | ||
| Line 656: | Line 656: | ||
</td> | </td> | ||
<td> | <td> | ||
| − | <table cellpadding= | + | <table cellpadding=2 bgcolor=#ffffff> |
<tr> | <tr> | ||
<td colspan="2"> | <td colspan="2"> | ||
| Line 682: | Line 682: | ||
==Resetting the Lighting Conditions== | ==Resetting the Lighting Conditions== | ||
| − | <table cellpadding= | + | <table cellpadding=2 bgcolor=#c1e7e7> |
<tr valign="top"> | <tr valign="top"> | ||
<td>[[file:DotPoint.JPG|link=]]</td> | <td>[[file:DotPoint.JPG|link=]]</td> | ||
| Line 693: | Line 693: | ||
<td>[[file:EnvironmentReset.PNG|link=]]</td> | <td>[[file:EnvironmentReset.PNG|link=]]</td> | ||
<td> | <td> | ||
| − | <table cellpadding= | + | <table cellpadding=2 bgcolor=#ffffff> |
<tr> | <tr> | ||
<td colspan="2"> | <td colspan="2"> | ||
| Line 701: | Line 701: | ||
<td>[[file:Steps.PNG|link=]]</td> | <td>[[file:Steps.PNG|link=]]</td> | ||
<td><span style="font-size: 17px;">'''Steps:'''</span><br> | <td><span style="font-size: 17px;">'''Steps:'''</span><br> | ||
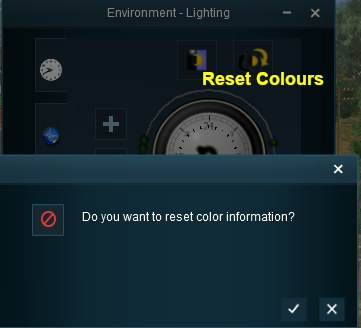
| − | *Click the '''Color Reset''' button, then either:- | + | *<span style="font-weight: 700; font-size: 15px; background-color: lightcyan;">Left Click</span> on the '''Color Reset''' button, then either:- |
| − | **Click the [[file:Tick.PNG|link=]] icon to accept the reset, or | + | **<span style="font-weight: 700; font-size: 15px; background-color: lightcyan;">Left Click</span> on the [[file:Tick.PNG|link=]] icon to accept the reset, or |
| − | **Click the [[file:Cross.PNG|link=]] icon to reject the reset</td> | + | **<span style="font-weight: 700; font-size: 15px; background-color: lightcyan;">Left Click</span> on the [[file:Cross.PNG|link=]] icon to reject the reset</td> |
</tr> | </tr> | ||
<tr> | <tr> | ||
| Line 716: | Line 716: | ||
==Adding a New Control Point== | ==Adding a New Control Point== | ||
| − | <table cellpadding= | + | <table cellpadding=2 bgcolor=#c1e7e7> |
<tr valign="top"> | <tr valign="top"> | ||
<td>[[file:DotPoint.JPG|link=]]</td> | <td>[[file:DotPoint.JPG|link=]]</td> | ||
| Line 736: | Line 736: | ||
<td width=50>[[file:Steps.PNG|link=]]</td> | <td width=50>[[file:Steps.PNG|link=]]</td> | ||
<td width=350><span style="font-size: 17px;">'''Steps:'''</span><br> | <td width=350><span style="font-size: 17px;">'''Steps:'''</span><br> | ||
| − | #Click the '''Add''' button [[file:EnvironmentAddPointButton.PNG|link=]] | + | #<span style="font-weight: 700; font-size: 15px; background-color: lightcyan;">Left Click</span> on the '''Add''' button [[file:EnvironmentAddPointButton.PNG|link=]] |
| − | #Click on the ring at the place where the new '''control point''' is to be located | + | #<span style="font-weight: 700; font-size: 15px; background-color: lightcyan;">Left Click</span> on the ring at the place where the new '''control point''' is to be located |
</td> | </td> | ||
<td> | <td> | ||
| Line 748: | Line 748: | ||
<td><span style="font-size: 17px; font-weight: 700;">Notes:'''</span><br> | <td><span style="font-size: 17px; font-weight: 700;">Notes:'''</span><br> | ||
---- | ---- | ||
| − | The '''Add''' button will remain active (selected) until it is deactivated so | + | The '''Add''' button will remain active (selected) until it is deactivated so each <span style="font-weight: 700; font-size: 15px; background-color: lightcyan;">Left Click</span> on the ring will add another control point.<br> |
| − | The button can be deactivated by | + | The button can be deactivated by a <span style="font-weight: 700; font-size: 15px; background-color: lightcyan;">Left Click</span> on it again or by selecting another button. |
</td> | </td> | ||
</tr> | </tr> | ||
| Line 778: | Line 778: | ||
<td><span style="font-size: 17px; font-weight: 700;">Notes:'''</span><br> | <td><span style="font-size: 17px; font-weight: 700;">Notes:'''</span><br> | ||
---- | ---- | ||
| − | During the running of a Session the lighting will "morph" or "transform" at a steady rate from the set of colour values at one control point to the set of colour values at the next control point. Click the '''Diurnal Cycle''' button for a demonstration. | + | During the running of a Session the lighting will "morph" or "transform" at a steady rate from the set of colour values at one control point to the set of colour values at the next control point. <span style="font-weight: 700; font-size: 15px; background-color: lightcyan;">Left Click</span> on the '''Diurnal Cycle''' button for a demonstration. |
<table> | <table> | ||
<tr valign="top"> | <tr valign="top"> | ||
| Line 803: | Line 803: | ||
==Deleting a Control point== | ==Deleting a Control point== | ||
| − | <table cellpadding= | + | <table cellpadding=2 bgcolor=#c1e7e7> |
<tr valign="top"> | <tr valign="top"> | ||
<td>[[file:DotPoint.JPG|link=]]</td> | <td>[[file:DotPoint.JPG|link=]]</td> | ||
| Line 822: | Line 822: | ||
<td width=50>[[file:Steps.PNG|link=]]</td> | <td width=50>[[file:Steps.PNG|link=]]</td> | ||
<td width=350><span style="font-size: 17px;">'''Steps:'''</span><br> | <td width=350><span style="font-size: 17px;">'''Steps:'''</span><br> | ||
| − | #Click the '''Delete''' button [[file:EnvironmentDeletePointButton.PNG|link=]] | + | #<span style="font-weight: 700; font-size: 15px; background-color: lightcyan;">Left Click</span> on the '''Delete''' button [[file:EnvironmentDeletePointButton.PNG|link=]] |
| − | #Click on the '''control point''' to be deleted | + | #<span style="font-weight: 700; font-size: 15px; background-color: lightcyan;">Left Click</span> on the '''control point''' to be deleted |
</td> | </td> | ||
<td> | <td> | ||
| Line 834: | Line 834: | ||
<td><span style="font-size: 17px; font-weight: 700;">Notes:'''</span><br> | <td><span style="font-size: 17px; font-weight: 700;">Notes:'''</span><br> | ||
---- | ---- | ||
| − | The '''Delete''' button will remain active (selected) until it is deactivated so | + | The '''Delete''' button will remain active (selected) until it is deactivated so each <span style="font-weight: 700; font-size: 15px; background-color: lightcyan;">Left Click</span> on another control point will also delete that point.<br> |
| − | The button can be deactivated by | + | The button can be deactivated by a <span style="font-weight: 700; font-size: 15px; background-color: lightcyan;">Left Click</span> on it or by selecting another button. |
</td> | </td> | ||
</tr> | </tr> | ||
| Line 858: | Line 858: | ||
==Moving a Control point== | ==Moving a Control point== | ||
| − | <table cellpadding= | + | <table cellpadding=2 bgcolor=#c1e7e7> |
<tr valign="top"> | <tr valign="top"> | ||
<td>[[file:DotPoint.JPG|link=]]</td> | <td>[[file:DotPoint.JPG|link=]]</td> | ||
| Line 864: | Line 864: | ||
</tr> | </tr> | ||
</table> | </table> | ||
| + | |||
<table width=1000> | <table width=1000> | ||
<tr valign="top"> | <tr valign="top"> | ||
| Line 877: | Line 878: | ||
<td width=50>[[file:Steps.PNG|link=]]</td> | <td width=50>[[file:Steps.PNG|link=]]</td> | ||
<td width=350><span style="font-size: 17px;">'''Steps:'''</span><br> | <td width=350><span style="font-size: 17px;">'''Steps:'''</span><br> | ||
| − | #Click the '''Move''' button [[file:EnvironmentMovePointButton.PNG|link=]] | + | #<span style="font-weight: 700; font-size: 15px; background-color: lightcyan;">Left Click</span> on the '''Move''' button [[file:EnvironmentMovePointButton.PNG|link=]] |
| − | #Click on the '''control point''' to be moved and either:- | + | #<span style="font-weight: 700; font-size: 15px; background-color: lightcyan;">Left Click</span> on the '''control point''' to be moved and either:- |
| − | ::* | + | ::*<span style="font-weight: 700; font-size: 15px; background-color: lightcyan;">Left Click and Drag</span> the point to its new position around the ring, or |
| − | ::* | + | ::*<span style="font-weight: 700; font-size: 15px; background-color: lightcyan;">Left Click</span> on the ring at the spot where the point is to be placed |
</td> | </td> | ||
<td> | <td> | ||
| − | <table bgcolor=#000000 width=400> | + | <table bgcolor=#000000 width=400 cellpadding=2> |
<tr valign="top"> | <tr valign="top"> | ||
<td> | <td> | ||
| − | <table bgcolor=# | + | <table bgcolor=#ffffff cellpadding=2> |
<tr valign="top"> | <tr valign="top"> | ||
<td>[[image:NotePad.PNG|link=]]</td> | <td>[[image:NotePad.PNG|link=]]</td> | ||
<td><span style="font-size: 17px; font-weight: 700;">Notes:'''</span><br> | <td><span style="font-size: 17px; font-weight: 700;">Notes:'''</span><br> | ||
---- | ---- | ||
| − | The '''Move''' button will remain active (selected) until it is deactivated so | + | The '''Move''' button will remain active (selected) until it is deactivated so each <span style="font-weight: 700; font-size: 15px; background-color: lightcyan;">Left Click</span> on the ring will move the selected control point again.<br> |
| − | The button can be deactivated by | + | The button can be deactivated by a <span style="font-weight: 700; font-size: 15px; background-color: lightcyan;">Left Click</span> on it or by selecting another button. |
</td> | </td> | ||
</tr> | </tr> | ||
| Line 903: | Line 904: | ||
</tr> | </tr> | ||
</table> | </table> | ||
| − | |||
| − | |||
| − | |||
| − | |||
| − | |||
| − | |||
</td> | </td> | ||
</tr> | </tr> | ||
| Line 915: | Line 910: | ||
==The Skybox== | ==The Skybox== | ||
| − | <table cellpadding= | + | <table cellpadding=2 bgcolor=#c1e7e7> |
<tr valign="top"> | <tr valign="top"> | ||
<td>[[file:DotPoint.JPG|link=]]</td> | <td>[[file:DotPoint.JPG|link=]]</td> | ||
| Line 942: | Line 937: | ||
</table> | </table> | ||
<br> | <br> | ||
| − | <table cellpadding= | + | <table cellpadding=2 bgcolor=#ffffff> |
<tr> | <tr> | ||
<td colspan="2"> | <td colspan="2"> | ||
| Line 951: | Line 946: | ||
<td><span style="font-size: 17px;">'''Steps:'''</span><br> | <td><span style="font-size: 17px;">'''Steps:'''</span><br> | ||
#Select a '''control point''' for a specific time of day | #Select a '''control point''' for a specific time of day | ||
| − | #Click in a region of the Skybox (top, middle, bottom) - a while line or bar will appear across the selected region | + | #<span style="font-weight: 700; font-size: 15px; background-color: lightcyan;">Left Click</span> in a region of the Skybox (top, middle, bottom) - a while line or bar will appear across the selected region |
#Set the '''RGB''' color wheels for the selected region | #Set the '''RGB''' color wheels for the selected region | ||
#Repeat for the other two regions and for other times of the day/night as needed</td> | #Repeat for the other two regions and for other times of the day/night as needed</td> | ||
| Line 997: | Line 992: | ||
==Fog Control== | ==Fog Control== | ||
| − | <table cellpadding= | + | <table cellpadding=2 bgcolor=#c1e7e7> |
<tr valign="top"> | <tr valign="top"> | ||
<td>[[file:DotPoint.JPG|link=]]</td> | <td>[[file:DotPoint.JPG|link=]]</td> | ||
| Line 1,007: | Line 1,002: | ||
<tr valign="top"> | <tr valign="top"> | ||
<td> | <td> | ||
| − | <table cellpadding= | + | <table cellpadding=2 bgcolor=#eeeeee> |
<tr> | <tr> | ||
<td colspan="2"> | <td colspan="2"> | ||
| Line 1,069: | Line 1,064: | ||
='''Location'''= | ='''Location'''= | ||
| − | <table cellpadding= | + | <table cellpadding=2 bgcolor=#c1e7e7> |
<tr valign="top"> | <tr valign="top"> | ||
<td>[[file:DotPoint.JPG|link=]]</td> | <td>[[file:DotPoint.JPG|link=]]</td> | ||
| − | <td>The '''Location Tools''' control the geographic and date (season) data for the Route and Session. Click the '''Location''' tab icon to open the '''Location Tool Controls'''</td> | + | <td>The '''Location Tools''' control the geographic and date (season) data for the Route and Session. <span style="font-weight: 700; font-size: 15px; color: blue;">Left Click</span> on the '''Location''' tab icon to open the '''Location Tool Controls'''</td> |
</tr> | </tr> | ||
</table> | </table> | ||
| Line 1,097: | Line 1,092: | ||
<td><span style="font-size: 17px; font-weight: 700;">Settings:'''</span><br> | <td><span style="font-size: 17px; font-weight: 700;">Settings:'''</span><br> | ||
'''Set the Month''' by scrolling '''left''' or '''right''' through the 12 month calendar<br> | '''Set the Month''' by scrolling '''left''' or '''right''' through the 12 month calendar<br> | ||
| − | '''Set the Day''' (if required) by | + | '''Set the Day''' (if required) by a <span style="font-weight: 700; font-size: 15px; background-color: lightcyan;">Left Click</span> on the date in the selected month |
</td> | </td> | ||
</tr> | </tr> | ||
| Line 1,126: | Line 1,121: | ||
</table> | </table> | ||
<br> | <br> | ||
| − | <table cellpadding= | + | <table cellpadding=2 bgcolor=#c1e7e7> |
<tr valign="top"> | <tr valign="top"> | ||
<td>[[image:DotPoint.JPG|link=]]</td> | <td>[[image:DotPoint.JPG|link=]]</td> | ||
| Line 1,231: | Line 1,226: | ||
The middle section is the '''World Origin Tool''' and sets the geographic location, including the altitude, of the route using a '''World Origin''' marker that is only visible in Surveyor. | The middle section is the '''World Origin Tool''' and sets the geographic location, including the altitude, of the route using a '''World Origin''' marker that is only visible in Surveyor. | ||
<br> | <br> | ||
| − | <table cellpadding= | + | <table cellpadding=2 bgcolor=#c1e7e7> |
<tr valign="top"> | <tr valign="top"> | ||
<td>[[file:DotPoint.JPG|link=]]</td> | <td>[[file:DotPoint.JPG|link=]]</td> | ||
| Line 1,246: | Line 1,241: | ||
<td>[[file:EnvironmentOriginAdd.PNG|link=]]</td> | <td>[[file:EnvironmentOriginAdd.PNG|link=]]</td> | ||
<td> | <td> | ||
| − | <table cellpadding= | + | <table cellpadding=2 bgcolor=#ffffff> |
<tr> | <tr> | ||
<td colspan="2"> | <td colspan="2"> | ||
| Line 1,255: | Line 1,250: | ||
<td><span style="font-size: 17px;">'''Steps:'''</span><br> | <td><span style="font-size: 17px;">'''Steps:'''</span><br> | ||
#Move the Surveyor view to the location where you want the marker to be placed | #Move the Surveyor view to the location where you want the marker to be placed | ||
| − | #Click on the '''Add world origin''' button | + | #<span style="font-weight: 700; font-size: 15px; background-color: lightcyan;">Left Click</span> on the '''Add world origin''' button |
| − | #Click the selected location in the layout to place the marker | + | #<span style="font-weight: 700; font-size: 15px; background-color: lightcyan;">Left Click</span> the selected location in the layout to place the marker |
| − | + | Another <span style="font-weight: 700; font-size: 15px; background-color: lightcyan;">Left Click</span> will simply move the marker again | |
</td> | </td> | ||
</tr> | </tr> | ||
| Line 1,269: | Line 1,264: | ||
</tr> | </tr> | ||
</table> | </table> | ||
| − | Once it has been placed, the marker can be moved by | + | Once it has been placed, the marker can be moved by a <span style="font-weight: 700; font-size: 15px; background-color: lightcyan;">Left Click and Drag</span> or a <span style="font-weight: 700; font-size: 15px; background-color: lightcyan;">Left Click</span>. After adding the marker it should be edited to add geographic data. |
<br> | <br> | ||
<table> | <table> | ||
<tr valign="top"> | <tr valign="top"> | ||
<td>[[file:EnvironmentOriginGo.PNG|link=]]</td> | <td>[[file:EnvironmentOriginGo.PNG|link=]]</td> | ||
| − | <td>Click the '''Go to world origin''' icon to move the Surveyor screen so that it is centred on the '''World Origin''' marker. | + | <td><span style="font-weight: 700; font-size: 15px; background-color: lightcyan;">Left Click</span> on the '''Go to world origin''' icon to move the Surveyor screen so that it is centred on the '''World Origin''' marker. |
</td> | </td> | ||
</tr> | </tr> | ||
| Line 1,281: | Line 1,276: | ||
<tr valign="top"> | <tr valign="top"> | ||
<td>[[file:EnvironmentOriginEdit.PNG|link=]]</td> | <td>[[file:EnvironmentOriginEdit.PNG|link=]]</td> | ||
| − | <td>Click the '''Edit world origin''' icon to set or edit the '''World Origin''' data. See '''Editing the World Origin''' below. | + | <td><span style="font-weight: 700; font-size: 15px; background-color: lightcyan;">Left Click</span> on the '''Edit world origin''' icon to set or edit the '''World Origin''' data. See '''Editing the World Origin''' below. |
</td> | </td> | ||
</tr> | </tr> | ||
| Line 1,297: | Line 1,292: | ||
*Altitude in '''metres'''. This, with the '''Snowline''' setting, will affect the appearance of assets that have a snow effect layer | *Altitude in '''metres'''. This, with the '''Snowline''' setting, will affect the appearance of assets that have a snow effect layer | ||
<br> | <br> | ||
| − | <table cellpadding= | + | <table cellpadding=2 bgcolor=#c1e7e7> |
<tr valign="top"> | <tr valign="top"> | ||
<td>[[file:DotPoint.JPG|link=]]</td> | <td>[[file:DotPoint.JPG|link=]]</td> | ||
| Line 1,310: | Line 1,305: | ||
The '''Reset''' button sets all values to their defaults. | The '''Reset''' button sets all values to their defaults. | ||
<br> | <br> | ||
| − | Click the [[file:Tick.PNG|link=]] icon to accept the entered data<br> | + | <span style="font-weight: 700; font-size: 15px; background-color: lightcyan;">Left Click</span> on the [[file:Tick.PNG|link=]] icon to accept the entered data<br> |
| − | Click the [[file:Cross.PNG|link=]] icon to reject the entered data | + | <span style="font-weight: 700; font-size: 15px; background-color: lightcyan;">Left Click</span> on the [[file:Cross.PNG|link=]] icon to reject the entered data |
</td> | </td> | ||
</tr> | </tr> | ||
| Line 1,319: | Line 1,314: | ||
==Deleting the World Origin== | ==Deleting the World Origin== | ||
| − | <table cellpadding= | + | <table cellpadding=2 bgcolor=#c1e7e7> |
<tr valign="top"> | <tr valign="top"> | ||
<td>[[file:DotPoint.JPG|link=]]</td> | <td>[[file:DotPoint.JPG|link=]]</td> | ||
| Line 1,329: | Line 1,324: | ||
<tr valign="top"> | <tr valign="top"> | ||
<td> | <td> | ||
| − | <table cellpadding= | + | <table cellpadding=2 bgcolor=#ffffff width=400> |
<tr> | <tr> | ||
<td colspan="2"> | <td colspan="2"> | ||
| Line 1,339: | Line 1,334: | ||
#Open the '''Objects Tool''' in the Surveyor screen | #Open the '''Objects Tool''' in the Surveyor screen | ||
#Select the '''Delete''' tool | #Select the '''Delete''' tool | ||
| − | #Click on the '''World Origin''' marker | + | #<span style="font-weight: 700; font-size: 15px; background-color: lightcyan;">Left Click</span> on the '''World Origin''' marker |
</td> | </td> | ||
</tr> | </tr> | ||
| Line 1,372: | Line 1,367: | ||
==Traffic Control== | ==Traffic Control== | ||
| − | <table cellpadding= | + | <table cellpadding=2 bgcolor=#c1e7e7> |
<tr valign="top"> | <tr valign="top"> | ||
<td>[[file:DotPoint.JPG|link=]]</td> | <td>[[file:DotPoint.JPG|link=]]</td> | ||
| Line 1,403: | Line 1,398: | ||
[[file:EnvironmentTrafficOff.PNG|link=]]</td> | [[file:EnvironmentTrafficOff.PNG|link=]]</td> | ||
<td> | <td> | ||
| − | <table cellpadding= | + | <table cellpadding=2 bgcolor=#eeeeee> |
<tr> | <tr> | ||
<td colspan="2"> | <td colspan="2"> | ||
| Line 1,411: | Line 1,406: | ||
<td>[[file:Gears.PNG|link=]]</td> | <td>[[file:Gears.PNG|link=]]</td> | ||
<td><span style="font-size: 17px;">'''Settings:'''</span><br> | <td><span style="font-size: 17px;">'''Settings:'''</span><br> | ||
| − | *Click the car icon to '''enable''' and '''disable''' traffic</td> | + | *<span style="font-weight: 700; font-size: 15px; background-color: lightcyan;">Left Click</span> on the car icon to '''enable''' and '''disable''' traffic</td> |
</tr> | </tr> | ||
<tr> | <tr> | ||
| Line 1,434: | Line 1,429: | ||
='''Weather and Water'''= | ='''Weather and Water'''= | ||
| − | <table cellpadding= | + | <table cellpadding=2 bgcolor=#c1e7e7> |
<tr valign="top"> | <tr valign="top"> | ||
<td>[[file:DotPoint.JPG|link=]]</td> | <td>[[file:DotPoint.JPG|link=]]</td> | ||
| − | <td>The '''Weather and Water Tools''' control the weather (sky, weather type, wind, snow) and water surface data for the Route and Session. Click the '''Weather and Water''' tab icon to open the '''Weather and Water Tool Controls'''</td> | + | <td>The '''Weather and Water Tools''' control the weather (sky, weather type, wind, snow) and water surface data for the Route and Session. <span style="font-weight: 700; font-size: 15px; color: blue;">Left Click</span> on the '''Weather and Water''' tab icon to open the '''Weather and Water Tool Controls'''</td> |
</tr> | </tr> | ||
<tr valign="top"> | <tr valign="top"> | ||
| Line 1,450: | Line 1,445: | ||
<td> | <td> | ||
==Set the Sky== | ==Set the Sky== | ||
| − | <table cellpadding= | + | <table cellpadding=2 bgcolor=#c1e7e7> |
<tr valign="top"> | <tr valign="top"> | ||
<td>[[file:DotPoint.JPG|link=]]</td> | <td>[[file:DotPoint.JPG|link=]]</td> | ||
| Line 1,461: | Line 1,456: | ||
<td>[[file:EnvironmentSkyType.PNG|link=]]</td> | <td>[[file:EnvironmentSkyType.PNG|link=]]</td> | ||
<td> | <td> | ||
| − | <table cellpadding= | + | <table cellpadding=2 bgcolor=#eeeeee> |
<tr> | <tr> | ||
<td colspan="2"> | <td colspan="2"> | ||
| Line 1,469: | Line 1,464: | ||
<td>[[file:Gears.PNG|link=]]</td> | <td>[[file:Gears.PNG|link=]]</td> | ||
<td><span style="font-size: 17px;">'''Settings:'''</span><br> | <td><span style="font-size: 17px;">'''Settings:'''</span><br> | ||
| − | *Click the '''Sky Title''' (Cloud Cover) to select from a drop down list of sky types, or | + | *<span style="font-weight: 700; font-size: 15px; background-color: lightcyan;">Left Click</span> on the '''Sky Title''' (Cloud Cover) to select from a drop down list of sky types, or |
*Scroll through the list by using the '''Scroll''' icons | *Scroll through the list by using the '''Scroll''' icons | ||
</td> | </td> | ||
| Line 1,484: | Line 1,479: | ||
==Set the Weather== | ==Set the Weather== | ||
| − | <table cellpadding= | + | <table cellpadding=2 bgcolor=#c1e7e7> |
<tr valign="top"> | <tr valign="top"> | ||
<td>[[file:DotPoint.JPG|link=]]</td> | <td>[[file:DotPoint.JPG|link=]]</td> | ||
| Line 1,494: | Line 1,489: | ||
<tr valign="top"> | <tr valign="top"> | ||
<td> | <td> | ||
| − | <table cellpadding= | + | <table cellpadding=2 bgcolor=#eeeeee width=250> |
<tr valign="top"> | <tr valign="top"> | ||
<td colspan="2"> | <td colspan="2"> | ||
| Line 1,538: | Line 1,533: | ||
==Wind Strength== | ==Wind Strength== | ||
| − | <table cellpadding= | + | <table cellpadding=2 bgcolor=#c1e7e7> |
<tr valign="top"> | <tr valign="top"> | ||
<td>[[file:DotPoint.JPG|link=]]</td> | <td>[[file:DotPoint.JPG|link=]]</td> | ||
| Line 1,544: | Line 1,539: | ||
</tr> | </tr> | ||
</table> | </table> | ||
| − | <table cellpadding= | + | <table cellpadding=2 bgcolor=#eeeeee> |
<tr> | <tr> | ||
<td colspan="2"> | <td colspan="2"> | ||
| Line 1,565: | Line 1,560: | ||
==Set the Water Surface== | ==Set the Water Surface== | ||
| − | <table cellpadding= | + | <table cellpadding=2 bgcolor=#c1e7e7> |
<tr valign="top"> | <tr valign="top"> | ||
<td>[[file:DotPoint.JPG|link=]]</td> | <td>[[file:DotPoint.JPG|link=]]</td> | ||
| Line 1,576: | Line 1,571: | ||
<td>[[file:EnvironmentWaterType.PNG|link=]]</td> | <td>[[file:EnvironmentWaterType.PNG|link=]]</td> | ||
<td> | <td> | ||
| − | <table cellpadding= | + | <table cellpadding=2 bgcolor=#eeeeee> |
<tr> | <tr> | ||
<td colspan="2"> | <td colspan="2"> | ||
| Line 1,584: | Line 1,579: | ||
<td>[[file:Gears.PNG|link=]]</td> | <td>[[file:Gears.PNG|link=]]</td> | ||
<td><span style="font-size: 17px;">'''Settings:'''</span><br> | <td><span style="font-size: 17px;">'''Settings:'''</span><br> | ||
| − | *Click the '''Water Surface''' to select from a drop down list of surface effects, or | + | *<span style="font-weight: 700; font-size: 15px; background-color: lightcyan;">Left Click</span> on the '''Water Surface''' to select from a drop down list of surface effects, or |
*Scroll through the list by using the '''Scroll''' icons | *Scroll through the list by using the '''Scroll''' icons | ||
</td> | </td> | ||
| Line 1,599: | Line 1,594: | ||
==Set the Snow Altitude== | ==Set the Snow Altitude== | ||
| − | <table cellpadding= | + | <table cellpadding=2 bgcolor=#c1e7e7> |
<tr valign="top"> | <tr valign="top"> | ||
<td>[[file:DotPoint.JPG|link=]]</td> | <td>[[file:DotPoint.JPG|link=]]</td> | ||
| Line 1,609: | Line 1,604: | ||
<tr valign="top"> | <tr valign="top"> | ||
<td> | <td> | ||
| − | <table cellpadding= | + | <table cellpadding=2 bgcolor=#eeeeee> |
<tr> | <tr> | ||
<td colspan="2"> | <td colspan="2"> | ||
| Line 1,669: | Line 1,664: | ||
---- | ---- | ||
='''Trainz Wiki'''= | ='''Trainz Wiki'''= | ||
| − | <table cellpadding= | + | <table cellpadding=2 bgcolor=#ffffff> |
<tr valign="top"> | <tr valign="top"> | ||
<td>[[file:TrainzWiki.png|link=]]</td> | <td>[[file:TrainzWiki.png|link=]]</td> | ||
Revision as of 22:43, 22 April 2023
The information in this Wiki Page applies to TANE, TRS19, Trainz Plus and TRS22. A video tutorial specific to setting the environmental controls in TRS19, Trainz Plus and TRS22 can be found at TRS19 Environment and Lighting Tutorial
|
|
||||||||||||||||
Loading and Saving Environmental Settings
| A newly created Route will have its environmental settings set to their default values | |
| A newly created Session will have its environmental settings set to those of the Route | |
| Where both the Route and Session have saved environmental settings, then those in the Session will be used |
In Routes
- When you create a new Route, or load an existing Route with NO saved Environmental settings, then the settings used will be the default values.
- If you change any of the Environmental settings of a Route then you must also edit the Route (e.g. change or edit a Route asset or feature) and save it for those settings to become part of the Route.
In Sessions
- When you create a new Session, or load an existing Session with NO saved Environmental settings, then the Session will use the settings that are part of the Route. These could also be the default settings.
- When you load an existing Session with saved Environmental settings, then the settings from the Session will take priority over any settings that have been saved in the Route.
- If you change any of the Environmental settings of a Session then you must also edit the Session (e.g. change or edit a Session asset or property) and save it for those settings to become part of the Session.
|
The Environment Tool
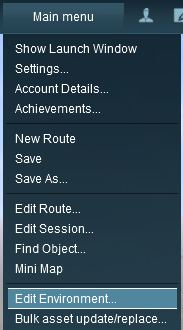
Open the Environment Tools Editor from the Surveyor Main Menu in TANE as shown below left or from the Surveyor Edit Menu in TRS19 and later versions as shown below right.
 |
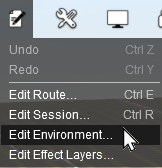 |
In all versions select Edit Environment |
This will open the Environment Properties Window as shown below.
| The Clock Dial shown in this tool does NOT set the game time. It sets the times at which lighting conditions change | |
| To set the Game Time add the Startup Options Rule or the Time and Rate Rule in the Session Editor |
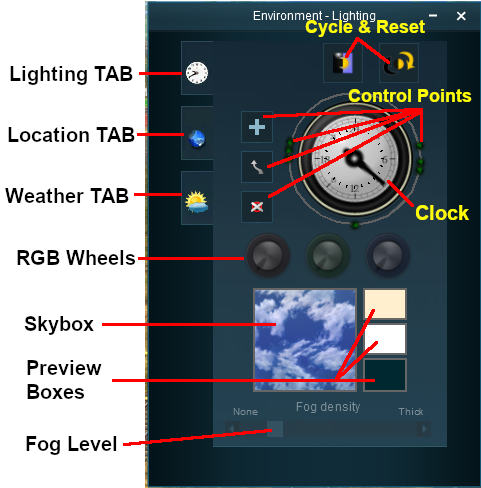
|
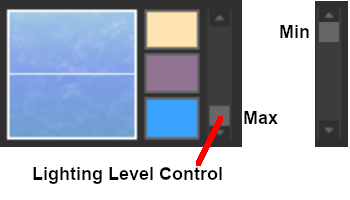
TRS19 and later Trainz versions have an additional control that adjusts the lighting level, as shown below |
Lighting
| The Lighting Tools control the ambient, sun and water colours. This tool tab is opened by default whenever the Environment Editor is opened |
Light and Time
| The dial shown is a 24 hour clock that sets the lighting conditions at selected times of the day and night |
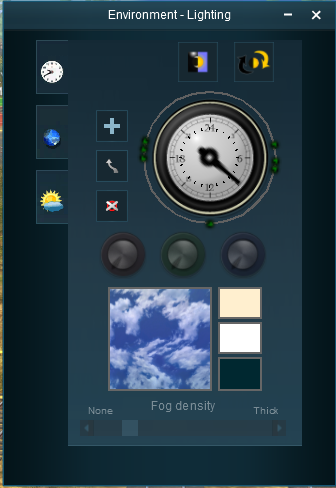 |
The Time of Day
|
||||||||||||
Setting the Lighting Conditions
Colour Control Points
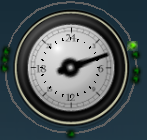
The ring around the dial contains a number of green dots.
| Each dot is a Control Point that sets the specific Red, Green and Blue colour values, and other lighting features, at the time shown on the clock |
 |
|
||||||
| Each colour value can be altered by dragging its needle point to a new position around the dial. Each new position will change the balance between the 3 colours and will alter the lighting displayed in the scene at that particular time. |
Types of Lighting
|
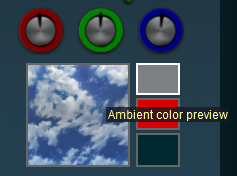
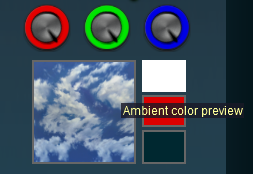
The 3 boxes below the colour wheels and next to the Sky box show the colour effects created for each type of lighting at the selected time.
Ambient Colour
 |
|
||||||
Sun Colour
 |
|
||||||
Water Colour
|
 |
|
|||||||||
Water Effect Layer
In TRS19 SP4 and later a new method of adding water to a route was introduced - as an Effect Layer.
The water colour for the Water Effect Layer is set by altering the colour for the Top Skybox.
|
See The Skybox below for more details.
Mixing Colours
|
|
||||||||||||||||
|
||||||||||||||||||||||||||||||||||||||||||||||||||||||||
|
|||||||||||||||||
TRS19/Trainz Plus/TRS22 Lighting Level Control
In TRS19 and later Trainz versions users have an additional control that is placed next to the Ambient, Sun and Water colour boxes. This sets the overall brightness or lighting level for each control point.
|
|
|
||||||
Resetting the Lighting Conditions
| All the lighting colour settings can be reset back to the Trainz default colours. |
 |
|
||||||
Adding a New Control Point
| New control points can be added to the clock dial |
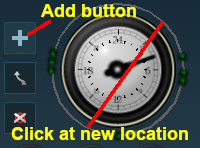 |
|
|||||||||
|
|
||||||||||
|
Deleting a Control point
| Existing control points can be deleted |
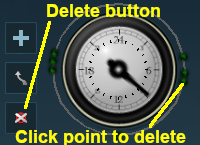 |
|
|||||||||
|
|
||||||||||
Moving a Control point
| Existing control points can be moved |
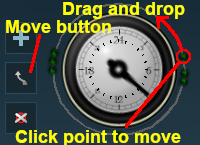 |
|
|||||||||
The Skybox
| The Skybox sets the sky colours in three different regions of the sky at the selected time of day, as shown in the extreme example below |
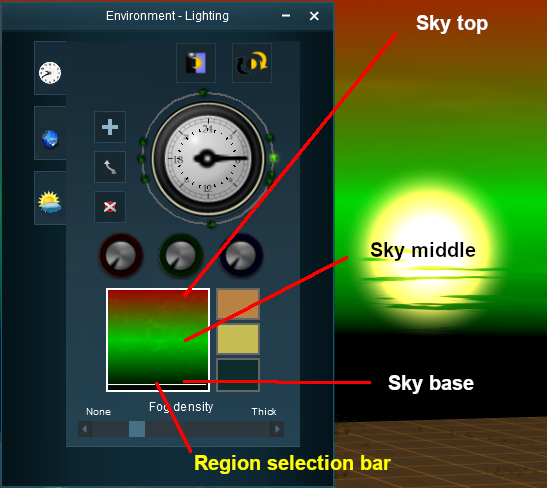 |
|
|||||||||||||||
Fog Control
| This controls the level of "fog" in the scene |
|
|
|||||||||||||
Location
| The Location Tools control the geographic and date (season) data for the Route and Session. Left Click on the Location tab icon to open the Location Tool Controls |
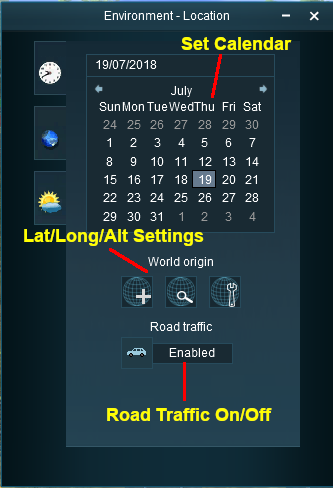 |
Set DateThe top section is a standard calendar selection tool that allows you to set the month and the day of the month. The only effect this has in Trainz is to set, with the geographic coordinates, the season of the year.
|
||||||||||||||||||
|
|
||||||||||||||
Set World Origin
The middle section is the World Origin Tool and sets the geographic location, including the altitude, of the route using a World Origin marker that is only visible in Surveyor.
| Setting the World Origin does NOT set regional features such as which side of the road the cars drive on. Use the Route Editor - Region setting for that | |
| The World Origin is always part of a Route, not part of a Session |
 |
|
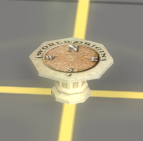 The World Origin marker |
||||||
Once it has been placed, the marker can be moved by a Left Click and Drag or a Left Click. After adding the marker it should be edited to add geographic data.
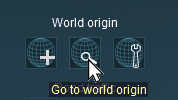 |
Left Click on the Go to world origin icon to move the Surveyor screen so that it is centred on the World Origin marker. |
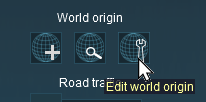 |
Left Click on the Edit world origin icon to set or edit the World Origin data. See Editing the World Origin below. |
Editing the World Origin
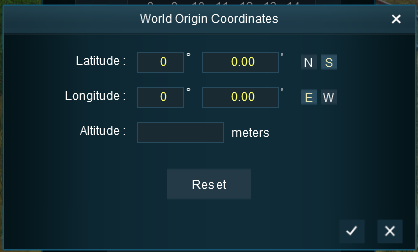 |
Enter the geographic data for the world origin.
|
Deleting the World Origin
| There is no delete button for the World Origin marker, but you can still delete it |
|
|
|||||||||
Traffic Control
| This tool simply turns the road traffic ON and OFF |
|
 |
|
||||||
Weather and Water
| The Weather and Water Tools control the weather (sky, weather type, wind, snow) and water surface data for the Route and Session. Left Click on the Weather and Water tab icon to open the Weather and Water Tool Controls | |
| To set the Water Colour, refer to the |
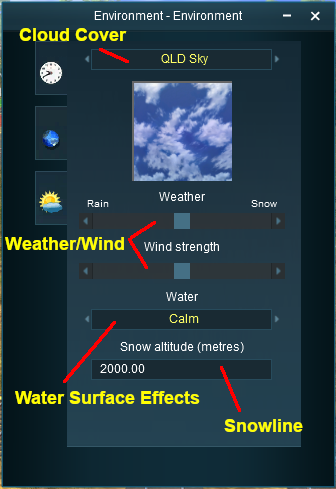 |
Set the Sky
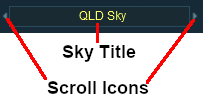
The box below the sky title will give a preview of the selected sky. Set the Weather
|
|||||||||||||||||||||||
Wind Strength
| This setting only effects SpeedTrees |
|
|
|
| Settings:
|
|
|
|
|
Set the Water Surface
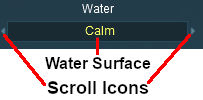
| This sets the water surface effects |
 |
|
||||||
Set the Snow Altitude
| This sets the altitude at which objects with snow effects will display those effects. It has no effect on objects created without this feature |
|
| ||||||||||||||
Trainz Wiki
 |
More Tutorials and Guides to Using Trainz |
This page was created by Trainz user pware in July 2018 and was last updated as shown below.
