|
|
| Line 1: |
Line 1: |
| − | <!-- 843 -->
| |
| − | The information in this Wiki Page applies to '''Surveyor 2.0 (S20)''' as found in '''Trainz Plus'''.<br>
| |
| − |
| |
| − | <table>
| |
| − | <tr valign="top">
| |
| − | <td>
| |
| − | __TOC__
| |
| − | </td>
| |
| − | <td width=800>
| |
| − | <table cellpadding=4 bgcolor=#c1e7e7>
| |
| − | <tr valign="top">
| |
| − | <td colspan=2><span style="font-size: 17px; font-weight: 700;">In Summary:</span></td>
| |
| − | </tr>
| |
| − | <tr valign="top">
| |
| − | <td>[[image:DotPoint.JPG|10px|link=]]</td>
| |
| − | <td>'''Surveyor 2.0''' (or '''S20''') is the new and much more powerful '''Surveyor''' interface provided to '''Trainz Plus Gold''' and '''Trainz Plus Standard''' subscribers as an alternative to '''Surveyor Classic'''. Classic is still available as an option to subscribers</td>
| |
| − | </tr>
| |
| − | <tr valign="top">
| |
| − | <td>[[image:DotPoint.JPG|10px|link=]]</td>
| |
| − | <td>'''S20''' combines the separate '''Tool Flyouts''' from Classic into a single set of common tools<td>
| |
| − | </tr>
| |
| − | <tr valign="top">
| |
| − | <td>[[image:DotPoint.JPG|10px|link=]]</td>
| |
| − | <td>Further tools and information are provided by a series of moveable and dockable on-screen '''Palettes'''</td>
| |
| − | </tr>
| |
| − | <tr valign="top">
| |
| − | <td>[[image:DotPoint.JPG|10px|link=]]</td>
| |
| − | <td>Assets can be positioned in a route using new '''3D Tools''' with more freedom than was previously possible</td>
| |
| − | </tr>
| |
| − | <tr valign="top">
| |
| − | <td>[[image:DotPoint.JPG|10px|link=]]</td>
| |
| − | <td>Track assets, such as signals, now have far more options for positioning on the track, including vertically, than is possible in Classic</td>
| |
| − | </tr>
| |
| − | <tr valign="top">
| |
| − | <td>[[image:DotPoint.JPG|10px|link=]]</td>
| |
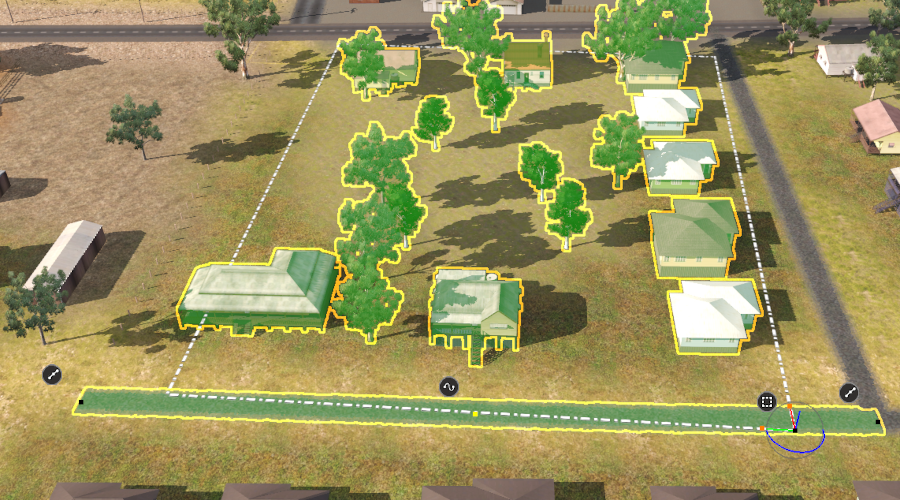
| − | <td>A new '''Marquee Tool''' allows:-
| |
| − | <table>
| |
| − | <tr valign="top">
| |
| − | <td width=10>[[image:DotPoint.JPG|10px|link=]]</td>
| |
| − | <td>groups of different assets placed in the route to be selected, copied, deleted and moved</td>
| |
| − | </tr>
| |
| − | <tr valign="top">
| |
| − | <td>[[image:DotPoint.JPG|10px|link=]]</td>
| |
| − | <td>multiple baseboards to be added, deleted and have their grid resolutions changed in a single operation not just one-at-a-time as in Classic</td>
| |
| − | </tr>
| |
| − | <tr valign="top">
| |
| − | <td>[[image:DotPoint.JPG|10px|link=]]</td>
| |
| − | <td>'''Scrapbooks''' (assets that form a "scene" in a route) to be created and shared with other routes and through the DLS</td>
| |
| − | </tr>
| |
| − | </table>
| |
| − | </td>
| |
| − | </tr>
| |
| − | </table>
| |
| − | </td>
| |
| − | </tr>
| |
| − | </table>
| |
| − |
| |
| − | <table> <!-- BEGIN Nav Buttons Table -->
| |
| − | <tr valign="top">
| |
| − | <td width=729><span id="stepTools"></span> </td>
| |
| − | <td width=46>[[image:BackToTop.png|link=#top|alt=Top|Top]]</td>
| |
| − | <td width=75> </td>
| |
| − | <td width=75>[[image:NextDown.png|link=#stepBrush|alt=Next Down|Next Down]]</td>
| |
| − | <td width=75>[[image:BackToBottom.png|link=#bottom|alt=Bottom|Bottom]]</td>
| |
| − | </tr>
| |
| − | </table> <!-- END Nav Buttons Table -->
| |
| − |
| |
| − | ='''The Tools Palette'''=
| |
| − |
| |
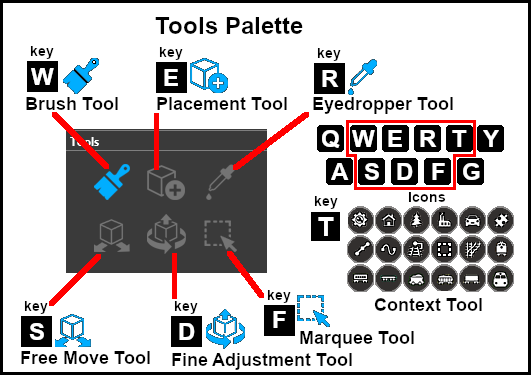
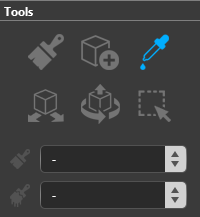
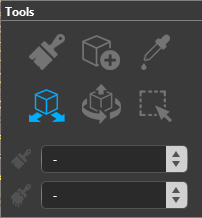
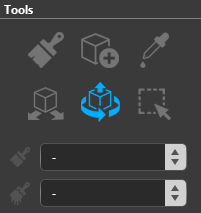
| − | The '''Tools Palette''' is at the core of the new interface and takes the place of all the '''Tool Flyouts''' that have been the standard for Trainz Surveyor for many years now. Some of the tools are new while others have been given new abilities.<br>
| |
| − |
| |
| − | <table width=1000>
| |
| − | <tr valign="top">
| |
| − | <td>[[image:Tools_S20.png|link=|alt=Tools and keymap for S20]]<br>
| |
| − | <br>
| |
| − | The <span style="font-weight: 700; font-size: 15px; color: white; background-color: black;"> Context Tool </span> is attached as an icon to a selected or newly placed object. The icon will vary according to the type of object.</td>
| |
| − | <td>
| |
| − | <span id="Notes_Palettes"></span>
| |
| − | <table bgcolor=#000000 width=500 cellpadding=2>
| |
| − | <tr valign="top">
| |
| − | <td>
| |
| − | <table bgcolor=#ffffb0 width=496 cellpadding=2>
| |
| − | <tr valign="top">
| |
| − | <td width=22>[[image:NotePad.PNG|link=]]</td>
| |
| − | <td width=374><span style="font-size: 17px; font-weight: 700;">Notes: Palettes'''</span><br>
| |
| − | ----
| |
| − | </td>
| |
| − | </tr>
| |
| − | <tr valign="top">
| |
| − | <td colspan=2>
| |
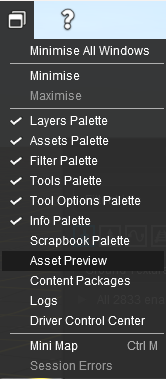
| − | If the '''Tools Palette''' is not shown on the screen, then:-
| |
| − | <table>
| |
| − | <tr valign="top">
| |
| − | <td width=175>[[image:WindowsMenu_S20.png|link=|alt=Windows Menu]]</td>
| |
| − | <td>
| |
| − | <table>
| |
| − | <tr valign="top">
| |
| − | <td width=25>[[image:DotPoint1.JPG|link=]]</td>
| |
| − | <td>open the '''Window Menu''' from the menu icons at the top of the screen</td>
| |
| − | </tr>
| |
| − | <tr valign="top">
| |
| − | <td> </td>
| |
| − | <td>
| |
| − | <table>
| |
| − | <tr valign="top">
| |
| − | <td width=10>[[image:BulletTick.png|link=]]</td>
| |
| − | <td>visible palettes have ticks next to their names</td>
| |
| − | </tr>
| |
| − | </table>
| |
| − | </td>
| |
| − | </tr>
| |
| − | <tr valign="top">
| |
| − | <td>[[image:DotPoint2.JPG|link=]]</td>
| |
| − | <td>'''Left''' click on the item '''Tools Palette'''</td>
| |
| − | </tr>
| |
| − | <tr valign="top">
| |
| − | <td> </td>
| |
| − | <td>
| |
| − | this will add a [[image:BulletTick.png|link=]] and make the '''Tools Palette''' visible</td>
| |
| − | </tr>
| |
| − | <tr valign="top">
| |
| − | <td>[[image:DotPoint3.JPG|link=]]</td>
| |
| − | <td>make sure that the '''Tool Options Palette''' is also visible</td>
| |
| − | </tr>
| |
| − | </table>
| |
| − | </td>
| |
| − | </tr>
| |
| − | </table>
| |
| − | </td>
| |
| − | </tr>
| |
| − | </table>
| |
| − | </td>
| |
| − | </tr>
| |
| − | </table>
| |
| − | </td>
| |
| − | </tr>
| |
| − | </table>
| |
| − | <br>
| |
| − | <table> <!-- BEGIN Nav Buttons Table -->
| |
| − | <tr valign="top">
| |
| − | <td width=729><span id="stepBrush"></span> </td>
| |
| − | <td width=46>[[image:BackToTop.png|link=#top|alt=Top|Top]]</td>
| |
| − | <td width=75>[[image:NextUp.png|link=#stepTools|alt=Next Up|Next Up]]</td>
| |
| − | <td width=75>[[image:NextDown.png|link=#stepPlacement|alt=Next Down|Next Down]]</td>
| |
| − | <td width=75>[[image:BackToBottom.png|link=#bottom|alt=Bottom|Bottom]]</td>
| |
| − | </tr>
| |
| − | </table> <!-- END Nav Buttons Table -->
| |
| − |
| |
| − | ='''The Brush Tool'''=
| |
| − |
| |
| − | <table width=1000>
| |
| − | <tr valign="top">
| |
| − | <td width=40>[[image:S20_BrushToolIcon.png|link=]]</td>
| |
| − | <td width=160>'''Keyboard Shortcut:''' <span style="color: white; background-color: black; font-weight: 700; font-size: 17px;"> W </span></td>
| |
| − | <td width=800><span style="font-weight: 700; font-size: 15px;">The <span style="color: white; background-color: black;"> Brush Tool </span> "paints" the terrain, ground textures, effect layers and scrapbook scenes in a route</span></td>
| |
| − | </tr>
| |
| − | </table>
| |
| − | <br>
| |
| − |
| |
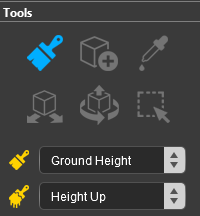
| − | When selected, the '''Brush Tool''' has two drop down menu lists.<br>
| |
| − |
| |
| − | <table width=900>
| |
| − | <tr valign="top">
| |
| − | <td width=200>[[image:BrushTools_S20.png|link=|alt=Brush Tools]]</td>
| |
| − | <td>
| |
| − | <table width=700>
| |
| − | <tr valign="top">
| |
| − | <td colspan=3>The first drop down menu will set the '''"Brush Target"''' which is the type of brush.<br>
| |
| − | The '''Targets''' are:-</td>
| |
| − | </tr>
| |
| − | <tr valign="top">
| |
| − | <td width=200>
| |
| − | <table>
| |
| − | <tr valign="top">
| |
| − | <td width=10>[[image:BulletTick.png|link=]]</td>
| |
| − | <td>'''Ground Height'''</td>
| |
| − | </tr>
| |
| − | <tr valign="top">
| |
| − | <td>[[image:BulletTick.png|link=]]</td>
| |
| − | <td>'''Ground Texture'''</td>
| |
| − | </tr>
| |
| − | <tr valign="top">
| |
| − | <td>[[image:BulletTick.png|link=]]</td>
| |
| − | <td>'''Scrapbook Data'''</td>
| |
| − | </tr>
| |
| − | <tr valign="top">
| |
| − | <td>[[image:BulletTick.png|link=]]</td>
| |
| − | <td>'''<''List of Effect Layers''>'''</td>
| |
| − | </tr>
| |
| − | <tr valign="top">
| |
| − | <td>[[image:BulletTick.png|link=]]</td>
| |
| − | <td>'''Edit Effect Layers'''</td>
| |
| − | </tr>
| |
| − | </table>
| |
| − | </td>
| |
| − | <td width=100>[[image:BrushToolsGroundOptions_S20.png|link=]]</td>
| |
| − | <td width=350>
| |
| − | <table bgcolor=#000000 width=350 cellpadding=2>
| |
| − | <tr valign="top">
| |
| − | <td>
| |
| − | <table bgcolor=#ffffb0 width=346 cellpadding=2>
| |
| − | <tr valign="top">
| |
| − | <td>[[image:NotePad.PNG|link=]]</td>
| |
| − | <td>If you have any '''Effect Layers''' then they will appear as '''Targets''' in this drop down list. Select an '''Effect Layer''' to use the brush to paint with that layer.</td>
| |
| − | </tr>
| |
| − | </table>
| |
| − | </td>
| |
| − | </tr>
| |
| − | </table>
| |
| − | </td>
| |
| − | </tr>
| |
| − | </table>
| |
| − | </td>
| |
| − | </tr>
| |
| − | </table>
| |
| − | <br>
| |
| − | =='''Ground Height'''==
| |
| − |
| |
| − | <table width=900 bgcolor=#000000>
| |
| − | <tr valign="top">
| |
| − | <td>
| |
| − | <table width=896 bgcolor=#ffffff>
| |
| − | <tr valign="top">
| |
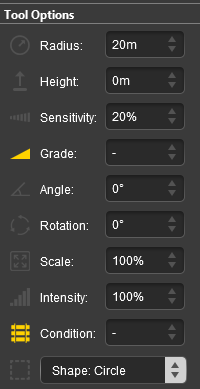
| − | <td>This brush tool uses the '''Tool Options Palette'''. If this palette is not visible on the screen then refer to [[image:PageLink.PNG|link=]] '''[[#Notes_Palettes|Notes: Palettes]]''' at the top of this document.
| |
| − | </td>
| |
| − | </tr>
| |
| − | </table>
| |
| − | </td>
| |
| − | </tr>
| |
| − | </table>
| |
| − |
| |
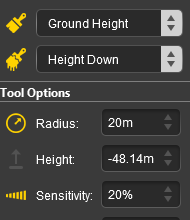
| − | When the '''Ground Height Target''' is selected, the second drop down box will give a choice of several '''Ground Height''' tools.<br>
| |
| − |
| |
| − | <table width=400>
| |
| − | <tr valign="top">
| |
| − | <td colspan=2>The choices are:- </td>
| |
| − | </tr>
| |
| − | <tr valign="top">
| |
| − | <td width=200>
| |
| − | <table>
| |
| − | <tr valign="top">
| |
| − | <td width=10>[[image:BulletTick.png|link=]]</td>
| |
| − | <td>'''Height Up'''</td>
| |
| − | </tr>
| |
| − | <tr valign="top">
| |
| − | <td>[[image:BulletTick.png|link=]]</td>
| |
| − | <td>'''Height Down'''</td>
| |
| − | </tr>
| |
| − | <tr valign="top">
| |
| − | <td>[[image:BulletTick.png|link=]]</td>
| |
| − | <td>'''Set Height'''</td>
| |
| − | </tr>
| |
| − | <tr valign="top">
| |
| − | <td>[[image:BulletTick.png|link=]]</td>
| |
| − | <td>'''Grade'''</td>
| |
| − | </tr>
| |
| − | </table>
| |
| − | </td>
| |
| − | <td width=200>[[image:BrushToolsHeightOptions_S20.png|link=]]</td>
| |
| − | </tr>
| |
| − | </table>
| |
| − |
| |
| − | <table width=1000>
| |
| − | <tr valign="top">
| |
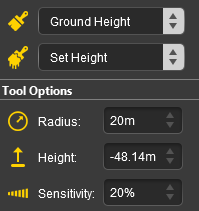
| − | <td colspan=4>The available brush tool options are shown in the '''Tool Options Palette''' with a <span style="font-size: 15px; font-weight: 700; color: gold; background-color: black;"> Gold </span> coloured icon next to their names. Those options that have their icon greyed out will be ignored, but they can still be edited.</td>
| |
| − | </tr>
| |
| − | <tr valign="top" align="center">
| |
| − | <td width=210><span style="font-size: 15px; font-weight: 700; color: white; background-color: black;"> Height Up/Height Down </span><br>[[image:BrushToolsHeightUpDown_S20.png|link=|alt=Up/Down brush options]]</td>
| |
| − | <td width=210><span style="font-size: 15px; font-weight: 700; color: white; background-color: black;"> Set Height </span><br>[[image:BrushToolsHeightSet_S20.png|link=|alt=Height brush options]]</td>
| |
| − | <td width=210><span style="font-size: 15px; font-weight: 700; color: white; background-color: black;"> Grade </span><br>[[image:BrushToolsHeightGrade_S20.png|link=|alt=Grade brush options]]</td>
| |
| − | <td width=390><br>
| |
| − | <table bgcolor=#000000 width=390 cellpadding=2>
| |
| − | <tr valign="top">
| |
| − | <td>
| |
| − | <table bgcolor=#ffffff width=386 align="left">
| |
| − | <tr valign="top">
| |
| − | <td width=90><span style="font-size: 15px; font-weight: 700; color: gold; background-color: black;"> Radius </span></td>
| |
| − | <td width=286>the brush radius (metres) - see '''Notes:''' below</td>
| |
| − | </tr>
| |
| − | <tr valign="top">
| |
| − | <td colspan=2>
| |
| − | <table bgcolor=#ffffb0>
| |
| − | <tr valign="top">
| |
| − | <td width=90 align="right">'''Range:''' </td>
| |
| − | <td width=296>5m and above</td>
| |
| − | </tr>
| |
| − | </table>
| |
| − | </td>
| |
| − | </tr>
| |
| − | <tr valign="top">
| |
| − | <td><span style="font-size: 15px; font-weight: 700; color: gold; background-color: black;"> Height </span></td>
| |
| − | <td>the brush height (metres)</td>
| |
| − | </tr>
| |
| − | <tr valign="top">
| |
| − | <td colspan=2>
| |
| − | <table bgcolor=#ffffb0>
| |
| − | <tr valign="top">
| |
| − | <td width=90 align="right">'''Range:''' </td>
| |
| − | <td width=296>-3000m to 3000m</td>
| |
| − | </tr>
| |
| − | </table>
| |
| − | </td>
| |
| − | </tr>
| |
| − | <tr valign="top">
| |
| − | <td><span style="font-size: 15px; font-weight: 700; color: gold; background-color: black;"> Sensitivity </span></td>
| |
| − | <td>the rate at which the height changes</td>
| |
| − | </tr>
| |
| − | <tr valign="top">
| |
| − | <td colspan=2>
| |
| − | <table bgcolor=#ffffb0>
| |
| − | <tr valign="top">
| |
| − | <td width=90 align="right">'''Range:''' </td>
| |
| − | <td width=296>1% (very slowly) to 100% (very quickly)</td>
| |
| − | </tr>
| |
| − | </table>
| |
| − | </td>
| |
| − | </tr>
| |
| − | <tr valign="top">
| |
| − | <td><span style="font-size: 15px; font-weight: 700; color: gold; background-color: black;"> Grade </span></td>
| |
| − | <td>slope gradient - see '''Notes:''' below</td>
| |
| − | </tr>
| |
| − | <tr valign="top">
| |
| − | <td colspan=2>
| |
| − | <table bgcolor=#ffffb0>
| |
| − | <tr valign="top">
| |
| − | <td width=90 align="right">'''Range:''' </td>
| |
| − | <td width=296>0% = flat ('''"Plateau"''' in '''Classic''') to</td>
| |
| − | </tr>
| |
| − | <tr valign="top">
| |
| − | <td> </td>
| |
| − | <td>±100% = steep (but '''not''' vertical)</td>
| |
| − | </tr>
| |
| − | </table>
| |
| − | </td>
| |
| − | </tr>
| |
| − | <tr valign="top">
| |
| − | <td><span style="font-size: 15px; font-weight: 700; color: gold; background-color: black;"> Angle </span></td>
| |
| − | <td>grade direction (compass degrees)</td>
| |
| − | </tr>
| |
| − | <tr valign="top">
| |
| − | <td colspan=2>
| |
| − | <table bgcolor=#ffffb0>
| |
| − | <tr valign="top">
| |
| − | <td width=90 align="right">'''Range:''' </td>
| |
| − | <td width=296>0° (North) to ±359°<br>
| |
| − | a negative value reverses the grade</td>
| |
| − | </tr>
| |
| − | </table>
| |
| − | </td>
| |
| − | </tr>
| |
| − | </table>
| |
| − | </td>
| |
| − | </tr>
| |
| − | </table>
| |
| − | </td>
| |
| − | </tr>
| |
| − | </table>
| |
| − | <br>
| |
| − | <table bgcolor=#000000 width=1000 cellpadding=2>
| |
| − | <tr valign="top">
| |
| − | <td>
| |
| − | <table bgcolor=#ffffb0 width=996 cellpadding=2>
| |
| − | <tr valign="top">
| |
| − | <td>
| |
| − | <table>
| |
| − | <tr valign="top">
| |
| − | <td>[[image:NotePad.PNG|link=]]</td>
| |
| − | <td><span style="font-size: 17px; font-weight: 700;">Notes:'''</span><br>
| |
| − | ----
| |
| − | </td>
| |
| − | </tr>
| |
| − | </table>
| |
| − | <table>
| |
| − | <tr valign="top">
| |
| − | <td width=10>[[image:DotPoint.JPG|10px|link=]]</td>
| |
| − | <td>Unlike '''Surveyor Classic''', there appears to be no upper limit to the brush <span style="font-size: 15px; font-weight: 700; color: gold; background-color: black;"> Radius </span>. Brushes of hundreds of metres (even kilometres) in size are possible. However, if you are using the brush to set an entire baseboard, or many baseboards, to a specific height then the '''Marquee Tool''' may be a better choice.</td>
| |
| − | </tr>
| |
| − | <tr valign="top">
| |
| − | <td>[[image:DotPoint.JPG|10px|link=]]</td>
| |
| − | <td>The <span style="font-size: 15px; font-weight: 700; color: gold; background-color: black;"> Grade </span> is defined as '''vertical rise''' divided by '''horizontal distance''' converted to a percentage figure. So a grade of 100% (the maximum allowed) would mean a slope formed by the height and distance both being the same value (e.g. a height increase of 50m over a distance of 50m). A vertical slope (a cliff) would have an infinite grade which is currently impossible in Surveyor.</td>
| |
| − | </tr>
| |
| − | </table>
| |
| − | </td>
| |
| − | </tr>
| |
| − | </table>
| |
| − | </td>
| |
| − | </tr>
| |
| − | </table>
| |
| − | <br>
| |
| − |
| |
| − | =='''Ground Texture'''==
| |
| − |
| |
| − | <table width=900 bgcolor=#000000>
| |
| − | <tr valign="top">
| |
| − | <td>
| |
| − | <table width=896 bgcolor=#ffffff>
| |
| − | <tr valign="top">
| |
| − | <td>This brush tool uses the '''Tool Options Palette'''. If this palette is not visible on the screen then refer to [[image:PageLink.PNG|link=]] '''[[#Notes_Palettes|Notes: Palettes]]''' at the top of this document.
| |
| − | </td>
| |
| − | </tr>
| |
| − | </table>
| |
| − | </td>
| |
| − | </tr>
| |
| − | </table>
| |
| − |
| |
| − | When the '''Ground Texture Target''' is selected, the second drop down box will be disabled - there are no brush texture tool choices.<br>
| |
| − |
| |
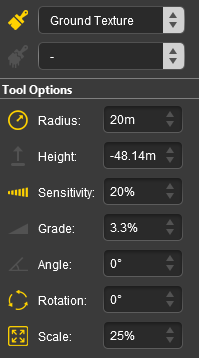
| − | The available brush tool options are shown in the '''Tool Options Palette''' with a <span style="font-size: 15px; font-weight: 700; color: gold; background-color: black;"> Gold </span> coloured icon next to their names. Those options that have their icon greyed out will be ignored, but they can still be edited.<br>
| |
| − |
| |
| − | <table width=700>
| |
| − | <tr valign="top">
| |
| − | <td rowspan=5 width=210>[[image:BrushToolsTexture_S20.png|link=|alt=Texture brush options]]</td>
| |
| − | <td width=390>
| |
| − | <table>
| |
| − | <tr valign="top">
| |
| − | <td width=390>
| |
| − | <table bgcolor=#000000 width=390 cellpadding=2>
| |
| − | <tr valign="top">
| |
| − | <td>
| |
| − | <table bgcolor=#ffffff width=386>
| |
| − | <tr valign="top">
| |
| − | <td width=90><span style="font-size: 15px; font-weight: 700; color: gold; background-color: black;"> Radius </span></td>
| |
| − | <td width=296>the brush radius (metres) - see '''Notes:''' below</td>
| |
| − | </tr>
| |
| − | <tr valign="top">
| |
| − | <td colspan=2>
| |
| − | <table bgcolor=#ffffb0>
| |
| − | <tr valign="top">
| |
| − | <td width=90 align="right">'''Range:''' </td>
| |
| − | <td width=296>5m and above</td>
| |
| − | </tr>
| |
| − | </table>
| |
| − | </td>
| |
| − | </tr>
| |
| − | <tr valign="top">
| |
| − | <td><span style="font-size: 15px; font-weight: 700; color: gold; background-color: black;"> Sensitivity </span></td>
| |
| − | <td>texture transparency</td>
| |
| − | </tr>
| |
| − | <tr valign="top">
| |
| − | <td colspan=2>
| |
| − | <table bgcolor=#ffffb0>
| |
| − | <tr valign="top">
| |
| − | <td width=90 align="right">'''Range:''' </td>
| |
| − | <td width=296>1% = almost transparent to</td>
| |
| − | </tr>
| |
| − | <tr valign="top">
| |
| − | <td> </td>
| |
| − | <td width=296>100% = solid (opaque)</td>
| |
| − | </tr>
| |
| − | </table>
| |
| − | </td>
| |
| − | </tr>
| |
| − | <tr valign="top">
| |
| − | <td><span style="font-size: 15px; font-weight: 700; color: gold; background-color: black;"> Rotation </span></td>
| |
| − | <td>initial rotation angle - see '''Notes:''' below</td>
| |
| − | </tr>
| |
| − | <tr valign="top">
| |
| − | <td colspan=2>
| |
| − | <table bgcolor=#ffffb0>
| |
| − | <tr valign="top">
| |
| − | <td width=90 align="right">'''Range:''' </td>
| |
| − | <td width=296>0° to ±360° (larger angles can be entered)</td>
| |
| − | </tr>
| |
| − | </table>
| |
| − | </td>
| |
| − | </tr>
| |
| − | <tr valign="top">
| |
| − | <td><span style="font-size: 15px; font-weight: 700; color: gold; background-color: black;"> Scale </span></td>
| |
| − | <td>the texture pattern scaling factor</td>
| |
| − | </tr>
| |
| − | <tr valign="top">
| |
| − | <td colspan=2>
| |
| − | <table bgcolor=#ffffb0>
| |
| − | <tr valign="top">
| |
| − | <td width=90 align="right">'''Range:''' </td>
| |
| − | <td width=296>0.01% = smallest to 100% = full size</td>
| |
| − | </tr>
| |
| − | </table>
| |
| − | </td>
| |
| − | </tr>
| |
| − | </table>
| |
| − | </td>
| |
| − | </tr>
| |
| − | </table>
| |
| − | </td>
| |
| − | </tr>
| |
| − | </table>
| |
| − | </td>
| |
| − | </tr>
| |
| − | </table>
| |
| − | <br>
| |
| − | <table bgcolor=#000000 width=900 cellpadding=2>
| |
| − | <tr valign="top">
| |
| − | <td>
| |
| − | <table bgcolor=#ffffb0 width=896 cellpadding=2>
| |
| − | <tr valign="top">
| |
| − | <td>
| |
| − | <table>
| |
| − | <tr valign="top">
| |
| − | <td>[[image:NotePad.PNG|link=]]</td>
| |
| − | <td><span style="font-size: 17px; font-weight: 700;">Notes:'''</span><br>
| |
| − | ----
| |
| − | </td>
| |
| − | </tr>
| |
| − | </table>
| |
| − | <table>
| |
| − | <tr valign="top">
| |
| − | <td width=10>[[image:DotPoint.JPG|10px|link=]]</td>
| |
| − | <td>Unlike '''Surveyor Classic''', there appears to be no upper limit to the brush <span style="font-size: 15px; font-weight: 700; color: gold; background-color: black;"> Radius </span>. Brushes of hundreds of metres (even kilometres) in size are possible. If you are using the brush to paint an entire baseboard, or many baseboards, then the '''Marquee Tool''' will be quicker but it will not give the options of changing the scale and rotation.</td>
| |
| − | </tr>
| |
| − | <tr valign="top">
| |
| − | <td>[[image:DotPoint.JPG|10px|link=]]</td>
| |
| − | <td>The <span style="font-size: 15px; font-weight: 700; color: gold; background-color: black;"> Rotation </span> controls the starting angle for the texture when painting and is often used to avoid pattern repetition. As in '''Surveyor Classic''', holding down the <span style="font-size: 15px; font-weight: 700; color: white; background-color: black;"> [ </span> or <span style="font-size: 15px; font-weight: 700; color: white; background-color: black;"> ] </span> keys while painting will continuously change the rotation angle.
| |
| − | <table>
| |
| − | <tr valign="top">
| |
| − | <td>[[image:Stop.PNG|link=]]</td>
| |
| − | <td>'''Warning:''' Changing the rotation angle during painting is '''not''' recommended for '''PBR Textures''' as this will significantly increase the memory useage (each rotation will load in another copy of the PBR texture).</td>
| |
| − | </tr>
| |
| − | </table>
| |
| − | </td>
| |
| − | </tr>
| |
| − | </table>
| |
| − | </td>
| |
| − | </tr>
| |
| − | </table>
| |
| − | </td>
| |
| − | </tr>
| |
| − | </table>
| |
| − | <br>
| |
| − |
| |
| − | =='''Scrapbook Data'''==
| |
| − |
| |
| − | <table width=900 bgcolor=#000000>
| |
| − | <tr valign="top">
| |
| − | <td>
| |
| − | <table width=896 bgcolor=#ffffff>
| |
| − | <tr valign="top">
| |
| − | <td>This brush tool uses both the '''Tool Options Palette''' and the '''Scrapbook Palette'''. If these palettes are not visible on the screen then refer to [[image:PageLink.PNG|link=]] '''[[#Notes_Palettes|Notes: Palettes]]''' at the top of this document.</td>
| |
| − | </tr>
| |
| − | </table>
| |
| − | </td>
| |
| − | </tr>
| |
| − | </table>
| |
| − | <br>
| |
| − | <table bgcolor=#000000 700 cellpadding=2>
| |
| − | <tr valign="top">
| |
| − | <td>
| |
| − | <table bgcolor=#ffffe0 width=696 cellpadding=2>
| |
| − | <tr valign="top">
| |
| − | <td>[[image:PencilTips.PNG|link=]]</td>
| |
| − | <td>The scrapbook contents can be '''Pasted''' into a route from the '''Context Menu''' of a scenery asset.</td>
| |
| − | </tr>
| |
| − | </table>
| |
| − | </td>
| |
| − | </tr>
| |
| − | </table>
| |
| − | <br>
| |
| − | <span style="font-weight: 700; font-size: 15px; color: white; background-color: black;"> The Scrapbook Brush </span><br>
| |
| − |
| |
| − | When the '''Scrapbook Data Target''' is selected, the second drop down box will give a choice of two '''Scrapbook Data''' tools.<br>
| |
| − |
| |
| − | <table width=400>
| |
| − | <tr valign="top">
| |
| − | <td colspan=2>
| |
| − | The choices are:- </td>
| |
| − | </tr>
| |
| − | <tr valign="top">
| |
| − | <td width=200>
| |
| − | <table>
| |
| − | <tr valign="top">
| |
| − | <td width=10>[[image:BulletTick.png|link=]]</td>
| |
| − | <td>'''Scrapbook Brush'''</td>
| |
| − | </tr>
| |
| − | <tr valign="top">
| |
| − | <td>[[image:BulletTick.png|link=]]</td>
| |
| − | <td>'''Scrapbook Clone'''</td>
| |
| − | </tr>
| |
| − | </table>
| |
| − | </td>
| |
| − | <td width=200>[[image:BrushToolsScrapbookOptions_S20.png|link=]]</td>
| |
| − | </tr>
| |
| − | </table>
| |
| − | <br>
| |
| − | <table width=900 bgcolor=#000000>
| |
| − | <tr valign="top">
| |
| − | <td>
| |
| − | <table width=896 bgcolor=#ffffb0>
| |
| − | <tr valign="top">
| |
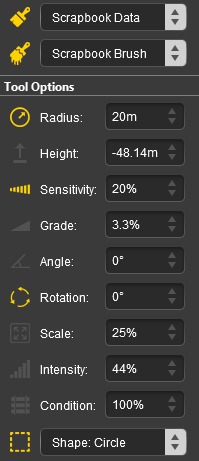
| − | <td><span style="font-size: 15px; font-weight: 700; color: white; background-color: black;"> Scrapbook Brush </span> will '''resize''' the scrapbook contents to fit the selected brush shape and size.
| |
| − | <table>
| |
| − | <tr valign="top">
| |
| − | <td width=10>[[image:DotPoint.JPG|10px|link=]]</td>
| |
| − | <td>If the brush is small then the scrapbook contents will be compressed closer together</td>
| |
| − | </tr>
| |
| − | <tr valign="top">
| |
| − | <td>[[image:DotPoint.JPG|10px|link=]]</td>
| |
| − | <td>If the brush is large then the contents will be spaced further apart</td>
| |
| − | </tr>
| |
| − | <tr valign="top">
| |
| − | <td>[[image:DotPoint.JPG|10px|link=]]</td>
| |
| − | <td>Every '''Left Click''' will paste another complete scrapbook copy</td>
| |
| − | </tr>
| |
| − | <tr valign="top">
| |
| − | <td>[[image:DotPoint.JPG|10px|link=]]</td>
| |
| − | <td>The '''Scale''' control in the '''Tool Options Palette''' is ignored.</td>
| |
| − | </tr>
| |
| − | </table>
| |
| − | </td>
| |
| − | </tr>
| |
| − | <tr valign="top">
| |
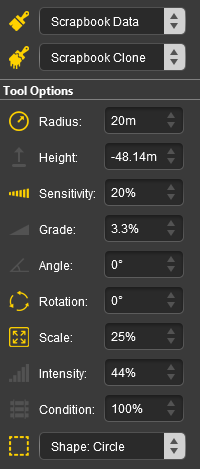
| − | <td><span style="font-size: 15px; font-weight: 700; color: white; background-color: black;"> Scrapbook Clone </span> will paste the scrapbook at its original size - subject to the '''Scale''' setting.
| |
| − | <table>
| |
| − | <tr valign="top">
| |
| − | <td width=10>[[image:DotPoint.JPG|10px|link=]]</td>
| |
| − | <td>If the brush is the same size as the original scrapbook then a single exact copy will be pasted</td>
| |
| − | </tr>
| |
| − | <tr valign="top">
| |
| − | <td>[[image:DotPoint.JPG|10px|link=]]</td>
| |
| − | <td>If the brush is smaller than the original scrapbook size then only the central part of the scrapbook will be revealed and more will be added when the brush is moved around until the "painted" area reaches the size of the original. Further painting will clone or tile the scrapbook contents</td>
| |
| − | </tr>
| |
| − | <tr valign="top">
| |
| − | <td>[[image:DotPoint.JPG|10px|link=]]</td>
| |
| − | <td>If the brush is larger than the original scrapbook size then the contents will be cloned or tiled to fill the set brush size</td>
| |
| − | </tr>
| |
| − | <tr valign="top">
| |
| − | <td>[[image:DotPoint.JPG|10px|link=]]</td>
| |
| − | <td>The '''Scale''' control is not ignored but selecting extremes (e.g. a very large brush and a very small scale value) can cause problems (e.g. system "lockup" while it attempts to scale and clone the scrapbook contents)</td>
| |
| − | </tr>
| |
| − | </table>
| |
| − | </td>
| |
| − | </tr>
| |
| − | </table>
| |
| − | </td>
| |
| − | </tr>
| |
| − | </table>
| |
| − | <br>
| |
| − | <table width=900>
| |
| − | <tr valign="top">
| |
| − | <td colspan=3>The available brush tool options are shown in the '''Tool Options Palette''' with a <span style="font-size: 15px; font-weight: 700; color: gold; background-color: black;"> Gold </span> coloured icon next to their names. Those options that have their icon greyed out will be ignored, but they can still be edited.</td>
| |
| − | </tr>
| |
| − | <tr valign="top" align="center">
| |
| − | <td width=210><span style="font-size: 15px; font-weight: 700; color: white; background-color: black;"> Scrapbook Brush </span><br>[[image:BrushToolsScrapBrush_S20.png|link=|alt=Brush options]]</td>
| |
| − | <td width=210><span style="font-size: 15px; font-weight: 700; color: white; background-color: black;"> Scrapbook Clone </span><br>[[image:BrushToolsScrapClone_S20.png|link=|alt=Clone options]]</td>
| |
| − | <td width=480><br>
| |
| − | <table bgcolor=#000000 width=480 cellpadding=2>
| |
| − | <tr valign="top">
| |
| − | <td>
| |
| − | <table bgcolor=#ffffff width=476 align="left">
| |
| − | <tr valign="top">
| |
| − | <td width=90><span style="font-size: 15px; font-weight: 700; color: gold; background-color: black;"> Radius </span></td>
| |
| − | <td width=386>the brush radius (metres) - see '''Notes:''' below</td>
| |
| − | </tr>
| |
| − | <tr valign="top">
| |
| − | <td colspan=2>
| |
| − | <table bgcolor=#ffffb0>
| |
| − | <tr valign="top">
| |
| − | <td width=90 align="right">'''Range:''' </td>
| |
| − | <td width=386>5m and above</td>
| |
| − | </tr>
| |
| − | </table>
| |
| − | </td>
| |
| − | </tr>
| |
| − | <tr valign="top">
| |
| − | <td><span style="font-size: 15px; font-weight: 700; color: gold; background-color: black;"> Rotation </span></td>
| |
| − | <td>initial rotation angle (degrees) - see '''Notes:''' below</td>
| |
| − | </tr>
| |
| − | <tr valign="top">
| |
| − | <td colspan=2>
| |
| − | <table bgcolor=#ffffb0>
| |
| − | <tr valign="top">
| |
| − | <td width=90 align="right">'''Range:''' </td>
| |
| − | <td width=386>0° to ±360° (larger angles can be entered)</td>
| |
| − | </tr>
| |
| − | </table>
| |
| − | </td>
| |
| − | </tr>
| |
| − | <tr valign="top">
| |
| − | <td><span style="font-size: 15px; font-weight: 700; color: gold; background-color: black;"> Scale </span></td>
| |
| − | <td>the scrapbook scaling factor</td>
| |
| − | </tr>
| |
| − | <tr valign="top">
| |
| − | <td colspan=2>
| |
| − | <table bgcolor=#ffffb0>
| |
| − | <tr valign="top">
| |
| − | <td width=90 align="right">'''Range:''' </td>
| |
| − | <td width=386>0.01% = smallest to 100% = full size</td>
| |
| − | </tr>
| |
| − | </table>
| |
| − | </td>
| |
| − | </tr>
| |
| − | <tr valign="top">
| |
| − | <td><span style="font-size: 15px; font-weight: 700; color: gold; background-color: black;"> Shape </span></td>
| |
| − | <td>brush shape</td>
| |
| − | </tr>
| |
| − | <tr valign="top">
| |
| − | <td colspan=2>
| |
| − | <table bgcolor=#ffffb0>
| |
| − | <tr valign="top">
| |
| − | <td width=90 align="right">'''Options:''' </td>
| |
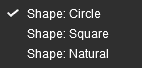
| − | <td width=145>[[image:BrushToolsScrapShapes_S20.png|link=]]</td>
| |
| − | <td>'''Circle''' and '''Square''' will set the brush to the selected shape</td>
| |
| − | </tr>
| |
| − | <tr valign="top">
| |
| − | <td> </td>
| |
| − | <td colspan=2>'''Natural''' will set the brush to the same shape as the '''Marquee''' that created the scrapbook, which may be rectangular. The '''Radius''' setting will set the ''relative'' brush dimensions</td>
| |
| − | </tr>
| |
| − | </table>
| |
| − | </td>
| |
| − | </tr>
| |
| − | </table>
| |
| − | </td>
| |
| − | </tr>
| |
| − | </table>
| |
| − | </td>
| |
| − | </tr>
| |
| − | </table>
| |
| − | <br>
| |
| − | <table bgcolor=#000000 width=700 cellpadding=2>
| |
| − | <tr valign="top">
| |
| − | <td>
| |
| − | <table bgcolor=#ffffb0 width=696 cellpadding=2>
| |
| − | <tr valign="top">
| |
| − | <td>
| |
| − | <table>
| |
| − | <tr valign="top">
| |
| − | <td>[[image:NotePad.PNG|link=]]</td>
| |
| − | <td><span style="font-size: 17px; font-weight: 700;">Notes:'''</span><br>
| |
| − | ----
| |
| − | </td>
| |
| − | </tr>
| |
| − | </table>
| |
| − | <table>
| |
| − | <tr valign="top">
| |
| − | <td width=10>[[image:DotPoint.JPG|10px|link=]]</td>
| |
| − | <td>Unlike '''Surveyor Classic''', there appears to be no upper limit to the brush <span style="font-size: 15px; font-weight: 700; color: gold; background-color: black;"> Radius </span>. Brushes of hundreds of metres (even kilometres) in size are possible.</td>
| |
| − | </tr>
| |
| − | <tr valign="top">
| |
| − | <td>[[image:DotPoint.JPG|10px|link=]]</td>
| |
| − | <td>The <span style="font-size: 15px; font-weight: 700; color: gold; background-color: black;"> Rotation </span> controls the starting angle for pasting the scrapbook objects. In '''Surveyor Classic''' you could only rotate and paste in 90° increments. In '''S20''' you can rotate and paste at any angle.</td>
| |
| − | </tr>
| |
| − | </table>
| |
| − | </td>
| |
| − | </tr>
| |
| − | </table>
| |
| − | </td>
| |
| − | </tr>
| |
| − | </table>
| |
| − | <br>
| |
| − | <table>
| |
| − | <tr valign="top">
| |
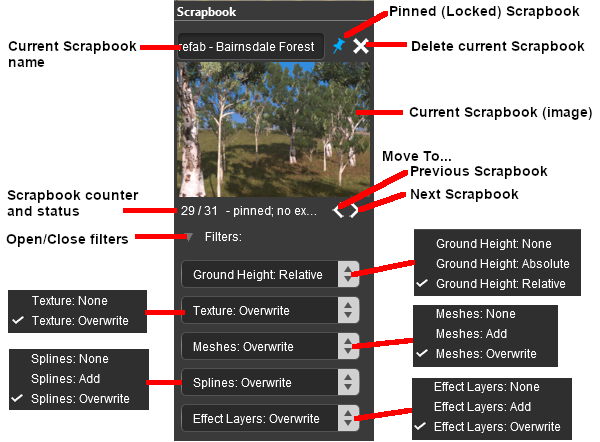
| − | <td><span style="font-weight: 700; font-size: 15px; color: white; background-color: black;"> The Scrapbook Palette </span><br>
| |
| − | [[image:ScrapbookTools_S20.png|link=|alt=Scrapbook palette tools]]</td>
| |
| − | <td><br>
| |
| − | <table bgcolor=#000000 width=500 cellpadding=2>
| |
| − | <tr valign="top">
| |
| − | <td>
| |
| − | <table bgcolor=#ffffff width=496 cellpadding=2>
| |
| − | <tr valign="top">
| |
| − | <td align="center" colspan=3>
| |
| − | <span style="font-size: 15px; font-weight: 700; color: white; background-color: black;"> Scrapbook Pasting Options </span></td>
| |
| − | </tr>
| |
| − | <tr valign="top">
| |
| − | <td bgcolor="yellow" colspan=3><span style="font-weight: 700; font-size: 15px;"> What Features to Paste </span></td>
| |
| − | </tr>
| |
| − | <tr valign="top">
| |
| − | <td>  </td>
| |
| − | <td width=130><span style="font-size: 15px; font-weight: 700; color: white; background-color: black;"> Ground Height </span></td>
| |
| − | <td>terrain height(s) used in the scrapbook</td>
| |
| − | </tr>
| |
| − | <tr valign="top">
| |
| − | <td>  </td>
| |
| − | <td><span style="font-size: 15px; font-weight: 700; color: white; background-color: black;"> Texture </span></td>
| |
| − | <td>textures used in the scrapbook</td>
| |
| − | </tr>
| |
| − | <tr valign="top">
| |
| − | <td>  </td>
| |
| − | <td><span style="font-size: 15px; font-weight: 700; color: white; background-color: black;"> Meshes </span></td>
| |
| − | <td>scenery objects (e.g. trees, buildings) used in the scrapbook</td>
| |
| − | </tr>
| |
| − | <tr valign="top">
| |
| − | <td>  </td>
| |
| − | <td><span style="font-size: 15px; font-weight: 700; color: white; background-color: black;"> Splines </span></td>
| |
| − | <td>spline objects used in the scrapbook</td>
| |
| − | </tr>
| |
| − | <tr valign="top">
| |
| − | <td>  </td>
| |
| − | <td><span style="font-size: 15px; font-weight: 700; color: white; background-color: black;"> Effect Layers </span></td>
| |
| − | <td>effect layers ('''TurfFX''', '''Clutter''') used in the scrapbook</td>
| |
| − | </tr>
| |
| − | <tr valign="top">
| |
| − | <td bgcolor="yellow" colspan=3><span style="font-weight: 700; font-size: 15px;"> How to Paste Each Feature</span></td>
| |
| − | </tr>
| |
| − | <tr valign="top">
| |
| − | <td>  </td>
| |
| − | <td><span style="font-size: 15px; font-weight: 700; color: white; background-color: black;"> None </span></td>
| |
| − | <td>do not paste this feature</td>
| |
| − | </tr>
| |
| − | <tr valign="top">
| |
| − | <td>  </td>
| |
| − | <td><span style="font-size: 15px; font-weight: 700; color: white; background-color: black;"> Add </span></td>
| |
| − | <td>add this feature to those already present</td>
| |
| − | </tr>
| |
| − | <tr valign="top">
| |
| − | <td>  </td>
| |
| − | <td ><span style="font-size: 15px; font-weight: 700; color: white; background-color: black;"> Overwrite </span></td>
| |
| − | <td>use this feature to replace those already present</td>
| |
| − | </tr>
| |
| − | <tr valign="top">
| |
| − | <td colspan=3>For the '''Ground Height''' feature:-</td>
| |
| − | </tr>
| |
| − | <tr valign="top">
| |
| − | <td>  </td>
| |
| − | <td><span style="font-size: 15px; font-weight: 700; color: white; background-color: black;"> Absolute </span></td>
| |
| − | <td>use the ground heights in the scrapbook to replace the existing ground heights</td>
| |
| − | </tr>
| |
| − | <tr valign="top">
| |
| − | <td>  </td>
| |
| − | <td><span style="font-size: 15px; font-weight: 700; color: white; background-color: black;"> Relative </span></td>
| |
| − | <td>'''modify''' the existing ground heights according to those used in the scrapbook (to '''ignore''' the scrapbook ground heights completely select the option '''None''')</td>
| |
| − | </tr>
| |
| − | </table>
| |
| − | </td>
| |
| − | </tr>
| |
| − | </table>
| |
| − | </td>
| |
| − | </tr>
| |
| − | </table>
| |
| − | <br>
| |
| − | =='''Effect Layers'''==
| |
| − |
| |
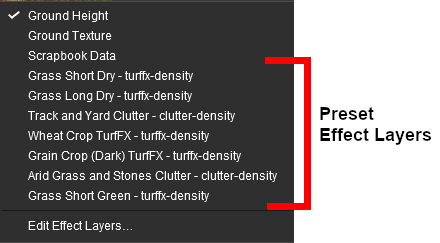
| − | If the route has preset '''Effect Layers''' installed then they will be listed individually as additional '''Targets'''.<br>
| |
| − |
| |
| − | <table width=1000>
| |
| − | <tr valign="top">
| |
| − | <td width=440>[[image:BrushToolsPresets_S20.png|link=]]</td>
| |
| − | <td width=560>To paint with an '''Effect Layer''' simply select one from the list and start painting. The '''Brush Tool Options''' settings <span style="font-weight: 700; font-size: 15px; color: white; background-color: black;"> Radius </span> and <span style="font-weight: 700; font-size: 15px; color: white; background-color: black;"> Sensitivity </span> will control how the '''Effect Layer''' is applied.<br>
| |
| − | <br>
| |
| − | <table bgcolor=#000000 width=560 cellpadding=2>
| |
| − | <tr valign="top">
| |
| − | <td>
| |
| − | <table bgcolor=#ffffb0 width=556 cellpadding=2>
| |
| − | <tr valign="top">
| |
| − | <td>
| |
| − | <table>
| |
| − | <tr valign="top">
| |
| − | <td>[[image:NotePad.PNG|link=]]</td>
| |
| − | <td><span style="font-size: 17px; font-weight: 700;">Notes:'''</span><br>
| |
| − | ----
| |
| − | </td>
| |
| − | </tr>
| |
| − | </table>
| |
| − | <table>
| |
| − | <tr valign="top">
| |
| − | <td width=10>[[image:DotPoint.JPG|10px|link=]]</td>
| |
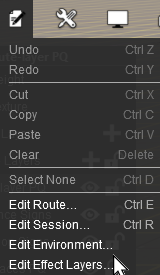
| − | <td>'''Effect Layers''' are created using the '''Edit Effect Layers''' options found in both the '''Edit Menu''' at the top of the screen and also in the '''Brush Tools''' drop down list (see below). They can also be loaded from '''.CDP''' files and installed from the '''Download Station (DLS)'''.</td>
| |
| − | </tr>
| |
| − | <tr valign="top">
| |
| − | <td>[[image:DotPoint.JPG|10px|link=]]</td>
| |
| − | <td>Once installed or created, '''Effect Layers''' can be added to a route as presets using either of the '''Edit Effect Layers''' options.
| |
| − | </td>
| |
| − | </tr>
| |
| − | </table>
| |
| − | </td>
| |
| − | </tr>
| |
| − | </table>
| |
| − | </td>
| |
| − | </tr>
| |
| − | </table>
| |
| − | </td>
| |
| − | </tr>
| |
| − | </table>
| |
| − | <br>
| |
| − | =='''Edit Effect Layers...'''==
| |
| − |
| |
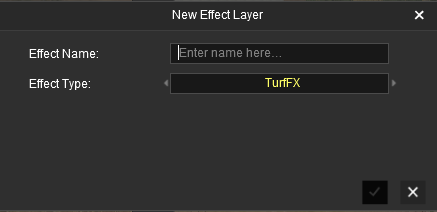
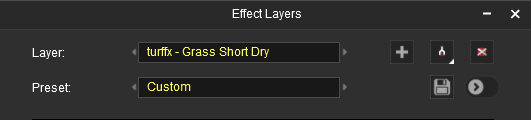
| − | When this '''Target''' is selected, the '''Edit Effect Layers''' options will appear. This is the same as selecting '''Edit Effect Layers ...''' from the '''Trainz Edit Menu'''.
| |
| − |
| |
| − | <table>
| |
| − | <tr valign="top">
| |
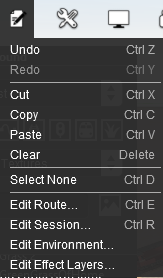
| − | <td>[[image:EditMenuSelectEffectLayers.png|link=|alt=Open effect layers]]</td>
| |
| − | <td>
| |
| − | * If no Effect Layers are present then you can create a new one<br>
| |
| − | [[image:NewEffectLayerEntry.png|link=|alt=New effect layer]]</td>
| |
| − | <td>
| |
| − | * If Effect Layers are present then select one to edit<br>
| |
| − | [[image:EditEffectLayersMenu.png|link=|alt=Edit effect alyers]]</td>
| |
| − | </tr>
| |
| − | </table>
| |
| − | <br>
| |
| − | <table cellpadding=4 bgcolor="Aquamarine">
| |
| − | <tr valign="top">
| |
| − | <td>[[image:LinkWiki.PNG|link=]]</td>
| |
| − | <td>
| |
| − | More information on creating and editing '''Effect Layers''' can be found on the '''Trainz Wiki''' at:-<br>
| |
| − | *'''[[TurfFX_Effect_Layer]]'''
| |
| − | *'''[[Clutter_Effect_Layer]]'''
| |
| − | *'''[[Water_Effect_Layer]]'''
| |
| − | </td>
| |
| − | </tr>
| |
| − | </table>
| |
| − | <br>
| |
| − | <table> <!-- BEGIN Nav Buttons Table -->
| |
| − | <tr valign="top">
| |
| − | <td width=729><span id="stepPlacement"></span> </td>
| |
| − | <td width=46>[[image:BackToTop.png|link=#top|alt=Top|Top]]</td>
| |
| − | <td width=75>[[image:NextUp.png|link=#stepBrush|alt=Next Up|Top]]</td>
| |
| − | <td width=75>[[image:NextDown.png|link=#stepEyedropper|alt=Next Down|Next Down]]</td>
| |
| − | <td width=75>[[image:BackToBottom.png|link=#bottom|alt=Bottom|Bottom]]</td>
| |
| − | </tr>
| |
| − | </table> <!-- END Nav Buttons Table -->
| |
| − |
| |
| − | ='''The Placement Tool'''=
| |
| − |
| |
| − | <table width=1000>
| |
| − | <tr valign="top">
| |
| − | <td width=40>[[image:S20_PlacementToolIcon.png|link=]]</td>
| |
| − | <td width=160>'''Keyboard Shortcut:''' <span style="color: white; background-color: black; font-weight: 700; font-size: 17px;"> E </span></td>
| |
| − | <td width=800><span style="font-weight: 700; font-size: 15px;">The <span style="color: white; background-color: black;"> Placement Tool </span> adds objects to a route</span></td>
| |
| − | </tr>
| |
| − | </table>
| |
| − | <br>
| |
| − |
| |
| − | <table width=900 bgcolor=#000000>
| |
| − | <tr valign="top">
| |
| − | <td>
| |
| − | <table width=896 bgcolor=#ffffff>
| |
| − | <tr valign="top">
| |
| − | <td>This tool uses the '''Assets Palette'''. If this palette is not visible on the screen then refer to [[image:PageLink.PNG|link=]] '''[[#Notes_Palettes|Notes: Palettes]]''' at the top of this document.
| |
| − | </td>
| |
| − | </tr>
| |
| − | </table>
| |
| − | </td>
| |
| − | </tr>
| |
| − | </table>
| |
| − | <br>
| |
| − | When selected, the '''Placement Tool''' has no drop down menu lists.<br>
| |
| − |
| |
| − | <table width=900>
| |
| − | <tr valign="top">
| |
| − | <td width=200>[[image:PlacementTools_S20.png|link=|alt=Placement Tools]]</td>
| |
| − | <td>
| |
| − | <table width=700>
| |
| − | <tr valign="top">
| |
| − | <td>
| |
| − | <table bgcolor=#000000 width=700 cellpadding=2>
| |
| − | <tr valign="top">
| |
| − | <td>
| |
| − | <table bgcolor=#ffffe0 width=696 cellpadding=2>
| |
| − | <tr valign="top">
| |
| − | <td>[[image:PencilTips.PNG|link=]]</td>
| |
| − | <td><span style="font-weight: 700; font-size: 15px;">More Placement Options</span><td>
| |
| − | </tr>
| |
| − | <tr valign="top">
| |
| − | <td colspan=2>After an object has been placed in a route its position and height can be changed by:-</td>
| |
| − | </tr>
| |
| − | <tr valign="top">
| |
| − | <td width=10>[[image:DotPoint.JPG|10px|link=]]</td>
| |
| − | <td>using the [[image:PageLink.PNG|link=]] '''[[#The Free Move Tool|Free Move Tool]]'''</td>
| |
| − | </tr>
| |
| − | <tr valign="top">
| |
| − | <td width=10>[[image:DotPoint.JPG|10px|link=]]</td>
| |
| − | <td>using the [[image:PageLink.PNG|link=]] '''[[#The Fine Adjustment Tool|Fine Adjustment Tool]]'''</td>
| |
| − | </tr>
| |
| − | <tr valign="top">
| |
| − | <td>[[image:DotPoint.JPG|10px|link=]]</td>
| |
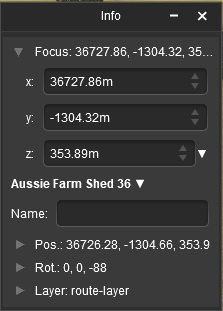
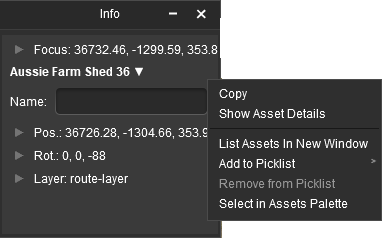
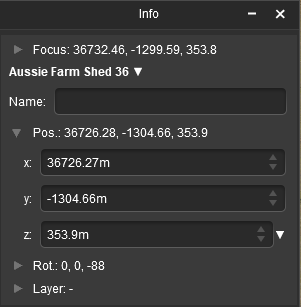
| − | <td>editing its <span style="font-size: 15px; font-weight: 700; color: white; background-color: black;"> X </span> <span style="font-size: 15px; font-weight: 700; color: white; background-color: black;"> Y </span> <span style="font-size: 15px; font-weight: 700; color: white; background-color: black;"> Z </span> values in [[image:PageLink.PNG|link=]] '''[[#The Info Palette|The Info Palette]]'''</td>
| |
| − | </tr>
| |
| − | <tr valign="top">
| |
| − | <td width=10>[[image:DotPoint.JPG|10px|link=]]</td>
| |
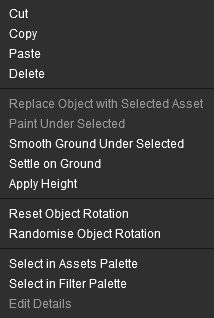
| − | <td>selecting the <span style="font-size: 15px; font-weight: 700; color: white; background-color: black;"> Apply Height </span> option in its '''Context Menu'''</td>
| |
| − | </tr>
| |
| − | </table>
| |
| − | </td>
| |
| − | </tr>
| |
| − | </table>
| |
| − | </td>
| |
| − | </tr>
| |
| − | </table>
| |
| − | </td>
| |
| − | </tr>
| |
| − | </table>
| |
| − | <br>
| |
| − | The first step is to identify and select the particular object that you want to add to the route.<br>
| |
| − |
| |
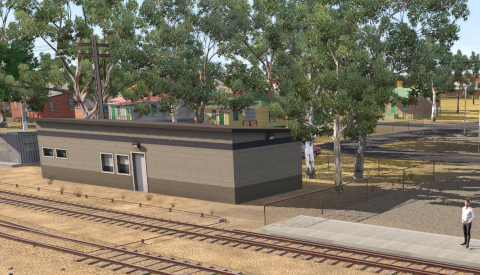
| − | =='''Placing a Scenery Mesh Object'''==
| |
| − |
| |
| − | Individual "non-spline" scenery objects that are not attached to track are often referred to in '''Trainz''' terminology as <span style="font-weight: 700; font-size: 15px; background-color: lightcyan;"> Scenery Mesh Objects </span>.<br>
| |
| − | <br>
| |
| − | [[image:DotPoint1.JPG|link=]] In the '''Asset Palette''' either:-
| |
| − | <table width=1000>
| |
| − | <tr valign="top">
| |
| − | <td>
| |
| − | <table width=250 bgcolor=#0000ff>
| |
| − | <tr valign="top">
| |
| − | <td>
| |
| − | <table width=246 bgcolor=#ffffff>
| |
| − | <tr valign="top">
| |
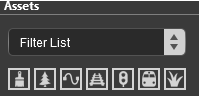
| − | <td width=246 align="center">'''Left''' click on an object selection icon<br>
| |
| − | [[image:FilterSelectIcons.png|link=|alt=Filter Icons]]
| |
| − | <table>
| |
| − | <tr valign="top" align="left">
| |
| − | <td>[[image:GroundTextureFilter_S20.png|link=]]</td>
| |
| − | <td>all ground textures</td>
| |
| − | </tr>
| |
| − | <tr valign="top" align="left">
| |
| − | <td>[[image:SceneryMeshFilter_S20.png|link=]]</td>
| |
| − | <td>all non-spline scenery objects</td>
| |
| − | </tr>
| |
| − | <tr valign="top" align="left">
| |
| − | <td>[[image:ScenerySplineFilter_S20.png|link=]]</td>
| |
| − | <td>all spline scenery objects</td>
| |
| − | </tr>
| |
| − | <tr valign="top" align="left">
| |
| − | <td>[[image:TrackSplineFilter_S20.png|link=]]</td>
| |
| − | <td>all track spline objects</td>
| |
| − | </tr>
| |
| − | <tr valign="top" align="left">
| |
| − | <td>[[image:TrackMeshFilter_S20.png|link=]]</td>
| |
| − | <td>all track objects (signals, etc)</td>
| |
| − | </tr>
| |
| − | <tr valign="top" align="left">
| |
| − | <td>[[image:TrainFilter_S20.png|link=]]</td>
| |
| − | <td>all rolling stock</td>
| |
| − | </tr>
| |
| − | <tr valign="top" align="left">
| |
| − | <td>[[image:PresetFilter_S20.png|link=]]</td>
| |
| − | <td>all '''Effect Layer''' presets</td>
| |
| − | </tr>
| |
| − | </table>
| |
| − | </td>
| |
| − | </tr>
| |
| − | </table>
| |
| − | </td>
| |
| − | </tr>
| |
| − | </table>
| |
| − | </td>
| |
| − | <td width=50 align="center"><span style="font-size: 17px; font-weight: 700;">OR</span></td>
| |
| − | <td>
| |
| − | <table width=250 bgcolor=#0000ff>
| |
| − | <tr valign="top">
| |
| − | <td>
| |
| − | <table width=246 bgcolor=#ffffff>
| |
| − | <tr valign="top">
| |
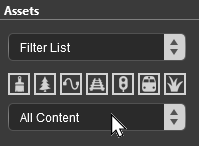
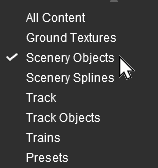
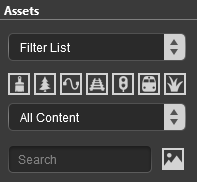
| − | <td align="center">'''Left''' click the '''Content Drop-down Box'''<br>
| |
| − | [[image:FilterSelect.png|link=|alt=Filter List]]<br>
| |
| − | Then select '''Scenery Objects'''<br>
| |
| − | [[image:FilterSelectSceneryObject_S20.png|link=|alt=Scenery Objects]]
| |
| − | </td>
| |
| − | </tr>
| |
| − | </table>
| |
| − | </td>
| |
| − | </tr>
| |
| − | </table>
| |
| − | </td>
| |
| − | <td>
| |
| − | <table bgcolor=#000000 width=400 cellpadding=2>
| |
| − | <tr valign="top">
| |
| − | <td>
| |
| − | <table bgcolor=#ffffe0 width=396 cellpadding=2>
| |
| − | <tr valign="top">
| |
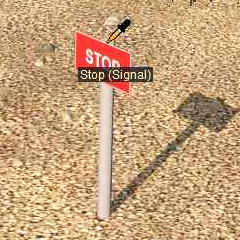
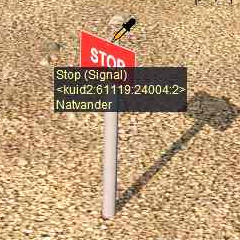
| − | <td>[[image:PencilTips.PNG|link=]] <span style="font-size: 15px; font-weight: 700; color: white; background-color: blue;"> Shortcut </span><br>
| |
| − | If you already have the same object placed in your route then:-
| |
| − | # select the '''Eyedropper Tool''' in the '''Tools Palette''' (or press the <span style="font-weight: 700; font-size: 17px; color: white; background-color: black;"> R </span> key)
| |
| − | # '''Left''' click on the existing object in the route
| |
| − | # then '''Left''' click on the objects name in the Filter List
| |
| − | This will instantly select that particular object in the Filter List and switch control to the '''Placement Tool'''.<br>
| |
| − |
| |
| − | Jump to '''Step [[image:DotPoint5.JPG|link=]]''' below.</td>
| |
| − | </tr>
| |
| − | </table>
| |
| − | </td>
| |
| − | </tr>
| |
| − | </table>
| |
| − | </td>
| |
| − | </tr>
| |
| − | </table>
| |
| − | <br>
| |
| − | <table width=900>
| |
| − | <tr valign="top">
| |
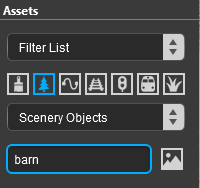
| − | <td width=20>[[image:DotPoint2.JPG|link=]]</td>
| |
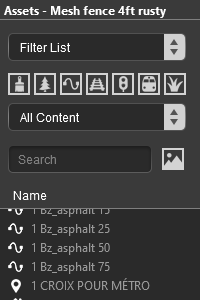
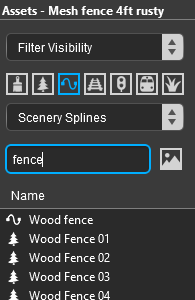
| − | <td>To narrow down the filter list type part of the object name into the '''Search Text Box'''. For example if you have selected '''Scenery Objects''' and want to find "barns", then type "barn" ('''UPPER/lower''' case does not matter).</td>
| |
| − | </tr>
| |
| − | </table>
| |
| − | <br>
| |
| − | <table width=900>
| |
| − | <tr valign="top">
| |
| − | <td width=200>[[image:FilterSelectSearchBarn_S20.png|link=|alt=Text search]]</td>
| |
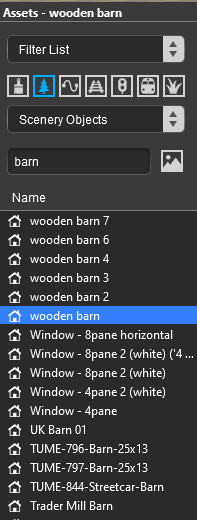
| − | <td><br>[[image:DotPoint3.JPG|link=]] This will list all the '''Scenery Objects''' containing the text "barn" in their name.<br>
| |
| − | <table width=700>
| |
| − | <tr valign="top">
| |
| − | <td width=200>[[image:FilterSelectWoodenBarn_S20.png|link=|alt=Filtered list]]</td>
| |
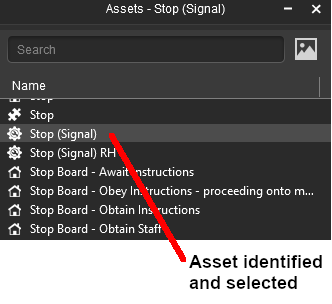
| − | <td valign="middle">[[image:DotPoint4.JPG|link=]] Select ('''Left''' click) on the required item in the list (e.g. "Wooden Barn").<br><br>
| |
| − | When selected the object will be highlighted on a blue background and its name will appear in the '''Assets Palette''' title bar.<br><br>
| |
| − | If you are not sure about an object then '''Dbl-Left''' click on the name to bring up its image and description.<br><br>
| |
| − | <table width=700 bgcolor=#000000>
| |
| − | <tr valign="top">
| |
| − | <td>
| |
| − | <table width=696 bgcolor=#ffffff>
| |
| − | <tr valign="top">
| |
| − | <td>Selecting an object in the '''Assets Palette''' filter list will automatically select the '''Placement Tool''' so the next '''Left''' click in the route will place that object in the route.</td>
| |
| − | </tr>
| |
| − | </table>
| |
| − | </td>
| |
| − | </tr>
| |
| − | </table>
| |
| − | </td>
| |
| − | </tr>
| |
| − | </table>
| |
| − | </td>
| |
| − | </tr>
| |
| − | </table>
| |
| − | <br>
| |
| − | <table width=1000>
| |
| − | <tr valign="top">
| |
| − | <td width=500>
| |
| − | <table width=500>
| |
| − | <tr valign="top">
| |
| − | <td>[[image:DotPoint5.JPG|link=]] The final step is to place the selected object into the route.</td>
| |
| − | </tr>
| |
| − | <tr valign="top">
| |
| − | <td>
| |
| − | # If the '''Placement Tool''' is not selected then '''Left''' click it or press the <span style="color: white; background-color: black; font-weight: 700; font-size: 15px;"> E </span> key
| |
| − | # '''Click''' on the spot where you want to place the object</td>
| |
| − | </tr>
| |
| − | </table>
| |
| − | </td>
| |
| − | <td width=500>
| |
| − | <table bgcolor=#000000 width=500 cellpadding=2>
| |
| − | <tr valign="top">
| |
| − | <td>
| |
| − | <table bgcolor=#ffffb0 width=496 cellpadding=2>
| |
| − | <tr valign="top">
| |
| − | <td>
| |
| − | <table>
| |
| − | <tr valign="top">
| |
| − | <td>[[image:NotePad.PNG|link=]]</td>
| |
| − | <td><span style="font-size: 17px; font-weight: 700;">Notes:'''</span><br>
| |
| − | ----
| |
| − | </td>
| |
| − | </tr>
| |
| − | </table>
| |
| − | <table>
| |
| − | <tr valign="top">
| |
| − | <td width=10>[[image:DotPoint.JPG|10px|link=]]</td>
| |
| − | <td>the '''Placement Tool''' will remain on and active until another tool has been selected. So everytime you click another copy of the object (or another object if you change your selection) will be added to the route</td>
| |
| − | </tr>
| |
| − | <tr valign="top">
| |
| − | <td>[[image:DotPoint.JPG|10px|link=]]</td>
| |
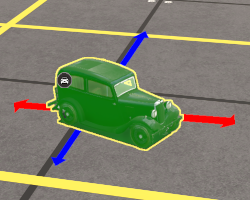
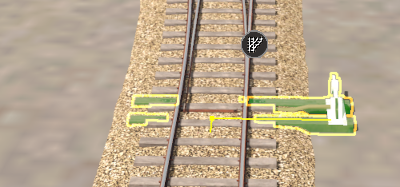
| − | <td>the last object placed will be highlighted (covered in "green/yellow"). This will be the selected object if you switch control to the '''Free Move Tool''' or the '''Fine Adjustment Tool'''</td>
| |
| − | </tr>
| |
| − | </table>
| |
| − | </td>
| |
| − | </tr>
| |
| − | </table>
| |
| − | </td>
| |
| − | </tr>
| |
| − | </table>
| |
| − | </td>
| |
| − | </tr>
| |
| − | </table>
| |
| − | <br>
| |
| − |
| |
| − | =='''Placing a Scenery or Track Spline'''==
| |
| − |
| |
| − | Start the process of laying a track or spline by identifying and selecting the spline as described in steps [[image:DotPoint1.JPG|link=]] to [[image:DotPoint5.JPG|link=]] above. Then continue by following the steps listed below.<br>
| |
| − |
| |
| − | <table width=900>
| |
| − | <tr valign="top">
| |
| − | <td rowspan=2 width=420>[[image:PlacementTrack1_S20.png|link=]]</td>
| |
| − | <td width=20>[[image:DotPoint6.JPG|link=]]</td>
| |
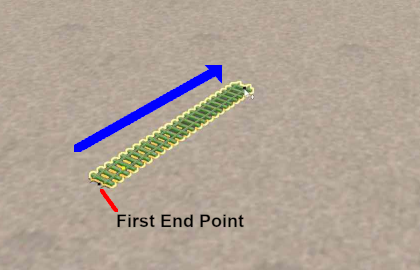
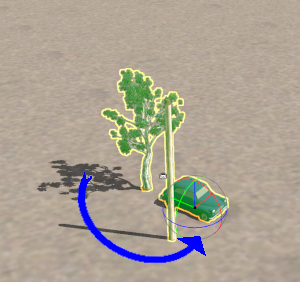
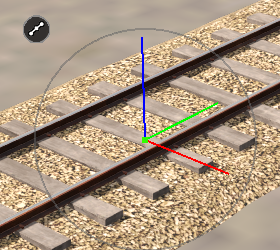
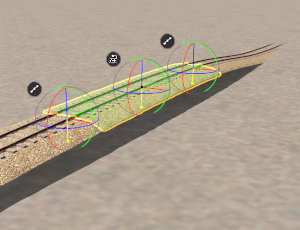
| − | <td>'''"Click on the spot"''' as shown in '''Step''' [[image:DotPoint5.JPG|link=]] above to place the start or first '''endpoint''' of the spline.</td>
| |
| − | </tr>
| |
| − | <tr valign="top">
| |
| − | <td width=20>[[image:DotPoint7.JPG|link=]]</td>
| |
| − | <td>Move the mouse in the direction you want to lay the spline or track. The spline will follow the mouse wherever you move it.</td>
| |
| − | </tr>
| |
| − | <tr valign="top">
| |
| − | <td>[[image:PlacementTrack2_S20.png|link=]]</td>
| |
| − | <td width=20>[[image:DotPoint8.JPG|link=]]</td>
| |
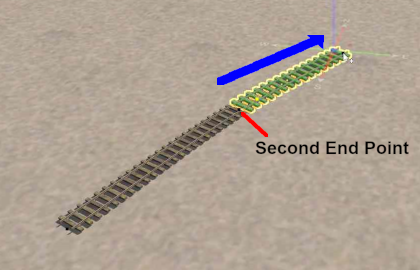
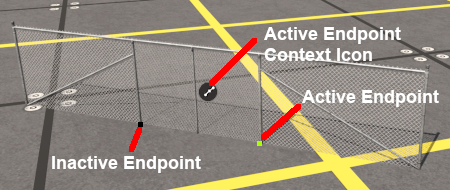
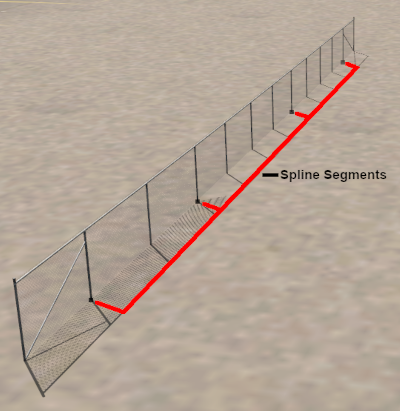
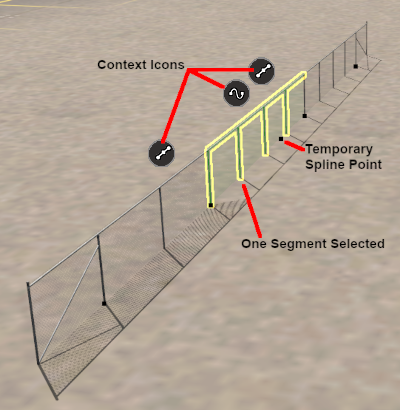
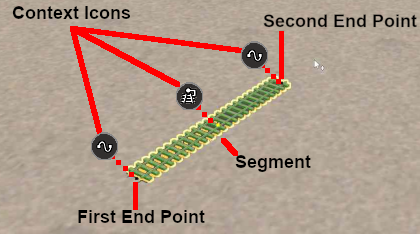
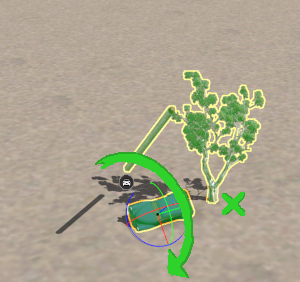
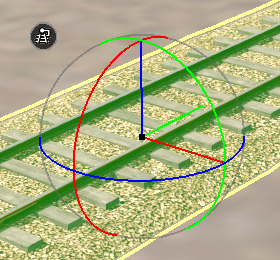
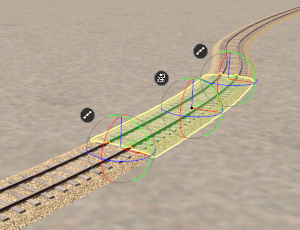
| − | <td>When you have the pointer in the final position for the first spline segment, '''Left''' click the mouse. This will anchor the second spline endpoint. The spline between the two endpoints is the first spline segment.<br>
| |
| − | <br>
| |
| − | The spline segment will now have three '''Context Icons''', one for each '''endpoint''' and one for the spline segment.</td>
| |
| − | </tr>
| |
| − | <tr valign="top">
| |
| − | <td>[[image:PlacementTrack3_S20.png|link=]]</td>
| |
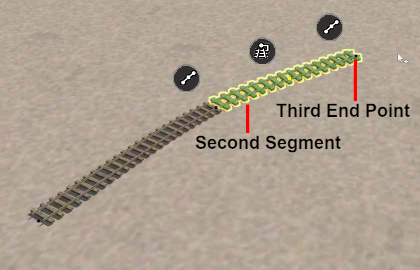
| − | <td width=20>[[image:DotPoint9.JPG|link=]]</td>
| |
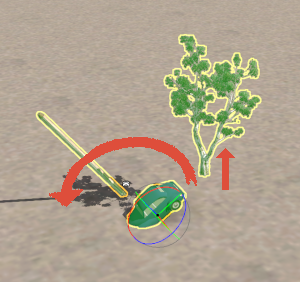
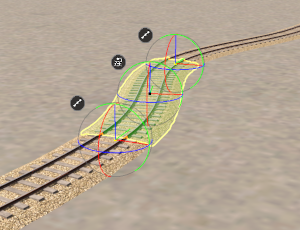
| − | <td>'''Left''' click on the new endpoint and move the mouse in the direction you want to continue laying the spline or track. The spline will follow the mouse wherever you move it.</td>
| |
| − | </tr>
| |
| − | <tr valign="top">
| |
| − | <td rowspan=2>[[image:PlacementTrack4_S20.png|link=]]</td>
| |
| − | <td width=20>[[image:DotPoint10.JPG|link=]]</td>
| |
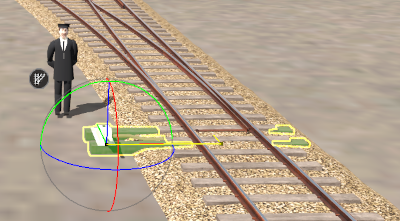
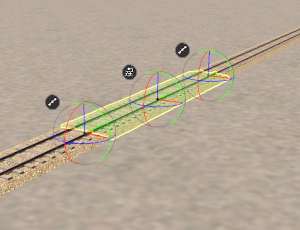
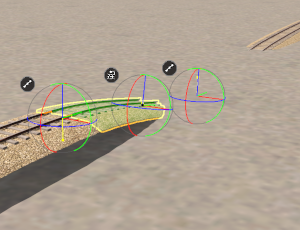
| − | <td>When you have the pointer in the final position for the second spline segment, '''Left''' click the mouse. This will anchor the third spline endpoint and produce new '''Context Icons''' for the second segment.</td>
| |
| − | </tr>
| |
| − | <tr valign="top">
| |
| − | <td width=20>[[image:DotPoint11.JPG|link=]]</td>
| |
| − | <td>Repeat '''Steps''' [[image:DotPoint9.JPG|link=]] and [[image:DotPoint10.JPG|link=]] above to continue laying the spline.</td>
| |
| − | </tr>
| |
| − | </table>
| |
| − | <br>
| |
| − | <span style="font-weight: 700; font-size: 17px; color: white; background-color: blue;"> Spline Segment Heights </span><br>
| |
| − |
| |
| − | When you start adding a spline to a route it will always be placed at the height of the terrain regardless of the '''Tool Options''' <span style="font-weight: 700; font-size: 15px; color: white; background-color: black;"> Height </span> setting.<br>
| |
| − |
| |
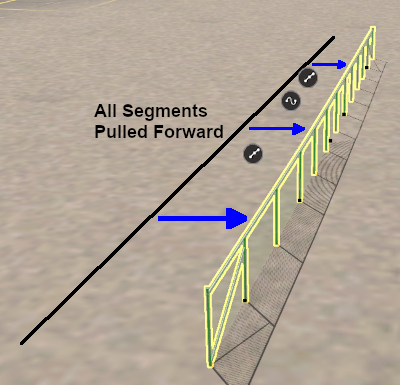
| − | However, you can set the height of the last segment that was added and this will set the height of all the segments added from that point.
| |
| − | <table bgcolor=#000000 width=600 cellpadding=2>
| |
| − | <tr valign="top">
| |
| − | <td>
| |
| − | <table bgcolor=#ffffff width=596 cellpadding=2>
| |
| − | <tr valign="top">
| |
| − | <td width=20>[[image:DotPoint1.JPG|link=]]</td>
| |
| − | <td>Lay the first spline segment which will be added at the terrain ground height</td>
| |
| − | </tr>
| |
| − | <tr valign="top">
| |
| − | <td width=20>[[image:DotPoint2.JPG|link=]]</td>
| |
| − | <td>Enter a value in the '''Tool Options''' <span style="font-weight: 700; font-size: 15px; color: white; background-color: black;"> Height </span> and press the <span style="font-weight: 700; font-size: 15px; color: white; background-color: black;"> Enter </span> key</td>
| |
| − | </tr>
| |
| − | <tr align="top">
| |
| − | <td colspan=2>The endpoints of the current spline segment will immediately be adjusted to the new height setting</td>
| |
| − | </tr>
| |
| − | <tr valign="top">
| |
| − | <td width=20>[[image:DotPoint3.JPG|link=]]</td>
| |
| − | <td>Continue laying spline segments. Each new segment will be added at the new height
| |
| − | </td>
| |
| − | </tr>
| |
| − | </table>
| |
| − | </td>
| |
| − | </tr>
| |
| − | </table>
| |
| − | <br>
| |
| − |
| |
| − | =='''Placement Tool Options'''==
| |
| − |
| |
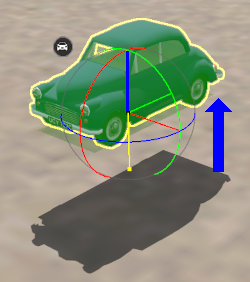
| − | The '''Tool Options Palette''' <span style="font-weight: 700; font-size: 15px; color: white; background-color: black;"> Height </span> setting for '''Scenery Mesh Objects''', '''Scenery Splines''' and '''Track Splines''' when using the '''Placement Tool''' does not show a gold coloured icon which indicates an "active" control setting but the setting '''<u>is</u>''' active.<br>
| |
| − | <br>
| |
| − | <span style="font-weight: 700; font-size: 17px; color: white; background-color: blue;"> Mesh Object Tool Options </span><br>
| |
| − | <br>
| |
| − | <table width=1000>
| |
| − | <tr valign="top">
| |
| − | <td width=200>[[image:PlacementMeshHeight0_S20.png|link=]]</td>
| |
| − | <td width=200>[[image:PlacementMeshHeight3_S20.png|link=]]</td>
| |
| − | <td>
| |
| − | <table width=600>
| |
| − | <tr valign="top">
| |
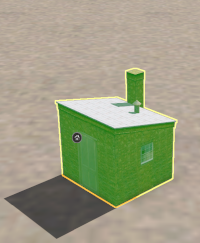
| − | <td width=20>[[image:DotPoint1.JPG|link=]]</td>
| |
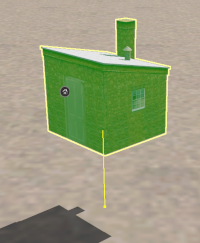
| − | <td width=580>After placing the mesh object in the route, enter a value in the '''Tool Options Palette''' <span style="font-weight: 700; font-size: 15px; color: white; background-color: black;"> Height </span> setting</td>
| |
| − | </tr>
| |
| − | <tr valign="top">
| |
| − | <td>[[image:DotPoint2.JPG|link=]]</td>
| |
| − | <td>Press the <span style="font-weight: 700; font-size: 15px; color: white; background-color: black;"> Enter </span> key</td>
| |
| − | </tr>
| |
| − | <tr valign="top">
| |
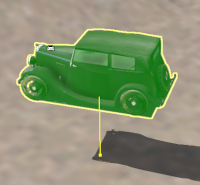
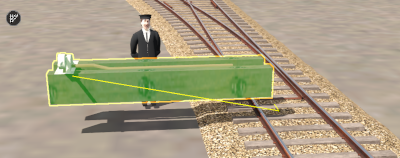
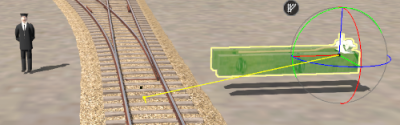
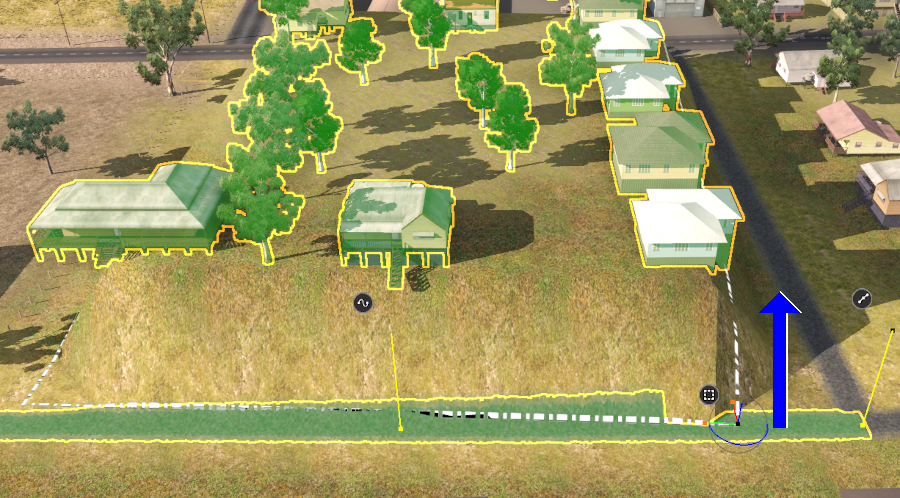
| − | <td colspan=2><br>The object will be moved to the set height above (or below) the terrain. The vertical yellow line shown in the second image on the left indicates the height change. The small yellow dot at the base of the line is the terrain '''attachment point''' for the object.<br>
| |
| − | <br>
| |
| − | <table bgcolor=#000000 width=600 cellpadding=2>
| |
| − | <tr valign="top">
| |
| − | <td>
| |
| − | <table bgcolor=#ffffe0 width=596 cellpadding=2>
| |
| − | <tr valign="top">
| |
| − | <td>[[image:PencilTips.PNG|link=]]</td>
| |
| − | <td>An existing height that is already in the '''Tool Options Palette''' can also be applied '''<u>after the object has been placed</u>''' using the <span style="font-size: 15px; font-weight: 700; color: white; background-color: black;"> Apply Height </span> option in its '''Context Menu'''.</td>
| |
| − | </tr>
| |
| − | </table>
| |
| − | </td>
| |
| − | </tr>
| |
| − | </table>
| |
| − | </td>
| |
| − | </tr>
| |
| − | </table>
| |
| − | </td>
| |
| − | </tr>
| |
| − | </table>
| |
| − | <br>
| |
| − |
| |
| − | <span style="font-weight: 700; font-size: 17px; color: white; background-color: blue;"> Spline Tool Options </span><br>
| |
| − | <br>
| |
| − | Splines have two '''Placement Tool''' settings in the '''Tool Options Palette'''.
| |
| − |
| |
| − | <table width=900>
| |
| − | <tr valign="top">
| |
| − | <td width=200>[[image:PlacementSplineTools_S20.png|link=]]</td>
| |
| − | <td>
| |
| − | <table bgcolor=#000000 width=700 cellpadding=2>
| |
| − | <tr valign="top">
| |
| − | <td>
| |
| − | <table bgcolor=#ffffff width=696 cellpadding=2>
| |
| − | <tr valign="top">
| |
| − | <td width=90><span style="font-size: 15px; font-weight: 700; color: gold; background-color: black;"> Grade </span></td>
| |
| − | <td>spline gradient (see '''Notes:''' below). The finishing '''endpoint''' of each spline segment will be set higher (for a '''positive''' grade) or lower (for a '''negative''' grade) than the starting '''endpoint'''</td>
| |
| − | </tr>
| |
| − | <tr valign="top">
| |
| − | <td colspan=2>
| |
| − | <table bgcolor=#ffffb0>
| |
| − | <tr valign="top">
| |
| − | <td width=90 align="right">'''Range:''' </td>
| |
| − | <td width=696>0% (flat) to ±100% (steep but '''not''' vertical)</td>
| |
| − | </tr>
| |
| − | </table>
| |
| − | </td>
| |
| − | </tr>
| |
| − | <tr valign="top">
| |
| − | <td width=90><span style="font-size: 15px; font-weight: 700; color: gold; background-color: black;"> Condition </span></td>
| |
| − | <td>this applies to '''Track Spline''' objects and sets the track '''condition''' (or "ride comfort") for each segment</td>
| |
| − | </tr>
| |
| − | <tr valign="top">
| |
| − | <td colspan=2>
| |
| − | <table bgcolor=#ffffb0>
| |
| − | <tr valign="top">
| |
| − | <td width=90 align="right">'''Range:''' </td>
| |
| − | <td width=696>1% (terrible track condition) to 100% (perfect track condition)<br>
| |
| − | </td>
| |
| − | </tr>
| |
| − | </table>
| |
| − | <table bgcolor=#ffffe0 width=692 cellpadding=2>
| |
| − | <tr valign="top">
| |
| − | <td>[[image:PencilTips.PNG|link=]]</td>
| |
| − | <td>The '''Track Condition''' can also be set for each track segment in its '''Context Menu''' <span style="font-size: 15px; font-weight: 700; color: white; background-color: black;"> Edit Properties </span> option</td>
| |
| − | </tr>
| |
| − | </table>
| |
| − | </td>
| |
| − | </tr>
| |
| − | </table>
| |
| − | </td>
| |
| − | </tr>
| |
| − | </table>
| |
| − | <br>
| |
| − | <table bgcolor=#000000 width=700 cellpadding=2>
| |
| − | <tr valign="top">
| |
| − | <td>
| |
| − | <table bgcolor=#ffffe0 width=696 cellpadding=2>
| |
| − | <tr valign="top">
| |
| − | <td>[[image:PencilTips.PNG|link=]]</td>
| |
| − | <td>The <span style="font-size: 15px; font-weight: 700; color: white; background-color: black;"> Height </span> setting in the '''Tool Options Palette''' can also be applied to a '''selected''' spline '''endpoint''' or '''segment'''. If the '''endpoint''' or '''segment''' is at the end of the spline then the following new endpoints and segments will be added at the new height.
| |
| − | <table>
| |
| − | <tr valign="top">
| |
| − | <td colspan=2>The height change can be made by:-</td>
| |
| − | </tr>
| |
| − | <tr valign="top">
| |
| − | <td>[[image:Ablue.png|link=]]</td>
| |
| − | <td>directly entering a value in the '''Tool Options''' <span style="font-size: 15px; font-weight: 700; color: white; background-color: black;"> Height </span> setting, <span style="font-size: 15px; font-weight: 700;">OR</span></td>
| |
| − | </tr>
| |
| − | <tr valign="top">
| |
| − | <td>[[image:Bblue.png|link=]]</td>
| |
| − | <td>selecting the <span style="font-size: 15px; font-weight: 700; color: white; background-color: black;"> Apply Height </span> option from the objects '''Context Menu'''</td>
| |
| − | </tr>
| |
| − | </table>
| |
| − | </td>
| |
| − | </tr>
| |
| − | </table>
| |
| − | </td>
| |
| − | </tr>
| |
| − | </table>
| |
| − | </td>
| |
| − | </tr>
| |
| − | </table>
| |
| − | <br>
| |
| − | <table bgcolor=#000000 width=900 cellpadding=2>
| |
| − | <tr valign="top">
| |
| − | <td>
| |
| − | <table bgcolor=#ffffb0 width=896 cellpadding=2>
| |
| − | <tr valign="top">
| |
| − | <td>[[image:NotePad.PNG|link=]]</td>
| |
| − | <td><span style="font-size: 17px; font-weight: 700;">Notes:'''</span><br>
| |
| − | ----
| |
| − | </td>
| |
| − | </tr>
| |
| − | <tr valign="top">
| |
| − | <td> </td>
| |
| − | <td>The <span style="font-size: 15px; font-weight: 700; color: gold; background-color: black;"> Grade </span> is defined as '''vertical rise''' divided by '''horizontal distance''' converted to a percentage figure. So a grade of 100% (the maximum allowed) would mean a gradient formed by both measurements having the same value (e.g. a rise of 50m over a distance of 50m). A vertical grade (such as up a cliff face) would have an infinite grade which is currently impossible in Surveyor.</td>
| |
| − | </tr>
| |
| − | </table>
| |
| − | </td>
| |
| − | </tr>
| |
| − | </table>
| |
| − | <br>
| |
| − |
| |
| − | =='''Deleting Placed Objects'''==
| |
| − | <br>
| |
| − | To delete objects either:-
| |
| − | <table width=900>
| |
| − | <tr valign="top">
| |
| − | <td>
| |
| − | <table width=420 bgcolor=#0000ff>
| |
| − | <tr valign="top">
| |
| − | <td>
| |
| − | <table width=416 bgcolor=#ffffff>
| |
| − | <tr valign="top">
| |
| − | <td>[[image:DotPoint1.JPG|link=]]</td>
| |
| − | <td>Select the object or a group of objects using either the:-
| |
| − | <table>
| |
| − | <tr valign="top">
| |
| − | <td>[[image:Ablue.png|link=]]</td>
| |
| − | <td>'''Free Move Tool''' (or press <span style="font-weight: 700; font-size: 17px; color: white; background-color: black;"> S </span>) <span style="font-size: 15px; font-weight: 700;">OR</span></td>
| |
| − | </tr>
| |
| − | <tr valign="top">
| |
| − | <td>[[image:Bblue.png|link=]]</td>
| |
| − | <td>'''Fine Adjustment Tool''' (or press <span style="font-weight: 700; font-size: 17px; color: white; background-color: black;"> D </span>)</td>
| |
| − | </tr>
| |
| − | <tr valign="top">
| |
| − | <td> </td>
| |
| − | <td>Multiple objects can be selected by holding down the <span style="font-weight: 700; font-size: 17px; color: white; background-color: black;"> Shift </span> key when using these tools</td>
| |
| − | </tr>
| |
| − | <tr valign="top">
| |
| − | <td colspan=2>'''Then ..'''</td>
| |
| − | </tr>
| |
| − | </table>
| |
| − | </td>
| |
| − | </tr>
| |
| − | <tr valign="top">
| |
| − | <td>[[image:DotPoint2.JPG|link=]]</td>
| |
| − | <td>Either:-
| |
| − | <table>
| |
| − | <tr valign="top">
| |
| − | <td>[[image:Ablue.png|link=]]</td>
| |
| − | <td>Press the <span style="font-weight: 700; font-size: 17px; color: white; background-color: black;"> Delete </span> key, <span style="font-size: 15px; font-weight: 700;">OR</span></td>
| |
| − | </tr>
| |
| − | <tr valign="top">
| |
| − | <td>[[image:Bblue.png|link=]]</td>
| |
| − | <td>Open the '''Context Menu''' of the object (or object group) and select the <span style="font-weight: 700; font-size: 17px; color: white; background-color: black;"> Delete </span> option
| |
| − | </td>
| |
| − | </tr>
| |
| − | </table>
| |
| − | </td>
| |
| − | </tr>
| |
| − | </table>
| |
| − | </td>
| |
| − | </tr>
| |
| − | </table>
| |
| − | </td>
| |
| − | <td width=50 align="center"><span style="font-size: 17px; font-weight: 700;">OR</span></td>
| |
| − | <td>
| |
| − | <table width=420 bgcolor=#0000ff>
| |
| − | <tr valign="top">
| |
| − | <td>
| |
| − | <table width=416 bgcolor=#ffffff>
| |
| − | <tr valign="top">
| |
| − | <td>
| |
| − | <table>
| |
| − | <tr valign="top">
| |
| − | <td width=20>[[image:DotPoint1.JPG|link=]]</td>
| |
| − | <td>Use the '''Marquee Tool''' to select the object or a group of objects, then either:-
| |
| − | <table>
| |
| − | <tr valign="top">
| |
| − | <td>[[image:Ablue.png|link=]]</td>
| |
| − | <td>Press the <span style="font-weight: 700; font-size: 17px; color: white; background-color: black;"> Delete </span> key <span style="font-size: 15px; font-weight: 700;">OR</span></td>
| |
| − | </tr>
| |
| − | <tr valign="top">
| |
| − | <td>[[image:Bblue.png|link=]]</td>
| |
| − | <td>Open the '''Marquee''' '''Context Menu''' and select the <span style="font-weight: 700; font-size: 17px; color: white; background-color: black;"> Delete </span> option</td>
| |
| − | </tr>
| |
| − | </table>
| |
| − | </tr>
| |
| − | </table>
| |
| − | </td>
| |
| − | </tr>
| |
| − | </table>
| |
| − | </td>
| |
| − | </tr>
| |
| − | </table>
| |
| − | </td>
| |
| − | </tr>
| |
| − | </table>
| |
| − |
| |
| − | <br>
| |
| − | <table> <!-- BEGIN Nav Buttons Table -->
| |
| − | <tr valign="top">
| |
| − | <td width=729><span id="stepEyedropper"></span> </td>
| |
| − | <td width=46>[[image:BackToTop.png|link=#top|alt=Top|Top]]</td>
| |
| − | <td width=75>[[image:NextUp.png|link=#stepPlacement|alt=Next Up|Top]]</td>
| |
| − | <td width=75>[[image:NextDown.png|link=#stepFreeMove|alt=Next Down|Next Down]]</td>
| |
| − | <td width=75>[[image:BackToBottom.png|link=#bottom|alt=Bottom|Bottom]]</td>
| |
| − | </tr>
| |
| − | </table> <!-- END Nav Buttons Table -->
| |
| − |
| |
| − | ='''The Eyedropper Tool'''=
| |
| − |
| |
| − | <table width=1000>
| |
| − | <tr valign="top">
| |
| − | <td width=40>[[image:S20_DropperToolIcon.png|link=]]</td>
| |
| − | <td width=160>'''Keyboard Shortcut:''' <span style="color: white; background-color: black; font-weight: 700; font-size: 17px;"> R </span></td>
| |
| − | <td width=800><span style="font-weight: 700; font-size: 15px;">The <span style="color: white; background-color: black;"> Eyedropper Tool </span> identifies objects in a route</span></td>
| |
| − | </tr>
| |
| − | </table>
| |
| − | <br>
| |
| − |
| |
| − | <table width=900 bgcolor=#000000>
| |
| − | <tr valign="top">
| |
| − | <td>
| |
| − | <table width=896 bgcolor=#ffffff>
| |
| − | <tr valign="top">
| |
| − | <td>This tool uses the '''Assets Palette'''. If this palette is not visible on the screen then refer to [[image:PageLink.PNG|link=]] '''[[#Notes_Palettes|Notes: Palettes]]''' at the top of this document.
| |
| − | </td>
| |
| − | </tr>
| |
| − | </table>
| |
| − | </td>
| |
| − | </tr>
| |
| − | </table>
| |
| − | <br>
| |
| − | When selected, the '''Eyedropper Tool''' has no drop down menu lists.<br>
| |
| − |
| |
| − | [[image:EyedropperTools_S20.png|link=|alt=Eyedropper Tools]]<br>
| |
| − |
| |
| − | =='''Quick Steps'''==
| |
| − |
| |
| − | [[image:DotPoint1.JPG|link=]] With the '''Eyedropper Tool''' selected, move the mouse pointer (which will now be an eyedropper symbol) onto any object in view.<br>
| |
| − |
| |
| − | <table width=1000>
| |
| − | <tr valign="top">
| |
| − | <td>[[image:EyedropperToolSelect1_S20.png|link=|alt=Eyedropper]]<br><br>
| |
| − | [[image:EyedropperToolSelect2_S20.png|link=|alt=Eyedropper]]</td>
| |
| − | <td rowspan=2>
| |
| − | <table bgcolor=#000000 width=760 cellpadding=2>
| |
| − | <tr valign="top">
| |
| − | <td>
| |
| − | <table bgcolor=#ffffb0 width=756 cellpadding=2>
| |
| − | <tr valign="top">
| |
| − | <td>
| |
| − | <table>
| |
| − | <tr valign="top">
| |
| − | <td>[[image:NotePad.PNG|link=]]</td>
| |
| − | <td><span style="font-size: 17px; font-weight: 700;">Notes:'''</span><br>
| |
| − | ----
| |
| − | </td>
| |
| − | </tr>
| |
| − | </table>
| |
| − | <table>
| |
| − | <tr valign="top">
| |
| − | <td width=10>[[image:DotPoint.JPG|10px|link=]]</td>
| |
| − | <td>The object will be identified by its name appearing in a <span style="font-weight: 700; font-size: 15px; color: white; background-color: black;"> ToolTip </span> below the mouse pointer (image shown left).</td>
| |
| − | </tr>
| |
| − | <tr valign="top">
| |
| − | <td>[[image:DotPoint.JPG|10px|link=]]</td>
| |
| − | <td>Leave the mouse pointer in place for a few seconds and additional information about the object will be shown, its '''<kuid>''' code, '''Author''' and (if available) some of its description (image shown below left).
| |
| − | </td>
| |
| − | </tr>
| |
| − | </table>
| |
| − | </td>
| |
| − | </tr>
| |
| − | </table>
| |
| − | </td>
| |
| − | </tr>
| |
| − | </table>
| |
| − | <br>
| |
| − | [[image:DotPoint2.JPG|link=]] '''Left''' click on the object to identify it in the '''Filter List'''.<br>
| |
| − | <table>
| |
| − | <tr valign="top">
| |
| − | <td>[[image:EyedropperToolAssetSelected_S20.png|link=|alt=Asset filter set by the Eyedropper in S20]]</td>
| |
| − | <td>
| |
| − | <table bgcolor=#000000 width=360 cellpadding=2>
| |
| − | <tr valign="top">
| |
| − | <td>
| |
| − | <table bgcolor=#ffffb0 width=356 cellpadding=2>
| |
| − | <tr valign="top">
| |
| − | <td>
| |
| − | <table>
| |
| − | <tr valign="top">
| |
| − | <td>[[image:NotePad.PNG|link=]]</td>
| |
| − | <td><span style="font-size: 17px; font-weight: 700;">Notes:'''</span><br>
| |
| − | ----
| |
| − | </td>
| |
| − | </tr>
| |
| − | </table>
| |
| − | <table>
| |
| − | <tr valign="top">
| |
| − | <td width=10>[[image:DotPoint.JPG|10px|link=]]</td>
| |
| − | <td>The type of object and its name will be automatically shown (highligted in grey) in the '''Asset Palette''' filters as shown in the image left.</td>
| |
| − | </tr>
| |
| − | <tr valign="top">
| |
| − | <td>[[image:DotPoint.JPG|10px|link=]]</td>
| |
| − | <td>'''Left''' click on the object name in the '''Asset Filter List''' to select it (highlight in blue) and switch control to the '''Placement Tool'''<br>
| |
| − | [[image:AssetFilterNameSelected_S20.png|link=]]</td>
| |
| − | </tr>
| |
| − | </table>
| |
| − | </td>
| |
| − | </tr>
| |
| − | </table>
| |
| − | </td>
| |
| − | </tr>
| |
| − | </table>
| |
| − | </td>
| |
| − | </tr>
| |
| − | </table>
| |
| − | </td>
| |
| − | </tr>
| |
| − | </table>
| |
| − |
| |
| − | =='''Narrowing the Search'''==
| |
| − |
| |
| − | Sometimes (or often) a scene will be too crowded with different scenery objects to be able to use the '''Eyedropper Tool''' to easily select a single object. In these cases additional options are available to help "remove the clutter".<br>
| |
| − |
| |
| − | At the top of the '''Assets Palette''' is a drop down box which controls how the '''Eyedropper Tool''' works with the filters that you set.<br>
| |
| − |
| |
| − | <table width=550>
| |
| − | <tr valign="top">
| |
| − | <td width=200>[[image:AssetsPalette_S20.png|link=|alt=Assets palette]]</td>
| |
| − | <td width=350>The drop down box will provide three options:-<br>
| |
| − | <table width=350>
| |
| − | <tr valign="top">
| |
| − | <td width=150>
| |
| − | <table width=150>
| |
| − | <tr valign="top">
| |
| − | <td width=10>[[image:BulletTick.png|link=]]</td>
| |
| − | <td>'''Filter List'''</td>
| |
| − | </tr>
| |
| − | <tr valign="top">
| |
| − | <td>[[image:BulletTick.png|link=]]</td>
| |
| − | <td>'''Filter Selection'''</td>
| |
| − | </tr>
| |
| − | <tr valign="top">
| |
| − | <td>[[image:BulletTick.png|link=]]</td>
| |
| − | <td>'''Filter Visibility'''</td>
| |
| − | </tr>
| |
| − | </table>
| |
| − | </td>
| |
| − | <td width=200>[[image:AssetsPaletteFilterOptions_S20.png|link=]]</td>
| |
| − | </tr>
| |
| − | </table>
| |
| − | </td>
| |
| − | </tr>
| |
| − | </table>
| |
| − | <br>
| |
| − | These options work with the '''Asset Filters''' to help narrow the search for a specific object or type of object that is in the route.<br>
| |
| − |
| |
| − | <table width=900 bgcolor=#000000>
| |
| − | <tr valign="top">
| |
| − | <td>
| |
| − | <table width=896 bgcolor=#ffffff>
| |
| − | <tr valign="top">
| |
| − | <td width=120><span style="font-weight: 700; font-size: 15ps; color: white; background-color: black;"> Filter List </span></td>
| |
| − | <td>this option will have no effect on the operation of the '''Eyedropper Tool''' or on the objects displayed on the screen. It is the default setting and any selections made with the eyedropper will be shown in the '''Assets Palette''' as described in the section '''Quick Steps''' above.</td>
| |
| − | </tr>
| |
| − | <tr valign="top">
| |
| − | <td><span style="font-weight: 700; font-size: 15ps; color: white; background-color: black;"> Filter Selection </span></td>
| |
| − | <td>this option will restrict the '''Eyedropper Tool''' to only working on those objects that are in the filtered list. Objects that are not in the filtered list cannot be selected and will not have their details (name, <kuid>, author) displayed on the screen. </td>
| |
| − | </tr>
| |
| − | <tr valign="top">
| |
| − | <td><span style="font-weight: 700; font-size: 15ps; color: white; background-color: black;"> Filter Visibility </span></td>
| |
| − | <td>this option will '''hide''' all objects that are not in the filtered list. The only exceptions are '''Ground Textures''' and '''Effect Layers''' which will be visible but, unless they are also in the filtered list, cannot be selected.</td>
| |
| − | </tr>
| |
| − | </table>
| |
| − | </td>
| |
| − | </tr>
| |
| − | </table>
| |
| − |
| |
| − | As an example the following images show the progressive application of a '''Visibility Filter'''.<br>
| |
| − |
| |
| − | <table width=1000>
| |
| − | <tr valign="top">
| |
| − | <td>[[image:AssetFilterScene1_S20.png|link=]]</td>
| |
| − | <td>[[image:AssestFilteredScene1.png|link=]]</td>
| |
| − | <td>
| |
| − | [[image:DotPoint1Blue.png|link=]] No filter has been applied.<br>
| |
| − | <br>
| |
| − | All the objects are visible on the Surveyor screen.<br>
| |
| − | <br>
| |
| − | '''ALL''' objects can be selected by the '''Eyedropper Tool'''
| |
| − | </td>
| |
| − | </tr>
| |
| − | <tr valign="top">
| |
| − | <td>[[image:AssetFilterScene2_S20.png|link=]]</td>
| |
| − | <td>[[image:AssestFilteredScene2.png|link=]]</td>
| |
| − | <td>
| |
| − | [[image:DotPoint2Blue.png|link=]] The '''Visibility Filter''' option has been applied and the filtered list has been set to display only '''Scenery Splines'''.<br>
| |
| − | <br>
| |
| − | All objects except '''Scenery Splines''', '''Ground Textures''' and '''Effect Layers''' are now hidden.<br>
| |
| − | <br>
| |
| − | Only '''Scenery Splines''' can be selected by the '''Eyedropper Tool'''.
| |
| − | </td>
| |
| − | </tr>
| |
| − | <tr valign="top">
| |
| − | <td>[[image:AssetFilterScene3_S20.png|link=]]</td>
| |
| − | <td>[[image:AssestFilteredScene3.png|link=]]</td>
| |
| − | <td>
| |
| − | [[image:DotPoint3Blue.png|link=]] An additional filter has been applied. The word "fence" has been added to the search text box.<br>
| |
| − | <br>
| |
| − | All '''Scenery Splines''' that do not have the text "fence" in their names have now been hidden.<br>
| |
| − | <br>
| |
| − | Only the remaining visible '''Scenery Splines''' can be selected by the '''Eyedropper Tool'''.
| |
| − | </td>
| |
| − | </tr>
| |
| − | </table>
| |
| − | <table> <!-- BEGIN Nav Buttons Table -->
| |
| − | <tr valign="top">
| |
| − | <td width=729><span id="stepFreeMove"></span> </td>
| |
| − | <td width=46>[[image:BackToTop.png|link=#top|alt=Top|Top]]</td>
| |
| − | <td width=75>[[image:NextUp.png|link=#stepEyedropper|alt=Next Up|Top]]</td>
| |
| − | <td width=75>[[image:NextDown.png|link=#stepFineAdjustment|alt=Next Down|Next Down]]</td>
| |
| − | <td width=75>[[image:BackToBottom.png|link=#bottom|alt=Bottom|Bottom]]</td>
| |
| − | </tr>
| |
| − | </table> <!-- END Nav Buttons Table -->
| |
| − |
| |
| − | ='''The Free Move Tool'''=
| |
| − |
| |
| − | <table width=1000>
| |
| − | <tr valign="top">
| |
| − | <td width=40>[[image:S20_FreeMoveToolIcon.png|link=]]</td>
| |
| − | <td width=160>'''Keyboard Shortcut:''' <span style="color: white; background-color: black; font-weight: 700; font-size: 17px;"> S </span></td>
| |
| − | <td width=800><span style="font-weight: 700; font-size: 15px;">The <span style="color: white; background-color: black;"> Free Move Tool </span> moves objects around a route</span></td>
| |
| − | </tr>
| |
| − | </table>
| |
| − | <br>
| |
| − |
| |
| − | <table width=900 bgcolor=#000000>
| |
| − | <tr valign="top">
| |
| − | <td>
| |
| − | <table width=896 bgcolor=#ffffff>
| |
| − | <tr valign="top">
| |
| − | <td>This tool uses the '''Tool Options Palette'''. If this palette is not visible on the screen then refer to [[image:PageLink.PNG|link=]] '''[[#Notes_Palettes|Notes: Palettes]]''' at the top of this document.
| |
| − | </td>
| |
| − | </tr>
| |
| − | </table>
| |
| − | </td>
| |
| − | </tr>
| |
| − | </table>
| |
| − | <br>
| |
| − | When selected, the '''Free Move Tool''' has no drop down menu lists.<br>
| |
| − |
| |
| − | <table width=900>
| |
| − | <tr valign="top">
| |
| − | <td width=200>[[image:FreeMoveTools_S20.png|link=|alt=Free Move Tools]]</td>
| |
| − | <td>
| |
| − | <table width=700>
| |
| − | <tr valign="top">
| |
| − | <td>
| |
| − | <table bgcolor=#000000 width=700 cellpadding=2>
| |
| − | <tr valign="top">
| |
| − | <td>
| |
| − | <table bgcolor=#ffffe0 width=696 cellpadding=2>
| |
| − | <tr valign="top">
| |
| − | <td>[[image:PencilTips.PNG|link=]]</td>
| |
| − | <td><span style="font-weight: 700; font-size: 15px;">Free Move Alternatives</span><td>
| |
| − | </tr>
| |
| − | <tr valign="top">
| |
| − | <td colspan=2>In addition to the '''Free Move Tool''' the position and height of objects can be changed by:-</td>
| |
| − | </tr>
| |
| − | <tr valign="top">
| |
| − | <td width=10>[[image:DotPoint.JPG|10px|link=]]</td>
| |
| − | <td>using the [[image:PageLink.PNG|link=]] '''[[#The Fine Adjustment Tool|Fine Adjustment Tool]]'''</td>
| |
| − | </tr>
| |
| − | <tr valign="top">
| |
| − | <td>[[image:DotPoint.JPG|10px|link=]]</td>
| |
| − | <td>editing its <span style="font-size: 15px; font-weight: 700; color: white; background-color: black;"> X </span> <span style="font-size: 15px; font-weight: 700; color: white; background-color: black;"> Y </span> <span style="font-size: 15px; font-weight: 700; color: white; background-color: black;"> Z </span> values in [[image:PageLink.PNG|link=]] '''[[#The Info Palette|The Info Palette]]'''</td>
| |
| − | </tr>
| |
| − | <tr valign="top">
| |
| − | <td width=10>[[image:DotPoint.JPG|10px|link=]]</td>
| |
| − | <td>selecting the <span style="font-size: 15px; font-weight: 700; color: white; background-color: black;"> Apply Height </span> option in its '''Context Menu'''</td>
| |
| − | </tr>
| |
| − | </table>
| |
| − | </td>
| |
| − | </tr>
| |
| − | </table>
| |
| − | </td>
| |
| − | </tr>
| |
| − | </table>
| |
| − | </td>
| |
| − | </tr>
| |
| − | </table>
| |
| − | <br>
| |
| − | =='''For Scenery Mesh Objects'''==
| |
| − |
| |
| − | Individual "non-spline" scenery objects that are not attached to track are often referred to in '''Trainz''' terminology as '''Scenery Mesh Objects'''.<br>
| |
| − | <br>
| |
| − | <span style="font-weight: 700; font-size: 17px; color: white; background-color: blue;"> Moving a Scenery Mesh Object </span><br>
| |
| − |
| |
| − | <table width=900>
| |
| − | <tr valign="top">
| |
| − | <td width=250>[[image:FreeMoveToolCar_S20.png|link=]]</td>
| |
| − | <td width=650>
| |
| − | <table bgcolor=#000000 width=650 cellpadding=2>
| |
| − | <tr valign="top">
| |
| − | <td>
| |
| − | <table bgcolor=#ffffff width=646 cellpadding=2>
| |
| − | <tr valign="top">
| |
| − | <td colspan=2>To move a '''Scenery Mesh Object''':-</td>
| |
| − | </tr>
| |
| − | <tr valign="top">
| |
| − | <td width=20>[[image:DotPoint1.JPG|link=]]</td>
| |
| − | <td>Select the '''Free Move Tool'''.</td>
| |
| − | </tr>
| |
| − | <tr valign="top">
| |
| − | <td>[[image:DotPoint2.JPG|link=]]</td>
| |
| − | <td>Select ('''Left''' click on) the object.</td>
| |
| − | </tr>
| |
| − | <tr valign="top">
| |
| − | <td>[[image:DotPoint3.JPG|link=]]</td>
| |
| − | <td>Use the mouse ('''Left''' button held down) to drag the object in any '''horizontal''' direction.
| |
| − | </td>
| |
| − | </tr>
| |
| − | </table>
| |
| − | </td>
| |
| − | </tr>
| |
| − | </table>
| |
| − | <br>
| |
| − | <table bgcolor=#000000 width=650 cellpadding=2>
| |
| − | <tr valign="top">
| |
| − | <td>
| |
| − | <table bgcolor=#ffffb0 width=646 cellpadding=2>
| |
| − | <tr valign="top">
| |
| − | <td>[[image:NotePad.PNG|link=]]</td>
| |
| − | <td>When moving a scenery object, its height will be '''fixed''' to the terrain height.</td>
| |
| − | </tr>
| |
| − | </table>
| |
| − | </td>
| |
| − | </tr>
| |
| − | </table>
| |
| − | </td>
| |
| − | </tr>
| |
| − | </table>
| |
| − | <br>
| |
| − | <span style="font-weight: 700; font-size: 17px; color: white; background-color: blue;"> Set the Height for a Scenery Mesh Object </span><br>
| |
| − |
| |
| − | When placed in a route by the '''Placement Tool''' a scenery object will take the height of the terrain as its set height. It will be '''fixed''' to the terrain so when you move it around it will always be at the same height as the terrain it is over.<br>
| |
| − |
| |
| − | This can be changed to '''fix''' the object to a set height above or below the terrain.<br>
| |
| − |
| |
| − | <table width=900>
| |
| − | <tr valign="top">
| |
| − | <td width=200>[[image:FreeMoveMeshObjectSetAboveGround_S20.png|link=]]</td>
| |
| − | <td>
| |
| − | <table bgcolor=#000000 width=700 cellpadding=2>
| |
| − | <tr valign="top">
| |
| − | <td>
| |
| − | <table bgcolor=#ffffff width=696 cellpadding=2>
| |
| − | <tr valign="top">
| |
| − | <td colspan=2>To set the height of a '''Scenery Mesh Object''':-</td>
| |
| − | </tr>
| |
| − | <tr valign="top">
| |
| − | <td width=20>[[image:DotPoint1.JPG|link=]]</td>
| |
| − | <td>With the scenery object selected, enter a height value into the '''Tool Options''' <span style="font-weight: 700; font-size: 15px; color: white; background-color: black;"> Height </span> text box</td>
| |
| − | </tr>
| |
| − | <tr valign="top">
| |
| − | <td>[[image:DotPoint2.JPG|link=]]</td>
| |
| − | <td>Hit the <span style="font-weight: 700; font-size: 15px; color: white; background-color: black;"> Enter </span> key</td>
| |
| − | </tr>
| |
| − | <tr valign="top">
| |
| − | <td colspan=2>The scenery object will now be '''fixed''' at the entered height above (or below) the terrain as it is moved around.
| |
| − | </td>
| |
| − | </tr>
| |
| − | </table>
| |
| − | </td>
| |
| − | </tr>
| |
| − | </table>
| |
| − | </td>
| |
| − | </tr>
| |
| − | </table>
| |
| − | <br>
| |
| − | <span style="font-weight: 700; font-size: 17px; color: white; background-color: blue;"> Mesh Object Context Menu </span><br>
| |
| − |
| |
| − | A selected scenery object, or a group of selected scenery objects, will have a '''Context Icon''' that opens a '''Context Menu'''. The icon design will vary between object types.<br>
| |
| − |
| |
| − | <table bgcolor=#000000 width=400 cellpadding=2>
| |
| − | <tr valign="top">
| |
| − | <td>
| |
| − | <table bgcolor=#ffffff width=396 cellpadding=2>
| |
| − | <tr valign="top">
| |
| − | <td width=396>To open a selected objects '''Context menu''' either:-<br>
| |
| − | <table>
| |
| − | <tr valign="top">
| |
| − | <td width=20>[[image:Ablue.png|link=]]</td>
| |
| − | <td width=266>'''Left''' click the '''Context Icon''', <span style="font-size: 15px; font-weight: 700;">OR</span></td>
| |
| − | <td width=110 rowspan=2>[[image:ContextIcons_S20.png|link=]]</td>
| |
| − | </tr>
| |
| − | <tr valign="top">
| |
| − | <td>[[image:Bblue.png|link=]]</td>
| |
| − | <td>Press the <span style="color: white; background-color: black; font-weight: 700; font-size: 15px;"> T </span> key</td>
| |
| − | </tr>
| |
| − | </table>
| |
| − | </td>
| |
| − | </tr>
| |
| − | </table>
| |
| − | </td>
| |
| − | </tr>
| |
| − | </table>
| |
| − | <br>
| |
| − | <table width=1000>
| |
| − | <tr valign="top">
| |
| − | <td width=220><span style="font-weight: 700; font-size: 15px; color: white; background-color: black;"> Mesh Object Context Menu </span><br>
| |
| − | [[image:ContextMenuMeshObject_S20.png|link=]]</td>
| |
| − | <td width=780>
| |
| − | <table width=780 bgcolor=#000000>
| |
| − | <tr valign="top">
| |
| − | <td>
| |
| − | <table width=776 bgcolor=#ffffff>
| |
| − | <tr valign="top">
| |
| − | <td width=240><span style="font-weight: 700; color: white; background-color: black;"> Cut </span></td>
| |
| − | <td>remove the selected object or objects and move them into the '''Scrapbook'''</td>
| |
| − | </tr>
| |
| − | <tr valign="top">
| |
| − | <td><span style="font-weight: 700; color: white; background-color: black;"> Copy </span></td>
| |
| − | <td>copy the selected object or objects and place them into the '''Scrapbook'''</td>
| |
| − | </tr>
| |
| − | <tr valign="top">
| |
| − | <td><span style="font-weight: 700; color: white; background-color: black;"> Paste </span></td>
| |
| − | <td>paste the contents of the current '''Scrapbook''' at the cursor (focus) point</td>
| |
| − | </tr>
| |
| − | <tr valign="top">
| |
| − | <td><span style="font-weight: 700; color: white; background-color: black;"> Delete </span></td>
| |
| − | <td>delete the selected objects. It has the same effect as pressing the <span style="font-weight: 700; font-size: 15px; color: white; background-color: black;"> Delete </span> key</td>
| |
| − | </tr>
| |
| − | <tr valign="top">
| |
| − | <td><span style="font-weight: 700; color: white; background-color: black;"> Replace Object with Selected Asset </span></td>
| |
| − | <td>the highlighted object will be replaced with the asset currently selected in the '''Assets Palette'''</td>
| |
| − | </tr>
| |
| − | <tr valign="top">
| |
| − | <td><span style="font-weight: 700; color: white; background-color: black;"> Paint Under Selected </span></td>
| |
| − | <td>the texture selected in the '''Assets Palette''' will be painted under the highlighted object. The '''Tool Options''' for the '''Brush Tool''' ('''Radius''' and '''Sensitivity''') will control how the texture is applied</td>
| |
| − | </tr>
| |
| − | <tr valign="top">
| |
| − | <td><span style="font-weight: 700; color: white; background-color: black;"> Smooth Ground Under Selected </span></td>
| |
| − | <td>changes the height of the terrain under the object to match the set height of the object. If multiple objects at different heights have been selected then the terrain height will be set to match the height of the lowest object</td>
| |
| − | </tr>
| |
| − | <tr valign="top">
| |
| − | <td><span style="font-weight: 700; color: white; background-color: black;"> Settle on Ground </span></td>
| |
| − | <td>sets the height of the objects to match the height of the terrain beneath them ("drops them back to earth")</td>
| |
| − | </tr>
| |
| − | <tr valign="top">
| |
| − | <td><span style="font-weight: 700; color: white; background-color: black;"> Apply Height </span></td>
| |
| − | <td>sets the height of the objects to the value in the '''Tool Options''' <span style="font-weight: 700; font-size: 15px; color: white; background-color: black;"> Height </span> text box</td>
| |
| − | </tr>
| |
| − | <tr valign="top">
| |
| − | <td><span style="font-weight: 700; color: white; background-color: black;"> Reset Object Rotation </span></td>
| |
| − | <td>resets the rotation angle of the objects to their default values</td>
| |
| − | </tr>
| |
| − | <tr valign="top">
| |
| − | <td><span style="font-weight: 700; color: white; background-color: black;"> Randomise Object Rotation </span></td>
| |
| − | <td>applies a random rotation angle to each object</td>
| |
| − | </tr>
| |
| − | <tr valign="top">
| |
| − | <td><span style="font-weight: 700; color: white; background-color: black;"> Select in Assets Palette </span></td>
| |
| − | <td>identifies the selected object in the '''Asset Palette''' like the '''Eyedropper Tool'''</td>
| |
| − | </tr>
| |
| − | <tr valign="top">
| |
| − | <td><span style="font-weight: 700; color: white; background-color: black;"> Edit Properties </span></td>
| |
| − | <td>opens the '''Properties''' window of the selected object</td>
| |
| − | </tr>
| |
| − | </table>
| |
| − | </td>
| |
| − | </tr>
| |
| − | </table>
| |
| − | </td>
| |
| − | </tr>
| |
| − | </table>
| |
| − | <br>
| |
| − | =='''For Track Objects'''==
| |
| − |
| |
| − | '''Track Objects''' (signals, switches, speed signs, etc) are always attached to an existing track. They can be moved to new positions along the track and in '''Surveyor Classic''' that was the limit of their movement.<br>
| |
| − |
| |
| − | '''Surveyor 2.0''' brings a new freedom of movement to track objects. They can be moved away from the track to the left or right as well as above and below the track. The operation of a track object is not affected by these changes.<br>
| |
| − |
| |
| − | <table width=1000>
| |
| − | <tr valign="top">
| |
| − | <td width=400>[[image:FreeMoveTrackObjectOnTrack_S20.png|link=]]<br>
| |
| − | '''Throw Lever''' track object in its original position</td>
| |
| − | <td rowspan=2 width=600>
| |
| − | <table bgcolor=#000000 width=600 cellpadding=2>
| |
| − | <tr valign="top">
| |
| − | <td>
| |
| − | <table bgcolor=#ffffff width=596 cellpadding=2>
| |
| − | <tr valign="top">
| |
| − | <td colspan=2>To move a track object horizontally left or right of the track:-</td>
| |
| − | </tr>
| |
| − | <tr valign="top">
| |
| − | <td width=20>[[image:DotPoint1.JPG|link=]]</td>
| |
| − | <td>select the track object with the '''Free Move Tool'''<td>
| |
| − | </tr>
| |
| − | <tr valign="top">
| |
| − | <td width=20>[[image:DotPoint2.JPG|link=]]</td>
| |
| − | <td>drag the object left or right
| |
| − | <td>
| |
| − | </tr>
| |
| − | </table>
| |
| − | </td>
| |
| − | </tr>
| |
| − | </table>
| |
| − | <br>
| |
| − | <table bgcolor=#000000 width=600 cellpadding=2>
| |
| − | <tr valign="top">
| |
| − | <td>
| |
| − | <table bgcolor=#ffffff width=596 cellpadding=2>
| |
| − | <tr valign="top">
| |
| − | <td colspan=2>To move a track object vertically:-</td>
| |
| − | </tr>
| |
| − | <tr valign="top">
| |
| − | <td width=20>[[image:DotPoint1.JPG|link=]]</td>
| |
| − | <td>select the track object with the '''Free Move Tool'''<td>
| |
| − | </tr>
| |
| − | <tr valign="top">
| |
| − | <td width=20>[[image:DotPoint2.JPG|link=]]</td>
| |
| − | <td>enter a value in the '''Tool Options''' <span style="font-weight: 700; font-size: 15px; color: white; background-color: black;"> Height </span> control and press the <span style="font-weight: 700; font-size: 15px; color: white; background-color: black;"> Enter </span> key<td>
| |
| − | <td>
| |
| − | </tr>
| |
| − | </table>
| |
| − | </td>
| |
| − | </tr>
| |
| − | </table>
| |
| − | <br>
| |
| − | <table bgcolor=#000000 width=600 cellpadding=2>
| |
| − | <tr valign="top">
| |
| − | <td>
| |
| − | <table bgcolor=#ffffe0 width=596 cellpadding=2>
| |
| − | <tr valign="top">
| |
| − | <td>[[image:PencilTips.PNG|link=]]</td>
| |
| − | <td colspan=2>Situations where this feature is useful include:-</td>
| |
| − | </tr>
| |
| − | <tr valign="top">
| |
| − | <td width=10>[[image:DotPoint.JPG|10px|link=]]</td>
| |
| − | <td>placing '''Track Marks''' and '''Triggers''' above or beside the track so that they are not hidden by consists parked on top of them</td>
| |
| − | </tr>
| |
| − | <tr valign="top">
| |
| − | <td>[[image:DotPoint.JPG|10px|link=]]</td>
| |
| − | <td>repositioning switches, signals, track signs closer to or further away from the track - particularly useful if the track object was originally created for a different gauge track
| |
| − | </td>
| |
| − | </tr>
| |
| − | </table>
| |
| − | </td>
| |
| − | </tr>
| |
| − | </table>
| |
| − | </td>
| |
| − | </tr>
| |
| − | <tr valign="top">
| |
| − | <td width=400>[[image:FreeMoveTrackObjectOffTrack_S20.png|link=]]<br>
| |
| − | After being moved left with the '''Free Move Tool''' and up with the '''Height''' setting in the '''Tool Options Palette'''</td>
| |
| − | </tr>
| |
| − | </table>
| |
| − |
| |
| − | The track object can still be moved along the track with the '''Free Move Tool'''. <br>
| |
| − |
| |
| − | <table bgcolor=#000000 width=600 cellpadding=2>
| |
| − | <tr valign="top">
| |
| − | <td>
| |
| − | <table bgcolor=#ffffb0 width=596 cellpadding=2>
| |
| − | <tr valign="top">
| |
| − | <td>[[image:NotePad.PNG|link=]]</td>
| |
| − | <td>Track objects can be restored to their original height and position (on the track) by opening their '''Context Menu''' and selecting:-
| |
| − | <table>
| |
| − | <tr valign="top:>
| |
| − | <td width=20>[[image:Ablue.png|link=]]</td>
| |
| − | <td><span style="font-weight: 700; font-size: 15px; color: white; background-color: black;"> Reattach to Track </span> to cancel the both the height and position changes, <span style="font-size: 15px; font-weight: 700;">OR</span></td>
| |
| − | </tr>
| |
| − | <tr valign="top:>
| |
| − | <td width=20>[[image:Bblue.png|link=]]</td>
| |
| − | <td><span style="font-weight: 700; font-size: 15px; color: white; background-color: black;"> Settle on Ground </span> to cancel the height change only</td>
| |
| − | </tr>
| |
| − | </table>
| |
| − | </td>
| |
| − | </tr>
| |
| − | </table>
| |
| − | </td>
| |
| − | </tr>
| |
| − | </table>
| |
| − | <br>
| |
| − | Track objects can also be rotated to the opposite side of the track.
| |
| − | <table>
| |
| − | <tr valign="top">
| |
| − | <td width=400>[[image:FreeMoveTrackObjectReversed_S20.png|link=]]</td>
| |
| − | <td>
| |
| − | <table bgcolor=#000000 width=600 cellpadding=2>
| |
| − | <tr valign="top">
| |
| − | <td>
| |
| − | <table bgcolor=#ffffff width=596 cellpadding=2>
| |
| − | <tr valign="top">
| |
| − | <td colspan=2>To rotate a track object:-</td>
| |
| − | </tr>
| |
| − | <tr valign="top">
| |
| − | <td width=20>[[image:DotPoint1.JPG|link=]]</td>
| |
| − | <td>Open the track objects '''Context Menu''' (click the icon or press the <span style="font-weight: 700; font-size: 15px; color: white; background-color: black;"> T </span> key)</td>
| |
| − | </tr>
| |
| − | <tr valign="top">
| |
| − | <td width=20>[[image:DotPoint2.JPG|link=]]</td>
| |
| − | <td>Select the option <span style="font-weight: 700; font-size: 15px; color: white; background-color: black;"> Rotate Trackside </span></td>
| |
| − | </tr>
| |
| − | <tr valign="top">
| |
| − | <td colspan=2>Rotating a track object does not change its distance from the track or its height.
| |
| − | </td>
| |
| − | </tr>
| |
| − | </table>
| |
| − | </td>
| |
| − | </tr>
| |
| − | </table>
| |
| − | </td>
| |
| − | </tr>
| |
| − | </table>
| |
| − | <br>
| |
| − | =='''For Spline Objects (Including Track)'''==
| |
| − |
| |
| − | Scenery splines and track splines are defined by their '''endpoints'''. Splines are usually added to a route as a series of joined segments linked at the endpoints.<br>
| |
| − |
| |
| − | <table bgcolor=#000000 width=600 cellpadding=2>
| |
| − | <tr valign="top">
| |
| − | <td>
| |
| − | <table bgcolor=#ffffff width=596 cellpadding=2>
| |
| − | <tr valign="top">
| |
| − | <td colspan=2>Moving a spline can involve moving:-</td>
| |
| − | </tr>
| |
| − | <tr valign="top">
| |
| − | <td width=20>[[image:Ablue.png|link=]]</td>
| |
| − | <td>an endpoint, <span style="font-size: 15px; font-weight: 700;">OR</span></td>
| |
| − | </tr>
| |
| − | <tr valign="top:>
| |
| − | <td width=20>[[image:Bblue.png|link=]]</td>
| |
| − | <td>a segment, <span style="font-size: 15px; font-weight: 700;">OR</span></td>
| |
| − | </tr>
| |
| − | <tr valign="top:>
| |
| − | <td width=20>[[image:Cblue.png|link=]]</td>
| |
| − | <td>multiple segments including the whole length of the spline</td>
| |
| − | </tr>
| |
| − | </table>
| |
| − | </td>
| |
| − | </tr>
| |
| − | </table>
| |
| − | <br>
| |
| − | <span style="font-weight: 700; font-size: 17px; color: white; background-color: blue;"> Moving Spline Endpoints </span><br>
| |
| − |
| |
| − | <table width=900>
| |
| − | <tr valign="top">
| |
| − | <td width=450>[[image:FreeMoveToolSpline_S20.png|link=]]</td>
| |
| − | <td width=450>
| |
| − | <table bgcolor=#000000 width=450 cellpadding=2>
| |
| − | <tr valign="top">
| |
| − | <td>
| |
| − | <table bgcolor=#ffffff width=446 cellpadding=2>
| |
| − | <tr valign="top">
| |
| − | <td colspan=2>To move an individual spline endpoint:-</td>
| |
| − | </tr>
| |
| − | <tr valign="top">
| |
| − | <td width=20>[[image:DotPoint1.JPG|link=]]</td>
| |
| − | <td>Select the '''Free Move Tool'''.</td>
| |
| − | </tr>
| |
| − | <tr valign="top">
| |
| − | <td>[[image:DotPoint2.JPG|link=]]</td>
| |
| − | <td>Select ('''Left''' click on) the spline endpoint to be moved. This will be shown as '''green''' meaning '''active'''. Inactive spline endpoints are shown as '''black'''.</td>
| |
| − | </tr>
| |
| − | <tr valign="top">
| |
| − | <td>[[image:DotPoint3.JPG|link=]]</td>
| |
| − | <td>Use the mouse ('''Left''' button held down) to drag the spline endpoint in any '''horizontal''' direction.</td>
| |
| − | </tr>
| |
| − | </table>
| |
| − | </td>
| |
| − | </tr>
| |
| − | </table>
| |
| − | <br>
| |
| − | <table bgcolor=#000000 width=450 cellpadding=2>
| |
| − | <tr valign="top">
| |
| − | <td>
| |
| − | <table bgcolor=#ffffb0 width=446 cellpadding=2>
| |
| − | <tr valign="top">
| |
| − | <td>[[image:NotePad.PNG|link=]]</td>
| |
| − | <td>The spline endpoint will be '''fixed''' at its original height.</td>
| |
| − | </tr>
| |
| − | </table>
| |
| − | </td>
| |
| − | </tr>
| |
| − | </table>
| |
| − | </td>
| |
| − | </tr>
| |
| − | </table>
| |
| − | <br>
| |
| − | <span style="font-weight: 700; font-size: 17px; color: white; background-color: blue;"> Moving Spline Segments </span><br>
| |
| − |
| |
| − | Splines are frequently made of multiple segments joined together. You can easily move a spline by moving its segments, individually or as a group.<br>
| |
| − |
| |
| − | <table width=900>
| |
| − | <tr valign="top">
| |
| − | <td width=400>[[image:FreeMoveSplineSegments_S20.png|link=|alt=spline made of 3 joined segments]]</td>
| |
| − | <td>
| |
| − | <table bgcolor=#000000 width=500 cellpadding=2>
| |
| − | <tr valign="top">
| |
| − | <td>
| |
| − | <table bgcolor=#ffffb0 width=496 cellpadding=2>
| |
| − | <tr valign="top">
| |
| − | <td>[[image:NotePad.PNG|link=]]</td>
| |
| − | <td>Not all splines have endpoints at each ends. As shown in the image on the left, some splines will have an "endcap" that is attached to the start of the first segment and to the end of the last segment. The use of an endcap is a purely cosmetic effect - to give the spline a more distinctive appearance.
| |
| − | </td>
| |
| − | </tr>
| |
| − | </table>
| |
| − | </td>
| |
| − | </tr>
| |
| − | </table>
| |
| − | </td>
| |
| − | </tr>
| |
| − | </table>
| |
| − | <br>
| |
| − | <table width=900>
| |
| − | <tr valign="top">
| |
| − | <td width=400>[[image:FreeMoveSplineSegmentSelected_S20.png|link=]]</td>
| |
| − | <td width=500>
| |
| − | <table>
| |
| − | <tr valign="top">
| |
| − | <td colspan=2>To move an individual segment or multiple segments:-</td>
| |
| − | </tr>
| |
| − | <tr valign="top">
| |
| − | <td width=20>[[image:DotPoint1.JPG|link=]]</td>
| |
| − | <td>Select the '''Free Move Tool'''.</td>
| |
| − | </tr>
| |
| − | <tr valign="top">
| |
| − | <td>[[image:DotPoint2.JPG|link=]]</td>
| |
| − | <td>Select ('''Left''' click on) the spline segment to be moved - click anywhere between the two spline endpoints on the segment.<br>
| |
| − | </td>
| |
| − | </tr>
| |
| − | <tr valign="top">
| |
| − | <td colspan=2>
| |
| − | The selected segment will be highlighted in '''green/yellow'''.<br>
| |
| − | <br>
| |
| − | The segment that you clicked will have a temporary endpoint inserted at the location where you clicked.<br><br>
| |
| − | This temporary endpoint is:-<br>
| |
| − | <table>
| |
| − | <tr valign="top">
| |
| − | <td width=10>[[image:DotPoint.JPG|10px|link=]]</td>
| |
| − | <td>where the '''Context Icon''' for the segment will be attached</td>
| |
| − | </tr>
| |
| − | <tr valign="top">
| |
| − | <td>[[image:DotPoint.JPG|10px|link=]]</td>
| |
| − | <td>the location where a new permanent endpoint can be added from the segments '''Context Menu'''</td>
| |
| − | </tr>
| |
| − | </table>
| |
| − | </td>
| |
| − | </tr>
| |
| − | </table>
| |
| − | </td>
| |
| − | </tr>
| |
| − | </table>
| |
| − |
| |
| − | <table width=900>
| |
| − | <tr valign="top">
| |
| − | <td width=400>[[image:FreeMoveSplineSegmentsAllSelected_S20.png|link=]]</td>
| |
| − | <td width=500>
| |
| − | <table width=500>
| |
| − | <tr valign="top">
| |
| − | <td colspan=2>'''IF''' you are going to select and move more than one spline segment, then:-</td>
| |
| − | </tr>
| |
| − | <tr valign="top">
| |
| − | <td width=20>[[image:DotPoint3.JPG|link=]]</td>
| |
| − | <td>hold the <span style="font-weight: 700; font-size: 15px; color: white; background-color: black;"> Shift </span> key down and individually '''Left''' click between the endpoints on each additional segment.<br>
| |
| − | <br>
| |
| − | The '''last''' segment that you click will have the temporary endpoint added.</td>
| |
| − | </tr>
| |
| − | <tr valign="top>
| |
| − | <td colspan=2>
| |
| − | <table bgcolor=#000000 width=500 cellpadding=2>
| |
| − | <tr valign="top">
| |
| − | <td>
| |
| − | <table bgcolor=#ffffe0 width=496 cellpadding=2>
| |
| − | <tr valign="top">
| |
| − | <td>[[image:PencilTips.PNG|link=]]</td>
| |
| − | <td>To select '''ALL''' the segments in a spline, '''Dbl-Left''' click on a segment<br>
| |
| − | If the spline contains a junction then this will only select all the segments upto the junction point<br>
| |
| − | <br>
| |
| − | The segment that you double-clicked will have the temporary endpoint added</td>
| |
| − | </tr>
| |
| − | </table>
| |
| − | </td>
| |
| − | </tr>
| |
| − | </table>
| |
| − | </tr>
| |
| − | </table>
| |
| − | </td>
| |
| − | </tr>
| |
| − | </table>
| |
| − |
| |
| − | <table>
| |
| − | <tr valign="top">
| |
| − | <td width=20>[[image:DotPoint4.JPG|link=]]</td>
| |
| − | <td>Use the mouse ('''Left''' button held down) to drag the selected segment(s) in any horizontal direction.<br>
| |
| − | <table>
| |
| − | <tr valign="top">
| |
| − | <td colspan=2>If you had selected:-</td>
| |
| − | </tr>
| |
| − | <tr valign="top">
| |
| − | <td width=10>[[image:DotPoint.JPG|10px|link=]]</td>
| |
| − | <td>only a single spline segment then only that segment will be moved and the adjacent segments that were not selected will have their shapes (but not their endpoints) adjusted</td>
| |
| − | </tr>
| |
| − | <tr valign="top">
| |
| − | <td>[[image:DotPoint.JPG|10px|link=]]</td>
| |
| − | <td>multiple spline segments then those segments will be moved and the adjacent segments that were not selected will also have their shapes adjusted</td>
| |
| − | </tr>
| |
| − | <tr valign="top">
| |
| − | <td>[[image:DotPoint.JPG|10px|link=]]</td>
| |
| − | <td>the entire spline then '''ALL''' the segments and endpoints will be moved</td>
| |
| − | </tr>
| |
| − | </table>
| |
| − | </td>
| |
| − | </tr>
| |
| − | </table>
| |
| − | <table>
| |
| − | <tr valign="top">
| |
| − | <td>[[image:FreeMoveSplineSegmentSelectedMoved_S20.png|link=]]</td>
| |
| − | <td>[[image:FreeMoveSplineSegmentsAllSelectedMoved_S20.png|link=]]</td>
| |
| − | </tr>
| |
| − | </table>
| |
| − | <br>
| |
| − | <span style="font-weight: 700; font-size: 17px; color: white; background-color: blue;"> Spline Object Context Menu </span><br>
| |
| − |
| |
| − | <table width=900>
| |
| − | <tr valign="top">
| |
| − | <td width=420>[[image:ContextIconsSpline_S20.png|link=]]</td>
| |
| − | <td>
| |
| − | <table bgcolor=#000000 width=480 cellpadding=2>
| |
| − | <tr valign="top">
| |
| − | <td>
| |
| − | <table bgcolor=#ffffb0 width=476 cellpadding=2>
| |
| − | <tr valign="top">
| |
| − | <td>
| |
| − | <table>
| |
| − | <tr valign="top">
| |
| − | <td>[[image:NotePad.PNG|link=]]</td>
| |
| − | <td><span style="font-size: 17px; font-weight: 700;">Notes:'''</span></td>
| |
| − | </tr>
| |
| − | </table>
| |
| − | <table>
| |
| − | <tr valign="top">
| |
| − | <td colspan=2>Splines have two different '''Context Icons''' that lead to two slightly different '''Context Menus'''.</td>
| |
| − | </tr>
| |
| − | <tr valign="top">
| |
| − | <td width=10>[[image:DotPoint.JPG|10px|link=]]</td>
| |
| − | <td>one context icon and menu for each '''endpoint'''</td>
| |
| − | </tr>
| |
| − | <tr valign="top">
| |
| − | <td>[[image:DotPoint.JPG|10px|link=]]</td>
| |
| − | <td>one context icon and menu for the '''segment'''</td>
| |
| − | </tr>
| |
| − | <tr valign="top">
| |
| − | <td colspan=2>If multiple segments have been selected then the last segment added to the selection will have the context icons. If all the segments were selected by a '''Dbl-Click''' then the segment that was clicked will have the icons.</td>
| |
| − | </tr>
| |
| − | </table>
| |
| − | </td>
| |
| − | </tr>
| |
| − | </table>
| |
| − | </td>
| |
| − | </tr>
| |
| − | </table>
| |
| − | </td>
| |
| − | </tr>
| |
| − | </table>
| |
| − | <br>
| |
| − | '''Left''' click on an icon to open its '''Context Menu'''.<br>
| |
| − | <br>
| |
| − | <table>
| |
| − | <tr valign="top">
| |
| − | <td>
| |
| − | <table>
| |
| − | <tr valign="top">
| |
| − | <td width=220>[[image:SplineEndPointContextIcon_S20.png|link=]] <span style="font-weight: 700; font-size: 15px; color: white; background-color: black;"> Endpoint Context Menu </span><br>
| |
| − | [[image:ContextMenuSplineObject_S20.png|link=]]</td>
| |
| − | <td width=220>[[image:SplineSegmentContextIcon_S20.png|link=]] <span style="font-weight: 700; font-size: 15px; color: white; background-color: black;"> Segment Context Menu </span><br>
| |
| − | [[image:ContextMenuSplineSegment_S20.png|link=]]</td>
| |
| − | </tr>
| |
| − | </table>
| |
| − | <br>
| |
| − | <table width=1000 bgcolor=#000000>
| |
| − | <tr valign="top">
| |
| − | <td>
| |
| − | <table width=996 bgcolor=#ffffff>
| |
| − | <tr valign="top">
| |
| − | <td width=250><span style="font-weight: 700; color: white; background-color: black;"> Cut </span></td>
| |
| − | <td>remove the segment or segments and move them into the '''Scrapbook'''</td>
| |
| − | </tr>
| |
| − | <tr valign="top">
| |
| − | <td><span style="font-weight: 700; color: white; background-color: black;"> Copy </span></td>
| |
| − | <td>copy the segment or segments and place them into the '''Scrapbook'''</td>
| |
| − | </tr>
| |
| − | <tr valign="top">
| |
| − | <td><span style="font-weight: 700; color: white; background-color: black;"> Paste </span></td>
| |
| − | <td>paste the contents of the current '''Scrapbook''' at the cursor (focus) point</td>
| |
| − | </tr>
| |
| − | <tr valign="top">
| |
| − | <td><span style="font-weight: 700; color: white; background-color: black;"> Delete </span></td>
| |
| − | <td>delete the segment, segments or endpoint. It has the same effect as pressing the <span style="font-weight: 700; font-size: 15px; color: white; background-color: black;"> Delete </span> key</td>
| |
| − | </tr>
| |
| − | <tr valign="top">
| |
| − | <td><span style="font-weight: 700; color: white; background-color: black;"> Replace Spline with Selected Asset </span></td>
| |
| − | <td>the highlighted spline will be replaced with the asset currently selected in the '''Assets Palette'''</td>
| |
| − | </tr>
| |
| − | <tr valign="top">
| |
| − | <td><span style="font-weight: 700; color: white; background-color: black;"> Paint Under Selected </span></td>
| |
| − | <td>the texture selected in the '''Assets Palette''' will be painted under the highlighted spline segments. The '''Tool Options''' for the '''Brush Tool''' ('''Radius''' and '''Sensitivity''') will control how the texture is applied</td>
| |
| − | </tr>
| |
| − | <tr valign="top">
| |
| − | <td><span style="font-weight: 700; color: white; background-color: black;"> Smooth Ground Under Selected </span></td>
| |
| − | <td>changes the height of the terrain under the segment or segments to match the set height of the spline (does not work on endpoints)</td>
| |
| − | </tr>
| |
| − | <tr valign="top">
| |
| − | <td><span style="font-weight: 700; color: white; background-color: black;"> Settle on Ground </span></td>
| |
| − | <td>sets the height of the segment, segments or endpoint to match the height of the terrain beneath them ("drops them back to earth"). When used on segments the spline will follow the height changes of the terrain</td>
| |
| − | </tr>
| |
| − | <tr valign="top">
| |
| − | <td><span style="font-weight: 700; color: white; background-color: black;"> Apply Height (to this Spline Endpoint) </span></td>
| |
| − | <td>sets the height of the segment, segments or endpoint to the value in the '''Tool Options''' <span style="font-weight: 700; font-size: 15px; color: white; background-color: black;"> Height </span> text box</td>
| |
| − | </tr>
| |
| − | <tr valign="top">
| |
| − | <td><span style="font-weight: 700; color: white; background-color: black;"> Apply Grade to this Spline Endpoint </span></td>
| |
| − | <td>sets the height of the endpoint to give a '''Grade''' to the surrounding segments that matches the value in the '''Tool Options''' <span style="font-weight: 700; font-size: 15px; color: white; background-color: black;"> Grade </span> text box</td>
| |
| − | </tr>
| |
| − | <tr valign="top">
| |
| − | <td><span style="font-weight: 700; color: white; background-color: black;"> Straighten Spline </span></td>
| |
| − | <td>forces a straight line (as far as possible) between the endpoints of a single segment. This option will be ticked if the segment has already been straightened in which case selecting this option will "un-straighten" the segment and remove the tick</td>
| |
| − | </tr>
| |
| − | <tr valign="top">
| |
| − | <td><span style="font-weight: 700; color: white; background-color: black;"> Separate Splines </span></td>
| |
| − | <td>breaks the spline into two separate splines at the endpoint</td>
| |
| − | </tr>
| |
| − | <tr valign="top">
| |
| − | <td><span style="font-weight: 700; color: white; background-color: black;"> Merge Splines </span></td>
| |
| − | <td>removes the selected endpoint and merges the segments on both sides into one segment. The two segments can also be joined by selecting and deleting the endpoint with the <span style="font-weight: 700; font-size: 15px; color: white; background-color: black;"> Delete </span> key</td>
| |
| − | </tr>
| |
| − | <tr valign="top">
| |
| − | <td><span style="font-weight: 700; color: white; background-color: black;"> Insert Spline Point Here </span></td>
| |
| − | <td>inserts a new endpoint in a segment at the point where it was clicked. This will create a new segment at the endpoint</td>
| |
| − | </tr>
| |
| − | <tr valign="top">
| |
| − | <td><span style="font-weight: 700; color: white; background-color: black;"> Select in Assets Palette </span></td>
| |
| − | <td>identifies the selected spline in the '''Asset Palette''' like the '''Eyedropper Tool'''</td>
| |
| − | </tr>
| |
| − | <tr valign="top">
| |
| − | <td><span style="font-weight: 700; color: white; background-color: black;"> Edit Properties </span></td>
| |
| − | <td>opens the '''Properties''' window of the selected spline</td>
| |
| − | </tr>
| |
| − | </table>
| |
| − | </td>
| |
| − | </tr>
| |
| − | </table>
| |
| − | <br>
| |
| − | <table> <!-- BEGIN Nav Buttons Table -->
| |
| − | <tr valign="top">
| |
| − | <td width=729><span id="stepFineAdjustment"></span> </td>
| |
| − | <td width=46>[[image:BackToTop.png|link=#top|alt=Top|Top]]</td>
| |
| − | <td width=75>[[image:NextUp.png|link=#stepFreeMove|alt=Next Up|Top]]</td>
| |
| − | <td width=75>[[image:NextDown.png|link=#stepMarquee|alt=Next Down|Next Down]]</td>
| |
| − | <td width=75>[[image:BackToBottom.png|link=#bottom|alt=Bottom|Bottom]]</td>
| |
| − | </tr>
| |
| − | </table> <!-- END Nav Buttons Table -->
| |
| − |
| |
| − | ='''The Fine Adjustment Tool'''=
| |
| − |
| |
| − | <table width=1000>
| |
| − | <tr valign="top">
| |
| − | <td width=40>[[image:S20_FineAdjustmentToolIcon.png|link=]]</td>
| |
| − | <td width=160>'''Keyboard Shortcut:''' <span style="color: white; background-color: black; font-weight: 700; font-size: 17px;"> D </span></td>
| |
| − | <td width=800><span style="font-weight: 700; font-size: 15px;">The <span style="color: white; background-color: black;"> Fine Adjustment Tool </span> makes 3D adjustments (position and rotations) to objects in a route</span></td>
| |
| − | </tr>
| |
| − | </table>
| |
| − | <br>
| |
| − |
| |
| − | <table width=900 bgcolor=#000000>
| |
| − | <tr valign="top">
| |
| − | <td>
| |
| − | <table width=896 bgcolor=#ffffff>
| |
| − | <tr valign="top">
| |
| − | <td>This tool uses the '''Tool Options Palette'''. If this palette is not visible on the screen then refer to [[image:PageLink.PNG|link=]] '''[[#Notes_Palettes|Notes: Palettes]]''' at the top of this document.
| |
| − | </td>
| |
| − | </tr>
| |
| − | </table>
| |
| − | </td>
| |
| − | </tr>
| |
| − | </table>
| |
| − | <br>
| |
| − | When selected, the '''Fine Adjustment Tool''' has no drop down menu lists.<br>
| |
| − |
| |
| − | <table width=900>
| |
| − | <tr valign="top">
| |
| − | <td width=200>[[image:FineAdjustmentTools_S20.png|link=|alt=Fine Adjustment Tools]]</td>
| |
| − | <td>
| |
| − | <table width=700>
| |
| − | <tr valign="top">
| |
| − | <td>
| |
| − | <table bgcolor=#000000 width=700 cellpadding=2>
| |
| − | <tr valign="top">
| |
| − | <td>
| |
| − | <table bgcolor=#ffffe0 width=696 cellpadding=2>
| |
| − | <tr valign="top">
| |
| − | <td>[[image:PencilTips.PNG|link=]]</td>
| |
| − | <td><span style="font-weight: 700; font-size: 15px;">Fine Adjustment Alternatives</span><td>
| |
| − | </tr>
| |
| − | <tr valign="top">
| |
| − | <td colspan=2>In addition to the '''Fine Adjustment Tool''' the position and height of objects can be changed by:-</td>
| |
| − | </tr>
| |
| − | <tr valign="top">
| |
| − | <td width=10>[[image:DotPoint.JPG|10px|link=]]</td>
| |
| − | <td>using the [[image:PageLink.PNG|link=]] '''[[#The Free Move Tool|Free Move Tool]]'''</td>
| |
| − | </tr>
| |
| − | <tr valign="top">
| |
| − | <td>[[image:DotPoint.JPG|10px|link=]]</td>
| |
| − | <td>editing its <span style="font-size: 15px; font-weight: 700; color: white; background-color: black;"> X </span> <span style="font-size: 15px; font-weight: 700; color: white; background-color: black;"> Y </span> <span style="font-size: 15px; font-weight: 700; color: white; background-color: black;"> Z </span> <span style="font-size: 15px; font-weight: 700; color: white; background-color: black;"> R </span> <span style="font-size: 15px; font-weight: 700; color: white; background-color: black;"> P </span> <span style="font-size: 15px; font-weight: 700; color: white; background-color: black;"> Y </span> values in [[image:PageLink.PNG|link=]] '''[[#The Info Palette|The Info Palette]]'''</td>
| |
| − | </tr>
| |
| − | <tr valign="top">
| |
| − | <td width=10>[[image:DotPoint.JPG|10px|link=]]</td>
| |
| − | <td>selecting the <span style="font-size: 15px; font-weight: 700; color: white; background-color: black;"> Apply Height </span> option in its '''Context Menu'''</td>
| |
| − | </tr>
| |
| − | </table>
| |
| − | </td>
| |
| − | </tr>
| |
| − | </table>
| |
| − | </td>
| |
| − | </tr>
| |
| − | </table>
| |
| − | </td>
| |
| − | </tr>
| |
| − | </table>
| |
| − | <br>
| |
| − | The most obvious feature of the '''Fine Adjustment Tool''' is the '''3D Anchor Frame''' it adds to the selected object.<br>
| |
| − |
| |
| − | <table width=900>
| |
| − | <tr valign="top">
| |
| − | <td width=250>[[image:FineAdjust3DFrame_S20.png|link=]]</td>
| |
| − | <td width=650>The coloured lines, called <span style="font-weight: 700; font-size: 15px; background-color: lightcyan;"> Anchors </span>, allow manual positional and rotational controls:-
| |
| − | <table width=650>
| |
| − | <tr valign="top">
| |
| − | <td colspan=2><span style="font-weight: 700; font-size: 15px; color: white; background-color: black;"> The Horizontal and Vertical Anchors </span></td>
| |
| − | </tr>
| |
| − | <tr valign="top">
| |
| − | <td width=150><span style="font-weight: 700; font-size: 15px; color: white; background-color: red;"> Red </span> <span style="font-weight: 700; font-size: 15px; color: white; background-color: green;"> Green </span> <span style="font-weight: 700; font-size: 15px; color: white; background-color: blue;"> Blue </span></td>
| |
| − | <td>move the object (forward and back) in the direction of the '''Anchor'''</td>
| |
| − | </tr>
| |
| − | <tr valign="top">
| |
| − | <td colspan=2><span style="font-weight: 700; font-size: 15px; color: white; background-color: black;"> The Rotational Anchors </span></td>
| |
| − | </tr>
| |
| − | <tr valign="top">
| |
| − | <td width=150><span style="font-weight: 700; font-size: 15px; color: white; background-color: red;"> Red </span> <span style="font-weight: 700; font-size: 15px; color: white; background-color: green;"> Green </span> <span style="font-weight: 700; font-size: 15px; color: white; background-color: blue;"> Blue </span></td>
| |
| − | <td>rotate the object (clockwise and anti-clockwise) along the '''Anchor'''</td>
| |
| − | </tr>
| |
| − | <tr valign="top">
| |
| − | <td colspan=2>
| |
| − | <table bgcolor=#000000 weight=650 cellpadding=2>
| |
| − | <tr valign="top">
| |
| − | <td>
| |
| − | <table bgcolor=#ffffff width=646 cellpadding=2>
| |
| − | <tr valign="top">
| |
| − | <td colspan=2>To use the '''Fine Adjustment Tool''' controls:-</td>
| |
| − | </tr>
| |
| − | <tr valign="top">
| |
| − | <td width=20>[[image:DotPoint1.JPG|link=]]</td>
| |
| − | <td>move the mouse pointer onto an Anchor - its colour will change to white</td>
| |
| − | </tr>
| |
| − | <tr valign="top">
| |
| − | <td width=20>[[image:DotPoint2.JPG|link=]]</td>
| |
| − | <td>hold down the '''Left''' button</td>
| |
| − | </tr>
| |
| − | <tr valign="top">
| |
| − | <td width=20>[[image:DotPoint3.JPG|link=]]</td>
| |
| − | <td>drag the pointer along the chosen line in the direction required (e.g. Up or Down on the blue vertical Anchor)</td>
| |
| − | </tr>
| |
| − | </table>
| |
| − | </td>
| |
| − | </tr>
| |
| − | </table>
| |
| − | </td>
| |
| − | </tr>
| |
| − | </table>
| |
| − | </td>
| |
| − | </tr>
| |
| − | </table>
| |
| − | <br>
| |
| − | <table bgcolor=#000000 width=700 cellpadding=2>
| |
| − | <tr valign="top">
| |
| − | <td>
| |
| − | <table bgcolor=#ffffb0 width=696 cellpadding=2>
| |
| − | <tr valign="top">
| |
| − | <td>[[image:NotePad.PNG|link=]]</td>
| |
| − | <td><span style="font-size: 17px; font-weight: 700;">Notes:'''</span><br>
| |
| − | ----
| |
| − | Not all objects will have <span style="font-weight: 700; font-size: 15px; color: white; background-color: red;"> Red </span> and/or <span style="font-weight: 700; font-size: 15px; color: white; background-color: green;"> Green </span> rotational Anchors.
| |
| − | </td>
| |
| − | </tr>
| |
| − | </table>
| |
| − | </td>
| |
| − | </tr>
| |
| − | </table>
| |
| − | <br>
| |
| − | =='''For Scenery Mesh Objects'''==
| |
| − |
| |
| − | Individual "non-spline" scenery objects that are not attached to track are often referred to in '''Trainz''' terminology as <span style="font-weight: 700; font-size: 15px; background-color: lightcyan;"> Scenery Mesh Objects </span>.<br>
| |
| − |
| |
| − | You can move the objects freely in the horizontal plane by using a '''Left Click and Drag" anywhere on the selected object except on an '''Anchor''' point or line.<br>
| |
| − |
| |
| − | <table>
| |
| − | <tr valign="top">
| |
| − | <td width=250 align="center"><span style="font-weight: 700; font-size: 15px; color: white; background-color: blue;"> Blue </span> vertical Anchor movement<br>[[image:FineAdjustZMove_S20.png|link=]]</td>
| |
| − | <td width=20> </td>
| |
| − | <td width=250 align="center"><span style="font-weight: 700; font-size: 15px; color: white; background-color: green;"> Green </span> Anchor rotation<br>[[image:FineAdjustYawMove_S20.png|link=]]</td>
| |
| − | <td width=20> </td>
| |
| − | <td width=250 align="center"><span style="font-weight: 700; font-size: 15px; color: white; background-color: red;"> Red </span> Anchor rotation<br>[[image:FineAdjustPitchMove_S20.png|link=]]</td>
| |
| − | <td width=20> </td>
| |
| − | <td width=250 align="center"><span style="font-weight: 700; font-size: 15px; color: white; background-color: blue;"> Blue </span> Anchor rotation<br>[[image:FineAdjustRotateXYMove_S20.png|link=]]</td>
| |
| − | </tr>
| |
| − | </table>
| |
| − | <br>
| |
| − | <table>
| |
| − | <tr valign="top>
| |
| − | <td width=900>
| |
| − | <table bgcolor=#000000 width=480 cellpadding=2>
| |
| − | <tr valign="top">
| |
| − | <td>
| |
| − | <table bgcolor=#ffffb0 width=896 cellpadding=2>
| |
| − | <tr valign="top">
| |
| − | <td>[[image:NotePad.PNG|link=]]</td>
| |
| − | <td><span style="font-size: 17px; font-weight: 700;">Notes:'''</span><br>
| |
| − | ----
| |
| − | Objects can be restored to their original height and rotation settings by opening their '''Context Menu''' and selecting either:-
| |
| − | <table>
| |
| − | <tr valign="top">
| |
| − | <td>[[image:Ablue.png|link=]]</td>
| |
| − | <td><span style="font-weight: 700; font-size: 15px; color: white; background-color: black;"> Reset Object Rotation </span> to cancel the rotation changes, <span style="font-weight: 700; font-size: 15px;">OR</span></td>
| |
| − | </tr>
| |
| − | <tr valign="top">
| |
| − | <td>[[image:Bblue.png|link=]]</td>
| |
| − | <td><span style="font-weight: 700; font-size: 15px; color: white; background-color: black;"> Settle on Ground </span> to cancel the height change</td>
| |
| − | </tr>
| |
| − | </table>
| |
| − | The <span style="font-weight: 700; font-size: 15px; color: white; background-color: black;"> Randomise Object Rotation </span> option in the '''Context Menu''' only affects rotations around the vertical axis.
| |
| − | </td>
| |
| − | </tr>
| |
| − | </table>
| |
| − | </td>
| |
| − | </tr>
| |
| − | </table>
| |
| − | </td>
| |
| − | </tr>
| |
| − | </table>
| |
| − | <br>
| |
| − | <span style="font-weight: 700; font-size: 17px; color: white; background-color: blue;"> Selecting Multiple Objects </span><br>
| |
| − |
| |
| − | Multiple objects can be selected with the '''Fine Adjustment Tool'''.<br>
| |
| − |
| |
| − | <table width=1000>
| |
| − | <tr valign="top">
| |
| − | <td width=300>[[image:FineAdjustMultiGroup_S20.png|link=]]</td>
| |
| − | <td width=300>[[image:FineAdjustMultiSelect_S20.png|link=]]</td>
| |
| − | <td>
| |
| − | <table bgcolor=#000000 width=400 cellpadding=2>
| |
| − | <tr valign="top">
| |
| − | <td>
| |
| − | <table bgcolor=#ffffff width=396 cellpadding=2>
| |
| − | <tr valign="top">
| |
| − | <td colspan=2>To select multiple objects:-</td>
| |
| − | </tr>
| |
| − | <tr valign="top">
| |
| − | <td>[[image:DotPoint1.JPG|link=]]</td>
| |
| − | <td>Select the '''Fine Adjustment Tool''' or press the <span style="font-weight: 700; font-size: 15px; color: white; background-color: black;"> D </span> key
| |
| − | </td>
| |
| − | </tr>
| |
| − | <tr valign="top">
| |
| − | <td>[[image:DotPoint2.JPG|link=]]</td>
| |
| − | <td>Hold the <span style="font-weight: 700; font-size: 15px; color: white; background-color: black;"> Shift </span> key down</td>
| |
| − | </tr>
| |
| − | <tr valign="top">
| |
| − | <td>[[image:DotPoint3.JPG|link=]]</td>
| |
| − | <td>'''Left''' click on each object that is to be included in the selection group</td>
| |
| − | </tr>
| |
| − | </table>
| |
| − | </td>
| |
| − | </tr>
| |
| − | </table>
| |
| − | <br>
| |
| − | <table bgcolor=#000000 width=400 cellpadding=2>
| |
| − | <tr valign="top">
| |
| − | <td>
| |
| − |
| |
| − | <table bgcolor=#ffffb0 width=396 cellpadding=2>
| |
| − | <tr valign="top">
| |
| − | <td>[[image:NotePad.PNG|link=]]</td>
| |
| − | <td><span style="font-size: 17px; font-weight: 700;">Notes:'''</span><br>
| |
| − | The last object selected will have the '''3D Anchor Frame''' and '''Context Icon''' attached to it. If that object limits the allowed '''Anchor rotations''' then that limitation will be applied to all the objects in the selection.
| |
| − | </td>
| |
| − | </tr>
| |
| − | </table>
| |
| − | </td>
| |
| − | </tr>
| |
| − | </table>
| |
| − | </td>
| |
| − | </tr>
| |
| − | </table>
| |
| − | <br>
| |
| − | <table bgcolor=#000000 width=700 cellpadding=2>
| |
| − | <tr valign="top">
| |
| − | <td>
| |
| − | <table bgcolor=#ffffe0 width=696 cellpadding=2>
| |
| − | <tr valign="top">
| |
| − | <td>[[image:PencilTips.PNG|link=]]</td>
| |
| − | <td>
| |
| − | <table>
| |
| − | <tr valign="top">
| |
| − | <td width=10>[[image:DotPoint.JPG|10px|link=]]</td>
| |
| − | <td>If one of the objects in the group has movement restrictions then do not select it as the last object unless its restrictions are not an issue.</td>
| |
| − | </tr>
| |
| − | <tr valign="top">
| |
| − | <td>[[image:DotPoint.JPG|10px|link=]]</td>
| |
| − | <td>To see if any objects have movement restrictions, '''Left''' click on each one in turn to check its '''3D Anchor Frame'''. If an '''Anchor''' is not showing in the frame then there is a movement restriction.</td>
| |
| − | </tr>
| |
| − | </table>
| |
| − | </td>
| |
| − | </tr>
| |
| − | </table>
| |
| − | </td>
| |
| − | </tr>
| |
| − | </table>
| |
| − | <br>
| |
| − | In the examples shown above, the car and the pole have no movement restrictions while the tree does not allow rotations through the <span style="font-weight: 700; font-size: 15px; color: white; background-color: red;"> Red </span> and <span style="font-weight: 700; font-size: 15px; color: white; background-color: green;"> Green </span> rotational Anchors.<br>
| |
| − | <br>
| |
| − | The car was the last selected object so it has the '''Context Icon''' and the '''3D Anchor Frame'''.<br>
| |
| − |
| |
| − | <table width=700>
| |
| − | <tr valign="top">
| |
| − | <td width=300>[[image:FineAdjustMultiRotate_S20.png|link=]]</td>
| |
| − | <td>Using the <span style="font-weight: 700; font-size: 15px; color: white; background-color: blue;"> Blue </span> rotation Anchor, all the objects are rotated in the horizontal plane around the '''3D Anchor Frame''' which is attached to the car, the last object that was selected. The '''3D Anchor Frame''' on the car is the centre of all rotations.</td>
| |
| − | </tr>
| |
| − | <tr valign="top">
| |
| − | <td width=300>[[image:FineAdjustMultiYaw_S20.png|link=]]</td>
| |
| − | <td>Restarting from their original positions and using the <span style="font-weight: 700; font-size: 15px; color: white; background-color: green;"> Green </span> rotation Anchor, the car and pole objects are rotated
| |
| − | through a horizontal plane which runs through the 3D Anchor Frame. The tree does not move.</td>
| |
| − | </tr>
| |
| − | <tr valign="top">
| |
| − | <td width=300>[[image:FineAdjustMultiPitch_S20.png|link=]]</td>
| |
| − | <td>Again restarting from their original positions and using the <span style="font-weight: 700; font-size: 15px; color: white; background-color: red;"> Red </span> rotation Anchor , the car and pole objects are rotated through a horizontal plane which runs through the 3D Anchor Frame. This time the tree does move but vertically upwards. It does not rotate like the car and the pole.</td>
| |
| − | </tr>
| |
| − | </table>
| |
| − | <br>
| |
| − | <span style="font-weight: 700; font-size: 17px; color: white; background-color: blue;"> Mesh Object Context Menu </span><br>
| |
| − | <br>
| |
| − | <table width=1000>
| |
| − | <tr valign="top">
| |
| − | <td width=220>[[image:ContextMenuMeshObject_S20.png|link=]]</td>
| |
| − | <td width=780>
| |
| − | <table width=780 bgcolor=#000000>
| |
| − | <tr valign="top">
| |
| − | <td>
| |
| − | <table width=776 bgcolor=#ffffff>
| |
| − | <tr valign="top">
| |
| − | <td width=240><span style="font-weight: 700; color: white; background-color: black;"> Cut </span></td>
| |
| − | <td>remove the selected object or objects and move them into the '''Scrapbook'''</td>
| |
| − | </tr>
| |
| − | <tr valign="top">
| |
| − | <td><span style="font-weight: 700; color: white; background-color: black;"> Copy </span></td>
| |
| − | <td>copy the selected object or objects and place them into the '''Scrapbook'''</td>
| |
| − | </tr>
| |
| − | <tr valign="top">
| |
| − | <td><span style="font-weight: 700; color: white; background-color: black;"> Paste </span></td>
| |
| − | <td>paste the contents of the current '''Scrapbook''' at the cursor (focus) point</td>
| |
| − | </tr>
| |
| − | <tr valign="top">
| |
| − | <td><span style="font-weight: 700; color: white; background-color: black;"> Delete </span></td>
| |
| − | <td>delete the selected objects. It has the same effect as pressing the <span style="font-weight: 700; font-size: 15px; color: white; background-color: black;"> Delete </span> key</td>
| |
| − | </tr>
| |
| − | <tr valign="top">
| |
| − | <td><span style="font-weight: 700; color: white; background-color: black;"> Replace Object with Selected Asset </span></td>
| |
| − | <td>the highlighted object will be replaced with the asset currently selected in the '''Assets Palette'''</td>
| |
| − | </tr>
| |
| − | <tr valign="top">
| |
| − | <td><span style="font-weight: 700; color: white; background-color: black;"> Paint Under Selected </span></td>
| |
| − | <td>the texture selected in the '''Assets Palette''' will be painted under the highlighted object. The '''Tool Options''' for the '''Brush Tool''' ('''Radius''' and '''Sensitivity''') will control how the texture is applied</td>
| |
| − | </tr>
| |
| − | <tr valign="top">
| |
| − | <td><span style="font-weight: 700; color: white; background-color: black;"> Smooth Ground Under Selected </span></td>
| |
| − | <td>changes the height of the terrain under the object to match the set height of the object. If multiple objects at different heights have been selected then the terrain height will be set to match the height of the lowest object</td>
| |
| − | </tr>
| |
| − | <tr valign="top">
| |
| − | <td><span style="font-weight: 700; color: white; background-color: black;"> Settle on Ground </span></td>
| |
| − | <td>sets the height of the objects to match the height of the terrain beneath them ("drops them back to earth")</td>
| |
| − | </tr>
| |
| − | <tr valign="top">
| |
| − | <td><span style="font-weight: 700; color: white; background-color: black;"> Apply Height </span></td>
| |
| − | <td>sets the height of the objects to the value in the '''Tool Options''' <span style="font-weight: 700; font-size: 15px; color: white; background-color: black;"> Height </span> text box</td>
| |
| − | </tr>
| |
| − | <tr valign="top">
| |
| − | <td><span style="font-weight: 700; color: white; background-color: black;"> Reset Object Rotation </span></td>
| |
| − | <td>resets the rotation angle of the objects to their default values</td>
| |
| − | </tr>
| |
| − | <tr valign="top">
| |
| − | <td><span style="font-weight: 700; color: white; background-color: black;"> Randomise Object Rotation </span></td>
| |
| − | <td>applies a random rotation angle to each object</td>
| |
| − | </tr>
| |
| − | <tr valign="top">
| |
| − | <td><span style="font-weight: 700; color: white; background-color: black;"> Select in Assets Palette </span></td>
| |
| − | <td>identifies the selected object in the '''Asset Palette''' like the '''Eyedropper Tool'''</td>
| |
| − | </tr>
| |
| − | <tr valign="top">
| |
| − | <td><span style="font-weight: 700; color: white; background-color: black;"> Edit Properties </span></td>
| |
| − | <td>opens the '''Properties''' window of the selected object</td>
| |
| − | </tr>
| |
| − | </table>
| |
| − | </td>
| |
| − | </tr>
| |
| − | </table>
| |
| − | </td>
| |
| − | </tr>
| |
| − | </table>
| |
| − | <br>
| |
| − |
| |
| − | =='''For Track Objects'''==
| |
| − |
| |
| − | '''Track Objects''' (signals, switches, speed signs, etc) are always attached to an existing track. They can be moved to new positions along the track and in '''Surveyor Classic''' that was the limit of their movement.<br>
| |
| − |
| |
| − | '''Surveyor 2.0''' brings a new freedom of movement to track objects. They can be moved away from the track to the left or right as well as above and below the track. The operation of a track object is not affected by these changes.<br>
| |
| − |
| |
| − | <table width=900>
| |
| − | <tr valign="top">
| |
| − | <td width=250>[[image:FineAdjustTrackObject_S20.png|link=]]</td>
| |
| − | <td>
| |
| − | <table bgcolor=#000000 width=550 cellpadding=2>
| |
| − | <tr valign="top">
| |
| − | <td>
| |
| − | <table bgcolor=#ffffe0 width=546 cellpadding=2>
| |
| − | <tr valign="top">
| |
| − | <td>[[image:PencilTips.PNG|link=]]</td>
| |
| − | <td colspan=2>Situations where this feature is useful include:-</td>
| |
| − | </tr>
| |
| − | <tr valign="top">
| |
| − | <td width=10>[[image:DotPoint.JPG|10px|link=]]</td>
| |
| − | <td>placing '''Track Marks''' and '''Triggers''' above or beside the track so that they are not hidden by consists parked on top of them</td>
| |
| − | </tr>
| |
| − | <tr valign="top">
| |
| − | <td>[[image:DotPoint.JPG|10px|link=]]</td>
| |
| − | <td>repositioning switches, signals, track signs closer to or further away from the track - particularly useful if the track object was originally created for a different gauge track
| |
| − | </td>
| |
| − | </tr>
| |
| − | </table>
| |
| − | </td>
| |
| − | </tr>
| |
| − | </table>
| |
| − | </td>
| |
| − | </tr>
| |
| − | </table>
| |
| − | <br>
| |
| − | <table bgcolor=#000000 width=850 cellpadding=2>
| |
| − | <tr valign="top">
| |
| − | <td>
| |
| − | <table bgcolor=#ffffb0 width=846 cellpadding=2>
| |
| − | <tr valign="top">
| |
| − | <td>[[image:NotePad.PNG|link=]]</td>
| |
| − | <td>Track objects can be restored to their original height and position (on the track) by opening their '''Context Menu''' and selecting:-
| |
| − | <table>
| |
| − | <tr valign="top:>
| |
| − | <td width=20>[[image:Ablue.png|link=]]</td>
| |
| − | <td><span style="font-weight: 700; font-size: 15px; color: white; background-color: black;"> Reattach to Track </span> to cancel the both the height and position changes, <span style="font-size: 15px; font-weight: 700;">OR</span></td>
| |
| − | </tr>
| |
| − | <tr valign="top:>
| |
| − | <td width=20>[[image:Bblue.png|link=]]</td>
| |
| − | <td><span style="font-weight: 700; font-size: 15px; color: white; background-color: black;"> Settle on Ground </span> to cancel the height change only</td>
| |
| − | </tr>
| |
| − | </table>
| |
| − | </td>
| |
| − | </tr>
| |
| − | </table>
| |
| − | </td>
| |
| − | </tr>
| |
| − | </table>
| |
| − | <br>
| |
| − | Track objects can also be rotated to the opposite side of the track.
| |
| − | <table width=900>
| |
| − | <tr valign="top">
| |
| − | <td width=400>[[image:FineAdjustTrackObjectReversed_S20.png|400px|link=]]</td>
| |
| − | <td>
| |
| − | <table bgcolor=#000000 width=500 cellpadding=2>
| |
| − | <tr valign="top">
| |
| − | <td>
| |
| − | <table bgcolor=#ffffff width=496 cellpadding=2>
| |
| − | <tr valign="top">
| |
| − | <td colspan=2>To rotate a track object:-</td>
| |
| − | </tr>
| |
| − | <tr valign="top">
| |
| − | <td width=20>[[image:DotPoint1.JPG|link=]]</td>
| |
| − | <td>Open the track objects '''Context Menu''' (click the icon or press the <span style="font-weight: 700; font-size: 15px; color: white; background-color: black;"> T </span> key)</td>
| |
| − | </tr>
| |
| − | <tr valign="top">
| |
| − | <td width=20>[[image:DotPoint2.JPG|link=]]</td>
| |
| − | <td>Select the option <span style="font-weight: 700; font-size: 15px; color: white; background-color: black;"> Rotate Trackside </span></td>
| |
| − | </tr>
| |
| − | <tr valign="top">
| |
| − | <td colspan=2>Rotating a track object does not change its distance from the track.
| |
| − | </td>
| |
| − | </tr>
| |
| − | </table>
| |
| − | </td>
| |
| − | </tr>
| |
| − | </table>
| |
| − | </td>
| |
| − | </tr>
| |
| − | </table>
| |
| − | <br>
| |
| − | =='''For Spline Objects (Including Track)'''==
| |
| − |
| |
| − | Scenery splines and track splines are defined by their '''endpoints'''. Splines are usually added to a route as a series of joined segments linked at the endpoints.<br>
| |
| − |
| |
| − | <table bgcolor=#000000 width=600 cellpadding=2>
| |
| − | <tr valign="top">
| |
| − | <td>
| |
| − | <table bgcolor=#ffffff width=596 cellpadding=2>
| |
| − | <tr valign="top">
| |
| − | <td colspan=2>Moving a spline can involve moving:-</td>
| |
| − | </tr>
| |
| − | <tr valign="top">
| |
| − | <td width=20>[[image:Ablue.png|link=]]</td>
| |
| − | <td>an endpoint, <span style="font-size: 15px; font-weight: 700;">OR</span></td>
| |
| − | </tr>
| |
| − | <tr valign="top:>
| |
| − | <td width=20>[[image:Bblue.png|link=]]</td>
| |
| − | <td>a segment, <span style="font-size: 15px; font-weight: 700;">OR</span></td>
| |
| − | </tr>
| |
| − | <tr valign="top:>
| |
| − | <td width=20>[[image:Cblue.png|link=]]</td>
| |
| − | <td>multiple segments including the whole length of the spline</td>
| |
| − | </tr>
| |
| − | </table>
| |
| − | </td>
| |
| − | </tr>
| |
| − | </table>
| |
| − | <br>
| |
| − | <span style="font-weight: 700; font-size: 17px; color: white; background-color: blue;"> Moving Spline Endpoints </span><br>
| |
| − |
| |
| − | <table width=900>
| |
| − | <tr valign="top">
| |
| − | <td width=280>[[image:FineAdjustSplineEndPoint_S20.png|link=]]</td>
| |
| − | <td width=620>
| |
| − | <table bgcolor=#000000 width=620 cellpadding=2>
| |
| − | <tr valign="top">
| |
| − | <td>
| |
| − | <table bgcolor=#ffffff width=616 cellpadding=2>
| |
| − | <tr valign="top">
| |
| − | <td colspan=2>To move an individual spline endpoint:-</td>
| |
| − | </tr>
| |
| − | <tr valign="top">
| |
| − | <td width=20>[[image:DotPoint1.JPG|link=]]</td>
| |
| − | <td>Select the '''Fine Adjustment Tool'''.</td>
| |
| − | </tr>
| |
| − | <tr valign="top">
| |
| − | <td>[[image:DotPoint2.JPG|link=]]</td>
| |
| − | <td>Select, '''Left''' click on, the spline endpoint to be moved.</td>
| |
| − | </tr>
| |
| − | <tr valign="top">
| |
| − | <td colspan=2>'''Note:''' only the horizontal <span style="font-weight: 700; font-size: 15px; color: white; background-color: red;"> Red </span> and <span style="font-weight: 700; font-size: 15px; color: white; background-color: green;"> Green </span> and the vertical <span style="font-weight: 700; font-size: 15px; color: white; background-color: blue;"> Blue </span> lines can be selected.</td>
| |
| − | </tr>
| |
| − | <tr valign="top">
| |
| − | <td>[[image:DotPoint3.JPG|link=]]</td>
| |
| − | <td>'''Left Click and Drag''' either:-
| |
| − | <table>
| |
| − | <tr valign-"top">
| |
| − | <td>[[image:Ablue.png|link=]]</td>
| |
| − | <td>an '''Anchor''' to move the endpoint in that specific direction, <span style="font-size: 15px; font-weight: 700;">OR</span></td>
| |
| − | </tr>
| |
| − | <tr valign-"top">
| |
| − | <td>[[image:Bblue.png|link=]]</td>
| |
| − | <td>the endpoint itself to move it in any direction in the horizontal plane</td>
| |
| − | </tr>
| |
| − | </table>
| |
| − | </td>
| |
| − | </tr>
| |
| − | </table>
| |
| − | </td>
| |
| − | </tr>
| |
| − | </table>
| |
| − | </td>
| |
| − | </tr>
| |
| − | </table>
| |
| − | <br>
| |
| − | <span style="font-weight: 700; font-size: 17px; color: white; background-color: blue;"> Moving Spline Segments </span><br>
| |
| − |
| |
| − | <table bgcolor=#000000 width=500 cellpadding=2>
| |
| − | <tr valign="top">
| |
| − | <td>
| |
| − | <table bgcolor=#ffffb0 width=496 cellpadding=2>
| |
| − | <tr valign="top">
| |
| − | <td width=20>[[image:NotePad.PNG|link=]]</td>
| |
| − | <td><span style="font-size: 17px; font-weight: 700;">Notes:</span></td>
| |
| − | </tr>
| |
| − | <tr valign="top">
| |
| − | <td> </td>
| |
| − | <td>The <span style="font-weight: 700; font-size: 15px; color: white; background-color: green;"> Green </span> rotational Anchor '''CANNOT''' be used on '''Track splines'''
| |
| − | </td>
| |
| − | </tr>
| |
| − | </table>
| |
| − | </td>
| |
| − | </tr>
| |
| − | </table>
| |
| − | <br>
| |
| − | <table width=900>
| |
| − | <tr valign="top">
| |
| − | <td width=280>[[image:FineAdjustSplineSegment_S20.png|link=]]</td>
| |
| − | <td width=620>
| |
| − | <table bgcolor=#000000 width=620 cellpadding=2>
| |
| − | <tr valign="top">
| |
| − | <td>
| |
| − | <table bgcolor=#ffffff width=616 cellpadding=2>
| |
| − | <tr valign="top">
| |
| − | <td colspan=2>To move spline segments:-</td>
| |
| − | </tr>
| |
| − | <tr valign="top">
| |
| − | <td width=20>[[image:DotPoint1.JPG|link=]]</td>
| |
| − | <td>Select the '''Fine Adjustment Tool'''.</td>
| |
| − | </tr>
| |
| − | <tr valign="top">
| |
| − | <td>[[image:DotPoint2.JPG|link=]]</td>
| |
| − | <td>Select, '''Left''' click on, the spline segment to be moved.</tr>
| |
| − | <tr valign="top">
| |
| − | <td>[[image:DotPoint3.JPG|link=]]</td>
| |
| − | <td>'''Left Click and Drag''' either:-</td>
| |
| − | </tr>
| |
| − | <tr valign="top">
| |
| − | <td> </td>
| |
| − | <td>
| |
| − | <table>
| |
| − | <tr valign-"top">
| |
| − | <td>[[image:Ablue.png|link=]]</td>
| |
| − | <td>an '''Anchor''' to move the endpoint in that specific direction, <span style="font-size: 15px; font-weight: 700;">OR</span></td>
| |
| − | </tr>
| |
| − | <tr valign-"top">
| |
| − | <td>[[image:Bblue.png|link=]]</td>
| |
| − | <td>anywhere in a segment to move it in any direction in the horizontal plane</td>
| |
| − | </tr>
| |
| − | </table>
| |
| − | </td>
| |
| − | </tr>
| |
| − | </table>
| |
| − | </td>
| |
| − | </tr>
| |
| − | </table>
| |
| − | </td>
| |
| − | </tr>
| |
| − | </table>
| |
| − | <br>
| |
| − | <table bgcolor=#000000 width=900 cellpadding=2>
| |
| − | <tr valign="top">
| |
| − | <td>
| |
| − | <table bgcolor=#ffffe0 width=896 cellpadding=2>
| |
| − | <tr valign="top">
| |
| − | <td>[[image:PencilTips.PNG|link=]]</td>
| |
| − | <td>To select:-
| |
| − | <table>
| |
| − | <tr valign-"top">
| |
| − | <td>[[image:Ablue.png|link=]]</td>
| |
| − | <td>more than one segment. Hold the <span style="font-weight: 700; font-size: 15px; color: white; background-color: black;"> Shift </span> key down and individually '''Left''' click on each segment</td>
| |
| − | </tr>
| |
| − | <tr valign-"top">
| |
| − | <td>[[image:Bblue.png|link=]]</td>
| |
| − | <td>'''ALL''' the segments. '''Dbl-Left''' click on a segment. If the spline contains a junction then this will only select all the segments upto the junction point</td>
| |
| − | </tr>
| |
| − | </table>
| |
| − | </td>
| |
| − | </tr>
| |
| − | </table>
| |
| − | </td>
| |
| − | </tr>
| |
| − | </table>
| |
| − | <br>
| |
| − | <table width=900>
| |
| − | <tr valign="top">
| |
| − | <td width=320>[[image:FineAdjustSplineSegmentStraight_S20.png|link=]]</td>
| |
| − | <td>Selecting a spline segment with the '''Fine Adjustment Tool''' will add a '''Temporary Endpoint''' at the point where the segment was clicked.<br>
| |
| − | <br>
| |
| − | This will produce 3 '''Fine Adjustment Tool''' control frames, one at each end of the segment and one at the click point, as shown in the image on the left. The whole segment can be moved, as shown in the following images, by a '''Left Click and Drag''' anywhere within the segment.</td>
| |
| − | </tr>
| |
| − | </table>
| |
| − |
| |
| − | <table width=640>
| |
| − | <tr valign="top">
| |
| − | <td width=320>[[image:FineAdjustSplineSegmentXYMove_S20.png|link=]]<br>
| |
| − | Segment moved to the right along the <span style="font-weight: 700; font-size: 15px; color: white; background-color: red;"> Red </span> line</td>
| |
| − | <td width=320>[[image:FineAdjustSplineSegmentZMove_S20.png|link=]]<br>
| |
| − | Segment moved up along the <span style="font-weight: 700; font-size: 15px; color: white; background-color: blue;"> Blue </span> line</td>
| |
| − | </tr>
| |
| − | <tr valign="top">
| |
| − | <td width=320>[[image:FineAdjustSplineSegmentRotate_S20.png|link=]]<br>
| |
| − | Segment rotated anti-clockwise around the <span style="font-weight: 700; font-size: 15px; color: white; background-color: blue;"> Blue </span> Anchor</td>
| |
| − | <td width=320>[[image:FineAdjustSplineSegmentPitch_S20.png|link=]]<br>
| |
| − | Segment rotated clockwise the <span style="font-weight: 700; font-size: 15px; color: white; background-color: red;"> Red </span> Anchor</td>
| |
| − | </tr>
| |
| − | </table>
| |
| − | </td>
| |
| − | </tr>
| |
| − | </table>
| |
| − | <br>
| |
| − | <table bgcolor=#000000 width=900 cellpadding=2>
| |
| − | <tr valign="top">
| |
| − | <td>
| |
| − | <table bgcolor=#ffffe0 width=896 cellpadding=2>
| |
| − | <tr valign="top">
| |
| − | <td>[[image:PencilTips.PNG|link=]]</td>
| |
| − | <td>
| |
| − | <table>
| |
| − | <tr valign="top">
| |
| − | <td width=10>[[image:DotPoint.JPG|10px|link=]]</td>
| |
| − | <td>a <span style="font-weight: 700; font-size: 15px; color: white; background-color: blue;"> Blue </span> line height change and a <span style="font-weight: 700; font-size: 15px; color: white; background-color: red;"> Red </span> Anchor rotation can be cancelled at any time (even after saving and reloading the route) by selecting the <span style="font-weight: 700; font-size: 15px; color: white; background-color: black;"> Settle on Ground </span> option from the segments '''Context Menu'''</td>
| |
| − | </tr>
| |
| − | <tr valign="top">
| |
| − | <td>[[image:DotPoint.JPG|10px|link=]]</td>
| |
| − | <td>a <span style="font-weight: 700; font-size: 15px; color: white; background-color: blue;"> Blue </span> Anchor rotation can be straightened at any time (even after saving and reloading the route) by selecting the <span style="font-weight: 700; font-size: 15px; color: white; background-color: black;"> Straighten Spline </span> option from the segments '''Context Menu''' but this will not return the '''endpoints''' to their original positions
| |
| − | </td>
| |
| − | </tr>
| |
| − | </table>
| |
| − | </td>
| |
| − | </tr>
| |
| − | </table>
| |
| − | </td>
| |
| − | </tr>
| |
| − | </table>
| |
| − | <br>
| |
| − | <table> <!-- BEGIN Nav Buttons Table -->
| |
| − | <tr valign="top">
| |
| − | <td width=729><span id="stepMarquee"></span> </td>
| |
| − | <td width=46>[[image:BackToTop.png|link=#top|alt=Top|Top]]</td>
| |
| − | <td width=75>[[image:NextUp.png|link=#stepFineAdjustment|alt=Next Up|Next Up]]</td>
| |
| − | <td width=75>[[image:NextDown.png|link=#stepInfo|alt=Next Down|Next Down]]</td>
| |
| − | <td width=75>[[image:BackToBottom.png|link=#bottom|alt=Bottom|Bottom]]</td>
| |
| − | </tr>
| |
| − | </table> <!-- END Nav Buttons Table -->
| |
| − |
| |
| | <!-- 843 --> | | <!-- 843 --> |
| | The information in this Wiki Page applies to '''Surveyor 2.0 (S20)''' as found in '''Trainz Plus'''.<br> | | The information in this Wiki Page applies to '''Surveyor 2.0 (S20)''' as found in '''Trainz Plus'''.<br> |
| Line 6,514: |
Line 3,413: |
| | </tr> | | </tr> |
| | </table> <!-- END Nav Buttons Table --> | | </table> <!-- END Nav Buttons Table --> |
| − |
| |
| − | ='''The Info Palette'''=
| |
| − |
| |
| − | <table width=900 bgcolor=#000000>
| |
| − | <tr valign="top">
| |
| − | <td>
| |
| − | <table width=896 bgcolor=#ffffff>
| |
| − | <tr valign="top">
| |
| − | <td>If the '''Info Palette''' is not visible on the screen then refer to [[image:PageLink.PNG|link=]] '''[[#Notes_Palettes|Notes: Palettes]]''' at the top of this document. Some '''Info Palette''' functions will also require the '''Assets Palette''' and the '''Tool Options Palette'''.
| |
| − | </td>
| |
| − | </tr>
| |
| − | </table>
| |
| − | </td>
| |
| − | </tr>
| |
| − | </table>
| |
| − | <br>
| |
| − |
| |
| − | This palette can be easily overlooked but it has some very useful features.<br>
| |
| − |
| |
| − | <table width=900>
| |
| − | <tr valign="top">
| |
| − | <td colspan=2>Its uses are:-</td>
| |
| − | </tr>
| |
| − | <tr valign="top">
| |
| − | <td width=10>[[image:DotPoint.JPG|10px|link=]]</td>
| |
| − | <td>to display precise data on the "focus" - the position of the cursor</td>
| |
| − | </tr>
| |
| − | <tr valign="top">
| |
| − | <td>[[image:DotPoint.JPG|10px|link=]]</td>
| |
| − | <td>to display precise data on the position and attitude of objects</td>
| |
| − | </tr>
| |
| − | <tr valign="top">
| |
| − | <td>[[image:DotPoint.JPG|10px|link=]]</td>
| |
| − | <td>to allow precise control over the position and attitude of objects (i.e. it can be used instead of the '''Free Move Tool''' and the '''Fine Adjustment Tool''')</td>
| |
| − | </tr>
| |
| − | <tr valign="top">
| |
| − | <td>[[image:DotPoint.JPG|10px|link=]]</td>
| |
| − | <td>to change the "home" layer and binding layer of a selected object</td>
| |
| − | </tr>
| |
| − | <tr valign="top">
| |
| − | <td>[[image:DotPoint.JPG|10px|link=]]</td>
| |
| − | <td>to lock and unlock layers</td>
| |
| − | </tr>
| |
| − | </table>
| |
| − | <br>
| |
| − | The '''Info Palette''' will appear as shown in the image below.<br>
| |
| − |
| |
| − | <table width=900>
| |
| − | <tr valign="top">
| |
| − | <td width=370>[[image:InfoPalette_S20.png|link=]]</td>
| |
| − | <td valign="middle">Each of the small arrowhead icons will open the palette to display more information and some controls.</td>
| |
| − | </tr>
| |
| − | </table>
| |
| − | <br>
| |
| − | <table bgcolor=#000000 width=900 cellpadding=2>
| |
| − | <tr valign="top">
| |
| − | <td>
| |
| − | <table bgcolor=#ffffb0 width=896 cellpadding=2>
| |
| − | <tr valign="top">
| |
| − | <td>[[image:NotePad.PNG|link=]]</td>
| |
| − | <td><span style="font-size: 17px; font-weight: 700;">Notes:'''</span><br>
| |
| − | ----
| |
| − | All the positional data and controls in the '''Info Palette''' are defined in the following ways:-<br>
| |
| − | <table>
| |
| − | <tr valign="top">
| |
| − | <td><span style="font-weight: 700; font-size: 17px; color: white; background-color: black;"> X </span></td>
| |
| − | <td>is '''ALWAYS''' the <span style="font-weight: 700; font-size: 17px; color: white; background-color: black;"> North-South </span> compass direction regardless of the direction that an asset is facing</td>
| |
| − | </tr>
| |
| − | <tr valign="top">
| |
| − | <td><span style="font-weight: 700; font-size: 17px; color: white; background-color: black;"> Y </span></td>
| |
| − | <td>is '''ALWAYS''' the <span style="font-weight: 700; font-size: 17px; color: white; background-color: black;"> East-West </span> compass direction regardless of the direction that an asset is facing</td>
| |
| − | </tr>
| |
| − | <tr valign="top">
| |
| − | <td><span style="font-weight: 700; font-size: 17px; color: white; background-color: black;"> Z </span></td>
| |
| − | <td>is '''ALWAYS''' the <span style="font-weight: 700; font-size: 17px; color: white; background-color: black;"> Vertical </span> direction (perpendicular to the compass directions) regardless of how an asset has been rolled or tilted</td>
| |
| − | </tr>
| |
| − | <tr valign="top">
| |
| − | <td colspan=2>
| |
| − | ----
| |
| − | </td>
| |
| − | </tr>
| |
| − | <tr valign="top">
| |
| − | <td>[[image:DotPoint.JPG|10px|link=]]</td>
| |
| − | <td>distances are measured in metres from the '''North-West''' corner of the first baseboard.</td>
| |
| − | </tr>
| |
| − | <tr valign="top">
| |
| − | <td>[[image:DotPoint.JPG|10px|link=]]</td>
| |
| − | <td><span style="font-weight: 700; font-size: 15px;"> (+) </span> positive distances are in the <span style="font-weight: 700; font-size: 15px; color: white; background-color: black;"> South </span> and <span style="font-weight: 700; font-size: 15px; color: white; background-color: black;"> East </span> directions</td>
| |
| − | </tr>
| |
| − | <tr valign="top">
| |
| − | <td>[[image:DotPoint.JPG|10px|link=]]</td>
| |
| − | <td><span style="font-weight: 700; font-size: 15px;"> (-) </span> negative distances are in the <span style="font-weight: 700; font-size: 15px; color: white; background-color: black;"> North </span> and <span style="font-weight: 700; font-size: 15px; color: white; background-color: black;"> West </span> directions. New boards added to the '''North''' of the first baseboard will have negative '''X''' coordinates and new boards added to the '''West''' of the first baseboard will have negative '''Y''' coordinates.</td>
| |
| − | </tr>
| |
| − | </table>
| |
| − | </td>
| |
| − | </tr>
| |
| − | </table>
| |
| − | </td>
| |
| − | </tr>
| |
| − | </table>
| |
| − | <br>
| |
| − | <span style="font-weight: 700; font-size: 17px; color: white; background-color: black;"> Focus Info and Controls </span><br>
| |
| − | <br>
| |
| − | The '''Focus''' shows the current position and height of the '''Cursor''' object. Open up the '''Focus''' by '''Left''' clicking on its arrowhead icon.<br>
| |
| − |
| |
| − | <table bgcolor=#000000 width=700 cellpadding=2>
| |
| − | <tr valign="top">
| |
| − | <td>
| |
| − | <table bgcolor=#ffffe0 width=696 cellpadding=2>
| |
| − | <tr valign="top">
| |
| − | <td>[[image:PencilTips.PNG|link=]]</td>
| |
| − | <td>Before changing the cursor position with the '''Focus''' controls, set a '''Bookmark''' at its current position.
| |
| − | </td>
| |
| − | </tr>
| |
| − | </table>
| |
| − | </td>
| |
| − | </tr>
| |
| − | </table>
| |
| − | <br>
| |
| − | <table width=900>
| |
| − | <tr valign="top">
| |
| − | <td width=210>[[image:InfoPaletteFocus_S20.png|link=]]</td>
| |
| − | <td>
| |
| − | <br>
| |
| − | The current cursor position is shown in the '''X''', '''Y''' and '''Z''' text boxes. These values can be edited to move the cursor to a new position but '''CARE''' will be needed.
| |
| − | <br>
| |
| − | <table bgcolor=#000000 width=690 cellpadding=2>
| |
| − | <tr valign="top">
| |
| − | <td>
| |
| − | <table bgcolor=#ffffb0 width=686 cellpadding=2>
| |
| − | <tr valign="top">
| |
| − | <td>[[image:NotePad.PNG|link=]]</td>
| |
| − | <td><span style="font-size: 17px; font-weight: 700;">Notes:'''</span><br>
| |
| − | If you enter an '''X''' or '''Y''' value that is beyond the edge of a baseboard then the cursor will be refocussed at a point on the baseboard edge that is the closest to the entered co-ordinates.
| |
| − | </td>
| |
| − | </tr>
| |
| − | </table>
| |
| − | </td>
| |
| − | </tr>
| |
| − | </table>
| |
| − | <br>
| |
| − | On the right of each box is a pair of '''Up/Down''' controls. '''Left Click and Drag''' up or down on these to adjust the cursor position in smaller increments.
| |
| − | </td>
| |
| − | </tr>
| |
| − | </table>
| |
| − | <br>
| |
| − | Next to the '''Z''' co-ordinate is a small down arrow. '''Left''' click on the arrow to open its menu.<br>
| |
| − | <table width=900>
| |
| − | <tr valign="top">
| |
| − | <td width=325>[[image:InfoPaletteFocusMenu_S20.png|link=]]</td>
| |
| − | <td>There is only one item in the sub-menu. <span style="font-weight: 700; font-size: 15px; color: white; background-color: black;"> Use Height for Brush </span><br>
| |
| − | '''Left''' click on the option to copy the current cursor height ('''Z''') value from the '''Info Palette''' to the '''Tool Options Palette''' <span style="font-weight: 700; font-size: 15px; color: white; background-color: black;"> Height </span> entry.</td>
| |
| − | </tr>
| |
| − | </table>
| |
| − | <br>
| |
| − |
| |
| − | <span style="font-weight: 700; font-size: 17px; color: white; background-color: black;"> Asset Name Menu </span><br>
| |
| − | <br>
| |
| − | You must have an object selected for its name to be shown and the menu options to be available.<br>
| |
| − | <table width=900>
| |
| − | <tr valign="top">
| |
| − | <td width=210>[[image:InfoPaletteMulti_S20.png|link=]]</td>
| |
| − | <td>If more than one object has been selected then the name of the last selected object will be shown together with a count of additional selected objects (the named object '''(+2)''' indicating 2 additional objects shown in the image on the left). The position data shown will be for the last selected object.</td>
| |
| − | </tr>
| |
| − | </table>
| |
| − | <br>
| |
| − | Next to the assets name co-ordinate is a small down arrow. '''Left''' click on the arrow to open its menu.<br>
| |
| − | <table width=1000>
| |
| − | <tr valign="top">
| |
| − | <td width=370>[[image:InfoPaletteMenu_S20.png|link=]]</td>
| |
| − | <td>The menu options are:-
| |
| − | <table>
| |
| − | <tr valign="top">
| |
| − | <td width=200><span style="font-weight: 700; font-size: 15px; color: white; background-color: black;"> Copy </span></td>
| |
| − | <td>undescribed at present</td>
| |
| − | </tr>
| |
| − | <tr valign="top">
| |
| − | <td><span style="font-weight: 700; font-size: 15px; color: white; background-color: black;"> Show Asset Details </span></td>
| |
| − | <td>opens a new window showing the image and description of the selected asset</td>
| |
| − | </tr>
| |
| − | <tr valign="top">
| |
| − | <td><span style="font-weight: 700; font-size: 15px; color: white; background-color: black;"> List Assets in New Window </span></td>
| |
| − | <td>opens up '''Content Manager''' and lists all the selected assets</td>
| |
| − | </tr>
| |
| − | <tr valign="top">
| |
| − | <td><span style="font-weight: 700; font-size: 15px; color: white; background-color: black;"> Add to Picklist </span></td>
| |
| − | <td>adds selected assets to a '''Picklist'''</td>
| |
| − | </tr>
| |
| − | <tr valign="top">
| |
| − | <td><span style="font-weight: 700; font-size: 15px; color: white; background-color: black;"> Remove from Picklist </span></td>
| |
| − | <td>removes selected assets from a '''Picklist''' (assets must already be in a '''Picklist''')</td>
| |
| − | </tr>
| |
| − | <tr valign="top">
| |
| − | <td><span style="font-weight: 700; font-size: 15px; color: white; background-color: black;"> Select in Assets Palette </span></td>
| |
| − | <td>highlights the selected asset in the '''Assets Palette'''</td>
| |
| − | </tr>
| |
| − | </table>
| |
| − | </td>
| |
| − | </tr>
| |
| − | </table>
| |
| − | <br>
| |
| − |
| |
| − | <span style="font-weight: 700; font-size: 17px; color: white; background-color: black;"> Position Info and Controls </span><br>
| |
| − | <br>
| |
| − | You must have an object selected for its position data to be shown and edited. Open up the object position data by '''Left''' clicking on its '''Pos:''' arrowhead icon.<br>
| |
| − |
| |
| − | <table width=900>
| |
| − | <tr valign="top">
| |
| − | <td width=210>[[image:InfoPalettePos_S20.png|link=]]</td>
| |
| − | <td>The position of the selected object (or the last object if more than one is selected) is shown in the '''X''', '''Y''' and '''Z''' text boxes. These values can be edited to move the object or objects to a new position but '''CARE''' will be needed.
| |
| − | <br>
| |
| − | <table bgcolor=#000000 width=690 cellpadding=2>
| |
| − | <tr valign="top">
| |
| − | <td>
| |
| − | <table bgcolor=#ffffb0 width=686 cellpadding=2>
| |
| − | <tr valign="top">
| |
| − | <td>[[image:NotePad.PNG|link=]]</td>
| |
| − | <td><span style="font-size: 17px; font-weight: 700;">Notes:'''</span><br>
| |
| − | If you enter an '''X''' or '''Y''' value that is beyond the edge of a baseboard then the objects will be moved to that position and may vanish from view. The '''Undo''' command can be used to reverse the move or the '''Marquee Tool''' can be used to add a baseboard under the "floating" objects.</td>
| |
| − | </tr>
| |
| − | </table>
| |
| − | </td>
| |
| − | </tr>
| |
| − | </table>
| |
| − | <br>
| |
| − | On the right of each box is a pair of '''Up/Down''' controls. '''Left Click and Drag''' up or down on these to adjust the position in smaller increments.
| |
| − | </td>
| |
| − | </tr>
| |
| − | </table>
| |
| − | <br>
| |
| − | Next to the '''Z''' co-ordinate is a small down arrow. '''Left''' click on the arrow to open its menu.<br>
| |
| − | <table width=900>
| |
| − | <tr valign="top">
| |
| − | <td width=325>[[image:InfoPalettePosMenu_S20.png|link=]]</td>
| |
| − | <td>There is only one item in the sub-menu. <span style="font-weight: 700; font-size: 15px; color: white; background-color: black;"> Use Height for Brush </span><br>
| |
| − | '''Left''' click on the option to copy the height ('''Z''') value for the selected object from the '''Info Palette''' to the '''Tool Options Palette''' <span style="font-weight: 700; font-size: 15px; color: white; background-color: black;"> Height </span> entry.</td>
| |
| − | </tr>
| |
| − | </table>
| |
| − | <br>
| |
| − |
| |
| − | <span style="font-weight: 700; font-size: 17px; color: white; background-color: black;"> Rotation Info and Controls </span><br>
| |
| − | <br>
| |
| − | You must have an object selected for its rotation data to be shown and edited. Open up the object rotation data by '''Left''' clicking on its '''Rot:''' arrowhead icon.<br>
| |
| − |
| |
| − | <table width=900>
| |
| − | <tr valign="top">
| |
| − | <td width=210>[[image:InfoPaletteRot_S20.png|link=]]</td>
| |
| − | <td width=790>The rotational orientation of the selected object (or the last object if more than one is selected) is shown in the '''R''', '''P''' and '''Y''' text boxes. These values can be edited to rotate the object or objects in 3D space '''BUT''' not all objects can be rotated in certain directions.<br><br>
| |
| − | On the right of each box is a pair of '''Up/Down''' controls. '''Left Click and Drag''' up or down on these to adjust the rotation angle in smaller increments.
| |
| − | </td>
| |
| − | </tr>
| |
| − | </table>
| |
| − | <br>
| |
| − | <table bgcolor=#000000 width=900 cellpadding=2>
| |
| − | <tr valign="top">
| |
| − | <td>
| |
| − | <table bgcolor=#ffffb0 width=896 cellpadding=2>
| |
| − | <tr valign="top">
| |
| − | <td>[[image:NotePad.PNG|link=]]</td>
| |
| − | <td><span style="font-size: 17px; font-weight: 700;">Notes:'''</span><br>
| |
| − | ----
| |
| − | The rotation data and controls are defined in the following ways:-<br>
| |
| − | <table>
| |
| − | <tr valign="top">
| |
| − | <td><span style="font-weight: 700; font-size: 17px; color: white; background-color: black;"> R </span></td>
| |
| − | <td>'''ALWAYS''' rotates around the <span style="font-weight: 700; font-size: 17px; color: white; background-color: black;"> North-South </span> compass direction regardless of the direction that an asset is facing</td>
| |
| − | </tr>
| |
| − | <tr valign="top">
| |
| − | <td><span style="font-weight: 700; font-size: 17px; color: white; background-color: black;"> P </span></td>
| |
| − | <td>'''ALWAYS''' rotates around the <span style="font-weight: 700; font-size: 17px; color: white; background-color: black;"> East-West </span> compass direction regardless of the direction that an asset is facing</td>
| |
| − | </tr>
| |
| − | <tr valign="top">
| |
| − | <td><span style="font-weight: 700; font-size: 17px; color: white; background-color: black;"> Y </span></td>
| |
| − | <td>'''ALWAYS''' rotates around the <span style="font-weight: 700; font-size: 17px; color: white; background-color: black;"> Vertical </span> direction (perpendicular to the compass directions) regardless of how an asset has been rolled or tilted</td>
| |
| − | </tr>
| |
| − | <tr valign="top">
| |
| − | <td colspan=2>
| |
| − | ----
| |
| − | </td>
| |
| − | </tr>
| |
| − | <tr valign="top">
| |
| − | <td>[[image:DotPoint.JPG|10px|link=]]</td>
| |
| − | <td>all angles are measured in degrees</td>
| |
| − | </tr>
| |
| − | <tr valign="top">
| |
| − | <td>[[image:DotPoint.JPG|10px|link=]]</td>
| |
| − | <td><span style="font-weight: 700; font-size: 15px;"> (+) </span> positive angles are '''clockwise''' when facing the primary direction (<span style="font-weight: 700; font-size: 15px; color: white; background-color: black;"> North </span> or <span style="font-weight: 700; font-size: 15px; color: white; background-color: black;"> East </span>) and '''clockwise''' around the <span style="font-weight: 700; font-size: 17px; color: white; background-color: black;"> Vertical </span> axis</td>
| |
| − | </tr>
| |
| − | <tr valign="top">
| |
| − | <td>[[image:DotPoint.JPG|10px|link=]]</td>
| |
| − | <td><span style="font-weight: 700; font-size: 15px;"> (-) </span> negative angles are '''anticlockwise''' when facing the primary direction (<span style="font-weight: 700; font-size: 15px; color: white; background-color: black;"> North </span> or <span style="font-weight: 700; font-size: 15px; color: white; background-color: black;"> East </span>) and '''anticlockwise''' around the <span style="font-weight: 700; font-size: 17px; color: white; background-color: black;"> Vertical </span> axis</td>
| |
| − | </tr>
| |
| − | <tr valign="top">
| |
| − | <td>[[image:DotPoint.JPG|10px|link=]]</td>
| |
| − | <td>angles greater than ±360° can be entered but will give the same result as the corresponding angle less than 360°. For example: 450° is exactly the same angle as 90° (450-360=90)</td>
| |
| − | </tr>
| |
| − | <tr valign="top">
| |
| − | <td>[[image:DotPoint.JPG|10px|link=]]</td>
| |
| − | <td>clockwise and anticlockwise angles are complementary. For example: entering -270° (anticlockwise) will give the same angle as entering 90° (clockwise)</td>
| |
| − | </tr>
| |
| − | </table>
| |
| − | </td>
| |
| − | </tr>
| |
| − | </table>
| |
| − | </td>
| |
| − | </tr>
| |
| − | </table>
| |
| − | <br>
| |
| − |
| |
| − | =='''Layer Info and Controls'''==
| |
| − | <br>
| |
| − | You must have an object selected for its layer data to be shown and edited. Open up the object layer data by '''Left''' clicking on its '''Layer:''' arrowhead icon.<br>
| |
| − |
| |
| − | <table bgcolor=#000000 width=900 cellpadding=2>
| |
| − | <tr valign="top">
| |
| − | <td>
| |
| − | <table bgcolor=#ffffb0 width=896 cellpadding=2>
| |
| − | <tr valign="top">
| |
| − | <td>
| |
| − | <table>
| |
| − | <tr valign="top">
| |
| − | <td>[[image:NotePad.PNG|link=]]</td>
| |
| − | <td><span style="font-size: 17px; font-weight: 700;">Notes:'''</span><br>
| |
| − | ----
| |
| − | </td>
| |
| − | </tr>
| |
| − | </table>
| |
| − | <table>
| |
| − | <tr valign="top">
| |
| − | <td width=10>[[image:DotPoint.JPG|10px|link=]]</td>
| |
| − | <td>operations such as '''creating, deleting, merging, renaming, moving''' and '''hiding layers''' are performed using the '''Assets Palette'''</td>
| |
| − | </tr>
| |
| − | <tr valign="top">
| |
| − | <td>[[image:DotPoint.JPG|10px|link=]]</td>
| |
| − | <td>layers can be '''Locked''' and '''Unlocked''' using the '''Info Palette''' or the '''Assets Palette''' but the '''Assets Palette''' is the better option for this</td>
| |
| − | </tr>
| |
| − | <tr valign="top">
| |
| − | <td>[[image:DotPoint.JPG|10px|link=]]</td>
| |
| − | <td>the '''Info Palette''' is used to change the assignment of individual assets to layers and to set their optional '''Binding Layer'''</td>
| |
| − | </tr>
| |
| − | </table>
| |
| − | </td>
| |
| − | </tr>
| |
| − | </table>
| |
| − | </td>
| |
| − | </tr>
| |
| − | </table>
| |
| − | <br>
| |
| − | <table width=900>
| |
| − | <tr valign="top">
| |
| − | <td width=210>[[image:InfoPaletteLayer_S20.png|link=]]</td>
| |
| − | <td>This will show the:-
| |
| − | <table>
| |
| − | <tr valign="top">
| |
| − | <td width=10>[[image:DotPoint.JPG|10px|link=]]</td>
| |
| − | <td>current layer assigned to the selected object</td>
| |
| − | </tr>
| |
| − | <tr valign="top">
| |
| − | <td>[[image:DotPoint.JPG|10px|link=]]</td>
| |
| − | <td>its assigned '''Binding Layer''' (if any)</td>
| |
| − | </tr>
| |
| − | <tr valign="top">
| |
| − | <td>[[image:DotPoint.JPG|10px|link=]]</td>
| |
| − | <td>the '''Locked/Unlocked''' status of the assigned layer</td>
| |
| − | </tr>
| |
| − | <tr valign="top">
| |
| − | <td> </td>
| |
| − | <td>[[image:InfoPaletteLockedLayerBtn_S20.png|link=]] Layer is currently '''Unlocked'''. Click this button to '''Lock''' the layer</td>
| |
| − | </tr>
| |
| − | <tr valign="top">
| |
| − | <td> </td>
| |
| − | <td>[[image:InfoPaletteUnlockedLayerBtn_S20.png|link=]] Layer is currently '''Locked'''. Click this button to '''Unlock''' the layer</td>
| |
| − | </tr>
| |
| − | <tr valign="top">
| |
| − | <td> </td>
| |
| − | <td>Using this button will also change the '''Locked/Unlocked''' padlock icon shown next the to layer name in the '''Assets Palette'''<br>
| |
| − | [[image:AssetsPaletteLockedUnlockedLayers_S20.png|link=]]</td>
| |
| − | </tr>
| |
| − | </table>
| |
| − | </td>
| |
| − | </tr>
| |
| − | </table>
| |
| − | <br>
| |
| − | <table width=900>
| |
| − | <tr valign="top">
| |
| − | <td width=210>[[image:InfoPaletteLayersMulti_S20.png|link=]]</td>
| |
| − | <td>If multiple objects from different layers have been selected then no layer name will be shown in the '''Layer''' and '''Binding''' boxes. Instead they will be left "blank" as shown in the image on the left.<br><br>
| |
| − |
| |
| − | Both boxes can still be opened to assign layers to objects.</td>
| |
| − | </tr>
| |
| − | </table>
| |
| − | <br>
| |
| − |
| |
| − | <span style="font-weight: 700; font-size: 17px; color: white; background-color: black;"> Assigning Objects to a Different Layer </span><br>
| |
| − |
| |
| − | A selected object or group of selected objects can be assigned to a different layer. If multiple objects have been selected then they '''do not''' have to all be in the same layer.<br>
| |
| − |
| |
| − | <table bgcolor=#000000 width=600 cellpadding=2>
| |
| − | <tr valign="top">
| |
| − | <td>
| |
| − | <table bgcolor=#ffffb0 width=596 cellpadding=2>
| |
| − | <tr valign="top">
| |
| − | <td>[[image:NotePad.PNG|link=]]</td>
| |
| − | <td><span style="font-size: 17px; font-weight: 700;">Notes:'''</span><br>
| |
| − | ----
| |
| − | Before changing any objects to another layer, make sure that the source layer (or source layers for multiple objects) and the destination layer are '''unlocked'''.
| |
| − | <table>
| |
| − | <tr valign="top">
| |
| − | <td width=25>[[image:LayerUnLocked_S20.png|link=]]</td>
| |
| − | <td>'''unlocked layers''' are shown in the '''Assets Palette''' with an open padlock icon</td>
| |
| − | </tr>
| |
| − | <tr valign="top">
| |
| − | <td width=25>[[image:LayerLocked_S20.png|link=]]</td>
| |
| − | <td>'''locked layers''' are shown in the '''Assets Palette''' with a closed padlock icon. '''Left''' click the icon to unlock the layer</td>
| |
| − | </tr>
| |
| − | </table>
| |
| − | </td>
| |
| − | </tr>
| |
| − | </table>
| |
| − | </td>
| |
| − | </tr>
| |
| − | </table>
| |
| − | <br>
| |
| − | <table width=900>
| |
| − | <tr valign="top">
| |
| − | <td width=265>[[image:InfoPaletteLayerDropBoxList_S20.png|link=]]</td>
| |
| − | <td width=635>
| |
| − | <table bgcolor=##ff0000 width=635 cellpadding=2>
| |
| − | <tr valign="top">
| |
| − | <td>
| |
| − | <table bgcolor=#fcbcbc width=631 cellpadding=2>
| |
| − | <tr valign="top">
| |
| − | <td>[[image:Stop.PNG|link=]]</td>
| |
| − | <td>This operation will '''TOTALLY FAIL''' if the destination layer is locked and it will '''FAIL''' for any object in a source layer that is locked</td>
| |
| − | </tr>
| |
| − | </table>
| |
| − | </td>
| |
| − | </tr>
| |
| − | </table>
| |
| − | <br>
| |
| − | <table bgcolor=#000000 width=635 cellpadding=2>
| |
| − | <tr valign="top">
| |
| − | <td>
| |
| − | <table bgcolor=#ffffff width=631 cellpadding=2>
| |
| − | <tr valign="top">
| |
| − | <td colspan=2>To change the assigned layer of an object or group of objects:-</td>
| |
| − | </tr>
| |
| − | <tr valign="top">
| |
| − | <td width=25>[[image:DotPoint1.JPG|link=]]</td>
| |
| − | <td>'''Left''' click on the '''Layer''' drop down box. The layer containing the object (for a '''single selected object only''') will be shown with a [[image:BulletTick.png|link=]] in front of its name</td>
| |
| − | </tr>
| |
| − | <tr valign="top">
| |
| − | <td>[[image:DotPoint2.JPG|link=]]</td>
| |
| − | <td>Select the destination layer name from the drop down list</td>
| |
| − | </tr>
| |
| − | <tr valign="top">
| |
| − | <td colspan=2>The layer reassignment will start the instant the destination layer is selected</td>
| |
| − | </tr>
| |
| − | <tr valign="top">
| |
| − | <td>[[image:DotPoint3.JPG|link=]]</td>
| |
| − | <td>If you see a '''Debugging Window''' on the screen as the task is processed, it will inform you when the task has been completed. You can then close the window</td>
| |
| − | </tr>
| |
| − | </table>
| |
| − | </td>
| |
| − | </tr>
| |
| − | </table>
| |
| − | </td>
| |
| − | </tr>
| |
| − | </table>
| |
| − | <br>
| |
| − | Once a target layer has been selected then the <span style="font-weight: 700; font-size: 15px; color: white; background-color: black;"> Select Layer </span> button, which sets the '''Active Layer''', may become active.<br><br>
| |
| − |
| |
| − | The '''Active Layer''' is the layer used by the '''Placement Tool''' when objects are added to a route (or session). This button gives you the opportunity to set the '''Active Layer''' to the same layer that you just used to assign to an object. Its use is '''optional'''.<br><br>
| |
| − |
| |
| − | You can also set the '''Active Layer''' by selecting its name from the layer list in the '''Assets Palette'''.<br>
| |
| − |
| |
| − | <table bgcolor=#000000 width=900 cellpadding=2>
| |
| − | <tr valign="top">
| |
| − | <td>
| |
| − | <table bgcolor=#ffffff width=896 cellpadding=2>
| |
| − | <tr valign="top">
| |
| − | <td colspan=2>[[image:Ablue.png|link=]] '''If the <span style="font-weight: 700; font-size: 15px; color: white; background-color: black;"> Select Layer </span> button is greyed out'''</td>
| |
| − | </tr>
| |
| − | <tr valign="top">
| |
| − | <td>[[image:InfoPaletteLayerSelectBtnOff_S20.png|link=]]</td>
| |
| − | <td>then the selected object is now assigned to the current '''Active Layer''' so there is no need to use this option</td>
| |
| − | </tr>
| |
| − | <tr valign="top">
| |
| − | <td colspan=2>[[image:Bblue.png|link=]] '''If it is NOT greyed out'''</td>
| |
| − | </tr>
| |
| − | <tr valign="top">
| |
| − | <td>[[image:InfoPaletteLayerSelectBtnOn_S20.png|link=]]</td>
| |
| − | <td>then the selected object is now assigned to a layer that is '''not''' the current '''Active Layer'''. You have the option to '''Left''' click on this button to switch the '''Active Layer''' to the same layer as the object
| |
| − | </td>
| |
| − | </tr>
| |
| − | </table>
| |
| − | </td>
| |
| − | </tr>
| |
| − | </table>
| |
| − | <br>
| |
| − |
| |
| − | <span style="font-weight: 700; font-size: 17px; color: white; background-color: black;"> Assigning Objects to a Binding Layer </span><br>
| |
| − |
| |
| − | The '''Binding Layer''', or '''Bound Layer''' as it is also called, is a tool used in the development of a route or session.<br>
| |
| − |
| |
| − | It allows you to temporarily assign an object to a second layer while it is still in its original layer. The object will then take on the properties ('''Locked/Unlocked''', '''Hidden/Visible''') of both layers.<br>
| |
| − |
| |
| − | <table>
| |
| − | <tr valign="top">
| |
| − | <td colspan=2>So if the '''original layer''' or the '''binding layer''' is:-</td>
| |
| − | </tr>
| |
| − | <tr valign="top">
| |
| − | <td width=10>[[image:DotPoint.JPG|10px|link=]]</td>
| |
| − | <td>'''LOCKED''' then the object will be '''LOCKED'''</td>
| |
| − | </tr>
| |
| − | <tr valign="top">
| |
| − | <td>[[image:DotPoint.JPG|10px|link=]]</td>
| |
| − | <td>'''HIDDEN''' then the object will be '''HIDDEN'''</td>
| |
| − | </tr>
| |
| − | </table>
| |
| − |
| |
| − | Some examples of using the '''Binding Layer''':-<br>
| |
| − |
| |
| − | <table bgcolor=#000000 width=900 cellpadding=2>
| |
| − | <tr valign="top">
| |
| − | <td>
| |
| − | <table bgcolor=#ffffff width=896 cellpadding=2>
| |
| − | <tr valign="top">
| |
| − | <td colspan=2><span style="font-weight: 700; font-size: 15px; color: white; background-color: blue;"> Example 1: </span></td>
| |
| − | </tr>
| |
| − | <tr valign="top">
| |
| − | <td width=100>'''The problem:'''</td>
| |
| − | <td>You need to stop an object from being selected so that you can you move other objects on or around it</td>
| |
| − | </tr>
| |
| − | <tr valign="top">
| |
| − | <td>'''The solution:'''</td>
| |
| − | <td>Set the '''Binding Layer''' of the object to a locked layer (or use the '''Assets Palette''' to create a new empty layer and lock it). The object will then be locked even though its original layer is unlocked so it cannot be selected or moved. When the edit has been completed, reset the object '''Binding Layer''' to '''<none>''' or delete the empty locked layer you just created</td>
| |
| − | </tr>
| |
| − | <tr valign="top">
| |
| − | <td colspan=2><span style="font-weight: 700; font-size: 15px; color: white; background-color: blue;"> Example 2: </span></td>
| |
| − | </tr>
| |
| − | <tr valign="top">
| |
| − | <td>'''The problem:'''</td>
| |
| − | <td>A group of objects (e.g trees) are blocking access to another object.</td>
| |
| − | </tr>
| |
| − | <tr valign="top">
| |
| − | <td>'''The solution:'''</td>
| |
| − | <td>Set the '''Binding Layer''' of the blocking objects to a hidden layer (or use the '''Assets Palette''' to create a new empty layer and hide it). The blocking objects will no longer be visible even though their original layer is visible. When the edit has been completed, reset their '''Binding Layer''' to '''<none>''' or delete the empty hidden layer you just created
| |
| − | </td>
| |
| − | </tr>
| |
| − | </table>
| |
| − | </td>
| |
| − | </tr>
| |
| − | </table>
| |
| − | <br>
| |
| − | <table width=900>
| |
| − | <tr valign="top">
| |
| − | <td width=265>[[image:InfoPaletteBindingDropBox_S20.png|link=]]</td>
| |
| − | <td width=635>
| |
| − | <table bgcolor=#000000 width=635 cellpadding=2>
| |
| − | <tr valign="top">
| |
| − | <td>
| |
| − | <table bgcolor=#ffffff width=631 cellpadding=2>
| |
| − | <tr valign="top">
| |
| − | <td colspan=2>To change the assigned binding layer of an object or group of objects:-</td>
| |
| − | </tr>
| |
| − | <tr valign="top">
| |
| − | <td width=25>[[image:DotPoint1.JPG|link=]]</td>
| |
| − | <td>'''Left''' click on the '''Binding''' drop down box. If the object is already bound to a layer (for a '''single selected object only''') the binding layer will be shown with a [[image:BulletTick.png|link=]] in front of its name</td>
| |
| − | </tr>
| |
| − | <tr valign="top">
| |
| − | <td>[[image:DotPoint2.JPG|link=]]</td>
| |
| − | <td>Select the '''Binding''' layer name from the drop down list</td>
| |
| − | </tr>
| |
| − | <tr valign="top">
| |
| − | <td colspan=2>The layer reassignment will start the instant the layer is selected</td>
| |
| − | </tr>
| |
| − | <tr valign="top">
| |
| − | <td>[[image:DotPoint3.JPG|link=]]</td>
| |
| − | <td>If you see a '''Debugging Window''' on the screen as the task is processed, it will inform you when the task has been completed. You can then close the window</td>
| |
| − | </tr>
| |
| − | </table>
| |
| − | </td>
| |
| − | </tr>
| |
| − | </table>
| |
| − | </td>
| |
| − | </tr>
| |
| − | </table>
| |
| − | <br>
| |
| − | <table width=900>
| |
| − | <tr valign="top">
| |
| − | <td colspan=2>As an example, the image below shows what you will see for a single object that has had:-</td>
| |
| − | </tr>
| |
| − | <tr valign="top">
| |
| − | <td width=210>[[image:InfoPaletteLayerSetBindingSet_S20.png|link=]]</td>
| |
| − | <td>
| |
| − | <table width=690>
| |
| − | <tr valign="top">
| |
| − | <td width=10>[[image:DotPoint.JPG|10px|link=]]</td>
| |
| − | <td>its assigned layer changed (in the example from "route-layer" to "Station Buildings")</td>
| |
| − | </tr>
| |
| − | <tr valign="top">
| |
| − | <td>[[image:DotPoint.JPG|10px|link=]]</td>
| |
| − | <td>its binding layer set (in the example to "Multi Industries")</td>
| |
| − | </tr>
| |
| − | <tr valign="top">
| |
| − | <td>[[image:DotPoint.JPG|10px|link=]]</td>
| |
| − | <td>the newly assigned layer is not locked so you have the option to lock it</td>
| |
| − | </tr>
| |
| − | <tr valign="top">
| |
| − | <td>[[image:DotPoint.JPG|10px|link=]]</td>
| |
| − | <td>the newly assigned layer is not the '''Active Layer''' so you have the option to make it the '''Active Layer'''</td>
| |
| − | </tr>
| |
| − | </table>
| |
| − | </td>
| |
| − | </tr>
| |
| − | </table>
| |
| − | <br>
| |
| − |
| |
| − | <table cellpadding=4 bgcolor="Aquamarine">
| |
| − | <tr valign="top">
| |
| − | <td>[[image:LinkWiki.PNG|link=]]</td>
| |
| − | <td>
| |
| − | More information on creating, editing and using '''Layers''' can be found on the '''Trainz Wiki''' at:-<br>
| |
| − | *'''[[How_to_Use_Layers|How to Use Layers]]'''
| |
| − | </td>
| |
| − | </tr>
| |
| − | </table>
| |
| − |
| |
| − | <table> <!-- BEGIN Nav Buttons Table -->
| |
| − | <tr valign="top">
| |
| − | <td width=729><span id="bottom"></span> </td>
| |
| − | <td width=46>[[image:BackToTop.png|link=#top|alt=Top|Top]]</td>
| |
| − | <td width=75>[[image:NextUp.png|link=#stepInfo|alt=Next Up|Top]]</td>
| |
| − | <td width=75> </td>
| |
| − | <td width=75> </td>
| |
| − | </tr>
| |
| − | </table> <!-- END Nav Buttons Table -->
| |
| − | ----
| |
| − | ----
| |
| − |
| |
| − | ='''Trainz Wiki'''=
| |
| − | <table cellpadding=4 bgcolor=#ffffff>
| |
| − | <tr valign="top">
| |
| − | <td>[[image:TrainzWiki.png|link=]]</td>
| |
| − | <td>
| |
| − | <span style="font-size: 17px;">'''More Tutorials and Guides to Using Trainz'''</span><br>
| |
| − | *'''<span class="plainlinks">[http://online.ts2009.com/mediaWiki/index.php/HowTo How to Guides]</span>'''
| |
| − | *'''[[Driver Commands List]]'''
| |
| − | *'''[[Session Rule List with Parameters|Session Rules List (Alphabetical) with Parameters]]'''
| |
| − | *'''[[Session Rules By Categories With Properties|Session Rules List (Categories) With Parameters]]'''
| |
| − | </td>
| |
| − | </tr>
| |
| − | </table>
| |
| − | ----
| |
| − | This page was created by Trainz user '''<span class="plainlinks">[http://online.ts2009.com/mediaWiki/index.php/User:Pware pware]</span>''' in January 2023 and was last updated as shown below.
| |
| − | ----
| |
| − | [[Category:How-to guides]]
| |
| | | | |
| | ='''The Info Palette'''= | | ='''The Info Palette'''= |
Individual "non-spline" scenery objects that are not attached to track are often referred to in Trainz terminology as Scenery Mesh Objects .
 In the Asset Palette either:-
Start the process of laying a track or spline by identifying and selecting the spline as described in steps to  above. Then continue by following the steps listed below.
When you start adding a spline to a route it will always be placed at the height of the terrain regardless of the Tool Options Height setting.
However, you can set the height of the last segment that was added and this will set the height of all the segments added from that point.
Sometimes (or often) a scene will be too crowded with different scenery objects to be able to use the Eyedropper Tool to easily select a single object. In these cases additional options are available to help "remove the clutter".
Individual "non-spline" scenery objects that are not attached to track are often referred to in Trainz terminology as Scenery Mesh Objects.
Moving a Scenery Mesh Object
Splines are frequently made of multiple segments joined together. You can easily move a spline by moving its segments, individually or as a group.
This palette can be easily overlooked but it has some very useful features.
A selected object or group of selected objects can be assigned to a different layer. If multiple objects have been selected then they do not have to all be in the same layer.
It allows you to temporarily assign an object to a second layer while it is still in its original layer. The object will then take on the properties (Locked/Unlocked, Hidden/Visible) of both layers.