How to Use S20 Tools
m |
m (→ Ground Texture ) |
||
| Line 256: | Line 256: | ||
<td width=390> | <td width=390> | ||
<table> | <table> | ||
| + | <tr valign="top"> | ||
| + | <td width=390> | ||
| + | <table bgcolor=#000000 width=390 cellpadding=2> | ||
| + | <tr valign="top"> | ||
| + | <td> | ||
| + | <table bgcolor=#ffffff width=386> | ||
<tr valign="top"> | <tr valign="top"> | ||
<td width=90><span style="font-size: 15px; font-weight: 700; color: gold; background-color: black;"> Radius </span></td> | <td width=90><span style="font-size: 15px; font-weight: 700; color: gold; background-color: black;"> Radius </span></td> | ||
| − | <td width= | + | <td width=296>the brush radius (metres) - see '''Notes:''' below</td> |
</tr> | </tr> | ||
<tr valign="top"> | <tr valign="top"> | ||
| Line 265: | Line 271: | ||
<tr valign="top"> | <tr valign="top"> | ||
<td width=90 align="right">'''Range:''' </td> | <td width=90 align="right">'''Range:''' </td> | ||
| − | <td width= | + | <td width=296>5m and above</td> |
</tr> | </tr> | ||
</table> | </table> | ||
| Line 279: | Line 285: | ||
<tr valign="top"> | <tr valign="top"> | ||
<td width=90 align="right">'''Range:''' </td> | <td width=90 align="right">'''Range:''' </td> | ||
| − | <td width= | + | <td width=296>1% = almost transparent to</td> |
</tr> | </tr> | ||
<tr valign="top"> | <tr valign="top"> | ||
<td> </td> | <td> </td> | ||
| − | <td width= | + | <td width=296>100% = solid (opaque)</td> |
</tr> | </tr> | ||
</table> | </table> | ||
| Line 297: | Line 303: | ||
<tr valign="top"> | <tr valign="top"> | ||
<td width=90 align="right">'''Range:''' </td> | <td width=90 align="right">'''Range:''' </td> | ||
| − | <td width= | + | <td width=296>0° to ±360° (larger angles can be entered)</td> |
</tr> | </tr> | ||
</table> | </table> | ||
| Line 311: | Line 317: | ||
<tr valign="top"> | <tr valign="top"> | ||
<td width=90 align="right">'''Range:''' </td> | <td width=90 align="right">'''Range:''' </td> | ||
| − | <td width= | + | <td width=296>0.01% = smallest to 100% = full size</td> |
| + | </tr> | ||
| + | </table> | ||
| + | </td> | ||
| + | </tr> | ||
| + | </table> | ||
| + | </td> | ||
</tr> | </tr> | ||
</table> | </table> | ||
| Line 337: | Line 349: | ||
<tr valign="top"> | <tr valign="top"> | ||
<td>[[image:DotPoint.JPG|link=]]</td> | <td>[[image:DotPoint.JPG|link=]]</td> | ||
| − | <td>The <span style="font-size: 15px; font-weight: 700; color: gold; background-color: black;"> Rotation </span> controls the starting angle for the texture when painting and is often used to avoid pattern repetition. As in '''Surveyor Classic''', holding down the <span style="font-size: 15px; font-weight: 700; color: white; background-color: black;"> [ </span> or <span style="font-size: 15px; font-weight: 700; color: white; background-color: black;"> ] </span> keys while painting will continuously change the angle.< | + | <td>The <span style="font-size: 15px; font-weight: 700; color: gold; background-color: black;"> Rotation </span> controls the starting angle for the texture when painting and is often used to avoid pattern repetition. As in '''Surveyor Classic''', holding down the <span style="font-size: 15px; font-weight: 700; color: white; background-color: black;"> [ </span> or <span style="font-size: 15px; font-weight: 700; color: white; background-color: black;"> ] </span> keys while painting will continuously change the angle. |
| − | + | <table> | |
| − | Changing the rotation angle during painting is '''not''' recommended for '''PBR Textures''' as this will significantly increase the memory useage (each rotation will load in another copy of the PBR texture). </td> | + | <tr valign="top"> |
| + | <td>[[image:Stop.PNG|link=]]</td> | ||
| + | <td>'''Warning:''' Changing the rotation angle during painting is '''not''' recommended for '''PBR Textures''' as this will significantly increase the memory useage (each rotation will load in another copy of the PBR texture).</td> | ||
| + | </tr> | ||
| + | </table> | ||
| + | </td> | ||
</tr> | </tr> | ||
</table> | </table> | ||
| Line 346: | Line 363: | ||
</table> | </table> | ||
<br> | <br> | ||
| + | |||
===<span style="color: white; background-color: blue;"> Scrapbook Data </span>=== | ===<span style="color: white; background-color: blue;"> Scrapbook Data </span>=== | ||
Revision as of 13:59, 7 January 2023
The information in this Wiki Page applies to Surveyor 2.0 (S20) as found in Trainz Plus.
This document is under development
|
|
|||||||||
The Tools Palette
 |
|
|||||||||||||||||
The Brush Tool
The Brush Tool is used for painting the route. It can:-
When selected, the Brush Tool will show two drop down menu lists. |
 |
The first drop down menu will set the Brush Target, the type of brush. The Targets are:-
|
 |
Ground Height
When this Target is selected, the second drop down box will give a choice of several Ground Height tools. The choices are:-
|
 |
| The different control options available with this brush tool are shown in the Tools Options Palette. If this palette is not visible on the screen then refer to Notes: Palettes at the top of this document. The available brush tool options are shown with a Gold coloured icon next to their names. Those options that have their icon greyed out will be ignored, but they can still be edited. |
|||||||||||||||||||||||||||||||||||
Height Up/Height Down  |
Set Height  |
Grade  |
|
||||||||||||||||||||||||||||||||
|
Ground Texture
When this Target is selected, the second drop down box will be disabled - there are no brush texture tool choices. The different control options available with this brush tool are shown in the Tools Options Palette. If this palette is not visible on the screen then refer to Notes: Palettes at the top of this document.
The available brush tool options are shown with a Gold coloured icon next to their names. Those options that have their icon greyed out will be ignored, but they can still be edited.
 |
|
||||||||||||||||||||||||||||
|
Scrapbook Data
When this Target is selected, the second drop down box will give a choice of two Scrapbook Data tools. The choices are:-
|
| The different control options available with this brush tool are shown in the Tools Options Palette. This brush tool also uses the Scrapbook Palette. If both of these palettes are not visible on the screen then refer to Notes: Palettes at the top of this document. The available brush tool options are shown with a Gold coloured icon next to their names. Those options that have their icon greyed out will be ignored, but they can still be edited. |
||||||||||||||||||||||||||
Scrapbook Clone  |
Scrapbook Brush  |
|
||||||||||||||||||||||||
|
The Srapbook Palette  |
|
|||||||||||||||||||||||||||||||||||||||
Edit Effect Layers...
The Placement Tool
| Keyboard Shortcut: E |
The Placement Tool is used to add assets to the route.
The first step is to identify and select the particular asset that you want to add to the route.
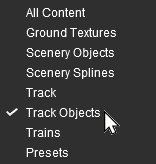
In the Asset Palette either:-
|
OR |
|
|
|||||||||||||||||||||||||||||
|
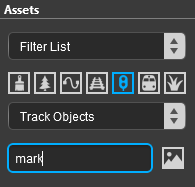
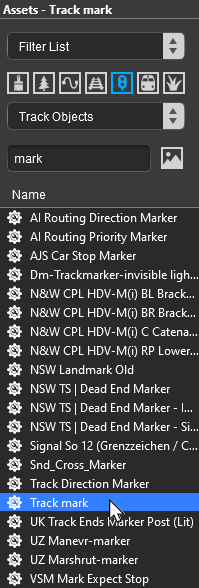
To narrow down the filter list type part of the asset name into the Search Text Box. For example if you have selected Track Objects and want to find "Trackmarks", then type "mark" (UPPER/lower case does not matter).
 |
|
|
|
|
The Eyedropper Tool
| Keyboard Shortcut: R |
The Eyedropper Tool is used to identify objects that are in the route. The objects can be textures, effect layers, scenery, rolling stock, track and track equipment, and splines.
The Free Move Tool
| Keyboard Shortcut: S |
The Free Move Tool is used to move objects in the route.
The Fine Adjustment Tool
| Keyboard Shortcut: D |
The Fine Adjustment Tool is used to make fine adjustments (XYZ axis, rotation, tilt) to objects in the route.
The Marquee Tool
| Keyboard Shortcut: F |
The Marquee Tool is used to select areas of the route.
Trainz Wiki
 |
More Tutorials and Guides to Using Trainz |
This page was created by Trainz user pware in January 2023 and was last updated as shown below.


