|
| From |
To |
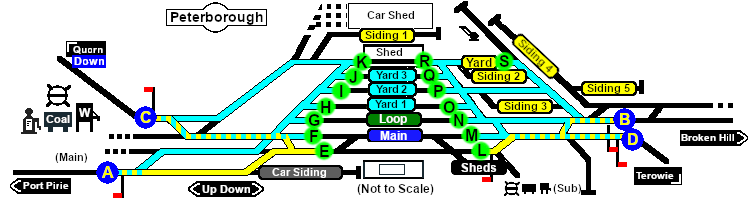
Interlocking Tower Paths |
Path Descriptions |
  |
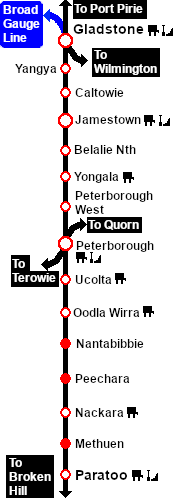
Port Pirie to Station |
Arriving from Gladstone or Jamestown to station |
 |
Port Pirie to Main |
Arriving from Gladstone or Jamestown to main |
 |
Port Pirie to Loop |
Arriving from Gladstone or Jamestown to loop |
 |
Port Pirie to Yard 1 |
Arriving from Gladstone or Jamestown to yard 1 |
 |
Port Pirie to Yard 2 |
Arriving from Gladstone or Jamestown to yard 2 |
 |
Port Pirie to Yard 3 |
Arriving from Gladstone or Jamestown to yard 3 |
 |
Port Pirie to Goods Shed |
Arriving from Gladstone or Jamestown to goods shed |
 |
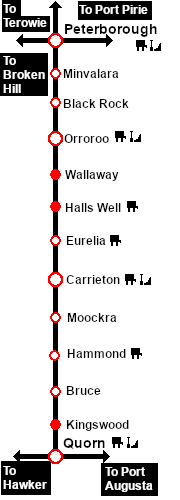
Quorn to Station |
Arriving from Quorn to station |
| |
Quorn to Main |
Arriving from Quorn to main |
| |
Quorn to Loop |
Arriving from Quorn to loop |
| |
Quorn to Yard 1 |
Arriving from Quorn to yard 1 |
| |
Quorn to Yard 2 |
Arriving from Quorn to yard 2 |
| |
Quorn to Yard 3 |
Arriving from Quorn to yard 3 |
| |
Quorn to Goods Shed |
Arriving from Quorn to goods shed |
  |
Station to Broken Hill |
Departing to Paratoo from station |
 |
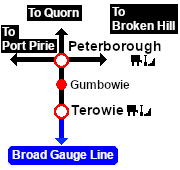
Station to Terowie |
Departing to Terowie from station |
 |
Main to Broken Hill |
Departing to Paratoo from main |
| |
Main to Terowie |
Departing to Terowie from main |
 |
Loop to Broken Hill |
Departing to Paratoo from loop |
| |
Loop to Terowie |
Departing to Terowie from loop |
 |
Yard 1 to Broken Hill |
Departing to Paratoo from yard 1 |
| |
Yard 1 to Terowie |
Departing to Terowie from yard 1 |
 |
Yard 2 to Broken Hill |
Departing to Paratoo from yard 2 |
| |
Yard 2 to Terowie |
Departing to Terowie from yard 2 |
 |
Yard 3 to Broken Hill |
Departing to Paratoo from yard 3 |
| |
Yard 3 to Terowie |
Departing to Terowie from yard 3 |
 |
Goods Shed to Broken Hill |
Departing to Broken Hill from goods shed |
| |
Goods Shed to Terowie |
Departing to Terowie from goods shed |
 |
Goods Shed Yard to Broken Hill |
Departing to Broken Hill from goods shed yard |
| All reverse paths (e.g. to ) are also available |
|