Getting Started with Normal Mapping
For all practical purposes bump mapping and normal mapping mean the same thing - a technique for introducing three dimensional information on the surface of a mesh even when the mesh itself is perfectly flat at that point.
Contents |
Normals?
A normal is a line drawn at right angles to the surface of a plane, for a flat section of ground the normal points directly upwards towards the zenith. TRS compares the direction of the normal with the direction of the current ambient light source and uses the result to calculate how much light is falling onto the surface and how brightly it should be lit.
For an object which only has a straightforward diffuse texture the normal is always perpendicular to the object's surface, and the way that the object is lit will be determined only by the angle of the object relative to the light source.
Normal mapping allows this lighting calculation to be modified for each on screen pixel used to render the object. An additional value, calculated from the red, green and blue components of the normal map, is factored into the lighting calculation. This forces TRS to render each pixel of the object in a different way and can be used to give the impression of three dimensional shapes which are not actually present in the model itself.
The calculations involved are carried out by the graphics card on your PC. Most modern graphics cards support 'bump mapping' but if your card is older this support may not be present. If this is the case bump mapping will not work on your machine.
How are Normal Maps Produced?
There are two basic methods:
- By using a texture generated in Max or Blender from a highly detailed model. A texture produced by this means can be applied to a simplified mesh and the normal information in the baked texture will be used to replace any omitted mesh detail, producing the required 3d effect. This is the more reliable route but the need for a highly detailed 3d source will mean that it can be very time consuming.
- By using a graphics filter to infer height information from an existing texture file. The filter will produce a normal map based on what the texture file appears to represent. NVidia produce a suitable filter for Photoshop (it also works in some versions of Paint Shop Pro) which can be downloaded free of charge and other software is available. Using filters on existing texture files is quick and simple but, since the filter can never actually know what the texture represents, it can give unpredictable results.
What do Normal Maps Look Like?
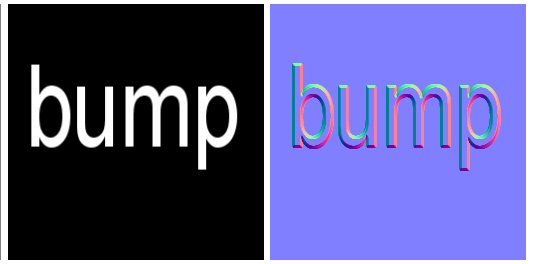
Here is a simple texture file and its corresponding normal map, produced using the NVidia filter.
The effect is similar to the embossing filters which can be found in many paint programmes and is used by TRS in a very similar way. The general blue background color denotes flat areas where the direction of the normal will be unaffected. The fringe color around the edge of the text changes with the angle of the edge. TRS uses the varying colors to calculate the varying direction of the normals at each point.
In the case above, the height information required is absolutely obvious and the filter has no problem producing the required map. This is not necessarily true for all texture images though, and some ingenuity may be required to produce usable maps in many cases.
Normal maps are not designed to be edited by hand. It is perfectly feasible though to edit the underlying texture and reapply the filter. What you will be looking for is a normal map in which the embossing effect is readily visible to the naked eye and containing a minimum of extraneous visual noise. It can be helpful to apply other filters to your texture prior to producing the normal map. In some cases, where your diffuse texture is very 'busy', you might consider using an entirely different source which just contains height information. As you can see from the example the filter is sensitive to changes of color but doesn't care what colors are actually used.
The NVidia filter allows you to adjust various aspects of the map, such as the depth of the effect and whether or not it appears to be 'upside down'. The upside down effect can be a drawback of normal mapping since the 3d effect is based on an optical illusion. By using other visual clues the human brain interprets a normal map as representing either a raised or a sunken effect. If your own brain happens to get it wrong in some cases this is just too bad, there are no adjustments that you can make to the files which will fix the issue.
Getting a Normal Mapped Object into the Game
The following assumes that you are conversant with producing basic models, mapping them and exporting them to *.im files and configuring them for use in the game. It also assumes that you are using 3ds Max, TRS2009, and the latest beta exporters.
These techniques may or may not work with other software or with earlier versions of TRS or the exporters.
TRS supports two specially named materials for use with normal maps, in both cases name can be any user supplied identifier.
name.m.tbumptex
A material named thus supports a diffuse map, with an optional alpha channel used for transparency, and a normal texture. This material also provides for specular lighting and self illumination.
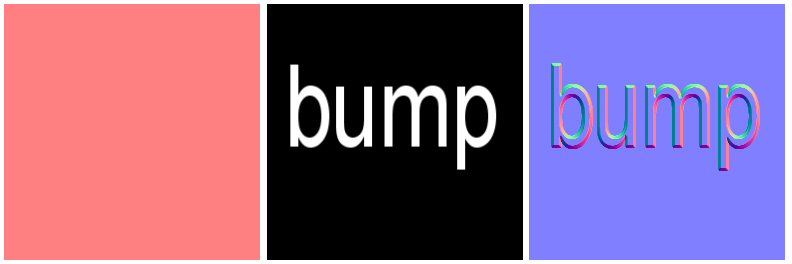
To create a very simple asset using this material in Photoshop or Paint Shop Pro create three texture files:
All three should be 256 x 256 pixels and should be saved as 24 bit uncompressed tga.
- The first, pink file, should be saved as box.tga, this will be used as a diffuse texture.
- The second file is only used to produce normal maps and can be saved to a name of your own choice.
- Use the NVidia filter to produce a normal map based on the second file and save it as normal.tga. It should look something like the third image above.
In 3ds Max:
- Create a cube with roughly equal X, Y and Z dimensions.
- Apply box.tga in the diffuse slot.
- Apply UVW coordinates using 'box' mapping, tiling values for U, V and W of 1.
- Export the mesh and create a config.txt file, make sure that the model can be successfully placed in the game.
- Back in 3ds Max, apply normal.tga in the bump slot.
- Note that you will not normally see any effect in Max.
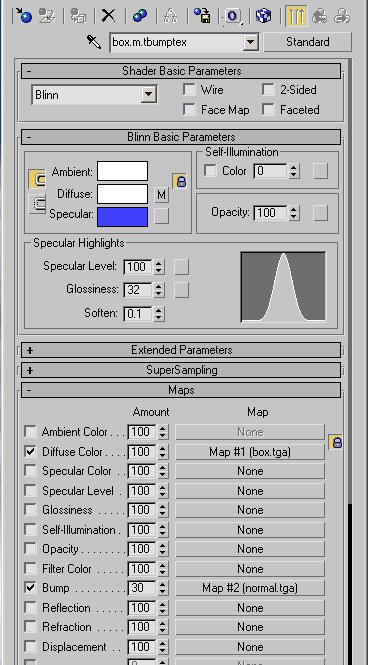
- Make sure that your material editor settings match those in this image, including box.m.tbumptex as the name of the material:
- Ordinarily you would set Specular color to 128,128,128 but in this case I've deliberately used a strong blue to help you to see the relationship between normal mapping and specular lighting for the m.tbumptex material when used in the game.
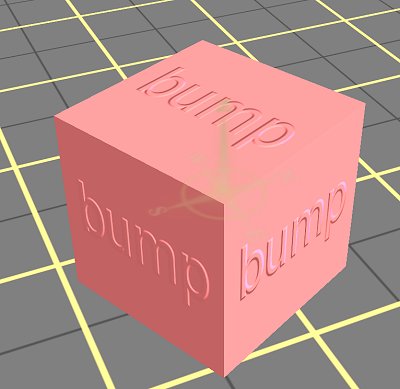
- Making sure that Use Default Material Colors is not checked in the exporter dialogue, export the model with these settings and place a copy in the game, this is what you should see:
Note that all of the modelling that you can see is being produced by the normal map. There is no information in the mesh nor in the diffuse image file.
If you have this working then you should be able to play around with the various material settings to explore what can and cannot be done. Note that a cube is not the best shape with which to explore specular lighting, you might like to experiment with the same material on a sphere or cylinder as well.


