SAR Belalie North V1
From TrainzOnline
(Difference between revisions)
(Created page with "<!-- V1.0 --> <table> <tr valign="top"> <td width=750> <table width=750> <tr valign="top"> <td align="center">link=</td> </tr> <tr valign="top"> <td ali...") |
m |
||
| (One intermediate revision by one user not shown) | |||
| Line 9: | Line 9: | ||
</tr> | </tr> | ||
<tr valign="top"> | <tr valign="top"> | ||
| − | <td align="center">[[image:Tab_HM_White.png|link=]]& | + | <td align="center">[[image:Tab_HM_White.png|link=]] [[image:Tab_IN_Grey.png|link=SAR_Belalie North_Industry_V1]] [[image:Tab_TM_Grey.png|link=SAR_Belalie North_TrackMarks_V1]] [[image:Tab_SW_Grey.png|link=SAR_Belalie North_Switches_V1]] [[image:Tab_Blank_Grey.png|link=]]</td> |
</tr> | </tr> | ||
<tr valign="top"> | <tr valign="top"> | ||
| Line 19: | Line 19: | ||
<tr valign="middle"> | <tr valign="middle"> | ||
| − | <td width=220 align="right">[[Image:SAR_PortPirie-BrokenHill_Line.png|link=SAR_Port_Pirie- | + | <td width=220 align="right">[[Image:SAR_PortPirie-BrokenHill_Line.png|link=SAR_Port_Pirie-Broken_Hill_V1|alt=PortPirie-BrokenHill|Show Port Pirie-Broken Hill]]</td> |
| − | <td width=110 align="center">[[Image:Next Left.png|link=|alt=]]<br>[[Image:SAR_Jamestown_Name.png|link=SAR | + | <td width=110 align="center">[[Image:Next Left.png|link=|alt=]]<br>[[Image:SAR_Jamestown_Name.png|link=SAR Jamestown_V1|alt=Jamestown|Next Up Location]]</td> |
| − | <td width=90 align="center">[[Image:Location Index.png|link=SAR | + | <td width=90 align="center">[[Image:Location Index.png|link=SAR Index_V1|alt=Location Index|Location Index]]<br>[[image:Scenario Index.png|link=SAR Peterborough Base Session_V1|alt=Scenarios|Scenario Index]]</td> |
| − | <td width=110 align="center">[[Image:Next Right.png|link=|alt=]]<br>[[Image:SAR_Yongala_Name.png|link=SAR | + | <td width=110 align="center">[[Image:Next Right.png|link=|alt=]]<br>[[Image:SAR_Yongala_Name.png|link=SAR Yongala_V1|alt=Yongala|Next Down Location]]</td> |
| − | <td width=220 align="left">[[Image:SAR_PortPirie-BrokenHill_Line.png|link=SAR_Port_Pirie- | + | <td width=220 align="left">[[Image:SAR_PortPirie-BrokenHill_Line.png|link=SAR_Port_Pirie-Broken_Hill_V1|alt=PortPirie-BrokenHill|Show Port Pirie-Broken Hill]]</td> |
</tr> | </tr> | ||
</table> | </table> | ||
| − | [[image: | + | <table width=750> |
| + | <tr valign="top"> | ||
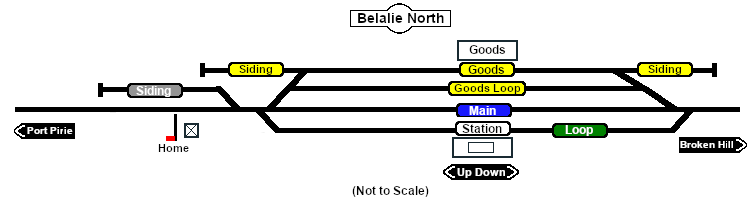
| + | <td>[[image:SAR_Belalie_North_V1.png|link=|alt=Belalie North map]]</td> | ||
| + | </tr> | ||
| + | <tr valign="top"> | ||
| + | <td align="center"><span style="font-weight: 700;">This is the original <span style="color: blue;">v1.0 Belalie North Map and description</span>. For the latest <span style="color: blue;">SAR Peterborough Narrow Gauge Division v2.0</span> version click <span style="background-color: yellow;">[[SAR_Belalie_North_V2|here]]</span></span>. The '''v2.0''' version of the route and sessions requires '''Trainz Plus''' or '''TRS22'''<br> | ||
| + | [[Image:line740.png|link=]]</td> | ||
| + | </tr> | ||
| + | </table> | ||
<table bgcolor="lightgrey" bordercolor="lightgrey" width=750> | <table bgcolor="lightgrey" bordercolor="lightgrey" width=750> | ||
<tr valign="top"> | <tr valign="top"> | ||
| − | <td><span style="font-weight: 700; background-color: black; color: white;">& | + | <td><span style="font-weight: 700; background-color: black; color: white;"> Commodities: </span> |
<table width=300> | <table width=300> | ||
| Line 40: | Line 48: | ||
<td align="center" width=50>[[Image:Passenger_Icon_off.png|link=|alt=Passengers]]<br><span style="font-size: 10px; font-weight: 700;">Passengers</span><br>[[image:Station_Label.png|link=]]</td> | <td align="center" width=50>[[Image:Passenger_Icon_off.png|link=|alt=Passengers]]<br><span style="font-size: 10px; font-weight: 700;">Passengers</span><br>[[image:Station_Label.png|link=]]</td> | ||
<td align="center" width=50>[[Image:Goods_Icon.png|link=|alt=Goods]]<br><span style="font-size: 10px; font-weight: 700;">Goods</span><br>[[image:Goods_Label.png|link=]]</td> | <td align="center" width=50>[[Image:Goods_Icon.png|link=|alt=Goods]]<br><span style="font-size: 10px; font-weight: 700;">Goods</span><br>[[image:Goods_Label.png|link=]]</td> | ||
| − | <td align="center" width=50>& | + | <td align="center" width=50> </td> |
| − | <td align="center" width=50>& | + | <td align="center" width=50> </td> |
| − | <td align="center" width=50>& | + | <td align="center" width=50> </td> |
</tr> | </tr> | ||
| Line 53: | Line 61: | ||
<tr valign="top"> | <tr valign="top"> | ||
| − | <td width=175>& | + | <td width=175> </td> |
</tr> | </tr> | ||
| Line 59: | Line 67: | ||
</td> | </td> | ||
| − | <td><span style="font-weight: 700;"><span style="background-color: black; color: white;">& | + | <td><span style="font-weight: 700;"><span style="background-color: black; color: white;"> Facilities: </span></span> |
<table width=250> | <table width=250> | ||
| Line 65: | Line 73: | ||
<td align="center" width=50>[[Image:Loop_Icon.png|link=|alt=Loop]]<br><span style="font-size: 10px; font-weight: 700;">Loop</span><br>[[image:Loop_Label.png|link=]]</td> | <td align="center" width=50>[[Image:Loop_Icon.png|link=|alt=Loop]]<br><span style="font-size: 10px; font-weight: 700;">Loop</span><br>[[image:Loop_Label.png|link=]]</td> | ||
| − | <td align="center" width=50>& | + | <td align="center" width=50> </td> |
| − | <td align="center" width=50>& | + | <td align="center" width=50> </td> |
| − | <td align="center" width=50>& | + | <td align="center" width=50> </td> |
</tr> | </tr> | ||
| Line 78: | Line 86: | ||
<tr valign="top"> | <tr valign="top"> | ||
<td width=750> | <td width=750> | ||
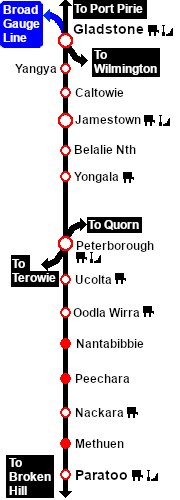
| − | <span style="font-weight: 700;"><span style="color: white; background-color: black;">& | + | <span style="font-weight: 700;"><span style="color: white; background-color: black;"> Distance from Gladstone: </span> 43½ kms, 27 miles <span style="color: white; background-color: black;"> from Peterborough: </span> 20½ kms, 12¾ miles</span><br> |
| − | Unmanned station on the <span style="font-weight: 700; color: white; background-color: black;">& | + | Unmanned station on the <span style="font-weight: 700; color: white; background-color: black;"> Port Pirie-Broken Hill Line </span>. At 621m (2,037ft) '''Belalie North''' was the highest point in the entire '''SAR''' system.<br> |
Station, goods and crossing loops with sidings.<br> | Station, goods and crossing loops with sidings.<br> | ||
| − | This location was bypassed in favour of an alignment with easier grades when the line was converted to standard gauge (4ft8& | + | This location was bypassed in favour of an alignment with easier grades when the line was converted to standard gauge (4ft8½in - 1435mm) during 1969-1970. |
</td> | </td> | ||
</tr> | </tr> | ||
| Line 95: | Line 103: | ||
</td> | </td> | ||
<td> | <td> | ||
| − | [[Image:SAR_PortPirie-BrokenHill_Line.png|link=SAR_Port_Pirie- | + | [[Image:SAR_PortPirie-BrokenHill_Line.png|link=SAR_Port_Pirie-Broken_Hill_V1|alt=PortPirie-BrokenHill|Show Port Pirie-Broken Hill]]<br> |
| − | [[Image:SAR_Gladstone-Paratoo Strip | + | [[Image:SAR_Gladstone-Paratoo Strip Map_V1.png|link=|alt=Gladstone-Paratoo Strip Map]]</td> |
</tr> | </tr> | ||
</table> | </table> | ||
Revision as of 22:32, 26 April 2024
|
 |
