How to Use Track Direction Markers
m (→Related Links) |
|||
| Line 12: | Line 12: | ||
<tr valign="top"> | <tr valign="top"> | ||
<td>[[file:DotPoint.JPG|link=]]</td> | <td>[[file:DotPoint.JPG|link=]]</td> | ||
| − | <td>'''Track | + | <td>'''Track Direction Markers are yellow coloured track markers that are invisible in ''Driver Mode'' but visible in ''Surveyor Mode'''''</td> |
</tr> | </tr> | ||
<tr valign="top"> | <tr valign="top"> | ||
<td>[[file:DotPoint.JPG|link=]]</td> | <td>[[file:DotPoint.JPG|link=]]</td> | ||
| − | <td>'''Track | + | <td>'''Track Direction Markers are used as "One Way" signs to force trains under AI control to travel in a specific direction through the track section where they are placed'''</td> |
</tr> | </tr> | ||
<tr valign="top"> | <tr valign="top"> | ||
<td>[[file:DotPoint.JPG|link=]]</td> | <td>[[file:DotPoint.JPG|link=]]</td> | ||
| − | <td>'''Track | + | <td>'''Track Direction Markers only work on AI controlled trains.''' They have no effect on manually controlled trains</td> |
| − | + | ||
| − | + | ||
| − | + | ||
| − | + | ||
</tr> | </tr> | ||
</table> | </table> | ||
| Line 30: | Line 26: | ||
</tr> | </tr> | ||
</table> | </table> | ||
| − | |||
<table> <!-- BEGIN Nav Buttons Table --> | <table> <!-- BEGIN Nav Buttons Table --> | ||
<tr valign="top"> | <tr valign="top"> | ||
| Line 40: | Line 35: | ||
</tr> | </tr> | ||
</table> <!-- END Nav Buttons Table --> | </table> <!-- END Nav Buttons Table --> | ||
| − | ='''What are Track | + | ='''What are Track Direction Markers?'''= |
| − | + | While '''Track Marks''' can be used to direct trains around a layout, they must be added to the '''Driver Commands''' in the form of '''Drive Via''' commands, and similar, to individual train drivers to work. '''Direction Markers''' can perform some of the same work without needing to be added to the command lists of the drivers. Their disadvantage is that '''Direction Markers''' will affect all AI controlled trains while '''Track Marks''' will only affect those AI trains where they appear in the driver command lists.<br> | |
| − | + | '''Direction Markers''' force AI drivers to follow a particular path. They only work on AI controlled trains and have no effect on manually controlled trains. | |
| − | + | ||
| − | + | ||
| − | + | ||
| − | + | ||
| − | + | ||
| − | + | ||
| − | + | ||
| − | + | ||
| − | + | ||
| − | + | ||
| − | + | ||
| − | + | ||
| − | + | ||
| − | + | ||
| − | + | ||
| − | + | ||
| − | + | ||
| − | + | ||
| − | + | ||
| − | + | ||
| − | + | ||
| − | + | ||
| − | + | ||
<br> | <br> | ||
='''Route or Session?'''= | ='''Route or Session?'''= | ||
| Line 74: | Line 46: | ||
<tr valign="top"> | <tr valign="top"> | ||
<td>[[file:DotPoint.JPG|link=]]</td> | <td>[[file:DotPoint.JPG|link=]]</td> | ||
| − | <td>''' | + | <td>'''Direction Markers can be placed in a Route layer or in a Session layer'''</td> |
</tr> | </tr> | ||
</table> | </table> | ||
| Line 89: | Line 61: | ||
<tr valign="top"> | <tr valign="top"> | ||
<td width=20>[[image:DotPoint.JPG|link=]]</td> | <td width=20>[[image:DotPoint.JPG|link=]]</td> | ||
| − | <td>Placing | + | <td>Placing '''Direction Markers''' in a '''Route layer''' (e.g. in the same layer as the track) means that they will be available in '''all Sessions''' created using that particular Route. |
</td> | </td> | ||
</tr> | </tr> | ||
<tr valign="top"> | <tr valign="top"> | ||
<td width=20>[[image:DotPoint.JPG|link=]]</td> | <td width=20>[[image:DotPoint.JPG|link=]]</td> | ||
| − | <td>Placing | + | <td>Placing '''Direction Markers''' in a '''Session layer''' means that they will only be available in that Session. This can be useful if two or more Sessions are being created and you want to use different '''Direction Markers''' in each Session. |
</td> | </td> | ||
</tr> | </tr> | ||
| Line 123: | Line 95: | ||
</tr> | </tr> | ||
</table> <!-- END Nav Buttons Table --> | </table> <!-- END Nav Buttons Table --> | ||
| − | + | ='''Adding a Track Direction Marker'''= | |
| − | ='''Adding a Track | + | |
<table bgcolor=#000000 width=900> | <table bgcolor=#000000 width=900> | ||
| Line 131: | Line 102: | ||
<table bgcolor=#ffffb0 width=896> | <table bgcolor=#ffffb0 width=896> | ||
<tr valign="top"> | <tr valign="top"> | ||
| − | <td>[[ | + | <td>[[image:NotePad.PNG|link=]]</td> |
<td><span style="font-size: 17px; font-weight: 700;">Notes:'''</span><br> | <td><span style="font-size: 17px; font-weight: 700;">Notes:'''</span><br> | ||
---- | ---- | ||
| − | A | + | A '''Direction Marker''' has no useful properties other than the direction it is pointing. This is the direction that all AI controlled trains will be forced to take. |
| − | + | </td> | |
| − | + | ||
| − | + | ||
| − | + | ||
| − | + | ||
| − | + | ||
</tr> | </tr> | ||
</table> | </table> | ||
| Line 148: | Line 114: | ||
<br> | <br> | ||
=='''<span style="color: black; background-color: cyan;"> In Surveyor Classic (S10) </span>'''== | =='''<span style="color: black; background-color: cyan;"> In Surveyor Classic (S10) </span>'''== | ||
| − | |||
| − | |||
<table> | <table> | ||
<tr valign="top"> | <tr valign="top"> | ||
| − | <td>[[file: | + | <td>[[file:TrackDirectionTools.png|link=]]</td> |
<td> | <td> | ||
<table cellpadding=4 bgcolor=#ffffff> | <table cellpadding=4 bgcolor=#ffffff> | ||
| Line 164: | Line 128: | ||
<td><span style="font-size: 17px; font-weight: 700;">Steps:</span><br> | <td><span style="font-size: 17px; font-weight: 700;">Steps:</span><br> | ||
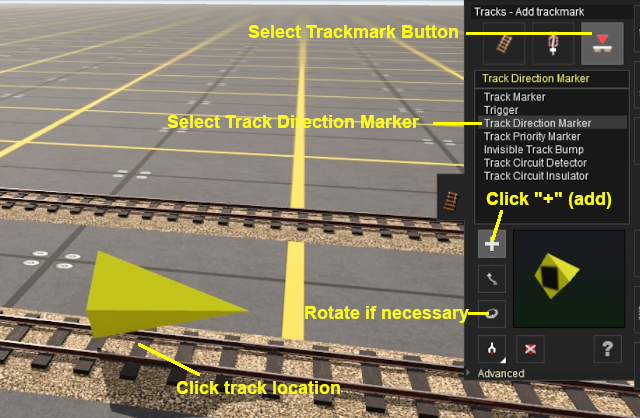
# Open the '''Track Tool''' | # Open the '''Track Tool''' | ||
| − | # | + | # Select the '''Trackmark button''' |
| − | # | + | # Select the '''Track Direction Marker''' |
| − | # | + | # Select the '''+''' (add) button - it may already be selected |
| − | # <span style="font-weight: 700; font-size: 15px; background-color: lightcyan;">Left Click</span> on the track location where the | + | # <span style="font-weight: 700; font-size: 15px; background-color: lightcyan;">Left Click</span> on the track location where the '''Direction Marker''' is to be placed |
| − | If | + | # If it is not facing the correct direction, rotate the marker to point in the opposite direction |
</td> | </td> | ||
</tr> | </tr> | ||
| Line 174: | Line 138: | ||
<td colspan="2"> | <td colspan="2"> | ||
----</td> | ----</td> | ||
| − | |||
| − | |||
| − | |||
| − | |||
| − | |||
| − | |||
| − | |||
| − | |||
| − | |||
| − | |||
| − | |||
| − | |||
| − | |||
| − | |||
| − | |||
| − | |||
| − | |||
| − | |||
| − | |||
| − | |||
| − | |||
| − | |||
| − | |||
| − | |||
| − | |||
| − | |||
| − | |||
| − | |||
| − | |||
| − | |||
| − | |||
| − | |||
| − | |||
| − | |||
| − | |||
| − | |||
| − | |||
| − | |||
| − | |||
| − | |||
| − | |||
| − | |||
| − | |||
| − | |||
| − | |||
| − | |||
| − | |||
| − | |||
| − | |||
| − | |||
| − | |||
| − | |||
| − | |||
| − | |||
| − | |||
| − | |||
| − | |||
| − | |||
| − | |||
| − | |||
| − | |||
| − | |||
| − | |||
| − | |||
| − | |||
| − | |||
| − | |||
| − | |||
| − | |||
| − | |||
| − | |||
| − | |||
| − | |||
| − | |||
| − | |||
| − | |||
| − | |||
</tr> | </tr> | ||
</table> | </table> | ||
| Line 261: | Line 148: | ||
'''Surveyor 2.0''' is currently only available for '''Trainz Plus Standard''' and '''Trainz Plus Gold''' subscription members.<br> | '''Surveyor 2.0''' is currently only available for '''Trainz Plus Standard''' and '''Trainz Plus Gold''' subscription members.<br> | ||
| − | ===<span style="color: white; background-color: blue;"> Adding a | + | ===<span style="color: white; background-color: blue;"> Adding a Direction Marker </span>=== |
[[image:DotPoint1.JPG|link=]] In the '''Asset Palette''' either:- | [[image:DotPoint1.JPG|link=]] In the '''Asset Palette''' either:- | ||
| Line 337: | Line 224: | ||
<tr valign="top"> | <tr valign="top"> | ||
<td colspan=2>[[image:PencilTips.PNG|link=]] <span style="font-size: 15px; font-weight: 700; color: white; background-color: blue;"> Shortcut </span><br> | <td colspan=2>[[image:PencilTips.PNG|link=]] <span style="font-size: 15px; font-weight: 700; color: white; background-color: blue;"> Shortcut </span><br> | ||
| − | If you already have a ''' | + | If you already have a '''Direction Marker''' placed in your route then:-</td> |
</tr> | </tr> | ||
<tr valign="top"> | <tr valign="top"> | ||
<td width=20>[[image:DotPoint1Blue.png|link=]]</td> | <td width=20>[[image:DotPoint1Blue.png|link=]]</td> | ||
| − | <td>move the tool pointer over the existing | + | <td>move the tool pointer over the existing direction marker object and hold down the <span style="font-weight: 700; font-size: 15px; color: white; background-color: black;"> Alt </span> key. The object name will appear in a '''ToolTip''' attached to the pointer</td> |
</tr> | </tr> | ||
<tr valign="top"> | <tr valign="top"> | ||
<td>[[image:DotPoint2Blue.png|link=]]</td> | <td>[[image:DotPoint2Blue.png|link=]]</td> | ||
| − | <td> | + | <td><span style="font-weight: 700; font-size: 15px;"><span style="color: white; background-color: black;"> Alt </span> + <span style="color: black; background-color: lightcyan;">Left Click</span></span> (hold down the <span style="font-weight: 700; font-size: 15px; color: white; background-color: black;"> Alt </span> key and <span style="font-weight: 700; font-size: 15px; background-color: lightcyan;">Left Click</span>) on the direction marker to identify it in the '''Assets Palette''' and to select the '''Placement Tool'''. Release the key.</td> |
</tr> | </tr> | ||
<tr valign="top"> | <tr valign="top"> | ||
| Line 362: | Line 249: | ||
<table> | <table> | ||
<tr valign="top"> | <tr valign="top"> | ||
| − | <td>[[image: | + | <td>[[image:FilterSelectDirectionMark.png|link=|alt=Filtered list]]</td> |
| − | <td valign="middle">[[image:DotPoint4.JPG|link=]] <span style="font-weight: 700; font-size: 15px; background-color: lightcyan;">Left Click</span> on the item name '''Track | + | <td valign="middle">[[image:DotPoint4.JPG|link=]] <span style="font-weight: 700; font-size: 15px; background-color: lightcyan;">Left Click</span> on the item name '''AI Routing Direction Marker''' or '''Track Direction Marker'''.<br> |
| + | <br> | ||
| + | <table bgcolor=#000000 width=560 cellpadding=2> | ||
| + | <tr valign="top"> | ||
| + | <td> | ||
| + | <table bgcolor=#ffffb0 width=556 cellpadding=2> | ||
| + | <tr valign="top"> | ||
| + | <td>[[image:NotePad.PNG|link=]]</td> | ||
| + | <td><span style="font-size: 17px; font-weight: 700;">Notes:'''</span><br> | ||
| + | ---- | ||
| + | There are '''two''' separate '''Direction Markers''' available.<br> | ||
| + | <table> | ||
| + | <tr valign="top"> | ||
| + | <td width=10>[[image:DotPoint.JPG|10px|link=]]</td> | ||
| + | <td>'''Track Direction Marker''' - this is the original version</td> | ||
| + | </tr> | ||
| + | <tr valign="top"> | ||
| + | <td>[[image:DotPoint.JPG|10px|link=]]</td> | ||
| + | <td>'''AI Routing Direction Marker''' - this is similar to the original but it does not affect signal operations</td> | ||
| + | </tr> | ||
| + | </table> | ||
| + | </td> | ||
| + | </tr> | ||
| + | </table> | ||
| + | </td> | ||
| + | </tr> | ||
| + | </table> | ||
| + | <br> | ||
If you are not sure about an asset then <span style="font-weight: 700; font-size: 15px; background-color: lightcyan;">Double Left Click</span> on the name to bring up its image and description.</td> | If you are not sure about an asset then <span style="font-weight: 700; font-size: 15px; background-color: lightcyan;">Double Left Click</span> on the name to bring up its image and description.</td> | ||
</tr> | </tr> | ||
| Line 370: | Line 284: | ||
</tr> | </tr> | ||
</table> | </table> | ||
| − | [[image:DotPoint5.JPG|link=]] Place the ''' | + | [[image:DotPoint5.JPG|link=]] Place the '''Direction Marker''' on the track.<br> |
<table width=1000> | <table width=1000> | ||
<tr valign="top"> | <tr valign="top"> | ||
| − | <td>[[image: | + | <td>[[image:DirectionmarkAdd_S20.png|link=|alt=Add direction marker]]<br> |
<br> | <br> | ||
<table bgcolor=#000000 width=480 cellpadding=2> | <table bgcolor=#000000 width=480 cellpadding=2> | ||
| Line 383: | Line 297: | ||
<td><span style="font-size: 17px; font-weight: 700;">Notes:'''</span><br> | <td><span style="font-size: 17px; font-weight: 700;">Notes:'''</span><br> | ||
---- | ---- | ||
| − | To delete a ''' | + | To delete a '''Direction Marker''' (or any asset):- |
# select either the:- | # select either the:- | ||
#* '''Free Move Tool''' (or press <span style="font-weight: 700; font-size: 17px; color: white; background-color: black;"> S </span>) or | #* '''Free Move Tool''' (or press <span style="font-weight: 700; font-size: 17px; color: white; background-color: black;"> S </span>) or | ||
#* '''Fine Adjustment Tool''' (or press <span style="font-weight: 700; font-size: 17px; color: white; background-color: black;"> D </span>) | #* '''Fine Adjustment Tool''' (or press <span style="font-weight: 700; font-size: 17px; color: white; background-color: black;"> D </span>) | ||
| − | # <span style="font-weight: 700; font-size: 15px; background-color: lightcyan;">Left Click</span> on the ''' | + | # <span style="font-weight: 700; font-size: 15px; background-color: lightcyan;">Left Click</span> on the '''Direction Marker''' |
# press the <span style="font-weight: 700; font-size: 17px; color: white; background-color: black;"> Delete </span> key | # press the <span style="font-weight: 700; font-size: 17px; color: white; background-color: black;"> Delete </span> key | ||
</td> | </td> | ||
| − | |||
| − | |||
| − | |||
| − | |||
| − | |||
| − | |||
| − | |||
| − | |||
| − | |||
| − | |||
| − | |||
| − | |||
| − | |||
| − | |||
| − | |||
| − | |||
</tr> | </tr> | ||
</table> | </table> | ||
| Line 428: | Line 326: | ||
<tr valign="top"> | <tr valign="top"> | ||
<td>[[image:DotPoint2Blue.png|link=]]</td> | <td>[[image:DotPoint2Blue.png|link=]]</td> | ||
| − | <td><span style="font-weight: 700; font-size: 15px; background-color: lightcyan;">Left Click</span> on the track at the position where you want to place the ''' | + | <td><span style="font-weight: 700; font-size: 15px; background-color: lightcyan;">Left Click</span> on the track at the position where you want to place the '''Direction Marker'''</td> |
</tr> | </tr> | ||
</table> | </table> | ||
| − | The ''' | + | The '''Direction Marker''' can be easily moved if needed - see below. |
</td> | </td> | ||
</tr> | </tr> | ||
| Line 438: | Line 336: | ||
----</td> | ----</td> | ||
</tr> | </tr> | ||
| − | </table><br> | + | </table> |
| + | <br> | ||
[[image:Tools_S20.png|link=|alt=Tools and keymap for S20]] | [[image:Tools_S20.png|link=|alt=Tools and keymap for S20]] | ||
</td> | </td> | ||
| Line 444: | Line 343: | ||
</table> | </table> | ||
<br> | <br> | ||
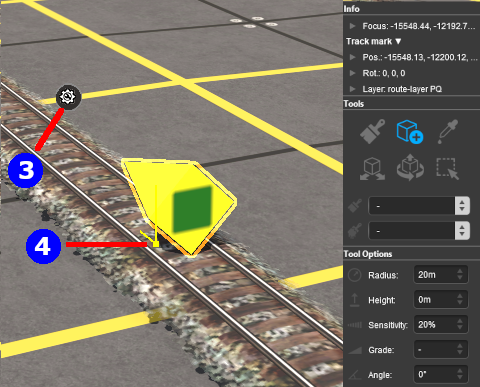
| − | ===<span style="color: white; background-color: blue;"> Set the | + | ===<span style="color: white; background-color: blue;"> Set the Direction Marker Properties </span>=== |
| − | + | <table width=1000> | |
| − | <table width= | + | |
<tr valign="top"> | <tr valign="top"> | ||
| − | <td>[[image: | + | <td>[[image:DirectionmarkAdjust_S20.png|link=]]</td> |
| − | <td>[[image:DotPoint3Blue.png|link=]] <span style="font-weight: 700; font-size: 17px;">Change Its | + | <td>[[image:DotPoint3Blue.png|link=]] <span style="font-weight: 700; font-size: 17px;">Change Its Direction</span><br> |
| + | The direction the marker points is its '''ONLY''' important property.<br> | ||
<table cellpadding=4 bgcolor=#ffffff> | <table cellpadding=4 bgcolor=#ffffff> | ||
<tr> | <tr> | ||
| Line 457: | Line 356: | ||
<tr valign="top"> | <tr valign="top"> | ||
<td>[[image:Steps.PNG|link=]]</td> | <td>[[image:Steps.PNG|link=]]</td> | ||
| − | <td> | + | <td>If you need to rotate the '''Direction Marker''' to face the opposite direction then:- |
| − | # <span style="font-weight: 700; font-size: 15px; background-color: lightcyan;">Left Click</span> on | + | # <span style="font-weight: 700; font-size: 15px; background-color: lightcyan;">Left Click</span> on its '''Context Menu Icon''' ([[image:DotPoint3Blue.png|link=]] in the image on the left or press the <span style="font-weight: 700; font-size: 17px; color: white; background-color: black;"> T </span> key) to open up the object property and control menu |
| − | # | + | # from the popup menu select <span style="font-weight: 700; font-size: 15px; color: white; background-color: black;"> Rotate Trackside </span></td> |
| − | + | ||
| − | + | ||
| − | </td> | + | |
</tr> | </tr> | ||
<tr> | <tr> | ||
| Line 468: | Line 364: | ||
----</td> | ----</td> | ||
</tr> | </tr> | ||
| − | </ | + | <tr valign="top"> |
| − | </td> | + | <td colspan=2>[[image:DotPoint3Blue.png|link=]] <span style="font-weight: 700; font-size: 17px;">Change Its Name</span><br> |
| + | The name of the marker is only useful for finding it in the route. It is not needed for any operational purpose.</td> | ||
</tr> | </tr> | ||
| − | |||
| − | |||
| − | |||
| − | |||
| − | |||
<tr> | <tr> | ||
<td colspan="2"> | <td colspan="2"> | ||
| Line 483: | Line 375: | ||
<td>[[image:Steps.PNG|link=]]</td> | <td>[[image:Steps.PNG|link=]]</td> | ||
<td><span style="font-size: 17px; font-weight: 700;">Steps:</span><br> | <td><span style="font-size: 17px; font-weight: 700;">Steps:</span><br> | ||
| − | [[image: | + | # <span style="font-weight: 700; font-size: 15px; background-color: lightcyan;">Left Click</span> on the '''Context Menu Icon''' ([[image:DotPoint3Blue.png|link=]] in the image on the left or press the <span style="font-weight: 700; font-size: 17px; color: white; background-color: black;"> T </span> key) to open up the object property and control menu |
| + | # <span style="font-weight: 700; font-size: 15px; background-color: lightcyan;">Left Click</span> on the <span style="font-weight: 700; font-size: 15px; color: white; background-color: black;"> Edit Properties </span> option in the popup menu | ||
| + | # enter a name for the '''Direction Marker''' | ||
| + | # <span style="font-weight: 700; font-size: 15px; background-color: lightcyan;">Left Click</span> on the [[image:Tick.PNG|link=]] to accept the change or on the [[image:Cross.PNG|link=]] to reject it | ||
</td> | </td> | ||
</tr> | </tr> | ||
| Line 489: | Line 384: | ||
<td colspan="2"> | <td colspan="2"> | ||
----</td> | ----</td> | ||
| + | </tr> | ||
| + | </table> | ||
| + | </td> | ||
</tr> | </tr> | ||
</table> | </table> | ||
<br> | <br> | ||
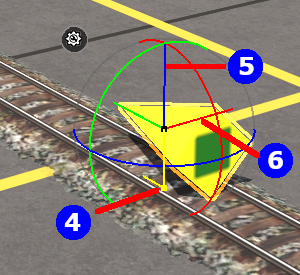
| − | ===<span style="color: white; background-color: blue;"> Move the | + | ===<span style="color: white; background-color: blue;"> Move the Direction Marker </span>=== |
| − | [[image: | + | [[image:DotPoint4Blue.png|link=]] <span style="font-weight: 700; font-size: 17px;">Move it Along the Track</span><br> |
<table cellpadding=4 bgcolor=#ffffff> | <table cellpadding=4 bgcolor=#ffffff> | ||
<tr> | <tr> | ||
| Line 503: | Line 401: | ||
<td>[[image:Steps.PNG|link=]]</td> | <td>[[image:Steps.PNG|link=]]</td> | ||
<td><span style="font-size: 17px; font-weight: 700;">Steps:</span><br> | <td><span style="font-size: 17px; font-weight: 700;">Steps:</span><br> | ||
| − | [[image:DotPoint.JPG|10px|link=]] <span style="font-weight: 700; font-size: 15px; background-color: lightcyan;">Left Click and Drag</span> | + | [[image:DotPoint.JPG|10px|link=]] <span style="font-weight: 700; font-size: 15px; background-color: lightcyan;">Left Click and Drag</span> on the '''Yellow Dot''' next to the '''Direction Marker''' ([[image:DotPoint4Blue.png|link=]] in the images above and below) to move the '''Direction Marker''' along the track |
</td> | </td> | ||
</tr> | </tr> | ||
| Line 514: | Line 412: | ||
<table width=900> | <table width=900> | ||
<tr valign="top"> | <tr valign="top"> | ||
| − | <td>[[image: | + | <td>[[image:DirectionmarkFineAdjust_S20.png|link=]]</td> |
| − | <td>[[image: | + | <td>[[image:DotPoint5Blue.png|link=]] <span style="font-weight: 700; font-size: 17px;">Reposition it Up/Down</span><br> |
| − | This feature allows a ''' | + | This feature allows a '''Direction Marker''' to be physically placed above the track so that it will not be hidden if a consist is parked on the '''Direction Marker'''.<br> |
<table cellpadding=4 bgcolor=#ffffff width=530> | <table cellpadding=4 bgcolor=#ffffff width=530> | ||
<tr> | <tr> | ||
| Line 526: | Line 424: | ||
<td><span style="font-size: 17px; font-weight: 700;">Steps:</span><br> | <td><span style="font-size: 17px; font-weight: 700;">Steps:</span><br> | ||
# Select the '''Fine Adjustment Tool''' (or press the <span style="font-weight: 700; font-size: 17px; color: white;background-color: black;"> D </span> key) | # Select the '''Fine Adjustment Tool''' (or press the <span style="font-weight: 700; font-size: 17px; color: white;background-color: black;"> D </span> key) | ||
| − | # <span style="font-weight: 700; font-size: 15px; background-color: lightcyan;">Left Click and Drag</span> | + | # <span style="font-weight: 700; font-size: 15px; background-color: lightcyan;">Left Click and Drag</span> on the '''Blue Vertical Axis Line''' above the '''Direction Marker''' ([[image:DotPoint5Blue.png|link=]] in the image on the left) to move the '''Direction Marker''' up or down |
</td> | </td> | ||
</tr> | </tr> | ||
| Line 540: | Line 438: | ||
<tr valign="top"> | <tr valign="top"> | ||
<td>[[image:PencilTips.PNG|link=]]</td> | <td>[[image:PencilTips.PNG|link=]]</td> | ||
| − | <td>If you need to return the ''' | + | <td>If you need to return the '''Direction Marker''' to its original position then:- |
# <span style="font-weight: 700; font-size: 15px; background-color: lightcyan;">Left Click</span> on its '''Context Menu Icon''' (or press the <span style="font-weight: 700; font-size: 17px; color: white; background-color: black;"> T </span> key if the asset has already been selected) | # <span style="font-weight: 700; font-size: 15px; background-color: lightcyan;">Left Click</span> on its '''Context Menu Icon''' (or press the <span style="font-weight: 700; font-size: 17px; color: white; background-color: black;"> T </span> key if the asset has already been selected) | ||
# from the popup menu select <span style="font-weight: 700; font-size: 15px; color: white; background-color: black;"> Reattach to Track </span></td> | # from the popup menu select <span style="font-weight: 700; font-size: 15px; color: white; background-color: black;"> Reattach to Track </span></td> | ||
| Line 552: | Line 450: | ||
</table> | </table> | ||
<br> | <br> | ||
| − | + | [[image:DotPoint6Blue.png|link=]] <span style="font-weight: 700; font-size: 17px;">Reposition it Left/Right</span><br> | |
| − | [[image: | + | This feature allows a '''Direction Marker''' to be physically placed left or right alongside the track so that it will not be hidden if a consist is parked on the '''Direction Marker'''.<br> |
| − | This feature allows a ''' | + | |
<table cellpadding=4 bgcolor=#ffffff width=900> | <table cellpadding=4 bgcolor=#ffffff width=900> | ||
<tr> | <tr> | ||
| Line 564: | Line 461: | ||
<td><span style="font-size: 17px; font-weight: 700;">Steps:</span><br> | <td><span style="font-size: 17px; font-weight: 700;">Steps:</span><br> | ||
# Select the '''Fine Adjustment Tool''' (or press the <span style="font-weight: 700; font-size: 17px; color: white;background-color: black;"> D </span> key) | # Select the '''Fine Adjustment Tool''' (or press the <span style="font-weight: 700; font-size: 17px; color: white;background-color: black;"> D </span> key) | ||
| − | # <span style="font-weight: 700; font-size: 15px; background-color: lightcyan;">Left Click and Drag</span> | + | # <span style="font-weight: 700; font-size: 15px; background-color: lightcyan;">Left Click and Drag</span> on the '''Red Horizontal Axis Line''' on the '''Direction Marker''' ([[image:DotPoint6Blue.png|link=]] in the image above to move the '''Direction Marker''' left or right of the track |
</td> | </td> | ||
</tr> | </tr> | ||
<tr valign="top"> | <tr valign="top"> | ||
<td colspan=2> | <td colspan=2> | ||
| − | |||
<table bgcolor=#000000 width=800> | <table bgcolor=#000000 width=800> | ||
<tr valign="top"> | <tr valign="top"> | ||
| Line 578: | Line 474: | ||
<td><span style="font-size: 17px; font-weight: 700;">Notes:'''</span><br> | <td><span style="font-size: 17px; font-weight: 700;">Notes:'''</span><br> | ||
---- | ---- | ||
| − | The '''Green Horizontal Axis Line''' shown as [[image: | + | The '''Green Horizontal Axis Line''' shown as [[image:DotPoint7Blue.png|link=]] in the image above pointing forward from the '''Direction Marker''' will move the '''Direction Marker''' forward/backward regardless of whether it is on the track or not. It has the same effect [[image:DotPoint4Blue.png|link=]] <span style="font-weight: 700; font-size: 15px;">Move it Along the Track</span>. However, by using this tool it is possible to move the '''Direction Marker''' beyond the end of the track if that is ever required. |
</td> | </td> | ||
</tr> | </tr> | ||
| Line 598: | Line 494: | ||
<tr valign="top"> | <tr valign="top"> | ||
<td>[[image:PencilTips.PNG|link=]]</td> | <td>[[image:PencilTips.PNG|link=]]</td> | ||
| − | <td>If you need to return the ''' | + | <td>If you need to return the '''Direction Marker''' to its original position then:- |
| − | # <span style="font-weight: 700; font-size: 15px; background-color: lightcyan;">Left Click</span> on its '''Context | + | # <span style="font-weight: 700; font-size: 15px; background-color: lightcyan;">Left Click</span> on its '''Context Manu Icon''' (or press the <span style="font-weight: 700; font-size: 17px; color: white; background-color: black;"> T </span> key if the asset has already been selected) |
# from the popup menu select <span style="font-weight: 700; font-size: 15px; color: white; background-color: black;"> Reattach to Track </span></td> | # from the popup menu select <span style="font-weight: 700; font-size: 15px; color: white; background-color: black;"> Reattach to Track </span></td> | ||
</tr> | </tr> | ||
| Line 608: | Line 504: | ||
<br> | <br> | ||
| − | ===<span style="color: white; background-color: blue;"> Assign a | + | ===<span style="color: white; background-color: blue;"> Assign a Direction Marker to a New Layer </span>=== |
<table cellpadding=4 bgcolor=#ffffff width=1000> | <table cellpadding=4 bgcolor=#ffffff width=1000> | ||
<tr valign="top"> | <tr valign="top"> | ||
| Line 674: | Line 570: | ||
</tr> | </tr> | ||
</table> <!-- END Nav Buttons Table --> | </table> <!-- END Nav Buttons Table --> | ||
| + | ='''Direction Marker Operation'''= | ||
| − | + | <table cellpadding=4 bgcolor=#c1e7e7> | |
| − | + | ||
| − | + | ||
| − | + | ||
| − | + | ||
| − | + | ||
| − | <table cellpadding=4 bgcolor= | + | |
<tr valign="top"> | <tr valign="top"> | ||
| − | <td | + | <td colspan=2><span style="font-size: 17px; font-weight: 700;">Main Points:</span></td> |
| − | < | + | |
| − | + | ||
| − | </td> | + | |
</tr> | </tr> | ||
| − | |||
| − | |||
| − | |||
<tr valign="top"> | <tr valign="top"> | ||
<td>[[file:DotPoint.JPG|link=]]</td> | <td>[[file:DotPoint.JPG|link=]]</td> | ||
| − | <td>''' | + | <td>'''Track Direction Markers only work on AI controlled trains.''' They have no effect on manually controlled trains</td> |
</tr> | </tr> | ||
<tr valign="top"> | <tr valign="top"> | ||
<td>[[file:DotPoint.JPG|link=]]</td> | <td>[[file:DotPoint.JPG|link=]]</td> | ||
| − | <td> | + | <td>If the set path is blocked, then the AI will '''NOT''' attempt to find another path</td> |
</tr> | </tr> | ||
| − | |||
| − | |||
| − | |||
<tr valign="top"> | <tr valign="top"> | ||
| − | <td>[[file: | + | <td>[[file:DotPoint.JPG|link=]]</td> |
| − | <td> | + | <td>A set path will be ignored if a shorter path is available</td> |
| − | + | ||
| − | + | ||
| − | + | ||
</tr> | </tr> | ||
| − | + | </table> | |
| − | + | ||
| − | + | ||
| − | + | ||
| − | + | Consider the situation represented in the diagrams below. An AI controlled train is moving left to right towards a junction and a loop line. A '''Direction Marker''' (yellow triangle) has been set on the main line which only allows AI trains traveling right-to-left to pass along that section of track.<br> | |
| − | + | ||
| − | + | ||
| − | + | ||
| − | + | ||
| − | + | ||
| − | + | In '''Figure 1''' below, The train approaches the junction at the start of the one way section.<br> | |
| − | + | ||
| − | + | ||
| − | + | ||
| − | + | ||
| − | + | ||
| − | + | [[file:DirectionMap1.png|link=|alt=Direction Map - approach]]<br> | |
| − | < | + | <span style="text-decoration: underline; font-weight: 700;">Figure 1</span><br> |
| − | < | + | ---- |
| + | In '''Figure 2''' below, the train has been forced to take the loop line to avoid the section controlled by the '''Direction Marker'''.<br> | ||
| − | ==''' | + | [[file:DirectionMap2.png|link=|alt=Direction Map - bypass]]<br> |
| − | + | <span style="text-decoration: underline; font-weight: 700;">Figure 2</span><br> | |
| + | ---- | ||
| + | In '''Figure 3''' below, the loop line has been blocked by another train. The moving train will attempt to use the loop line but it will be halted and will not attempt to find another path.<br> | ||
| − | + | [[file:DirectionMap3.png|link=|alt=Direction Map - blocked]]<br> | |
| − | + | <span style="text-decoration: underline; font-weight: 700;">Figure 3</span><br> | |
| − | + | ---- | |
| − | < | + | '''Direction Markers can be ignored by the AI'''<br> |
| − | + | In '''Figure 4''' below, the marker has been placed on the loop line and is pointing in the same direction as the moving train. However, the mainline path represents the shorter route for the consist so the "preferred" direction, as indicated by the '''Direction Marker''', is ignored. Placing a '''Direction Marker''' is no guarantee that the path will be followed if more suitable paths are available.<br> | |
| − | < | + | |
| − | < | + | [[file:DirectionMap4.png|link=|alt=Direction Map - path ignored]]<br> |
| − | </ | + | <span style="text-decoration: underline; font-weight: 700;">Figure 4</span><br> |
<br> | <br> | ||
| − | |||
| − | |||
| − | |||
| − | |||
| − | |||
| − | |||
| − | |||
| − | |||
| − | |||
| − | |||
| − | |||
| − | |||
| − | |||
| − | |||
| − | |||
| − | |||
| − | |||
| − | |||
| − | |||
='''Related Links'''= | ='''Related Links'''= | ||
| Line 802: | Line 652: | ||
</tr> | </tr> | ||
</table> | </table> | ||
| − | + | ||
| − | + | ||
| − | + | ||
[[Category:How-to guides]] | [[Category:How-to guides]] | ||
Revision as of 08:06, 24 April 2023
The information in this Wiki Page applies to TANE, TRS19, Trainz Plus and TRS22.
|
|
|||||||||
What are Track Direction Markers?
While Track Marks can be used to direct trains around a layout, they must be added to the Driver Commands in the form of Drive Via commands, and similar, to individual train drivers to work. Direction Markers can perform some of the same work without needing to be added to the command lists of the drivers. Their disadvantage is that Direction Markers will affect all AI controlled trains while Track Marks will only affect those AI trains where they appear in the driver command lists.
Direction Markers force AI drivers to follow a particular path. They only work on AI controlled trains and have no effect on manually controlled trains.
Route or Session?
| Direction Markers can be placed in a Route layer or in a Session layer |
|
 |
Information on Route and Session layers can be found at:- |
Adding a Track Direction Marker
|
In Surveyor Classic (S10)
 |
|
||||||
In Surveyor 2.0 (S20)
Surveyor 2.0 is currently only available for Trainz Plus Standard and Trainz Plus Gold subscription members.
Adding a Direction Marker
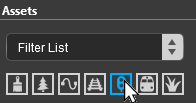
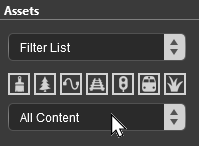
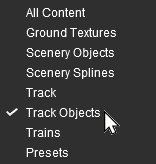
![]() In the Asset Palette either:-
In the Asset Palette either:-
|
OR |
|
|
|||||||||||||||
|
||||||||
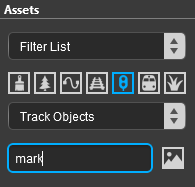
![]() To narrow down the filter list, type "mark" (UPPER/lower case does not matter) in the Search Text Box
To narrow down the filter list, type "mark" (UPPER/lower case does not matter) in the Search Text Box
 |
|

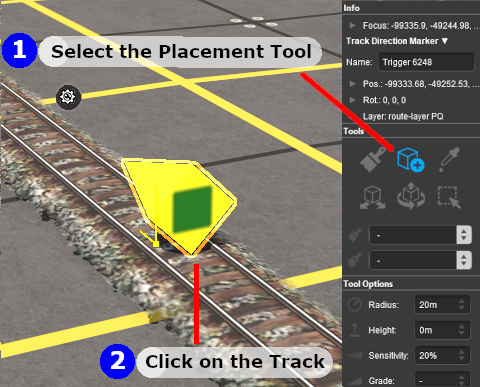
![]() Place the Direction Marker on the track.
Place the Direction Marker on the track.
|
|
|||||||||||||
Set the Direction Marker Properties
 |
The direction the marker points is its ONLY important property.
|
||||||||||||||
Move the Direction Marker
![]() Move it Along the Track
Move it Along the Track
|
|
|
 |
Steps:
|
|
|
|
 |
This feature allows a Direction Marker to be physically placed above the track so that it will not be hidden if a consist is parked on the Direction Marker.
|
|||||||||
![]() Reposition it Left/Right
Reposition it Left/Right
This feature allows a Direction Marker to be physically placed left or right alongside the track so that it will not be hidden if a consist is parked on the Direction Marker.
|
|
||||
|
Steps:
|
|||
|
||||
|
|
||||
|
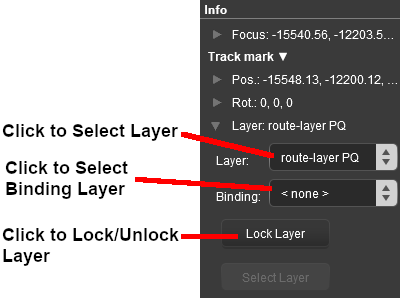
Assign a Direction Marker to a New Layer
| The Info Palette will show the layer assigned to the currently selected object. To the left of the layer name is a small arrow object. | ||||||||||||
|
|
|
|||||||||||

Direction Marker Operation
| Main Points: | |
| Track Direction Markers only work on AI controlled trains. They have no effect on manually controlled trains | |
| If the set path is blocked, then the AI will NOT attempt to find another path | |
| A set path will be ignored if a shorter path is available | |
Consider the situation represented in the diagrams below. An AI controlled train is moving left to right towards a junction and a loop line. A Direction Marker (yellow triangle) has been set on the main line which only allows AI trains traveling right-to-left to pass along that section of track.
In Figure 1 below, The train approaches the junction at the start of the one way section.

Figure 1
In Figure 2 below, the train has been forced to take the loop line to avoid the section controlled by the Direction Marker.

Figure 2
In Figure 3 below, the loop line has been blocked by another train. The moving train will attempt to use the loop line but it will be halted and will not attempt to find another path.

Figure 3
Direction Markers can be ignored by the AI
In Figure 4 below, the marker has been placed on the loop line and is pointing in the same direction as the moving train. However, the mainline path represents the shorter route for the consist so the "preferred" direction, as indicated by the Direction Marker, is ignored. Placing a Direction Marker is no guarantee that the path will be followed if more suitable paths are available.

Figure 4
Related Links
|
Trainz Wiki
 |
More Tutorials and Guides to Using Trainz |