How to Use Layers
m (→Locking Individual Layers) |
(→Route Layers vs Session Layers: Updated to include major change for Trainz Plus) |
||
| (48 intermediate revisions by 2 users not shown) | |||
| Line 1: | Line 1: | ||
| + | The information in this Wiki Page applies to '''TANE''', '''TRS19''' and '''Trainz Plus'''. | ||
| + | |||
| + | __TOC__ | ||
='''What Are Layers?'''= | ='''What Are Layers?'''= | ||
<table cellpadding="4" bgcolor=#c1e7e7> | <table cellpadding="4" bgcolor=#c1e7e7> | ||
<tr valign="top"> | <tr valign="top"> | ||
| − | <td>[[file:DotPoint.JPG]]</td> | + | <td colspan=2><span style="font-size: 17px;"><b>In Summary:</b></span></td> |
| + | </tr> | ||
| + | <tr valign="top"> | ||
| + | <td>[[file:DotPoint.JPG|link=]]</td> | ||
<td>'''Layers are a ''Surveyor'' tool that allows you to better manage the objects that are placed in your Trainz World.'''<td> | <td>'''Layers are a ''Surveyor'' tool that allows you to better manage the objects that are placed in your Trainz World.'''<td> | ||
</tr> | </tr> | ||
<tr valign="top"> | <tr valign="top"> | ||
| − | <td>[[file:DotPoint.JPG]]</td> | + | <td>[[file:DotPoint.JPG|link=]]</td> |
<td>'''Layers are a ''Driver'' tool that allows you to change what the players see as they drive around your Trainz World.'''<td> | <td>'''Layers are a ''Driver'' tool that allows you to change what the players see as they drive around your Trainz World.'''<td> | ||
</tr> | </tr> | ||
</table> | </table> | ||
| − | Layers can contain any | + | Layers can contain any objects, visible and invisible, that can be placed into a layout using the Surveyor '''Object''', '''Track''' and '''Train''' tools. The layers and their contents can be hidden from view or locked against alteration whenever required. Their main use is in the development of a Route and a Session but they can also be used as a way of providing some additional novelty during a Driver session. |
| + | <table width="100%"> | ||
<br> | <br> | ||
| + | <tr valign="top"> | ||
| + | <td align="right">[[file:BackToTop.png|link=#top|alt=Top|Top]]</td> | ||
| + | </tr> | ||
| + | </table> | ||
='''The Layers Tool'''= | ='''The Layers Tool'''= | ||
| Line 19: | Line 30: | ||
<tr valign="top"> | <tr valign="top"> | ||
<td>[[file:SurveyorToolMenuLayers.JPG|150px]]</td> | <td>[[file:SurveyorToolMenuLayers.JPG|150px]]</td> | ||
| − | <td><br><br><br><br><br><br><br><br><br><br><br><br><br>[[file:RightArrowRed.JPG]] | + | <td><br><br><br><br><br><br><br><br><br><br><br><br><br>[[file:RightArrowRed.JPG|link=]] |
<td>Click the '''Layers Tool''' to open up its properties.<br> | <td>Click the '''Layers Tool''' to open up its properties.<br> | ||
[[file:LayersTools.JPG|480px]]</td> | [[file:LayersTools.JPG|480px]]</td> | ||
| Line 25: | Line 36: | ||
<table cellpadding="4" bgcolor=#ffffb0> | <table cellpadding="4" bgcolor=#ffffb0> | ||
<tr valign="top"> | <tr valign="top"> | ||
| − | <td>[[file:NotePad.PNG]]</td> | + | <td>[[file:NotePad.PNG|link=]]</td> |
| − | <td><font size | + | <td><span style="font-size: 17px;">'''Notes:'''</span><br> |
The layers are organised into two groups:- | The layers are organised into two groups:- | ||
*'''Route Layers''' in the top group, and | *'''Route Layers''' in the top group, and | ||
| Line 43: | Line 54: | ||
<table> | <table> | ||
<tr valign="top"> | <tr valign="top"> | ||
| − | <td>[[file:LayersToolsRoute.JPG]]</td> | + | <td>[[file:LayersToolsRoute.JPG|link=]]</td> |
| − | <td>[[file:LayersToolsSession.JPG]]</td> | + | <td>[[file:LayersToolsSession.JPG|link=]]</td> |
<td><br> | <td><br> | ||
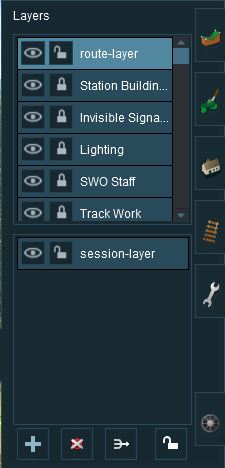
*The first image on the left gives an example of the layers that can appear if a '''Route only''' is loaded into Surveyor. These are the layers that are saved with the Route. '''Note that a default "session-layer" is present'''. | *The first image on the left gives an example of the layers that can appear if a '''Route only''' is loaded into Surveyor. These are the layers that are saved with the Route. '''Note that a default "session-layer" is present'''. | ||
<table cellpadding="4" bgcolor=#c1e7e7> | <table cellpadding="4" bgcolor=#c1e7e7> | ||
<tr valign="top"> | <tr valign="top"> | ||
| − | <td>[[file:DotPoint.JPG]]</td> | + | <td>[[file:DotPoint.JPG|link=]]</td> |
<td>'''An empty default "session-layer" is always created in the Session Layers Group when only the Route is loaded into Surveyor.'''<td> | <td>'''An empty default "session-layer" is always created in the Session Layers Group when only the Route is loaded into Surveyor.'''<td> | ||
</tr> | </tr> | ||
| Line 59: | Line 70: | ||
<table cellpadding="4" bgcolor=#c1e7e7 width="730"> | <table cellpadding="4" bgcolor=#c1e7e7 width="730"> | ||
<tr valign="top"> | <tr valign="top"> | ||
| − | <td>[[file:DotPoint.JPG]]</td> | + | <td colspan=2><span style="font-size: 17px;"><b>In Summary:</b></span></td> |
| + | </tr> | ||
| + | <tr valign="top"> | ||
| + | <td>[[file:DotPoint.JPG|link=]]</td> | ||
<td>'''Route Layers are saved with the Route. Session Layers are saved with the Session.<td> | <td>'''Route Layers are saved with the Route. Session Layers are saved with the Session.<td> | ||
</tr> | </tr> | ||
<tr valign="top"> | <tr valign="top"> | ||
| − | <td>[[file:DotPoint.JPG]]</td> | + | <td>[[file:DotPoint.JPG|link=]]</td> |
<td>'''If you edit a Session Layer and later load just the Route then those edits will not appear.'''</td> | <td>'''If you edit a Session Layer and later load just the Route then those edits will not appear.'''</td> | ||
</tr> | </tr> | ||
<tr valign="top"> | <tr valign="top"> | ||
| − | <td>[[file:DotPoint.JPG]]</td> | + | <td>[[file:DotPoint.JPG|link=]]</td> |
<td>'''If you load just the Route and edit its "session-layer" then those edits will not appear the next time you load just the Route''' because an empty "session-layer" is created each time a Route is loaded without a Session.<br><br> | <td>'''If you load just the Route and edit its "session-layer" then those edits will not appear the next time you load just the Route''' because an empty "session-layer" is created each time a Route is loaded without a Session.<br><br> | ||
</td> | </td> | ||
| Line 75: | Line 89: | ||
<table cellpadding="4" bgcolor=#fcbcbc> | <table cellpadding="4" bgcolor=#fcbcbc> | ||
<tr valign="top"> | <tr valign="top"> | ||
| − | <td>[[file:Stop.PNG]]</td> | + | <td>[[file:Stop.PNG|link=]]</td> |
| − | <td><font size=" | + | <td><span style="font-size: 17px;"><b>WARNING:</b></span></td> |
| − | < | + | </tr> |
| + | <tr valign="top"> | ||
| + | <td>[[file:DotPoint.JPG|link=]]</td> | ||
| + | <td><span style="font-size: 17px;">'''If you load a <span style="text-decoration: underline;">ROUTE</span> without a SESSION then only <span style="text-decoration: underline;">edit the Route Layers</span>'''</span></td> | ||
| + | </tr> | ||
| + | <tr valign="top"> | ||
| + | <td>[[file:DotPoint.JPG|link=]]</td> | ||
| + | <td><span style="font-size: 17px;">'''If you load a <span style="text-decoration: underline;">SESSION</span> and edit any Session layers then <span style="text-decoration: underline;">save the Session</span>'''</span></td> | ||
</tr> | </tr> | ||
</table> | </table> | ||
| Line 89: | Line 110: | ||
<table> | <table> | ||
<tr valign="top"> | <tr valign="top"> | ||
| − | <td>[[file:LayersNewRoute.JPG]]</td> | + | <td>[[file:LayersNewRoute.JPG|link=]]</td> |
<td> | <td> | ||
<table cellpadding="4" bgcolor=#ffffb0> | <table cellpadding="4" bgcolor=#ffffb0> | ||
<tr valign="top"> | <tr valign="top"> | ||
| − | <td>[[file:NotePad.PNG]]</td> | + | <td>[[file:NotePad.PNG|link=]]</td> |
| − | <td><font size | + | <td><span style="font-size: 17px;">'''Notes:'''</span><br> |
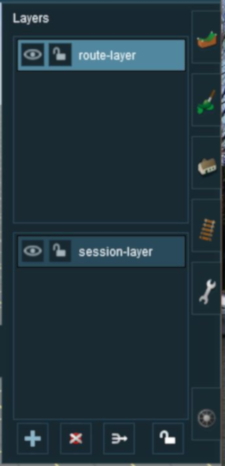
*When a brand new route is created it will come with two layers, a single "route-layer" and a single "session-layer". | *When a brand new route is created it will come with two layers, a single "route-layer" and a single "session-layer". | ||
*Both layers will be empty (the baseboard with its grid is saved with the route but is not in any layer). | *Both layers will be empty (the baseboard with its grid is saved with the route but is not in any layer). | ||
| Line 102: | Line 123: | ||
<table cellpadding="4" bgcolor=#ffffb0> | <table cellpadding="4" bgcolor=#ffffb0> | ||
<tr valign="top"> | <tr valign="top"> | ||
| − | <td>[[file:PencilTips.PNG]]</td> | + | <td>[[file:PencilTips.PNG|link=]]</td> |
<td>'''A layer can be renamed at anytime by double clicking on its name with the left mouse button and typing a new name.'''</td> | <td>'''A layer can be renamed at anytime by double clicking on its name with the left mouse button and typing a new name.'''</td> | ||
</tr> | </tr> | ||
| Line 112: | Line 133: | ||
<table cellpadding="4" bgcolor=#c1e7e7> | <table cellpadding="4" bgcolor=#c1e7e7> | ||
<tr valign="top"> | <tr valign="top"> | ||
| − | <td>[[file:DotPoint.JPG]]</td> | + | <td colspan=2><span style="font-size: 17px;"><b>In Summary:</b></span></td> |
| + | </tr> | ||
| + | <tr valign="top"> | ||
| + | <td>[[file:DotPoint.JPG|link=]]</td> | ||
<td>'''The ''Active Layer'' is the selected (highlighted) layer.'''</td> | <td>'''The ''Active Layer'' is the selected (highlighted) layer.'''</td> | ||
| + | </tr> | ||
| + | <tr valign="top"> | ||
| + | <td>[[file:DotPoint.JPG|link=]]</td> | ||
| + | <td>When you load the '''Route only''' into Surveyor, the '''first Route layer''' will be the '''Active Layer'''</td> | ||
| + | </tr> | ||
| + | <tr valign="top"> | ||
| + | <td>[[file:DotPoint.JPG|link=]]</td> | ||
| + | <td>When you load a '''Session''' into Surveyor, the '''first Session layer''' will be the '''Active Layer'''</td> | ||
</tr> | </tr> | ||
</table> | </table> | ||
| Line 120: | Line 152: | ||
<table cellpadding="4" bgcolor=#ffffb0 width="480"> | <table cellpadding="4" bgcolor=#ffffb0 width="480"> | ||
<tr valign="top"> | <tr valign="top"> | ||
| − | <td>[[file:NotePad.PNG]]</td> | + | <td>[[file:NotePad.PNG|link=]]</td> |
| − | <td><font size | + | <td><span style="font-size: 17px;">'''Notes:'''</span><br> |
The '''Active Layer''' is the "working layer" which is:- | The '''Active Layer''' is the "working layer" which is:- | ||
*where new objects will be added to the layout | *where new objects will be added to the layout | ||
| Line 129: | Line 161: | ||
<table cellpadding="4" bgcolor=#fcbcbc width="480"> | <table cellpadding="4" bgcolor=#fcbcbc width="480"> | ||
<tr valign="top"> | <tr valign="top"> | ||
| − | <td> | + | <td colspan=2><span style="font-size: 17px;"><b>Caution:</b></span></td> |
| − | < | + | |
| − | + | ||
</tr> | </tr> | ||
| − | |||
| − | |||
| − | |||
<tr valign="top"> | <tr valign="top"> | ||
| − | <td>[[file: | + | <td>[[file:Stop.PNG|link=]]</td> |
| − | <td> | + | <td>'''Trainz''' does not identify which is the '''Active Layer''' in Surveyor and this often leads to problems such as objects being added to the wrong layer.<br> |
| − | + | See [[file:PageLink.PNG|link=]] '''[[#Adding Objects To Layers|Adding Objects To Layers]]''' below for more information.</td> | |
| − | + | ||
| − | + | ||
| − | + | ||
</tr> | </tr> | ||
</table> | </table> | ||
| − | + | <br> | |
==Adding a New Layer== | ==Adding a New Layer== | ||
<table> | <table> | ||
<tr> | <tr> | ||
| − | <td>[[file:LayersToolButtonsADD.JPG]]</td> | + | <td>[[file:LayersToolButtonsADD.JPG|link=]]</td> |
<td>Click the '''Add Button'''</td> | <td>Click the '''Add Button'''</td> | ||
</tr> | </tr> | ||
| Line 159: | Line 183: | ||
<table> | <table> | ||
<tr valign="top"> | <tr valign="top"> | ||
| − | <td>[[file:LayersAddLayer.JPG]]</td> | + | <td>[[file:LayersAddLayer.JPG|link=]]</td> |
<td> | <td> | ||
<table cellpadding="4" bgcolor=#ffffff> | <table cellpadding="4" bgcolor=#ffffff> | ||
| Line 167: | Line 191: | ||
</tr> | </tr> | ||
<tr valign="top"> | <tr valign="top"> | ||
| − | <td>[[file:Steps.PNG]]</td> | + | <td>[[file:Steps.PNG|link=]]</td> |
| − | <td><font size | + | <td><span style="font-size: 17px;">'''Steps:'''</span><br> |
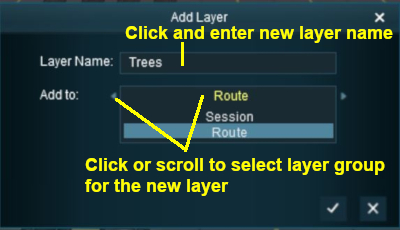
#Enter a name for the new layer | #Enter a name for the new layer | ||
#Select the layer group, '''Route''' or '''Session''', where it will be placed | #Select the layer group, '''Route''' or '''Session''', where it will be placed | ||
| − | #Click the [[file:Tick.PNG]] icon</td> | + | #Click the [[file:Tick.PNG|link=]] icon</td> |
</tr> | </tr> | ||
<tr> | <tr> | ||
| Line 178: | Line 202: | ||
</tr> | </tr> | ||
</table> | </table> | ||
| − | You can easily rename the layer or move it to the other layer group later if you change your mind. | + | <table cellpadding="4" bgcolor=#ffffb0> |
| + | <tr valign="top"> | ||
| + | <td>[[file:PencilTips.PNG|link=]]</td> | ||
| + | <td>You can easily rename the layer or move it to the other layer group later if you change your mind.</td> | ||
| + | </tr> | ||
| + | </table></td> | ||
</tr> | </tr> | ||
</table> | </table> | ||
| Line 186: | Line 215: | ||
<table> | <table> | ||
<tr> | <tr> | ||
| − | <td>[[file:LayersToolButtonsDELETE.JPG]]</td> | + | <td>[[file:LayersToolButtonsDELETE.JPG|link=]]</td> |
| − | <td>Select the layer to be deleted and click the '''Delete Button'''. If you don't select a layer to delete then | + | <td>Select the layer to be deleted and click the '''Delete Button'''. If you don't select a layer to delete then '''Trainz''' will select the current '''Active Layer'''.</td> |
</tr> | </tr> | ||
</table> | </table> | ||
| Line 193: | Line 222: | ||
<table cellpadding="4" bgcolor=#fcbcbc> | <table cellpadding="4" bgcolor=#fcbcbc> | ||
<tr valign="top"> | <tr valign="top"> | ||
| − | <td>[[file:Stop.PNG]]</td> | + | <td colspan=2><span style="font-size: 17px;"><b>Warning:</b></span></td> |
| + | </tr> | ||
| + | <tr valign="top"> | ||
| + | <td>[[file:Stop.PNG|link=]]</td> | ||
<td>'''Deleting a layer will delete ALL the objects placed in that layer''' except objects that are "Bound" to that layer.</td> | <td>'''Deleting a layer will delete ALL the objects placed in that layer''' except objects that are "Bound" to that layer.</td> | ||
</tr> | </tr> | ||
| Line 202: | Line 234: | ||
<table> | <table> | ||
<tr> | <tr> | ||
| − | <td>[[file:LayerDeleteEmpty.JPG]]</td> | + | <td>[[file:LayerDeleteEmpty.JPG|link=]]</td> |
<td> | <td> | ||
<table cellpadding="4" bgcolor=#ffffff> | <table cellpadding="4" bgcolor=#ffffff> | ||
| Line 210: | Line 242: | ||
</tr> | </tr> | ||
<tr valign="top"> | <tr valign="top"> | ||
| − | <td>[[file:Choices.PNG]]</td> | + | <td>[[file:Choices.PNG|link=]]</td> |
| − | <td><font size | + | <td><span style="font-size: 17px;">'''Choices:'''</span><br> |
*Click '''Yes''' to delete the layer | *Click '''Yes''' to delete the layer | ||
*Click '''No''' to cancel the delete operation</td> | *Click '''No''' to cancel the delete operation</td> | ||
| Line 227: | Line 259: | ||
<table> | <table> | ||
<tr> | <tr> | ||
| − | <td>[[file:LayerDeleteNotEmpty.JPG]]</td> | + | <td>[[file:LayerDeleteNotEmpty.JPG|link=]]</td> |
<td> | <td> | ||
<table cellpadding="4" bgcolor=#ffffff> | <table cellpadding="4" bgcolor=#ffffff> | ||
| Line 235: | Line 267: | ||
</tr> | </tr> | ||
<tr valign="top"> | <tr valign="top"> | ||
| − | <td>[[file:Choices.PNG]]</td> | + | <td>[[file:Choices.PNG|link=]]</td> |
| − | <td><font size | + | <td><span style="font-size: 17px;">'''Choices:'''</span><br> |
*Click '''Merge''' to merge this layer and its contents into another layer. See '''Merging Layers''' below for more information | *Click '''Merge''' to merge this layer and its contents into another layer. See '''Merging Layers''' below for more information | ||
*Click '''Delete''' to delete the layer and its contents. '''This cannot be undone''' | *Click '''Delete''' to delete the layer and its contents. '''This cannot be undone''' | ||
| Line 253: | Line 285: | ||
<table> | <table> | ||
<tr> | <tr> | ||
| − | <td>[[file:LayersToolButtonsMERGE.JPG]]</td> | + | <td>[[file:LayersToolButtonsMERGE.JPG|link=]]</td> |
| − | <td>Select the layer to be merged into another layer and click the '''Merge Button'''. If you don't select a layer to merge then | + | <td>Select the layer to be merged into another layer and click the '''Merge Button'''. If you don't select a layer to merge then '''Trainz''' will select the current '''Active Layer'''.</td> |
</tr> | </tr> | ||
</table> | </table> | ||
<table cellpadding="4" bgcolor=#c1e7e7> | <table cellpadding="4" bgcolor=#c1e7e7> | ||
<tr valign="top"> | <tr valign="top"> | ||
| − | <td>[[file:DotPoint.JPG]]</td> | + | <td colspan=2><span style="font-size: 17px;"><b>In Summary:</b></span></td> |
| + | </tr> | ||
| + | <tr valign="top"> | ||
| + | <td>[[file:DotPoint.JPG|link=]]</td> | ||
<td>'''Merging a layer into another layer will move ALL the objects from the first layer into the second layer.''' The first layer, which is now empty, will then be deleted. </td> | <td>'''Merging a layer into another layer will move ALL the objects from the first layer into the second layer.''' The first layer, which is now empty, will then be deleted. </td> | ||
</tr> | </tr> | ||
<tr valign="top"> | <tr valign="top"> | ||
| − | <td>[[file:DotPoint.JPG]]</td> | + | <td>[[file:DotPoint.JPG|link=]]</td> |
<td>'''Once layers have been merged they cannot be separated.'''</td> | <td>'''Once layers have been merged they cannot be separated.'''</td> | ||
</tr> | </tr> | ||
| Line 272: | Line 307: | ||
<table> | <table> | ||
<tr valign="top"> | <tr valign="top"> | ||
| − | <td>[[file:LayersMergeInto.JPG]]</td> | + | <td>[[file:LayersMergeInto.JPG|link=]]</td> |
<td> | <td> | ||
<table cellpadding="4" bgcolor=#ffffff> | <table cellpadding="4" bgcolor=#ffffff> | ||
| Line 280: | Line 315: | ||
</tr> | </tr> | ||
<tr valign="top"> | <tr valign="top"> | ||
| − | <td>[[file:Steps.PNG]]</td> | + | <td>[[file:Steps.PNG|link=]]</td> |
| − | <td><font size | + | <td><span style="font-size: 17px;">'''Steps:'''</span><br> |
#Select the '''destination layer''' for the merge | #Select the '''destination layer''' for the merge | ||
| − | #Click the [[file:Tick.PNG]] icon | + | #Click the [[file:Tick.PNG|link=]] icon |
The '''Merge into:''' list shows all the available layers with no distinction between Route Layers and Session Layers</td> | The '''Merge into:''' list shows all the available layers with no distinction between Route Layers and Session Layers</td> | ||
</tr> | </tr> | ||
| Line 300: | Line 335: | ||
<table cellpadding="4" bgcolor=#ffffb0> | <table cellpadding="4" bgcolor=#ffffb0> | ||
<tr valign="top"> | <tr valign="top"> | ||
| − | <td>[[file:PencilTips.PNG]]</td> | + | <td>[[file:PencilTips.PNG|link=]]</td> |
<td>It is good practice to '''LOCK ALL LAYERS that you are not currently editing.''' This will avoid the all too common problem of accidentally adding objects to the wrong layer.</td> | <td>It is good practice to '''LOCK ALL LAYERS that you are not currently editing.''' This will avoid the all too common problem of accidentally adding objects to the wrong layer.</td> | ||
</tr> | </tr> | ||
| Line 307: | Line 342: | ||
<table cellpadding="4" bgcolor=#c1e7e7> | <table cellpadding="4" bgcolor=#c1e7e7> | ||
<tr valign="top"> | <tr valign="top"> | ||
| − | <td>[[file:DotPoint.JPG]]</td> | + | <td>[[file:DotPoint.JPG|link=]]</td> |
<td>If you '''LOCK''' or '''UNLOCK''' a Route Layer while editing a Session then you will have made a change to the Route and will be asked to save both the Route and the Session when you exit Surveyor.</td> | <td>If you '''LOCK''' or '''UNLOCK''' a Route Layer while editing a Session then you will have made a change to the Route and will be asked to save both the Route and the Session when you exit Surveyor.</td> | ||
</tr> | </tr> | ||
| Line 317: | Line 352: | ||
<table cellpadding="4" bgcolor=#c1e7e7> | <table cellpadding="4" bgcolor=#c1e7e7> | ||
<tr valign="top"> | <tr valign="top"> | ||
| − | <td>[[file:DotPoint.JPG]]</td> | + | <td>[[file:DotPoint.JPG|link=]]</td> |
<td>'''The objects in a LOCKED layer cannot be moved or deleted''' but they can be moved to other layers.</td> | <td>'''The objects in a LOCKED layer cannot be moved or deleted''' but they can be moved to other layers.</td> | ||
</tr> | </tr> | ||
| Line 324: | Line 359: | ||
<table> | <table> | ||
<tr valign="top"> | <tr valign="top"> | ||
| − | <td>[[file:LayersRouteTreesActive.JPG]]</td> | + | <td>[[file:LayersRouteTreesActive.JPG|link=]]</td> |
| − | <td>[[file:LayersRouteTreesActiveLocked.JPG]]</td> | + | <td>[[file:LayersRouteTreesActiveLocked.JPG|link=]]</td> |
<td><br> | <td><br> | ||
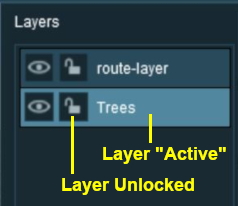
*The first image on the left shows two Route Layers, both UNLOCKED with their Padlock icons '''Open'''. One layer, "Trees", is highlighted showing that it is the currently active layer. | *The first image on the left shows two Route Layers, both UNLOCKED with their Padlock icons '''Open'''. One layer, "Trees", is highlighted showing that it is the currently active layer. | ||
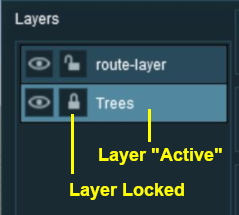
| Line 336: | Line 371: | ||
<table> | <table> | ||
<tr valign="top"> | <tr valign="top"> | ||
| − | <td>[[file:LayersRouteTreesActiveLockedError.JPG]]<br> | + | <td>[[file:LayersRouteTreesActiveLockedError.JPG|link=]]<br> |
| − | *Click the [[file:Tick.PNG]] icon to UNLOCK the layer</td> | + | *Click the [[file:Tick.PNG|link=]] icon to UNLOCK the layer</td> |
</tr> | </tr> | ||
</table> | </table> | ||
| Line 345: | Line 380: | ||
<table> | <table> | ||
<tr> | <tr> | ||
| − | <td>[[file:LayersToolButtonsLOCKALL.JPG]]</td> | + | <td>[[file:LayersToolButtonsLOCKALL.JPG|link=]]</td> |
<td>Click the '''Lock Button'''</td> | <td>Click the '''Lock Button'''</td> | ||
</tr> | </tr> | ||
| Line 355: | Line 390: | ||
==Moving a Layer== | ==Moving a Layer== | ||
| − | In the example | + | <table cellpadding="4" bgcolor=#c1e7e7> |
| + | <tr valign="top"> | ||
| + | <td colspan=2><span style="font-size: 17px;"><b>Main Points:</b></span></td> | ||
| + | </tr> | ||
| + | <tr valign="top"> | ||
| + | <td>[[file:DotPoint.JPG|link=]]</td> | ||
| + | <td>Layers can be moved up or down<br> | ||
| + | * within the same layer group (e.g. '''Route''' or '''Session''') | ||
| + | * between the two groups</td> | ||
| + | </tr> | ||
| + | <tr valign="top"> | ||
| + | <td>[[file:DotPoint.JPG|link=]]</td> | ||
| + | <td>A layer containing track objects (e.g. signals, switches, etc) '''CANNOT''' be placed above the layer containing the track</td> | ||
| + | </tr> | ||
| + | </table> | ||
| + | |||
| + | In the example shown below a layer created in the Route Layers Group is being moved into the Session Layers Group. | ||
<table> | <table> | ||
<tr valign="top"> | <tr valign="top"> | ||
| − | <td>[[file:LayersMove1.JPG]]</td> | + | <td>[[file:LayersMove1.JPG|link=]]</td> |
| − | <td>[[file:LayersMove3.JPG]]</td> | + | <td>[[file:LayersMove3.JPG|link=]]</td> |
<td> | <td> | ||
<table cellpadding="4" bgcolor=#ffffff> | <table cellpadding="4" bgcolor=#ffffff> | ||
| Line 367: | Line 418: | ||
</tr> | </tr> | ||
<tr valign="top"> | <tr valign="top"> | ||
| − | <td>[[file:Steps.PNG]]</td> | + | <td>[[file:Steps.PNG|link=]]</td> |
| − | <td><font size | + | <td><span style="font-size: 17px;">'''Steps:'''</span><br> |
#Select the layer to be moved and hold down the left mouse button | #Select the layer to be moved and hold down the left mouse button | ||
#Drag the layer up or down to its new position | #Drag the layer up or down to its new position | ||
| Line 384: | Line 435: | ||
<table cellpadding="4" bgcolor=#c1e7e7> | <table cellpadding="4" bgcolor=#c1e7e7> | ||
<tr valign="top"> | <tr valign="top"> | ||
| − | <td>[[file:DotPoint.JPG]]</td> | + | <td>[[file:DotPoint.JPG|link=]]</td> |
| − | <td>When adding track objects to a track, the ''' | + | <td>When adding track objects to a track, the '''object being added must be in the same layer or in a layer below''' the layer containing the track. For more information, see the section [[file:PageLink.PNG|link=]] '''[[#The "route-layer"|The "route-layer"]]''' below.</td> |
</tr> | </tr> | ||
<tr valign="top"> | <tr valign="top"> | ||
| − | <td>[[file:DotPoint.JPG]]</td> | + | <td>[[file:DotPoint.JPG|link=]]</td> |
| − | <td>If you attempt to move a layer containing track objects, such as signals, to a | + | <td>If you attempt to move a layer containing track objects, such as signals, to a position above the layer containing the track, you will get an error message.</td> |
</tr> | </tr> | ||
</table> | </table> | ||
| Line 395: | Line 446: | ||
</tr> | </tr> | ||
</table> | </table> | ||
| − | |||
==Hiding Layers== | ==Hiding Layers== | ||
| Line 402: | Line 452: | ||
<table> | <table> | ||
<tr valign="top"> | <tr valign="top"> | ||
| − | <td>[[file:LayersHideNone.JPG]]</td> | + | <td>[[file:LayersHideNone.JPG|link=]]</td> |
<td> | <td> | ||
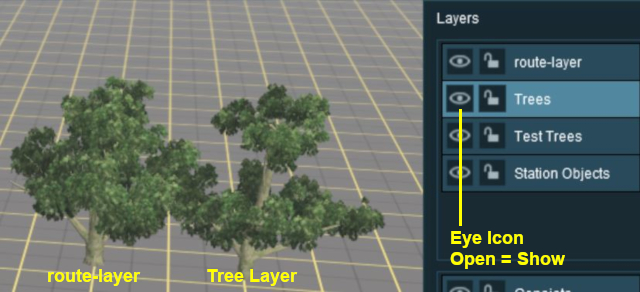
*In the image shown left the two trees are in different Route Layers | *In the image shown left the two trees are in different Route Layers | ||
| Line 409: | Line 459: | ||
</tr> | </tr> | ||
<tr valign="top"> | <tr valign="top"> | ||
| − | <td>[[file:LayersHideTree.JPG]]</td> | + | <td>[[file:LayersHideTree.JPG|link=]]</td> |
<td> | <td> | ||
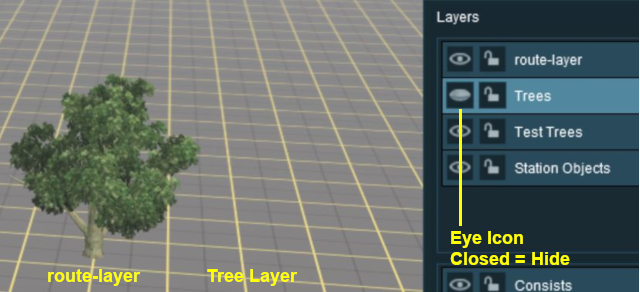
*In the image shown left the '''Trees''' layer has its '''Eye Icon''' set to '''Hide'''<br><br> | *In the image shown left the '''Trees''' layer has its '''Eye Icon''' set to '''Hide'''<br><br> | ||
<table cellpadding="4" bgcolor=#c1e7e7> | <table cellpadding="4" bgcolor=#c1e7e7> | ||
<tr valign="top"> | <tr valign="top"> | ||
| − | <td>[[file:DotPoint.JPG]]</td> | + | <td>[[file:DotPoint.JPG|link=]]</td> |
<td>'''If you attempt to add an object to a hidden layer you will receive a warning message.'''</td> | <td>'''If you attempt to add an object to a hidden layer you will receive a warning message.'''</td> | ||
</tr> | </tr> | ||
<tr valign="top"> | <tr valign="top"> | ||
| − | <td>[[file:DotPoint.JPG]]</td> | + | <td>[[file:DotPoint.JPG|link=]]</td> |
<td>'''Layers that are hidden when saved in ''Surveyor'' will also be hidden when loaded in ''Driver''.'''<td> | <td>'''Layers that are hidden when saved in ''Surveyor'' will also be hidden when loaded in ''Driver''.'''<td> | ||
</tr> | </tr> | ||
| Line 426: | Line 476: | ||
</table> | </table> | ||
<br> | <br> | ||
| + | <table width="100%"> | ||
| + | <tr valign="top"> | ||
| + | <td align="right">[[file:BackToTop.png|link=#top|alt=Top|Top]]</td> | ||
| + | </tr> | ||
| + | </table> | ||
='''Route Layers vs Session Layers'''= | ='''Route Layers vs Session Layers'''= | ||
| Line 433: | Line 488: | ||
<table cellpadding="4" bgcolor=#c1e7e7> | <table cellpadding="4" bgcolor=#c1e7e7> | ||
<tr valign="top"> | <tr valign="top"> | ||
| − | <td>[[file:DotPoint.JPG]]</td> | + | <td colspan=2><span style="font-size: 17px;"><b>In Summary:</b></span></td> |
| + | </tr> | ||
| + | <tr valign="top"> | ||
| + | <td>[[file:DotPoint.JPG|link=]]</td> | ||
<td>There are no "cast iron" rules that dictate what should be placed in the '''Route Layers Group''' and what should be placed in the '''Session Layers Group'''. Each Route and Session will be different and different creators have different ways of working. The main question to be asked is how many different '''Sessions''' will be created using a particular '''Route'''?</td> | <td>There are no "cast iron" rules that dictate what should be placed in the '''Route Layers Group''' and what should be placed in the '''Session Layers Group'''. Each Route and Session will be different and different creators have different ways of working. The main question to be asked is how many different '''Sessions''' will be created using a particular '''Route'''?</td> | ||
</tr> | </tr> | ||
| Line 440: | Line 498: | ||
<table cellpadding="4" bgcolor=#ffffb0> | <table cellpadding="4" bgcolor=#ffffb0> | ||
<tr valign="top"> | <tr valign="top"> | ||
| − | <td>[[file:NotePad.PNG]]</td> | + | <td>[[file:NotePad.PNG|link=]]</td> |
| − | <td><font size | + | <td><span style="font-size: 17px;">'''Notes:'''</span><br> |
*'''For a Route with only a single Session''' - everything can safely go into the '''Route Layers Group''' | *'''For a Route with only a single Session''' - everything can safely go into the '''Route Layers Group''' | ||
| − | :Many creators only ever build a single Session for each of their Routes and do not use Session Layers at all. | + | :Many creators only ever build a single Session for each of their Routes and do not use Session Layers at all (but they still have to save the session separately from the route). |
*'''For a Route with multiple (2 or more) Sessions''' - certain things will probably need to go into the '''Session Layers Group''' for each Session. | *'''For a Route with multiple (2 or more) Sessions''' - certain things will probably need to go into the '''Session Layers Group''' for each Session. | ||
:Many creators build multiple Sessions for each Route and rely on the Session Layers to create the differences between their Sessions. | :Many creators build multiple Sessions for each Route and rely on the Session Layers to create the differences between their Sessions. | ||
</td> | </td> | ||
| + | </tr> | ||
| + | </table> | ||
| + | <br> | ||
| + | <table cellpadding="4" bgcolor=#fcbcbc> | ||
| + | <tr valign="top"> | ||
| + | <td>[[file:Stop.PNG|link=]]</td> | ||
| + | <td><span style="font-size: 17px; font-weight: 700;">Changes in Trainz Plus</span><br> | ||
| + | The '''recommended''' practice in '''Trainz Plus''' is to place all consists in a '''session layer''' and '''NOT''' in a '''route layer'''. Because of the changes introduced in this version of Trainz, the '''Unified Driver Surveyor''' editor interface, placing a train in the route layer will mean that it will not show in your existing sessions (other than the one you are currently editing)</td> | ||
</tr> | </tr> | ||
</table> | </table> | ||
| Line 453: | Line 519: | ||
<table cellpadding="4" bgcolor=#c1e7e7> | <table cellpadding="4" bgcolor=#c1e7e7> | ||
<tr valign="top"> | <tr valign="top"> | ||
| − | <td>[[file:DotPoint.JPG]]</td> | + | <td>[[file:DotPoint.JPG|link=]]</td> |
<td>The '''Route Layer Group''' should be used for everything that will always appear in '''Driver Mode''' regardless of which Session is playing.''' </td> | <td>The '''Route Layer Group''' should be used for everything that will always appear in '''Driver Mode''' regardless of which Session is playing.''' </td> | ||
</tr> | </tr> | ||
| Line 460: | Line 526: | ||
*A '''Special Objects''' layer or layers that can be used to hold certain scenery objects. For example all the trees or a particular building. This can be very useful when you need to hide those objects to locate or place other objects. Trackside cameras in particular can be very difficult to find when placed in a forest. | *A '''Special Objects''' layer or layers that can be used to hold certain scenery objects. For example all the trees or a particular building. This can be very useful when you need to hide those objects to locate or place other objects. Trackside cameras in particular can be very difficult to find when placed in a forest. | ||
*A '''Platform Objects''' layer can be used to hold all platform items such as seats, luggage, luggage trolleys, people, lamp posts, etc. Because these items are placed on top of a platform object they can be very difficult to move or delete without first moving the platform. The layer containing the platform can be locked allowing these objects to be easily moved or deleted. | *A '''Platform Objects''' layer can be used to hold all platform items such as seats, luggage, luggage trolleys, people, lamp posts, etc. Because these items are placed on top of a platform object they can be very difficult to move or delete without first moving the platform. The layer containing the platform can be locked allowing these objects to be easily moved or deleted. | ||
| − | *'''Hiding and Showing Objects''' in '''Driver Mode'''. There is a Session Rule that can hide and show layers during the running of a Session. For example: a rail worker can be | + | *'''Hiding and Showing Objects''' in '''Driver Mode'''. There is a Session Rule and a Driver Command that can hide and show layers during the running of a Session. For example: a rail worker can be placed in a separate layer and positioned next to a track lever while shunting operations are underway but can be removed from the scene by hiding that layer when shunting has been completed. |
*A '''Test Layer''' for experimenting. Not sure if a particular object is right for your layout? Place it in a temporary layer which you can hide and show to see any differences it makes. This is particularly useful if you are deciding between different types of grasses, for example, placed throughout the layout. If the objects prove to be unsuitable then they can all be deleted by deleting the layer. If they are suitable then the layer can be merged with another or left as a new layer. | *A '''Test Layer''' for experimenting. Not sure if a particular object is right for your layout? Place it in a temporary layer which you can hide and show to see any differences it makes. This is particularly useful if you are deciding between different types of grasses, for example, placed throughout the layout. If the objects prove to be unsuitable then they can all be deleted by deleting the layer. If they are suitable then the layer can be merged with another or left as a new layer. | ||
<table cellpadding="4" bgcolor=#ffffb0> | <table cellpadding="4" bgcolor=#ffffb0> | ||
<tr valign="top"> | <tr valign="top"> | ||
| − | <td>[[file:PencilTips.PNG]]</td> | + | <td>[[file:PencilTips.PNG|link=]]</td> |
| − | <td>'''It is a good idea to place ALL the consists in the same layer''' particularly if they are going to be coupled together during the running of a Session.</td> | + | <td> |
| + | *'''It is a good idea to place ALL the consists in the same layer''' particularly if they are going to be coupled together during the running of a Session. | ||
| + | *A very useful development tool is the '''Bound Layer'''. See [[file:PageLink.PNG|link=]] '''[[#The Bound Layer|The Bound Layer]]''' section below.</td> | ||
</tr> | </tr> | ||
</table> | </table> | ||
| Line 472: | Line 540: | ||
===The "route-layer"=== | ===The "route-layer"=== | ||
| + | <table cellpadding="4" bgcolor=#c1e7e7> | ||
| + | <tr valign="top"> | ||
| + | <td>[[file:DotPoint.JPG|link=]]</td> | ||
| + | <td>'''To avoid any confusion over which layer is the original "route-layer", this is one layer that should not be renamed or moved from the top position.'''</td> | ||
| + | </tr> | ||
| + | </table> | ||
| + | <br> | ||
While all layers are equal, the "route-layer" is special. | While all layers are equal, the "route-layer" is special. | ||
| + | <table cellpadding="4" bgcolor=#fcbcbc> | ||
| + | <tr valign="top"> | ||
| + | <td colspan=2><span style="font-size: 17px;"><b>Warning:</b></span></td> | ||
| + | </tr> | ||
| + | <tr valign="top"> | ||
| + | <td>[[file:Stop.PNG|link=]]</td> | ||
| + | <td>'''Track objects''', such as signals, junctions and track signs, ''cannot'' be placed in any layer that is above the layer containing the track that they are attached to. If the '''route-layer''' is used for all the track and track objects and this layer is left as the top layer then this will never be a problem.</td> | ||
| + | </tr> | ||
| + | </table> | ||
| + | <br> | ||
<table cellpadding="4" bgcolor=#ffffb0> | <table cellpadding="4" bgcolor=#ffffb0> | ||
<tr valign="top"> | <tr valign="top"> | ||
| − | <td>[[file:PencilTips.PNG]]</td> | + | <td>[[file:PencilTips.PNG|link=]]</td> |
<td>It is recommended that the following objects should be placed in the "route-layer":- | <td>It is recommended that the following objects should be placed in the "route-layer":- | ||
*Track and interactive industries with track | *Track and interactive industries with track | ||
| Line 484: | Line 569: | ||
*Track signs (speed limits, warnings, etc) | *Track signs (speed limits, warnings, etc) | ||
..and that the "route-layer" be placed at the top of the '''Route Layers Group'''.</td> | ..and that the "route-layer" be placed at the top of the '''Route Layers Group'''.</td> | ||
| − | |||
| − | |||
| − | |||
| − | |||
| − | |||
| − | |||
| − | |||
| − | |||
| − | |||
| − | |||
| − | |||
| − | |||
| − | |||
| − | |||
| − | |||
| − | |||
</tr> | </tr> | ||
</table> | </table> | ||
| Line 507: | Line 576: | ||
<table cellpadding="4" bgcolor=#c1e7e7> | <table cellpadding="4" bgcolor=#c1e7e7> | ||
<tr valign="top"> | <tr valign="top"> | ||
| − | <td>[[file:DotPoint.JPG]]</td> | + | <td>[[file:DotPoint.JPG|link=]]</td> |
<td>The '''Session Layers Group''' should be used for everything that will only be seen in the '''''currently loaded Session'''''.</td> | <td>The '''Session Layers Group''' should be used for everything that will only be seen in the '''''currently loaded Session'''''.</td> | ||
</tr> | </tr> | ||
| Line 516: | Line 585: | ||
<table cellpadding="4" bgcolor=#ffffb0> | <table cellpadding="4" bgcolor=#ffffb0> | ||
<tr valign="top"> | <tr valign="top"> | ||
| − | <td>[[file:NotePad.PNG]]</td> | + | <td>[[file:NotePad.PNG|link=]]</td> |
| − | <td><font size | + | <td><span style="font-size: 17px;">'''Notes:'''</span><br> |
Session Layers can contain:- | Session Layers can contain:- | ||
*Scenery objects that will only appear in one or some of the Sessions. | *Scenery objects that will only appear in one or some of the Sessions. | ||
| Line 527: | Line 596: | ||
<table cellpadding="4" bgcolor=#ffffb0> | <table cellpadding="4" bgcolor=#ffffb0> | ||
<tr valign="top"> | <tr valign="top"> | ||
| − | <td>[[file:PencilTips.PNG]]</td> | + | <td>[[file:PencilTips.PNG|link=]]</td> |
<td> | <td> | ||
*'''It is a good idea to place ALL the consists in the same Session Layer''' particularly if they are going to be coupled together during the running of a Session. | *'''It is a good idea to place ALL the consists in the same Session Layer''' particularly if they are going to be coupled together during the running of a Session. | ||
| Line 534: | Line 603: | ||
</table> | </table> | ||
<br> | <br> | ||
| + | <table width="100%"> | ||
| + | <tr valign="top"> | ||
| + | <td align="right">[[file:BackToTop.png|link=#top|alt=Top|Top]]</td> | ||
| + | </tr> | ||
| + | </table> | ||
='''Adding Objects To Layers'''= | ='''Adding Objects To Layers'''= | ||
| − | When an object (such as a scenery item, consist, track or track object) is added to the layout it is automatically placed in the currently '''Active Layer'''. Unfortunately, | + | When an object (such as a scenery item, consist, track or track object) is added to the layout it is automatically placed in the currently '''Active Layer'''. Unfortunately, '''Trainz''' does not indicate which layer is the '''Active Layer''' unless you open the Layers Tool to look. This can lead to objects being placed into the wrong layers and while these objects can later be moved to another layer (see the section [[file:PageLink.PNG|link=]] '''[[#Moving Objects To Other Layers|Moving Objects To Other Layers]]''' below) it would be better to correctly set the '''Active Layer''' first. |
<br><br> | <br><br> | ||
<table cellpadding="4" bgcolor=#ffffb0> | <table cellpadding="4" bgcolor=#ffffb0> | ||
<tr valign="top"> | <tr valign="top"> | ||
| − | <td>[[file:PencilTips.PNG]]</td> | + | <td>[[file:PencilTips.PNG|link=]]</td> |
<td>It is good practice to '''LOCK ALL LAYERS that you are not currently editing.''' This will avoid the all too common problem of accidentally adding objects to the wrong layer.</td> | <td>It is good practice to '''LOCK ALL LAYERS that you are not currently editing.''' This will avoid the all too common problem of accidentally adding objects to the wrong layer.</td> | ||
</tr> | </tr> | ||
| Line 548: | Line 622: | ||
<table cellpadding="4" bgcolor=#c1e7e7> | <table cellpadding="4" bgcolor=#c1e7e7> | ||
<tr valign="top"> | <tr valign="top"> | ||
| − | <td>[[file:DotPoint.JPG]]</td> | + | <td>[[file:DotPoint.JPG|link=]]</td> |
<td>'''You cannot add objects to a layer that is LOCKED.'''</td> | <td>'''You cannot add objects to a layer that is LOCKED.'''</td> | ||
</tr> | </tr> | ||
| Line 556: | Line 630: | ||
<table> | <table> | ||
<tr valign="top"> | <tr valign="top"> | ||
| − | <td>[[file:LayersRouteTreesActiveLockedError.JPG]]<br> | + | <td>[[file:LayersRouteTreesActiveLockedError.JPG|link=]]<br> |
| − | *Click the [[file:Tick.PNG]] icon to '''UNLOCK the layer'''.</td> | + | *Click the [[file:Tick.PNG|link=]] icon to '''UNLOCK the layer'''.</td> |
</tr> | </tr> | ||
</table> | </table> | ||
| Line 563: | Line 637: | ||
<table cellpadding="4" bgcolor=#c1e7e7> | <table cellpadding="4" bgcolor=#c1e7e7> | ||
<tr valign="top"> | <tr valign="top"> | ||
| − | <td>[[file:DotPoint.JPG]]</td> | + | <td>[[file:DotPoint.JPG|link=]]</td> |
| − | <td>When adding track objects (signals, speed signs, etc) to a track, the ''' | + | <td>When adding track objects (signals, speed signs, etc) to a track, the '''objects being added must be in the same layer as the track or in a layer below the track layer'''. For more information, see the section [[file:PageLink.PNG|link=]] '''[[#The "route-layer"|The "route-layer"]]''' above.</td> |
</tr> | </tr> | ||
</table> | </table> | ||
| Line 570: | Line 644: | ||
<table cellpadding="4" bgcolor=#ffffb0> | <table cellpadding="4" bgcolor=#ffffb0> | ||
<tr valign="top"> | <tr valign="top"> | ||
| − | <td>[[file:NotePad.PNG]]</td> | + | <td>[[file:NotePad.PNG|link=]]</td> |
| − | <td><font size | + | <td><span style="font-size: 17px;">'''Notes:'''</span><br> |
| − | There are many features of | + | There are many features of Trainz Routes and Sessions that are '''NOT stored in layers'''. These include:- |
<div style="column-count:2;-moz-column-count:2;-webkit-column-count:2"> | <div style="column-count:2;-moz-column-count:2;-webkit-column-count:2"> | ||
*landforms | *landforms | ||
*textures | *textures | ||
| + | *trackside camera positions and settings | ||
*weather conditions | *weather conditions | ||
*time of day | *time of day | ||
| Line 584: | Line 659: | ||
*portal settings | *portal settings | ||
*passenger station settings | *passenger station settings | ||
| − | *interlocking tower settings | + | *navigation points |
| + | *interlocking tower settings'''^''' | ||
</div> | </div> | ||
| − | Landforms | + | Landforms, textures and trackside cameras are saved as part of the '''Route''' while all the others are saved as part of a '''Session'''. |
| + | <br> | ||
| + | '''^''' A bug has been reported in the Interlocking Towers (and the Enhanced Interlocking Towers) where the path and settings are initially saved in the Route but any later edits and changes are then saved in the Session. The workaround for this is to always load the Session when working with ITs and EITs. | ||
</td> | </td> | ||
</tr> | </tr> | ||
</table> | </table> | ||
<br> | <br> | ||
| + | <table width="100%"> | ||
| + | <tr valign="top"> | ||
| + | <td align="right">[[file:BackToTop.png|link=#top|alt=Top|Top]]</td> | ||
| + | </tr> | ||
| + | </table> | ||
='''Deleting Objects From Layers'''= | ='''Deleting Objects From Layers'''= | ||
<table cellpadding="4" bgcolor=#ffffb0> | <table cellpadding="4" bgcolor=#ffffb0> | ||
<tr valign="top"> | <tr valign="top"> | ||
| − | <td>[[file:PencilTips.PNG]]</td> | + | <td>[[file:PencilTips.PNG|link=]]</td> |
<td>It is good practice to '''LOCK ALL LAYERS that you are not currently editing.''' This will avoid the all too common problem of accidentally deleting objects from the wrong layer.</td> | <td>It is good practice to '''LOCK ALL LAYERS that you are not currently editing.''' This will avoid the all too common problem of accidentally deleting objects from the wrong layer.</td> | ||
</tr> | </tr> | ||
| Line 602: | Line 685: | ||
<table cellpadding="4" bgcolor=#c1e7e7> | <table cellpadding="4" bgcolor=#c1e7e7> | ||
<tr valign="top"> | <tr valign="top"> | ||
| − | <td>[[file:DotPoint.JPG]]</td> | + | <td>[[file:DotPoint.JPG|link=]]</td> |
<td>'''You cannot delete objects from a layer that is LOCKED.'''</td> | <td>'''You cannot delete objects from a layer that is LOCKED.'''</td> | ||
</tr> | </tr> | ||
</table> | </table> | ||
| − | Unfortunately | + | Unfortunately '''Trainz''' does not give you a warning message when you attempt to delete an object from a locked layer, the object just refuses to be deleted. |
<table cellpadding="4" bgcolor=#ffffb0> | <table cellpadding="4" bgcolor=#ffffb0> | ||
<tr valign="top"> | <tr valign="top"> | ||
| − | <td>[[file:PencilTips.PNG]]</td> | + | <td>[[file:PencilTips.PNG|link=]]</td> |
<td>If you cannot delete an object then check:- | <td>If you cannot delete an object then check:- | ||
*that the objects layer and bound layer (if set) are unlocked | *that the objects layer and bound layer (if set) are unlocked | ||
| Line 618: | Line 701: | ||
</table> | </table> | ||
<br> | <br> | ||
| + | <table width="100%"> | ||
| + | <tr valign="top"> | ||
| + | <td align="right">[[file:BackToTop.png|link=#top|alt=Top|Top]]</td> | ||
| + | </tr> | ||
| + | </table> | ||
='''Moving Objects To Other Layers'''= | ='''Moving Objects To Other Layers'''= | ||
| Line 623: | Line 711: | ||
<table> | <table> | ||
<tr valign="top"> | <tr valign="top"> | ||
| − | <td>[[file:LayersObjectProperties.JPG]]</td> | + | <td>[[file:LayersObjectProperties.JPG|link=]]</td> |
<td> | <td> | ||
<table cellpadding="4" bgcolor=#ffffff> | <table cellpadding="4" bgcolor=#ffffff> | ||
<tr valign="top"> | <tr valign="top"> | ||
| − | <td>[[file:Steps.PNG]]</td> | + | <td>[[file:Steps.PNG|link=]]</td> |
| − | <td><font size | + | <td><span style="font-size: 17px;">'''Steps:'''</span><br> |
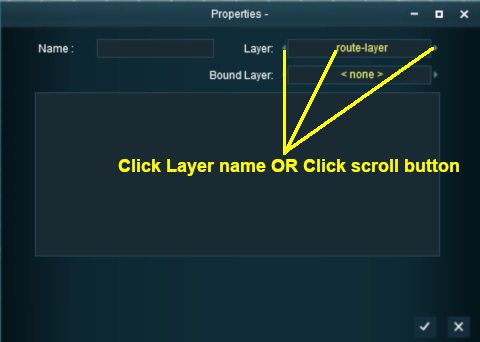
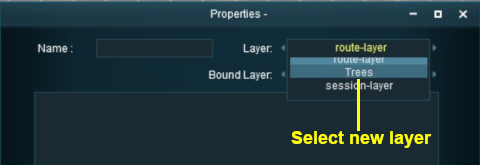
To move individual objects from one layer to another:- | To move individual objects from one layer to another:- | ||
#Open the '''Properties''' window ('''?''' button in the '''Object Tools''') of the object to be moved | #Open the '''Properties''' window ('''?''' button in the '''Object Tools''') of the object to be moved | ||
#Click the '''Layer''' or one of the '''scroll buttons''' | #Click the '''Layer''' or one of the '''scroll buttons''' | ||
#Select the new layer | #Select the new layer | ||
| − | #Click the [[file:Tick.PNG]] icon | + | #Click the [[file:Tick.PNG|link=]] icon |
</td> | </td> | ||
</tr> | </tr> | ||
| Line 644: | Line 732: | ||
<table cellpadding="4" bgcolor=#c1e7e7> | <table cellpadding="4" bgcolor=#c1e7e7> | ||
<tr valign="top"> | <tr valign="top"> | ||
| − | <td>[[file:DotPoint.JPG]]</td> | + | <td>[[file:DotPoint.JPG|link=]]</td> |
<td>'''You can move an object into and out of a locked layer'''</td> | <td>'''You can move an object into and out of a locked layer'''</td> | ||
</tr> | </tr> | ||
<tr valign="top"> | <tr valign="top"> | ||
| − | <td>[[file:DotPoint.JPG]]</td> | + | <td>[[file:DotPoint.JPG|link=]]</td> |
<td>Multiple scenery objects can be moved to another layer by using the '''Bulk Asset Update/Replacement''' tool from the ''Surveyor Main Menu''</td> | <td>Multiple scenery objects can be moved to another layer by using the '''Bulk Asset Update/Replacement''' tool from the ''Surveyor Main Menu''</td> | ||
</tr> | </tr> | ||
| Line 654: | Line 742: | ||
</tr> | </tr> | ||
<tr valign="top"> | <tr valign="top"> | ||
| − | <td>[[file:LayersObjectPropertiesChangeLayer.JPG]]</td> | + | <td>[[file:LayersObjectPropertiesChangeLayer.JPG|link=]]</td> |
</tr> | </tr> | ||
</table> | </table> | ||
<br> | <br> | ||
| + | <table width="100%"> | ||
| + | <tr valign="top"> | ||
| + | <td align="right">[[file:BackToTop.png|link=#top|alt=Top|Top]]</td> | ||
| + | </tr> | ||
| + | </table> | ||
='''The Bound Layer'''= | ='''The Bound Layer'''= | ||
| − | This is a little used and probably little understood layer feature. It allows you to attach an object to two different layers so it can have the properties (locked/unlocked and show/hide) of both layers. | + | This is a little used and probably little understood layer feature. It allows you to attach an object to two different layers so it can have the properties (locked/unlocked and show/hide) of both layers. The bound layer was introduced as a development tool, its sole use is as a tool in the building of routes and sessions. |
<table cellpadding="4" bgcolor=#c1e7e7> | <table cellpadding="4" bgcolor=#c1e7e7> | ||
<tr valign="top"> | <tr valign="top"> | ||
| − | <td>[[file:DotPoint.JPG]]</td> | + | <td>[[file:DotPoint.JPG|link=]]</td> |
| − | <td>'''An object will be LOCKED and cannot be deleted or moved if its layer OR its bound layer is locked.''' | + | <td>'''An object will be LOCKED and cannot be deleted or moved if its layer OR its <span style="text-decoration: underline;">bound layer</span> is locked.''' |
</tr> | </tr> | ||
<tr valign="top"> | <tr valign="top"> | ||
| − | <td>[[file:DotPoint.JPG]]</td> | + | <td>[[file:DotPoint.JPG|link=]]</td> |
| − | <td>'''An object will be HIDDEN if its layer OR its bound layer is hidden.''' | + | <td>'''An object will be HIDDEN if its layer OR its <span style="text-decoration: underline;">bound layer</span> is hidden.''' |
</tr> | </tr> | ||
</table> | </table> | ||
| Line 680: | Line 773: | ||
<table> | <table> | ||
<tr valign="top"> | <tr valign="top"> | ||
| − | <td>[[file:LayersBoundLayer.JPG]]</td> | + | <td>[[file:LayersBoundLayer.JPG|link=]]</td> |
<td><br> | <td><br> | ||
<table cellpadding="4" bgcolor=#ffffff> | <table cellpadding="4" bgcolor=#ffffff> | ||
| Line 688: | Line 781: | ||
</tr> | </tr> | ||
<tr valign="top"> | <tr valign="top"> | ||
| − | <td>[[file:Steps.PNG]]</td> | + | <td>[[file:Steps.PNG|link=]]</td> |
| − | <td><font size | + | <td><span style="font-size: 17px;">'''Steps:'''</span><br> |
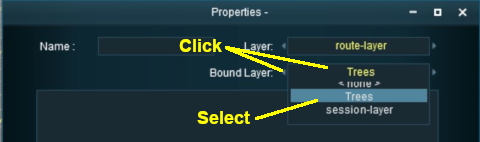
In the '''Properties Window''' of an object:- | In the '''Properties Window''' of an object:- | ||
#Click the '''Bound Layer''' box or one of its '''scroll buttons''' | #Click the '''Bound Layer''' box or one of its '''scroll buttons''' | ||
| Line 706: | Line 799: | ||
<table cellpadding="4" bgcolor=#c1e7e7> | <table cellpadding="4" bgcolor=#c1e7e7> | ||
<tr valign="top"> | <tr valign="top"> | ||
| − | <td>[[file:DotPoint.JPG]]</td> | + | <td>[[file:DotPoint.JPG|link=]]</td> |
<td>'''When a layer is deleted any objects bound to that layer will have their ''Bound Layer'' reset to ''<none>''''' | <td>'''When a layer is deleted any objects bound to that layer will have their ''Bound Layer'' reset to ''<none>''''' | ||
</tr> | </tr> | ||
| Line 713: | Line 806: | ||
<table cellpadding="4" bgcolor=#ffffb0> | <table cellpadding="4" bgcolor=#ffffb0> | ||
<tr valign="top"> | <tr valign="top"> | ||
| − | <td>[[file:PencilTips.PNG]]</td> | + | <td>[[file:PencilTips.PNG|link=]]</td> |
<td>If you are going to be working with multiple objects that will be bound to a locked or hidden layer then a simple strategy is to:- | <td>If you are going to be working with multiple objects that will be bound to a locked or hidden layer then a simple strategy is to:- | ||
*Create a new empty layer called "Locked" or "Hidden" and lock or hide that layer, according to your needs | *Create a new empty layer called "Locked" or "Hidden" and lock or hide that layer, according to your needs | ||
| Line 721: | Line 814: | ||
</table> | </table> | ||
<br> | <br> | ||
| + | |||
| + | <table cellpadding="4" bgcolor=#ffffb0> | ||
| + | <tr valign="top"> | ||
| + | <td>[[file:PencilTips.PNG|link=]]</td> | ||
| + | <td>If you need to remove an object from a route but cannot alter the route (e.g. it is payware or under another users kuid) then create a new hidden session layer and change the bound layer of the object to the hidden layer. This will be treated as a change to the session only and Trainz will not ask you to save the route as well as the session.</td> | ||
| + | </tr> | ||
| + | </table> | ||
| + | <br> | ||
| + | <table width="100%"> | ||
| + | <tr valign="top"> | ||
| + | <td align="right">[[file:BackToTop.png|link=#top|alt=Top|Top]]</td> | ||
| + | </tr> | ||
| + | </table> | ||
='''Layers in Driver Mode'''= | ='''Layers in Driver Mode'''= | ||
| Line 728: | Line 834: | ||
<table> | <table> | ||
<tr valign="top"> | <tr valign="top"> | ||
| − | <td>[[file:LayersDriveShow.JPG]][[file:LayersDriveHide.JPG]]</td> | + | <td>[[file:LayersDriveShow.JPG|link=]][[file:LayersDriveHide.JPG|link=]]</td> |
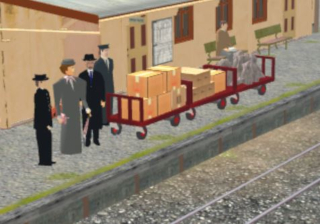
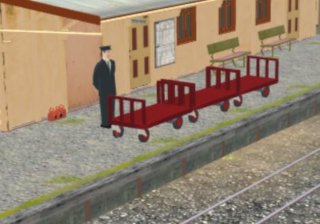
<td>The two '''Driver Mode''' scenes shown on the left illustrate this feature. | <td>The two '''Driver Mode''' scenes shown on the left illustrate this feature. | ||
*In the first image on the left, all layers are visible | *In the first image on the left, all layers are visible | ||
| Line 737: | Line 843: | ||
</table> | </table> | ||
| − | This effect | + | This effect could be achieved in two different ways:- |
| + | #'''A Driver Command''' - specific to a particular driver, or | ||
| + | #'''A Session Rule''' - specific to a particular driver, consist, or any driver/consist<br> | ||
| + | =='''Using a Driver Command'''== | ||
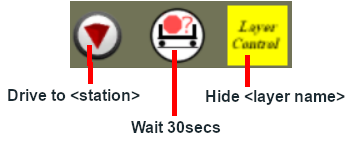
| + | The driver command '''Layer Control''' hides and shows named layers.<br> | ||
| + | [[file:LayerControlExample.png|link=]]<br> | ||
| + | =='''Using Session Rules'''== | ||
<br> | <br> | ||
<table cellpadding="4" bgcolor=#ffffff> | <table cellpadding="4" bgcolor=#ffffff> | ||
<tr valign="top"> | <tr valign="top"> | ||
| − | <td width="58">[[file:RulesWiki.PNG]]</td> | + | <td width="58">[[file:RulesWiki.PNG|link=]]</td> |
| − | <td width="640"><font size | + | <td width="640"><span style="font-size: 17px;">'''Rules Used:'''</span><br> |
----</td> | ----</td> | ||
</tr> | </tr> | ||
| Line 752: | Line 864: | ||
<table cellpadding="4" bgcolor=#ffffff> | <table cellpadding="4" bgcolor=#ffffff> | ||
<tr valign="top"> | <tr valign="top"> | ||
| − | <td width="58">[[file:screenshot.PNG]]</td> | + | <td width="58">[[file:screenshot.PNG|link=]]</td> |
| − | <td width="640"><font size | + | <td width="640"><span style="font-size: 17px;">'''Session Editor Screenshot:'''</span><br> |
----</td> | ----</td> | ||
</tr> | </tr> | ||
| Line 759: | Line 871: | ||
<table> | <table> | ||
<tr> | <tr> | ||
| − | <td>[[file:LayersDriveHideRules.JPG]]</td> | + | <td>[[file:LayersDriveHideRules.JPG|link=]]</td> |
</tr> | </tr> | ||
</table> | </table> | ||
| Line 765: | Line 877: | ||
<table cellpadding="4" bgcolor=#ffffff> | <table cellpadding="4" bgcolor=#ffffff> | ||
<tr valign="top"> | <tr valign="top"> | ||
| − | <td width="58">[[file:explanation.PNG]]</td> | + | <td width="58">[[file:explanation.PNG|link=]]</td> |
| − | <td width="640"><font size | + | <td width="640"><span style="font-size: 17px;">'''Description:'''</span><br> |
----</td> | ----</td> | ||
</tr> | </tr> | ||
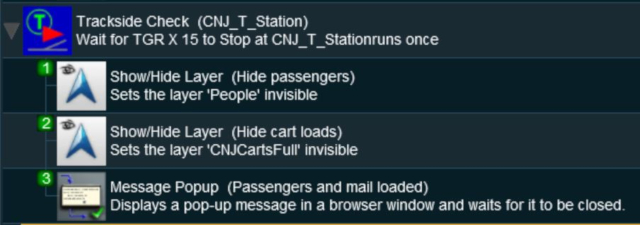
| Line 775: | Line 887: | ||
**The '''Show/Hide Layer Rule''' is used to hide the layer named "CNJCartsFull". The boxes and mail bags on the three platform trolleys are hidden. | **The '''Show/Hide Layer Rule''' is used to hide the layer named "CNJCartsFull". The boxes and mail bags on the three platform trolleys are hidden. | ||
**The '''Message Popup Rule''' is used to place a message on the screen informing the player that the passengers and mail have been loaded. | **The '''Message Popup Rule''' is used to place a message on the screen informing the player that the passengers and mail have been loaded. | ||
| + | <br> | ||
| + | <table width="100%"> | ||
| + | <tr valign="top"> | ||
| + | <td align="right">[[file:BackToTop.png|link=#top|alt=Top|Top]]</td> | ||
| + | </tr> | ||
| + | </table> | ||
| + | |||
---- | ---- | ||
---- | ---- | ||
| − | |||
='''Trainz Wiki'''= | ='''Trainz Wiki'''= | ||
<table cellpadding="4" bgcolor=#ffffff> | <table cellpadding="4" bgcolor=#ffffff> | ||
<tr valign="top"> | <tr valign="top"> | ||
| − | <td>[[file:TrainzWiki.png]]</td> | + | <td>[[file:TrainzWiki.png|link=]]</td> |
<td> | <td> | ||
| − | <font size | + | <span style="font-size: 17px;">'''More Tutorials and Guides to Using Trainz'''</span><br> |
*'''<span class="plainlinks">[http://online.ts2009.com/mediaWiki/index.php/HowTo How to Guides]</span>''' | *'''<span class="plainlinks">[http://online.ts2009.com/mediaWiki/index.php/HowTo How to Guides]</span>''' | ||
| + | *'''[[Driver Commands List]]''' | ||
*'''[[Session Rule List with Parameters|Session Rules List (Alphabetical) with Parameters]]''' | *'''[[Session Rule List with Parameters|Session Rules List (Alphabetical) with Parameters]]''' | ||
*'''[[Session Rules By Categories With Properties|Session Rules List (Categories) With Parameters]]''' | *'''[[Session Rules By Categories With Properties|Session Rules List (Categories) With Parameters]]''' | ||
Revision as of 16:30, 15 December 2019
The information in this Wiki Page applies to TANE, TRS19 and Trainz Plus.
Contents |
What Are Layers?
| In Summary: | ||
| Layers are a Surveyor tool that allows you to better manage the objects that are placed in your Trainz World. | ||
| Layers are a Driver tool that allows you to change what the players see as they drive around your Trainz World. | ||
Layers can contain any objects, visible and invisible, that can be placed into a layout using the Surveyor Object, Track and Train tools. The layers and their contents can be hidden from view or locked against alteration whenever required. Their main use is in the development of a Route and a Session but they can also be used as a way of providing some additional novelty during a Driver session.
The Layers Tool
 |

| Click the Layers Tool to open up its properties. |
|
Loading a Route and Loading a Session
The layers you see will depend on whether you have loaded a Route by itself (with no "child" Session) or a Session and its "parent" Route.
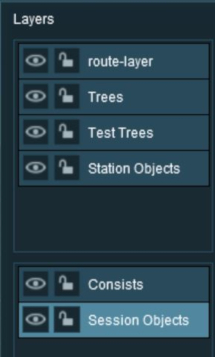
 |
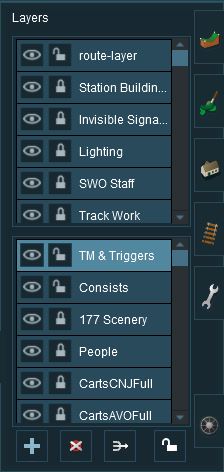 |
In both cases, the Route Layers are identical because the same Route has been loaded. A Session contains its own layers, the Session Layers, that are loaded and saved with the Session but are not loaded or saved with the Route.
|
||||||||||||||||||
Creating a New Route
 |
|
The "Active Layer"
| In Summary: | |
| The Active Layer is the selected (highlighted) layer. | |
| When you load the Route only into Surveyor, the first Route layer will be the Active Layer | |
| When you load a Session into Surveyor, the first Session layer will be the Active Layer | |
In the image above, the route-layer is the Active Layer. You can change the Active Layer at any time by clicking on the name of another layer.
| Notes: The Active Layer is the "working layer" which is:-
|
| Caution: | |
| Trainz does not identify which is the Active Layer in Surveyor and this often leads to problems such as objects being added to the wrong layer. See |
|
Adding a New Layer
| Click the Add Button |
An Add layer dialogue window will appear.
 |
|
||||||||

Deleting a Layer
| Select the layer to be deleted and click the Delete Button. If you don't select a layer to delete then Trainz will select the current Active Layer. |
| Warning: | |
| Deleting a layer will delete ALL the objects placed in that layer except objects that are "Bound" to that layer. | |
If the layer being deleted is empty, then the following dialogue window will appear:-
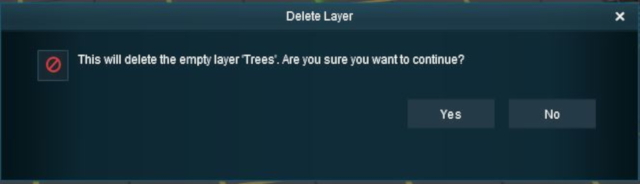 |
|
||||||
If the layer being deleted is NOT empty, then the following dialogue window will appear:-
 |
|
||||||
Merging Layers
| Select the layer to be merged into another layer and click the Merge Button. If you don't select a layer to merge then Trainz will select the current Active Layer. |
| In Summary: | |
| Merging a layer into another layer will move ALL the objects from the first layer into the second layer. The first layer, which is now empty, will then be deleted. | |
| Once layers have been merged they cannot be separated. | |
The layer merge dialogue window will appear as shown below:-
 |
|
||||||
Locking Layers
| It is good practice to LOCK ALL LAYERS that you are not currently editing. This will avoid the all too common problem of accidentally adding objects to the wrong layer. |
| If you LOCK or UNLOCK a Route Layer while editing a Session then you will have made a change to the Route and will be asked to save both the Route and the Session when you exit Surveyor. |
Locking Individual Layers
To LOCK an individual layer, click on the Open Padlock icon next to its name. The layer being locked does not have to be the current Active Layer.
| The objects in a LOCKED layer cannot be moved or deleted but they can be moved to other layers. |
 |
 |
|
If you attempt to add a scenery object to a locked layer you will receive the following message:-
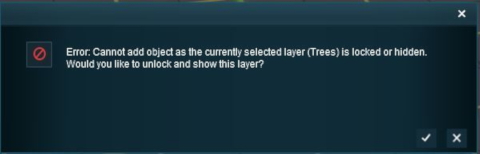
|
Locking ALL Route Layers
| Click the Lock Button |
This will LOCK ALL the layers in the Route Layers Group. The Session Layers Group will not be affected.
The Route Layers Group can be UNLOCKED by clicking the Lock Button again.
Moving a Layer
| Main Points: | |
Layers can be moved up or down
|
|
| A layer containing track objects (e.g. signals, switches, etc) CANNOT be placed above the layer containing the track | |
In the example shown below a layer created in the Route Layers Group is being moved into the Session Layers Group.
 |
 |
|
||||||||||
Hiding Layers
To hide or show a layer click the Eye Icon next to its name.
 |
|
|||||
 |
|
Route Layers vs Session Layers
This topic has filled endless threads in the Trainz Forums with arguments raging on both sides.
| In Summary: | |
| There are no "cast iron" rules that dictate what should be placed in the Route Layers Group and what should be placed in the Session Layers Group. Each Route and Session will be different and different creators have different ways of working. The main question to be asked is how many different Sessions will be created using a particular Route? | |
Notes:
|
| Changes in Trainz Plus The recommended practice in Trainz Plus is to place all consists in a session layer and NOT in a route layer. Because of the changes introduced in this version of Trainz, the Unified Driver Surveyor editor interface, placing a train in the route layer will mean that it will not show in your existing sessions (other than the one you are currently editing) |
The Route Layers Group
| The Route Layer Group should be used for everything that will always appear in Driver Mode regardless of which Session is playing. |
There is nothing stopping you from placing everything in the "route-layer" of the Route Layers Group and never having to worry about dealing with layers ever again - some creators prefer to work this way. However, layers do provide you with a way of organising your scenery objects to make them more manageable, particularly in more complicated layouts. Some examples:-
- A Special Objects layer or layers that can be used to hold certain scenery objects. For example all the trees or a particular building. This can be very useful when you need to hide those objects to locate or place other objects. Trackside cameras in particular can be very difficult to find when placed in a forest.
- A Platform Objects layer can be used to hold all platform items such as seats, luggage, luggage trolleys, people, lamp posts, etc. Because these items are placed on top of a platform object they can be very difficult to move or delete without first moving the platform. The layer containing the platform can be locked allowing these objects to be easily moved or deleted.
- Hiding and Showing Objects in Driver Mode. There is a Session Rule and a Driver Command that can hide and show layers during the running of a Session. For example: a rail worker can be placed in a separate layer and positioned next to a track lever while shunting operations are underway but can be removed from the scene by hiding that layer when shunting has been completed.
- A Test Layer for experimenting. Not sure if a particular object is right for your layout? Place it in a temporary layer which you can hide and show to see any differences it makes. This is particularly useful if you are deciding between different types of grasses, for example, placed throughout the layout. If the objects prove to be unsuitable then they can all be deleted by deleting the layer. If they are suitable then the layer can be merged with another or left as a new layer.
|
The "route-layer"
| To avoid any confusion over which layer is the original "route-layer", this is one layer that should not be renamed or moved from the top position. |
While all layers are equal, the "route-layer" is special.
| Warning: | |
| Track objects, such as signals, junctions and track signs, cannot be placed in any layer that is above the layer containing the track that they are attached to. If the route-layer is used for all the track and track objects and this layer is left as the top layer then this will never be a problem. | |
It is recommended that the following objects should be placed in the "route-layer":-
|
The Session Layers Group
| The Session Layers Group should be used for everything that will only be seen in the currently loaded Session. |
If you are creating more than one Session based around a particular Route, then you will probably make use of the Session Layers.
| Notes: Session Layers can contain:-
|
|
Adding Objects To Layers
When an object (such as a scenery item, consist, track or track object) is added to the layout it is automatically placed in the currently Active Layer. Unfortunately, Trainz does not indicate which layer is the Active Layer unless you open the Layers Tool to look. This can lead to objects being placed into the wrong layers and while these objects can later be moved to another layer (see the section ![]() Moving Objects To Other Layers below) it would be better to correctly set the Active Layer first.
Moving Objects To Other Layers below) it would be better to correctly set the Active Layer first.
| It is good practice to LOCK ALL LAYERS that you are not currently editing. This will avoid the all too common problem of accidentally adding objects to the wrong layer. |
| You cannot add objects to a layer that is LOCKED. |
If you attempt to add a scenery object to a locked layer you will receive the following message:-
|
| When adding track objects (signals, speed signs, etc) to a track, the objects being added must be in the same layer as the track or in a layer below the track layer. For more information, see the section |
| Notes: There are many features of Trainz Routes and Sessions that are NOT stored in layers. These include:-
Landforms, textures and trackside cameras are saved as part of the Route while all the others are saved as part of a Session.
|
Deleting Objects From Layers
| It is good practice to LOCK ALL LAYERS that you are not currently editing. This will avoid the all too common problem of accidentally deleting objects from the wrong layer. |
| You cannot delete objects from a layer that is LOCKED. |
Unfortunately Trainz does not give you a warning message when you attempt to delete an object from a locked layer, the object just refuses to be deleted.
If you cannot delete an object then check:-
|
Moving Objects To Other Layers
 |
|
||||||||
 |
|||||||||
The Bound Layer
This is a little used and probably little understood layer feature. It allows you to attach an object to two different layers so it can have the properties (locked/unlocked and show/hide) of both layers. The bound layer was introduced as a development tool, its sole use is as a tool in the building of routes and sessions.
| An object will be LOCKED and cannot be deleted or moved if its layer OR its bound layer is locked. | |
| An object will be HIDDEN if its layer OR its bound layer is hidden. |
Some applications:-
- Temporarily locking an object by binding it to a locked layer while allowing other objects in the same unlocked layer to be moved or deleted. A simple but very effective development technique is to create a Route layer called "Locked" and then lock it. If you need to temporarily stop an object from being deleted or moved then it can be bound to the "Locked" layer.
- Temporarily hiding an object by binding it to a hidden layer (this will require the hidden layer to be made visible so the object can be unbound).
 |
|
||||||
| When a layer is deleted any objects bound to that layer will have their Bound Layer reset to <none> |
If you are going to be working with multiple objects that will be bound to a locked or hidden layer then a simple strategy is to:-
|
| If you need to remove an object from a route but cannot alter the route (e.g. it is payware or under another users kuid) then create a new hidden session layer and change the bound layer of the object to the hidden layer. This will be treated as a change to the session only and Trainz will not ask you to save the route as well as the session. |
Layers in Driver Mode
During the running of a Session in Driver Mode visible layers can be hidden and invisible layers revealled according to the events that occur during the Session.
  |
The two Driver Mode scenes shown on the left illustrate this feature.
|
This effect could be achieved in two different ways:-
- A Driver Command - specific to a particular driver, or
- A Session Rule - specific to a particular driver, consist, or any driver/consist
Using a Driver Command
The driver command Layer Control hides and shows named layers.
Using Session Rules
 |
Rules Used: |
- Trackside Check Rule - to trigger the event
- Show/Hide Layer Rule - to hide layers
- Message Popup Rule - to open a browser window with a message
 |
Session Editor Screenshot: |
 |
 |
Description: |
In this example:-
- The Trackside Check Rule is triggered when a specific train comes to a stop at a trackmark. This then executes the following rules:-
- The Show/Hide Layer Rule is used to hide the layer named "People". Four passengers (three standing and one seated) are hidden.
- The Show/Hide Layer Rule is used to hide the layer named "CNJCartsFull". The boxes and mail bags on the three platform trolleys are hidden.
- The Message Popup Rule is used to place a message on the screen informing the player that the passengers and mail have been loaded.
Trainz Wiki
 |
More Tutorials and Guides to Using Trainz |