HowTo/Export from Blender using FBX
(Added some warnings and error tables) |
(Major rewrite for Blender 2.80) |
||
| (41 intermediate revisions by 5 users not shown) | |||
| Line 1: | Line 1: | ||
| − | + | This page describes how to export a simple model from Blender 2.80 into the [[FBX file format]] for use in Trainz. The model uses a Trainz PBRMetal format so it is only suitable for TRS2019 and later versions. The Blender source and PBRMetal textures are provided. | |
| − | + | Some knowledge of using Blender and Trainz asset creation is assumed. | |
| − | + | [[File:Cube asset in game.jpg|500px|left]] {{clear}} | |
| − | = | + | =Video Tutorial= |
| − | + | A video tutorial can be found at [https://www.youtube.com/watch?v=qTXgaNOETF0 Exporting basic Cube from Blender with PBR Materials]. | |
| − | |||
| + | =Asset Creation Workflow= | ||
| − | + | The basic workflow is: | |
| + | :# Create your mesh. | ||
| + | :# Create a UV map for mapping mesh polygons to a texture. | ||
| + | :# Apply a Trainz material including textures. | ||
| + | :# If required, animate the mesh. | ||
| + | :# Export the model to an FBX file. | ||
| + | :# Import the model into Trainz. Trainz will create a Trainzmesh mesh data file. | ||
| − | The | + | The provided Blender models are ready for you to do steps 3 through 6. Step 4 is ignored. |
| − | === | + | =Exporting FBX in Blender 2.80= |
| + | ==Blender 2.80 Features== | ||
| − | + | Blender 2.8 introduces a number of new features that can benefit Trainz modellers. These include "Collections", a change in workspaces, and opportunities to create Trainz PBR textures within Blender. The latter is quite complex and the author is currently evaluating a number of tools that might be useful. Those tools are likely to be payware but very cheap payware compared to full commercial toolsets. | |
| + | There is now a separate Image Editor and UV Editor. The differences are not obvious apart from some minor changes to the associated toolsets. | ||
| − | + | ===Collections=== | |
| − | + | Scene Collections replace the old layers system and now avoids the 20 layer limit. The most useful aspect of collections is that you can name them so their contents are easily recognised. For example, you can put all your LOD0 meshes in a LOD0 collection, LOD1 meshes in a LOD1 collection, and so on. | |
| − | + | You can group items such as lamps and cameras in their own collection and simply hide them when not needed. You can find more information on collections in video tutorials on the Web. | |
| − | + | ===Workspaces=== | |
| − | + | You might find workspaces easier to use than earlier Blender versions. You can easily add or delete workspaces as it suits your development style. A useful set of workspaces might be: | |
| − | + | :*Default (you can rename that to something like "Modelling") | |
| − | + | :*UV Editing | |
| − | + | :*Shading | |
| − | + | :*Animation | |
| − | + | :*Compositing (optional, but could be used for baking parameter textures) | |
| − | + | :*3D View Full (optional) | |
| + | :*Scripting (optional) | ||
| + | ==Blender 2.80 Issues for Trainz Modellers== | ||
| + | ===Blender Render=== | ||
| + | This is gone for 2.8 and that will make it difficult for those not wanting to use Trainz PBR textures. The author has not yet investigated if cycles can be used for this purpose except for NOTEX. | ||
| + | ===Parenting=== | ||
| + | Parent/child links are less obvious in 2.8. You can see the relationship in the collection tree but it is possible to have a child object in a different collection and that is a bit confusing. | ||
| + | ==Blender Addons== | ||
| + | There are a number of interesting addons for Blender 2.8. Some are free and others are payware. | ||
| + | The Material Library addon comes with Blender 2.8 as a community addon. You don't need to install it but you do need to enable it. | ||
| + | You can find this addon in the Edit Menu, Preferences, and filter on "material". See the following image:<br /> | ||
| + | [[File:Material library.jpg|800px]]<br /> | ||
| + | This addon will allow you to save Trainz PBR materials. | ||
| + | ==Example Model== | ||
| + | A sample model of a simple cube is provided. The mesh is UV mapped but there is no material or textures linked in the model. The source files include both a starting and completed model together with texture images, config.txt, etc. Just change the owner KUID id to yours. | ||
| + | The source files can be found here: [[File:blender_cube280.zip]] | ||
| + | :* Create a suitable working folder on your PC. You might call it "FBX_export_example_1". | ||
| + | :* Unzip the files into that folder. | ||
| + | :* Start Blender 2.8 and load file "mycube_b280_start.blend". | ||
| − | ===The | + | ==Creating a Trainz PBRMetal Material== |
| + | The Trainz PBRMetal material is the base material for Trainz PBR assets. Other Trainz PBR materials are variations of this material. There isn't a standard Blender shader node for PBRMetal but we can use the Principled BSDF shader node and set up the three texture imputs of Albedo, Parameter and Normal. See [[M.pbrmetal]] for more information on this material. | ||
| + | <br />Making a PBRMetal material is a little tedious but we can automate this by using a standard Blender addon called Material Library VX. | ||
| + | :* Change to the Shading workspace. | ||
| + | :* Select the cube and select the material icon in the Properties window (bottom right). It should show no materials. | ||
| + | :* Select New (material). You should get this view although the material name may be different:[[File:New material.jpg|1400px]] | ||
| + | :* Blender creates a new material with a Principled BSDF shader node and material output node. This will be the basis of our Trainz PBR material. | ||
| + | :* Change the name of the material to "Template_Trainz_PBRMetal". We deliberately use a generic name because we will want to save it for other models. | ||
| + | :* Within the Shader Node editor press Shift A and add a texture->image texture node. | ||
| + | :* Select the new texture node and press Shift D and drag the texture node copy to a blank space. Repeat to create another texture node. These nodes will be used for our Albedo, Normal and Parameter textures. | ||
| + | :* Make sure the three texture nodes are stacked one on top of each other as per the image below. | ||
| + | :* Connect the top texture node from the Colour output to the Base Color input on the shader node. You make connections by left clicking the output (on the right) and dragging the line to the destination input. | ||
| + | :* Connect the Alpha output of the middle texture node to the Roughness input shader node. While this may not make sense it does work! | ||
| + | :* Connect the Color output of the bottom node to the Normal input shader node. | ||
| + | :* Press Shift A and add a Vector-Normal Map node to a blank space within the editor. | ||
| + | :* Drag the Normal Map node onto the link between the bottom texture node and the Normal input. Blender automatically reroutes the links. Note that you could have created the Normal Map node and dropped it on that link. | ||
| + | :* The result should look like this:<br />[[File:Trainz PBRMetal template.jpg]]<br /> | ||
| − | + | ==Saving the PBRMetal Material Template== | |
| + | This action need only be done once. | ||
| + | :* Select the Material icon in the Properties Editor. | ||
| + | :* Find the Material Library VX panel. This is the addon we enabled earlier. | ||
| + | :* Choose the Cycles Templates library. There will be a pause here as the addon loads a Blender file in the background and finds the materials within it. | ||
| + | :* Add the "Template_Trainz_PBRMetal" to the library by clicking the plus (+) icon. | ||
| + | :* Scroll through the list or search for "Trainz" to ensure the template is in the list. | ||
| + | :* Change the material name allocated to the mesh to "mycube.m.pbrmetal" or any suitable name.<br />[[File:Mycube material.jpg]]<br /> | ||
| + | ==Using the Template in Other Projects== | ||
| + | We created the Trainz PBRMetal template so it can be used in other projects. To see how this works try the following: | ||
| + | :* Save your current working file. | ||
| + | :* Start a new project and just use the default cube. | ||
| + | :* Select the Material option in the Properties Editor. | ||
| + | :* There should be a default material called Material1. If not, just create a new one. | ||
| + | :* Scroll down to find the Material Library VX panel. | ||
| + | :* Select the Cycles Template library. | ||
| + | :* Search for "trainz" or scroll down until you find it. | ||
| + | :* Click on the Apply icon which looks like a round ball. The Trainz PBRMetal template will replace the existing material allocated to the mesh. | ||
| + | :* Open the Shading workspace and the material we created earlier will be visible. All you need to do is rename the material and allocate the textures which is what we will do next. | ||
| − | == | + | ==Add the Material Textures== |
| + | :* Reopen your working Blender file if required. | ||
| + | :* Change to the Shading Workspace. | ||
| + | :* Select the top texture node, click on Open and add the file "cube_albedo.png". You may need to navigate Blender to your working folder as it doesn't default to your Blender file location. | ||
| + | :* Select the middle texture node and load the file "cube_parameter.png". | ||
| + | :* Change the Color Space to Non-color. | ||
| + | :* Select the bottom texture node and load the file "cube_normal.png". | ||
| + | :* Change the Color Space to Non-color. | ||
| + | :* If you have the 3D Viewport in "Look dev" mode (3rd ball icon from the left) you will see the material applied to the cube. This is a reasonable representation of how it will look in Trainz. | ||
| + | [[ File:Material applied.jpg]] | ||
| − | |||
| − | |||
| − | + | ==Exporting to FBX== | |
| + | The model is now ready for export. | ||
| + | :* Change to the Default workspace and select the mesh object in the 3D Viewport. | ||
| + | :* Select File->Export->Export FBX and the FBX export panel will show in the bottom left hand corner of the window. If the Export FBX option isn’t shown, then make sure it is enabled in User Preferences. | ||
| + | :* Operator Presets. This option allows you to define an export configuration that can be recalled rather than having to set options each time. | ||
| + | :* Scale: Leave the scale value at 1.0 and make sure the small button to the right of the scale is unchecked. | ||
| + | :* The four export options categories: Main, Geometries, Armature and Animation show different menus and sub options for those categories. You can leave the standard settings for Geometries, Armature and Animation. | ||
| + | :* For Main options: | ||
| + | :*:* Check Selected Objects. | ||
| + | :*:* Apply Scalings: Use “FBX All”. | ||
| + | :*:* Forward: select option “Y Forward”. This automatically changes the Up option to “Z Up” which is correct for Trainz. | ||
| + | :* Check Mesh only since we are not exporting empties or animation. | ||
| + | :* Leave all other options at their default values. | ||
| + | :* At the top of the window, make sure the selected target folder is your project folder. | ||
| + | :* Enter the target FBX file as “mycube_lod0.fbx” . | ||
| + | :* Click on the Export FBX button at the top right. The mesh will be exported. | ||
| + | [[File:B280 FBX PBRMetal asset FBX export settings.jpg]] {{clear}} | ||
| − | + | TIP: You can save your preferences for a given situation by clicking on the plus button (+) next to Operator Presets and saving the preset with a name. | |
| − | + | ||
| + | ==Importing into Trainz== | ||
| + | ===Config.txt=== | ||
| + | When you submit your asset, Trainz will convert the FBX file to a Trainzmesh file so the mesh table will need to identify each mesh as such. For the sample asset the filename will be mycube_lod0.trainzmesh. See the config.txt in the project folder. | ||
| − | == | + | ===Texture.txt files=== |
| + | You can provide your own texture.txt files (advisable) or let the commit process create them for you. The commit process will create suitable files, such as those required for normal maps, but you can provide your own if you have special requirements. | ||
| − | The FBX | + | ===Committing the asset=== |
| + | Commit the asset by dragging the folder onto CM. Assuming the commit is error free, open the asset for edit in explorer and see what Trainz has created. | ||
| + | The trainzmesh files should be as described above. The FBX files will also be present so you may want to delete those if you are ready to upload your asset to the DLS or elsewhere. If you delete the FBX files, then you will need to commit the asset again. Since the trainzmesh files already exist no FBX conversion is carried out. | ||
| − | + | ==Animation== | |
| − | + | If you are interest in animation for Blender 2.8, see this [[HowTo/Export Blender FBX Animation|page]]. | |
| − | = | + | =Errors, Warnings and other Issues= |
| − | + | ||
| − | + | ||
| − | + | ||
| − | + | ||
| − | + | ||
| − | + | ||
| − | + | ||
| − | + | ||
| − | + | ||
| − | + | ||
| − | + | ||
| − | + | ||
| − | + | ||
| − | + | ||
| − | + | ||
| − | == | + | ==Double Sided Meshes== |
| − | + | It appears that FBX does not support double sided meshes so you need to create a metadata file as described at [[FBX file format#Mesh Metadata Files]]. Note that this is done per material. i.e. you cannot have the same material for single sided and double sided meshes. | |
| − | + | ||
| − | + | ||
| − | + | ||
| − | + | ||
| − | + | ||
| − | + | ||
| − | + | ||
| − | + | ||
| − | + | ||
| − | + | ||
| − | + | ||
| − | + | ||
| − | [[ | + | |
| − | + | ||
| − | + | ||
| − | + | ||
| − | + | ||
| − | + | ||
| − | + | ||
| − | + | ||
| − | + | ||
| − | + | ||
| − | + | ||
| − | + | ||
| − | + | ||
| − | + | ||
| − | + | ||
| − | + | ||
| − | + | ||
| − | + | ||
| − | + | ||
| − | + | ||
| − | + | ||
| − | + | ||
| − | + | ||
| − | + | ||
| − | + | ||
| − | + | ||
| − | + | ||
| − | + | ||
| − | + | ||
| − | + | ||
| − | + | ||
| − | + | ||
| + | ==FBX to Trainzmesh Conversion Warnings and Errors== | ||
| + | Errors and warnings starting with a T, such as T16128, are errors ouput by the ASSIMP converter and are not output by the Trainz FBX importer. Errors or warnings starting with VE are generated by Trainz. See [[Asset_Validation]]. | ||
{| style="border:1px solid gray;border-collapse:collapse;background:white;font-weight:bold; " cellpadding=5px align=left width=70% | {| style="border:1px solid gray;border-collapse:collapse;background:white;font-weight:bold; " cellpadding=5px align=left width=70% | ||
| − | |||
|- style="font-weight:bold; text-align:center;" | |- style="font-weight:bold; text-align:center;" | ||
| − | ! width=40% style=" border:1px solid gray;"|Warning | + | ! width=40% style=" border:1px solid gray;"|Warning/Error |
! width=60% style=" border:1px solid gray;"|Help/Explanation | ! width=60% style=" border:1px solid gray;"|Help/Explanation | ||
|- | |- | ||
| − | | style="border:1px solid gray;font-weight:normal;"| | + | | style="border:1px solid gray;font-weight:normal;"|Warning: T16080: ...shading mode not recognised: Phong |
| − | | style="border:1px solid gray;font-weight:normal;"|You can ignore this | + | | style="border:1px solid gray;font-weight:normal;"| You can ignore this warning. |
|- | |- | ||
| − | | style="border:1px solid gray;font-weight:normal;"| | + | | style="border:1px solid gray;font-weight:normal;"|Warn, T15808: FBX-DOM (TOK_KEY, offset 0xnnnn) source object for connection does not exist |
| − | | style="border:1px solid gray;font-weight:normal;"| | + | | style="border:1px solid gray;font-weight:normal;"| You can ignore this warning. |
|- | |- | ||
| − | | style="border:1px solid gray;font-weight:normal;"| | + | | style="border:1px solid gray;font-weight:normal;"|Error: Unable to determine vertex format. |
| − | | style="border:1px solid gray;font-weight:normal;"| | + | | style="border:1px solid gray;font-weight:normal;"|This can be caused by having multiple UV maps for the same mesh. For example, baking a painted mesh to a bake mesh requires two UV maps. Remove old maps before exporting. If you wish to keep those maps, back up the Blender file and then delete the extra maps. |
| − | + | ||
| − | + | ||
| − | + | ||
| − | + | ||
| − | + | ||
| − | + | ||
| − | + | ||
| − | + | ||
| − | + | ||
|- | |- | ||
| − | | style="border:1px solid gray;font-weight:normal;"| | + | | style="border:1px solid gray;font-weight:normal;"|Error, T5268 or T9068, Failed to triangulate polygon (no ear found). Probably not a simple polygon. |
| − | | style="border:1px solid gray;font-weight:normal;"| | + | | style="border:1px solid gray;font-weight:normal;"|Try triangulating the mesh, or meshes, using Ctrl T (quads to tris). If the error continues, try using the Triangulate modifier. This problem is known to occur when using modifiers that may produce ngons on export. |
|- | |- | ||
| − | | style="border:1px solid gray;font-weight:normal;"| | + | | style="border:1px solid gray;font-weight:normal;"|Error, Error, T16128: FindInvalidDataProcess fails on mesh uvcoords: All vectors are identical" |
| − | | style="border:1px solid gray;font-weight:normal;"| | + | | style="border:1px solid gray;font-weight:normal;"|Probably caused by having multiple UV maps for the same mesh. Not sure of the relationship between this error and the "Unable to determine vertex format" error. |
| − | + | ||
| − | + | ||
| − | + | ||
|} | |} | ||
| + | ==Return to Index== | ||
| + | |||
| + | [[HowToGuides|<< How To Guides]] | ||
| − | + | [[Category:How-to guides]] | |
| − | + | [[Category:Modeling]] | |
| − | + | [[Category:Content creation]] | |
| − | + | ||
| − | + | ||
| − | + | ||
| − | + | ||
| − | + | ||
| − | + | ||
| − | + | ||
| − | + | ||
| − | + | ||
| − | + | ||
| − | + | ||
| − | + | ||
| − | + | ||
| − | + | ||
| − | + | ||
| − | + | ||
| − | + | ||
| − | + | ||
| − | + | ||
| − | + | ||
| − | + | ||
| − | + | ||
| − | + | ||
| − | + | ||
| − | + | ||
| − | + | ||
| − | + | ||
| − | + | ||
| − | + | ||
| − | + | ||
| − | + | ||
| − | + | ||
| − | + | ||
| − | + | ||
| − | + | ||
| − | + | ||
| − | + | ||
| − | + | ||
| − | + | ||
| − | + | ||
Revision as of 20:31, 1 September 2019
This page describes how to export a simple model from Blender 2.80 into the FBX file format for use in Trainz. The model uses a Trainz PBRMetal format so it is only suitable for TRS2019 and later versions. The Blender source and PBRMetal textures are provided.
Some knowledge of using Blender and Trainz asset creation is assumed.

Video Tutorial
A video tutorial can be found at Exporting basic Cube from Blender with PBR Materials.
Asset Creation Workflow
The basic workflow is:
- Create your mesh.
- Create a UV map for mapping mesh polygons to a texture.
- Apply a Trainz material including textures.
- If required, animate the mesh.
- Export the model to an FBX file.
- Import the model into Trainz. Trainz will create a Trainzmesh mesh data file.
The provided Blender models are ready for you to do steps 3 through 6. Step 4 is ignored.
Exporting FBX in Blender 2.80
Blender 2.80 Features
Blender 2.8 introduces a number of new features that can benefit Trainz modellers. These include "Collections", a change in workspaces, and opportunities to create Trainz PBR textures within Blender. The latter is quite complex and the author is currently evaluating a number of tools that might be useful. Those tools are likely to be payware but very cheap payware compared to full commercial toolsets. There is now a separate Image Editor and UV Editor. The differences are not obvious apart from some minor changes to the associated toolsets.
Collections
Scene Collections replace the old layers system and now avoids the 20 layer limit. The most useful aspect of collections is that you can name them so their contents are easily recognised. For example, you can put all your LOD0 meshes in a LOD0 collection, LOD1 meshes in a LOD1 collection, and so on. You can group items such as lamps and cameras in their own collection and simply hide them when not needed. You can find more information on collections in video tutorials on the Web.
Workspaces
You might find workspaces easier to use than earlier Blender versions. You can easily add or delete workspaces as it suits your development style. A useful set of workspaces might be:
- Default (you can rename that to something like "Modelling")
- UV Editing
- Shading
- Animation
- Compositing (optional, but could be used for baking parameter textures)
- 3D View Full (optional)
- Scripting (optional)
Blender 2.80 Issues for Trainz Modellers
Blender Render
This is gone for 2.8 and that will make it difficult for those not wanting to use Trainz PBR textures. The author has not yet investigated if cycles can be used for this purpose except for NOTEX.
Parenting
Parent/child links are less obvious in 2.8. You can see the relationship in the collection tree but it is possible to have a child object in a different collection and that is a bit confusing.
Blender Addons
There are a number of interesting addons for Blender 2.8. Some are free and others are payware.
The Material Library addon comes with Blender 2.8 as a community addon. You don't need to install it but you do need to enable it.
You can find this addon in the Edit Menu, Preferences, and filter on "material". See the following image:

This addon will allow you to save Trainz PBR materials.
Example Model
A sample model of a simple cube is provided. The mesh is UV mapped but there is no material or textures linked in the model. The source files include both a starting and completed model together with texture images, config.txt, etc. Just change the owner KUID id to yours. The source files can be found here: File:Blender cube280.zip
- Create a suitable working folder on your PC. You might call it "FBX_export_example_1".
- Unzip the files into that folder.
- Start Blender 2.8 and load file "mycube_b280_start.blend".
Creating a Trainz PBRMetal Material
The Trainz PBRMetal material is the base material for Trainz PBR assets. Other Trainz PBR materials are variations of this material. There isn't a standard Blender shader node for PBRMetal but we can use the Principled BSDF shader node and set up the three texture imputs of Albedo, Parameter and Normal. See M.pbrmetal for more information on this material.
Making a PBRMetal material is a little tedious but we can automate this by using a standard Blender addon called Material Library VX.
- Change to the Shading workspace.
- Select the cube and select the material icon in the Properties window (bottom right). It should show no materials.
- Select New (material). You should get this view although the material name may be different:
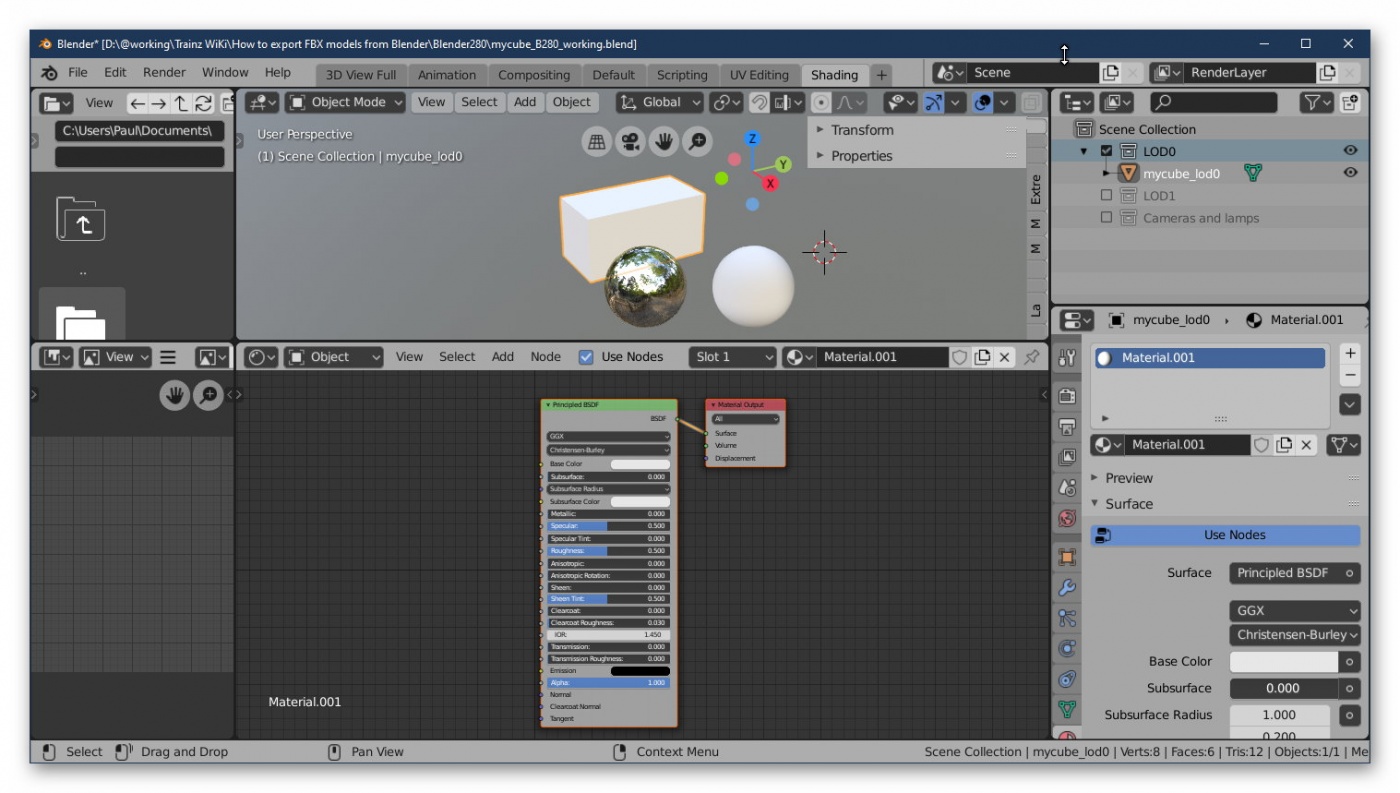
- Blender creates a new material with a Principled BSDF shader node and material output node. This will be the basis of our Trainz PBR material.
- Change the name of the material to "Template_Trainz_PBRMetal". We deliberately use a generic name because we will want to save it for other models.
- Within the Shader Node editor press Shift A and add a texture->image texture node.
- Select the new texture node and press Shift D and drag the texture node copy to a blank space. Repeat to create another texture node. These nodes will be used for our Albedo, Normal and Parameter textures.
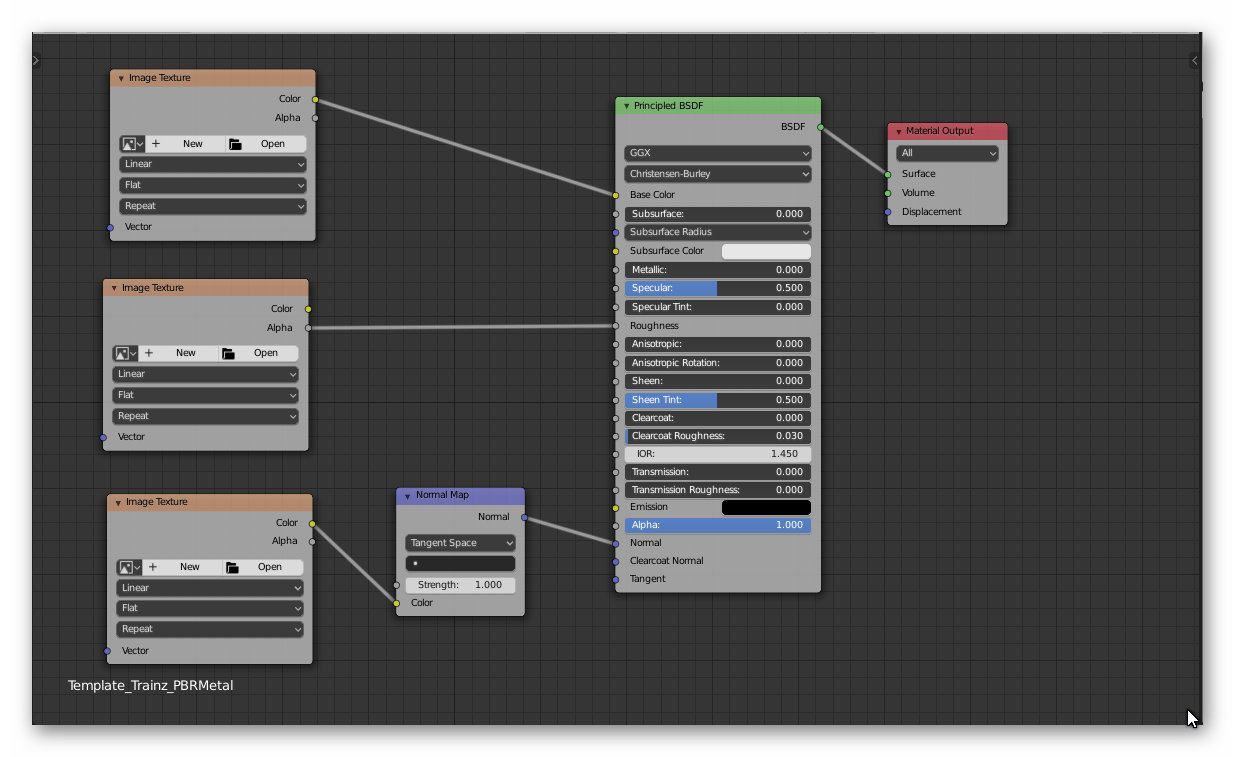
- Make sure the three texture nodes are stacked one on top of each other as per the image below.
- Connect the top texture node from the Colour output to the Base Color input on the shader node. You make connections by left clicking the output (on the right) and dragging the line to the destination input.
- Connect the Alpha output of the middle texture node to the Roughness input shader node. While this may not make sense it does work!
- Connect the Color output of the bottom node to the Normal input shader node.
- Press Shift A and add a Vector-Normal Map node to a blank space within the editor.
- Drag the Normal Map node onto the link between the bottom texture node and the Normal input. Blender automatically reroutes the links. Note that you could have created the Normal Map node and dropped it on that link.
- The result should look like this:


Saving the PBRMetal Material Template
This action need only be done once.
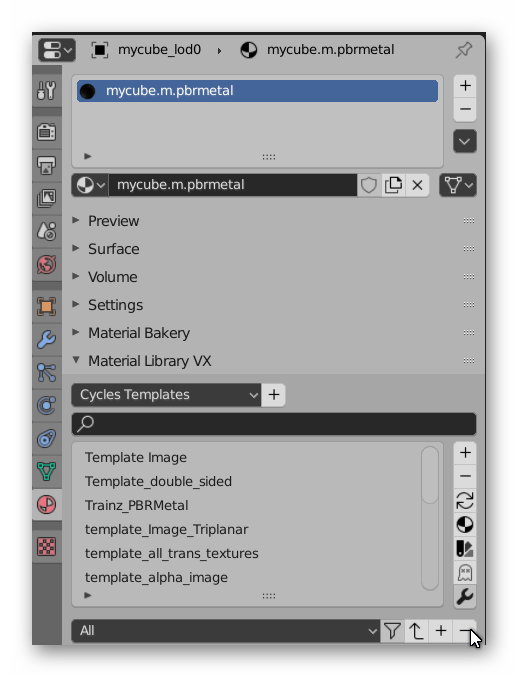
- Select the Material icon in the Properties Editor.
- Find the Material Library VX panel. This is the addon we enabled earlier.
- Choose the Cycles Templates library. There will be a pause here as the addon loads a Blender file in the background and finds the materials within it.
- Add the "Template_Trainz_PBRMetal" to the library by clicking the plus (+) icon.
- Scroll through the list or search for "Trainz" to ensure the template is in the list.
- Change the material name allocated to the mesh to "mycube.m.pbrmetal" or any suitable name.

Using the Template in Other Projects
We created the Trainz PBRMetal template so it can be used in other projects. To see how this works try the following:
- Save your current working file.
- Start a new project and just use the default cube.
- Select the Material option in the Properties Editor.
- There should be a default material called Material1. If not, just create a new one.
- Scroll down to find the Material Library VX panel.
- Select the Cycles Template library.
- Search for "trainz" or scroll down until you find it.
- Click on the Apply icon which looks like a round ball. The Trainz PBRMetal template will replace the existing material allocated to the mesh.
- Open the Shading workspace and the material we created earlier will be visible. All you need to do is rename the material and allocate the textures which is what we will do next.
Add the Material Textures
- Reopen your working Blender file if required.
- Change to the Shading Workspace.
- Select the top texture node, click on Open and add the file "cube_albedo.png". You may need to navigate Blender to your working folder as it doesn't default to your Blender file location.
- Select the middle texture node and load the file "cube_parameter.png".
- Change the Color Space to Non-color.
- Select the bottom texture node and load the file "cube_normal.png".
- Change the Color Space to Non-color.
- If you have the 3D Viewport in "Look dev" mode (3rd ball icon from the left) you will see the material applied to the cube. This is a reasonable representation of how it will look in Trainz.

Exporting to FBX
The model is now ready for export.
- Change to the Default workspace and select the mesh object in the 3D Viewport.
- Select File->Export->Export FBX and the FBX export panel will show in the bottom left hand corner of the window. If the Export FBX option isn’t shown, then make sure it is enabled in User Preferences.
- Operator Presets. This option allows you to define an export configuration that can be recalled rather than having to set options each time.
- Scale: Leave the scale value at 1.0 and make sure the small button to the right of the scale is unchecked.
- The four export options categories: Main, Geometries, Armature and Animation show different menus and sub options for those categories. You can leave the standard settings for Geometries, Armature and Animation.
- For Main options:
- Check Selected Objects.
- Apply Scalings: Use “FBX All”.
- Forward: select option “Y Forward”. This automatically changes the Up option to “Z Up” which is correct for Trainz.
- Check Mesh only since we are not exporting empties or animation.
- Leave all other options at their default values.
- At the top of the window, make sure the selected target folder is your project folder.
- Enter the target FBX file as “mycube_lod0.fbx” .
- Click on the Export FBX button at the top right. The mesh will be exported.

TIP: You can save your preferences for a given situation by clicking on the plus button (+) next to Operator Presets and saving the preset with a name.
Importing into Trainz
Config.txt
When you submit your asset, Trainz will convert the FBX file to a Trainzmesh file so the mesh table will need to identify each mesh as such. For the sample asset the filename will be mycube_lod0.trainzmesh. See the config.txt in the project folder.
Texture.txt files
You can provide your own texture.txt files (advisable) or let the commit process create them for you. The commit process will create suitable files, such as those required for normal maps, but you can provide your own if you have special requirements.
Committing the asset
Commit the asset by dragging the folder onto CM. Assuming the commit is error free, open the asset for edit in explorer and see what Trainz has created. The trainzmesh files should be as described above. The FBX files will also be present so you may want to delete those if you are ready to upload your asset to the DLS or elsewhere. If you delete the FBX files, then you will need to commit the asset again. Since the trainzmesh files already exist no FBX conversion is carried out.
Animation
If you are interest in animation for Blender 2.8, see this page.
Errors, Warnings and other Issues
Double Sided Meshes
It appears that FBX does not support double sided meshes so you need to create a metadata file as described at FBX file format#Mesh Metadata Files. Note that this is done per material. i.e. you cannot have the same material for single sided and double sided meshes.
FBX to Trainzmesh Conversion Warnings and Errors
Errors and warnings starting with a T, such as T16128, are errors ouput by the ASSIMP converter and are not output by the Trainz FBX importer. Errors or warnings starting with VE are generated by Trainz. See Asset_Validation.
| Warning/Error | Help/Explanation |
|---|---|
| Warning: T16080: ...shading mode not recognised: Phong | You can ignore this warning. |
| Warn, T15808: FBX-DOM (TOK_KEY, offset 0xnnnn) source object for connection does not exist | You can ignore this warning. |
| Error: Unable to determine vertex format. | This can be caused by having multiple UV maps for the same mesh. For example, baking a painted mesh to a bake mesh requires two UV maps. Remove old maps before exporting. If you wish to keep those maps, back up the Blender file and then delete the extra maps. |
| Error, T5268 or T9068, Failed to triangulate polygon (no ear found). Probably not a simple polygon. | Try triangulating the mesh, or meshes, using Ctrl T (quads to tris). If the error continues, try using the Triangulate modifier. This problem is known to occur when using modifiers that may produce ngons on export. |
| Error, Error, T16128: FindInvalidDataProcess fails on mesh uvcoords: All vectors are identical" | Probably caused by having multiple UV maps for the same mesh. Not sure of the relationship between this error and the "Unable to determine vertex format" error. |