SAR Scenario East-West Express
(Created page with "<span style="font-size: 19px; font-weight: 700; background-color: black; color: white;"> Vintage East-West Express: Terowie to Quorn Passenger </span><br> Between 1...") |
m |
||
| Line 15: | Line 15: | ||
<table> | <table> | ||
<tr valign="top"> | <tr valign="top"> | ||
| − | <td align="center">[[image: | + | <td align="center">[[image:SAR Scenarios.png|link=|alt=Scenarios|200px]] '''[[SAR Peterborough Base Session|Return to the Base Session Scenario List]]'''</td> |
</tr> | </tr> | ||
</table> | </table> | ||
| − | |||
<table bgcolor="lightcyan"> | <table bgcolor="lightcyan"> | ||
<tr valign="top"> | <tr valign="top"> | ||
| Line 35: | Line 34: | ||
</tr> | </tr> | ||
<tr valign="top"> | <tr valign="top"> | ||
| − | <td colspan=2>Click [[image:Line_Index_Label.png|link=SAR_Index]] or the graphic above to access the location data.</td> | + | <td colspan=2>Click [[image:Line_Index_Label.png|link=SAR_Index]] or the graphic above to access the location data (link will open in this window).</td> |
| + | </tr> | ||
| + | <tr valign="top"> | ||
| + | <td colspan=2> | ||
| + | '''Other Links:''' (these will open in this window)<br> | ||
| + | '''[[image:Kurandamini.png|link=|alt=Rolling Stock|100px]] [[SAR Peterborough Base Session#Locos|Locomotives and Rolling Stock]]''' - commodities carried<br> | ||
| + | '''[[image:SAR Industries.png|link=|alt=Industries|100px]] [[SAR Peterborough Base Session#Industries|Active Industries]]''' - commodities produced and consumed | ||
| + | </td> | ||
</tr> | </tr> | ||
</table> | </table> | ||
| Line 122: | Line 128: | ||
*The approaches to all locations are protected by invisible signals to prevent the '''AI Half Speed Slowdown Problem''' when approaching a signal at stop. | *The approaches to all locations are protected by invisible signals to prevent the '''AI Half Speed Slowdown Problem''' when approaching a signal at stop. | ||
*'''Enhanced Interlocking Towers''' with set paths are available for your optional use at '''Terowie''' (departure), '''Peterborough''' (arrival and departure), '''Orroroo''' (arrival and departure), '''Carrieton''' (arrival and departure) and at '''Quorn''' (arrival). Details of all available '''EIT Paths''' are provided in the [[image:Tab_PH_Grey.png|link=|75px]] tab at each location with '''EITs'''. Click [[image:Line_Index_Label.png|link=SAR_Index]] for details. | *'''Enhanced Interlocking Towers''' with set paths are available for your optional use at '''Terowie''' (departure), '''Peterborough''' (arrival and departure), '''Orroroo''' (arrival and departure), '''Carrieton''' (arrival and departure) and at '''Quorn''' (arrival). Details of all available '''EIT Paths''' are provided in the [[image:Tab_PH_Grey.png|link=|75px]] tab at each location with '''EITs'''. Click [[image:Line_Index_Label.png|link=SAR_Index]] for details. | ||
| − | *Trackmarks and industries have been provided for AI '''Drive To Trackmark''', '''Drive via Trackmark''' and '''Drive to <span style="background-color: yellow;"> Industry </span>''' commands. Details of all available '''Trackmarks''' and '''Industries''' are provided in the [[image:Tab_TM_Grey.png|link=|75px]] and [[image:Tab_IN_Grey.png|link=|75px]] tabs at each location. Click [[image:Line_Index_Label.png|link=SAR_Index]] | + | *Trackmarks and industries have been provided for AI '''Drive To Trackmark''', '''Drive via Trackmark''' and '''Drive to <span style="background-color: yellow;"> Industry </span>''' commands. Details of all available '''Trackmarks''' and '''Industries''' are provided in the [[image:Tab_TM_Grey.png|link=|75px]] and [[image:Tab_IN_Grey.png|link=|75px]] tabs at each location. Click [[image:Line_Index_Label.png|link=SAR_Index]] for details. |
| − | *Manual (no AI) driving is possible. For those locations without home or approach semaphore signals, a '''Caution''' warning sign has been placed at the location of the '''Main Approach Dn''' and '''Main Approach Up''' trackmarks. Details on all switches and suggested switch paths are provided in the [[image:Tab_SW_Grey.png|link=|75px]] tab at each location. Click [[image:Line_Index_Label.png|link=SAR_Index]] | + | *Manual (no AI) driving is possible. For those locations without home or approach semaphore signals, a '''Caution''' warning sign has been placed at the location of the '''Main Approach Dn''' and '''Main Approach Up''' trackmarks. Details on all switches and suggested switch paths are provided in the [[image:Tab_SW_Grey.png|link=|75px]] tab at each location. Click [[image:Line_Index_Label.png|link=SAR_Index]] for details. |
</td> | </td> | ||
</tr> | </tr> | ||
Revision as of 15:42, 17 February 2021
Vintage East-West Express: Terowie to Quorn Passenger
Between 1917 and 1932 the Peterborough-Quorn Line was a vital link in the Transcontinental Railway between Sydney on the east coast and Perth on the west coast.
The South Australian Railways provided an express passenger service, the East-West Express, that ran between Terowie and Port Augusta via Quorn. At Terowie it connected with broad gauge services from Adelaide. At Peterborough it connected with narrow gauge services from Broken Hill where there was a standard gauge connection from Sydney. At Quorn it connected with narrow gauge services from the Central Australian Line. At Port Augusta it connected with standard gauge services to Kalgoolie, where there was a narrow gauge connection to Perth.
Passengers making the entire trip from Sydney NSW to Perth WA would change trains 5 times - Parkes NSW, Broken Hill NSW, Peterborough SA, Port Augusta SA and Kalgoolie WA. They would change track gauges 3 times (standard to narrow to standard to narrow) and have to navigate through 5 different rail systems (NSWGR, Silverton Tramway, SAR, Commonwealth Railways and WAGR) plus a taxi between two stations in Broken Hill. The entire journey from coast to coast would take 6 days, if all the connections were made.
Today passengers can board a luxury train, the Indian Pacific, in Sydney and travel the entire distance to Perth in 3 days without leaving the train.
 |
|
|||||||||

| Duration: | 3 hours | |||||||||||||||||||||||||
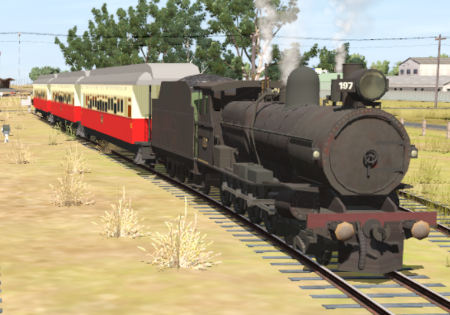
| Loco: | SAR T 197 at Terowie Station Sidings Other Unrostered Locos:
|
|||||||||||||||||||||||||
| Consist: | Attached to SAR T 197. 3 Kuranda BL1 coaches | |||||||||||||||||||||||||
| Task: |
|
|||||||||||||||||||||||||
| Driving Notes: |
|
|||||||||||||||||||||||||