SAR Peterborough Base Session
m |
(started moving scenarios to separate wiki pages) |
||
| Line 31: | Line 31: | ||
<td width=175 bgcolor="lightyellow">'''2 hrs'''</td> | <td width=175 bgcolor="lightyellow">'''2 hrs'''</td> | ||
<td width=50> </td> | <td width=50> </td> | ||
| − | <td width=300>'''[[ | + | <td width=300>'''[[SAR Scenario East-West Express|Vintage East-West Express: Terowie-Quorn]]'''</td> |
<td width=175 bgcolor="lightyellow">'''3 hrs'''</td> | <td width=175 bgcolor="lightyellow">'''3 hrs'''</td> | ||
</tr> | </tr> | ||
| Line 248: | Line 248: | ||
</tr> | </tr> | ||
| − | |||
| − | |||
| − | |||
| − | |||
| − | |||
| − | |||
| − | |||
| − | |||
| − | |||
| − | |||
| − | |||
| − | |||
| − | |||
| − | |||
| − | |||
| − | |||
| − | |||
| − | |||
| − | |||
| − | |||
| − | |||
| − | |||
| − | |||
| − | |||
| − | |||
| − | |||
| − | |||
| − | |||
| − | |||
| − | |||
| − | |||
| − | |||
| − | |||
| − | |||
| − | |||
| − | |||
| − | |||
| − | |||
| − | |||
| − | |||
| − | |||
| − | |||
| − | |||
| − | |||
| − | |||
| − | |||
| − | |||
| − | |||
| − | |||
| − | |||
| − | |||
| − | |||
| − | |||
| − | |||
| − | |||
| − | |||
| − | |||
| − | |||
| − | |||
| − | |||
| − | |||
| − | |||
| − | |||
| − | |||
| − | |||
| − | |||
| − | |||
| − | |||
| − | |||
| − | |||
| − | |||
| − | |||
| − | |||
| − | |||
| − | |||
| − | |||
| − | |||
| − | |||
| − | |||
| − | |||
| − | |||
| − | |||
| − | |||
| − | |||
| − | |||
| − | |||
| − | |||
| − | |||
| − | |||
| − | |||
| − | |||
| − | |||
| − | |||
| − | |||
| − | |||
| − | |||
| − | |||
| − | |||
| − | |||
| − | |||
| − | |||
| − | |||
| − | |||
| − | |||
| − | |||
| − | |||
| − | |||
| − | |||
| − | |||
| − | |||
| − | |||
| − | |||
| − | |||
| − | |||
| − | |||
| − | |||
| − | |||
| − | |||
| − | |||
| − | |||
| − | |||
| − | |||
| − | |||
| − | |||
| − | |||
| − | |||
| − | |||
| − | |||
| − | |||
| − | |||
| − | |||
| − | |||
| − | |||
| − | |||
| − | |||
| − | |||
| − | |||
| − | |||
| − | |||
| − | |||
| − | |||
| − | |||
| − | |||
| − | |||
| − | |||
| − | |||
| − | |||
| − | |||
</table> | </table> | ||
<br> | <br> | ||
| Line 934: | Line 786: | ||
# After loading take the wagons back to the '''Goods Transfer Sidings''' and store them on '''Siding 1'''. | # After loading take the wagons back to the '''Goods Transfer Sidings''' and store them on '''Siding 1'''. | ||
# Couple the loco to the rake of '''QLX''' wagons on '''Siding 2'''. | # Couple the loco to the rake of '''QLX''' wagons on '''Siding 2'''. | ||
| − | # Take the '''QLX''' wagons to the '''Goods Transfer Narrow Gauge''' | + | # Take the '''QLX''' wagons to the '''Goods Transfer Narrow Gauge''' shed and load. |
# After loading move the wagons onto '''Siding 2'''. | # After loading move the wagons onto '''Siding 2'''. | ||
# The two rakes of loaded wagons on '''Siding 1''' and '''Siding 2''' must be split and recombined into two consists according to their destinations. The destinations, '''Peterborough''' and '''Gladstone''', are shown in the name of each wagon. All the '''Gladstone''' wagons are to be placed into one consist and the '''Peterborough''' wagons into the other consist. | # The two rakes of loaded wagons on '''Siding 1''' and '''Siding 2''' must be split and recombined into two consists according to their destinations. The destinations, '''Peterborough''' and '''Gladstone''', are shown in the name of each wagon. All the '''Gladstone''' wagons are to be placed into one consist and the '''Peterborough''' wagons into the other consist. | ||
Revision as of 08:56, 16 February 2021
A set of scenarios to use with the SAR Peterborough (Northern) Narrow Gauge Division layout for TRS19. The scenarios replicate, as far as possible, some of the operations that existed in the division from the 1920s until the late 1960s. All rolling stock, EIT paths and industry setting are provided in the session. There are no AI controlled trains other than those you add yourself.
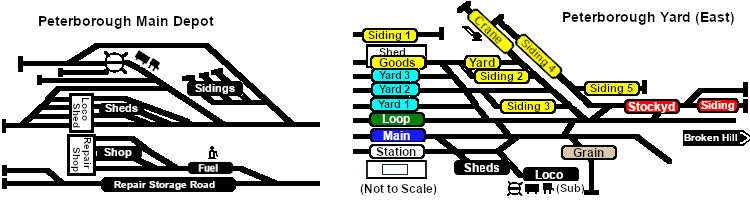
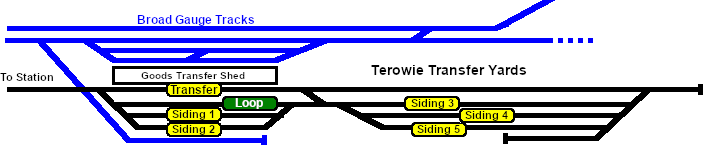
| Each location in the layout has a detailed set of track diagrams that provide the following information:- | |
 Line Index |
|
| Click |
|
| Scenarios |
||||
| Gladstone-Peterborough Depot Fuel | 2 hrs | Vintage East-West Express: Terowie-Quorn | 3 hrs | |
| Gladstone-Wilmington Local Freight | 3 hrs | Gladstone-Jamestown and Terowie Passenger | 35 min to Jamestown 1 hr 40 mins to Terowie |
|
| Gladstone Bulk Ore | 1 hr 25 min to Peterborough 2 hrs 45mins to Gladstone |
Paratoo Empty Wagon Return | 1 hr 25 min to Peterborough 2 hrs 45 mins to Paratoo |
|
| Quorn-Peterborough Local Freight | 3 hrs 30 min | Quorn-Gladstone Oil Return | x hrs to Peterborough x hrs to Gladstone |
|
| Peterborough-Paratoo Mixed | 1 hr 40 min | Paratoo-Gladstone/Terowie Express Freight | x hrs xx min Peterborough x hrs xx mins to Terowie x hrs xx mins to Gladstone |
|
| Peterborough Shunter | 1 hr | Gladstone Shunter | 40 min | |
| Terowie Shunter | x hr | |||
| Rolling Stock |
|||||||
| Locomotives | Passenger and Guard | Goods and Bulk | |||||
| Active Industries |
||
| Produce: (see note below) Passengers |
Consume: (see note below) Passengers |
|
| Only the stations at Gladstone, Jamestown, Peterborough, Terowie and Quorn are passenger enabled. By the mid 1960s the other stations were averaging only a few passengers a week, or a month in many cases. | ||
| Produce: (see note below) Wool Bales |
Consume: (see note below) Fertiliser Bagged General Goods |
|
| Wallaway only consumes Fertiliser Bagged and produces nothing. | ||
| Produce: (see note below) Farm Equipment I beams John Deere Tractor Product Lumber |
Consume: (all locations) Farm Equipment I beams John Deere Tractor Product Lumber |
|
| Terowie produces all products, a few locations produce Farm Equipment and John Deere Tractor Product. Some also produce Lumber. Check the |
||
| Produce: (Gladstone and Terowie only) Fertiliser Bagged General Goods Wool Bales |
Consume: (Gladstone and Terowie only) Fertiliser Bagged General Goods Wool Bales |
|
| Produce: (Gladstone only) Wool Bales |
Consume: (Gladstone only) Wool Bales |
|
| Produce: (except Peterborough) Wheat |
Consume: (Gladstone and Peterborough only) Wheat |
|
| Produce: Cattle Sheep |
Consume: Cattle Sheep |
|
| Peterborough has separate Cattle and Sheep stockyards. | ||
| Produce: |
Consume: (Quorn only) Diesel Fuel Petrol Fuel |
|
| Produce: Water |
Consume: |
|
| Produce: (see note below) Coal Water |
Consume: Coal |
|
| Water is produced with coal only at the Peterborough Main Coal & Water Stage | ||
| Produce: (see notes below) Bunker C Oil Water |
Consume: (see notes below) Bunker C Oil |
|
| Water is produced with bunker c oil only at the Peterborough Main Fuel & Water Stage Facility is at Peterborough (Main) Depot and Gladstone Depot only |
||
Gladstone to Wilmington Local Freight
A twice weekly (if required) freight service from Gladstone to Wilmington dropping wagons at locations as required.
| Duration: | 3 hours |
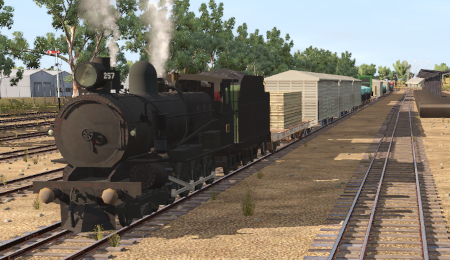
| Loco: | SAR T 257 on Gladstone Yard 2 Other Unrostered Locos:
|
| Consist: | Attached to SAR T 257. 4 MTW wagons, 5 QLX wagons, 4 WHE covered wagons, 1 DB Guard Van. Each wagon has its destination as part of its name e.g. QLX Wirrabara 2 indicating it is the 2nd QLX wagon for Wirrabara. |
| Task: |
|
| Driving Notes: |
|
Gladstone to Jamestown School Run
Gladstone to Terowie Passenger
A morning school run from Gladstone to Jamestown Mondays, Wednesdays, Fridays.
Morning passenger and school run from Gladstone to Terowie Tuesdays, Thursdays, Saturdays.
| Duration: | Jamestown School Run 35 minutes Terowie Passenger 1 hour 40 minutes |
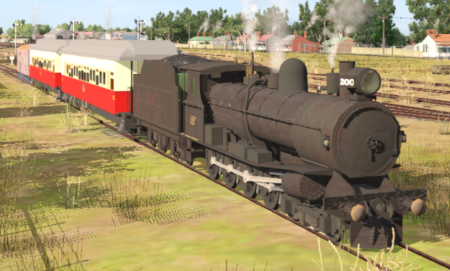
| Loco: | SAR T 200 at Gladstone Station Siding Other Unrostered Locos:
|
| Consist: | Attached to SAR T 200. 2 Kuranda BL1 coaches, 1 DB Guard Van |
| Task: |
|
| Driving Notes: |
|
Paratoo to Peterborough Bulk Ore Train
Paratoo to Gladstone Bulk Ore Train
Express bulk ore freight from Broken Hill to Port Pirie
| Duration: | Paratoo to Peterborough 1 hour 25 minutes (includes refuelling time) Paratoo to Gladstone 2 hours 45 minutes |
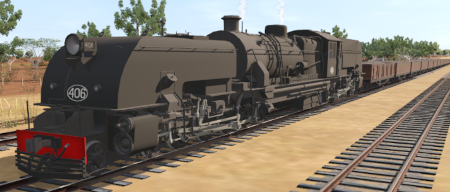
| Loco: | SAR 406 (Garrett) on the main line approaching Paratoo Other Unrostered Locos:
|
| Consist: | Attached to SAR 406. 23 CCC gondola wagons, 1 DB Guard Van. |
| Task: |
|
| Driving Notes: |
|
Gladstone to Peterborough Empty Ore
Gladstone to Paratoo Empty Ore
Moving empty ore wagons from Port Pirie to Broken Hill.
| Duration: | Gladstone to Peterborough 1 hour 20 minutes Gladstone to Paratoo 2 hour 45 minutes |
| Loco: | SAR T 201 at Gladstone Depot Other Unrostered Locos:
|
| Consist: | 22 CCC gondola wagons, 1 DB Guard Van on Gladstone Yard 1 |
| Task: |
|
| Driving Notes: |
|
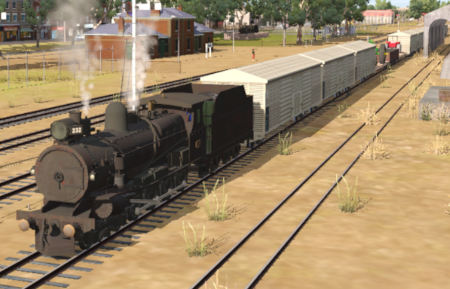
Quorn to Peterborough Local Freight
A thrice weekly (if required) freight service from Quorn to Peterborough dropping wagons at locations as required.
| Duration: | 3 hours 30 minutes |
| Loco: | SAR T 232 on Quorn Goods Loop Other Unrostered Locos:
|
| Consist: | Attached to SAR T 232. 3 MTW flat wagons, 9 QLX wagons, 2 WHE covered wagons, 2 CCC gondola wagons, 1 DB Guard Van. Each wagon has its destination as part of its name e.g. QLX Orroroo 2 indicating it is the 2nd QLX wagon for Orroroo. |
| Task: |
|
| Driving Notes: |
|
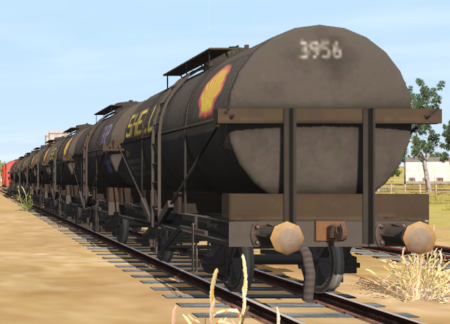
Quorn to Gladstone Oil Freight
Through freight from Quorn to Peterborough moving empty fuel cars from Quorn and Port Augusta to Peterborough where they will be attached to a freight for return to Port Pirie.
| Duration: | x hours |
| Loco: | SAR T 51 at Quorn Depot Other Unrostered Locos:
|
| Consist: | 8 Tank wagons (from Port Augusta) located at Quorn Goods Sidings, 4 Tank wagons located ar Quorn Fuel Depot, 1 DB Guard Van located ar Quorn Goods Sidings. |
| Task: |
|
| Driving Notes: |
|
Peterborough to Paratoo Mixed Passenger/Freight
Mixed passenger and freight run from Peterborough to Paratoo.
| Duration: | 1 hour 40 minutes |
| Loco: | SAR T 202 on Peterborough Car Siding Other Unrostered Locos:
|
| Consist: | Attached to SAR T 202. 1 Kuranda BL1 coach, 3 QLX wagons, 2 MTW flat wagons, 1 DB Guard Van. Each freight wagon has its destination as part of its name e.g. "QLX Nackara" indicating it is destined for Nackara. |
| Task: |
|
| Driving Notes: |
|
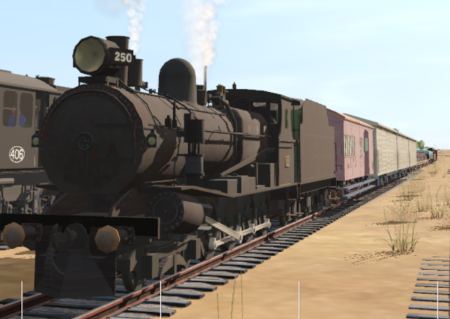
Paratoo to Gladstone and Terowie Mixed Through Freight
Express freight from Broken Hill to Port Pirie and Terowie. Train is divided at Peterborough.
| Duration: | Paratoo to Terowie x hours Paratoo to Gladstone x hours |
| Loco: | SAR T 250 on Paratoo Goods Loop
|
<
| Consist: | Attached to SAR T 250. 3 QLX wagons, 4 MTW flat wagons, 2 CCC gondola wagons, 2 WHE wagons, 3 Tank wagons, 2 DB Guard Vans (at either end). Each freight wagon has its destination as part of its name e.g. CCC Gladstone or MTW Terowie. |
| Task: |
|
| Driving Notes: |
|
Peterborough Shunter
Shunting operations that cover the length of Peterborough Yard and Peterborough Depot.
| Duration: | 1 hour |
| Loco: | SAR T 233 on Peterborough Depot Shed Road 1 Other Unrostered Locos:
|
 |
|
| Task: |
|
| Driving Notes: |
|
Gladstone Shunter
Shunting operations in Gladstone Yard and nearby sidings.
| Duration: | 40 minutes |
| Loco: | SAR T 210 at Gladstone Depot Other Unrostered Locos: none |
| Task: |
|
| Driving Notes: |
|
Terowie Shunter
Shunting operations in Terowie Yard.
| Duration: | xx minutes |
| Loco: | SAR T 198 at Terowie Depot Other Unrostered Locos:
|
 |
|
| Task: |
|
| Driving Notes: |
|
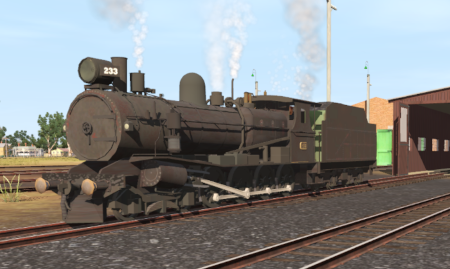
SAR T Class 4-8-0
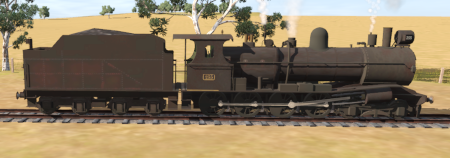 |
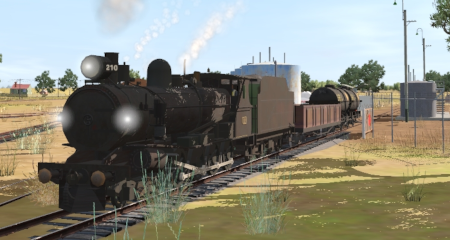
78 were built between 1910 and 1917 specifically for the Broken Hill-Port Pirie ore trains where they dominated until the mid 1960s. They were regarded as one of the most successful SAR steam locos. 6 were sold to the TGR (Tasmanian Government Railways), a few were transfered to other SAR narrow gauge lines and 5 were temporarily converted to broad gauge (5ft 3in, 1600mm). The vast majority saw out their lives on the SAR Northern (Peterborough) Narrow Gauge Division. The last examples were withdrawn from service in the early 1970s. Consumes: Coal and Water |
SAR 400 Class 4-8-2+2-8-4
 |
10 of these oil fired Garratts were purchased in the 1950s specifically for the Broken Hill-Port Pirie ore trains and the Leigh Creek coal trains. Most had been withdrawn by the mid 1960s. The last was withdrawn from service in 1970. Consumes: Bunker C Oil and Water |
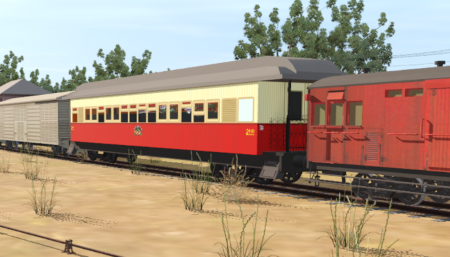
Kuranda BL1 Coach
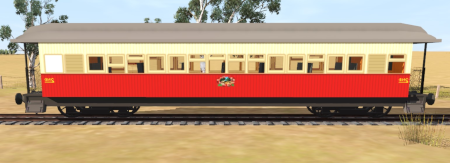 |
"Borrowed" from QR (Queensland Rail) as there seems to be no passenger enabled narrow gauge SAR coaches available on the DLS. The QR Kuranda BL1 coaches are very similar to the SAR Centenary coaches which are on the DLS, as broad gauge and standard gauge cars only, but are not passenger enabled. Loads and Unloads: Passengers |
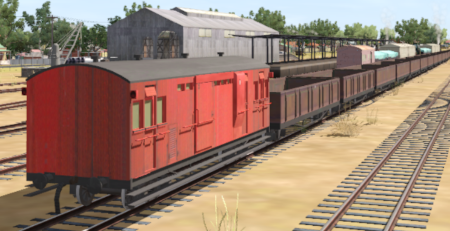
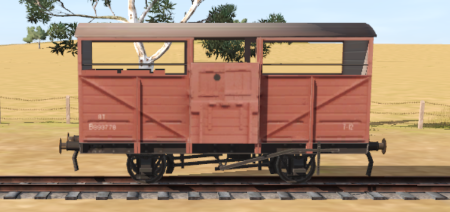
DB Guard Van
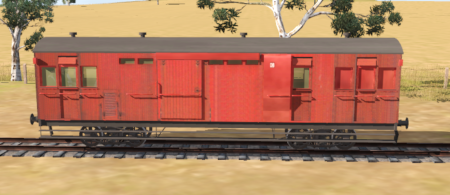 |
"Borrowed" from TGR (Tasmanian Government Railways) and can carry a limited number of passengers. Loads and Unloads: up to 6 Passengers |
MTW Flat Wagon
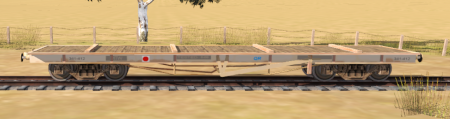 |
"Borrowed" from QR, designed to carry bulky loads.
|
QLX Van
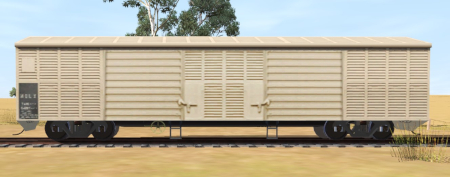 |
"Borrowed" from QR, a general purpose goods van.
|
CCC Gondola
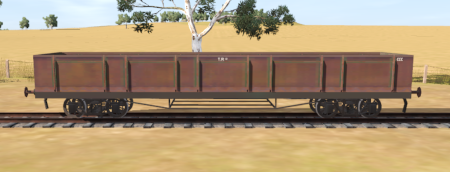 |
"Borrowed" from TGR, a bulk mineral wagon.
|
Livestock 8T 4-wheel
 |
Livestock van.
|
WHE Covered Wagon
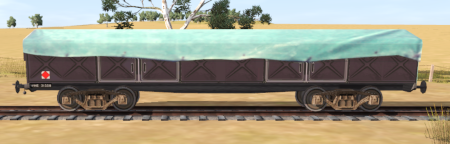 |
"Borrowed" from QR, a covered bulk wagon. This wagon is not industry enabled. I could not find a suitable narrow gauge industry enabled grain hopper on the DLS.
|
Tank 4-wheel
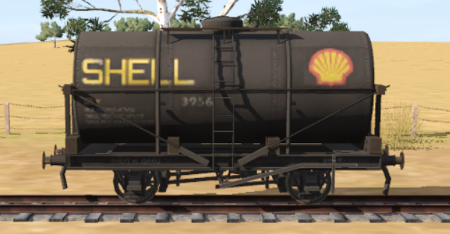 |
A bulk fuel wagon.
|
||||||