SAR Oodla Wirra

From TrainzOnline
(Difference between revisions)
Jump to: navigation, search
m
m
Line 23: Line 23:
 
</tr>
 
</tr>
 
</table></td>
 
</table></td>
<td colspan=1>'''Loco:'''
+
<td style="background-color: black;"><span style="color: white;">'''Loco:'''</span>
<table style="border:2px solid black;">
+
<table>
 
<tr valign="top">
 
<tr valign="top">
<td align="center">[[Image:Water_Icon.png|link=|alt=Water]]<br><font size=1>'''Water'''</font></td>
+
<td align="center">[[Image:Water_Icon.png|link=|alt=Water]]<br><span style="font-size: 10px; color: white;">'''Water'''</span></td>
 
</tr>
 
</tr>
 
</table></td>
 
</table></td>

Revision as of 17:14, 3 September 2019

Oodla Wirra

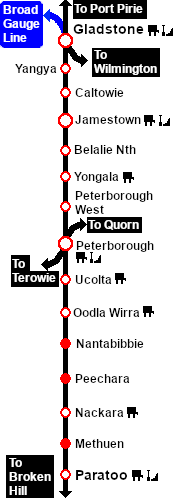
Main Line with Passing and Goods Loops and loco watering facilities. Unmanned station on the Peterborough to Paratoo section of the Port Pirie to Broken Hill line.

PortPirie-BrokenHill Line
Ucolta
Location Index
Nantabibbie
PortPirie-BrokenHill Line
Commodities: (load and/or unload)
Passengers
Passengers
Goods
Goods
Livestock
Livestock
Loco:
Water
Water
Facilities:
Loop
Loop
Line740.png
From To EIT Paths Description
Line740.png
Ablue.png         Bblue.png Port Pirie to Broken Hill Through (non stopping) service from Peterborough to Paratoo
Ablue.png Cred.png Bblue.png Port Pirie to Station to Broken Hill Through service from Peterborough to Paratoo stopping at station
Ablue.png         Dgreen.png Port Pirie to Goods/Stockyard Arriving service from Peterborough to goods and stockyard
Ablue.png         Ggreen.png Port Pirie to Loop Arriving service from Peterborough to loop
Egreen.png         Bblue.png Goods to Broken Hill Departing service to Paratoo from goods
Fgreen.png         Bblue.png Stockyard to Broken Hill Departing service to Paratoo from stockyard
Hgreen.png         Bblue.png Loop to Broken Hill Departing service to Paratoo from loop
Line740.png
All reverse paths (e.g. Bblue.png to Ablue.png) are also available
Line740.png
Gladstone-Paratoo Strip Map
Personal tools