SAR Caltowie Switches
From TrainzOnline
(Difference between revisions)
m |
m |
||
| Line 55: | Line 55: | ||
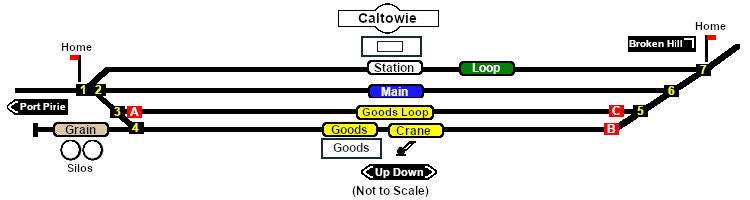
<td align="center">[[Image:No_1.png|20px|link=]]</td> | <td align="center">[[Image:No_1.png|20px|link=]]</td> | ||
<td>'''CT 1'''</td> | <td>'''CT 1'''</td> | ||
| − | <td><span style="background-color: yellow; font-weight: 700;">Down</span> '''(R) Main, (L) Station | + | <td><span style="background-color: yellow; font-weight: 700;">Down</span> '''(R) Main, (L) Station Loop'''</td> |
<td align="center">[[Image:No_2.png|20px|link=]]</td> | <td align="center">[[Image:No_2.png|20px|link=]]</td> | ||
<td>'''CT 2'''</td> | <td>'''CT 2'''</td> | ||
| Line 90: | Line 90: | ||
<td align="center">[[Image:No_7.png|20px|link=]]</td> | <td align="center">[[Image:No_7.png|20px|link=]]</td> | ||
<td>'''CT 7'''</td> | <td>'''CT 7'''</td> | ||
| − | <td><span style="background-color: cyan; font-weight: 700;">Up</span> '''(L) Main, (R) Station | + | <td><span style="background-color: cyan; font-weight: 700;">Up</span> '''(L) Main, (R) Station Loop'''</td> |
</tr> | </tr> | ||
| Line 103: | Line 103: | ||
<td colspan=6> | <td colspan=6> | ||
| − | <table width=750> <!-- BEGIN Switch Sets Station | + | <table width=750> <!-- BEGIN Switch Sets Station Loop table --> |
<tr valign="top"> | <tr valign="top"> | ||
| Line 116: | Line 116: | ||
</tr> | </tr> | ||
| − | </table> <!-- END Switch Sets Station | + | </table> <!-- END Switch Sets Station Loop table --> |
<table width=750> <!-- BEGIN Switch Mainline table --> | <table width=750> <!-- BEGIN Switch Mainline table --> | ||
Revision as of 16:06, 31 December 2020
|
 |
||||||||||||||||||||||||||||||||||||||||||||||||||||||||||||||||||||||||||||||||||||||||||||||||||||||