How to Use Track Markers
m (fixed HTML tag errors) |
m |
||
| Line 11: | Line 11: | ||
</tr> | </tr> | ||
<tr valign="top"> | <tr valign="top"> | ||
| − | <td>[[ | + | <td>[[image:DotPoint.JPG|link=]]</td> |
| − | <td>'''Track | + | <td>'''Track Priority Markers are purple coloured track markers that are invisible in ''Driver Mode'' but visible in ''Surveyor Mode''.''' They are used to direct specific trains under '''AI''' control '''through''' the track section where they are placed</td> |
</tr> | </tr> | ||
<tr valign="top"> | <tr valign="top"> | ||
| − | <td>[[ | + | <td>[[image:DotPoint.JPG|link=]]</td> |
| − | <td>'''Track | + | <td>'''Track Priority Markers only work on AI controlled trains.''' They have no effect on manually controlled trains</td> |
</tr> | </tr> | ||
<tr valign="top"> | <tr valign="top"> | ||
| − | <td>[[ | + | <td>[[image:DotPoint.JPG|link=]]</td> |
| − | <td>''' | + | <td>The '''direction''' that the marker is pointing has absolutely '''NO EFFECT''' on its operation</td> |
</tr> | </tr> | ||
<tr valign="top"> | <tr valign="top"> | ||
| − | <td>[[ | + | <td>[[image:DotPoint.JPG|link=]]</td> |
| − | <td> | + | <td>'''Track Priority Markers''' are used with '''Priority Levels''' that are assigned to each train</td> |
</tr> | </tr> | ||
</table> | </table> | ||
| Line 34: | Line 34: | ||
<tr valign="top"> | <tr valign="top"> | ||
<td width=729><span id="stepWhat"></span> </td> | <td width=729><span id="stepWhat"></span> </td> | ||
| − | <td width=46>[[ | + | <td width=46>[[image:BackToTop.png|link=#top|alt=Top|Top]]</td> |
| − | <td width=75>& | + | <td width=75> </td> |
| − | <td width=75>[[ | + | <td width=75>[[image:NextDown.png|link=#stepAdding|alt=Next Down|Next Down]]</td> |
| − | <td width=75>[[ | + | <td width=75>[[image:BackToBottom.png|link=#bottom|alt=Bottom|Bottom]]</td> |
</tr> | </tr> | ||
</table> <!-- END Nav Buttons Table --> | </table> <!-- END Nav Buttons Table --> | ||
| − | ='''What are Track | + | ='''What are Track Priority Markers?'''= |
| − | + | <table cellpadding=4 bgcolor=#c1e7e7> | |
| − | + | ||
| − | <table | + | |
| − | + | ||
| − | + | ||
| − | + | ||
<tr valign="top"> | <tr valign="top"> | ||
<td>[[image:DotPoint.JPG|link=]]</td> | <td>[[image:DotPoint.JPG|link=]]</td> | ||
| − | <td>''' | + | <td>'''Priority levels have no set meanings but can be assigned to specific AI trains to force them through selected sections of track (the track sections are defined as between consecutive junction sets)'''</td> |
</tr> | </tr> | ||
| + | </table> | ||
| + | <br> | ||
| + | '''Priority Markers''' are used to assign different levels of '''Priority''' to track sections. Trains under AI control that have the same '''Priority Level''' as the track will, usually, be directed along that track.<br> | ||
| + | |||
| + | <table bgcolor=#000000 width=900> | ||
<tr valign="top"> | <tr valign="top"> | ||
| − | < | + | <td> |
| − | < | + | <table bgcolor=#ffffe0 width=896> |
| − | + | ||
<tr valign="top"> | <tr valign="top"> | ||
| − | <td | + | <td>[[image:PencilTips.PNG|link=]]</td> |
| + | <td>A better way of thinking about the meaning of '''Priority''' is to use the word '''Preference''' instead. '''Preference''' indicates a '''choice''' between different paths while '''Priority''' is often mistakenly taken to mean importance. | ||
| + | </td> | ||
</tr> | </tr> | ||
| − | + | </table> | |
| − | + | </td> | |
| − | + | ||
| − | + | ||
| − | + | ||
| − | + | ||
| − | + | ||
</tr> | </tr> | ||
</table> | </table> | ||
| Line 73: | Line 69: | ||
<table cellpadding=4 bgcolor=#c1e7e7> | <table cellpadding=4 bgcolor=#c1e7e7> | ||
<tr valign="top"> | <tr valign="top"> | ||
| − | <td>[[ | + | <td>[[image:DotPoint.JPG|link=]]</td> |
| − | <td>''' | + | <td>'''Priority Markers can be placed in a Route layer or in a Session layer'''</td> |
</tr> | </tr> | ||
</table> | </table> | ||
| Line 83: | Line 79: | ||
<table bgcolor=#ffffb0 width=896> | <table bgcolor=#ffffb0 width=896> | ||
<tr valign="top"> | <tr valign="top"> | ||
| − | <td>[[ | + | <td>[[image:NotePad.PNG|link=]]</td> |
<td><span style="font-size: 17px; font-weight: 700;">Notes:'''</span><br> | <td><span style="font-size: 17px; font-weight: 700;">Notes:'''</span><br> | ||
---- | ---- | ||
| Line 89: | Line 85: | ||
<tr valign="top"> | <tr valign="top"> | ||
<td width=20>[[image:DotPoint.JPG|link=]]</td> | <td width=20>[[image:DotPoint.JPG|link=]]</td> | ||
| − | <td>Placing | + | <td>Placing '''Priority Markers''' in a '''Route layer''' (e.g. in the same layer as the track) means that they will be available in '''all Sessions''' created using that particular Route. |
</td> | </td> | ||
</tr> | </tr> | ||
<tr valign="top"> | <tr valign="top"> | ||
<td width=20>[[image:DotPoint.JPG|link=]]</td> | <td width=20>[[image:DotPoint.JPG|link=]]</td> | ||
| − | <td>Placing | + | <td>Placing '''Priority Markers''' in a '''Session layer''' means that they will only be available in that Session. This can be useful if two or more Sessions are being created and you want to use different '''Priority Markers''' in each Session. |
</td> | </td> | ||
</tr> | </tr> | ||
| Line 107: | Line 103: | ||
<table cellpadding=4 bgcolor="Aquamarine"> | <table cellpadding=4 bgcolor="Aquamarine"> | ||
<tr valign="top"> | <tr valign="top"> | ||
| − | <td>[[ | + | <td>[[image:LinkWiki.PNG|link=]]</td> |
<td>Information on Route and Session layers can be found at:-<br> | <td>Information on Route and Session layers can be found at:-<br> | ||
* '''[[How to Use Layers]]''' | * '''[[How to Use Layers]]''' | ||
| Line 117: | Line 113: | ||
<tr valign="top"> | <tr valign="top"> | ||
<td width=729><span id="stepAdding"></span> </td> | <td width=729><span id="stepAdding"></span> </td> | ||
| − | <td width=46>[[ | + | <td width=46>[[image:BackToTop.png|link=#top|alt=Top|Top]]</td> |
| − | <td width=75>[[ | + | <td width=75>[[image:NextUp.png|link=#stepWhat|alt=Next Up|Next Up]]</td> |
| − | <td width=75>[[ | + | <td width=75>[[image:NextDown.png|link=#stepAssigning|alt=Next Down|Next Down]]</td> |
| − | <td width=75>[[ | + | <td width=75>[[image:BackToBottom.png|link=#bottom|alt=Bottom|Bottom]]</td> |
</tr> | </tr> | ||
</table> <!-- END Nav Buttons Table --> | </table> <!-- END Nav Buttons Table --> | ||
| − | + | ='''Adding a Track Priority Marker'''= | |
| − | ='''Adding a Track | + | |
| − | + | ||
<table bgcolor=#000000 width=900> | <table bgcolor=#000000 width=900> | ||
<tr valign="top"> | <tr valign="top"> | ||
| Line 131: | Line 125: | ||
<table bgcolor=#ffffb0 width=896> | <table bgcolor=#ffffb0 width=896> | ||
<tr valign="top"> | <tr valign="top"> | ||
| − | <td>[[ | + | <td>[[image:NotePad.PNG|link=]]</td> |
<td><span style="font-size: 17px; font-weight: 700;">Notes:'''</span><br> | <td><span style="font-size: 17px; font-weight: 700;">Notes:'''</span><br> | ||
---- | ---- | ||
| − | A Track | + | A Track Priority Marker has no useful properties other than its '''Priority Level (1, 2 or 3)'''. |
| − | + | </td> | |
| − | + | ||
| − | + | ||
| − | + | ||
| − | + | ||
| − | + | ||
</tr> | </tr> | ||
</table> | </table> | ||
| Line 148: | Line 137: | ||
<br> | <br> | ||
=='''<span style="color: black; background-color: cyan;"> In Surveyor Classic (S10) </span>'''== | =='''<span style="color: black; background-color: cyan;"> In Surveyor Classic (S10) </span>'''== | ||
| − | |||
| − | |||
<table> | <table> | ||
<tr valign="top"> | <tr valign="top"> | ||
| − | <td>[[ | + | <td>[[image:PriorityMarker1.png|link=]]</td> |
<td> | <td> | ||
<table cellpadding=4 bgcolor=#ffffff> | <table cellpadding=4 bgcolor=#ffffff> | ||
| Line 161: | Line 148: | ||
</tr> | </tr> | ||
<tr valign="top"> | <tr valign="top"> | ||
| − | <td>[[ | + | <td>[[image:Steps.PNG|link=]]</td> |
<td><span style="font-size: 17px; font-weight: 700;">Steps:</span><br> | <td><span style="font-size: 17px; font-weight: 700;">Steps:</span><br> | ||
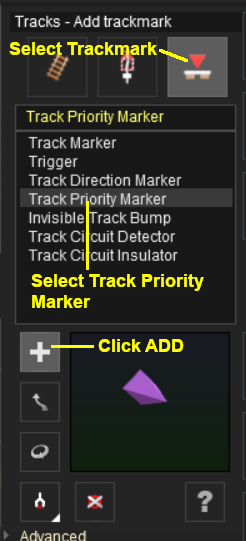
# Open the '''Track Tool''' | # Open the '''Track Tool''' | ||
| − | # | + | # <span style="font-weight: 700; font-size: 15px; background-color: lightcyan;">Left Click</span> on the '''Trackmark button''' |
| − | # | + | # <span style="font-weight: 700; font-size: 15px; background-color: lightcyan;">Left Click</span> on the '''Track Priority Marker''' |
| − | # | + | # <span style="font-weight: 700; font-size: 15px; background-color: lightcyan;">Left Click</span> on the '''+''' (add) button - it may already be selected |
| − | # | + | # <span style="font-weight: 700; font-size: 15px; background-color: lightcyan;">Left Click</span> on the track location where the priority marker is to be placed |
| − | + | ||
</td> | </td> | ||
</tr> | </tr> | ||
| Line 174: | Line 160: | ||
<td colspan="2"> | <td colspan="2"> | ||
----</td> | ----</td> | ||
| − | |||
| − | |||
| − | |||
| − | |||
| − | |||
</tr> | </tr> | ||
</table> | </table> | ||
<br> | <br> | ||
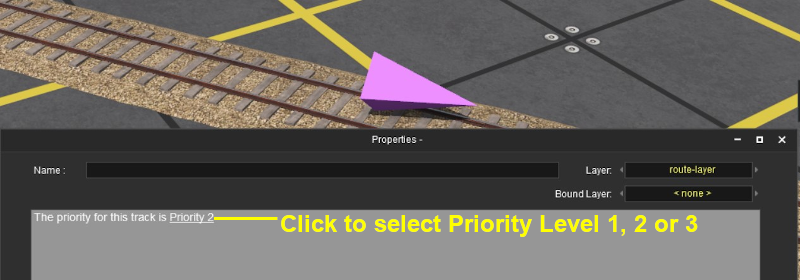
| − | < | + | This will place the Track Priority Marker on the track and open its properties window.<br> |
| − | + | [[image:PriorityMarker2.png|link=]]<br> | |
| − | + | <span style="font-weight: 700; font-size: 15px; background-color: lightcyan;">Left Click</span> the default '''Priority''' value shown to select one <span style="font-size: 17px; text-decoration: underline; font-weight: 700;">1</span>, <span style="font-size: 17px; text-decoration: underline; font-weight: 700;">2</span> or <span style="font-size: 17px; text-decoration: underline; font-weight: 700;">3</span>. Each <span style="font-weight: 700; font-size: 15px; background-color: lightcyan;">Left Click</span> will cycle to the next value.<br> | |
| − | + | ||
| − | + | ||
| − | + | ||
| − | < | + | |
| − | </ | + | |
| − | < | + | |
| − | </ | + | |
| − | < | + | |
| − | </ | + | |
| − | < | + | |
| − | < | + | |
| − | + | ||
| − | + | You can also assign the '''Priority Marker''':- | |
| − | + | *a name (which is not necessary for its operation) | |
| − | + | *a layer and | |
| − | + | *a bound layer | |
| − | + | ||
| − | + | ||
| − | + | ||
| − | + | ||
| − | + | ||
| − | + | ||
| − | + | ||
| − | + | ||
| − | + | ||
| − | + | ||
| − | + | ||
| − | * | + | |
| − | + | ||
| − | + | ||
| − | + | ||
| − | + | ||
| − | + | ||
| − | + | ||
| − | + | ||
| − | + | ||
| − | + | ||
| − | + | ||
| − | + | ||
| − | + | ||
| − | + | ||
| − | + | ||
| − | + | ||
| − | + | ||
| − | + | ||
| − | + | ||
| − | + | ||
| − | + | ||
| − | + | ||
| − | + | ||
| − | + | ||
| − | + | ||
| − | + | ||
| − | + | ||
| − | + | ||
| − | + | ||
| − | + | ||
| − | + | ||
| − | + | ||
| − | + | ||
| − | + | ||
| − | + | ||
| − | + | ||
| − | + | ||
| − | + | ||
| − | + | ||
| − | + | ||
</td> | </td> | ||
</tr> | </tr> | ||
| Line 261: | Line 179: | ||
'''Surveyor 2.0''' is currently only available for '''Trainz Plus Standard''' and '''Trainz Plus Gold''' subscription members.<br> | '''Surveyor 2.0''' is currently only available for '''Trainz Plus Standard''' and '''Trainz Plus Gold''' subscription members.<br> | ||
| − | ===<span style="color: white; background-color: blue;"> Adding a | + | ===<span style="color: white; background-color: blue;"> Adding a Priority Marker </span>=== |
[[image:DotPoint1.JPG|link=]] In the '''Asset Palette''' either:- | [[image:DotPoint1.JPG|link=]] In the '''Asset Palette''' either:- | ||
| Line 269: | Line 187: | ||
<table border=1> | <table border=1> | ||
<tr valign="top"> | <tr valign="top"> | ||
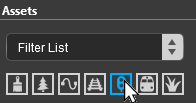
| − | <td width=250 align="center">[[image:Ablue.png|link=]] | + | <td width=250 align="center">[[image:Ablue.png|link=]] <span style="font-weight: 700; font-size: 15px; background-color: lightcyan;">Left Click</span> the '''Track Mesh Filter''' icon<br> |
[[image:TrackMeshFilter.png|link=|alt=Track mesh]] | [[image:TrackMeshFilter.png|link=|alt=Track mesh]] | ||
</td> | </td> | ||
| Line 279: | Line 197: | ||
<table border=1> | <table border=1> | ||
<tr valign="top"> | <tr valign="top"> | ||
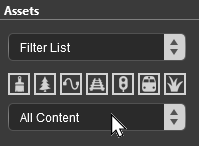
| − | <td align="center">[[image:Bblue.png|link=]] | + | <td align="center">[[image:Bblue.png|link=]] <span style="font-weight: 700; font-size: 15px; background-color: lightcyan;">Left Click</span> the '''Content Drop-down Box'''<br> |
[[image:FilterSelect.png|link=|alt=Filter List]]<br> | [[image:FilterSelect.png|link=|alt=Filter List]]<br> | ||
Then select '''Track Objects'''<br> | Then select '''Track Objects'''<br> | ||
| Line 312: | Line 230: | ||
<tr valign="top"> | <tr valign="top"> | ||
<td>2. </td> | <td>2. </td> | ||
| − | <td> | + | <td><span style="font-weight: 700; font-size: 15px; background-color: lightcyan;">Left Click</span> on the '''Assets Palette''' name</td> |
</tr> | </tr> | ||
<tr valign="top"> | <tr valign="top"> | ||
| Line 337: | Line 255: | ||
<tr valign="top"> | <tr valign="top"> | ||
<td colspan=2>[[image:PencilTips.PNG|link=]] <span style="font-size: 15px; font-weight: 700; color: white; background-color: blue;"> Shortcut </span><br> | <td colspan=2>[[image:PencilTips.PNG|link=]] <span style="font-size: 15px; font-weight: 700; color: white; background-color: blue;"> Shortcut </span><br> | ||
| − | If you already have a ''' | + | If you already have a '''Priority Marker''' placed in your route then:-</td> |
</tr> | </tr> | ||
<tr valign="top"> | <tr valign="top"> | ||
<td width=20>[[image:DotPoint1Blue.png|link=]]</td> | <td width=20>[[image:DotPoint1Blue.png|link=]]</td> | ||
| − | <td>move the tool pointer over the existing | + | <td>move the tool pointer over the existing priority marker object and hold down the <span style="font-weight: 700; font-size: 15px; color: white; background-color: black;"> Alt </span> key. The object name will appear in a '''ToolTip''' attached to the pointer</td> |
</tr> | </tr> | ||
<tr valign="top"> | <tr valign="top"> | ||
<td>[[image:DotPoint2Blue.png|link=]]</td> | <td>[[image:DotPoint2Blue.png|link=]]</td> | ||
| − | <td> | + | <td><span style="font-weight: 700; font-size: 15px;"><span style="color: white; background-color: black;"> Alt </span> + <span style="background-color: lightcyan;">Left Click</span></span> (hold down the <span style="font-weight: 700; font-size: 15px; color: white; background-color: black;"> Alt </span> key and <span style="font-weight: 700; font-size: 15px; background-color: lightcyan;">Left Click</span> on the priority marker to identify it in the '''Assets Palette''' and to select the '''Placement Tool'''. Release the key.</td> |
</tr> | </tr> | ||
<tr valign="top"> | <tr valign="top"> | ||
| Line 362: | Line 280: | ||
<table> | <table> | ||
<tr valign="top"> | <tr valign="top"> | ||
| − | <td>[[image: | + | <td>[[image:FilterSelectPriorityMark.png|link=|alt=Filtered list]]</td> |
| − | <td valign="middle">[[image:DotPoint4.JPG|link=]] | + | <td valign="middle">[[image:DotPoint4.JPG|link=]] <span style="font-weight: 700; font-size: 15px; background-color: lightcyan;">Left Click</span> on the item name '''AI Routing Priority Marker'''.<br><br> |
| − | If you are not sure about an asset then | + | If you are not sure about an asset then <span style="font-weight: 700; font-size: 15px; background-color: lightcyan;">Double Left Click</span> on the name to bring up its image and description.</td> |
</tr> | </tr> | ||
</table> | </table> | ||
| Line 370: | Line 288: | ||
</tr> | </tr> | ||
</table> | </table> | ||
| − | [[image:DotPoint5.JPG|link=]] Place the ''' | + | [[image:DotPoint5.JPG|link=]] Place the '''Priority Marker''' on the track.<br> |
<table width=1000> | <table width=1000> | ||
<tr valign="top"> | <tr valign="top"> | ||
| − | <td>[[image: | + | <td>[[image:PrioritymarkAdd_S20.png|link=|alt=Add priority marker]]<br> |
<br> | <br> | ||
<table bgcolor=#000000 width=480 cellpadding=2> | <table bgcolor=#000000 width=480 cellpadding=2> | ||
| Line 383: | Line 301: | ||
<td><span style="font-size: 17px; font-weight: 700;">Notes:'''</span><br> | <td><span style="font-size: 17px; font-weight: 700;">Notes:'''</span><br> | ||
---- | ---- | ||
| − | To delete a ''' | + | To delete a '''Priority Marker''' (or any asset):- |
# select either the:- | # select either the:- | ||
#* '''Free Move Tool''' (or press <span style="font-weight: 700; font-size: 17px; color: white; background-color: black;"> S </span>) or | #* '''Free Move Tool''' (or press <span style="font-weight: 700; font-size: 17px; color: white; background-color: black;"> S </span>) or | ||
#* '''Fine Adjustment Tool''' (or press <span style="font-weight: 700; font-size: 17px; color: white; background-color: black;"> D </span>) | #* '''Fine Adjustment Tool''' (or press <span style="font-weight: 700; font-size: 17px; color: white; background-color: black;"> D </span>) | ||
| − | # | + | # <span style="font-weight: 700; font-size: 15px; background-color: lightcyan;">Left Click</span> on the '''Priority Marker''' |
# press the <span style="font-weight: 700; font-size: 17px; color: white; background-color: black;"> Delete </span> key | # press the <span style="font-weight: 700; font-size: 17px; color: white; background-color: black;"> Delete </span> key | ||
</td> | </td> | ||
| − | |||
| − | |||
| − | |||
| − | |||
| − | |||
| − | |||
| − | |||
| − | |||
| − | |||
| − | |||
| − | |||
| − | |||
| − | |||
| − | |||
| − | |||
| − | |||
</tr> | </tr> | ||
</table> | </table> | ||
| Line 428: | Line 330: | ||
<tr valign="top"> | <tr valign="top"> | ||
<td>[[image:DotPoint2Blue.png|link=]]</td> | <td>[[image:DotPoint2Blue.png|link=]]</td> | ||
| − | <td> | + | <td><span style="font-weight: 700; font-size: 15px; background-color: lightcyan;">Left Click</span> on the track at the position where you want to place the '''Priority Marker'''</td> |
</tr> | </tr> | ||
</table> | </table> | ||
| − | The ''' | + | The '''Priority Marker''' can be easily moved if needed - see below. |
</td> | </td> | ||
</tr> | </tr> | ||
| Line 438: | Line 340: | ||
----</td> | ----</td> | ||
</tr> | </tr> | ||
| − | </table><br> | + | </table> |
| + | <br> | ||
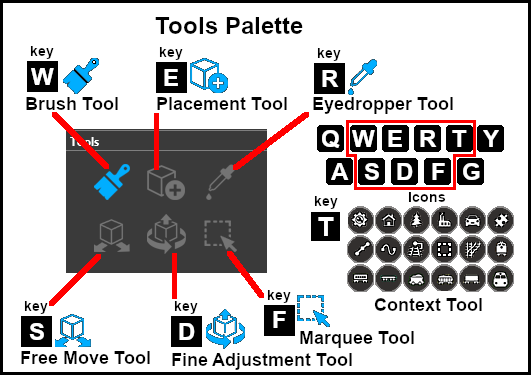
[[image:Tools_S20.png|link=|alt=Tools and keymap for S20]] | [[image:Tools_S20.png|link=|alt=Tools and keymap for S20]] | ||
| + | </td> | ||
| + | </tr> | ||
| + | </table> | ||
| + | <table bgcolor=#000000 width=600> | ||
| + | <tr valign="top"> | ||
| + | <td colspan=2> | ||
| + | <table bgcolor=#ffffe0 width=596> | ||
| + | <tr valign="top"> | ||
| + | <td>[[image:PencilTips.PNG|link=]]</td> | ||
| + | <td>If you need to rotate the '''Priority Marker''' to face the opposite direction then:- | ||
| + | # <span style="font-weight: 700; font-size: 15px; background-color: lightcyan;">Left Click</span> on its '''Context Menu Icon''' ([[image:DotPoint3Blue.png|link=]] in the image below or press the <span style="font-weight: 700; font-size: 17px; color: white; background-color: black;"> T </span> key if the asset has already been selected) | ||
| + | # from the popup menu select <span style="font-weight: 700; font-size: 15px; color: white; background-color: black;"> Rotate Trackside </span> | ||
| + | '''Note:''' the direction it faces has no effect on its operation.</td> | ||
| + | </tr> | ||
| + | </table> | ||
</td> | </td> | ||
</tr> | </tr> | ||
</table> | </table> | ||
<br> | <br> | ||
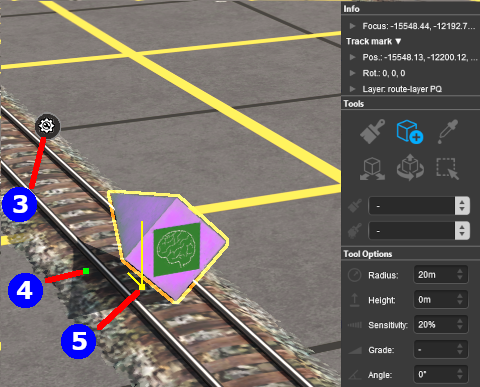
| − | ===<span style="color: white; background-color: blue;"> Set the | + | ===<span style="color: white; background-color: blue;"> Set the Priority Marker Properties </span>=== |
<table width=900> | <table width=900> | ||
<tr valign="top"> | <tr valign="top"> | ||
| − | <td>[[image: | + | <td width=480>[[image:PrioritymarkAdjust_S20.png|link=]]</td> |
| − | <td>[[image:DotPoint3Blue.png|link=]] <span style="font-weight: 700; font-size: 17px;">Change Its Name</span><br> | + | <td>[[image:DotPoint3Blue.png|link=]] <span style="font-weight: 700; font-size: 17px;">Set its Priority Level</span><br> |
| + | This is its only important property.<br> | ||
| + | <table cellpadding=4 bgcolor=#ffffff width=900> | ||
| + | <tr> | ||
| + | <td colspan="2"> | ||
| + | ----</td> | ||
| + | </tr> | ||
| + | <tr valign="top"> | ||
| + | <td width=50>[[image:Steps.PNG|link=]]</td> | ||
| + | <td><span style="font-size: 17px; font-weight: 700;">Steps:</span><br> | ||
| + | # <span style="font-weight: 700; font-size: 15px; background-color: lightcyan;">Left Click</span> on the '''Context Menu Icon''' ([[image:DotPoint3Blue.png|link=]] in the image on the left or press the <span style="font-weight: 700; font-size: 17px; color: white; background-color: black;"> T </span> key if the asset has already been selected) to open up the object property and control menu | ||
| + | # <span style="font-weight: 700; font-size: 15px; background-color: lightcyan;">Left Click</span> on the <span style="font-weight: 700; font-size: 15px; color: white; background-color: black;"> Edit Properties </span> option in the popup menu | ||
| + | # <span style="font-weight: 700; font-size: 15px; background-color: lightcyan;">Left Click</span> on the '''Priority Level''' number - it will start at '''Priority 0''' (meaning "not set"). Then select a value from the choices '''<u>1</u>''', '''<u>2</u>''' and '''<u>3</u>''' | ||
| + | # <span style="font-weight: 700; font-size: 15px; background-color: lightcyan;">Left Click</span> on the [[image:Tick.PNG|link=]] to accept the change or on the [[image:Cross.PNG|link=]] to reject it</td> | ||
| + | </tr> | ||
| + | <tr> | ||
| + | <td colspan="2"> | ||
| + | ----</td> | ||
| + | </tr> | ||
| + | </table> | ||
| + | [[image:DotPoint3Blue.png|link=]] <span style="font-weight: 700; font-size: 17px;">Change Its Name</span><br> | ||
| + | The name of the marker is only useful for finding it in the route. It is not needed for any operational purpose.<br> | ||
| + | |||
<table cellpadding=4 bgcolor=#ffffff> | <table cellpadding=4 bgcolor=#ffffff> | ||
<tr> | <tr> | ||
| Line 456: | Line 396: | ||
</tr> | </tr> | ||
<tr valign="top"> | <tr valign="top"> | ||
| − | <td>[[image:Steps.PNG|link=]]</td> | + | <td width=50>[[image:Steps.PNG|link=]]</td> |
<td><span style="font-size: 17px; font-weight: 700;">Steps:</span><br> | <td><span style="font-size: 17px; font-weight: 700;">Steps:</span><br> | ||
| − | # | + | # <span style="font-weight: 700; font-size: 15px; background-color: lightcyan;">Left Click</span> on the '''Context Menu Icon''' ([[image:DotPoint3Blue.png|link=]] in the image above or press the <span style="font-weight: 700; font-size: 17px; color: white; background-color: black;"> T </span> key if the asset has already been selected) to open up the object property and control menu |
| − | # | + | # <span style="font-weight: 700; font-size: 15px; background-color: lightcyan;">Left Click</span> on the <span style="font-weight: 700; font-size: 15px; color: white; background-color: black;"> Edit Properties </span> option in the popup menu |
| − | # enter a name for the ''' | + | # enter a name for the '''Priority Marker''' |
| − | # | + | # <span style="font-weight: 700; font-size: 15px; background-color: lightcyan;">Left Click</span> the [[image:Tick.PNG|link=]] to accept the change or the [[image:Cross.PNG|link=]] to reject it</td> |
| − | </td> | + | |
</tr> | </tr> | ||
<tr> | <tr> | ||
| Line 472: | Line 411: | ||
</tr> | </tr> | ||
</table> | </table> | ||
| − | |||
[[image:DotPoint4Blue.png|link=]] <span style="font-weight: 700; font-size: 17px;">Set its Trigger Radius</span><br> | [[image:DotPoint4Blue.png|link=]] <span style="font-weight: 700; font-size: 17px;">Set its Trigger Radius</span><br> | ||
| − | The | + | The trigger radius can be adjusted so that the marker can fit between two close junctions without overlapping them.<br> |
| + | |||
<table cellpadding=4 bgcolor=#ffffff> | <table cellpadding=4 bgcolor=#ffffff> | ||
<tr> | <tr> | ||
| Line 483: | Line 422: | ||
<td>[[image:Steps.PNG|link=]]</td> | <td>[[image:Steps.PNG|link=]]</td> | ||
<td><span style="font-size: 17px; font-weight: 700;">Steps:</span><br> | <td><span style="font-size: 17px; font-weight: 700;">Steps:</span><br> | ||
| − | + | * <span style="font-weight: 700; font-size: 15px; background-color: lightcyan;">Left Click and Drag</span> '''Forward''' or '''Backward''' to increase or reduce the trigger radius | |
</td> | </td> | ||
</tr> | </tr> | ||
| Line 492: | Line 431: | ||
</table> | </table> | ||
<br> | <br> | ||
| − | ===<span style="color: white; background-color: blue;"> Move the | + | ===<span style="color: white; background-color: blue;"> Move the Priority Marker </span>=== |
[[image:DotPoint5Blue.png|link=]] <span style="font-weight: 700; font-size: 17px;">Move it Along the Track</span><br> | [[image:DotPoint5Blue.png|link=]] <span style="font-weight: 700; font-size: 17px;">Move it Along the Track</span><br> | ||
| Line 503: | Line 442: | ||
<td>[[image:Steps.PNG|link=]]</td> | <td>[[image:Steps.PNG|link=]]</td> | ||
<td><span style="font-size: 17px; font-weight: 700;">Steps:</span><br> | <td><span style="font-size: 17px; font-weight: 700;">Steps:</span><br> | ||
| − | + | * <span style="font-weight: 700; font-size: 15px; background-color: lightcyan;">Left Click and Drag</span> '''Forward''' or '''Backward''' to drag the '''Priority Marker''' along the track | |
</td> | </td> | ||
</tr> | </tr> | ||
| Line 514: | Line 453: | ||
<table width=900> | <table width=900> | ||
<tr valign="top"> | <tr valign="top"> | ||
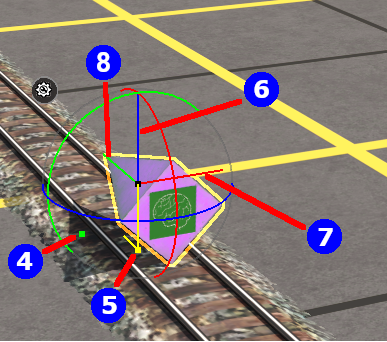
| − | <td>[[image: | + | <td>[[image:PrioritymarkFineAdjust_S20.png|link=]]</td> |
<td>[[image:DotPoint6Blue.png|link=]] <span style="font-weight: 700; font-size: 17px;">Reposition it Up/Down</span><br> | <td>[[image:DotPoint6Blue.png|link=]] <span style="font-weight: 700; font-size: 17px;">Reposition it Up/Down</span><br> | ||
| − | This feature allows a ''' | + | This feature allows a '''Priority Marker''' to be physically placed above the track so that it will not be hidden if a consist is parked on the '''Priority Marker'''.<br> |
<table cellpadding=4 bgcolor=#ffffff width=530> | <table cellpadding=4 bgcolor=#ffffff width=530> | ||
<tr> | <tr> | ||
| Line 526: | Line 465: | ||
<td><span style="font-size: 17px; font-weight: 700;">Steps:</span><br> | <td><span style="font-size: 17px; font-weight: 700;">Steps:</span><br> | ||
# Select the '''Fine Adjustment Tool''' (or press the <span style="font-weight: 700; font-size: 17px; color: white;background-color: black;"> D </span> key) | # Select the '''Fine Adjustment Tool''' (or press the <span style="font-weight: 700; font-size: 17px; color: white;background-color: black;"> D </span> key) | ||
| − | # | + | # <span style="font-weight: 700; font-size: 15px; background-color: lightcyan;">Left Click and Drag</span> '''Forward''' or '''Backward''' on the '''Blue Vertical Axis Line''' above the '''Priority Marker''' ([[image:DotPoint6Blue.png|link=]] in the image on the left) to move the '''Priority Marker''' '''Up''' or '''Down''' |
</td> | </td> | ||
</tr> | </tr> | ||
| Line 540: | Line 479: | ||
<tr valign="top"> | <tr valign="top"> | ||
<td>[[image:PencilTips.PNG|link=]]</td> | <td>[[image:PencilTips.PNG|link=]]</td> | ||
| − | <td>If you need to return the ''' | + | <td>If you need to return the '''Priority Marker''' to its original position then:- |
| − | # | + | # <span style="font-weight: 700; font-size: 15px; background-color: lightcyan;">Left Click</span> on its '''Context Menu Icon''' (or press the <span style="font-weight: 700; font-size: 17px; color: white; background-color: black;"> T </span> key if the asset has already been selected) |
# from the popup menu select <span style="font-weight: 700; font-size: 15px; color: white; background-color: black;"> Reattach to Track </span></td> | # from the popup menu select <span style="font-weight: 700; font-size: 15px; color: white; background-color: black;"> Reattach to Track </span></td> | ||
</tr> | </tr> | ||
| Line 554: | Line 493: | ||
[[image:DotPoint7Blue.png|link=]] <span style="font-weight: 700; font-size: 17px;">Reposition the it Left/Right</span><br> | [[image:DotPoint7Blue.png|link=]] <span style="font-weight: 700; font-size: 17px;">Reposition the it Left/Right</span><br> | ||
| − | This feature allows a ''' | + | This feature allows a '''Priority Marker''' to be physically placed left or right alongside the track so that it will not be hidden if a consist is parked on the '''Priority Marker'''.<br> |
<table cellpadding=4 bgcolor=#ffffff width=900> | <table cellpadding=4 bgcolor=#ffffff width=900> | ||
<tr> | <tr> | ||
| Line 564: | Line 503: | ||
<td><span style="font-size: 17px; font-weight: 700;">Steps:</span><br> | <td><span style="font-size: 17px; font-weight: 700;">Steps:</span><br> | ||
# Select the '''Fine Adjustment Tool''' (or press the <span style="font-weight: 700; font-size: 17px; color: white;background-color: black;"> D </span> key) | # Select the '''Fine Adjustment Tool''' (or press the <span style="font-weight: 700; font-size: 17px; color: white;background-color: black;"> D </span> key) | ||
| − | # | + | # <span style="font-weight: 700; font-size: 15px; background-color: lightcyan;">Left Click and Drag</span> '''Forward''' or '''Backward''' on the '''Red Horizontal Axis Line''' on the '''Priority Marker''' ([[image:DotPoint7Blue.png|link=]] in the image above) to move the '''Priority Marker''' '''Left''' or '''Right''' of the track |
</td> | </td> | ||
</tr> | </tr> | ||
| Line 578: | Line 517: | ||
<td><span style="font-size: 17px; font-weight: 700;">Notes:'''</span><br> | <td><span style="font-size: 17px; font-weight: 700;">Notes:'''</span><br> | ||
---- | ---- | ||
| − | The '''Green Horizontal Axis Line''' shown as [[image:DotPoint8Blue.png|link=]] in the image above pointing forward from the ''' | + | The '''Green Horizontal Axis Line''' shown as [[image:DotPoint8Blue.png|link=]] in the image above pointing forward from the '''Priority Marker''' will move the '''Priority Marker''' forward/backward regardless of whether it is on the track or not. It has the same effect as [[image:DotPoint5Blue.png|link=]] <span style="font-weight: 700; font-size: 15px;">Move it Along the Track</span>. However, by using this tool it is possible to move the '''Priority Marker''' beyond the end of the track if that is ever required. |
</td> | </td> | ||
</tr> | </tr> | ||
| Line 598: | Line 537: | ||
<tr valign="top"> | <tr valign="top"> | ||
<td>[[image:PencilTips.PNG|link=]]</td> | <td>[[image:PencilTips.PNG|link=]]</td> | ||
| − | <td>If you need to return the ''' | + | <td>If you need to return the '''Priority Marker''' to its original position then:- |
| − | # | + | # <span style="font-weight: 700; font-size: 15px; background-color: lightcyan;">Left Click</span> on its '''Context Menu Icon''' (or press the <span style="font-weight: 700; font-size: 17px; color: white; background-color: black;"> T </span> key if the asset has already been selected) |
# from the popup menu select <span style="font-weight: 700; font-size: 15px; color: white; background-color: black;"> Reattach to Track </span></td> | # from the popup menu select <span style="font-weight: 700; font-size: 15px; color: white; background-color: black;"> Reattach to Track </span></td> | ||
</tr> | </tr> | ||
| Line 608: | Line 547: | ||
<br> | <br> | ||
| − | ===<span style="color: white; background-color: blue;"> Assign a | + | ===<span style="color: white; background-color: blue;"> Assign a Priority Marker to a New Layer </span>=== |
| − | <table | + | |
| + | <table bgcolor=#ffffff width=1000> | ||
<tr valign="top"> | <tr valign="top"> | ||
<td colspan=2>The '''Info Palette''' will show the layer assigned to the currently selected object. To the left of the layer name is a small arrow object.</td> | <td colspan=2>The '''Info Palette''' will show the layer assigned to the currently selected object. To the left of the layer name is a small arrow object.</td> | ||
| Line 627: | Line 567: | ||
<td>[[image:Steps.PNG|link=]]</td> | <td>[[image:Steps.PNG|link=]]</td> | ||
<td><span style="font-size: 17px; font-weight: 700;">Steps:</span><br> | <td><span style="font-size: 17px; font-weight: 700;">Steps:</span><br> | ||
| − | # | + | # <span style="font-weight: 700; font-size: 15px; background-color: lightcyan;">Left Click</span> on the small arrow next to the layer name. This will open the layer properties for the selected object |
| − | # | + | # <span style="font-weight: 700; font-size: 15px; background-color: lightcyan;">Left Click</span> on the '''Layer''' drop down box to select a new layer for the object |
| − | # if required, | + | # if required, <span style="font-weight: 700; font-size: 15px; background-color: lightcyan;">Left Click</span> on the '''Binding''' drop down box to select a new binding layer for the object |
| − | # if required, | + | # if required, <span style="font-weight: 700; font-size: 15px; background-color: lightcyan;">Left Click</span> on the <span style="font-weight: 700; font-size: 17px; color: white; background-color: black;"> Lock Layer </span> button to lock the selected layer. If the layer is already locked then this will be shown as an <span style="font-weight: 700; font-size: 17px; color: white; background-color: black;"> Unlock Layer </span> button |
<br> | <br> | ||
<table bgcolor=#ff0000 width=550> | <table bgcolor=#ff0000 width=550> | ||
| Line 637: | Line 577: | ||
<table bgcolor=#fcbcbc width=546> | <table bgcolor=#fcbcbc width=546> | ||
<tr valign="top"> | <tr valign="top"> | ||
| − | <td>[[ | + | <td>[[image:Stop.PNG|link=]]</td> |
<td><span style="font-size: 15px; font-weight: 700;">WARNING:</span><br> | <td><span style="font-size: 15px; font-weight: 700;">WARNING:</span><br> | ||
You will not be allowed to place a track object in a layer that is higher up the list than the layer containing the track. | You will not be allowed to place a track object in a layer that is higher up the list than the layer containing the track. | ||
| Line 655: | Line 595: | ||
<table cellpadding=4 bgcolor="Aquamarine"> | <table cellpadding=4 bgcolor="Aquamarine"> | ||
<tr valign="top"> | <tr valign="top"> | ||
| − | <td>[[ | + | <td>[[image:LinkWiki.PNG|link=]]</td> |
<td>Information on layers can be found at:-<br> | <td>Information on layers can be found at:-<br> | ||
* '''[[How to Use Layers]]''' | * '''[[How to Use Layers]]''' | ||
| Line 667: | Line 607: | ||
<table> <!-- BEGIN Nav Buttons Table --> | <table> <!-- BEGIN Nav Buttons Table --> | ||
<tr valign="top"> | <tr valign="top"> | ||
| − | <td width=729><span id=" | + | <td width=729><span id="stepAssigning"></span> </td> |
| − | <td width=46>[[ | + | <td width=46>[[image:BackToTop.png|link=#top|alt=Top|Top]]</td> |
| − | <td width=75>[[ | + | <td width=75>[[image:NextUp.png|link=#stepAdding|alt=Next Up|Top]]</td> |
| − | <td width=75> | + | <td width=75>[[image:NextDown.png|link=#stepOperation|alt=Next Down|Next Down]]</td> |
| − | <td width=75>[[ | + | <td width=75>[[image:BackToBottom.png|link=#bottom|alt=Bottom|Bottom]]</td> |
</tr> | </tr> | ||
</table> <!-- END Nav Buttons Table --> | </table> <!-- END Nav Buttons Table --> | ||
| + | ='''Assigning Priority Levels to Trains'''= | ||
| − | + | <table cellpadding=4 bgcolor=#c1e7e7> | |
| − | + | ||
| − | + | ||
| − | + | ||
| − | + | ||
| − | + | ||
| − | <table cellpadding=4 bgcolor= | + | |
<tr valign="top"> | <tr valign="top"> | ||
| − | <td>[[ | + | <td>[[image:DotPoint.JPG|link=]]</td> |
| − | <td> | + | <td>'''A higher priority level <span style="text-decoration: underline;">does not mean</span> that one consist is more important than another'''. A priority <span style="text-decoration: underline; font-weight: 700;">1</span> consist will not be given first access to a junction, for example, or be the first one to depart. The priority levels have no set meaning beyond what you decide they will mean.</td> |
| − | + | ||
| − | </td> | + | |
</tr> | </tr> | ||
</table> | </table> | ||
<br> | <br> | ||
| − | <table | + | <table bgcolor=#000000 width=900> |
<tr valign="top"> | <tr valign="top"> | ||
| − | <td>[[ | + | <td> |
| − | <td>''' | + | <table bgcolor=#ffffb0 width=896> |
| + | <tr valign="top"> | ||
| + | <td>[[image:NotePad.PNG|link=]]</td> | ||
| + | <td><span style="font-size: 17px; font-weight: 700;">Notes:'''</span><br> | ||
| + | ----</td> | ||
</tr> | </tr> | ||
<tr valign="top"> | <tr valign="top"> | ||
| − | <td>[[ | + | <td width=10>[[image:DotPoint.JPG|10px|link=]]</td> |
| − | <td>''' | + | <td>Every locomotive (and its consist) '''must have a Priority Level''' of <span style="text-decoration: underline; font-weight: 700;">1</span>, <span style="text-decoration: underline; font-weight: 700;">2</span> or <span style="text-decoration: underline; font-weight: 700;">3</span>. The '''default priority level''' of every locomotive is '''2'''. You cannot assign '''NO''' Priority to a locomotive</td> |
| + | </tr> | ||
| + | <tr valign="top"> | ||
| + | <td>[[image:DotPoint.JPG|10px|link=]]</td> | ||
| + | <td>Setting the priority level of any wagon in a consist will set the priority level of '''ALL''' the wagons (including the loco) to the same value</td> | ||
| + | </tr> | ||
| + | </table> | ||
| + | </td> | ||
</tr> | </tr> | ||
</table> | </table> | ||
<br> | <br> | ||
| − | < | + | For example you could assign priority <span style="text-decoration: underline; font-weight: 700;">1</span> to '''express trains''' and <span style="text-decoration: underline; font-weight: 700;">3</span> to '''slow general "all stops" freight trains''', or you could assign priority <span style="text-decoration: underline; font-weight: 700;">3</span> to '''express trains''' and <span style="text-decoration: underline; font-weight: 700;">1</span> to '''slow general "all stops" freight trains''', it is up to you. These values will not alter the speed or importance of these trains but will only decide which paths they should take.<br> |
| − | + | <br> | |
| − | < | + | =='''<span style="color: black; background-color: cyan;"> In Surveyor Classic (S10) </span>'''== |
| − | + | ||
| − | + | ||
| − | + | To assign a priority level to a locomotive.<br> | |
| + | <table cellpadding=4 bgcolor=#ffffff> | ||
| + | <tr> | ||
| + | <td colspan="2"> | ||
| + | ----</td> | ||
</tr> | </tr> | ||
<tr valign="top"> | <tr valign="top"> | ||
| − | <td>[[ | + | <td>[[image:Steps.PNG|link=]]</td> |
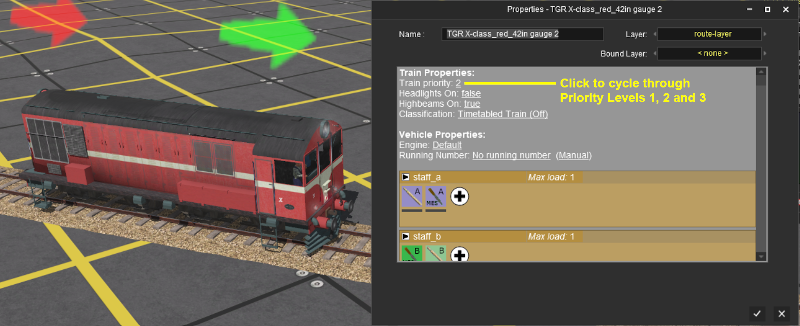
| − | <td><span style="font-size: 17px; font-weight: 700;"> | + | <td><span style="font-size: 17px; font-weight: 700;">Steps:'''</span><br> |
| − | + | # Open the properties window of the locomotive | |
| + | # <span style="font-weight: 700; font-size: 15px; background-color: lightcyan;">Left Click</span> on the '''Train Priority''' value - each click will cycle through the values <span style="text-decoration: underline; font-weight: 700;">1</span>, <span style="text-decoration: underline; font-weight: 700;">2</span>, <span style="text-decoration: underline; font-weight: 700;">3</span>. The '''default''' priority level for all consists is <span style="text-decoration: underline; font-weight: 700;">2</span> | ||
| + | # <span style="font-weight: 700; font-size: 15px; background-color: lightcyan;">Left Click</span> on the [[image:Tick.PNG|link=]] to accept the change or the [[image:Cross.PNG|link=]] to reject it | ||
| + | </td> | ||
| + | </tr> | ||
| + | <tr> | ||
| + | <td colspan="2"> | ||
| + | ----</td> | ||
| + | </tr> | ||
| + | </table> | ||
| − | + | [[image:PriorityTrain.png|link=]]<br> | |
| + | <br> | ||
| + | =='''<span style="color: white; background-color: blue;"> In Surveyor 2.0 (S20) </span>'''== | ||
| + | |||
| + | '''Surveyor 2.0''' is currently only available for '''Trainz Plus Standard''' and '''Trainz Plus Gold''' subscription members.<br> | ||
| + | |||
| + | To assign a priority level to a locomotive.<br> | ||
| + | |||
| + | <table width=1200> | ||
| + | <tr valign="top"> | ||
| + | <td>[[image:ConsistContextTool_S20.png|link=|alt=Context tool of a loco]]</td> | ||
| + | <td> | ||
| + | <table cellpadding=4 bgcolor=#ffffff> | ||
| + | <tr> | ||
| + | <td colspan="2"> | ||
| + | ----</td> | ||
</tr> | </tr> | ||
<tr valign="top"> | <tr valign="top"> | ||
| − | <td>[[ | + | <td>[[image:Steps.PNG|link=]]</td> |
| − | <td><span style="font-size: 17px; font-weight: 700;"> | + | <td><span style="font-size: 17px; font-weight: 700;">Steps:'''</span><br> |
| − | + | # select either the:- | |
| − | + | #* '''Free Move Tool''' (or press <span style="font-weight: 700; font-size: 17px; color: white; background-color: black;"> S </span>) or | |
| − | + | #* '''Fine Adjustment Tool''' (or press <span style="font-weight: 700; font-size: 17px; color: white; background-color: black;"> D </span>) | |
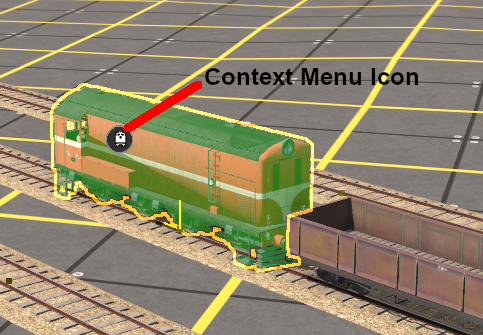
| + | # <span style="font-weight: 700; font-size: 15px; background-color: lightcyan;">Left Click</span> on the selected locomotive | ||
| + | # <span style="font-weight: 700; font-size: 15px; background-color: lightcyan;">Left Click</span> on the '''Context Menu Icon''' (shown in the image on the left or press the <span style="font-weight: 700; font-size: 17px; color: white; background-color: black;"> T </span> key) to open up the loco property and control menu | ||
| + | # <span style="font-weight: 700; font-size: 15px; background-color: lightcyan;">Left Click</span> on the <span style="font-weight: 700; font-size: 15px; color: white; background-color: black;"> Edit Properties </span> option in the popup menu | ||
| + | # <span style="font-weight: 700; font-size: 15px; background-color: lightcyan;">Left Click</span> the '''Train Priority''' value - each click will cycle through the values <span style="text-decoration: underline; font-weight: 700;">1</span>, <span style="text-decoration: underline; font-weight: 700;">2</span>, <span style="text-decoration: underline; font-weight: 700;">3</span>. The '''default''' priority level for all consists is <span style="text-decoration: underline; font-weight: 700;">2</span> | ||
| + | # <span style="font-weight: 700; font-size: 15px; background-color: lightcyan;">Left Click</span> the [[image:Tick.PNG|link=]] to accept the change or the [[image:Cross.PNG|link=]] to reject it | ||
| + | </td> | ||
</tr> | </tr> | ||
| + | <tr> | ||
| + | <td colspan="2"> | ||
| + | ----</td> | ||
| + | </tr> | ||
| + | </table> | ||
| + | </td> | ||
| + | </tr> | ||
| + | </table> | ||
| + | |||
| + | <table> <!-- BEGIN Nav Buttons Table --> | ||
<tr valign="top"> | <tr valign="top"> | ||
| − | <td>[[ | + | <td width=729><span id="stepOperation"></span> </td> |
| − | <td>< | + | <td width=46>[[image:BackToTop.png|link=#top|alt=Top|Top]]</td> |
| − | + | <td width=75>[[image:NextUp.png|link=#stepAssigning|alt=Next Up|Top]]</td> | |
| + | <td width=75>[[image:NextDown.png|link=#stepModifying|alt=Next Down|Next Down]]</td> | ||
| + | <td width=75>[[image:BackToBottom.png|link=#bottom|alt=Bottom|Bottom]]</td> | ||
| + | </tr> | ||
| + | </table> <!-- END Nav Buttons Table --> | ||
| − | + | ='''Priority Marker Operation'''= | |
| + | |||
| + | <table cellpadding=4 bgcolor=#c1e7e7> | ||
| + | <tr valign="top"> | ||
| + | <td colspan=2><span style="font-size: 17px; font-weight: 700;">Main Points:</span></td> | ||
| + | </tr> | ||
| + | <tr valign="top"> | ||
| + | <td>[[image:DotPoint.JPG|link=]]</td> | ||
| + | <td>'''Track Priority Markers only work on AI controlled trains.''' They have no effect on manually controlled trains</td> | ||
| + | </tr> | ||
| + | <tr valign="top"> | ||
| + | <td>[[image:DotPoint.JPG|link=]]</td> | ||
| + | <td>'''Track Priority Markers''' fool an AI train that has the same priority level into thinking that the path containing the marker is the shortest possible path, even when it is not</td> | ||
| + | </tr> | ||
| + | <tr valign="top"> | ||
| + | <td>[[image:DotPoint.JPG|link=]]</td> | ||
| + | <td>AI trains will avoid, where possible, a path containing a '''Track Priority Marker''' that does not match its own priority level</td> | ||
| + | </tr> | ||
| + | <tr valign="top"> | ||
| + | <td>[[image:DotPoint.JPG|link=]]</td> | ||
| + | <td>If the specified path is blocked, then the AI will '''ignore''' the '''Track Priority Marker''' and find another path</td> | ||
| + | </tr> | ||
| + | <tr valign="top"> | ||
| + | <td>[[image:DotPoint.JPG|link=]]</td> | ||
| + | <td>The direction that the '''Track Priority Marker''' is pointing has '''NO effect''' on its operation</td> | ||
</tr> | </tr> | ||
</table> | </table> | ||
| − | ==''' | + | Consider the situation represented in the diagrams below. Three trains - Red, Green, Yellow - have been given priority levels of <span style="text-decoration: underline; font-weight: 700;">1</span>, <span style="text-decoration: underline; font-weight: 700;">2</span> and <span style="text-decoration: underline; font-weight: 700;">3</span> as shown. Each is given the driver command '''Drive to Trackmark''' or '''Navigate to Trackmark'''. The destination trackmark is shown on the right.<br> |
| − | + | ||
| − | < | + | In '''Figure 1''' below, no '''Track Priority Markers''' have been set. All three trains will take the shortest path, assuming there are no blockages.<br> |
| + | |||
| + | [[image:PriorityMap_P0.png|link=|alt=Priority Map - Priority NULL]]<br> | ||
| + | <span style="text-decoration: underline; font-weight: 700;">Figure 1</span><br> | ||
| + | ---- | ||
| + | In '''Figure 2''' below, a '''Track Priority Marker''' has been placed on the top loop line and has been given a priority level of <span style="text-decoration: underline; font-weight: 700;">1</span>. The red train (priority level <span style="text-decoration: underline; font-weight: 700;">1</span>) will now take the priority <span style="text-decoration: underline; font-weight: 700;">1</span> path because it will "see" that as being the shortest of the three possible paths. The green and yellow trains (priority levels <span style="text-decoration: underline; font-weight: 700;">2</span> and <span style="text-decoration: underline; font-weight: 700;">3</span>) will still "see" the middle path as the shortest.<br> | ||
| + | |||
| + | [[image:PriorityMap_P1.png|link=|alt=Priority Map - Priority 1]]<br> | ||
| + | <span style="text-decoration: underline; font-weight: 700;">Figure 2</span><br> | ||
| + | ---- | ||
| + | In '''Figure 3''' below, a '''Track Priority Marker''' has been placed on the lower loop line and has been given a priority level of <span style="text-decoration: underline; font-weight: 700;">3</span>. For the same reasons as explained above, the yellow train (priority level <span style="text-decoration: underline; font-weight: 700;">3</span>) will now take the priority <span style="text-decoration: underline; font-weight: 700;">3</span> path because it now sees that as the shortest.<br> | ||
| + | |||
| + | [[image:PriorityMap_P3.png|link=|alt=Priority Map - Priority 3]]<br> | ||
| + | <span style="text-decoration: underline; font-weight: 700;">Figure 3</span><br> | ||
| + | ---- | ||
| + | In '''Figure 4''' below, '''Track Priority Markers''' have been placed on the upper and lower loop lines and set as shown. The red and yellow trains will take their respective loop paths while the green train is unaffected.<br> | ||
| + | |||
| + | [[image:PriorityMap_P13.png|link=|alt=Priority Map - Priority 1&3]]<br> | ||
| + | <span style="text-decoration: underline; font-weight: 700;">Figure 4</span><br> | ||
| + | ---- | ||
| + | An exception, shown in '''Figure 5''' below, will occur when a '''Track Priority Marker''' path has been blocked, for example by another train under AI or manual control. In the figure the lower loop path has been blocked. The red train will take its assigned path, the green train takes its shortest path and yellow train will be forced to take what it "sees" as the next shortest path.<br> | ||
| + | |||
| + | [[image:PriorityMap_P123Blocked.png|link=|alt=Priority Map - Priority 2&3 blocked]]<br> | ||
| + | <span style="text-decoration: underline; font-weight: 700;">Figure 5</span><br> | ||
| + | |||
| + | <table bgcolor=#000000 width=900> | ||
<tr valign="top"> | <tr valign="top"> | ||
| − | <td>[[ | + | <td> |
| − | <td> | + | <table bgcolor=#ffffb0 width=896> |
| − | + | <tr valign="top"> | |
| + | <td>[[image:NotePad.PNG|link=]]</td> | ||
| + | <td><span style="font-size: 17px; font-weight: 700;">Notes:</span><br> | ||
| + | ---- | ||
| + | An AI controlled train will '''not''' attempt to find an alternative path around a blockage if:- | ||
| + | *the <span style="text-decoration: underline; font-weight: 700;">Drive To</span> driver command is used, <span style="text-decoration: underline; font-weight: 700;">and</span> | ||
| + | *the blocked path is the shortest path and has the same priority value as the consist | ||
| + | This is the normal operation of the <span style="text-decoration: underline; font-weight: 700;">Drive To</span> command and is not caused by the '''Track Priority Markers''' or consist priority levels. This situation would occur with or without the use of priority levels and markers. | ||
| + | </td> | ||
| + | </tr> | ||
| + | </table> | ||
</td> | </td> | ||
</tr> | </tr> | ||
</table> | </table> | ||
<br> | <br> | ||
| + | ---- | ||
| + | Another exception, shown in '''Figure 6''' below, will occur when a driver command overrides a '''Track Priority Marker'''. In the figure the yellow train (priority level <span style="text-decoration: underline; font-weight: 700;">3</span>) has been given the driver command '''Drive To Station''' followed by '''Drive to Trackmark'''. As the station is not on the priority <span style="text-decoration: underline; font-weight: 700;">3</span> path, that path will be ignored to reach the station and then the trackmark. After stopping at the station the train will '''not''' reverse back onto the main line to then use the priority <span style="text-decoration: underline; font-weight: 700;">3</span> track.<br> | ||
| − | ==''' | + | [[image:PriorityMap_P3Station.png|link=|alt=Priority Map - Station]]<br> |
| − | + | <span style="text-decoration: underline; font-weight: 700;">Figure 6</span><br> | |
| + | ---- | ||
| + | <span style="font-weight: 700; font-size: 15px;">The Special Case of Priority 2</span><br> | ||
| + | '''Figure 7''' below shows a situation that does not fit the points made above. A '''Track Priority Marker''' has been set to priority level <span style="text-decoration: underline; font-weight: 700;">2</span> and placed on the lower loop. The green train has been given the command to drive to the trackmark but ignores its assigned priority <span style="text-decoration: underline; font-weight: 700;">2</span> path and proceeds via the shortest actual path. Track that has not been assigned a '''Track Priority Marker''' will have a default priority level of <span style="text-decoration: underline; font-weight: 700;">2</span>. In this situation, the green train "sees" two paths that match its priority level so it takes the shorter of the two.<br> | ||
| − | <table> | + | [[image:PriorityMap_P2.png|link=|alt=Priority Map - 2]]<br> |
| + | <span style="text-decoration: underline; font-weight: 700;">Figure 7</span><br> | ||
| + | ---- | ||
| + | '''Track Priority Markers''' can also be used to direct trains away from specific paths. '''Figure 8''' below shows how this can be done. A '''Track Priority Marker''' set to priority level <span style="text-decoration: underline; font-weight: 700;">1</span> has been positioned on the shortest physical path. This will block all trains of priority level <span style="text-decoration: underline; font-weight: 700;">2</span> and <span style="text-decoration: underline; font-weight: 700;">3</span> from using that path - they will see it as the longest available path. A second '''Track Priority Marker''' set to priority level <span style="text-decoration: underline; font-weight: 700;">3</span> has been positioned on the 2nd shortest physical path. This will block all trains of priority level <span style="text-decoration: underline; font-weight: 700;">1</span> and <span style="text-decoration: underline; font-weight: 700;">2</span> from using that path. The end result is that the green train (priority level <span style="text-decoration: underline; font-weight: 700;">2</span>) has only one path available - the longest physical path.<br> | ||
| + | |||
| + | [[image:PriorityMap_P13a.png|link=|alt=Priority Map - excluding 2]]<br> | ||
| + | <span style="text-decoration: underline; font-weight: 700;">Figure 8</span><br> | ||
| + | ---- | ||
| + | The situation shown in '''Figure 8''' above only works up to a point. '''Figure 9''' below shows what will happen when ALL paths are set to a blocking priority level. The green train (priority level <span style="text-decoration: underline; font-weight: 700;">2</span>) will ignore all the priority markers and choose its own shortest path. '''Track Priority Markers''' will only make a path '''*look*''' longer or shorter. When all paths have conflicting priorities to an AI train, then the AI will go back to selecting the actual shortest physical path.<br> | ||
| + | |||
| + | [[image:PriorityMap_P111.png|link=|alt=Priority Map - all conflicted]]<br> | ||
| + | <span style="text-decoration: underline; font-weight: 700;">Figure 9</span><br> | ||
| + | ---- | ||
| + | <br> | ||
| + | <table> <!-- BEGIN Nav Buttons Table --> | ||
<tr valign="top"> | <tr valign="top"> | ||
| − | <td>[[ | + | <td width=729><span id="stepModifying"></span> </td> |
| − | <td> | + | <td width=46>[[image:BackToTop.png|link=#top|alt=Top|Top]]</td> |
| + | <td width=75>[[image:NextUp.png|link=#stepOperation|alt=Next Up|Top]]</td> | ||
| + | <td width=75>[[image:NextDown.png|link=#stepMap|alt=Next Down|Next Down]]</td> | ||
| + | <td width=75>[[image:BackToBottom.png|link=#bottom|alt=Bottom|Bottom]]</td> | ||
| + | </tr> | ||
| + | </table> <!-- END Nav Buttons Table --> | ||
| + | <br> | ||
| + | ='''Modifying Train Priority Levels'''= | ||
| − | + | <table cellpadding=4 bgcolor=#c1e7e7> | |
| + | <tr valign="top"> | ||
| + | <td>[[image:DotPoint.JPG|link=]]</td> | ||
| + | <td>'''You can alter the Priority Level of a train in Driver mode'''</td> | ||
</tr> | </tr> | ||
</table> | </table> | ||
| + | <br> | ||
| + | [[image:Ablue.png|link=]] <span style="font-size: 17px; font-weight: 700;">Manually in Driver Mode</span><br> | ||
| + | |||
| + | This can be done "on the fly" using the mouse. | ||
| + | |||
| + | <table width=1000> | ||
| + | <tr valign="top"> | ||
| + | <td colspan=3> | ||
| + | ----</td> | ||
| + | </tr> | ||
| + | <tr valign="top"> | ||
| + | <td>[[image:Steps.PNG|link=]]</td> | ||
| + | <td><span style="font-size: 17px; font-weight: 700;">Steps:</span><br> | ||
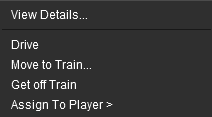
| + | # <span style="font-weight: 700; font-size: 15px;"><span style="color: white; background-color: black;"> Ctrl </span> + <span style="background-color: lightcyan;">Right Click</span></span> (hold down the <span style="font-weight: 700; font-size: 15px; color: white; background-color: black;"> Ctrl </span> key and <span style="font-weight: 700; font-size: 15px; background-color: lightcyan;">Right Click</span>) on the locomotive or on any of the wagons in the consist | ||
| + | # <span style="font-weight: 700; font-size: 15px; background-color: lightcyan;">Left Click</span> on '''View Details''' from the popup menu | ||
| + | # <span style="font-weight: 700; font-size: 15px; background-color: lightcyan;">Left Click</span> the current priority setting to cycle through the values to the one you want | ||
| + | <br> | ||
| + | <table bgcolor=#000000 cellpadding=2> | ||
| + | <tr valign="top"> | ||
| + | <td> | ||
| + | <table bgcolor=#ffffb0 cellpadding=2> | ||
| + | <tr valign="top"> | ||
| + | <td width=25>[[image:NotePad.PNG|link=]]</td> | ||
| + | <td>Setting the priority level of any wagon in a consist will set the priority level of '''ALL''' the wagons (including the loco) to the same value</td> | ||
| + | </tr> | ||
| + | </table> | ||
| + | </td> | ||
| + | </tr> | ||
| + | </table> | ||
| + | </td> | ||
| + | <td>[[image:ViewDetails1.png|link=|alt=View Details]]</td> | ||
| + | </tr> | ||
| + | <tr> | ||
| + | <td colspan="3"> | ||
| + | ----</td> | ||
| + | </tr> | ||
| + | </table> | ||
| + | |||
| + | <span style="font-weight: 700; font-size: 15px;">OR</span><br> | ||
| + | |||
| + | [[image:Bblue.png|link=]] <span style="font-size: 17px; font-weight: 700;">Using a Driver Command</span><br> | ||
| + | |||
| + | This can be done in '''Surveyor''' in the session [[image:PageLink.PNG|link=]]'''[[Session_Rule_List_with_Parameters#Driver_Setup_Rule|Driver Setup Rule]]''' or by adding a driver command to the command bar in '''Driver'''.<br> | ||
| + | |||
| + | * Insert the driver command [[image:PageLink2.PNG|link=]] '''[[Driver_Commands_List#Priorityz|Priorityz]]''' into the driver command bar and set it to the new level<br><br> | ||
| + | |||
<table cellpadding=4 bgcolor="Aquamarine"> | <table cellpadding=4 bgcolor="Aquamarine"> | ||
<tr valign="top"> | <tr valign="top"> | ||
| − | <td>[[ | + | <td>[[image:LinkWiki.PNG|link=]]</td> |
| − | <td>Information on adding driver commands can be found at:-<br> | + | <td>Information on adding driver commands can be found on the '''Trainz Wiki Page''' at:-<br> |
* '''[[How_to_Use_Driver_Setup_Rule|How to Use the Driver Setup Rule]]''' | * '''[[How_to_Use_Driver_Setup_Rule|How to Use the Driver Setup Rule]]''' | ||
</td> | </td> | ||
</tr> | </tr> | ||
</table> | </table> | ||
| + | <br> | ||
| + | <table> <!-- BEGIN Nav Buttons Table --> | ||
| + | <tr valign="top"> | ||
| + | <td width=729><span id="stepMap"></span> </td> | ||
| + | <td width=46>[[image:BackToTop.png|link=#top|alt=Top|Top]]</td> | ||
| + | <td width=75>[[image:NextUp.png|link=#stepModifying|alt=Next Up|Top]]</td> | ||
| + | <td width=75> </td> | ||
| + | <td width=75>[[image:BackToBottom.png|link=#bottom|alt=Bottom|Bottom]]</td> | ||
| + | </tr> | ||
| + | </table> <!-- END Nav Buttons Table --> | ||
| + | ='''Track Priority in Map View'''= | ||
| + | |||
| + | In Surveyor when using '''Map View''' or zooming the camera right out, the tracks will be shown colour coded according to their assigned track priority level. If the track layout shown in '''Figure 4''' above, with the priority markers as used in that figure, was shown in '''Map View''' then this would be the result. | ||
| + | |||
| + | [[image:PriorityMiniMap.png|link=|alt=MiniMap]]<br> | ||
| + | |||
| + | Tracks that have not been given a priority marker will be shown as dark blue indicating that they have the '''default priority level 2'''. | ||
| + | <br> | ||
='''Related Links'''= | ='''Related Links'''= | ||
<table cellpadding=4 bgcolor=#ffffff> | <table cellpadding=4 bgcolor=#ffffff> | ||
<tr valign="top"> | <tr valign="top"> | ||
| − | <td>[[ | + | <td>[[image:LinkWiki.PNG|link=]]</td> |
<td> | <td> | ||
* '''[[How to Use Track Direction Markers]]''' | * '''[[How to Use Track Direction Markers]]''' | ||
| − | * '''[[How to Use Track | + | * '''[[How to Use Track Markers]]''' |
* '''[[How to Use Track Triggers]]''' | * '''[[How to Use Track Triggers]]''' | ||
</td> | </td> | ||
| Line 780: | Line 921: | ||
<tr valign="top"> | <tr valign="top"> | ||
<td width=729><span id="bottom"></span> </td> | <td width=729><span id="bottom"></span> </td> | ||
| − | <td width=46>[[ | + | <td width=46>[[image:BackToTop.png|link=#top|alt=Top|Top]]</td> |
| − | <td width=75>[[ | + | <td width=75>[[image:NextUp.png|link=#stepMap|alt=Next Up|Top]]</td> |
<td width=75> </td> | <td width=75> </td> | ||
<td width=75> </td> | <td width=75> </td> | ||
| Line 792: | Line 933: | ||
<table cellpadding=4 bgcolor=#ffffff> | <table cellpadding=4 bgcolor=#ffffff> | ||
<tr valign="top"> | <tr valign="top"> | ||
| − | <td>[[ | + | <td>[[image:TrainzWiki.png|link=]]</td> |
<td> | <td> | ||
<span style="font-size: 17px;">'''More Tutorials and Guides to Using Trainz'''</span><br> | <span style="font-size: 17px;">'''More Tutorials and Guides to Using Trainz'''</span><br> | ||
| Line 805: | Line 946: | ||
This page was created by Trainz user '''<span class="plainlinks">[http://online.ts2009.com/mediaWiki/index.php/User:Pware pware]</span>''' in September 2019 and was last updated as shown below. | This page was created by Trainz user '''<span class="plainlinks">[http://online.ts2009.com/mediaWiki/index.php/User:Pware pware]</span>''' in September 2019 and was last updated as shown below. | ||
---- | ---- | ||
| + | |||
[[Category:How-to guides]] | [[Category:How-to guides]] | ||
Revision as of 08:01, 24 April 2023
The information in this Wiki Page applies to TANE, TRS19, Trainz Plus and TRS22.
|
|
|||||||||||
What are Track Priority Markers?
| Priority levels have no set meanings but can be assigned to specific AI trains to force them through selected sections of track (the track sections are defined as between consecutive junction sets) |
Priority Markers are used to assign different levels of Priority to track sections. Trains under AI control that have the same Priority Level as the track will, usually, be directed along that track.
|
Route or Session?
| Priority Markers can be placed in a Route layer or in a Session layer |
|
 |
Information on Route and Session layers can be found at:- |
Adding a Track Priority Marker
|
In Surveyor Classic (S10)
 |
You can also assign the Priority Marker:-
|
||||||
In Surveyor 2.0 (S20)
Surveyor 2.0 is currently only available for Trainz Plus Standard and Trainz Plus Gold subscription members.
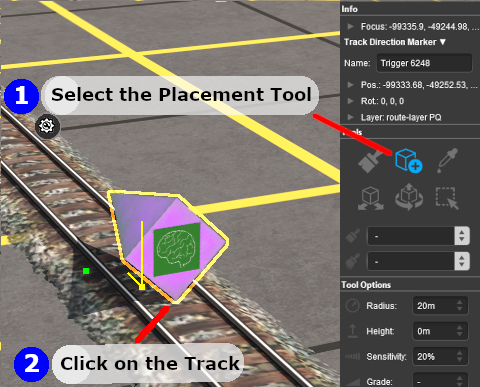
Adding a Priority Marker
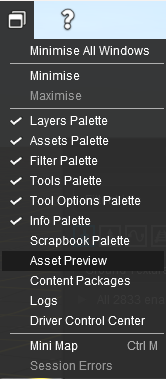
![]() In the Asset Palette either:-
In the Asset Palette either:-
|
OR |
|
|
|||||||||||||||
|
||||||||
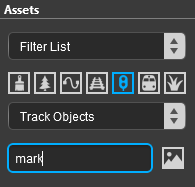
![]() To narrow down the filter list, type "mark" (UPPER/lower case does not matter) in the Search Text Box
To narrow down the filter list, type "mark" (UPPER/lower case does not matter) in the Search Text Box
 |
|
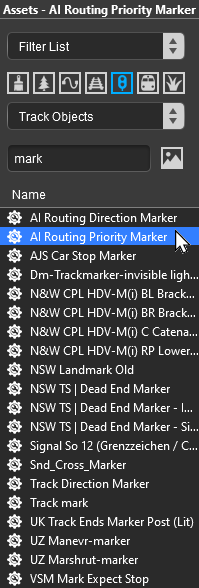
![]() Place the Priority Marker on the track.
Place the Priority Marker on the track.
|
|
|||||||||||||
|
|||
Set the Priority Marker Properties
 |
This is its only important property.
|
||||||||||||
![]() Set its Trigger Radius
Set its Trigger Radius
The trigger radius can be adjusted so that the marker can fit between two close junctions without overlapping them.
|
|
|
 |
Steps:
|
|
|
|
Move the Priority Marker
![]() Move it Along the Track
Move it Along the Track
|
|
|
|
Steps:
|
|
|
|
 |
This feature allows a Priority Marker to be physically placed above the track so that it will not be hidden if a consist is parked on the Priority Marker.
|
|||||||||
![]() Reposition the it Left/Right
Reposition the it Left/Right
This feature allows a Priority Marker to be physically placed left or right alongside the track so that it will not be hidden if a consist is parked on the Priority Marker.
|
|
||||
|
Steps:
|
|||
|
||||
|
|
||||
|
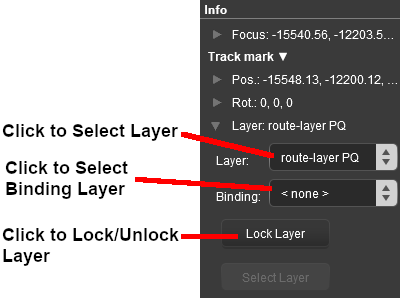
Assign a Priority Marker to a New Layer
| The Info Palette will show the layer assigned to the currently selected object. To the left of the layer name is a small arrow object. | ||||||||||||
|
|
|
|||||||||||

Assigning Priority Levels to Trains
| A higher priority level does not mean that one consist is more important than another. A priority 1 consist will not be given first access to a junction, for example, or be the first one to depart. The priority levels have no set meaning beyond what you decide they will mean. |
|
For example you could assign priority 1 to express trains and 3 to slow general "all stops" freight trains, or you could assign priority 3 to express trains and 1 to slow general "all stops" freight trains, it is up to you. These values will not alter the speed or importance of these trains but will only decide which paths they should take.
In Surveyor Classic (S10)
To assign a priority level to a locomotive.
|
|
|
|
Steps:
|
|
|
|
In Surveyor 2.0 (S20)
Surveyor 2.0 is currently only available for Trainz Plus Standard and Trainz Plus Gold subscription members.
To assign a priority level to a locomotive.
 |
|
||||||
Priority Marker Operation
| Main Points: | |
| Track Priority Markers only work on AI controlled trains. They have no effect on manually controlled trains | |
| Track Priority Markers fool an AI train that has the same priority level into thinking that the path containing the marker is the shortest possible path, even when it is not | |
| AI trains will avoid, where possible, a path containing a Track Priority Marker that does not match its own priority level | |
| If the specified path is blocked, then the AI will ignore the Track Priority Marker and find another path | |
| The direction that the Track Priority Marker is pointing has NO effect on its operation | |
Consider the situation represented in the diagrams below. Three trains - Red, Green, Yellow - have been given priority levels of 1, 2 and 3 as shown. Each is given the driver command Drive to Trackmark or Navigate to Trackmark. The destination trackmark is shown on the right.
In Figure 1 below, no Track Priority Markers have been set. All three trains will take the shortest path, assuming there are no blockages.

Figure 1
In Figure 2 below, a Track Priority Marker has been placed on the top loop line and has been given a priority level of 1. The red train (priority level 1) will now take the priority 1 path because it will "see" that as being the shortest of the three possible paths. The green and yellow trains (priority levels 2 and 3) will still "see" the middle path as the shortest.

Figure 2
In Figure 3 below, a Track Priority Marker has been placed on the lower loop line and has been given a priority level of 3. For the same reasons as explained above, the yellow train (priority level 3) will now take the priority 3 path because it now sees that as the shortest.

Figure 3
In Figure 4 below, Track Priority Markers have been placed on the upper and lower loop lines and set as shown. The red and yellow trains will take their respective loop paths while the green train is unaffected.

Figure 4
An exception, shown in Figure 5 below, will occur when a Track Priority Marker path has been blocked, for example by another train under AI or manual control. In the figure the lower loop path has been blocked. The red train will take its assigned path, the green train takes its shortest path and yellow train will be forced to take what it "sees" as the next shortest path.

Figure 5
|
Another exception, shown in Figure 6 below, will occur when a driver command overrides a Track Priority Marker. In the figure the yellow train (priority level 3) has been given the driver command Drive To Station followed by Drive to Trackmark. As the station is not on the priority 3 path, that path will be ignored to reach the station and then the trackmark. After stopping at the station the train will not reverse back onto the main line to then use the priority 3 track.

Figure 6
The Special Case of Priority 2
Figure 7 below shows a situation that does not fit the points made above. A Track Priority Marker has been set to priority level 2 and placed on the lower loop. The green train has been given the command to drive to the trackmark but ignores its assigned priority 2 path and proceeds via the shortest actual path. Track that has not been assigned a Track Priority Marker will have a default priority level of 2. In this situation, the green train "sees" two paths that match its priority level so it takes the shorter of the two.

Figure 7
Track Priority Markers can also be used to direct trains away from specific paths. Figure 8 below shows how this can be done. A Track Priority Marker set to priority level 1 has been positioned on the shortest physical path. This will block all trains of priority level 2 and 3 from using that path - they will see it as the longest available path. A second Track Priority Marker set to priority level 3 has been positioned on the 2nd shortest physical path. This will block all trains of priority level 1 and 2 from using that path. The end result is that the green train (priority level 2) has only one path available - the longest physical path.

Figure 8
The situation shown in Figure 8 above only works up to a point. Figure 9 below shows what will happen when ALL paths are set to a blocking priority level. The green train (priority level 2) will ignore all the priority markers and choose its own shortest path. Track Priority Markers will only make a path *look* longer or shorter. When all paths have conflicting priorities to an AI train, then the AI will go back to selecting the actual shortest physical path.

Figure 9
Modifying Train Priority Levels
| You can alter the Priority Level of a train in Driver mode |
![]() Manually in Driver Mode
Manually in Driver Mode
This can be done "on the fly" using the mouse.
|
|
|||||
|
Steps:
|
 |
|||
|
|
|||||
OR
![]() Using a Driver Command
Using a Driver Command
This can be done in Surveyor in the session ![]() Driver Setup Rule or by adding a driver command to the command bar in Driver.
Driver Setup Rule or by adding a driver command to the command bar in Driver.
- Insert the driver command
 Priorityz into the driver command bar and set it to the new level
|
Information on adding driver commands can be found on the Trainz Wiki Page at:- |
Track Priority in Map View
In Surveyor when using Map View or zooming the camera right out, the tracks will be shown colour coded according to their assigned track priority level. If the track layout shown in Figure 4 above, with the priority markers as used in that figure, was shown in Map View then this would be the result.
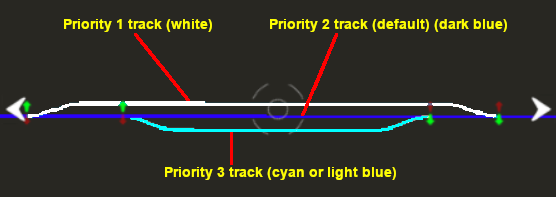
Tracks that have not been given a priority marker will be shown as dark blue indicating that they have the default priority level 2.
Related Links
|
|
Trainz Wiki
 |
More Tutorials and Guides to Using Trainz |
This page was created by Trainz user pware in September 2019 and was last updated as shown below.