The information in this Wiki Page applies to TANE, TRS19, Trainz Plus and TRS22.
 |
Driver Characters are avatars that can be assigned to locomotives in sessions. They play the role of train drivers and can be moved between locomotives |
|
|
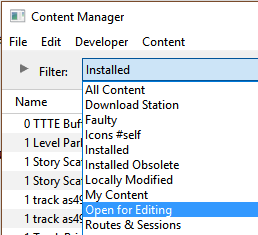
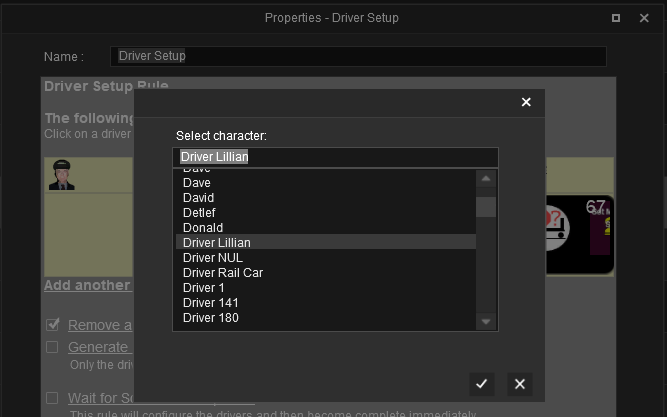
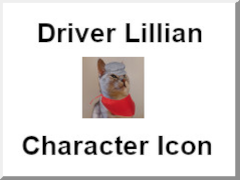
Driver Character Icons are small graphic icons or images that can be selected to represent locomotive drivers in the  Driver Setup Rule Driver Setup Rule |
|
|
|
Workflow Diagram
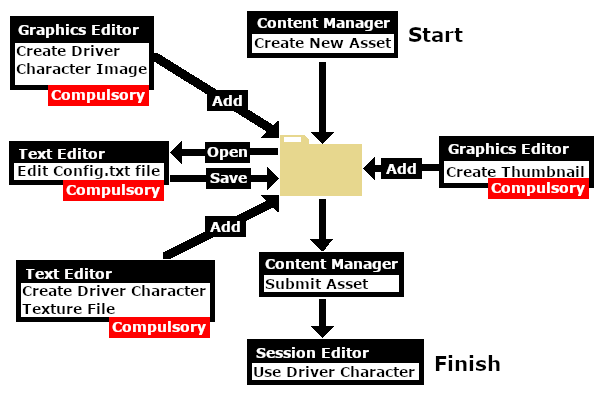 |
Create the Driver Image
|
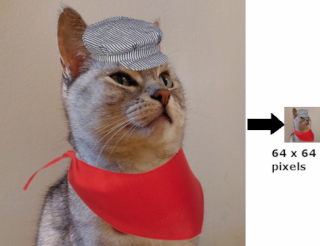
The final image must be reduced to 64 pixels by 64 pixels in size |
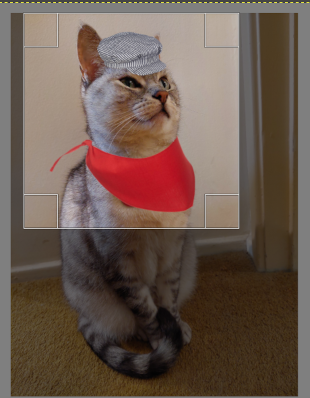
The image can be easily created and resized using your favourite image editor. It can start with a photograph, as shown in the example below, a piece of clip art or a drawing. Make sure that there will be no copyright issues so something of your own creation, such as a photograph, would be ideal.
 |
If possible use a photograph with a simple background behind the subject, as shown in the image on the left. This keeps the icon simple and can avoid unnecessary "clutter". Most image editors will have tools for removing unwanted backgrounds but this can be time consuming.
You may choose to add some clipart - in this case a train drivers cap and a "traditional" red scarf. Copyright free clipart is strongly recommended.
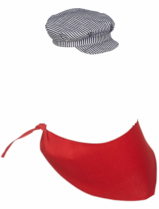
The clip art can be added as layers to the image which makes them easier to manipulate (resize and move). |
Crop the image to a square with the same number of pixels on each side with the minimum size being 64 pixels. Multiples of 64 (such as 128, 256, 512) would be ideal but not absolutely necessary as long as both the height and the width are the same size.
After cropping, reduce the image size to 64 pixels wide (and therefore 64 pixels high).
 |
Save the final resized image with a suitable name and in a suitable file format:-
- .png (best choice)
- .tga (2nd best choice but do not use compression)
- .jpg (3rd best choice)
|
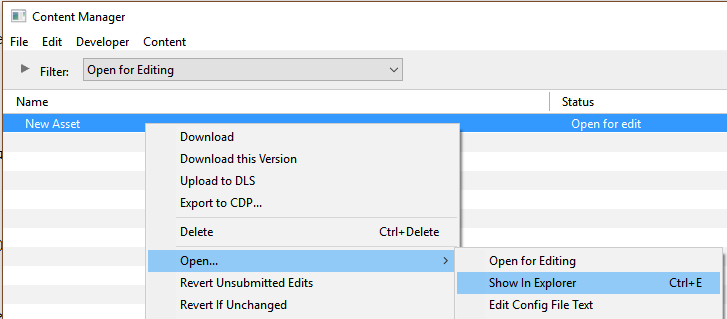
Create Driver Character Asset
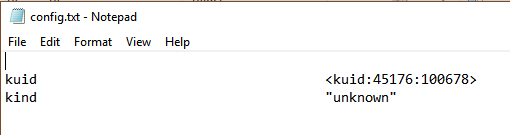
The Config.txt File
This file should follow the same (or a similar) format as the example below.
- entries in red must not be changed
- the indenting of the lines and the spacing ("tabbing") between the "tags" on the left and their contents on the right are purely to make it easier for humans to read
- the use of the {} braces is to group tags into common "containers". These containers must not be broken up and the number of { characters must match the number of } characters
- the order of the "tags" is not important
kuid                                    <kuid: this is an auto-generated number >
kind                                    "drivercharacter"
face-texture                            "DriverLillian.texture"
username                                "Driver Lillian"
category-class                          "OHD"
trainz-build                            4.3

thumbnails
{
  Default
  {
    width                               240
    height                              180
    image                               "thumbnail.jpg"
  }
  01
  {
    width                               64
    height                              64
    image                               "driverlillian.texture"
  }
}
description             "Icon for train driver Lillian"
 |
Language Options:
|
|
All Trainz assets have a language facility built into their config.txt files that allows other language translations to be added for certain tags, such as the username and description tags. A full description of the process can be found on the Trainz Wiki at Localize an Asset and a list of all the supported languages with their two character codes at Localization (country) Codes.
At the very basic level any creator can easily provide other language translations for the username and description tags in the assets they create. Examples are shown below for this sample asset. |
username                    "Driver Lillian"
username-c2                 "司机莉莲"
username-es                 "Conductor Liliana"
username-de                 "Fahrer Lilian"
username-fr                 "Chauffeur Lilianen"
username-nl                 "Chauffeur Lillian"
username-ru                 "Драйвер Лилиан"
|
|
Translations to Chinese (simplified), Spanish, French, German, Dutch and Russian, perfect or not, were provided by Google Translate.
|
The Thumbnail Image
|
A thumbnail image MUST be present in the asset |
 |
Notes:
The thumbnail image:-
- must be in JPG format.
- must be 240 pixels wide by 180 pixels tall.
- does not have to be named thumbnail.jpg as long as the name used is in the Thumbnails container in the config.txt file.
|
|
|
 |
The Icon Image
|
You will need image editing software to create the icon image or to change an existing image to the required dimensions and format |
|
See the  Create the Driver Image section at the top of this page for an example Create the Driver Image section at the top of this page for an example |
(not to scale) |
|
 |
Settings:
The image must meet the following specifications:-
- 64 pixels wide and 64 pixels tall
- bit depth should be 24 (no alpha channel or transparency) or 32 (if an alpha channel is used)
- image file format can be any of:-
- bmp
- jpg (jpg does not support transparency)
- png
- tga (tga compression should not be used)
|
|
|
|
If your image will have a transparency, such as a transparent background, it is usually a lot easier to save the image in a format that supports an alpha channel (bmp, png or tga) and either
- convert the background to a transparency or
- remove the background and add a transparent layer to the image as its background
than it is to use a format that does not support an alpha channel and have to create a second image for the alpha channel. See The Texture File below.
|
|
The Texture File
|
The .texture.txt file controls how an image icon is displayed, particularly its Alpha Channel (or transparency) data. The file must be present even if no transparency is used in the icon. |
|
|
Settings:
- the Texture File is a standard text file
- the filename is composed of:-
- a user selected asset_name followed by a period (.)
- the word texture followed by a period (.)
- the letters txt
|
|
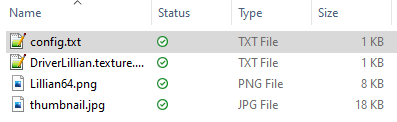
A sample Texture File, "driverlillian.texture.txt", is shown below:-
primary=Lillian64.png
alpha=Lillian64.png
tile=st
|
|
|
Settings:
- primary - this is the name of the icon image file that contains the RGB colour image. Any alpha channel in this file will be ignored
- alpha - this is the name of the icon image file that contains the Alpha Channel (transparency) image (see Notes: below)
- tile=st - instructs Trainz to tile the image both horizontally and vertically. This has no effect on the Driver Character icon but must be included for validation purposes
No "white spaces" between the text characters is allowed. |
|
|
|
Notes:
There are 3 general "scenarios" for the structure of the Texture File in a Driver Character asset.
 |
If the icon has a transparency (an alpha channel) and is saved in a format that supports the alpha channel |
Then:-
primary=Lillian64.png
alpha=Lillian64.png
tile=st
|
- the primary and alpha images are the same file, as in the example shown left
- the image must contain both the RGB colour data and the Alpha Channel (transparency) data (it must have a depth of 32 bits)
|
 |
If the icon needs to have transparency (an alpha channel) but an alpha channel is not available (e.g. it is saved in the jpg file format) or is not suitable |
Then:-
primary=Lillian64.jpg
alpha=Lillian64_alpha.jpg
tile=st
|
- two different files (different file names or different image file formats) must be used as in the example shown left
- both images must be the same size (64 pixels x 64 pixels)
- both images must have a depth of 24 bits - so no alpha channel must be present in either image
- the alpha image file should be a greyscale image or even just black and white
|
 |
If the icon image does not have a transparency and no alpha channel is needed |
Then:-
primary=Lillian64.jpg
tile=st
|
- the alpha= line in the .texture.txt file is not needed, as in the example shown left
- the primary file contains the RGB colour data and can be in any supported image format. If it also has alpha channel data then the alpha channel data will be ignored so the icon will be shown without any transparency
|
Image file formats supported by Trainz that have an alpha channel are:-
Image file formats supported by Trainz that DO NOT have an alpha channel are:-
|
 |
A detailed description of the .texture file format can be found on the Trainz Wiki Page at:-
|
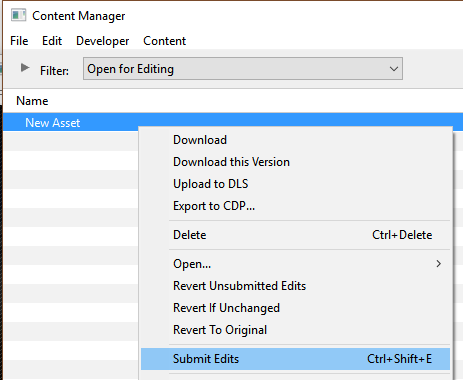
Using the Asset
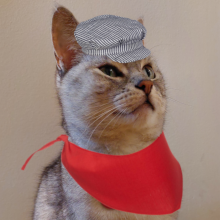
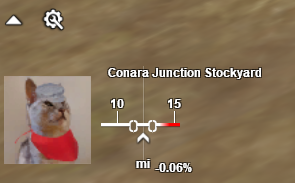
Once the new asset has been committed it will be available for use in a Driver Setup Rule.
The finished product as a Driver.
Trainz Wiki
 |
More Tutorials and Guides to Using Trainz
|
This page was created by Trainz user pware in November 2022 and was last updated as shown below.