HowTo/Use the Skin Modifier in GMax
(Links added) |
|||
| Line 129: | Line 129: | ||
| − | So looking at the jib mechanism in GMax I have the following in the | + | So looking at the jib mechanism in GMax I have the following in the "jib down" position. |
| + | |||
| + | |||
| + | '''Fig. 10.''' | ||
| + | |||
| + | [[Image:GMax_Skin_Modifier_Jib1.jpg]] | ||
| + | |||
| − | |||
When the jib is raised it looks as follows. | When the jib is raised it looks as follows. | ||
| − | + | '''Fig. 11.''' | |
| + | |||
| + | [[Image:GMax_Skin_Modifier_Jib2.jpg]] | ||
| + | |||
| + | |||
You can see here that the two meshes for the ropes have not moved. They must be linked to something. Otherwise the export will not work. In this case they are linked to b.r.main which at the origin of the drawing space. (not visible on the two diagrams above) | You can see here that the two meshes for the ropes have not moved. They must be linked to something. Otherwise the export will not work. In this case they are linked to b.r.main which at the origin of the drawing space. (not visible on the two diagrams above) | ||
| + | |||
The attachment point you can see is the one that the hoist rope for the hook is hung on. This way each major moving part is a separate mesh with its own animation that can be controlled by the script. | The attachment point you can see is the one that the hoist rope for the hook is hung on. This way each major moving part is a separate mesh with its own animation that can be controlled by the script. | ||
| + | |||
The animation is again 180 frames to get high movement resolution. The jib is linked to b.r.jib which is at the jib pivot point. | The animation is again 180 frames to get high movement resolution. The jib is linked to b.r.jib which is at the jib pivot point. | ||
| + | |||
The x-axis rotation of the jib is simply done by moving the animation to the last frame and rotating the jib to where you want it. GMax fills in the rest. Each of the two red pulley brackets is then rotated with their dummies to point at one another as the jib rises. | The x-axis rotation of the jib is simply done by moving the animation to the last frame and rotating the jib to where you want it. GMax fills in the rest. Each of the two red pulley brackets is then rotated with their dummies to point at one another as the jib rises. | ||
| + | |||
Now to connect the ropes. | Now to connect the ropes. | ||
| − | |||
| − | |||
| − | Add the Skin Animation Modifier as previously shown for the hook rope. This time we add two bones to the modifier. | + | Move the animation back to frame zero. It must look as in the first diagram above, with all of the ropes in their correct rest position. |
| + | |||
| + | |||
| + | Select the multi rope that runs between the two pulley blocks. The yellow one in this case. | ||
| + | |||
| + | |||
| + | Add the Skin Animation Modifier as previously shown for the hook rope. This time we add two bones to the modifier. | ||
| + | |||
| + | |||
| + | Firstly we add the bone (dummy) at the outer pulley bock pivot which is called "b.r.stay" in this case. Select it from the list presented when you press the "Add Bone" button. | ||
| − | |||
Now press the "Edit Envelopes" button. You should get the envelopes around the dummy as shown in the following scrap, Fig. 12, from the top view. | Now press the "Edit Envelopes" button. You should get the envelopes around the dummy as shown in the following scrap, Fig. 12, from the top view. | ||
| − | |||
| − | In the top view click on the envelope selection box shown so we can adjust the outer envelope radii. This time I chose to adjust the radius with the up-down buttons next to the radius box in the parameters | + | '''Fig. 12.''' |
| + | |||
| + | [[Image:GMax_Skin_Modifier_Skin_rollout3.jpg]] | ||
| + | |||
| + | In the top view click on the envelope selection box shown so we can adjust the outer envelope radii. This time I chose to adjust the radius with the up-down buttons next to the radius box in the parameters "Envelope Properties" rollout. | ||
Note that the selected outer envelope is a mauve (pink-purple) colour. | Note that the selected outer envelope is a mauve (pink-purple) colour. | ||
| Line 167: | Line 189: | ||
| − | + | '''Fig. 13.''' | |
| + | |||
| + | [[Image:GMax_Skin_Modifier_Skin_rollout4.jpg]] | ||
| + | |||
| + | |||
Note that the end vertices of the multi-rope are red dots indicating that they have been shown to be within the outer envelope. Now if you run the animation, the ends of the ropes should carry with the pulley. | Note that the end vertices of the multi-rope are red dots indicating that they have been shown to be within the outer envelope. Now if you run the animation, the ends of the ropes should carry with the pulley. | ||
| Line 175: | Line 201: | ||
We now add the bone for the other end of the multi-rope. In this case I selected the bone at the pivot of the second pulley block mechanism. See Fig. 14. Adjustments of outer envelope radii are the same as before. Just ensure that the outer envelope (the brown one) encloses the vertices that you want to move. | We now add the bone for the other end of the multi-rope. In this case I selected the bone at the pivot of the second pulley block mechanism. See Fig. 14. Adjustments of outer envelope radii are the same as before. Just ensure that the outer envelope (the brown one) encloses the vertices that you want to move. | ||
| − | + | ||
| + | '''Fig. 14.''' | ||
| + | |||
| + | [[Image:GMax_Skin_Modifier_Skin_rollout5.jpg]] | ||
| + | |||
| + | |||
You have now taken care of both ends of the ropes so you can de-select the multi-rope object and check run the animation. The ropes should stick to their appropriate pulleys and change length as the jib rises. | You have now taken care of both ends of the ropes so you can de-select the multi-rope object and check run the animation. The ropes should stick to their appropriate pulleys and change length as the jib rises. | ||
| Line 190: | Line 221: | ||
The winding drum end of the rope mesh terminates in the centre of b.r.tangent. So just add b.r.tangent as the second bone for this modifier. No adjustments are needed for the envelope radii. (provided your dummy box is a reasonable size.) In my case I had to adjust the animation rotation of the b.r.hoist to get the rope (the green object) tangential to the winding drum as in Fig. 15 below: | The winding drum end of the rope mesh terminates in the centre of b.r.tangent. So just add b.r.tangent as the second bone for this modifier. No adjustments are needed for the envelope radii. (provided your dummy box is a reasonable size.) In my case I had to adjust the animation rotation of the b.r.hoist to get the rope (the green object) tangential to the winding drum as in Fig. 15 below: | ||
| − | + | ||
| + | '''Fig. 15.''' | ||
| + | |||
| + | [[Image:GMax_Skin_Modifier_Skin_rollout6.jpg]] | ||
| + | |||
| + | |||
Frame 179 of the animation shows the jib fully raised and the ropes appearing to run around the pulleys on to the winding drum. | Frame 179 of the animation shows the jib fully raised and the ropes appearing to run around the pulleys on to the winding drum. | ||
| + | |||
You can now export the results of this tutorial to Trainz using my GMax Listener Exporter package. If you have been able to follow my method your results should work in Trainz. | You can now export the results of this tutorial to Trainz using my GMax Listener Exporter package. If you have been able to follow my method your results should work in Trainz. | ||
| + | |||
The crane when run in the game looks fantastic (even without the completed textures). The animated ropes give the illusion that the hoists are working. | The crane when run in the game looks fantastic (even without the completed textures). The animated ropes give the illusion that the hoists are working. | ||
| + | |||
The scripting to make it all work is a bit complicated. I have already posted an early version of the script on the forum if you are interested in seeing what I am up to there. | The scripting to make it all work is a bit complicated. I have already posted an early version of the script on the forum if you are interested in seeing what I am up to there. | ||
| − | |||
| − | The skin animation modifier as supplied with GMax is implemented with a single script that has a number of irritating little weaknesses. It may work quite nicely until you make some seemingly unrelated change, and then it all turns to custard. If this happens the only recovery path that works for me, is to delete the entire object on to which the skin modifier is attached and start again. That said, when it works it looks great, so it's definitely worth having the feature. | + | |
| + | ;A word of warning here. | ||
| + | |||
| + | :The skin animation modifier as supplied with GMax 1.2 is implemented with a single script that has a number of irritating little weaknesses. It may work quite nicely until you make some seemingly unrelated change, and then it all turns to custard. If this happens the only recovery path that works for me, is to delete the entire object (dummy) on to which the skin modifier is attached and start again. That said, when it works it looks great, so it's definitely worth having the feature. | ||
| + | |||
| + | |||
| + | Back to [[HowToGuides]] | ||
| + | |||
| + | |||
| + | [[Category:How-to guides]] | ||
Revision as of 11:56, 21 August 2012
GMax is used by many Trainzers for their 3D modelling. Though a little out-dated, it still is able to make first class models. It has the advantages of being free and also being a sub-set of AutoDesk's 3DSMax. For those of us who use/used AutoCAD in our work, GMax is the obvious choice.
I wrote my GMax Listener Exporter package to ensure that the meshes exported supported the latest features in Trainz. In the process I implemented the skin modifier in the exporter to be able to build models with extensible and flexible components.
See Trainz Tools by PEV for download information to get the exporter.
At this point the skin modifier implementation works best for extensible objects. I have more work to do to get proportional blending of bone movement for flexing objects, though simple ones do work correctly.
So, as a starting point, here is a small tutorial on making extensible objects.
LNER Crane 16
I have been working on a model of a locomotive mounted crane, which I shall use as an example.. Please keep in mind that this a complex project with a scripted interface to control the four (or maybe more) animations that do the work.
The crane has animations that raise/lower the hook, raise/lower the jib, slew the crane left/right., and the vertical steam engine of the crane. I propose to add another to animate the extending jacking beams used in the real world to stabilise the crane when loaded.
A Simple Example
Lets look, for a start, at the hook and its raise/lower animation.
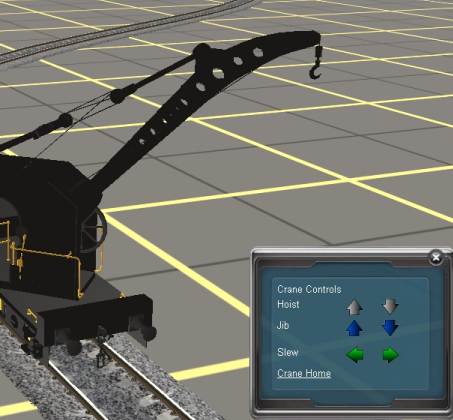
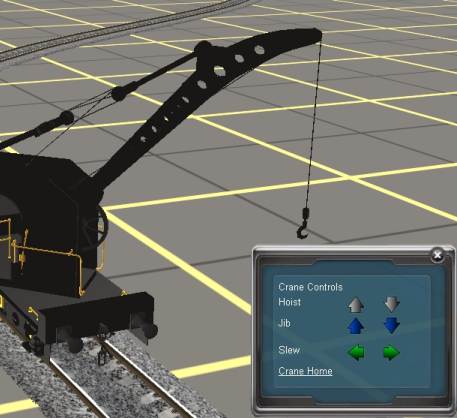
Here's how the finished animation looks:
Fig. 1. Hook in the up position. (animation frame 0)
Fig. 2. Hook lowered.(animation well away from frame 0)
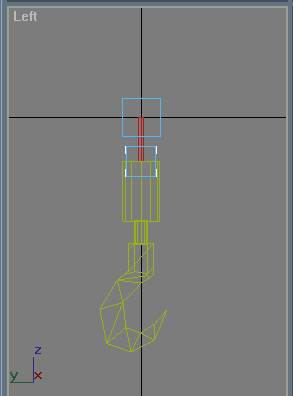
The hook and vertical rope are one Trainz mesh with the origin (0,0,0) at the top of the rope.
In GMax the rope is one editable mesh object (a 6 sided cylinder with the cap polygons deleted), and the Hook is
another editable mesh object.
There are two dummy helpers for the animation. b.r.main at the origin (0,0,0) and b.r.hook centred on the top of
the hook (at 0,0,-0.147 ), as shown in Fig. 3 below.
Fig. 3.
The rope mesh and b.r.hook are both linked to b.r.main and the hook mesh is linked to b.r.hook.
The animation is 180 frames. b.r.hook is animated for linear vertical movement. It is shown here at frame 0 whilst at frame 179 the dummy b.r.hook is lowered 14.5m (in -z direction) At this stage, when the animation is run the hook lowers but the rope remains as is.
Lets now look at making the rope mesh extend as the hook lowers, which gives the illusion of the rope being fed off the winding drum as the hook lowers.
This is done with the "skin" animation modifier.
|
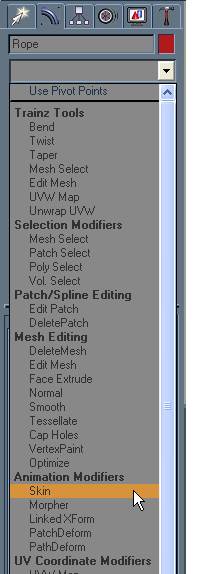
To enable the "skin" modifier, select the rope mesh and then open the modifier drop down and select "skin" from the Animation Modifiers, as in Fig. 4 below. Fig. 4. |
The skin modifier then presents its parameters rollout as shown below Fig. 5, centre: Fig. 5. |
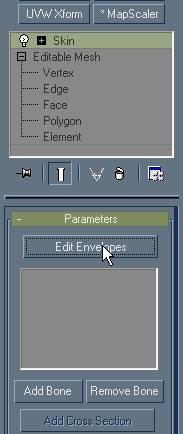
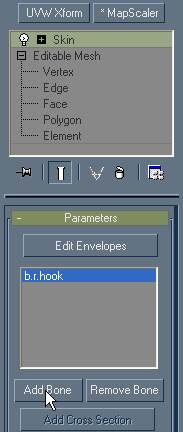
Press the "Add Bone" button and select b.r.hook from the list presented. The bone will appear in the parameters rollout as in Fig. 6 below. Fig. 6. |
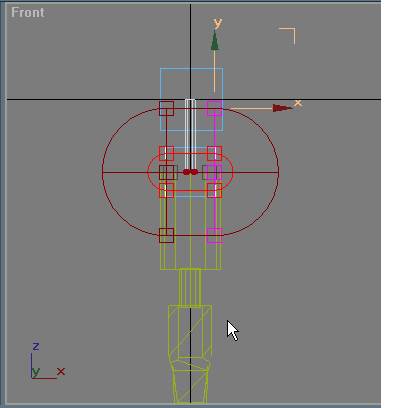
Press the "Edit Envelopes" button. In the drawing the b.r.hook dummy will be surrounded by oval shaped lines (the envelopes) as shown in Fig. 7 below.
Notice that there are two envelopes, a red one and a brown one. The red one is the "inner" envelope and the brown one is the "outer" envelope. My implementation of the skin modifier in the exporter only takes the "outer envelope" into account at this time.
Also notice that the vertices at the bottom of the selected rope mesh are shown as red dots. This means that those vertices are selected for inclusion in any movement made by b.r.hook.
If the outer envelope encloses the entire rope mesh the top vertices will also be selected, and will move with b.r.hook.
We don't want this to happen so we must ensure that the envelope is as shown here. To change envelope size (radius) you must click on selection boxes that form part of the envelope. One is selected in the image at the left and has the move gizmo attached to it ready for dragging to change size. Adjust by clicking on a gizmo arrow head and drag the arrow so the envelope moves to where you want it.
Fig. 7.
You can see from this view the envelopes have two semi-circular sides connected by a straight transition. In this case, you must adjust both sides, by selecting and dragging.
When you have adjusted the envelopes, de-select the rope mesh and run the animation. The rope should now extend with the hook and it descends.
As you can see, this is really simple, and with my GMax exporter it works correctly in Trainz.
A More Complex Example.
Now let us look at a more complex application of the skin modifier in which the jib hoisting ropes follow their pulleys and winding drum as the crane jib is raised.
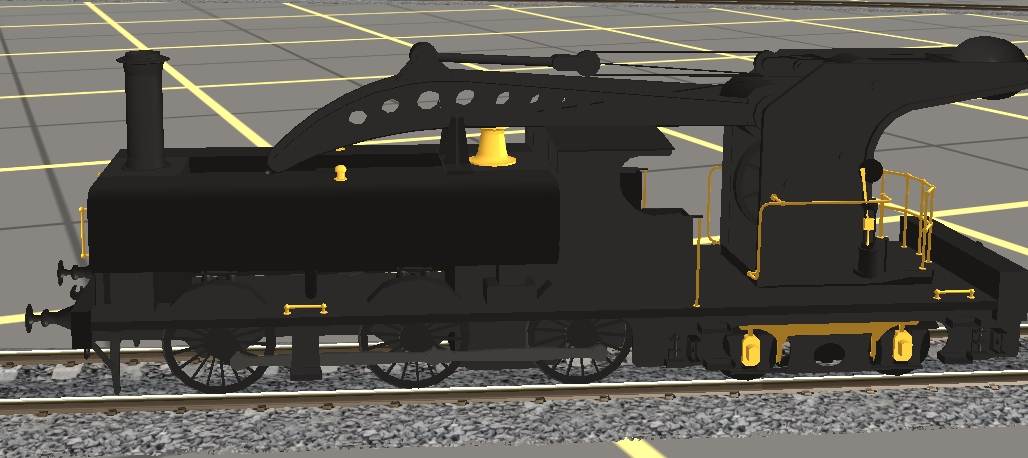
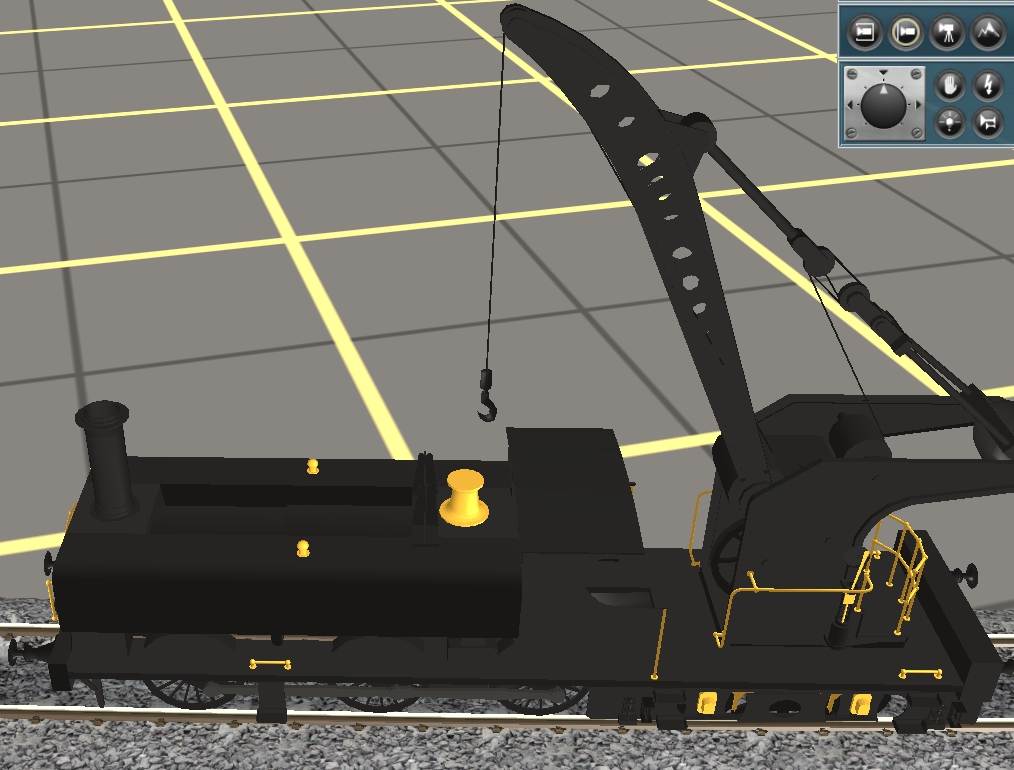
The two views below show the crane jib ropes in the jib lowered and raised positions. The model has no texture images as yet so the colours make things a little indistinct.
Fig. 8. Jib Lowered
Fig. 9. Jib Raised
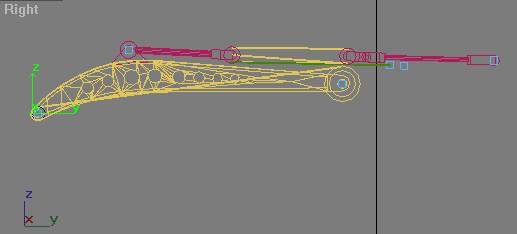
So looking at the jib mechanism in GMax I have the following in the "jib down" position.
Fig. 10.
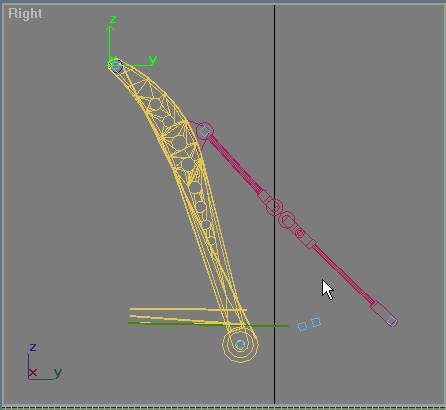
When the jib is raised it looks as follows.
Fig. 11.
You can see here that the two meshes for the ropes have not moved. They must be linked to something. Otherwise the export will not work. In this case they are linked to b.r.main which at the origin of the drawing space. (not visible on the two diagrams above)
The attachment point you can see is the one that the hoist rope for the hook is hung on. This way each major moving part is a separate mesh with its own animation that can be controlled by the script.
The animation is again 180 frames to get high movement resolution. The jib is linked to b.r.jib which is at the jib pivot point.
The x-axis rotation of the jib is simply done by moving the animation to the last frame and rotating the jib to where you want it. GMax fills in the rest. Each of the two red pulley brackets is then rotated with their dummies to point at one another as the jib rises.
Now to connect the ropes.
Move the animation back to frame zero. It must look as in the first diagram above, with all of the ropes in their correct rest position.
Select the multi rope that runs between the two pulley blocks. The yellow one in this case.
Add the Skin Animation Modifier as previously shown for the hook rope. This time we add two bones to the modifier.
Firstly we add the bone (dummy) at the outer pulley bock pivot which is called "b.r.stay" in this case. Select it from the list presented when you press the "Add Bone" button.
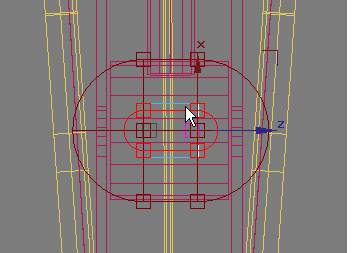
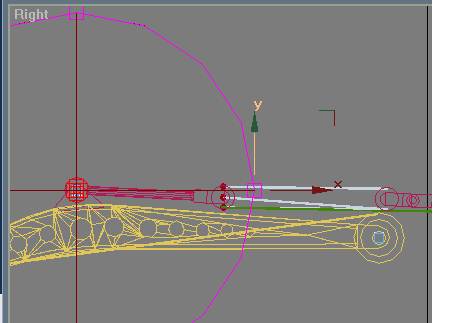
Now press the "Edit Envelopes" button. You should get the envelopes around the dummy as shown in the following scrap, Fig. 12, from the top view.
Fig. 12.
In the top view click on the envelope selection box shown so we can adjust the outer envelope radii. This time I chose to adjust the radius with the up-down buttons next to the radius box in the parameters "Envelope Properties" rollout.
Note that the selected outer envelope is a mauve (pink-purple) colour.
So we press the up button and watch the envelope in the side view. When it encloses the end of the ropes release the button.
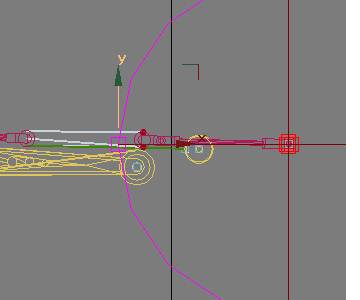
Repeat for the other side of the outer envelope. The side view should look as Fig. 13 on the left:
Fig. 13.
Note that the end vertices of the multi-rope are red dots indicating that they have been shown to be within the outer envelope. Now if you run the animation, the ends of the ropes should carry with the pulley.
Return the animation to frame 0.
We now add the bone for the other end of the multi-rope. In this case I selected the bone at the pivot of the second pulley block mechanism. See Fig. 14. Adjustments of outer envelope radii are the same as before. Just ensure that the outer envelope (the brown one) encloses the vertices that you want to move.
Fig. 14.
You have now taken care of both ends of the ropes so you can de-select the multi-rope object and check run the animation. The ropes should stick to their appropriate pulleys and change length as the jib rises.
Now we have to connect the single jib hoisting rope (the green rope) to the outer pulley block and the winding drum.
The winding drum has two dummies. One on the centre line if the drum, and is named b.r.hoist_jib in my case. This dummy is linked to b.r.main. The second dummy named b.r.tangent is, as the name implies ,on the circumference of the winding drum (made visible in the diagram). It is linked to b.r.hoist_jib.
So select the hoisting rope and add the skin modifier to the stack.
The outer end of the rope runs around the outer pulley block so use the same bone as for the multi rope. (b.r.stay in my case). The procedure for adding and adjusting the b.r.stay bone is exactly the same as above. The same outer envelope radius can be used.
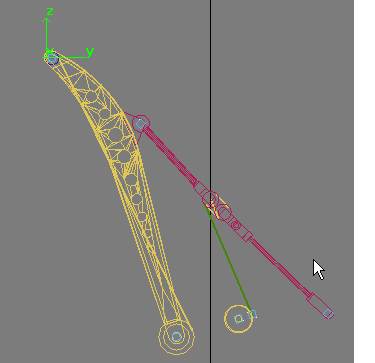
The winding drum end of the rope mesh terminates in the centre of b.r.tangent. So just add b.r.tangent as the second bone for this modifier. No adjustments are needed for the envelope radii. (provided your dummy box is a reasonable size.) In my case I had to adjust the animation rotation of the b.r.hoist to get the rope (the green object) tangential to the winding drum as in Fig. 15 below:
Fig. 15.
Frame 179 of the animation shows the jib fully raised and the ropes appearing to run around the pulleys on to the winding drum.
You can now export the results of this tutorial to Trainz using my GMax Listener Exporter package. If you have been able to follow my method your results should work in Trainz.
The crane when run in the game looks fantastic (even without the completed textures). The animated ropes give the illusion that the hoists are working.
The scripting to make it all work is a bit complicated. I have already posted an early version of the script on the forum if you are interested in seeing what I am up to there.
- A word of warning here.
- The skin animation modifier as supplied with GMax 1.2 is implemented with a single script that has a number of irritating little weaknesses. It may work quite nicely until you make some seemingly unrelated change, and then it all turns to custard. If this happens the only recovery path that works for me, is to delete the entire object (dummy) on to which the skin modifier is attached and start again. That said, when it works it looks great, so it's definitely worth having the feature.
Back to HowToGuides
