CCG/Getting Started
Contents |
CHAPTER 3: Understanding and using Content Creator Plus
The purpose of this chapter is to introduce users to Content Creator Plus, a powerful program used to generate and validate config.txt files. Content Creator Plus is intended for in-experienced content creators, however a degree of understanding regarding kinds and containers is assumed. Please refer to other Chapters in this document for assistance in familiarising yourself with the requirements and structures of containers and tags.
Getting Started
Main Screen
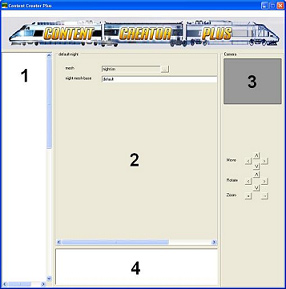
The main screen is divided into a number of areas:
- 1. Tree View
- 2. Tag space
- 3. 3D Viewport (only visible when a mesh is selected)
- 4. Error Message Box.
1. Tree View
When an existing config.txt file is loaded, the program will “parse” the text file and gather 2 different sorts of information: the tags and the containers. The tags are values being assigned to a property, and a container is a section of the config.txt that groups a number of tags or other containers.
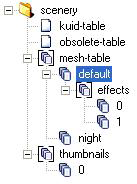
With many possible tags and containers, the best way to manage the containers is to display them in a tree view hierarchy (like the tree view of Explorer for example). The diagram below is a section of the tree view for a Kind traincar model:
The top “node” or Kind may be called traincar for example, and is the main container for the complete config.txt file. Traincar is the name of the Kind that we are currently creating (for example, if we were making a bogey, it would be listed as “bogey”). Under this main container are other sub containers in the config.txt file.
The tree may be freely expanded or collapsed (by clicking with the Left mouse button on the plus or minus symbols). When you click on one of the nodes, it will load the tags that are included for that container in the tag space, so you can add new entries or edit existing values. Left clicking on the node icon will select that node, whilst Left clicking the node name will select the node for renaming, if allowed (some names are reserved).
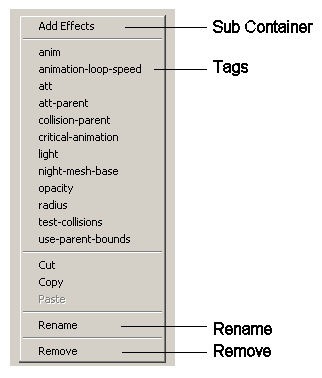
When you click with the Right mouse button on one of the nodes, a contextual menu will pop up with four different sections:
Sub-Containers: The first section is the available sub-container section. This section shows which sub-containers you may add to the opened container. Select a sub-container by clicking on it with the Left mouse button. Depending on the type of container added, when you click with the Left mouse button on the new container name, a number of compulsory entry dialog boxes may appear. The diagram above shows the containers and tags available under a mesh container.
Tags: The second section is the tag section. This shows you the list of non-compulsory tags (a non-compulsory tag is an optional tag for additional functionality). When you click on one of the choices with the Left mouse button, it will be added to the tag space that represents the container. You may also delete any non-compulsory tags.
Rename: The rename option allows you to change the name of a container, unless it is a reserved name.
Remove: The remove option allows you to delete an unwanted container from the config.txt file. This is particularly useful if you are editing a config.txt from an existing asset to create a new asset. Click on a container name with the Right mouse button to open the options for the container, and select an item using the Left mouse button.
2. Tag Space
This section of the program displays the content of a container. It dynamically changes as you either select different containers or add\delete tags.
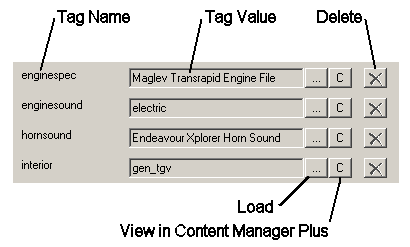
Selected tags may have a variety of buttons placed adjacently:
Tag Name: The name of every mandatory and\or user selected tag will be displayed on the left hand side of the space.
Tag Value: The value stored in the selected tag - initially shows blank for a new asset.
Load: This button will let you select a file or asset (depending on the tag type) which will be loaded into the Tag Value display.
View in Content Manager Plus: This button will open Content Manager and allow you to find and select an asset, or for an already selected asset, will show you that asset. Because the assets are loaded using their username, it allows you to verify that the selection is the one intended.
Delete: Removes the selected tag from the working config.txt.
3. 3D Viewport
When a mesh is referenced for the model, you need to specify a mesh file. Clicking on the “...” button will allow you to browse for the filename. The program will load the referenced mesh file, and display it in the 3D viewport. This viewport only appears in Content Creator Plus when a valid mesh is loaded.
Buttons below the viewport allow the camera to be moved, rotated or zoomed. Alternatively, you can control the model with your mouse by interacting directly with the 3D Viewport.
- Use the Mousewheel to zoom in and out
- Hold the Left mouse button down and drag to move the display
- Hold the Right mouse button down to drag to rotate the display
4. Error Message Box
When you load or save a config.txt file, the program will validate your data input to make sure that everything is correct. The error box is used to output error\warning messages to the user to assist error checking if the model is not working in Trainz.
Clicking on an error message within CCP with the Left mouse button will jump to the relevant tag in the config.txt file (in CCP) that is causing the error.
You can also Right click on the message, which will bring up a contextual menu that will let you copy the error message to the clipboard.
Note: Trainz offers many options (containers and tags) for an asset, and a user may select those that are considered appropriate for a particular Kind. CCP may not prompt you for a container or tag that is required to make the asset fully functional in Trainz.
For example, normally a traincar requires a reference to a bogey; if you neglect to select the appropriate bogey container for the asset, no error message will be displayed, but the asset may not show or operate correctly in Trainz. Using mandatory tags only may not be sufficient for an asset to operate correctly (or to your expectation) in Trainz.
Please refer to the chapters on Kinds, Containers, Tags and asset examples for guidance on the containers and tags required for a particular Kind.
