HowTo/Export from Blender using FBX
(Work in progress)
This is very much a work in progress as:
(1) the author learns more about the process, and
(2) N3V are exploring the FBX format.  Please contact the author if you have something to contribute.
Contents |
Introduction
This guide provides information for the export of FilmBoX (FBX) files from Blender.
Versions
| TANE: | 4.5 or later. |
| Blender: | Not sure about this but it does work for Blender 2.77a or later. The FBX exporter is a standard addon for Blender. |
| FBX format: | Binary format only (see discussion below). FBX 2011, FBX2012, FBX2013. |
| Special requirements: | None. Creators will need their preferred image editors and text editors but there are no special requirements for FBX. |
| Other software: | There are free FBX viewers available on the web including the FBX Review program by Autodesk. |
The FBX format
A brief discussion on the FBX format history can be found here . FBX can be exported either as an ASCII (i.e. human readable) file or in binary format. TANE will only recognise the binary format.
Blender and FBX
Blender is capable of both importing and exporting FBX. The Blender exporter does not export all possible object attributes and it is likely that TANE will not recognise all those attributes that are exported. The Blender documention contains a list of attributes that are exported.
Included in this guide is a list of attributes that have been observed as exported and treatment/acceptance by TANE. The list is incomplete and so is a work in progress.
Skills Required
For this version of the guide, it is assumed the user has some knowledge of the use of Blender and an understanding of the Trainz asset creation process.
Exporting a mesh object from Blender in FBX format
The FBX exporter addon must be enabled in User Preferences.
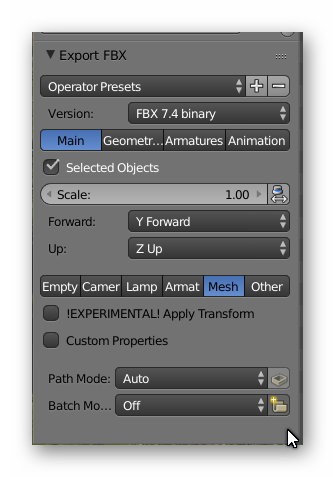
Select File->Export->Export FBX and the FBX export panel will show in the bottom left hand corner and should look like the following picture. The panel contents vary significantly between the Binary export version and the ASCII export version so make sure you have Binary selected.
The Main Menu
- Ignore the Operator Presets for now.
- Ensure FBX 7.4 binary version is selected.
- The Main/Geometry/Armatures/Animation buttons provide menu options for the item selected. Select the Main option.
- Selected Objects. This option needs careful consideration. Unlike the Blender XML exporter, the FBX exporter will export all objects in all layers
which is probably undesirable in many cases and particularly if you have different LOD models in different layers. So, first select those objects within Blender that you want to export and then select Selected Objects in this panel.
- Scale. Leave the Scale value as 1.00 and deselect the small icon to the right of the Scale value.
- Forward and Up. Set these to the values :Y forward and Z Up.
The options below are multi select (i.e. you can select more than one). For the time being just leave Mesh selected.
- Leave the Experimental and Custom Properties as deselected.
- Leave Path Mode as Auto and Batch Mode as Off.
- Choose the FBX filename and export using the Export FBX in the top right hand corner. There is no exporter log.
Tip
You can save your preferences for a given situation by clicking on the plus button (+) next to Operator Presets. This is particularly useful for animation.
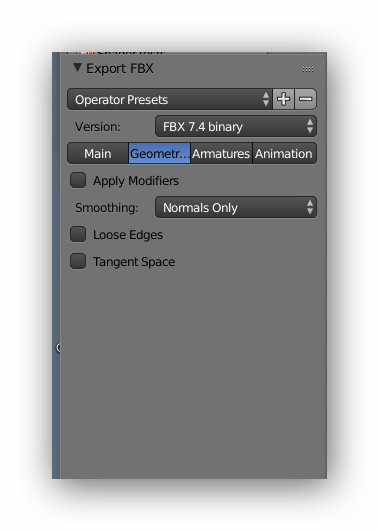
The Geometry Menu
- Leave these values as shown. (more testing required ;o) )
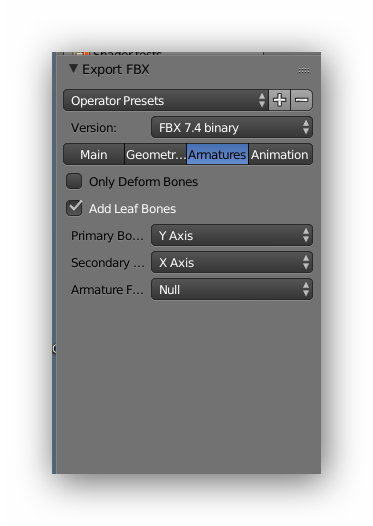
The Armatures Menu
- Leave these values as shown. (See animation section)
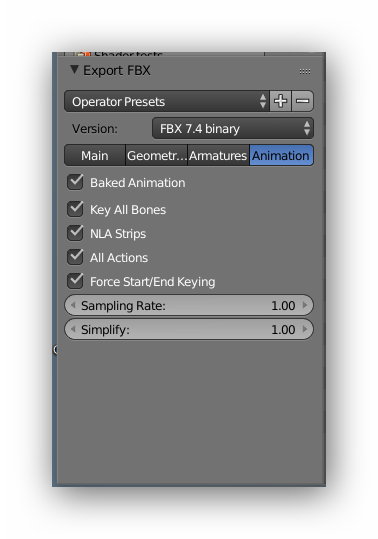
The Animation Menu
- Leave these values as shown. (See animation section)
Config.txt
Setting up the CONFIG.TXT
The only changes to the config.txt are in the mesh table. The mesh entries for FBX files now have a "trainzmesh" extention as per the following example:
 mesh-table {
   default {
     auto-create                           1
     mesh                                  "my-mesh.trainzmesh"
   }
 }
Note that for the LM.TXT Level of Detail (LOD) you can still use the LM convention but the LM.TXT file must refer to trainzmesh files.
Files Created
Mesh Files
The file my-mesh.trainzmesh is created during the asset commit. Currently the FBX file is not deleted but bundled into the asset. Since the FBX format is readable by 3D modelling tools, you may want to remove any FBX files from assets uploaded to the DLS or other web sites.
Texture.txt Files
You can provide your own texture.txt files (advisiable) or let the commit process create them for you. The commit process will create suitable files, such as those required for normal maps, but you can provide your own if you have special requirements.
Warnings and Errors
The TrainzDev team are reporting issues back to N3V and many problems have been fixed. The following is provided to assist creators.
| Warning | Help/Explanation |
|---|---|
| Phong shader not supported | You can ignore this as Trainz uses its own shaders. The warning is supposed to be suppressed but still occurs in some circumstances |
| Number of polys exceeds 10,000 polys | This is a standard TANE warning and not related to the FBX importer. |
| unused | unused |
| Error | Help/Explanation |
|---|---|
| LOD mesh poly counts are identical which triggers the 20% reduction error. | You need to select only those meshes that will be exported for a LOD and ensure that Selected Objects is selected. |
| No meshes show in game or Preview Asset. | This can occur for a number of reasons including material issues but ensure that your mesh has only one UV map. |
| unused | unused |
Materials
The FBX exporter treats materials much the same as the XML exporter. For detailed material descriptions see Material Types and the child pages detailing different Trainz material types.
The FBX exporter uses the following material options:
| Material Option | Comment |
|---|---|
| Diffuse -> Color | Used for both diffuse and emmissive colour |
| Shading -> Emit | |
| unused | unused |
Treatment of materials is unchanged and no changes to existing textures are required.
Values you can play with in any material include:
- Diffuse colour
- Diffuse specular
- Specular colour
- Specular intensity. This gets exported as specular factor.
- Specular hardness. This gets exported as shininess exponent.
- Shading Emit. Exported as emissive factor.
- Ambient. Exported as ambient factor.
Be wary of checking Shading->Shadeless as this stops the export of several attributes including: Specular Color, Specular Factor, Shininess Exponent, Reflection Color, Reflection Factor, Specular, and Shininess. The actual effect of this has not yet been tested.
Notes in each material section identify what is exported by the Blender exporter however these attributes may not be recognised by TANE. In particular, there is no point in specifying shader attributes as TANE uses its own shader.
(to be continued)


