Attachment point
Attachments are the means of specifying how sub meshes or other effects are placed or attached in a model.
Contents |
Attachments
An attachment point is located in the model and reference is made from the config.txt file, to define its use and function.
Attachment points use the a.name convention, to be recognised in Trainz. For an attachment point to move with an animated dummy, there is a special naming convention for the point in 3dsmax/gmax, e.g. a.r.dummy/a.name.
Attachment points should be created in top view, and the orientation of the axis will then be consistent. Sometimes the attachment point may not be facing the correct direction, and has to be rotated (realigned). Refer to other sections for advice on any special orientation required for different attachment points, for track, names, bogeys, coupler points and effects.
a.bog, a.limfront and a.limback are some of the important attachments for rollingstock models. As these have specific placements, it may be helpful to save a file of these points as a template, so you can merge it with your next model. With a few adjustments, you can quickly incorporate the template into the model and be sure the point names and orientation are correct.
3D Studio Max Guidelines
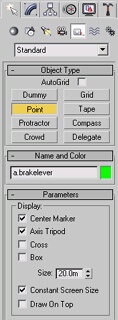
In 3dsmax & gmax: ‘Create’ tab, ‘Helpers’, ‘Point’.
To maintain correct alignment, attachment points should be created in the TOP viewport. The front end of the train body should be on the Left hand side when displayed in the RIGHT viewport in 3dsmax/gmax (ie, in TOP view, the loco should face down the page).
Any object in the scene that has to move (ie. levers and dials), or animate, will need to be ‘detached’ from the main model. To do this, select the polygons or elements you want detached and through the 3dsmax modify panel, press the detach button and name the new object.
To make life a heck of a lot easier later on, it pays to move the pivot point of each new object to it’s logical position. Ie. For needles and levers the pivot point should be the centre of rotation (with the rotation around the Z axis). Align lever shaft in the Positive Y direction.
To do this, access the 3dsmax Hierarchy panel, and press Affect Pivot Only. From here you can centre and align the pivot to the object and move it to the preferred location.
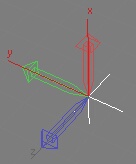
Be aware that the point itself must be rotated correctly, not the axis of the point. The Hirerachy...Affect Pivot Only option may be turned on to determine the orientation of the point, it must then be turned off before rotating the point (click on the Affect Pivot Only box to toggle on/off). Turn on the axis information again to verify the rotation of the point has been done correctly.
Once the pivot points have been set for all your new objects, now is the time to start adding attachment points. Add these through the 3dsmax create panel (see image below). Remember to use the a.name naming convention. Attachment points are simply points in 3D space where another mesh can inserted (through config.txt reference).
Since you have already worked out the pivot points of all your objects, all you have to do is align the attachment points to your object pivot points. Press the icon (above) and select the object to align to....
These attachments are exported as part of the default mesh (or the main mesh). Objects for attachment must not be included in the export as they are each exported from their own 3dsmax files and attached to the default mesh separately (through config.txt reference).
Remember to save a backup of the 3dsmax file!! Select each object from the scene and save each one as its own 3dsmax file, (command panel, file - save selected). You may delete the object from the main mesh scene after you save it.
![]() The next step is to open each 3dsmax file you have just created (of the movable objects), and move the object to 0,0,0 and make the rotational values 0,0,0 (press and right click these 3dsmax icons). This makes the object (and it’s pivot) aligned correctly to the origin of the scene.
The next step is to open each 3dsmax file you have just created (of the movable objects), and move the object to 0,0,0 and make the rotational values 0,0,0 (press and right click these 3dsmax icons). This makes the object (and it’s pivot) aligned correctly to the origin of the scene.
Now is the time to export the object to a Trainz mesh file (.im).
Naming
Moving attachment points for other models
Attachments use the a.name convention and allow the attachment of a submesh to a specific point in a mesh. If the attachment point in the main mesh is to move with an animation of that mesh, the special naming convention above must be used for the point to follow the animation, and allow the submesh to then follow the point. For example, a submesh is to be attached to a main mesh using the attachment name a.lever. This attachment point in the main mesh must be linked to a helper point called b.r.pivot, that is animated. The attachment point in the 3dsmax/gmax model must be named a.r.pivot/a.lever. In the config.txt file the attachment point will be entered as a.lever. Note the helper point in 3dsmax/gmax will be called b.r.pivot, not a.r.pivot! The submesh will now follow any animation in the main mesh. It can be useful for moving coronas, and animated nightwindow meshs.
Level Of Detail Meshes
From a .lm.txt configuration file:
attachmentCutOff = 0.1;
Attachment cutoff specifies the level where attachments with the flag :Cull are dropped.
ie To stop drawing the bogeys of the trains at a specific level of detail, append :Cull to the bogie attachment point. (ie a.bog0:Cull )
Where the above applies (bogeys culled) the body mesh will need a low poly representation of the bogeys.
Special Attachment Points
A number of Vehicle Attachment Points are reserved for predefined use in Trainz.

