HowTo/Export from Blender using FBX
This page describes how to export a simple model from Blender into the FBX file format for use in Trainz. The model uses a Trainz PBRMetal format so it is only suitable for TRS2019 and later versions. The Blender source and PBRMetal textures are provided. The tutorial was prepared using Blender 2.83.
Some knowledge of using Blender and Trainz asset creation is assumed.
Contents |
Video Tutorial
An additional video tutorial can be found at Exporting basic Cube from Blender with PBR Materials. That tutorial uses a different mesh model.
Asset Creation Workflow
The basic workflow is:
- Create your mesh.
- Create a UV map for mapping mesh polygons to a texture.
- Apply a Trainz material including textures.
- Export the model to an FBX file.
- Import the model into Trainz. Trainz will create a Trainzmesh mesh data file.
The provided Blender models are ready for you to do steps 3 through 5.
Adding the Material and Exporting
Load Your Model
A Blender 2.83 sample model of a simple box is provided. The mesh is UV mapped but there is no material or textures linked in the model. The Blender source files include both a starting and completed model together with texture images, config.txt, etc. For export, just change the owner KUID id to yours. The source files can be found here: File:Blender box283.zip
- Create a suitable working folder on your computer. You might call it "FBX_export_example_1".
- Unzip the files into that folder.
- Start Blender and load file "mybox_b283_start.blend".
Add the Material and Textures
- On opening, the Blender will be in the default view, with the box mesh selected, and the properties panel open at the materials tab. There are no materials allocated. The Outliner Window (top right) shows several Blender collections including a LOD0 and LOD1. The LOD1 collection is empty since the entire mesh is only 12 triangular polygons. Using collections named in this fashion makes it easier to export FBX meshes for the same LOD level.
- Create a new material and rename it "mybox.m.pbrmetal"
- Change to the Shading Workspace.
- There are a number of windows visible but the two of most interest are the 3DViewport at the top and the Shader Editor at the bottom. It is useful to have the 3D Viewer in LookDev mode (aka Material Preview). The Shader Editor was called the Node Editor in earlier versions of Blender.
- The Shader Editor will show a Principled BSDF Shader node and a Material Output node.
- For export to Trainz we will need to configure inputs to the shader node so that the texture/image names get correctly associated with the exported mesh and material. It's worth noting that the Principled BSDF shader already has a number of PBR values but you cannot assume those values will be correctly exported to Trainz. For example, Trainz expects the emissive, roughness, ambient occlusion and metallic values to be embedded in a "parameter" file.
- We will add three texture nodes and a vector conversion node for the normal map image.
- In the Shader Editor:
- Use Shift A and select Texture->Image Texture. This will add a texture node. Move it to the left of the shader node and towards the top.
- Select the Image Texture Node and press Shift D and drag the duplicated node below the first texture node.
- Repeat so you end up with three texture nodes.
- Select the top texture node, click on Open and add the file "box_albedo.png". You may need to navigate Blender to your working folder as it doesn't default to your Blender file location.
- Connect the texture node Color output to the shader Base Color input. You should see the albedo (colour) on the mesh in the 3D Editor.
- Select the middle texture node and load the file "box_parameter.png".
- Connect the texture node Color output to the shader Roughness input. The box in the 3D Editor will likely look shiny and will reflect any environment images you may have used.
- Change the Color Space to Non Color. This change may not affect Trainz but it will make the model more closely resemble the final result in Trainz.
- Select the bottom texture node and load the file "box_normal.png".
- Connect the texture node Color output to the Shader Normal input.
- Select Shift A and choose a Vector->Normal Map node. Drag it to the noodle (link) between the Normal texture node and the shader and drop it on the centre of the noodle. The connections will change so the texture node color output is routed through the Normal Map vector to the shader normal input. Leave the value of the Normal Map at Tangent Space. You can, if you wish, choose a UV map on the Normal Map node. It doesn't appear to affect Trainz if that field remains blank.
- Change the Normal texture node Color Space to Non Color.
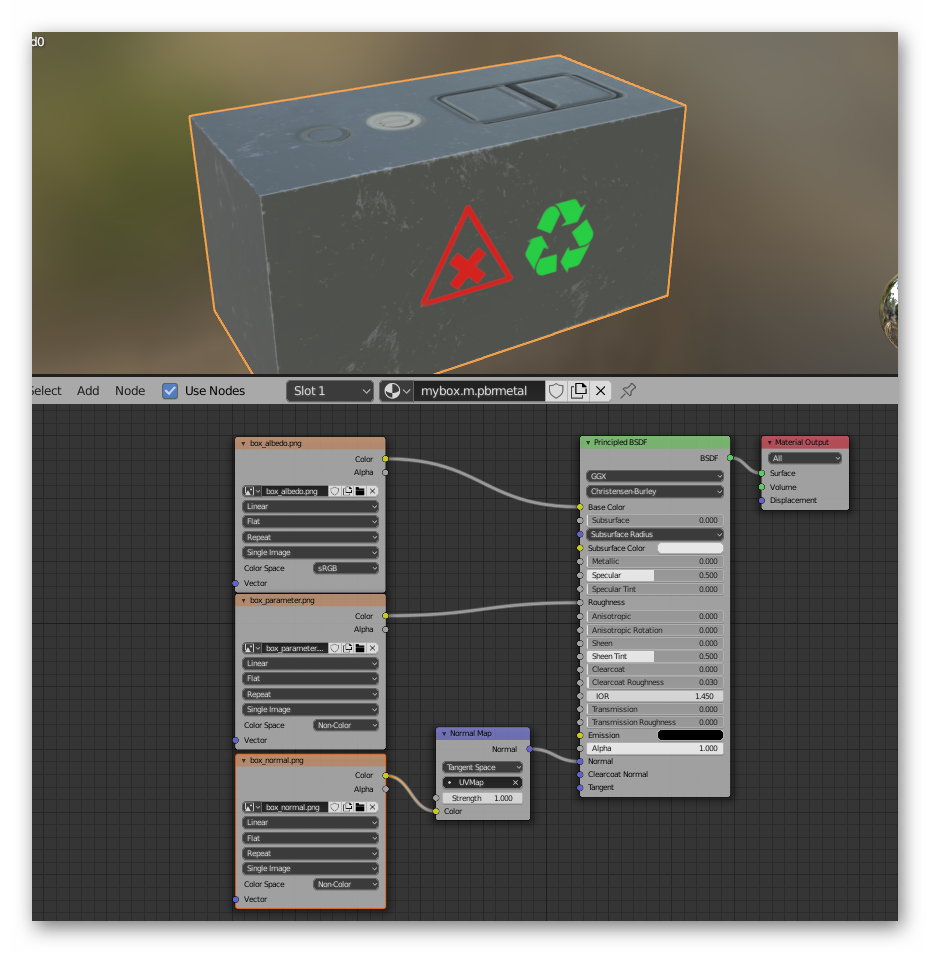
- The final shader node setup should look similar to the following picture. The 3D viewport may look different.
+ Click to show or hide comments about the shader node setup and the rendered asset in the 3D Editor
The rendered view in the 3D Editor is a product of the inputs and settings in the Shader Node tree. For our arrangement, the albedo and normal should be correct but the roughness input is not a true roughness value. It will be a value derived from the RGB channels (emit, roughness and AO). We use the roughness input only to provide a link to the parameter image within the material so that Trainz can find it. You should not assume the mesh, as viewed in Blender, will look exactly the same in Trainz.
Exporting to FBX
The model is now ready for export.
- Change to the Default workspace and select the mesh object in the 3D Viewport.
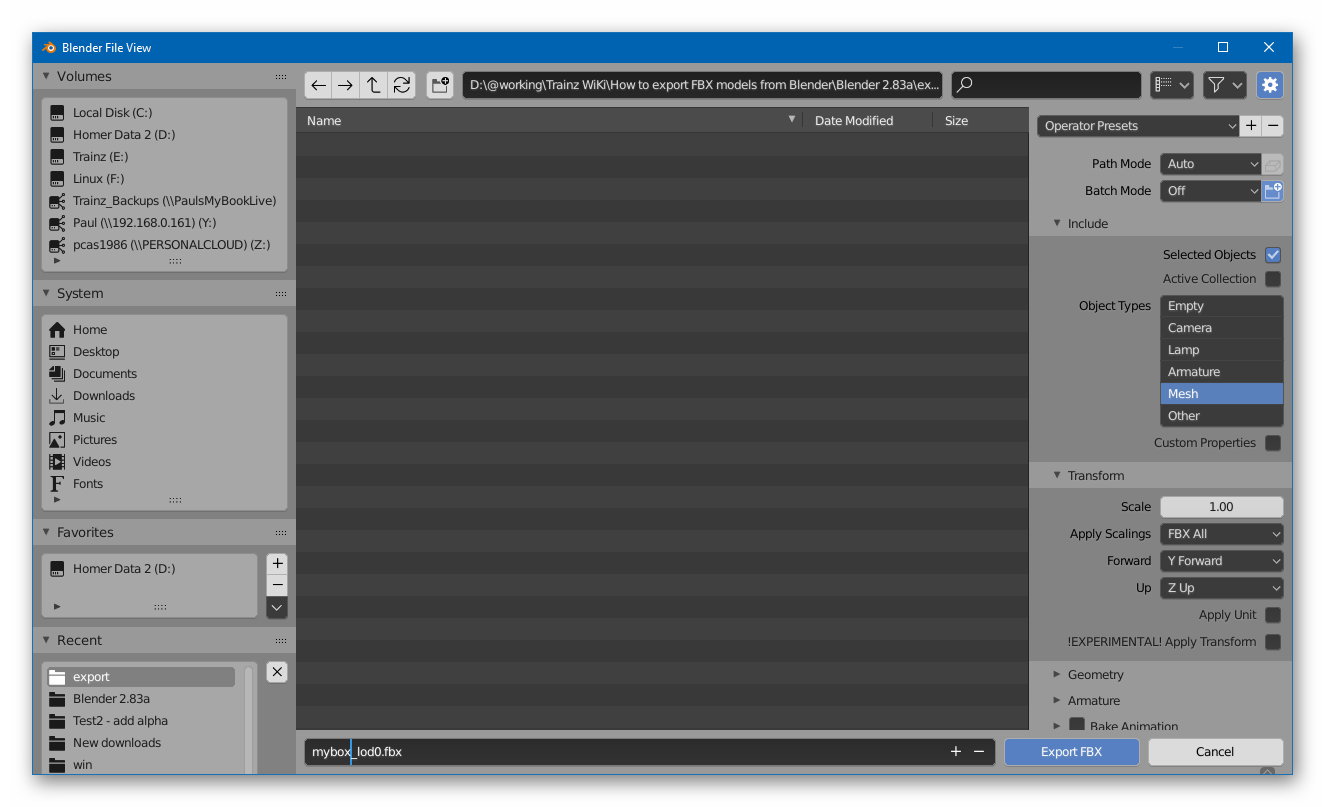
- Select File->Export->Export FBX and the FBX export window will be shown. If the Export FBX option isn’t shown, then make sure it is enabled in User Preferences.
- Operator Presets. This option allows you to define an export configuration that can be recalled rather than having to set options each time.
- Path Mode and Batch Mode. Leave unchanged.
- Tick Selected Objects and leave Active Collection blank.
- For Object Types just select Mesh.
- Ignore Custom Properties.
- Leave the scale value at 1.0.
- Apply Scalings: Use “FBX All”.
- Forward: select option “Y Forward”. This automatically changes the Up option to “Z Up” which is correct for Trainz.
- Apply Unit and Apply Transform: Leave blank.
- Leave the Geometry and Armature settings at their default value.
- Bake Animation: Uncheck.
- Leave any other options at their default values.
- At the top of the window, make sure the selected target folder is your project export folder.
- Enter the target FBX file as “mybox_lod0.fbx” .
- Click on the Export FBX button at the top right. The mesh will be exported.
+ Click to show or hide comments about the exporter settings
The settings show above are known to work with the base unit setting at "None". See Properties Editor->Scene Properties->Units-Unit System. There are other combinations that will work. If you find a setting that works for you then save it as a preset.

TIP: You can save your preferences for a given situation by clicking on the plus button (+) next to Operator Presets and saving the preset with a name.
Importing into Trainz
Config.txt
When you submit your asset, Trainz will convert the FBX file to a Trainzmesh file so the mesh table will need to identify each mesh as such. For the sample asset the filename will be mycube_lod0.trainzmesh. See the config.txt in the project folder.
Texture.txt files
You can provide your own texture.txt files (advisable) or let the commit process create them for you. The commit process will create suitable files, such as those required for normal maps, but you can provide your own if you have special requirements.
Committing the asset
Commit the asset by dragging the folder onto CM. Assuming the commit is error free, open the asset for edit in explorer and see what Trainz has created. The trainzmesh files should be as described above. The FBX files will also be present so you may want to delete those if you are ready to upload your asset to the DLS or elsewhere. If you delete the FBX files, then you will need to commit the asset again. Since the trainzmesh files already exist no FBX conversion is carried out.
Notes about the box asset
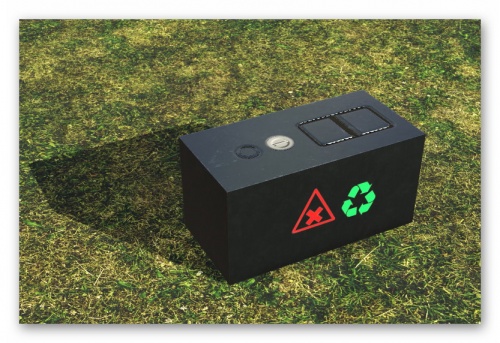
The material used for this asset was created within Substance Painter which is a powerful PBR material and texture creation tool. The decals, including those with normal maps, are part of the decal collection in Substance Painter. It is possible to create this material and effects within Blender but well beyond the scope of this tutorial. There are many video tutorials on the Internet that can assist with the preparation of PBR materials. There are also low cost addons that can bake PBR textures to image files for use as described in this tutorial.
Animation
If you are interest in animation for Blender 2.8, see this page.
Some basic tips for exporting
- Make sure you triangulate (convert to three sided polygons) before export. You can do this per mesh by using the triangulate command (Ctrl T) in mesh edit mode. Or you can add a triangulate modifier to the mesh in mesh object mode.
- Make sure you only have one UV map per mesh. Trainz doesn't seem to like more than one UV map.
- Unapplied mesh scaling can cause issues including island distortment in the UV editor. Apply any scaling before export.
Double Sided Meshes
It appears that FBX does not support double sided meshes so you will need to create a metadata file as described at FBX file format#Mesh Metadata Files. Note that this is done per material. i.e. you cannot have the same material for single sided and double sided meshes.
Errors, Warnings and other Issues
FBX to Trainzmesh Conversion Warnings and Errors
Errors and warnings starting with a T, such as T16128, are errors ouput by the ASSIMP converter and are not output by the Trainz FBX importer. Errors or warnings starting with VE are generated by Trainz. See Asset_Validation.
| Warning/Error | Help/Explanation |
|---|---|
| Warning: T16080: ...shading mode not recognised: Phong | You can ignore this warning. |
| Warn, T15808: FBX-DOM (TOK_KEY, offset 0xnnnn) source object for connection does not exist | You can ignore this warning. |
| Error: Unable to determine vertex format. | This can be caused by having multiple UV maps for the same mesh. For example, baking a painted mesh to a bake mesh requires two UV maps. Remove old maps before exporting. If you wish to keep those maps, back up the Blender file and then delete the extra maps. |
| Error, T5268 or T9068, Failed to triangulate polygon (no ear found). Probably not a simple polygon. | Try triangulating the mesh, or meshes, using Ctrl T (quads to tris). If the error continues, try using the Triangulate modifier. This problem is known to occur when using modifiers that may produce ngons on export. |
| Error, Error, T16128: FindInvalidDataProcess fails on mesh uvcoords: All vectors are identical" | Probably caused by having multiple UV maps for the same mesh. Not sure of the relationship between this error and the "Unable to determine vertex format" error. |

