HowTo/Export from Blender using FBX
(→Texture.txt Files) |
(Added animation section and some samples.) |
||
| Line 1: | Line 1: | ||
| − | + | This is a work in progress as: | |
| − | + | ||
| − | This is | + | |
(1) the author learns more about the process, and | (1) the author learns more about the process, and | ||
(2) N3V are exploring the FBX format. Please contact the author if you have something to contribute. | (2) N3V are exploring the FBX format. Please contact the author if you have something to contribute. | ||
| Line 17: | Line 15: | ||
|style="width:100px;"|TANE:||style="width:200px;"|4.5 or later. | |style="width:100px;"|TANE:||style="width:200px;"|4.5 or later. | ||
|- | |- | ||
| − | |Blender:|| Known to work for Blender 2. | + | |Blender:|| Known to work for Blender 2.78a or later. The FBX exporter is a standard addon for Blender. |
|- | |- | ||
|FBX format:|| Binary format only (see discussion below). FBX 2011, FBX2012, FBX2013. | |FBX format:|| Binary format only (see discussion below). FBX 2011, FBX2012, FBX2013. | ||
| Line 23: | Line 21: | ||
|Special requirements:|| None. Creators will need their preferred image editors and text editors but there are no special requirements for FBX. | |Special requirements:|| None. Creators will need their preferred image editors and text editors but there are no special requirements for FBX. | ||
|- | |- | ||
| − | |Other software:|| There are free FBX viewers available on the web including | + | |Other software:|| There are free FBX viewers available on the web including {{plain link|http://www.autodesk.com/products/fbx/fbx-review|FBX Review}} and FBX Converter programs by Autodesk. |
|} | |} | ||
| Line 52: | Line 50: | ||
===The Main Menu=== | ===The Main Menu=== | ||
| − | [[File:Blender_FBX_Main_Menu.jpg|380px|left | + | [[File:Blender_FBX_Main_Menu.jpg|380px|left]] |
* Ignore the Operator Presets for now. | * Ignore the Operator Presets for now. | ||
* Ensure FBX 7.4 binary version is selected. | * Ensure FBX 7.4 binary version is selected. | ||
| Line 70: | Line 68: | ||
====Tip==== | ====Tip==== | ||
| − | You can save your preferences for a given situation by clicking on the plus button (+) next to Operator Presets. This is particularly useful for animation. | + | You can save your preferences for a given situation by clicking on the plus button (+) next to Operator Presets and saving the preset with a name. This is particularly useful for animation. You will need to reload the preset each time you start Blender. |
===The Geometry Menu=== | ===The Geometry Menu=== | ||
| − | [[File:FBX Geometry Menu.jpg|380px|left | + | [[File:FBX Geometry Menu.jpg|380px|left]] |
| − | * Leave these values as shown. | + | * Leave these values as shown. |
{{clear}} | {{clear}} | ||
| − | ===The Armatures | + | ===The Armatures and Animation Menus=== |
| − | + | ||
| − | + | ||
| − | + | ||
| − | + | ||
| − | + | ||
| − | + | ||
| − | [ | + | * See the [http://online.ts2009.com/mediaWiki/index.php?title=HowTo/Export_from_Blender_using_FBX&action=submit#Animation Animation Section]. |
| − | + | ||
{{clear}} | {{clear}} | ||
| Line 122: | Line 113: | ||
==Warnings and Errors== | ==Warnings and Errors== | ||
| − | + | Ignore errors or warnings about Phong shaders. | |
| − | + | ||
| − | + | ||
| − | + | ||
| − | + | ||
| − | + | ||
| − | + | ||
| − | + | ||
| − | + | ||
| − | + | ||
| − | + | ||
| − | + | ||
| − | + | ||
| − | + | ||
| − | + | ||
| − | + | ||
| − | + | ||
| − | + | ||
| − | + | ||
| − | + | ||
| − | + | ||
| − | + | ||
| − | + | ||
| − | + | ||
| − | + | ||
| − | + | ||
| − | + | ||
| − | + | ||
| − | + | ||
| − | + | ||
| − | + | ||
| − | + | ||
| − | + | ||
| − | + | ||
| − | + | ||
| − | + | ||
| Line 275: | Line 231: | ||
| style="border:1px solid gray;font-weight:normal;"|Use Repeat if UV wrapping required. Probably only of value within Blender since Trainz texture.txt files define image wrapping. | | style="border:1px solid gray;font-weight:normal;"|Use Repeat if UV wrapping required. Probably only of value within Blender since Trainz texture.txt files define image wrapping. | ||
|} | |} | ||
| + | |||
| + | |||
| + | ===Sample Blender FBX Material Models=== | ||
| + | |||
| + | These are just Blender models (the cube) that demonstrate the various [http://online.ts2009.com/mediaWiki/index.php/Material_Types Trainz materials]. | ||
| + | |||
| + | Notex: Just a simple notex material on a box. | ||
| + | [File:4000001- FBX paint-test-notex.zip] | ||
| + | |||
| + | Onetex, reflect, tbumptex, tbumpenv and tbumpgloss | ||
| + | |||
| + | These are simple boxes using the same texture but with different material types; | ||
| + | |||
| + | Onetex: | ||
| + | [[File:4000002 - FBX paint-test-onetex.zip]] | ||
| + | |||
| + | Reflect: | ||
| + | [[File:4000003 - FBX - paint-test-reflect.zip]] | ||
| + | |||
| + | Tbumptex: | ||
| + | [[File:4000004 - FBX - paint-test tbumptex.zip]] | ||
| + | |||
| + | Tbumpenv: | ||
| + | [[File:4000005 - FBX - paint-test tbumpenv.zip]] | ||
| + | |||
| + | Tbumpgloss: | ||
| + | |||
| + | (TBD) | ||
| + | |||
| + | ==Animation== | ||
| + | |||
| + | ===Overview=== | ||
| + | |||
| + | Trainz will not animate a mesh without the use of helper points using the "b.r" notation. For Blender, those helper points can be armatures (bones) or empties. Lattices are not supported by the FBX exporter. | ||
| + | |||
| + | An animation must have a root helper normally called "b.r.main" although "b.r.root" will also work. Using such names helps identify the overall parent of the animation. | ||
| + | Other animation helpers are called "b.r.xxx", where "xxx" can be any name. These helpers must be children of the main/root helper. | ||
| + | |||
| + | |||
| + | ==Exporting an animated mesh object== | ||
| + | ===The Main Menu=== | ||
| + | [[File:Blender FBX export main-anim.jpg|380px|left]] | ||
| + | * Select Empty and Armature depending on how you set up your animation. | ||
| + | * Other options are described above. | ||
| + | {{clear}} | ||
| + | |||
| + | |||
| + | ===The Armatures Menu=== | ||
| + | [[File:FBX Armatures Menu.jpg|380px|left]] | ||
| + | * Use the values as shown. | ||
| + | {{clear}} | ||
| + | |||
| + | ===The Animation Menu=== | ||
| + | [[File:Blender FBX anim menu1.jpg|380px|left]] | ||
| + | * Select Baked Animation and disable the other options. | ||
| + | |||
| + | Authors note: This is completely different from the process described in the 3DS Max FBX animation export. | ||
| + | If Baked Animation is not ticked, then none of the other animation options are available. So far, none of those other options have been found useful. | ||
| + | {{clear}} | ||
| + | |||
| + | |||
| + | ==Files created during the export and import process== | ||
| + | |||
| + | The Blender exporter creates a binary file with the name of your choosing plus an FBX suffix. For animation, the exporter creates an internal name that the TANE importer uses for an animation (KIN) file. | ||
| + | |||
| + | If you choose Baked Animation (recommended), then the animation name is comprised of the FBX name and the word "_scene". So, if you export a model called "box.fbx" with animation, then the importer creates a "box.trainsmesh" and "box_scene.fbx". | ||
| + | |||
| + | If you don't choose Baked Animation, then the TANE importer uses the name of the animation channel so you might get names like "b.r.main-b.r.mainAction.kin". | ||
| + | |||
| + | ==Config.txt== | ||
| + | |||
| + | The names of mesh and KIN files may not be obvious so you may need to create some dummy names for your mesh and KIN files. After importing into TANE, open the asset for editing and look for the files created. Then go back and correct entries in the config.txt. | ||
| + | |||
| + | |||
| + | Sample mesh-table entry with animation: | ||
| + | |||
| + | mesh-table { | ||
| + | default { | ||
| + | auto-create 1 | ||
| + | mesh "box.trainzmesh" | ||
| + | anim "box_scene.kin" | ||
| + | animation-loop-speed 1.00 | ||
| + | } | ||
| + | |||
| + | |||
| + | |||
| + | |||
| + | ==Animation Warnings and Errors== | ||
| + | |||
| + | |||
| + | {| style="border:1px solid gray;border-collapse:collapse;background:white;font-weight:bold; " cellpadding=5px align=left width=70% | ||
| + | |+ Errors | ||
| + | |- style="font-weight:bold; text-align:center;" | ||
| + | ! width=40% style=" border:1px solid gray;"|Warning/Error | ||
| + | ! width=60% style=" border:1px solid gray;"|Help/Explanation | ||
| + | |- | ||
| + | | style="border:1px solid gray;font-weight:normal;"|! ... T14120: Simplified dummy tracks with just one key. | ||
| + | | style="border:1px solid gray;font-weight:normal;"| Not sure what this warning is about but the animation is OK. | ||
| + | |- | ||
| + | | style="border:1px solid gray;font-weight:normal;"|! ... Skipping one or more lines with the same contents | ||
| + | | style="border:1px solid gray;font-weight:normal;"|To be investigated. Perhaps the FBX file is repeating information. | ||
| + | |} | ||
| + | |||
| + | |||
| + | |||
| + | ==Sample Animations== | ||
| + | |||
| + | The following samples are provided to demonstrate different types of Blender FBX animations. You are free to use them for any purpose - i.e. no copyright! | ||
| + | |||
| + | ===Simple Animation 1 - Uses an empty as animated parent=== | ||
| + | |||
| + | [[File:890045 fbx anim1 - empty.zip]] | ||
| + | |||
| + | This animation rotates a coloured cube around the X axis using an empty as parent b.r.main. The animation action, within Blender, is called b.r.mainAction. The channel has been set to linear interpolation. | ||
| + | |||
| + | When exporting, you must select Empty and Mesh. | ||
| + | |||
| + | Exported names: The Blender FBX exporter creates a file called box.fbx. On commit, TANE creates a mesh file called box.trainzmesh and an animation file called box_scene.kin. | ||
| + | |||
| + | |||
| + | ===Simple Animation 2 - Uses an armature as animated parent=== | ||
| + | |||
| + | [[File:890044 fbx anim1 - armatures.zip]] | ||
| + | |||
| + | This animation rotates a coloured cube around the X axis using an armature with a single bone as parent b.r.main. The animation rotates anti-clockwise. | ||
| + | |||
| + | This is much the same as Sample 1 but demonstrates that you can use either an empty or an armature for simple animations. | ||
| + | |||
| + | When exporting, you must select Armature and Mesh. | ||
| + | |||
| + | Exported names: The Blender FBX exporter creates a file called box.fbx. On commit, TANE creates a mesh file called box.trainzmesh and an animation file called box_scene.kin. | ||
| + | |||
| + | |||
| + | ===Simple Animation 3 - Four animated cogs - LOD model=== | ||
| + | |||
| + | [[File:4000110 - FBX - anim test 4 - four cogs.zip]] | ||
| + | |||
| + | This animation simulates four rotating cogs. There are two LOD levels. LOD0 (the high poly version) is in layer 1 and LOD1 (the low poly version) is in layer 2. Layer 11 contains the animated armatures. There are four animation tracks. | ||
| + | |||
| + | To export LOD0, select all the objects in layers 1 and 11 so the LOD0 meshes and the armatures are all selected. On export, ensure Empty, Armature and Mesh are selected and use the name "4cogs-lod0.fbx". b.r.main is an empty so Empty must be selected. | ||
| + | |||
| + | To export LOD1, select all the objects in layers 2 and 11 so the LOD1 meshes and the armatures are all selected. On export, ensure Empty, Armature and Mesh are selected and use the name "4cogs-lod1.fbx". | ||
| + | |||
| + | You can choose any names you want but a meaningful name is useful. | ||
| + | |||
| + | This is the relevant section of config.txt: | ||
| + | |||
| + | mesh-table { | ||
| + | gears-lod0 { | ||
| + | auto-create 1 | ||
| + | mesh "4cogs-lod0.trainzmesh" | ||
| + | lod-level 0 | ||
| + | anim "4cogs-lod0_scene.kin" | ||
| + | animation-loop-speed 1.00 | ||
| + | } | ||
| + | gears-lod1 { | ||
| + | auto-create 1 | ||
| + | mesh "4cogs-lod1.trainzmesh" | ||
| + | lod-level 1 | ||
| + | anim "4cogs-lod0_scene.kin" | ||
| + | animation-loop-speed 1.00 | ||
| + | } | ||
| + | } | ||
| + | mesh-detail-level-count 2 | ||
| + | |||
| + | Note that the transition from LOD0 to LOD1 is obvious. | ||
| + | |||
| + | |||
| + | ===More Complex Animations=== | ||
| + | More complex animation samples will be added when available. | ||
Revision as of 15:32, 21 January 2017
This is a work in progress as:
(1) the author learns more about the process, and
(2) N3V are exploring the FBX format.  Please contact the author if you have something to contribute.
Introduction
This guide provides information for the export of FilmBoX (FBX) files from Blender.
Versions
| TANE: | 4.5 or later. |
| Blender: | Known to work for Blender 2.78a or later. The FBX exporter is a standard addon for Blender. |
| FBX format: | Binary format only (see discussion below). FBX 2011, FBX2012, FBX2013. |
| Special requirements: | None. Creators will need their preferred image editors and text editors but there are no special requirements for FBX. |
| Other software: | There are free FBX viewers available on the web including FBX Review and FBX Converter programs by Autodesk. |
The FBX format
A brief discussion on the FBX format history can be found here . FBX can be exported either as an ASCII (i.e. human readable) file or in binary format. TANE will only recognise the binary format.
Blender and FBX
Blender is capable of both importing and exporting FBX. The Blender exporter does not export all possible object attributes and it is likely that TANE will not recognise all those attributes that are exported. The Blender documention contains a list of attributes that are exported.
Included in this guide is a list of attributes that have been observed as exported and treatment/acceptance by TANE. The list is incomplete and so is a work in progress.
Skills Required
For this version of the guide, it is assumed the user has some knowledge of the use of Blender and an understanding of the Trainz asset creation process.
Exporting a mesh object from Blender in FBX format
The FBX exporter addon must be enabled in User Preferences.
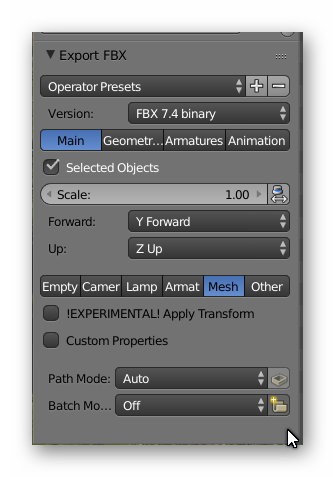
Select File->Export->Export FBX and the FBX export panel will show in the bottom left hand corner and should look like the following picture. The panel contents vary significantly between the Binary export version and the ASCII export version so make sure you have Binary selected.
The Main Menu
- Ignore the Operator Presets for now.
- Ensure FBX 7.4 binary version is selected.
- The Main/Geometry/Armatures/Animation buttons provide menu options for the item selected. Select the Main option.
- Selected Objects. This option needs careful consideration. Unlike the Blender XML exporter, the FBX exporter will export all objects in all layers
which is probably undesirable in many cases and particularly if you have different LOD models in different layers. So, first select those objects within Blender that you want to export and then select Selected Objects in this panel.
- Scale. Leave the Scale value as 1.00 and deselect the small icon to the right of the Scale value.
- Forward and Up. Set these to the values :Y forward and Z Up.
The options below are multi select (i.e. you can select more than one). For the time being just leave Mesh selected.
- Leave the Experimental and Custom Properties as deselected.
- Leave Path Mode as Auto and Batch Mode as Off.
- Choose the FBX filename and export using the Export FBX in the top right hand corner. There is no exporter log.
Tip
You can save your preferences for a given situation by clicking on the plus button (+) next to Operator Presets and saving the preset with a name. This is particularly useful for animation. You will need to reload the preset each time you start Blender.
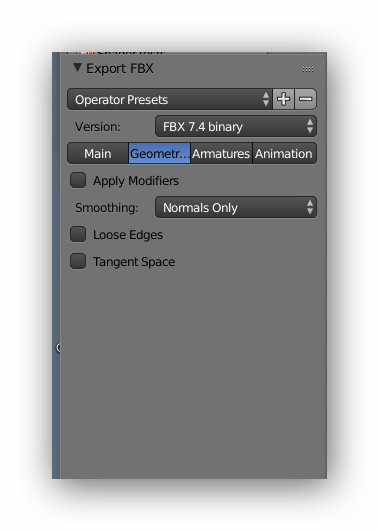
The Geometry Menu
- Leave these values as shown.
The Armatures and Animation Menus
- See the Animation Section.
Config.txt
Setting up the CONFIG.TXT
The only changes to the config.txt are in the mesh table. The mesh entries for FBX files now have a "trainzmesh" extention as per the following example:
 mesh-table {
   default {
     auto-create                           1
     mesh                                  "my-mesh.trainzmesh"
   }
 }
Note that for the LM.TXT Level of Detail (LOD) you can still use the LM convention but the LM.TXT file must refer to trainzmesh files.
Files Created
Mesh Files
The file my-mesh.trainzmesh is created during the asset commit. Currently the FBX file is not deleted but bundled into the asset. Since the FBX format is readable by 3D modelling tools, you may want to remove any FBX files from assets uploaded to the DLS or other web sites.
Texture.txt Files
You can provide your own texture.txt files (advisable) or let the commit process create them for you. The commit process will create suitable files, such as those required for normal maps, but you can provide your own if you have special requirements.
Warning: If you get odd effects with your textures, check the associated texture.txt file first. The FBX importer tends to add an "alpha=" line even though no alpha option has been chosen. This may be an issue with the Blender FBX exporter.
PEV's TextureTXT utility can be very useful for creating texture.txt files and its worth adding it into AssetX if you use AssetX for managing your projects.
Warnings and Errors
Ignore errors or warnings about Phong shaders.
Materials
This section identifies the material options used by the FBX exporter. For detailed descriptions on how Trainz uses material types see Material Types and the child pages detailing different Trainz material types.
The exporter treats material options based on the chosen material shader model. Even though Trainz uses its own shaders, it may be worthwhile selecting different shader models in Blender to see the effect. In particular, choosing the Phong model for the specular shader will enable the export of a number of extra material options. These may, or may not, actually result in observable changes in Trainz.
The FBX exporter uses the following material options:
| Material Option | Shader | Comment |
|---|---|---|
| Diffuse -> Color | Any | Used for both diffuse and emissive colour |
| Diffuse -> Intensity | Any | Factor applied to diffuse colour |
| Shading -> Emit | Any | Factor applied to emissive colour |
| World -> Ambient_Color | Any | Not sure what effect this may have, if any, on the exported result. See also Shading -> Ambient. |
| Shading -> Ambient | Any | Amount of global ambient colour the material receives. |
| Transparency | Any | Use transparency if checked. |
| Transparency -> Alpha | Any | Transparency (opacity) factor. |
| Specular -> Color | Phong | |
| Specular -> Intensity | Phong | |
| Specular -> Hardness | Phong | Shininess |
| Mirror -> Color | Phong | Mirror must be checked. (this hasn't been tested) |
| Mirror -> Reflectivity | Phong | Mirror must be checked |
Be wary of checking Shading->Shadeless as this stops the export of several attributes including: Specular Color, Specular Factor, Shininess Exponent, Reflection Color, Reflection Factor, Specular, and Shininess.
In summary, material values you can play with in any material include:
- Diffuse colour
- Diffuse specular
- Transparency
- Specular colour
- Specular intensity
- Specular hardness
- Shading Emit
- Mirror
- Ambient (in World)
Textures
This section identifies the texture options used by the FBX exporter. Very few of the available options are actually exported and the only exported item relevant to normal/bump maps is the Mapping->Coordinates value. In practice, this isn't an issue as test assets using Trainz bump mapped materials work fine. You might need to provide your own texture.txt files when normal maps are required.
The FBX exporter uses the following texture slot options:
| Texture Option | Comment |
|---|---|
| Texture name | Can be any name but recommend names such as Diffuse, Normal or similar to identify purpose. |
| Texture type | Must be "Image or movie" |
| Image -> Name | Filename of image. |
| Image -> Use Alpha | Tick if alpha channel is to be used. |
| Image -> Alpha Mode | This value is exported but probably not used by Trainz so leave it as "straight". |
| Mapping -> Coordinates | Use UV, Normal or Reflection |
| Mapping -> Map | UV map name |
| Image Mapping -> Extension | Use Repeat if UV wrapping required. Probably only of value within Blender since Trainz texture.txt files define image wrapping. |
Sample Blender FBX Material Models
These are just Blender models (the cube) that demonstrate the various Trainz materials.
Notex: Just a simple notex material on a box. [File:4000001- FBX paint-test-notex.zip]
Onetex, reflect, tbumptex, tbumpenv and tbumpgloss
These are simple boxes using the same texture but with different material types;
Onetex: File:4000002 - FBX paint-test-onetex.zip
Reflect: File:4000003 - FBX - paint-test-reflect.zip
Tbumptex: File:4000004 - FBX - paint-test tbumptex.zip
Tbumpenv: File:4000005 - FBX - paint-test tbumpenv.zip
Tbumpgloss:
(TBD)
Animation
Overview
Trainz will not animate a mesh without the use of helper points using the "b.r" notation. For Blender, those helper points can be armatures (bones) or empties. Lattices are not supported by the FBX exporter.
An animation must have a root helper normally called "b.r.main" although "b.r.root" will also work. Using such names helps identify the overall parent of the animation. Other animation helpers are called "b.r.xxx", where "xxx" can be any name. These helpers must be children of the main/root helper.
Exporting an animated mesh object
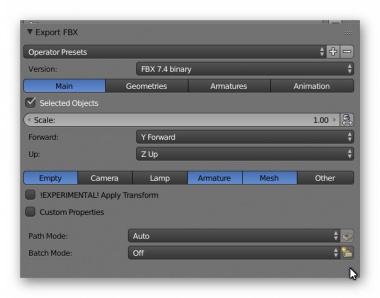
The Main Menu
- Select Empty and Armature depending on how you set up your animation.
- Other options are described above.
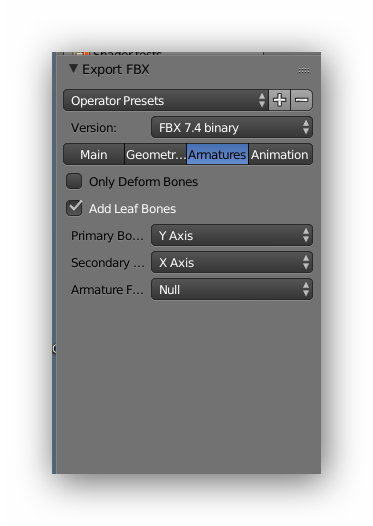
The Armatures Menu
- Use the values as shown.
The Animation Menu
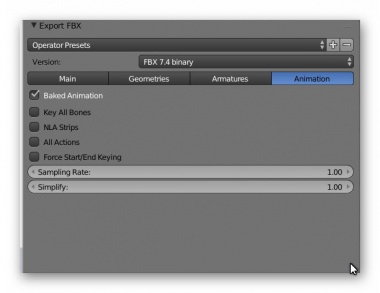
- Select Baked Animation and disable the other options.
Authors note: This is completely different from the process described in the 3DS Max FBX animation export. If Baked Animation is not ticked, then none of the other animation options are available. So far, none of those other options have been found useful.
Files created during the export and import process
The Blender exporter creates a binary file with the name of your choosing plus an FBX suffix. For animation, the exporter creates an internal name that the TANE importer uses for an animation (KIN) file.
If you choose Baked Animation (recommended), then the animation name is comprised of the FBX name and the word "_scene". So, if you export a model called "box.fbx" with animation, then the importer creates a "box.trainsmesh" and "box_scene.fbx".
If you don't choose Baked Animation, then the TANE importer uses the name of the animation channel so you might get names like "b.r.main-b.r.mainAction.kin".
Config.txt
The names of mesh and KIN files may not be obvious so you may need to create some dummy names for your mesh and KIN files. After importing into TANE, open the asset for editing and look for the files created. Then go back and correct entries in the config.txt.
Sample mesh-table entry with animation:
mesh-table {
 default {
   auto-create                           1
   mesh                                  "box.trainzmesh"
   anim                                  "box_scene.kin"
   animation-loop-speed                  1.00
 }
Animation Warnings and Errors
| Warning/Error | Help/Explanation |
|---|---|
| ! ... T14120: Simplified dummy tracks with just one key. | Not sure what this warning is about but the animation is OK. |
| ! ... Skipping one or more lines with the same contents | To be investigated. Perhaps the FBX file is repeating information. |
Sample Animations
The following samples are provided to demonstrate different types of Blender FBX animations. You are free to use them for any purpose - i.e. no copyright!
Simple Animation 1 - Uses an empty as animated parent
File:890045 fbx anim1 - empty.zip
This animation rotates a coloured cube around the X axis using an empty as parent b.r.main. The animation action, within Blender, is called b.r.mainAction. The channel has been set to linear interpolation.
When exporting, you must select Empty and Mesh.
Exported names: The Blender FBX exporter creates a file called box.fbx. On commit, TANE creates a mesh file called box.trainzmesh and an animation file called box_scene.kin.
Simple Animation 2 - Uses an armature as animated parent
File:890044 fbx anim1 - armatures.zip
This animation rotates a coloured cube around the X axis using an armature with a single bone as parent b.r.main. The animation rotates anti-clockwise.
This is much the same as Sample 1 but demonstrates that you can use either an empty or an armature for simple animations.
When exporting, you must select Armature and Mesh.
Exported names: The Blender FBX exporter creates a file called box.fbx. On commit, TANE creates a mesh file called box.trainzmesh and an animation file called box_scene.kin.
Simple Animation 3 - Four animated cogs - LOD model
File:4000110 - FBX - anim test 4 - four cogs.zip
This animation simulates four rotating cogs. There are two LOD levels. LOD0 (the high poly version) is in layer 1 and LOD1 (the low poly version) is in layer 2. Layer 11 contains the animated armatures. There are four animation tracks.
To export LOD0, select all the objects in layers 1 and 11 so the LOD0 meshes and the armatures are all selected. On export, ensure Empty, Armature and Mesh are selected and use the name "4cogs-lod0.fbx". b.r.main is an empty so Empty must be selected.
To export LOD1, select all the objects in layers 2 and 11 so the LOD1 meshes and the armatures are all selected. On export, ensure Empty, Armature and Mesh are selected and use the name "4cogs-lod1.fbx".
You can choose any names you want but a meaningful name is useful.
This is the relevant section of config.txt:
mesh-table {
 gears-lod0 {
   auto-create                           1
   mesh                                  "4cogs-lod0.trainzmesh"
   lod-level                             0
   anim                                  "4cogs-lod0_scene.kin"
   animation-loop-speed                  1.00
 }
 gears-lod1 {
   auto-create                           1
   mesh                                  "4cogs-lod1.trainzmesh"
   lod-level                             1
   anim                                  "4cogs-lod0_scene.kin"
   animation-loop-speed                  1.00
 }
} mesh-detail-level-count 2
Note that the transition from LOD0 to LOD1 is obvious.
More Complex Animations
More complex animation samples will be added when available.
