How to Create a Message Popup Icon
m (→The Icon Image) |
m (→The Texture File) |
||
| Line 352: | Line 352: | ||
<td>[[file:Gears.PNG]]</td> | <td>[[file:Gears.PNG]]</td> | ||
<td><font size="3">'''Settings:'''</font><br> | <td><font size="3">'''Settings:'''</font><br> | ||
| − | *'''primary''' - this is the name of the icon image file that contains the '''RGB''' colour image | + | *'''primary''' - this is the name of the icon image file that contains the '''RGB''' colour image. Any '''alpha channel''' will be ignored and will be rendered as '''white''' |
| − | *'''alpha''' - this is the name of the icon image file that contains the '''Alpha Channel''' (transparency) image | + | *'''alpha''' - this is the name of the icon image file that contains the '''Alpha Channel''' (transparency) image (see '''Notes:''' below) |
*'''tile=st''' - instructs TANE to tile the image both horizontally and vertically. This has no effect on the icon in a message popup window but must be included for validation purposes | *'''tile=st''' - instructs TANE to tile the image both horizontally and vertically. This has no effect on the icon in a message popup window but must be included for validation purposes | ||
No "white spaces" between the text characters is allowed.</td> | No "white spaces" between the text characters is allowed.</td> | ||
| Line 368: | Line 368: | ||
<td>[[file:NotePad.PNG]]</td> | <td>[[file:NotePad.PNG]]</td> | ||
<td><font size="3">'''Notes:'''</font><br> | <td><font size="3">'''Notes:'''</font><br> | ||
| − | In the example shown above, both the '''primary''' and '''alpha''' images are the same. In this case the image must contain '''<u>both</u>''' the '''RGB''' colour data and the '''Alpha Channel''' (transparency) data.<br> | + | In the example shown above, both the '''primary''' and '''alpha''' images are the same. In this case the image must contain '''<u>both</u>''' the '''RGB''' colour data and the '''Alpha Channel''' (transparency) data - so it must have a '''depth''' of '''32 bits'''.<br> |
Where the two files are not the same then:- | Where the two files are not the same then:- | ||
*both files must be the same size (64 x 64) | *both files must be the same size (64 x 64) | ||
| − | * | + | *both images must have a '''depth''' of '''24 bits''' - so no '''alpha channel''' must be present in either image |
| − | *the '''alpha''' image file ''should'' be a greyscale image | + | *the '''alpha''' image file ''should'' be a greyscale image<br> |
| − | Image file formats supported by TANE that have ''' | + | Image file formats supported by TANE that have '''alpha channels''' are:- |
*bmp | *bmp | ||
*png | *png | ||
Revision as of 16:55, 5 August 2018
Contents |
Message Popup Icons
| The icons used in Custom Message Popups belong to the class of Textures - Not Environmental |
Information on Message Popups can be found at the Trainz Wiki pages:-
Using the Message Popup Rule
Using the Message Popup Rule (Applications)
How to Create a HTML Asset
Message Popup Rule (description)
How to Create a New Non-Environmental Texture Asset
|
|
|||
 |
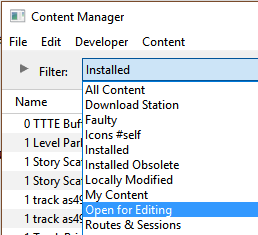
Step 2: Find the New Asset
|
||
|
|
|||
 |
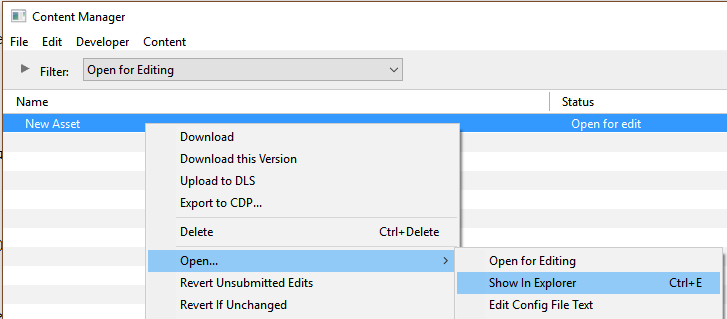
Step 3: Open the Asset in Windows Explorer
|
||
|
|
|||
 |
Step 4: Open File in Notepad
|
||
|
|
|||||
 |
Step 5: Edit the File
|
||||
|
|
|
 |
Step 6: Add Any "Extras" You will need to add three additional files (possibly more depending on how the icon is created) to the asset folder:-
|
 |
THIS IS AN EXAMPLE ONLY This is the minimum number of files needed in a Texture asset |
|
|
||||||||
 |
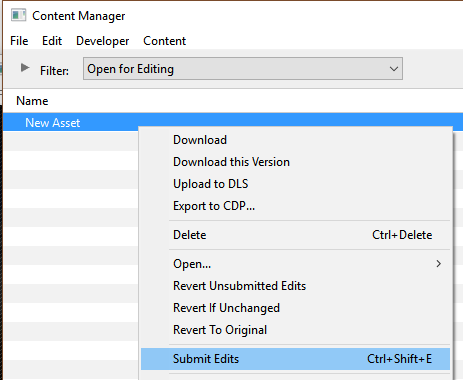
Step 7: Finish Up
|
|||||||
The Config.txt File
This file should follow the same (or a similar) format as the example below. Entries in blue will be different for each asset. The order of the "tags" is not important:-
kuid                                    <kuid:this is an auto-generated number>
kind                                    "texture"
texture                                 "asset_name.texture"
username                                "place your selected asset name here"
category-class                          "JI"
trainz-build                            4.3

thumbnails
{
  0
  {
    width                               240
    height                              180
    image                               "name_of_thumbnail.jpg"
  }

  {
    width                               64
    height                              64
    image                               "asset_name.texture"
  }
}
description                             "Place your description of the icon here"
|
|
|
| Settings: For the above example:
|
|
|
|
|
The Icon Image
| You will need image editing software to create the icon image or to change an existing image to the required dimensions and format. |
(not to scale) |
|
||||||
If your image will have a transparency, such as a transparent background, it is usually a lot easier to save the image in a format that supports an alpha channel (bmp, png or tga) and either
|
The Texture File
| The .texture.txt file mainly contains the transparency (or Alpha Channel) data. It is recommended that the file is present even if no transparency is used in the icon. |
|
|
|
Settings:
|
|
|
|
|
A sample .texture.txt file is shown below:-
primary=ashpit.tga alpha=ashpit.tga tile=st |
|
||||||
| Notes: In the example shown above, both the primary and alpha images are the same. In this case the image must contain both the RGB colour data and the Alpha Channel (transparency) data - so it must have a depth of 32 bits. Where the two files are not the same then:-
Image file formats supported by TANE that have alpha channels are:-
|
A more detailed description of the Texture File can be found on the Trainz Wiki at Texture File
Using the Asset
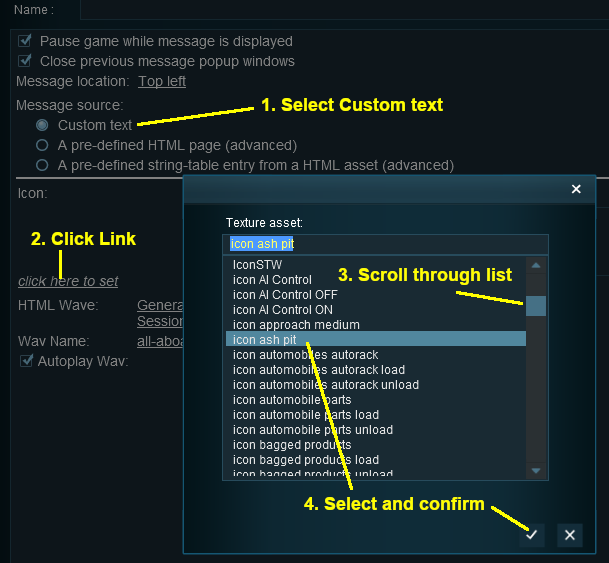
Once the new asset has been committed it will be available for use in a Message Popup Rule. It will appear as a Texture Asset in the rule icon list.
 |
|
||||||
Trainz Wiki
 |
More Tutorials and Guides to Using Trainz |


