HowTo/Build a drivable car
Tonyhilliam (Talk | contribs) |
|||
| (5 intermediate revisions by 2 users not shown) | |||
| Line 22: | Line 22: | ||
== The Interior == | == The Interior == | ||
| − | + | '''Name:''' "TestCarInterior" | |
| − | + | ||
| − | + | '''KUID:''' <kuid:523:1972943> | |
| + | |||
| + | '''Desc:''' This asset is a simple interior mesh for our car. We don't provide any interactive controls at the current time, although you could add these in the regular fashion. | ||
| + | |||
| + | The car's interior is configured similarly to a loco interior, but is missing all of the usual controls. You could add controls for a shift lever, steering wheel, etc. but this example relies on keyboard control and doesn't provide any visual feedback. | ||
| + | |||
| + | A single mesh is provided to give the visual appearance of the interior. | ||
| + | |||
| + | A single camera entry is provided to give the camera position within the interior. | ||
| + | |||
| + | A script class is specified, which provides all the interesting implementation details. The script file contains the following functions: | ||
| + | |||
| + | |||
| + | public void Init(Asset asset); | ||
| + | |||
| + | The Init() function sets up handlers for our various control inputs, and begins the movement thread. | ||
| + | |||
| + | |||
| + | public void HandleKeyForward(Message msg); | ||
| + | public void HandleKeyForwardUp(Message msg); | ||
| + | public void HandleKeyBackward(Message msg); | ||
| + | public void HandleKeyBackwardUp(Message msg); | ||
| + | public void HandleKeyLeft(Message msg); | ||
| + | public void HandleKeyLeftUp(Message msg); | ||
| + | public void HandleKeyRight(Message msg); | ||
| + | public void HandleKeyRightUp(Message msg); | ||
| + | |||
| + | The keypress handlers simply modify some boolean variables so that the ThreadedMovement() function knows the current user input state. | ||
| + | |||
| + | |||
| + | thread void ThreadedMovement(void); | ||
| + | |||
| + | The ThreadedMovement() function continuously updates the position of the parent map object (the car) based on the current user input state. This isn't a particularly efficient way to handle things, because it will chew CPU time even when the car is sitting idle. We don't really care for this example, because Trainz only has one Interior active at any given time. If you were writing a more time-sensitive script you should probably consider starting and stopping the movement thread as required. | ||
| − | |||
| − | |||
== The Car Scenery Object == | == The Car Scenery Object == | ||
| − | + | '''Name:''' "TestCar" | |
| − | + | ||
| − | + | '''KUID:''' <kuid:523:1972941> | |
| + | |||
| + | '''Desc:''' This asset is a simple exterior mesh for our car. You can place this object into a route using Surveyor, and the user can take over control of this object in Driver. This asset uses the "TestCarInterior" interior, and has four wheel attachments which each use the "TestCarWheel" mesh. | ||
| + | |||
| + | [[Image:TestCar.png]] | ||
| + | |||
| + | The car is a regular scenery object. There are two things worth noting about its configuration: | ||
| + | |||
| + | 1. It specifies an interior, so that the user can jump to interior view and so the user can control it. | ||
| + | |||
| + | interior <kuid:523:1972943> | ||
| + | |||
| + | 2. It uses four attachment effects in its mesh-table, one for each wheel. This will allow us to rotate or translate the wheel as desired. | ||
| + | |||
| + | frontright | ||
| + | { | ||
| + | kind "attachment" | ||
| + | default-mesh <kuid:523:1972942> | ||
| + | att "a.frontright" | ||
| + | } | ||
| − | |||
== The Car Wheel Mesh == | == The Car Wheel Mesh == | ||
| − | + | '''Name:''' "TestCarWheel" | |
| − | + | ||
| − | + | '''KUID:''' <kuid:523:1972942> | |
| + | |||
| + | '''Desc:''' A simple wheel mesh. We split these off the body of the car, so that they can be rotated or even bounced up and down independently of the car body. | ||
| + | |||
| + | [[Image:TestCarWheel.png]] | ||
== Creating a Route and Session == | == Creating a Route and Session == | ||
| − | + | The following simple steps allow you to place the car into a session, ready for use: | |
| + | |||
| + | 1. Open Surveyor with a new route and session (you can use an existing route and session easily enough, but let's start simple.) | ||
| + | |||
| + | 2. Open the Objects tab (F3). | ||
| + | |||
| + | 3. Select the "TestCar" object in the object picker. | ||
| + | |||
| + | 4. Click in the 3D world to place a single car instance. | ||
| + | |||
| + | 5. Open the "Edit Session..." dialog. | ||
| + | |||
| + | 6. Add the "Set Camera" rule. | ||
| + | |||
| + | 7. Set the rule options as shown in the following screenshot: | ||
| + | :[[Image:SetCameraRuleOptionsCar.png]] | ||
| + | |||
| + | 8. That's it! Save and QuickDrive. | ||
| + | |||
| + | |||
| + | == Where to go from here == | ||
| + | Now that you understand the basic concepts of gathering user input, moving scenery objects, and providing a controllable interior, there are a few other ideas that you could consider trying on your own: | ||
| + | |||
| + | * Spinning the wheels appropriately to match the movement of the car. | ||
| + | * Creating a more complex interior with a moving steering wheel. | ||
| + | * Adding a HUD display which shows the speed of the car. | ||
| + | * Add gear shift and brake controls. | ||
| Line 53: | Line 131: | ||
* [[Media:testcarinterior.zip]] - The "TestCarInterior" asset source files, in zip format. | * [[Media:testcarinterior.zip]] - The "TestCarInterior" asset source files, in zip format. | ||
* [[Media:testcarwheel.zip]] - The "TestCarWheel" asset source files, in zip format. | * [[Media:testcarwheel.zip]] - The "TestCarWheel" asset source files, in zip format. | ||
| + | |||
| + | |||
| + | ==Return to Index== | ||
| + | |||
| + | [[HowToGuides|<< How To Guides]] | ||
| + | |||
| + | [[Category:How-to guides]] | ||
Latest revision as of 08:58, 17 January 2018
This HowTo guide explores some of the new functionality being introduced in TS12. The art and scripts used here are deliberately simple examples rather than a complex real-world example, so that we can show off the new technology in an easy-to-understand manner.
Contents |
[edit] Concepts
The following concepts are demonstrated:
- Creating a non-train scenery object with an interior.
- Using a KIND Controlset asset with an interior script.
- Using attachment meshes.
- Moving map objects from script code.
[edit] Caveats
There are a few gotchas that developers should be aware of with these techniques:
- Trainz is first and foremost a Train Simulator. While we like to allow creative individuals to have a fairly free rein with the capabilities of the game engine, we sometimes have to take a step back and make sure that developers aren't sacrificing important parts of the game (Train Simulation, performance, stability) in their effort to achieve specific goals (flexibility, advanced features.) We have not fully evaluated the scope of this technology at the current time and it's important to note that if we find the flexibility of this system leading to compromised performance then we will step in and add deliberate limitations to restore the status quo. Feel free to play, but don't go overboard.
- There are a lot of features that should or could be added to improve on this example. We're sure that the community will be able to improve on this simple example and we'd love to see the directions that this technology is taken. We'll likely add new functionality in the future as well, but we're taking things one step at a time.
- The assets and techniques described here require TS12 SP1.
[edit] The Interior
Name: "TestCarInterior"
KUID: <kuid:523:1972943>
Desc: This asset is a simple interior mesh for our car. We don't provide any interactive controls at the current time, although you could add these in the regular fashion.
The car's interior is configured similarly to a loco interior, but is missing all of the usual controls. You could add controls for a shift lever, steering wheel, etc. but this example relies on keyboard control and doesn't provide any visual feedback.
A single mesh is provided to give the visual appearance of the interior.
A single camera entry is provided to give the camera position within the interior.
A script class is specified, which provides all the interesting implementation details. The script file contains the following functions:
public void Init(Asset asset);
The Init() function sets up handlers for our various control inputs, and begins the movement thread.
public void HandleKeyForward(Message msg);
public void HandleKeyForwardUp(Message msg);
public void HandleKeyBackward(Message msg);
public void HandleKeyBackwardUp(Message msg);
public void HandleKeyLeft(Message msg);
public void HandleKeyLeftUp(Message msg);
public void HandleKeyRight(Message msg);
public void HandleKeyRightUp(Message msg);
The keypress handlers simply modify some boolean variables so that the ThreadedMovement() function knows the current user input state.
thread void ThreadedMovement(void);
The ThreadedMovement() function continuously updates the position of the parent map object (the car) based on the current user input state. This isn't a particularly efficient way to handle things, because it will chew CPU time even when the car is sitting idle. We don't really care for this example, because Trainz only has one Interior active at any given time. If you were writing a more time-sensitive script you should probably consider starting and stopping the movement thread as required.
[edit] The Car Scenery Object
Name: "TestCar"
KUID: <kuid:523:1972941>
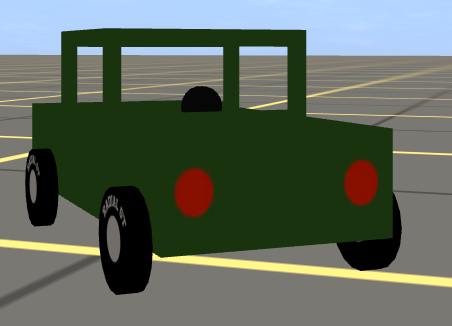
Desc: This asset is a simple exterior mesh for our car. You can place this object into a route using Surveyor, and the user can take over control of this object in Driver. This asset uses the "TestCarInterior" interior, and has four wheel attachments which each use the "TestCarWheel" mesh.
The car is a regular scenery object. There are two things worth noting about its configuration:
1. It specifies an interior, so that the user can jump to interior view and so the user can control it.
interior <kuid:523:1972943>
2. It uses four attachment effects in its mesh-table, one for each wheel. This will allow us to rotate or translate the wheel as desired.
frontright
{
  kind                          "attachment"
  default-mesh            <kuid:523:1972942>
  att                             "a.frontright"
}
[edit] The Car Wheel Mesh
Name: "TestCarWheel"
KUID: <kuid:523:1972942>
Desc: A simple wheel mesh. We split these off the body of the car, so that they can be rotated or even bounced up and down independently of the car body.
[edit] Creating a Route and Session
The following simple steps allow you to place the car into a session, ready for use:
1. Open Surveyor with a new route and session (you can use an existing route and session easily enough, but let's start simple.)
2. Open the Objects tab (F3).
3. Select the "TestCar" object in the object picker.
4. Click in the 3D world to place a single car instance.
5. Open the "Edit Session..." dialog.
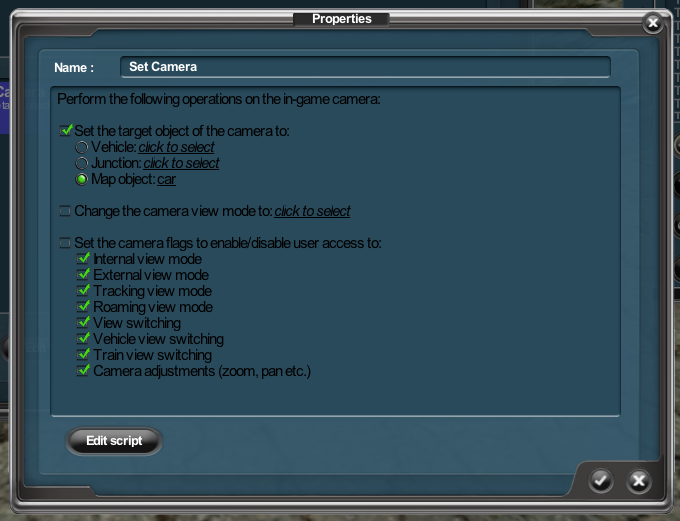
6. Add the "Set Camera" rule.
7. Set the rule options as shown in the following screenshot:
8. That's it! Save and QuickDrive.
[edit] Where to go from here
Now that you understand the basic concepts of gathering user input, moving scenery objects, and providing a controllable interior, there are a few other ideas that you could consider trying on your own:
- Spinning the wheels appropriately to match the movement of the car.
- Creating a more complex interior with a moving steering wheel.
- Adding a HUD display which shows the speed of the car.
- Add gear shift and brake controls.
[edit] Downloads
- Media:testcar.zip - The "TestCar" asset source files, in zip format.
- Media:testcarinterior.zip - The "TestCarInterior" asset source files, in zip format.
- Media:testcarwheel.zip - The "TestCarWheel" asset source files, in zip format.


