HowTo/Create a Help Page
Tonyhilliam (Talk | contribs) |
Tonyhilliam (Talk | contribs) |
||
| Line 87: | Line 87: | ||
| − | [[Category: | + | [[Category:How-to_guides|HowTo Guides]] |
Latest revision as of 10:57, 25 February 2014
This is a step by step guide to creating and editing a brand new Help Page for Trainz.
Contents |
[edit] What is a Help Page?
Before we start, let's look at what a Help Page is used for in this Trainz Wiki. Use R-click > Open new tab on this link to view the Help:Surveyor_Topology_Height_Get Help Page.
You will see that the page explains how to use a tool in Surveyor and also provides some links at the bottom to other Surveyor Tools. All pages with "Help:" can be accessed using the (?) tool in Trainz.
It is worth noting that the page you are on now is a HowTo page since it goes into much more detail than a Help Page.
[edit] Logging in to the Trainz Wiki
In order to create your own page on the wiki or to edit an existing page, you need a Planet Auran account. To log in, click on http://online.ts2009.com/mediaWiki/index.php/Main_Page and then click on the "Log In" option top right. Use your Planet Auran username and password.
- Note: You may experience a bug which says "username does not exist". Ignore the warning and as long as you see the "log out" option on the page, you will know you are really logged in.
[edit] Creating the new page name
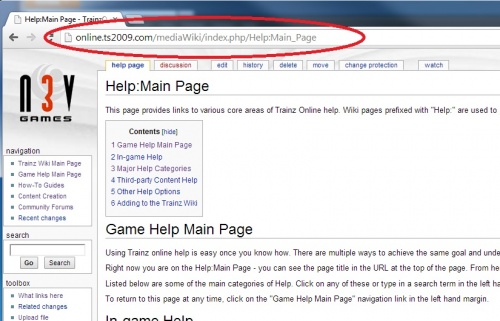
Open any existing Help Page (e.g. click on Game Help Main Page in the navigation section in the left hand margin). You will see the url of the page in the address bar in your browser.
Simply edit this url to the name of the page you want to create. In this case, we want our page to be called "Example Page" so we change the url to read Help:Example_Page.
- Note the use of the underscore in the url title. This doesn't appear in the page title (see image below).
- The page MUST have the "Help:" prefix
[edit] Adding your first sentence
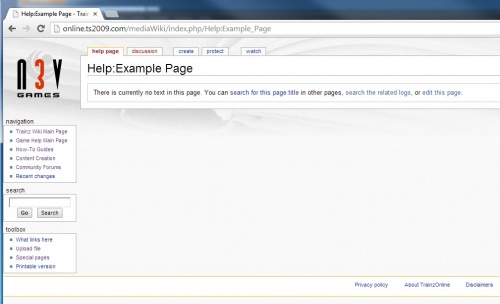
Once your new page is created, it will say "There is currently no text in this page. You can search for this page title in other pages, search the related logs, or edit this page."
(If you don't see this message, you have probably chosen a name for a page that already exists. e.g. Help:Main_Page)
To begin editing, click on the "Edit this Page" link.
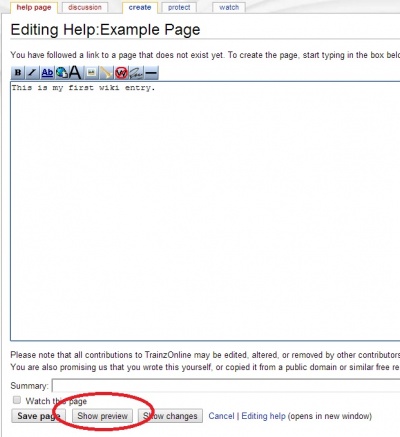
Type in "This is my first wiki entry." without the quotes, then hit Show Preview at the bottom of the page.
[edit] Formatting Tips
There are some very easy techniques to use to get your page formatted just like this page. We like to keep things standardized, so just following this template is all you really need to do.
Try each of tips listed in the following bullet points, and hit the Preview button each time to check your work:
- Using an asterisk "*" will create a bullet point.
- Using an equals sign before and after a word or words (e.g. "=Formatting Tips=") will create a heading
- Once you have created 3 or more headings, a numbered Contents section will automatically be added at the top of the page
[edit] Heading Indent
To indent a heading (e.g. to create a 4.1 heading in the contents section) use two equals signs: "=="
[edit] Inserting Images
The main format we use is a left aligned thumbnail image of about 400 pixels in size, and including a short caption description.
Simply use a double square bracket then the format "File:Show preview.jpg|thumb|400px|left|Use the "Show preview" button while editing" and then close with double square brackets.
- The "File:xxx.jpg" will display the .jpg image
- The |thumb adds a border around the image
- The 400px determines the size of the image
- "Left" moves the image to the left
- The caption is anything you write after the last pipe "|" that doesn't include any keywords (like left)
[edit] Creating and Uploading your Image
A picture is worth a thousand words, and so where ever possible, adding an image helps your reader better understand the situation. Here is a simple process we use to create our images:
- Use Alt-Printscreen to take a snapshot of Trainz (or whatever you are illustrating with your help or tutorial page)
- Open Paint and Ctrl-V to paste the the image
- Use Select and Crop to crop the area of the image
- Add a red mark using the arrow or circle tools
- Add some text
- Save the image
You are now ready to upload your image to the wiki:
- Click on Upload File in the left hand margin
- Click Choose File and navigate to where you saved your image
- Scroll down and click Upload File
- Copy the Destination Filename into your doc and use the File: format explained above
- Hit Preview to show that your image is showing correctly
[edit] Adding Important Links
The final step when creating a Help Page is to ensure that people have some sensible options of where else to go for more help.
We want every help page to be linked to the Category "Help", so at the bottom of your page add "Category: Help" without the quotes.
If there are other logical places to send them, include a "See Also" heading at the bottom. Use double square brackets around the page name to provide a link to other pages.


