SAR Scenario Session Time Change
m |
|||
| (21 intermediate revisions by one user not shown) | |||
| Line 3: | Line 3: | ||
<tr valign="top"> | <tr valign="top"> | ||
<td width=50 align="left"></td> | <td width=50 align="left"></td> | ||
| − | <td width=900 align="center"><span style="font-size: 21px; font-weight: 700; background-color: black; color: white;">& | + | <td width=900 align="center"><span style="font-size: 21px; font-weight: 700; background-color: black; color: white;"> SAR Scenario Session Time Change </span></td> |
| − | <td width=50 align="right"> | + | <td width=50 align="right"></td> |
</tr> | </tr> | ||
<tr valign="top"> | <tr valign="top"> | ||
| Line 10: | Line 10: | ||
</tr> | </tr> | ||
</table> <!-- END Title table --> | </table> <!-- END Title table --> | ||
| − | |||
| − | |||
| − | |||
| − | |||
| − | |||
| − | |||
| − | |||
----- | ----- | ||
<table width=1000> | <table width=1000> | ||
<tr valign="top"> | <tr valign="top"> | ||
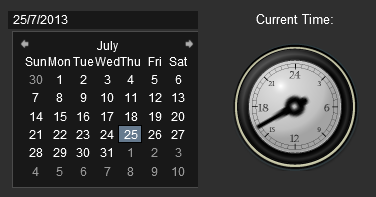
| − | <td width=900>When in '''Driver''' mode, the session clock will be shown at the top right corner of the screen. The '''SAR Peterborough Base Session''' always starts with the clock showing '''08:00'''. The time shown has no effect on the running of any scenarios in the '''SAR Peterborough Base Session''' as none of them have any rules or commands that refer to the | + | <td width=900>When in '''Driver''' mode, the session clock will be shown at the top right corner of the screen. The '''SAR Peterborough Base Session''' always starts with the clock showing '''08:00'''. The time shown has no effect on the running of any of the scenarios in the '''SAR Peterborough Base Session''' as none of them have any rules or commands that refer to the clock.</td> |
| − | <td width= | + | <td width=98>[[image:Clock_0800.png|link=]]</td> |
</tr> | </tr> | ||
</table> | </table> | ||
| − | However, you may prefer to have the session clock match the timetable for a selected run in one of the scenarios. For example, a timetabled train starting at a particular location at | + | However, you may prefer to have the session clock match the timetable for a selected run in one of the scenarios. For example, a timetabled train starting at a particular location at '''12:30'''.<br> |
This page provides the instructions for changing the session clock time to display the time value you prefer.<br> | This page provides the instructions for changing the session clock time to display the time value you prefer.<br> | ||
----- | ----- | ||
<br> | <br> | ||
| − | <span style="font-weight: 700; font-size: | + | You have two options for setting the Session Time:- |
| + | <br> | ||
| + | <table width=1000> | ||
| + | <tr valign="top"> | ||
| + | <td> | ||
| + | <table bgcolor=#000000 cellpadding=2> | ||
| + | <tr valign="top"> | ||
| + | <td> | ||
| + | <table width=496 bgcolor=#ffffff cellpadding=2> | ||
| + | <tr valign="top"> | ||
| + | <td colspan=2> | ||
| + | <table> | ||
| + | <tr valign="top"> | ||
| + | <td width=25>[[image:Ablue.png|link=]]</td> | ||
| + | <td><span style="font-weight: 700; font-size: 15px;">A Quick Driver Time Change (Trainz Plus and TRS22PE)</span></td> | ||
| + | </tr> | ||
| + | </table> | ||
| + | </td> | ||
| + | </tr> | ||
| + | <tr valign="top"> | ||
| + | <td>This allows you to quickly change the time and/or season "on the fly" while in Driver</td> | ||
| + | </tr> | ||
| + | <tr valign="top"> | ||
| + | <td>[[image:SessionOptionsCalendarTime_S20.png|link=]]</td> | ||
| + | </tr> | ||
| + | </table> | ||
| + | </td> | ||
| + | </tr> | ||
| + | </table> | ||
| + | </td> | ||
| + | <td> </td> | ||
| + | <td> | ||
| + | <table bgcolor=#000000 cellpadding=2> | ||
| + | <tr valign="top"> | ||
| + | <td> | ||
| + | <table width=496 bgcolor=#ffffff cellpadding=2> | ||
| + | <tr valign="top"> | ||
| + | <td colspan=2> | ||
| + | <table> | ||
| + | <tr valign="top"> | ||
| + | <td width=25>[[image:Bblue.png|link=]]</td> | ||
| + | <td><span style="font-weight: 700; font-size: 15px;">Editing the Session with the UDS (all Trainz versions)</span></td> | ||
| + | </tr> | ||
| + | </table> | ||
| + | </td> | ||
| + | </tr> | ||
| + | <tr valign="top"> | ||
| + | <td>This gives you the option of saving the time change as a new Session</td> | ||
| + | </tr> | ||
| + | <tr valign="top"> | ||
| + | <td>[[image:SAR_Surveyor_Session_Editor.png|490px|link=|alt=Session Editor]]</td> | ||
| + | </tr> | ||
| + | </table> | ||
| + | </td> | ||
| + | </tr> | ||
| + | </table> | ||
| + | </td> | ||
| + | </tr> | ||
| + | </table> | ||
| + | <br> | ||
| + | ='''A Quick Driver Time Change'''= | ||
| − | + | <table width=1000 bgcolor=#000000 cellpadding=2> | |
| + | <tr valign="top"> | ||
| + | <td> | ||
| + | <table width=996 bgcolor=#ffffb0 cellpadding=2> | ||
| + | <tr valign="top"> | ||
| + | <td width=25>[[image:NotePad.PNG|link=]]</td> | ||
| + | <td>This method is only available in '''Driver''' in '''Trainz''' versions '''Trainz Plus''' and '''TRS22PE'''</td> | ||
| + | </tr> | ||
| + | </table> | ||
| + | </td> | ||
| + | </tr> | ||
| + | </table> | ||
| − | <span style="font-weight: 700; font-size: 17px;">Step | + | <table width=1000> |
| + | <tr valign="top"> | ||
| + | <td colspan=3>In '''Driver''' open the '''Windows Menu''' and select <span style="font-weight: 700; font-size: 15px; color: white; background-color: black;"> Session Options </span>.<br></td> | ||
| + | </tr> | ||
| + | <tr valign="top"> | ||
| + | <td width=170>[[image:WindowsMenu_Driver.png|link=]]</td> | ||
| + | <td width=400>[[image:SessionOptionsPalette_S20.png|link=]]</td> | ||
| + | <td> | ||
| + | <table width=430 bgcolor=#000000 cellpadding=2> | ||
| + | <tr valign="top"> | ||
| + | <td> | ||
| + | <table bgcolor=#ffffb0 cellpadding=2> | ||
| + | <tr valign="top"> | ||
| + | <td> | ||
| + | <table> | ||
| + | <tr valign="top"> | ||
| + | <td width=25>[[image:NotePad.PNG|link=]]</td> | ||
| + | <td width=426><span style="font-size: 17px; font-weight: 700;">Notes:'''</span> | ||
| + | ---- | ||
| + | </td> | ||
| + | </tr> | ||
| + | <tr valign="top"> | ||
| + | <td colspan=2>This option has a number of advantages:-</td> | ||
| + | </tr> | ||
| + | </table> | ||
| + | <table> | ||
| + | <tr valign="top"> | ||
| + | <td width=10>[[image:DotPoint.JPG|10px|link=]]</td> | ||
| + | <td>The change can be quickly made without leaving '''Driver'''</td> | ||
| + | </tr> | ||
| + | <tr valign="top"> | ||
| + | <td>[[image:DotPoint.JPG|10px|link=]]</td> | ||
| + | <td>Other session features, such as the weather conditions, can be quickly altered</td> | ||
| + | </tr> | ||
| + | <tr valign="top"> | ||
| + | <td colspan=2>It does have one disadvantage:-</td> | ||
| + | </tr> | ||
| + | <tr valign="top"> | ||
| + | <td>[[image:DotPoint.JPG|10px|link=]]</td> | ||
| + | <td>Setting the '''exact time''' (to the exact minute) can be difficult</td> | ||
| + | </tr> | ||
| + | </table> | ||
| + | </td> | ||
| + | </tr> | ||
| + | </table> | ||
| + | </td> | ||
| + | </tr> | ||
| + | </table> | ||
| + | <br> | ||
| + | <table bgcolor=#000000 cellpadding=2> | ||
| + | <tr valign="top"> | ||
| + | <td> | ||
| + | <table bgcolor=#ffffff cellpadding=2> | ||
| + | <tr valign="top"> | ||
| + | <td colspan=2><span style="font-weight: 700; font-size: 15px;">Steps:</span> To set the session time:-</td> | ||
| + | </tr> | ||
| + | <tr valign="top"> | ||
| + | <td width=25>[[image:DotPoint1.JPG|link=]]</td> | ||
| + | <td>In the clock <span style="font-weight: 700; font-size: 15px; background-color: lightcyan;">Left Click and Drag</span> the clock hand around the dial to the required time</td> | ||
| + | </tr> | ||
| + | <tr valign="top"> | ||
| + | <td>[[image:DotPoint2.JPG|link=]]</td> | ||
| + | <td>Close (or minimise) the '''Session Options Window'''</td> | ||
| + | </tr> | ||
| + | </table> | ||
| + | </td> | ||
| + | </tr> | ||
| + | </table> | ||
| + | </td> | ||
| + | </tr> | ||
| + | </table> | ||
| + | <br> | ||
| + | ='''Editing the Session with the UDS'''= | ||
| + | |||
| + | <table width=1000> | ||
| + | <tr valign="top"> | ||
| + | <td> | ||
| + | Using the '''UDS''' (Universal Driver Surveyor) feature allows you to quickly switch between '''Driver''' and '''Surveyor''' and back again. It also makes it relatively easy to edit session parameters, such as the clock time, and restart any or all of the session rules. Its main advantage is that it gives you the option of saving your edits as a new session.</td> | ||
| + | </tr> | ||
| + | </table> | ||
| + | <br> | ||
| + | <span style="font-weight: 700; font-size: 17px;">Step [[image:DotPoint1.JPG|link=]] Switch from Driver to Surveyor</span><br> | ||
<table width=1000> | <table width=1000> | ||
<tr valign="top"> | <tr valign="top"> | ||
<td width=400>[[image:SAR_Driver_Tools_Menu.png|link=|alt=Driver Tools Menu]]</td> | <td width=400>[[image:SAR_Driver_Tools_Menu.png|link=|alt=Driver Tools Menu]]</td> | ||
| − | <td>In '''Driver''' open the '''Tools Menu''' and select | + | <td>In '''Driver''' open the '''Tools Menu''' and select <span style="font-weight: 700; font-size: 15px; color: white; background-color: black;"> Edit in Surveyor </span>.<br><br> |
| − | If you have | + | <table bgcolor=#000000 width=600 cellpadding=2> |
| + | <tr valign="top"> | ||
| + | <td> | ||
| + | <table bgcolor=#ffffb0 width=596 cellpadding=2> | ||
| + | <tr valign="top"> | ||
| + | <td>[[image:NotePad.PNG|link=]]</td> | ||
| + | <td><span style="font-size: 17px; font-weight: 700;">Notes:'''</span><br> | ||
| + | ---- | ||
| + | If you have '''Trainz Plus''' or '''TRS22 Platinum''' then you will see two '''Edit in Surveyor''' options - one for '''Surveyor Classic''' (the original Surveyor) and the other for '''Surveyor 2.0''' (the new Surveyor).<br> | ||
| − | It does not matter which one you select | + | It does not matter which one you select. |
| + | </td> | ||
</tr> | </tr> | ||
</table> | </table> | ||
| − | '''Trainz''' will immediately switch from '''Driver''' to '''Surveyor'''.<br> | + | </td> |
| + | </tr> | ||
| + | </table> | ||
| + | </td> | ||
| + | </tr> | ||
| + | </table> | ||
| + | '''Trainz''' will immediately switch from '''Driver''' to '''Surveyor'''.<br><br> | ||
| − | <span style="font-weight: 700; font-size: 17px;">Step | + | <span style="font-weight: 700; font-size: 17px;">Step [[image:DotPoint2.JPG|link=]] Open the Session Editor</span><br> |
<table width=1000> | <table width=1000> | ||
<tr valign="top"> | <tr valign="top"> | ||
<td width=250>[[image:SAR_Surveyor_Edit_Menu.png|link=|alt=Surveyor Edit Menu]]</td> | <td width=250>[[image:SAR_Surveyor_Edit_Menu.png|link=|alt=Surveyor Edit Menu]]</td> | ||
| − | <td>In '''Surveyor''' open the '''Edit Menu''' and select | + | <td>In '''Surveyor''' open the '''Edit Menu''' and select <span style="font-weight: 700; font-size: 15px; color: white; background-color: black;"> Edit Session.. </span><br><br> |
This will open the '''Session Editor'''<br> | This will open the '''Session Editor'''<br> | ||
| + | </td> | ||
| + | </tr> | ||
| + | </table> | ||
| + | <br> | ||
| + | <table width=1000> | ||
| + | <tr valign="top"> | ||
| + | <td width=590>[[image:SAR_Surveyor_Session_Editor.png|link=|alt=Session Editor]]</td> | ||
| + | <td>The '''Session Editor''' contains all the '''Rules''' that control how a session operates.<br><br> | ||
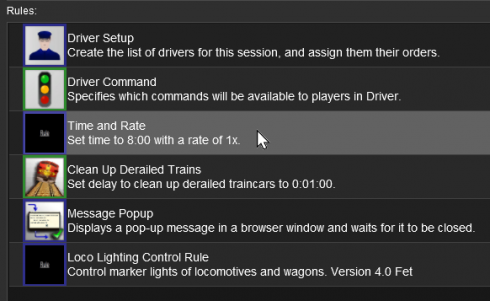
| + | There is only one rule that we will be editing, the '''Time and Rate''' rule.<br><br> | ||
| + | |||
| + | Click on the '''Time and Rate''' rule and then click on the '''Edit''' button at the bottom left of the '''Session Editor''' window.<br> | ||
| + | |||
| + | [[image:SAR_Surveyor_Session_Editor_Buttons.png|link=|alt=Editor Buttons]] | ||
</td> | </td> | ||
</tr> | </tr> | ||
</table> | </table> | ||
| + | <br> | ||
| + | |||
| + | <span style="font-weight: 700; font-size: 17px;">Step [[image:DotPoint3.JPG|link=]] Edit the Session Start Time</span><br> | ||
| + | |||
| + | <table width=1000> | ||
| + | <tr valign="top"> | ||
| + | <td width=550>[[image:SAR_Surveyor_Session_Editor_TimeRateRule.png|link=|alt=Time Rate Rule]]</td> | ||
| + | <td>The '''Time and Rate''' has just two simple controls - the session start time (in '''hours:minutes''') and the speed at which time passes (the '''x''' value).<br><br> | ||
| + | |||
| + | <span style="font-weight: 700; font-size: 15px;">To Change the Hour</span><br> | ||
| + | |||
| + | Click on the <span style="font-weight: 700; font-size: 17px; text-decoration: underline;">8</span><br><br> | ||
| + | |||
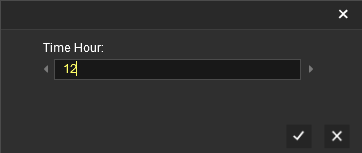
| + | This will open a dialogue window where you can enter the hour value, for example '''12'''. Hours are in 24 hour format from '''00''' to '''23'''.<br><br> | ||
| + | |||
| + | [[image:SAR_Surveyor_Session_Editor_Time12hr.png|link=|alt=12 Hours]]<br> | ||
| + | |||
| + | Click the '''Tick''' [[image:Tick.PNG|link=]] button on the '''Time Hour:''' dialogue window. | ||
| + | </td> | ||
| + | </tr> | ||
| + | </table> | ||
| + | <br> | ||
| + | |||
| + | <span style="font-weight: 700; font-size: 15px;">To Change the Minutes</span><br> | ||
| + | |||
| + | Click on the <span style="font-weight: 700; font-size: 17px; text-decoration: underline;">00</span><br><br> | ||
| + | |||
| + | This will open a dialogue window where you can enter the minute value, for example '''30'''. Minutes are from '''00''' to '''59'''.<br><br> | ||
| + | |||
| + | [[image:SAR_Surveyor_Session_Editor_Time30min.png|link=|alt=30 minutes]]<br> | ||
| + | |||
| + | Click the '''Tick''' [[image:Tick.PNG|link=]] button on the '''Time Minute:''' dialogue window.<br> | ||
| + | |||
| + | The new session start time will now be displayed in the '''Time and Rate''' Rule.<br> | ||
| + | |||
| + | [[image:SAR_Surveyor_Session_Editor_Time1230.png|link=|alt=Time 12:30]]<br> | ||
| + | |||
| + | Click the '''Tick''' [[image:Tick.PNG|link=]] button on the bottom right of the '''Time and Rate''' Rule window.<br> | ||
| + | |||
| + | The change will be confirmed by showing the time '''12:30''' in the '''Time and Rate''' Rule object in the '''Session Editor'''. | ||
| + | |||
| + | [[image:SAR_Surveyor_Time1230.png|link=|alt=Time 12:30]]<br><br> | ||
| + | |||
| + | <span style="font-weight: 700; font-size: 17px;">Step [[image:DotPoint4.JPG|link=]] Commit the Time Change</span><br> | ||
| + | |||
| + | At the bottom left of the '''Session Editor''' window are four buttons. <br> | ||
| + | |||
| + | <table width=1000> | ||
| + | <tr valign="top"> | ||
| + | <td width=425>[[image:SAR_Surveyor_Session_Editor_Buttons.png|link=|alt=Editor Buttons]]</td> | ||
| + | <td>Click the last button, '''Restart All Rules'''. This will restart any rules that have already started operating in the session.</td> | ||
| + | </tr> | ||
| + | <tr valign="top"> | ||
| + | <td>[[image:SAR_Surveyor_Session_Editor_Buttons_Restart.png|link=|alt=Editor Buttons]]</td> | ||
| + | <td>When the Restart task has been completed, the buttons will appear as shown on the left.</td> | ||
| + | </tr> | ||
| + | <tr valign="top"> | ||
| + | <td>[[image:SAR_Surveyor_Session_Editor_Buttons_Tick.png|link=|alt=Tick Buttons]]</td> | ||
| + | <td>Click the '''Tick''' [[image:Tick.PNG|link=]] button at the bottom right of the '''Session Editor''' screen. This will return you to the main '''Surveyor''' screen.</td> | ||
| + | </tr> | ||
| + | </table> | ||
| + | <br> | ||
| + | <span style="font-weight: 700; font-size: 17px;">Step [[image:DotPoint5.JPG|link=]] (Optional) Save as a New Session</span><br> | ||
| + | |||
| + | <table width=1000> | ||
| + | <tr valign="top"> | ||
| + | <td width=155>[[image:RouteSaveMenu.png|link=|alt=Save]]</td> | ||
| + | <td width=845>As an optional step, from '''Surveyor''' you can save your modified session like any other session. Press <span style="font-weight: 700; font-size: 15px;"><span style="color: white; background-color: black;"> Ctrl </span> + <span style="color: white; background-color: black;"> S </span></span> or select <span style="font-weight: 700; font-size: 15px; color: white; background-color: black;"> Save </span> from the '''Main Menu'''.<br> | ||
| + | |||
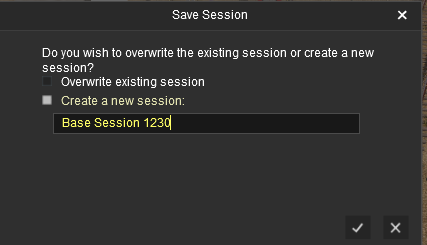
| + | From the '''Save Session''' dialogue box, select the option '''Create a new session''' to avoid overwriting the original session.<br> | ||
| + | |||
| + | <table> | ||
| + | <tr valign="top"> | ||
| + | <td>[[image:Save_Session_1230.png|link=]]</td> | ||
| + | <td> | ||
| + | <br> | ||
| + | <br> | ||
| + | Enter a meaningful name for the session, for example "Base Session 1230".</td> | ||
| + | </tr> | ||
| + | </table> | ||
| + | </td> | ||
| + | </tr> | ||
| + | </table> | ||
| + | <br> | ||
| + | |||
| + | <br> | ||
| + | <span style="font-weight: 700; font-size: 17px;">Step [[image:DotPoint6.JPG|link=]] Switch Back To Driver</span><br> | ||
| + | |||
| + | <table width=1000> | ||
| + | <tr valign="top"> | ||
| + | <td width=355>[[image:SAR_Surveyor_Tools_UDS_BackToDriver.png|link=|alt=Back to Driver]]</td> | ||
| + | <td>In '''Surveyor''' open the '''Edit Menu''' again and select <span style="font-weight: 700; font-size: 15px; color: white; background-color: black;"> Drive Session.. </span><br> | ||
| + | |||
| + | You will be switched back to '''Driver''' exactly where you were when you last left it to enter '''Surveyor'''.<br> | ||
| + | <table width=600> | ||
| + | <tr valign="top"> | ||
| + | <td width=500>However, there will be one difference. The clock at the top right corner of the screen will now show the updated session start time.</td> | ||
| + | <td width=99>[[image:Clock_1230.png|link=]]</td> | ||
| + | </tr> | ||
| + | </table> | ||
| + | </td> | ||
| + | </tr> | ||
| + | </table> | ||
| + | <br> | ||
| + | |||
| + | ---- | ||
| + | This page was created by Trainz user '''<span class="plainlinks">[http://online.ts2009.com/mediaWiki/index.php/User:Pware pware]</span>''' in October 2022 and was last updated as shown below. | ||
| + | ---- | ||
Latest revision as of 22:12, 23 April 2024
| SAR Scenario Session Time Change | ||
| For the SAR Peterborough Base Session v2.0 | ||
| When in Driver mode, the session clock will be shown at the top right corner of the screen. The SAR Peterborough Base Session always starts with the clock showing 08:00. The time shown has no effect on the running of any of the scenarios in the SAR Peterborough Base Session as none of them have any rules or commands that refer to the clock. |
However, you may prefer to have the session clock match the timetable for a selected run in one of the scenarios. For example, a timetabled train starting at a particular location at 12:30.
This page provides the instructions for changing the session clock time to display the time value you prefer.
You have two options for setting the Session Time:-
|
|
|||||||||||||||
[edit] A Quick Driver Time Change
|
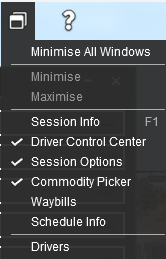
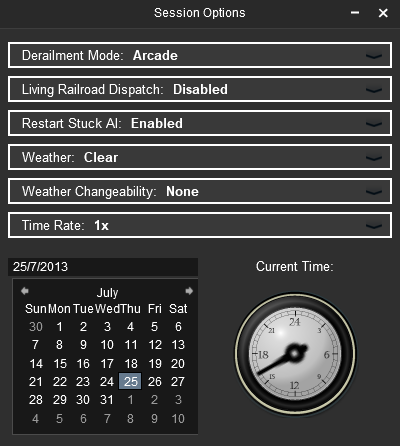
| In Driver open the Windows Menu and select Session Options . |
|||||||||||||||||||||||
 |
 |
|
|||||||||||||||||||||
[edit] Editing the Session with the UDS
| Using the UDS (Universal Driver Surveyor) feature allows you to quickly switch between Driver and Surveyor and back again. It also makes it relatively easy to edit session parameters, such as the clock time, and restart any or all of the session rules. Its main advantage is that it gives you the option of saving your edits as a new session. |
Step Switch from Driver to Surveyor
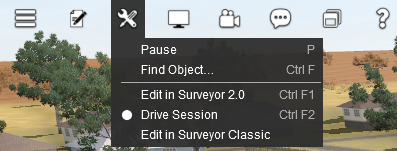 |
In Driver open the Tools Menu and select Edit in Surveyor .
|
Trainz will immediately switch from Driver to Surveyor.
Step Open the Session Editor
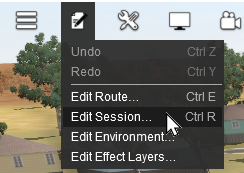 |
In Surveyor open the Edit Menu and select Edit Session.. This will open the Session Editor |
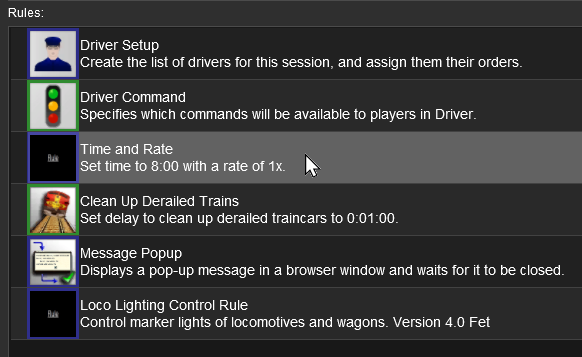 |
The Session Editor contains all the Rules that control how a session operates. There is only one rule that we will be editing, the Time and Rate rule. Click on the Time and Rate rule and then click on the Edit button at the bottom left of the Session Editor window.
|
Step Edit the Session Start Time
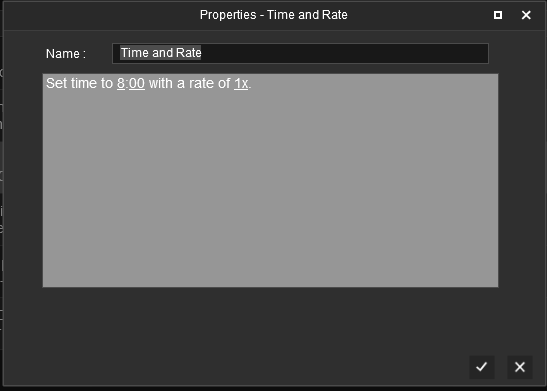 |
The Time and Rate has just two simple controls - the session start time (in hours:minutes) and the speed at which time passes (the x value). To Change the Hour Click on the 8 This will open a dialogue window where you can enter the hour value, for example 12. Hours are in 24 hour format from 00 to 23.
Click the Tick |
To Change the Minutes
Click on the 00
This will open a dialogue window where you can enter the minute value, for example 30. Minutes are from 00 to 59.
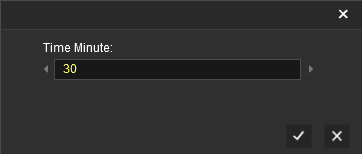
Click the Tick button on the Time Minute: dialogue window.
The new session start time will now be displayed in the Time and Rate Rule.
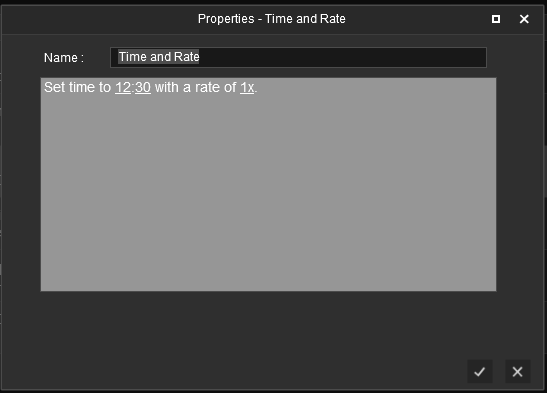
Click the Tick button on the bottom right of the Time and Rate Rule window.
The change will be confirmed by showing the time 12:30 in the Time and Rate Rule object in the Session Editor.

Step Commit the Time Change
At the bottom left of the Session Editor window are four buttons.
 |
Click the last button, Restart All Rules. This will restart any rules that have already started operating in the session. |
| When the Restart task has been completed, the buttons will appear as shown on the left. | |
 |
Click the Tick |
Step (Optional) Save as a New Session
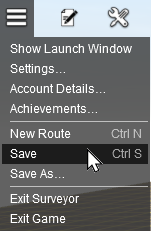 |
As an optional step, from Surveyor you can save your modified session like any other session. Press Ctrl + S or select Save from the Main Menu. From the Save Session dialogue box, select the option Create a new session to avoid overwriting the original session.
|
Step Switch Back To Driver
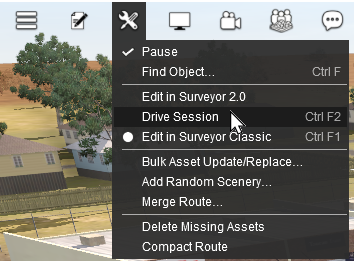 |
In Surveyor open the Edit Menu again and select Drive Session.. You will be switched back to Driver exactly where you were when you last left it to enter Surveyor.
|
This page was created by Trainz user pware in October 2022 and was last updated as shown below.
