How to Perform Database Repairs
m (→How to Create a "Clean Database") |
m |
||
| Line 1: | Line 1: | ||
<table width=1000> | <table width=1000> | ||
<tr valign="top"> | <tr valign="top"> | ||
| − | <td>The information in this Wiki Page applies to '''TANE''', '''TRS19''', '''Trainz Plus''' and '''TRS22'''. | + | <td colspan=2>The information in this Wiki Page applies to '''TANE''', '''TRS19''', '''Trainz Plus''' and '''TRS22'''. This guide will take you through the process of performing manual asset updates using '''Content Manager'''. Updates occur whenever new versions of assets installed on your system are uploaded to the '''DLS'''.</td> |
| − | + | ||
| − | This guide will take you through the process of performing manual | + | |
</tr> | </tr> | ||
| − | < | + | <tr valign="top"> |
| − | + | <td width=375> | |
__TOC__ | __TOC__ | ||
| − | < | + | </td> |
| + | <td> | ||
| + | <table bgcolor=#000000 cellpadding=2> | ||
<tr valign="top"> | <tr valign="top"> | ||
| − | <td | + | <td> |
| − | <td width= | + | <table bgcolor=#ffffb0 cellpadding=2> |
| − | <td | + | <tr valign="top"> |
| − | + | <td width=25>[[image:NotePad.PNG|link=]]</td> | |
| − | < | + | <td><span style="font-size: 17px; font-weight: 700;">Notes:'''</span><br> |
| + | ---- | ||
| + | The section describing how to create a '''Clean Install''' (i.e. containing only '''Base''' and '''Built-in''' assets) has been removed because the technique described no longer works in the latest versions of '''Trainz'''. | ||
| + | </td> | ||
</tr> | </tr> | ||
| − | </table> | + | </table> |
| − | + | </td> | |
| − | + | </tr> | |
| + | </table> | ||
| + | </td> | ||
| + | </tr> | ||
| + | </table> | ||
<table width=1000 bgcolor="lightcyan" cellpadding=2> | <table width=1000 bgcolor="lightcyan" cellpadding=2> | ||
<tr valign="top"> | <tr valign="top"> | ||
<td width=10>[[image:BlueDot10x10.png|link=]]</td> | <td width=10>[[image:BlueDot10x10.png|link=]]</td> | ||
| − | <td> | + | <td>'''Trainz''' will perform automatic updates when in '''Driver''' and '''Surveyor''' modes but you have little control over when and how this occurs</td> |
| − | + | ||
| − | + | ||
| − | + | ||
| − | + | ||
| − | + | ||
| − | + | ||
| − | + | ||
| − | + | ||
| − | + | ||
| − | + | ||
| − | + | ||
| − | + | ||
| − | + | ||
| − | + | ||
| − | + | ||
| − | + | ||
</tr> | </tr> | ||
</table> | </table> | ||
| Line 45: | Line 36: | ||
<table width=1000> <!-- BEGIN Nav Buttons Table --> | <table width=1000> <!-- BEGIN Nav Buttons Table --> | ||
<tr valign="top"> | <tr valign="top"> | ||
| − | <td width=729><span id=" | + | <td width=729><span id="stepFilter"></span> </td> |
| − | <td width=46>[[ | + | <td width=46>[[image:BackToTop.png|link=#top|alt=Top|Top]]</td> |
| − | <td width=75> | + | <td width=75> </td> |
| − | <td width=75>[[ | + | <td width=75>[[image:NextDown.png|link=#stepDLS|alt=Next Down|Next Down]]</td> |
| − | <td width=75>[[ | + | <td width=75>[[image:BackToBottom.png|link=#bottom|alt=Bottom|Bottom]]</td> |
</tr> | </tr> | ||
</table> <!-- END Nav Buttons Table --> | </table> <!-- END Nav Buttons Table --> | ||
| − | =''' | + | ='''Set Up An Update Filter'''= |
| − | + | <table width=1000 bgcolor=#000000 cellpadding=2> | |
| − | + | ||
| − | <table width=1000> | + | |
<tr valign="top"> | <tr valign="top"> | ||
| − | <td> | + | <td> |
| − | <td>" | + | <table width=996 bgcolor=#ffffe0 cellpadding=2> |
| + | <tr valign="top"> | ||
| + | <td>[[image:PencilTips.PNG|link=]]</td> | ||
| + | <td> | ||
| + | <table> | ||
| + | <tr valign="top"> | ||
| + | <td width=10>[[image:DotPoint.JPG|10px|link=]]</td> | ||
| + | <td>a '''Update Filter''' allows you to easily perform this operation at any time</td> | ||
</tr> | </tr> | ||
| − | |||
| − | |||
| − | |||
<tr valign="top"> | <tr valign="top"> | ||
| − | <td> | + | <td>[[image:DotPoint.JPG|10px|link=]]</td> |
| + | <td>because this is something that you will probably be doing on a regular basis, it would be a good idea to save the filter to perform the task of searching for asset updates.</td> | ||
</tr> | </tr> | ||
</table> | </table> | ||
| − | |||
| − | |||
| − | |||
| − | |||
| − | |||
| − | |||
| − | |||
| − | |||
| − | |||
</td> | </td> | ||
</tr> | </tr> | ||
| Line 84: | Line 69: | ||
</table> | </table> | ||
<br> | <br> | ||
| − | <table | + | <table cellpadding=2> |
<tr valign="top"> | <tr valign="top"> | ||
| − | <td | + | <td colspan=2><span style="font-weight: 700; font-size: 17px;">Steps:</span></td> |
| − | + | ||
| − | + | ||
| − | + | ||
| − | + | ||
</tr> | </tr> | ||
| − | |||
| − | |||
| − | |||
| − | |||
<tr valign="top"> | <tr valign="top"> | ||
| − | <td width= | + | <td width=25>[[image:DotPoint1.JPG|link=]]</td> |
| − | <td> | + | <td><span style="font-size: 17px; font-weight: 700;">Open a Content Manager Filter:</span> |
| − | </ | + | <table> <!-- BEGIN Step 1 table --> |
| − | < | + | |
| − | + | ||
| − | + | ||
| − | + | ||
| − | <table | + | |
<tr valign="top"> | <tr valign="top"> | ||
| + | <td>[[image:Update_Filter01.png|link=]]</td> | ||
<td> | <td> | ||
| − | |||
| − | |||
| − | |||
| − | |||
| − | |||
| − | |||
<table> | <table> | ||
<tr valign="top"> | <tr valign="top"> | ||
| − | <td width= | + | <td width=25>[[image:DotPoint1Blue.png|link=]]</td> |
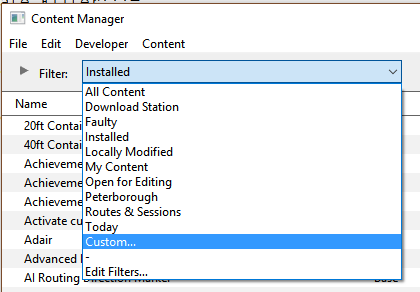
| − | <td>''' | + | <td>from the '''Trainz''' Launcher, select <span style="color: white; background-color: black; font-weight: 700; font-size: 15px;"> Manage Content </span></td> |
</tr> | </tr> | ||
<tr valign="top"> | <tr valign="top"> | ||
| − | <td>[[image: | + | <td>[[image:DotPoint2Blue.png|link=]]</td> |
| − | <td> | + | <td>in the '''Filter''' drop down box, select '''Custom...''' |
| + | </td> | ||
</tr> | </tr> | ||
| − | <tr | + | <tr> |
| − | <td colspan=2> | + | <td colspan=2> |
| + | <br>This will produce the following filter options...<br> | ||
| + | [[image:Update_Filter02a.png|link=]] | ||
| + | </td> | ||
| + | </tr> | ||
| + | </table> <!-- END Step 1 table --> | ||
| + | </td> | ||
</tr> | </tr> | ||
</table> | </table> | ||
| Line 129: | Line 103: | ||
</tr> | </tr> | ||
<tr valign="top"> | <tr valign="top"> | ||
| − | <td | + | <td>[[image:DotPoint2.JPG|link=]]</td> |
| − | < | + | <td><span style="font-size: 17px; font-weight: 700;">Configure:</span> |
| + | <table> <!-- BEGIN Step 2 table --> | ||
<tr valign="top"> | <tr valign="top"> | ||
| − | <td>[[ | + | <td>[[image:Update_Filter03.png|link=]]</td> |
| − | <td> | + | <td> |
| + | <table> | ||
| + | <tr valign="top"> | ||
| + | <td width=25>[[image:DotPoint1Blue.png|link=]]</td> | ||
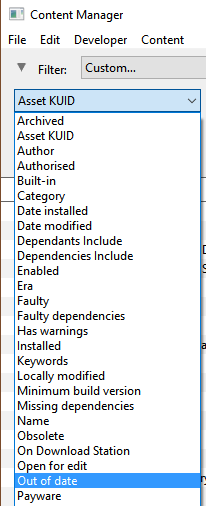
| + | <td>open the '''Asset KUID''' drop down box and select '''Out of date'''</td> | ||
| + | </tr> | ||
| + | <tr valign="top"> | ||
| + | <td width=25>[[image:DotPoint2Blue.png|link=]]</td> | ||
| + | <td>leave the '''Out of date''' setting at '''True'''</td> | ||
| + | </tr> | ||
| + | <tr> | ||
| + | <td colspan=2> | ||
| + | <br>This will produce the following filter options...<br> | ||
| + | [[image:Update_Filter04a.png|link=]] | ||
</td> | </td> | ||
</tr> | </tr> | ||
| Line 142: | Line 130: | ||
</td> | </td> | ||
</tr> | </tr> | ||
| − | |||
| − | |||
| − | |||
<tr valign="top"> | <tr valign="top"> | ||
| − | <td | + | <td>[[image:DotPoint3.JPG|link=]]</td> |
| − | < | + | <td><span style="font-size: 17px; font-weight: 700;">... and Configure:</span><br> |
| + | <table> <!-- BEGIN Step 3 table --> | ||
<tr valign="top"> | <tr valign="top"> | ||
| − | <td | + | <td>[[image:Update_Filter04.png|link=]] |
| − | + | ||
<table> | <table> | ||
<tr valign="top"> | <tr valign="top"> | ||
| − | <td | + | <td width=25>[[image:DotPoint1Blue.png|link=]]</td> |
| − | + | <td>delete the '''Name''' filter by a <span style="font-weight: 700; font-size: 15px; background-color: lightcyan;"> Left Click </span> on its [[image:CMFilterDeleteBtn.png|link=]] button on its extreme right</td> | |
| − | + | ||
| − | + | ||
| − | <td>[[ | + | |
</tr> | </tr> | ||
</table> | </table> | ||
| + | <br> | ||
| + | The final filter selection will look like ...<br> | ||
| + | [[image:Update_Filter05.png|link=]] | ||
</td> | </td> | ||
</tr> | </tr> | ||
</table> | </table> | ||
| − | + | </td> | |
| − | < | + | </tr> |
<tr valign="top"> | <tr valign="top"> | ||
| − | <td> | + | <td>[[image:DotPoint4.JPG|link=]]</td> |
| + | <td><span style="font-size: 17px; font-weight: 700;">Save:</span><br> | ||
| + | <table> <!-- BEGIN Step 4 table --> | ||
| + | <tr valign="top"> | ||
| + | <td colspan=2> | ||
<table> | <table> | ||
<tr valign="top"> | <tr valign="top"> | ||
<td width=25>[[image:DotPoint1Blue.png|link=]]</td> | <td width=25>[[image:DotPoint1Blue.png|link=]]</td> | ||
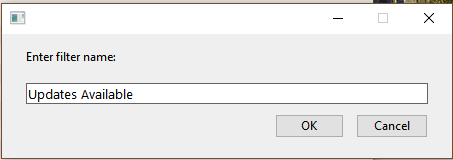
| − | <td> | + | <td>click the <span style="font-weight: 700; font-size: 15px;">Save</span> button</td> |
| − | + | ||
</tr> | </tr> | ||
<tr valign="top"> | <tr valign="top"> | ||
<td>[[image:DotPoint2Blue.png|link=]]</td> | <td>[[image:DotPoint2Blue.png|link=]]</td> | ||
| − | <td> | + | <td>enter a meaningful name for your filter and click <span style="font-weight: 700; font-size: 15px;">Ok</span></td> |
| − | + | ||
</tr> | </tr> | ||
<tr valign="top"> | <tr valign="top"> | ||
| − | <td | + | <td colspan=2>[[image:Update_Filter06.png|link=]]</td> |
| − | + | ||
| − | + | ||
| − | + | ||
| − | + | ||
| − | + | ||
| − | + | ||
| − | + | ||
</tr> | </tr> | ||
</table> | </table> | ||
</td> | </td> | ||
</tr> | </tr> | ||
| − | < | + | </table> |
| − | + | </td> | |
</tr> | </tr> | ||
</table> | </table> | ||
<br> | <br> | ||
| + | You can now select and run this filter whenever you want to check for and install any asset updates.<br> | ||
<table width=1000> <!-- BEGIN Nav Buttons Table --> | <table width=1000> <!-- BEGIN Nav Buttons Table --> | ||
<tr valign="top"> | <tr valign="top"> | ||
| − | <td width=729><span id=" | + | <td width=729><span id="stepDLS"></span> </td> |
| − | <td width=46>[[ | + | <td width=46>[[image:BackToTop.png|link=#top|alt=Top|Top]]</td> |
| − | <td width=75>[[ | + | <td width=75>[[image:NextUp.png|link=#stepFilter|alt=Next Up|Next Up]]</td> |
| − | <td width=75>[[ | + | <td width=75>[[image:NextDown.png|link=#stepBuiltin|alt=Next Down|Next Down]]</td> |
| − | <td width=75>[[ | + | <td width=75>[[image:BackToBottom.png|link=#bottom|alt=Bottom|Bottom]]</td> |
</tr> | </tr> | ||
</table> <!-- END Nav Buttons Table --> | </table> <!-- END Nav Buttons Table --> | ||
| − | =''' | + | ='''Updating Assets "Installed From DLS"'''= |
| − | <table width=1000 | + | <table width=1000> |
<tr valign="top"> | <tr valign="top"> | ||
| − | <td | + | <td>If you run your new filter and see one or more updated assets available for download that were "Installed from DLS", then the process is very simple.</td> |
| − | + | ||
</tr> | </tr> | ||
</table> | </table> | ||
<br> | <br> | ||
| − | <table width= | + | <table width=1000> |
<tr valign="top"> | <tr valign="top"> | ||
| + | <td>[[image:Update_DLS01.png|link=]]</td> | ||
<td> | <td> | ||
| − | <table | + | <table bgcolor=#000000 width=250> |
<tr valign="top"> | <tr valign="top"> | ||
| − | <td width= | + | <td> |
| − | <td> | + | <table bgcolor=#ffffe0 width=246> |
| − | + | <tr valign="top"> | |
| + | <td>[[image:PencilTips.PNG|link=]]</td> | ||
| + | <td>Clicking the '''Status''' column heading will sort the order of the rows into order so that all the "Available for download" updates will be grouped together. A second click may be needed to bring them to the top of the list or closer to the top.</td> | ||
| + | </tr> | ||
| + | </table> | ||
</td> | </td> | ||
</tr> | </tr> | ||
| + | </table> | ||
| + | </td> | ||
| + | </tr> | ||
| + | </table> | ||
| + | <br> | ||
| + | <table width=1000 bgcolor=#000000 cellpadding=2> | ||
<tr valign="top"> | <tr valign="top"> | ||
| − | <td> | + | <td> |
| − | <td> | + | <table width=996 bgcolor=#ffffff cellpadding=2> |
| + | <tr valign="top"> | ||
| + | <td colspan=2><span style="font-weight: 700; font-size: 17px;">Steps:</span> To download and install all the updated assets:- </td> | ||
</tr> | </tr> | ||
<tr valign="top"> | <tr valign="top"> | ||
| − | <td>[[image: | + | <td width=25>[[image:DotPoint1.JPG|link=]]</td> |
| − | <td> | + | <td>highlight all the items in the list shown as '''Installed from DLS''' in the '''Status''' column</td> |
</tr> | </tr> | ||
<tr valign="top"> | <tr valign="top"> | ||
| − | <td>[[image: | + | <td>[[image:DotPoint2.JPG|link=]]</td> |
| − | <td> | + | <td><span style="font-weight: 700; font-size: 15px; background-color: lightcyan;"> Right Click </span> on any one of the items and select '''Download''' from the popup menu</td> |
| + | </tr> | ||
| + | <tr valign="top"> | ||
| + | <td colspan=2>[[image:Update_DLS02.png|link=]]<br><br> | ||
| + | If the selected items have any new or updated dependencies that are also on the DLS then '''Content Manager''' will automatically find and download them as well</td> | ||
</tr> | </tr> | ||
</table> | </table> | ||
| Line 242: | Line 239: | ||
</table> | </table> | ||
<br> | <br> | ||
| − | <table bgcolor= | + | <table bgcolor="Aquamarine"> |
<tr valign="top"> | <tr valign="top"> | ||
| + | <td>[[image:LinkWiki.PNG|link=]]</td> | ||
<td> | <td> | ||
| − | + | More information on the '''Status''' labels used in '''Content Manager''' can be found on the '''Trainz Wiki Page''' at:-<br> | |
| − | + | '''[[Understand_Content_Manager_Status_Labels|How To Understand the Content Manager Status Labels]]'''<br> | |
| − | + | ||
| − | + | ||
| − | + | ||
</td> | </td> | ||
</tr> | </tr> | ||
</table> | </table> | ||
| − | </td> | + | <br> |
| + | <table width=1000> <!-- BEGIN Nav Buttons Table --> | ||
| + | <tr valign="top"> | ||
| + | <td width=729><span id="stepBuiltin"></span> </td> | ||
| + | <td width=46>[[image:BackToTop.png|link=#top|alt=Top|Top]]</td> | ||
| + | <td width=75>[[image:NextUp.png|link=#stepDLS|alt=Next Up|Next Up]]</td> | ||
| + | <td width=75>[[image:NextDown.png|link=#stepMixture|alt=Next Down|Next Down]]</td> | ||
| + | <td width=75>[[image:BackToBottom.png|link=#bottom|alt=Bottom|Bottom]]</td> | ||
| + | </tr> | ||
| + | </table> <!-- END Nav Buttons Table --> | ||
| + | |||
| + | ='''Updating Built in, Base and Payware Assets'''= | ||
| + | |||
| + | <table width=1000 bgcolor="lightcyan" cellpadding=2> | ||
| + | <tr valign="top"> | ||
| + | <td width=10>[[image:BlueDot10x10.png|link=]]</td> | ||
| + | <td>Assets that are '''Built-in''', '''Base''' or '''Installed, Payware''' will require a few extra steps to be updated</td> | ||
</tr> | </tr> | ||
</table> | </table> | ||
| − | + | ||
<table width=1000> | <table width=1000> | ||
| + | <tr valign="top"> | ||
| + | <td>The method shown above for updating '''DLS''' assets '''will not work''' for assets that are '''Built-in''', '''Base''' or '''Installed, Payware'''. If '''Content Manager''' lists updates for these types of assets as available for download then the process involves a few extra steps.</td> | ||
| + | </tr> | ||
| + | </table> | ||
| + | |||
| + | [[image:Update_Builtin01.png|link=]] | ||
| + | |||
| + | <table width=1000 cellpadding=2> | ||
<tr valign="top"> | <tr valign="top"> | ||
<td colspan=2><span style="font-weight: 700; font-size: 17px;">Steps:</span></td> | <td colspan=2><span style="font-weight: 700; font-size: 17px;">Steps:</span></td> | ||
| Line 263: | Line 282: | ||
<tr valign="top"> | <tr valign="top"> | ||
<td width=25>[[image:DotPoint1.JPG|link=]]</td> | <td width=25>[[image:DotPoint1.JPG|link=]]</td> | ||
| − | <td><span style="font-size: 17px; font-weight: 700;"> | + | <td><span style="font-size: 17px; font-weight: 700;">Select Built-in, Base and Payware Assets to Update:</span> |
| + | <table> <!-- BEGIN Step 1 table --> | ||
| + | <tr valign="top"> | ||
| + | <td>[[image:Update_Builtin02.png|link=]]</td> | ||
| + | <td> | ||
| + | <table> | ||
| + | <tr valign="top"> | ||
| + | <td width=25>[[image:DotPoint1Blue.png|link=]]</td> | ||
| + | <td>select all the '''Built-in''', '''Base''' or '''Installed, Payware''' items shown in your '''Updates Available''' list</td> | ||
</tr> | </tr> | ||
<tr valign="top"> | <tr valign="top"> | ||
| − | <td | + | <td>[[image:DotPoint2Blue.png|link=]]</td> |
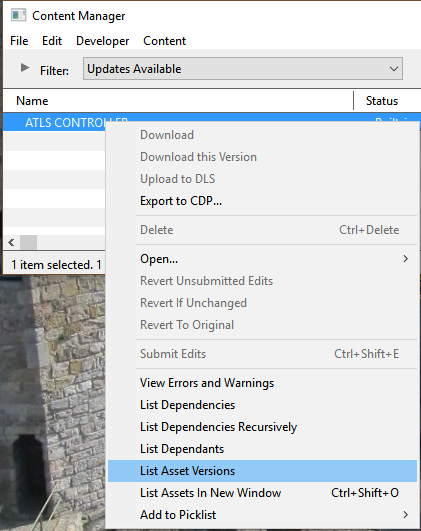
| − | < | + | <td>'''Right''' click on any one of the items in the list. Note that the option '''Download''' is not available in the popup menu</td> |
| + | </tr> | ||
<tr valign="top"> | <tr valign="top"> | ||
| − | <td>[[ | + | <td>[[image:DotPoint3Blue.png|link=]]</td> |
| − | <td> | + | <td>select the option '''List Asset Versions'''</td> |
</tr> | </tr> | ||
</table> | </table> | ||
| + | </td> | ||
| + | </tr> | ||
| + | <tr> | ||
| + | <td colspan=2> | ||
| + | <br> | ||
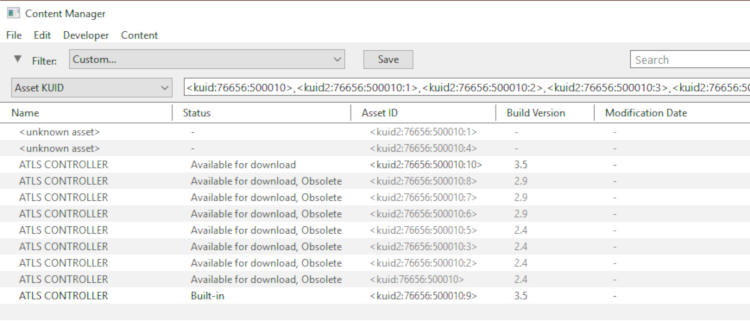
| + | This will display all the available versions of the selected assets that are:- | ||
<table> | <table> | ||
<tr valign="top"> | <tr valign="top"> | ||
| − | <td | + | <td width=10>[[image:RedDot10x10.png|link=]]</td> |
| + | <td>on your system, and</td> | ||
</tr> | </tr> | ||
<tr valign="top"> | <tr valign="top"> | ||
| − | <td | + | <td>[[image:RedDot10x10.png|link=]]</td> |
| − | <td> | + | <td>on the DLS, and</td> |
</tr> | </tr> | ||
<tr valign="top"> | <tr valign="top"> | ||
| − | <td>[[image: | + | <td>[[image:RedDot10x10.png|link=]]</td> |
| − | <td> | + | <td>obsolete</td> |
| + | </tr> | ||
| + | </table> | ||
| + | <br> | ||
| + | [[image:Update_Builtin03.png|link=]] | ||
| + | <br> | ||
| + | You may need to click the '''Status''' column heading once or twice to sort them into order and group all the '''Available for download''' assets together. | ||
| + | </td> | ||
| + | </tr> | ||
| + | </table> | ||
| + | </td> | ||
</tr> | </tr> | ||
<tr valign="top"> | <tr valign="top"> | ||
| − | <td>[[image: | + | <td>[[image:DotPoint2.JPG|link=]]</td> |
| − | <td>select the ''' | + | <td><span style="font-size: 17px; font-weight: 700;">Select Assets to Update:</span> |
| + | <table> <!-- BEGIN Step 2 table --> | ||
| + | <tr valign="top"> | ||
| + | <td> | ||
| + | <table> | ||
| + | <tr valign="top"> | ||
| + | <td width=10>[[image:RedDot10x10.png|link=]]</td> | ||
| + | <td>select all the items shown in the list as '''Available for download'''</td> | ||
| + | </tr> | ||
| + | <tr valign="top"> | ||
| + | <td>[[image:RedDot10x10.png|link=]]</td> | ||
| + | <td>'''DO NOT INCLUDE''' items shown as '''Available for download, Obsolete''' (unless that is what you really want)</td> | ||
| + | </tr> | ||
| + | <tr valign="top"> | ||
| + | <td>[[image:RedDot10x10.png|link=]]</td> | ||
| + | <td><span style="font-weight: 700; font-size: 15px; background-color: lightcyan;"> Right Click </span> on any one of the items and select '''Download''' from the popup menu</td> | ||
| + | </tr> | ||
| + | </table> | ||
| + | <br> | ||
| + | [[image:Update_Builtin04.png|link=]]<br><br> | ||
| + | If the items have any new or updated dependencies that are also on the '''DLS''' then '''Content Manager''' will automatically find and download them as well | ||
| + | </td> | ||
</tr> | </tr> | ||
</table> | </table> | ||
| Line 294: | Line 360: | ||
</table> | </table> | ||
<br> | <br> | ||
| − | + | <table width=1000> <!-- BEGIN Nav Buttons Table --> | |
| − | < | + | <tr valign="top"> |
| + | <td width=729><span id="stepMixture"></span> </td> | ||
| + | <td width=46>[[image:BackToTop.png|link=#top|alt=Top|Top]]</td> | ||
| + | <td width=75>[[image:NextUp.png|link=#stepBuiltin|alt=Next Up|Next Up]]</td> | ||
| + | <td width=75> </td> | ||
| + | <td width=75>[[image:BackToBottom.png|link=#bottom|alt=Bottom|Bottom]]</td> | ||
| + | </tr> | ||
| + | </table> <!-- END Nav Buttons Table --> | ||
| + | |||
| + | ='''Updating a Mixture of Assets'''= | ||
| + | |||
| + | |||
| + | <table cellpadding=4 bgcolor=#ffffff> | ||
<tr> | <tr> | ||
| − | <td> | + | <td colspan="2">If '''Content Manager''' shows a mixture of '''Installed from DLS''', '''Built-in''', '''Base''' and '''Installed, Payware''' assets to be updated, then use the method described above for updating all the assets.</td> |
| − | [[ | + | </tr> |
| + | <tr valign="top"> | ||
| + | <td><span style="font-size: 17px;">'''Steps:'''</span> | ||
| + | <table> | ||
| + | <tr valign="top"> | ||
| + | <td width=25>[[image:DotPoint1.JPG|link=]]</td> | ||
| + | <td>select all assets to be updated</td> | ||
| + | </tr> | ||
| + | <tr valign="top"> | ||
| + | <td width=25>[[image:DotPoint2.JPG|link=]]</td> | ||
| + | <td>select '''List Asset Versions''' from the menu</td> | ||
| + | </tr> | ||
| + | <tr valign="top"> | ||
| + | <td width=25>[[image:DotPoint3.JPG|link=]]</td> | ||
| + | <td>select and download all assets marked '''Available for download'''</td> | ||
| + | </tr> | ||
| + | </table> | ||
</td> | </td> | ||
</tr> | </tr> | ||
| Line 305: | Line 399: | ||
<table width=1000> <!-- BEGIN Nav Buttons Table --> | <table width=1000> <!-- BEGIN Nav Buttons Table --> | ||
<tr valign="top"> | <tr valign="top"> | ||
| − | <td width=729><span id=" | + | <td width=729><span id="bottom"></span> </td> |
| − | <td width=46>[[ | + | <td width=46>[[image:BackToTop.png|link=#top|alt=Top|Top]]</td> |
| − | <td width=75>[[ | + | <td width=75>[[image:NextUp.png|link=#stepMixture|alt=Next Up|Next Up]]</td> |
| − | <td width=75>& | + | <td width=75> </td> |
| − | <td width=75> | + | <td width=75> </td> |
</tr> | </tr> | ||
</table> <!-- END Nav Buttons Table --> | </table> <!-- END Nav Buttons Table --> | ||
---- | ---- | ||
| − | |||
| − | |||
='''Trainz Wiki'''= | ='''Trainz Wiki'''= | ||
| − | <table cellpadding= | + | <table cellpadding=4 bgcolor=#ffffff> |
<tr valign="top"> | <tr valign="top"> | ||
| − | <td>[[ | + | <td>[[image:TrainzWiki.png|link=]]</td> |
<td> | <td> | ||
<span style="font-size: 17px;">'''More Tutorials and Guides to Using Trainz'''</span><br> | <span style="font-size: 17px;">'''More Tutorials and Guides to Using Trainz'''</span><br> | ||
| Line 330: | Line 422: | ||
</table> | </table> | ||
---- | ---- | ||
| − | This page was created by Trainz user '''<span class="plainlinks">[http://online.ts2009.com/mediaWiki/index.php/User:Pware pware]</span>''' in | + | This page was created by Trainz user '''<span class="plainlinks">[http://online.ts2009.com/mediaWiki/index.php/User:Pware pware]</span>''' in Februrary 2019 and was last updated as shown below. |
---- | ---- | ||
[[Category:How-to guides]] | [[Category:How-to guides]] | ||
Revision as of 07:05, 7 November 2023
| The information in this Wiki Page applies to TANE, TRS19, Trainz Plus and TRS22. This guide will take you through the process of performing manual asset updates using Content Manager. Updates occur whenever new versions of assets installed on your system are uploaded to the DLS. | |||||
|
|
||||
| Trainz will perform automatic updates when in Driver and Surveyor modes but you have little control over when and how this occurs |
Set Up An Update Filter
|
| Steps: | |||||||||
Open a Content Manager Filter:
|
|||||||||
Configure:
|
|||||||||
... and Configure:
|
|||||||||
Save:
|
|||||||||
You can now select and run this filter whenever you want to check for and install any asset updates.
Updating Assets "Installed From DLS"
| If you run your new filter and see one or more updated assets available for download that were "Installed from DLS", then the process is very simple. |
 |
|
|
||||||||
 |
More information on the Status labels used in Content Manager can be found on the Trainz Wiki Page at:- |
Updating Built in, Base and Payware Assets
| Assets that are Built-in, Base or Installed, Payware will require a few extra steps to be updated |
| The method shown above for updating DLS assets will not work for assets that are Built-in, Base or Installed, Payware. If Content Manager lists updates for these types of assets as available for download then the process involves a few extra steps. |

| Steps: | |||||||||||||||||
Select Built-in, Base and Payware Assets to Update:
|
|||||||||||||||||
Select Assets to Update:
|
|||||||||||||||||
Updating a Mixture of Assets
| If Content Manager shows a mixture of Installed from DLS, Built-in, Base and Installed, Payware assets to be updated, then use the method described above for updating all the assets. | ||||||
Steps:
|
||||||
Trainz Wiki
 |
More Tutorials and Guides to Using Trainz |
This page was created by Trainz user pware in Februrary 2019 and was last updated as shown below.
