|
|
| Line 29: |
Line 29: |
| | <td align="center" width=50>'''From'''</td> | | <td align="center" width=50>'''From'''</td> |
| | <td align="center" width=50>'''To'''</td> | | <td align="center" width=50>'''To'''</td> |
| − | <td align="center" width=270>'''Tower Paths (Down)'''</td> | + | <td align="center" width=270>'''Tower Paths (Up)'''</td> |
| | </tr> | | </tr> |
| | <tr valign="top"> | | <tr valign="top"> |
| Line 152: |
Line 152: |
| | <td align="center">[[Image:Nred.png|link= ]]</td> | | <td align="center">[[Image:Nred.png|link= ]]</td> |
| | <td align="center">[[Image:Jred.png|link= ]]</td> | | <td align="center">[[Image:Jred.png|link= ]]</td> |
| − | <td>Loco Depot DE to Yard 2</td> | + | <td>'''Loco Depot DE to Yard 2'''</td> |
| | <td align="center">[[Image:Nred.png|link= ]]</td> | | <td align="center">[[Image:Nred.png|link= ]]</td> |
| | <td align="center">[[Image:Kred.png|link= ]]</td> | | <td align="center">[[Image:Kred.png|link= ]]</td> |
Revision as of 07:20, 4 April 2019
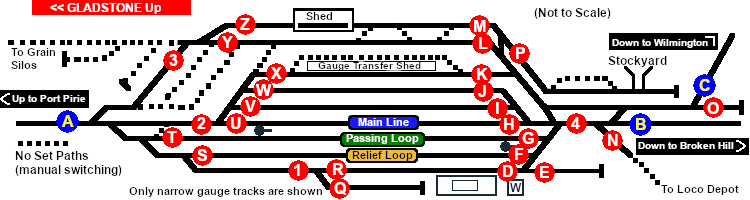
Main Line with Multiple Loops, Yards and Sidings plus loco servicing facilities. A major manned station, junction and a break-of-gauge location on the Port Pirie to Broken Hill line.
 |
| From |
To |
Tower Paths (Up) |
From |
To |
Tower Paths (Up) |
|
 |
 |
Approach (Broken Hill) Up Through to Port Pirie |
 |
 |
Approach (Broken Hill) Up to Port Pirie via Platform |
|
 |
Approach (Broken Hill) Up to Station |
|
 |
Approach (Broken Hill) Up to Relief |
|
 |
Approach (Broken Hill) Up to Loop |
|
 |
Approach (Broken Hill) Up to Main |
|
 |
Approach (Broken Hill) Up to Yard 1 |
|
 |
Approach (Broken Hill) Up to Yard 2 |
|
 |
Approach (Broken Hill) Up to Goods 1 |
|
 |
Approach (Broken Hill) Up to Goods 3 |
|
 |
Approach (Broken Hill) Up to Goods Shed |
 |
|
Approach (Wilmington) Up Through to Port Pirie |
 |
|
Approach (Wilmington) Up to Port Pirie via Platform |
|
|
Approach (Wilmington) Up to Station |
|
|
Approach (Wilmington) Up to Relief |
|
|
Approach (Wilmington) Up to Loop |
|
|
Approach (Wilmington) Up to Main |
|
|
Approach (Wilmington) Up to Yard 1 |
|
|
Approach (Wilmington) Up to Yard 2 |
|
|
Approach (Wilmington) Up to Goods 1 |
|
|
pproach (Wilmington) Up to Goods 3 |
|
|
Approach (Wilmington) Up to Goods Shed |
 |
|
Car Siding 1 DE to Station/td>
|  |
|
Loco Depot DE to Station |
|
|
Loco Depot DE to Relief |
|
|
Loco Depot DE to Loop |
|
|
Loco Depot DE to Main |
|
|
Loco Depot DE to Yard 1 |
|
|
Loco Depot DE to Yard 2 |
|
|
Loco Depot DE to Goods 1 |
|
|
Loco Depot DE to Goods 3 |
|
|
Loco Depot DE to Goods Shed |
 |
|
Goods Neck DE to Station |
|
|
Goods Neck DE to Relief |
|
|
Goods Neck DE to Loop |
|
|
Goods Neck DE to Main |
|
|
Goods Neck DE to Yard 1 |
|
|
Goods Neck DE to Yard 2 |
|
|
Goods Neck DE to Goods 1 |
|
|
Goods Neck DE to Goods 3 |
|
|
Goods Neck DE to Goods Shed |
 |
|
Stockyard DE to Goods Shed |
 |
|
Car Siding 2 DE to Port Pirie |
 |
|
Station Up to Port Pirie |
 |
|
Relief Up to Port Pirie |
 |
|
Loop Up to Port Pirie |
 |
|
Main Up to Port Pirie |
 |
|
Yard 1 Up to Port Pirie |
 |
|
Yard 1 Up to Port Pirie |
 |
|
Goods 1 Up to Port Pirie |
 |
|
Goods 3 Up to Port Pirie |
 |
|
Goods Shed Up to Port Pirie |
|
| From |
To |
Tower Shunt Paths |
|
|
 |
Car Siding 2 DE and Station Up to Station Yard Dn |
|
 |
Main Up, Yard 1 Up, Yard 2 Up and Goods 1 Up to Main Yard Dn |
|
 |
Goods 3 Up and Goods Shed Up to Goods Yard Dn |
 |
|
Main Yard Up to Station Dn, Relief Dn, Loop Dn, Main Dn, Yard 1 Dn, Yard 2 Dn, Goods 1 Dn, Goods 3 Dn, Goods Shed Dn |
|
|
 |