HowTo/Make your first Trainz Asset
m |
|||
| (70 intermediate revisions by 3 users not shown) | |||
| Line 1: | Line 1: | ||
| − | + | '''<span style="color:#ff0000">NOTE: This information is out of date.'''</span> While many of the techniques here are still valid, please see the [[TRS19]] page for links to the latest content creation information. | |
| − | + | This is a step by step tutorial that will teach you how to create a 3D model, create the Level of Detail (lower resolution) versions of the model, and import it into Trainz. | |
| − | ' | + | == Determine what software you'll need == |
| − | + | Before you start you will need: | |
| − | + | * A copy of Trainz Simulator 12 (or technically, a copy of Trainz). | |
| + | * A copy of 3DS Max studio that has a supported Trainz Exporter. We are using 3DS Max 2008 in this example. Information on all exporters can be found [[Max Exporters|here]] and the download files can be found on the [[Downloads]] page. | ||
| + | * To setup the exporter in 3DS Max you will want to extract the .zip file and then place the correct versions "JetExporter.dle" file into the plugins directory of your installed 3DS Max. For example, it might look like "C:\Program Files (x86)\Autodesk\3ds Max 2008\plugins" | ||
| + | |||
| + | * (OPTIONAL SOFTWARE) [http://quixel.se/ndo/ nDo2] is a Photoshop plugin that makes creating normal (or bump) maps for your models a breeze. | ||
| − | == | + | == How to setup the model and materials in 3DS Max == |
| − | + | ===Recommended Reading=== | |
| − | + | ||
| − | + | Before you start modelling you might want to read [[Modeling Trains for Trainz]] as it explains things like setting up the Unit Scale correctly to model in and a few other good pointers. | |
| − | + | ===Create Highest LOD First=== | |
| − | + | Model your object at the highest detail required to look good up close. The distance that the highest level of detail model (LOD 0) will be seen in Trainz could be from 0 up to about 40 meters away from the camera. | |
| − | + | ||
| − | == | + | |
| − | + | ||
| − | + | ||
| Line 30: | Line 29: | ||
| − | + | ===Additional LOD Levels=== | |
| − | + | Continue making a further 2 lower level detail models (LODs) for the exact same item you are modelling. | |
The 2nd highest detail model (LOD 1) is required to still look decent at 40 up to 80 meters away. You will want to remove about 50% of the original polygons found in the highest detailed model (LOD 0 - above). | The 2nd highest detail model (LOD 1) is required to still look decent at 40 up to 80 meters away. You will want to remove about 50% of the original polygons found in the highest detailed model (LOD 0 - above). | ||
The 3rd highest detail model (LOD 2) is required to still look decent at 80 up to 160 meters away. You will want to remove about 50% of the original polygons found in the 2nd highest detailed model (LOD 1). | The 3rd highest detail model (LOD 2) is required to still look decent at 80 up to 160 meters away. You will want to remove about 50% of the original polygons found in the 2nd highest detailed model (LOD 1). | ||
| − | This is an example of the LOD 0 detailed | + | This is an example of the LOD 0 detailed versus LOD 1 and LOD 2 detail. |
[[File:lod_0_v_lod_2.jpg]] [[File:lod_0_v_lod_2_distance.jpg]] | [[File:lod_0_v_lod_2.jpg]] [[File:lod_0_v_lod_2_distance.jpg]] | ||
| + | ===LOD 3 - Extremely low poly LOD=== | ||
| + | Create an extremely low detailed model (LOD 3) to be used in the distance. In this example we are saying this model will be used 160 meters and beyond. Usually the lowest detail model which is used in the distance is a billboard (2 polygon object) or a cube type object (8 - 10 polygons). Whatever you choose, this detail must use as fewer polygons as possible. | ||
| + | [[File:lod_3.jpg]] | ||
| − | + | ===Materials=== | |
| + | Setting up the materials is pretty easy but you'll need to work out what type of material (look) you want for your object. All the Trainz materials available for you to use in 3DS Max can be found [[Material Types|here]] and you'll also want to read about [[Exporting with 3D Studio Max]] for additional lighting material setup details. | ||
| − | [[File: | + | You should setup your image files as .TGA files and save them as 32-bits/pixel without "Compress (RLE)" checked. We are using Photoshop in the example below: |
| + | |||
| + | [[File:32-bits.jpg]] | ||
| + | |||
| + | == How to create the Trainz Asset and import it into Trainz Content Manager == | ||
| + | Once your models have LOD and materials applied, it's time to export from 3DS Max and get them into Trainz! | ||
| + | |||
| + | ===Exporting your model=== | ||
| + | To export into Trainz format you will want to Click File -> Export, Save as type, drop down and select Trainz format (*.IM, *.KIN) | ||
| + | |||
| + | ===Creating a Trainz Config File=== | ||
| + | When you have exported all your different LODs from 3DS Max to a folder (all your .IM and .texture.txt files, without errors), you are ready to use Content Manager to import your object into Trainz. | ||
| + | |||
| + | First you need to create a [[config.txt file]] - this file holds all the information the the Trainz code uses to manage your asset in the game. To do this, create a new file in the folder named "config.txt". | ||
| + | |||
| + | The "[[KIND TrainzBaseSpec]]" and "[[Content Configuration]]" pages give an enormous amount of information on everything to do with the config.txt options. Reading the Content Configuration pages can be very overwhelming to start with so below we have created the minimum information a config.txt file needs to get your LOD asset working in-game. (As you gain confidence, be sure to see what else Trainz can do though as it is very powerful!) | ||
| + | |||
| + | This is the very basic "scenery" object config.txt file. (Not to worry, we explain each part of this below) | ||
| + | |||
| + | kind "scenery" | ||
| + | username "Car_Example" | ||
| + | trainz-build 3.7 | ||
| + | category-class "FT" | ||
| + | mesh-detail-level-count 4 | ||
| + | mesh-table | ||
| + | { | ||
| + | default-lod0 | ||
| + | { | ||
| + | mesh "car_lod_0.im" | ||
| + | auto-create 1 | ||
| + | lod-level 0 | ||
| + | } | ||
| + | default-lod1 | ||
| + | { | ||
| + | mesh "car_lod_1.im" | ||
| + | auto-create 1 | ||
| + | lod-level 1 | ||
| + | } | ||
| + | default-lod2 | ||
| + | { | ||
| + | mesh "car_lod_2.im" | ||
| + | auto-create 1 | ||
| + | lod-level 2 | ||
| + | } | ||
| + | default-lod3 | ||
| + | { | ||
| + | mesh "car_lod_3.im" | ||
| + | auto-create 1 | ||
| + | lod-level 3 | ||
| + | } | ||
| + | } | ||
| + | thumbnails | ||
| + | { | ||
| + | 0 | ||
| + | { | ||
| + | image "screenshot.jpg" | ||
| + | width 240 | ||
| + | height 180 | ||
| + | } | ||
| + | } | ||
| + | kuid <kuid:661281:11003> | ||
| + | |||
| + | |||
| + | Let's break this down to understand what each part is / does. | ||
| + | |||
| + | kind "scenery" | ||
| + | username "Car_Example" | ||
| + | trainz-build 3.7 | ||
| + | category-class "FT" | ||
| + | You will find these first 4 parameters in the config.txt file outlined in [[KIND TrainzBaseSpec]]. | ||
| + | |||
| + | ====Number of LODs==== | ||
| + | mesh-detail-level-count 4 | ||
| + | This parameter is set manually. This specifies the number of LODs our content will use. If you have 2 LODs in your object then you would change the 4 to a 2. Additional information can be found here in [[KIND Mesh]]. | ||
| + | |||
| + | ====Mesh Table Structure==== | ||
| + | mesh-table | ||
| + | { | ||
| + | default-lod0 | ||
| + | { | ||
| + | mesh "car_lod_0.im" | ||
| + | auto-create 1 | ||
| + | lod-level 0 | ||
| + | } | ||
| + | default-lod1 | ||
| + | { | ||
| + | mesh "car_lod_1.im" | ||
| + | auto-create 1 | ||
| + | lod-level 1 | ||
| + | } | ||
| + | default-lod2 | ||
| + | { | ||
| + | mesh "car_lod_2.im" | ||
| + | auto-create 1 | ||
| + | lod-level 2 | ||
| + | } | ||
| + | default-lod3 | ||
| + | { | ||
| + | mesh "car_lod_3.im" | ||
| + | auto-create 1 | ||
| + | lod-level 3 | ||
| + | } | ||
| + | } | ||
| + | Let's explain what we are doing with the mesh-table section. We have a container which is 'mesh-table' with two brackets '{' and '}'. You'll notice everything contained within these brackets for the mesh-table so it knows what parameters are to be part of the mesh-table section. | ||
| + | |||
| + | Inside the first '{' bracket we find another section called default-lod0 and it too has it's own '{' and '}' brackets as it too has parameters that it controls. You will notice there are 4 'default-lod' sections that look very similar. Each of the 'default-lod' sections are a level of detail that is manually specified. | ||
| + | |||
| + | In the first section 'default-lod0' we have the 'mesh' parameter and have given it our highest detailed mesh called "car_lod_0.im". We also specify another parameter called 'auto-create' which tells Trainz to make this object visible as soon as the mesh loads, so we set this to '1'. | ||
| + | |||
| + | Following those 2 parameters we have a final parameter called 'lod-level' with the value of '0'. This means that our 'mesh' which we specified as "car_lod_0.im" is to be used as 'lod-level' 0. NOTE: LOD detail reduces the higher the lod-level number specified, e.g. 'lod-level 0' should be the highest detailed polygon model you are using. 'lod-level 1' should use the model that has significantly less polygons than the one being used in 'lod-level 0' ... and so on. You only need to specify a number of 'default-lod' sections that is equal to the number of LOD meshes you have exported. Also worth noting, the 'default-lod' section names are not used by the game itself, but they have to be unique. The 'lod-level' parameter is what determines the level of detail for that section, not the 'default-lod0' name. | ||
| + | |||
| + | The mesh-table section has a lot of parameters to choose from. Additional parameters can be found here "[[%22mesh-table%22_Container]]". | ||
| + | |||
| + | ====Thumbnails==== | ||
| + | thumbnails | ||
| + | { | ||
| + | 0 | ||
| + | { | ||
| + | image "screenshot.jpg" | ||
| + | width 240 | ||
| + | height 180 | ||
| + | } | ||
| + | } | ||
| + | The thumbnails section can be found here "[[KIND_TrainzBaseSpec]]". | ||
| + | |||
| + | Simply create a 240 wide by 180 high .jpg image of your object and save it in the directory where you have your .IM, .texture.txt and config.txt files. | ||
| + | |||
| + | Here is the car example: | ||
| + | |||
| + | [[File:car_screenshot.jpg]] | ||
| + | |||
| + | ====Creating a KUID==== | ||
| + | |||
| + | kuid <kuid:661281:11003> | ||
| + | This KUID is the unique ID for your Trainz Asset. The first number "661281" is your user ID (if you're not sure, see the next section on how to find your UserID). The second number "11003" is any old number we want BUT, it has to be unique to your content! A good idea is to come up with a numbering system such as having 0 - 1000 for locos, 1001 to 5000 for scenery objects and so on. For detailed information can be found on "[[KUID]]s" page. | ||
| + | |||
| + | ====Finding your User ID==== | ||
| + | In Content Manager, once you login to your [[Planet Auran account]], you'll find your User ID by going to File -> Settings, then click on the Internet tab. You will need this number to create any Trainz assets as it is used in the unique number that each asset requires (called a [[KUID]].) | ||
| + | |||
| + | [[File:your_kuid.jpg]] | ||
| + | ===Importing Content into Trainz=== | ||
| + | |||
| + | Now that you have everything in a folder ready to go, you can drag that folder onto Trainz Content Manager to start to get this content into Trainz. | ||
| + | |||
| + | [[File:folder.jpg]] | ||
| + | |||
| + | |||
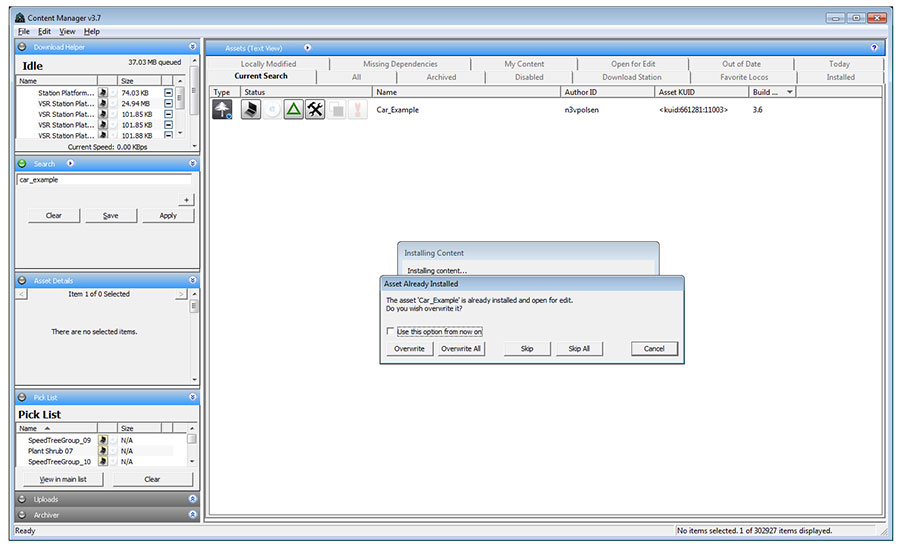
| + | If the files exist in Content Manager already, a prompted will show asking if you want to write over the files. If you know the files existed previously because you put them there, you will always want to say "Overwrite All" but if you are not sure, best to "Skip All" and investigate which content you are actually copying over. | ||
| + | |||
| + | [[File:overwrite.jpg]] | ||
| + | |||
| + | |||
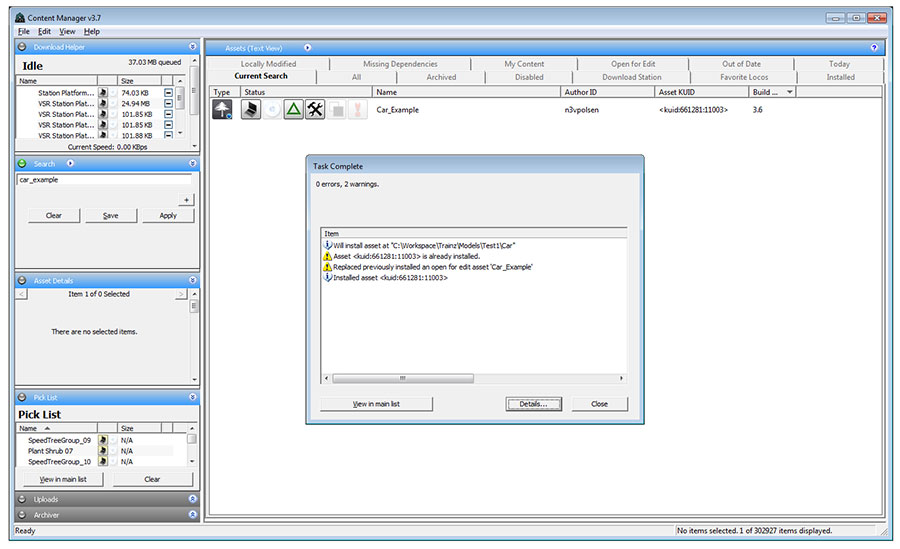
| + | Once you copy over the top of the content you will see a couple of warnings. You can ignore these if they are the following: | ||
| + | * "Asset [KUID] is already installed." | ||
| + | * "Replaced previously installed an open for edit asset [ASSET NAME]" | ||
| + | |||
| + | [[File:warnings.jpg]] | ||
| + | |||
| + | |||
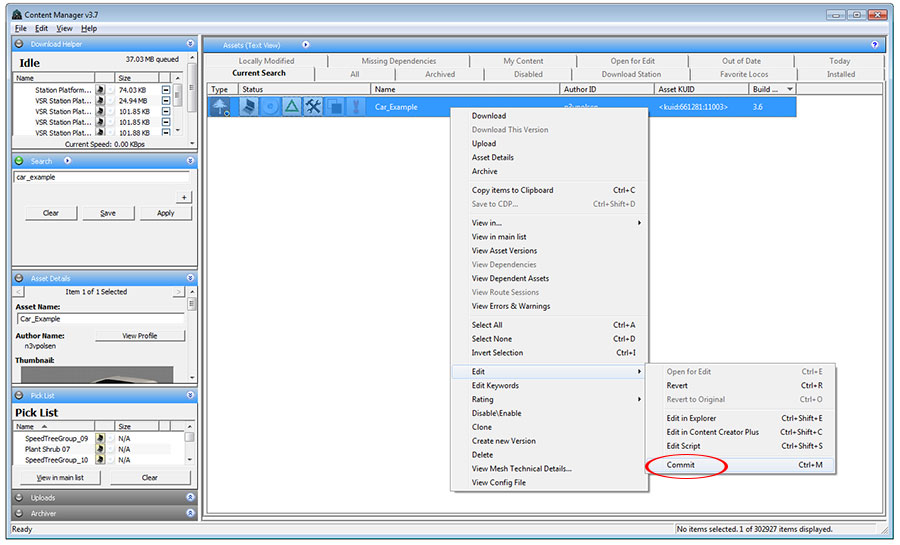
| + | Once you have no errors with the import you can commit your assets by right clicking on the asset and going to "Edit" -> "Commit" or using the CTRL+M shortcut key (you will use this a lot so might be good to learn the shortcuts) | ||
| + | |||
| + | [[File:commit.jpg]] | ||
| + | |||
| + | |||
| + | ====Import Errors==== | ||
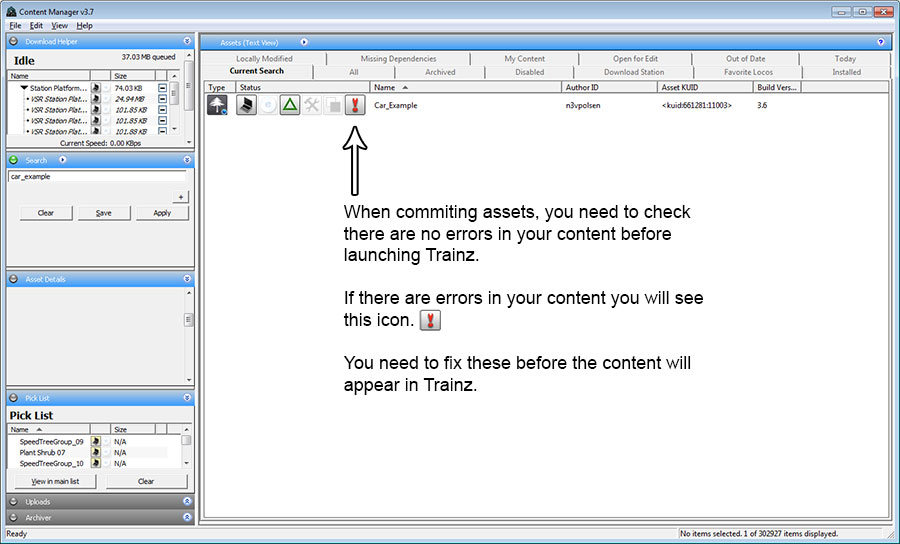
| + | Make sure you don't get any errors after you commit your Trainz asset. You will see the big exclamation mark icon appear if your Trainz asset has errors. | ||
| + | |||
| + | [[File:commit_with_errors.jpg]] | ||
| + | |||
| + | To find out what the errors are you right click on the Trainz asset and go to "View Errors & Warnings". You must fix all errors before the asset will appear in Trainz. If you can't work out how to solve an error, check out the "Potential Problems" section below. | ||
| + | |||
| + | [[File:commit_with_errors_view.jpg]] | ||
| + | |||
| + | == Finding the new Asset in Trainz Simulator 12 == | ||
| + | |||
| + | Time to load up Trainz and give this content a spin! When you get into Trainz, click on Create Route to start a new route. | ||
| + | |||
| + | Depending on what asset type (kind) you have specified will determine where you will find you asset. We have created a "Scenery" type so we will find this in the "Objects" -> "Object Mode" (or hit "O" for the shortcut key). Place one of these in your scene and zoom your camera to view all the LODs change as your distance from the object changes. If you can barely notice the level of detail changing (but it does actually work!) then you have done a really good job of making the LOD models change seamlessly. | ||
| + | |||
| + | In the examples below to make it very easy for you to spot the LOD change, we have given the highest detail (LOD 0) a RED dot, the medium detail (LOD 1) an orange color and the lowest detail (LOD 3) a green color. We have skipped LOD 2 in this instance but it is recommended to have 4 LODs to a high detailed model if possible. | ||
| + | |||
| + | LOD 0 - In Trainz Surveyor | ||
| + | |||
| + | [[File:surveyor_lod_0.jpg]] | ||
| + | |||
| + | |||
| + | LOD 1 - In Trainz Surveyor | ||
| + | |||
| + | [[File:surveyor_lod_1.jpg]] | ||
| + | |||
| + | |||
| + | LOD 3 - In Trainz Surveyor | ||
| + | |||
| + | [[File:surveyor_lod_3.jpg]] | ||
| + | |||
| + | ==Potential Problems== | ||
| + | |||
| + | To see additional stats while working in Surveyor to help determine potential problems with your Trainz asset or even just route creation in general using others assets, you might want to take a look here "[[Runtime_Performance_Statistics]]". | ||
| + | |||
| + | Furthermore, you can also find some really good information about content creation on the [http://forums.auran.com/trainz/blog.php?769929-Trainz-Developer-Blog Trainz Developer Blog]. | ||
| + | |||
| + | If you have read all there is to read on this wiki, and are still having problems getting this tutorial or other content working, then you probably should join in the discussions on on our Trainz Community on the [http://forums.auran.com/trainz/index.php Trainz Forums]. The forums are very active and if you show you are keen to learn, the people are very helpful! | ||
| + | |||
| + | ==Source Files== | ||
| + | |||
| + | You can download the source files to the Car Example (asset folder) used in this tutorial here: [[File:Carpackage.zip]] or [http://online.ts2009.com/mediaWiki/images/d/db/Carpackage.zip here]. Please note we have not referenced the same image for all 3 LODs. In this example we are changing colors to show you the different distances the LODs pop in. You should generally try and share one diffuse texture between the different LODs so that it saves on memory and performance. | ||
| + | |||
| + | If the source files you download look scary, don't worry! The Trainz Exporter for 3DS Max creates all those files except the "config.txt" file for you. | ||
| + | |||
| + | Good Luck and we can't wait to see your high detailed content for Trainz (with LODs!!!). | ||
| + | |||
| + | |||
| + | ==Return to Index== | ||
| + | |||
| + | [[HowToGuides|<< How To Guides]] | ||
| + | |||
| + | [[Category:How-to guides]] | ||
Latest revision as of 13:27, 6 June 2018
NOTE: This information is out of date. While many of the techniques here are still valid, please see the TRS19 page for links to the latest content creation information.
This is a step by step tutorial that will teach you how to create a 3D model, create the Level of Detail (lower resolution) versions of the model, and import it into Trainz.
Contents |
[edit] Determine what software you'll need
Before you start you will need:
- A copy of Trainz Simulator 12 (or technically, a copy of Trainz).
- A copy of 3DS Max studio that has a supported Trainz Exporter. We are using 3DS Max 2008 in this example. Information on all exporters can be found here and the download files can be found on the Downloads page.
- To setup the exporter in 3DS Max you will want to extract the .zip file and then place the correct versions "JetExporter.dle" file into the plugins directory of your installed 3DS Max. For example, it might look like "C:\Program Files (x86)\Autodesk\3ds Max 2008\plugins"
- (OPTIONAL SOFTWARE) nDo2 is a Photoshop plugin that makes creating normal (or bump) maps for your models a breeze.
[edit] How to setup the model and materials in 3DS Max
[edit] Recommended Reading
Before you start modelling you might want to read Modeling Trains for Trainz as it explains things like setting up the Unit Scale correctly to model in and a few other good pointers.
[edit] Create Highest LOD First
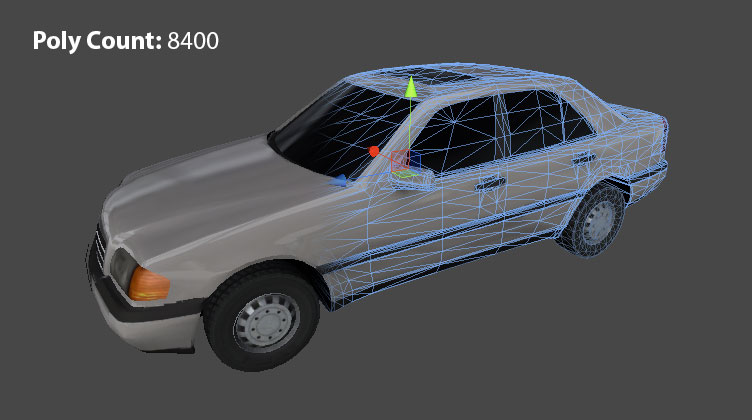
Model your object at the highest detail required to look good up close. The distance that the highest level of detail model (LOD 0) will be seen in Trainz could be from 0 up to about 40 meters away from the camera.
[edit] Additional LOD Levels
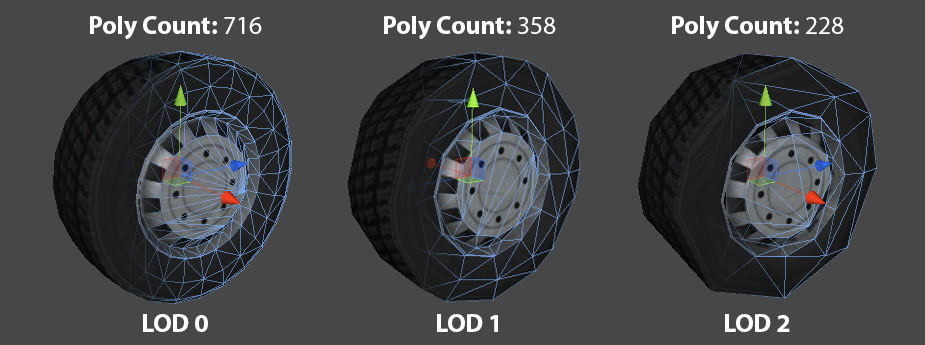
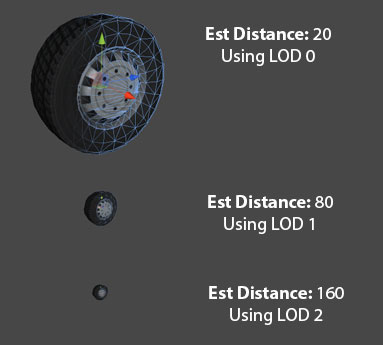
Continue making a further 2 lower level detail models (LODs) for the exact same item you are modelling. The 2nd highest detail model (LOD 1) is required to still look decent at 40 up to 80 meters away. You will want to remove about 50% of the original polygons found in the highest detailed model (LOD 0 - above). The 3rd highest detail model (LOD 2) is required to still look decent at 80 up to 160 meters away. You will want to remove about 50% of the original polygons found in the 2nd highest detailed model (LOD 1).
This is an example of the LOD 0 detailed versus LOD 1 and LOD 2 detail.
[edit] LOD 3 - Extremely low poly LOD
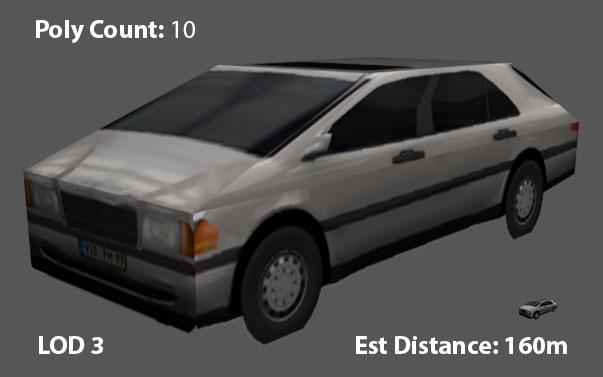
Create an extremely low detailed model (LOD 3) to be used in the distance. In this example we are saying this model will be used 160 meters and beyond. Usually the lowest detail model which is used in the distance is a billboard (2 polygon object) or a cube type object (8 - 10 polygons). Whatever you choose, this detail must use as fewer polygons as possible.
[edit] Materials
Setting up the materials is pretty easy but you'll need to work out what type of material (look) you want for your object. All the Trainz materials available for you to use in 3DS Max can be found here and you'll also want to read about Exporting with 3D Studio Max for additional lighting material setup details.
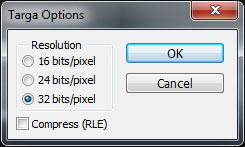
You should setup your image files as .TGA files and save them as 32-bits/pixel without "Compress (RLE)" checked. We are using Photoshop in the example below:
[edit] How to create the Trainz Asset and import it into Trainz Content Manager
Once your models have LOD and materials applied, it's time to export from 3DS Max and get them into Trainz!
[edit] Exporting your model
To export into Trainz format you will want to Click File -> Export, Save as type, drop down and select Trainz format (*.IM, *.KIN)
[edit] Creating a Trainz Config File
When you have exported all your different LODs from 3DS Max to a folder (all your .IM and .texture.txt files, without errors), you are ready to use Content Manager to import your object into Trainz.
First you need to create a config.txt file - this file holds all the information the the Trainz code uses to manage your asset in the game. To do this, create a new file in the folder named "config.txt".
The "KIND TrainzBaseSpec" and "Content Configuration" pages give an enormous amount of information on everything to do with the config.txt options. Reading the Content Configuration pages can be very overwhelming to start with so below we have created the minimum information a config.txt file needs to get your LOD asset working in-game. (As you gain confidence, be sure to see what else Trainz can do though as it is very powerful!)
This is the very basic "scenery" object config.txt file. (Not to worry, we explain each part of this below)
kind                                    "scenery"
username                                "Car_Example"
trainz-build                            3.7
category-class                          "FT"
mesh-detail-level-count                 4
mesh-table
{
 default-lod0
 {
   mesh                                "car_lod_0.im"
   auto-create                         1
   lod-level                           0
 }
 default-lod1
 {
   mesh                                "car_lod_1.im"
   auto-create                         1
   lod-level                           1
 }
 default-lod2
 {
   mesh                                "car_lod_2.im"
   auto-create                         1
   lod-level                           2
 }
 default-lod3
 {
   mesh                                "car_lod_3.im"
   auto-create                         1
   lod-level                           3
 }
}
thumbnails
{
 0
 {
   image                               "screenshot.jpg"
   width                               240
   height                              180
 }
}
kuid                                    <kuid:661281:11003>
Let's break this down to understand what each part is / does.
kind                                    "scenery"
username                                "Car_Example"
trainz-build                            3.7
category-class                          "FT"
You will find these first 4 parameters in the config.txt file outlined in KIND TrainzBaseSpec.
[edit] Number of LODs
mesh-detail-level-count 4
This parameter is set manually. This specifies the number of LODs our content will use. If you have 2 LODs in your object then you would change the 4 to a 2. Additional information can be found here in KIND Mesh.
[edit] Mesh Table Structure
mesh-table
{
 default-lod0
 {
   mesh                                "car_lod_0.im"
   auto-create                         1
   lod-level                           0
 }
 default-lod1
 {
   mesh                                "car_lod_1.im"
   auto-create                         1
   lod-level                           1
 }
 default-lod2
 {
   mesh                                "car_lod_2.im"
   auto-create                         1
   lod-level                           2
 }
 default-lod3
 {
   mesh                                "car_lod_3.im"
   auto-create                         1
   lod-level                           3
 }
}
Let's explain what we are doing with the mesh-table section. We have a container which is 'mesh-table' with two brackets '{' and '}'. You'll notice everything contained within these brackets for the mesh-table so it knows what parameters are to be part of the mesh-table section.
Inside the first '{' bracket we find another section called default-lod0 and it too has it's own '{' and '}' brackets as it too has parameters that it controls. You will notice there are 4 'default-lod' sections that look very similar. Each of the 'default-lod' sections are a level of detail that is manually specified.
In the first section 'default-lod0' we have the 'mesh' parameter and have given it our highest detailed mesh called "car_lod_0.im". We also specify another parameter called 'auto-create' which tells Trainz to make this object visible as soon as the mesh loads, so we set this to '1'.
Following those 2 parameters we have a final parameter called 'lod-level' with the value of '0'. This means that our 'mesh' which we specified as "car_lod_0.im" is to be used as 'lod-level' 0. NOTE: LOD detail reduces the higher the lod-level number specified, e.g. 'lod-level 0' should be the highest detailed polygon model you are using. 'lod-level 1' should use the model that has significantly less polygons than the one being used in 'lod-level 0' ... and so on. You only need to specify a number of 'default-lod' sections that is equal to the number of LOD meshes you have exported. Also worth noting, the 'default-lod' section names are not used by the game itself, but they have to be unique. The 'lod-level' parameter is what determines the level of detail for that section, not the 'default-lod0' name.
The mesh-table section has a lot of parameters to choose from. Additional parameters can be found here ""mesh-table"_Container".
[edit] Thumbnails
thumbnails
{
 0
 {
   image                               "screenshot.jpg"
   width                               240
   height                              180
 }
}
The thumbnails section can be found here "KIND_TrainzBaseSpec".
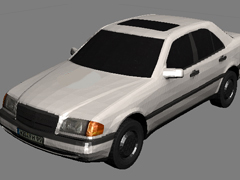
Simply create a 240 wide by 180 high .jpg image of your object and save it in the directory where you have your .IM, .texture.txt and config.txt files.
Here is the car example:
[edit] Creating a KUID
kuid <kuid:661281:11003>
This KUID is the unique ID for your Trainz Asset. The first number "661281" is your user ID (if you're not sure, see the next section on how to find your UserID). The second number "11003" is any old number we want BUT, it has to be unique to your content! A good idea is to come up with a numbering system such as having 0 - 1000 for locos, 1001 to 5000 for scenery objects and so on. For detailed information can be found on "KUIDs" page.
[edit] Finding your User ID
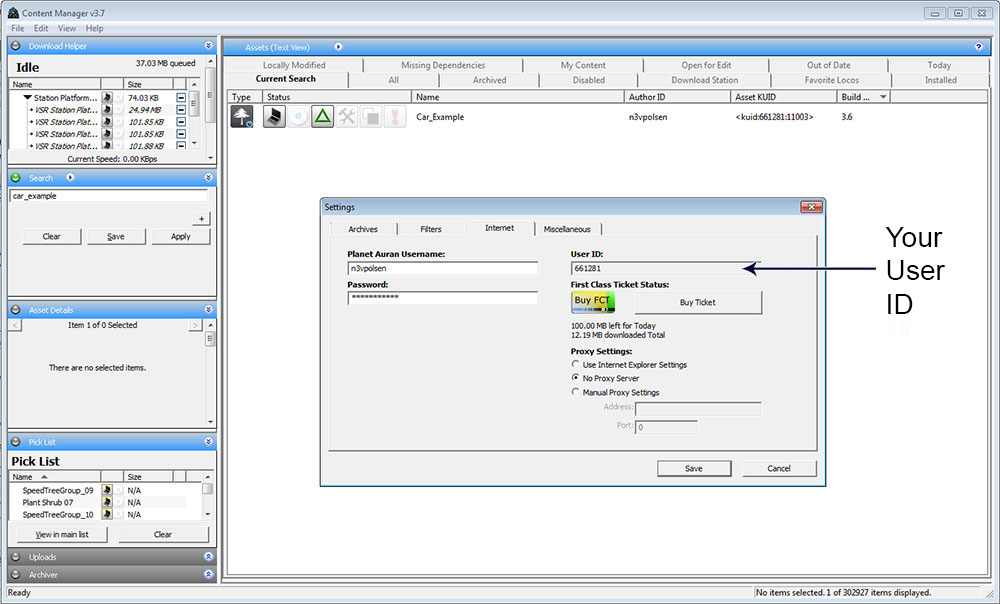
In Content Manager, once you login to your Planet Auran account, you'll find your User ID by going to File -> Settings, then click on the Internet tab. You will need this number to create any Trainz assets as it is used in the unique number that each asset requires (called a KUID.)
[edit] Importing Content into Trainz
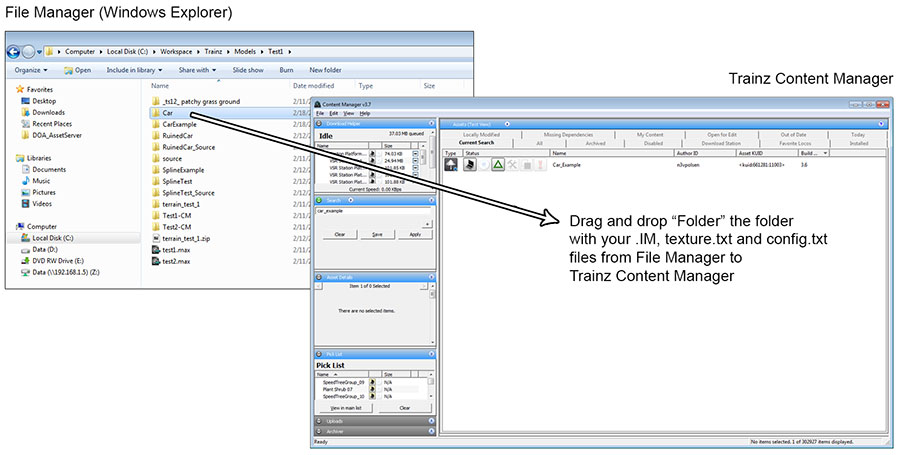
Now that you have everything in a folder ready to go, you can drag that folder onto Trainz Content Manager to start to get this content into Trainz.
If the files exist in Content Manager already, a prompted will show asking if you want to write over the files. If you know the files existed previously because you put them there, you will always want to say "Overwrite All" but if you are not sure, best to "Skip All" and investigate which content you are actually copying over.
Once you copy over the top of the content you will see a couple of warnings. You can ignore these if they are the following:
- "Asset [KUID] is already installed."
- "Replaced previously installed an open for edit asset [ASSET NAME]"
Once you have no errors with the import you can commit your assets by right clicking on the asset and going to "Edit" -> "Commit" or using the CTRL+M shortcut key (you will use this a lot so might be good to learn the shortcuts)
[edit] Import Errors
Make sure you don't get any errors after you commit your Trainz asset. You will see the big exclamation mark icon appear if your Trainz asset has errors.
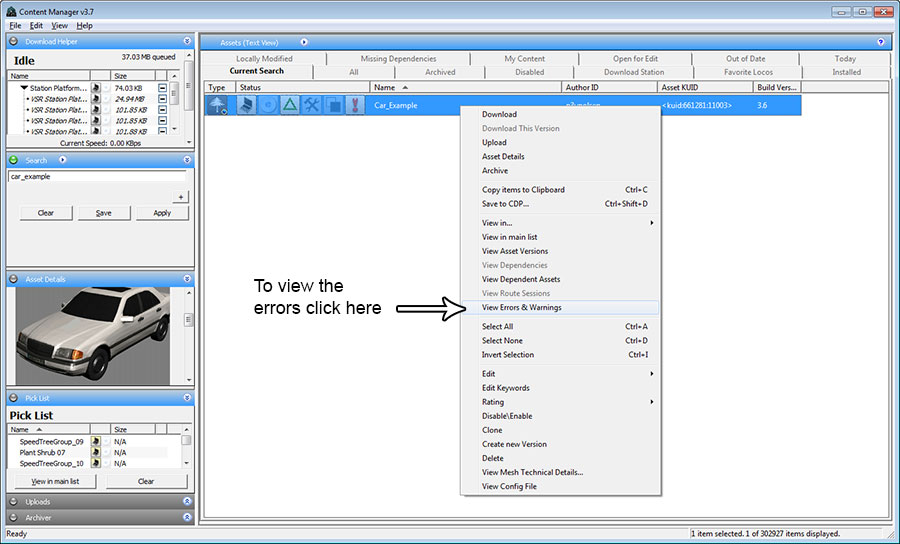
To find out what the errors are you right click on the Trainz asset and go to "View Errors & Warnings". You must fix all errors before the asset will appear in Trainz. If you can't work out how to solve an error, check out the "Potential Problems" section below.
[edit] Finding the new Asset in Trainz Simulator 12
Time to load up Trainz and give this content a spin! When you get into Trainz, click on Create Route to start a new route.
Depending on what asset type (kind) you have specified will determine where you will find you asset. We have created a "Scenery" type so we will find this in the "Objects" -> "Object Mode" (or hit "O" for the shortcut key). Place one of these in your scene and zoom your camera to view all the LODs change as your distance from the object changes. If you can barely notice the level of detail changing (but it does actually work!) then you have done a really good job of making the LOD models change seamlessly.
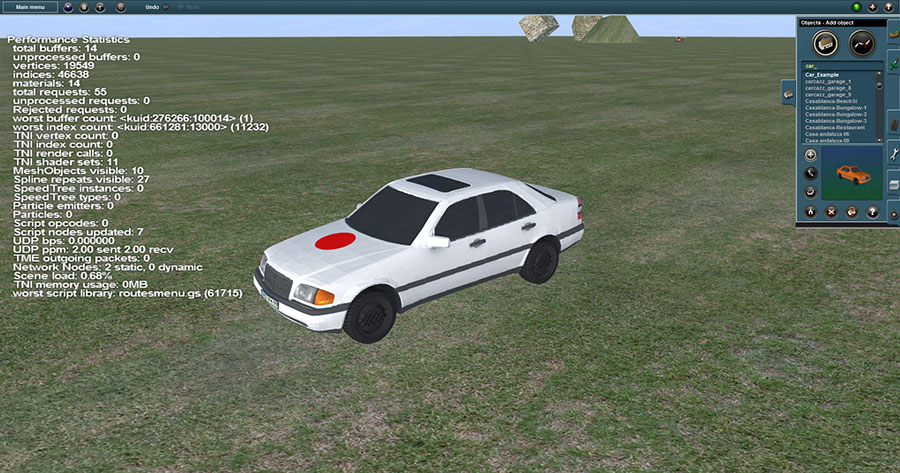
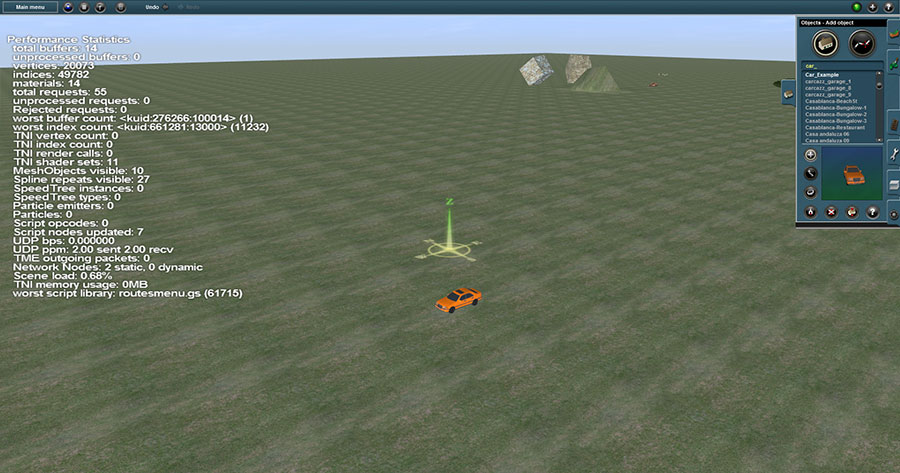
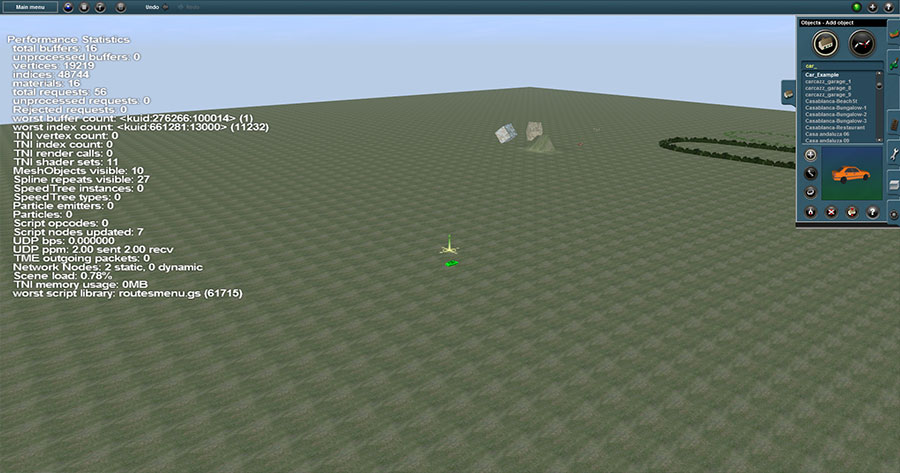
In the examples below to make it very easy for you to spot the LOD change, we have given the highest detail (LOD 0) a RED dot, the medium detail (LOD 1) an orange color and the lowest detail (LOD 3) a green color. We have skipped LOD 2 in this instance but it is recommended to have 4 LODs to a high detailed model if possible.
LOD 0 - In Trainz Surveyor
LOD 1 - In Trainz Surveyor
LOD 3 - In Trainz Surveyor
[edit] Potential Problems
To see additional stats while working in Surveyor to help determine potential problems with your Trainz asset or even just route creation in general using others assets, you might want to take a look here "Runtime_Performance_Statistics".
Furthermore, you can also find some really good information about content creation on the Trainz Developer Blog.
If you have read all there is to read on this wiki, and are still having problems getting this tutorial or other content working, then you probably should join in the discussions on on our Trainz Community on the Trainz Forums. The forums are very active and if you show you are keen to learn, the people are very helpful!
[edit] Source Files
You can download the source files to the Car Example (asset folder) used in this tutorial here: File:Carpackage.zip or here. Please note we have not referenced the same image for all 3 LODs. In this example we are changing colors to show you the different distances the LODs pop in. You should generally try and share one diffuse texture between the different LODs so that it saves on memory and performance.
If the source files you download look scary, don't worry! The Trainz Exporter for 3DS Max creates all those files except the "config.txt" file for you.
Good Luck and we can't wait to see your high detailed content for Trainz (with LODs!!!).
