|
| From |
To |
Tower Paths |
From |
To |
Tower Paths |
|
 |
 |
Approach (Port Pirie) Dn to Car Siding 1 DE |
|
|
Car Siding 1 DE to Port Pirie |
|
 |
Approach (Port Pirie) Dn to Station |
|
|
Station Up to Port Pirie |
|
 |
Approach (Port Pirie) Dn to Main |
|
|
Main Up to Port Pirie |
|
 |
Approach (Port Pirie) Dn to Loop |
|
|
Loop Up to Port Pirie |
|
 |
Approach (Port Pirie) Dn to Yard 1 |
|
|
Yard 1 Up to Port Pirie |
|
 |
Approach (Port Pirie) Dn to Yard 2 |
|
|
Yard 2 Up to Port Pirie |
|
 |
Approach (Port Pirie) Dn to Yard 3 |
|
|
Yard 3 Up to Port Pirie |
|
 |
Approach (Port Pirie) Dn to Goods Shed |
|
|
Goods Shed Up to Port Pirie |
 |
|
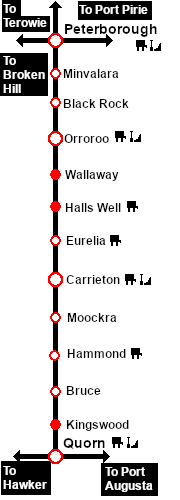
Approach (Quorn) Dn to Station |
|
|
Station Up to Quorn |
|
|
Approach (Quorn) Dn to Main |
|
|
Main Up to Quorn |
|
|
Approach (Quorn) Dn to Loop |
|
|
Loop Up to Quorn |
|
|
Approach (Quorn) Dn to Yard 1 |
|
|
Yard 1 Up to Quorn |
|
|
Approach (Quorn) Dn to Yard 2 |
|
|
Yard 2 Up to Quorn |
|
|
Approach (Quorn) Dn to Yard 3 |
|
|
Yard 3 Up to Quorn |
|
|
Approach (Quorn) Dn to Goods Shed |
|
|
Goods Shed Up to Quorn |
|
 |
Approach (Quorn) Dn to Car Shed and Siding Entry |
|
|
Car Shed and Siding Up to Quorn |
 |
|
Loco Depot (Main) 1 Dn to Station |
|
|
Station Up to Loco Depot (Main) 1 |
|
|
Loco Depot (Main) 1 Dn to Main |
|
|
Main Up to Loco Depot (Main) 1 |
|
|
Loco Depot (Main) 1 Dn to Loop |
|
|
Loop Up to Loco Depot (Main) 1 |
|
|
Loco Depot (Main) 1 Dn to Yard 1 |
|
|
Yard 1 Up to Loco Depot (Main) 1 |
|
|
Loco Depot (Main) 1 Dn to Yard 2 |
|
|
Yard 2 Up to Loco Depot (Main) 1 |
|
|
Loco Depot (Main) 1 Dn to Yard 3 |
|
|
Yard 3 Up to Loco Depot (Main) 1 |
|
|
Loco Depot (Main) 1 Dn to Goods Shed |
|
|
Goods Shed Up to Loco Depot (Main) 1 |
 |
|
Loco Depot (Main) 2 Dn to Station |
|
|
Station Up to Loco Depot (Main) 2 |
|
|
Loco Depot (Main) 2 Dn to Main |
|
|
Main Up to Loco Depot (Main) 2 |
|
|
Loco Depot (Main) 2 Dn to Loop |
|
|
Loop Up to Loco Depot (Main) 2 |
|
|
Loco Depot (Main) 2 Dn to Yard 1 |
|
|
Yard 1 Up to Loco Depot (Main) 2 |
|
|
Loco Depot (Main) 2 Dn to Yard 2 |
|
|
Yard 2 Up to Loco Depot (Main) 2 |
|
|
Loco Depot (Main) 2 Dn to Yard 3 |
|
|
Yard 3 Up to Loco Depot (Main) 2 |
|
|
Loco Depot (Main) 2 Dn to Goods Shed |
|
|
Goods Shed Up to Loco Depot (Main) 2 |
|
|
Loco Depot (Main) 2 Dn to Car Shed and Siding Dn |
|
|
Car Shed and Siding Up to Loco Depot (Main) 2 |
|
| From |
To |
Tower Paths |
From |
To |
Tower Paths |
|
 |
 |
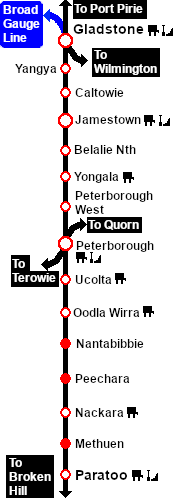
Approach (Broken Hill) Up to Station |
|
|
Station Dn to Broken Hill |
|
 |
Approach (Broken Hill) Up to Main |
|
|
Main Dn to Broken Hill |
|
 |
Approach (Broken Hill) Up to Loop |
|
|
Loop Dn to Broken Hill |
|
 |
Approach (Broken Hill) Up to Yard 1 |
|
|
Yard 1 Dn to Broken Hill |
|
 |
Approach (Broken Hill) Up to Yard 2 |
|
|
Yard 2 Dn to Broken Hill |
|
 |
Approach (Broken Hill) Up to Yard 3 |
|
|
Yard 3 Dn to Broken Hill |
|
 |
Approach (Broken Hill) Up to Goods Shed |
|
|
Goods Shed Dn to Broken Hill |
|
|
Approach (Broken Hill) Up to Station |
|
|
Station Dn to Broken Hill |
 |
|
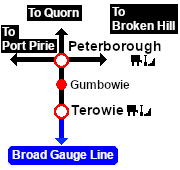
Approach (Terowie) Up to Main |
|
|
Main Dn to Terowie |
|
|
Approach (Terowie) Up to Loop |
|
|
Loop Dn to Terowie |
|
|
Approach (Terowie) Up to Yard 1 |
|
|
Yard 1 Dn to Terowie |
|
|
Approach (Terowie) Up to Yard 2 |
|
|
Yard 2 Dn to Terowie |
|
|
Approach (Terowie) Up to Yard 3 |
|
|
Yard 3 Dn to Terowie |
|
|
Approach (Terowie) Up to Goods Shed |
|
|
Goods Shed Dn to Terowie |
 |
|
Loco (Sub) Depot DE to Station |
|
|
Station Dn to Loco (Sub) Depot DE |
|
|
Loco (Sub) Depot DE to Main |
|
|
Main Dn to Loco (Sub) Depot DE |
 |
|
Flour Mill DE to Station |
|
|
Station Dn to Flour Mill DE |
|
|
Flour Mill DE to Main |
|
|
Main Dn to Flour Mill DE |
|
|
Flour Mill DE to Loop |
|
|
Loop Dn to Flour Mill DE |
|
|
Flour Mill DE to Yard 1 |
|
|
Yard 1 Dn to Flour Mill DE |
|
|
Flour Mill DE to Yard 2 |
|
|
Yard 2 Dn to Flour Mill DE |
|
|
Flour Mill DE to Yard 3 |
|
|
Yard 3 Dn to Flour Mill DE |
|
|
Flour Mill DE to Goods Shed |
|
|
Goods Shed to Flour Mill DE |
 |
|
Stockyard DE to Station |
|
|
Station Dn to Stockyard DE |
|
|
Stockyard DE to Main |
|
|
Main Dn to Stockyard DE |
|
|
Stockyard DE to Loop |
|
|
Loop Dn to Stockyard DE |
|
|
Stockyard DE to Yard 1 |
|
|
Yard 1 Dn to Stockyard DE |
|
|
Stockyard DE to Yard 2 |
|
|
Yard 2 Dn to Stockyard DE |
|
|
Stockyard DE to Yard 3 |
|
|
Yard 3 Dn to Stockyard DE |
|
|
Stockyard DE to Goods Shed |
|
|
Goods Shed Dn to Stockyard DE |
|