CCG/Modelling: Textures and Opacity Effects
Textures and Opacity Effects
Trainz makes use of a texture.tga map associated with an opacity texture map to create transparent, translucent and see through effects. This is applied to objects for transparent/translucent windows, ladders, lattice work for cranes, handrails, and catenary, to name a few.
A 24 bit uncompressed .tga texture (diffuse texture) may be created for the object and a 8 bit .bmp map (opacity texture) of the same size is used with the .tga texture to create areas of transparency. The opacity map is predominately black and white, or shades of grey.
- - any area on the opacity map that is white, will make corresponding areas on the diffuse map opaque;
- - any area on the opacity map that is black, will make corresponding areas on the diffuse map transparent;
- - any area on the opacity map that is shades of grey, will make corresponding areas on the diffuse map translucent, depending on the shade of grey.
There are certain requirements in using such maps:
Placement in 3DSMax
In 3DSMax, when using an opacity map with a diffuse map, the .tga texture is placed in the diffuse colour slot of the Material Navigator, and the opacity map is placed in the opacity slot. If an alpha channel is used, the same .tga file is placed in the opacity slot. Often it is necessary to tick the texture 2 sided box, so the object is visible from all directions, particularly with ladders and windows.
Opacity Fade Out
Most opacity maps are primarily black and white. In TRS, requirements have changed for the opacity map. If the map consists only of black and white, a third colour must be added. It is convenient to add at least one pixel of another colour, say rgb 32,32,32 to an area of black.
This is necessary to prevent the object from fading out and flickering a short distance away. It is particularly important with ladders, railings and catenary, any model with fine detail. However, use of the third color can give interference between different overlapping opacity layers, see Opacity Interference below.
Alpha Channel Use
While a separate opacity map to create the transparent effects may be used, it is better to make the opacity map an Alpha channel of the original .tga diffuse texture.
This may be made in GIMP, Photoshop, Paint Shop Pro or TgaTools2. The primarily black and white Alpha channel is saved (embedded) within the diffuse .tga texture file. Using the alpha channel procedure is more efficient for Trainz to process, it is quicker to load, than two separate maps. This is the recommended process for loading the opacity effects. Of course there are instances where the separate opacity map is useful (see reflective materials below).
Example
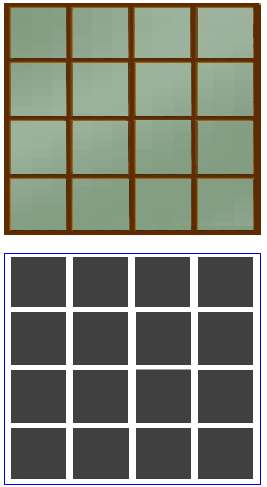
The images show a window .tga texture and a corresponding .bmp opacity map.
The window frame will show in the model, because the corresponding area on the opacity map is white. The green glass area will be translucent (show a green tinge) in this example because the "black" areas are actually a grey, rgb, 64,64,64. Once again, it is good practice to combine this opacity file as the Alpha channel of the original .tga texture file.
In TS2009 onwards, it doesn't matter how the images are constructed as long as a supported format is used. Content Manager builds a compressed texture when the asset is committed.
Applying Opacity to Models
When modeling a building with windows in 3dsmax/gmax, as an example, the windows should be constructed as separate planes and the window texture with the opacity applied to those planes.
This has two effects:
- - only requiring a small opacity map to match the window texture, instead of a very large opacity texture of the whole building with a few opacity areas "cut out";
- - more importantly, it is essential to prevent the complete wall being "see through" from different angles in Trainz. An opacity map that is part of a larger wall map can create this "vanishing wall effect", and flickering.
Opacity Settings in 3DSMax
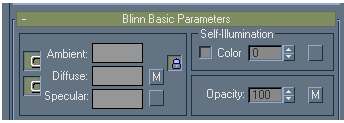
In the 3DSMax material editor there is an opacity settings box, where you can change the opacity of a material.
This option however will make the whole surface, to which the material is applied, transparent to the degree chosen in the percentage selection, 100% being opaque.
It will not allow the fine control of the opacity texturing that the Alpha channel provides.
Opacity Interference
If there are two opacity planes (transparency) close together and behind each other, there may be some display issues in Trainz. Current graphic cards are not always capable of determining the depth order of opacity texture in a scene in Trainz. This means that an object behind another object, both using transparency, may actually be shown in front of the foreground object.
An example would be a footbridge using transparency to show the timber lattice construction, being behind a train with transparent windows, the footbridge supports may actually appear in front of the train, instead of behind. This effect can occur on different parts of the same model, but also with separate objects. It may be reduced by using only black and white in the opacity map. If grey is used, the effect can be accentuated. See Opacity Fade Out above.
Special Use of Opacity - Reflection Materials
The methods outlined above may be extended to give other lighting effects, using the additional Reflective materials slot in the 3DSMax Material Navigator.
A nightwindows directory is often useful to provide a night mode for the model, with lights and lit windows. This requires a separate night model mesh, and can be called up as a sub mesh in the config.txt file. Some Kinds such as splines do not support the Nightwindows option.
To make a night effect on a spline, certain parts may be specially textured to give a lighted appearance at night. Three texture files are used, a texture for the day visible object or planes, an opacity file to determine the shape of the lit portion at night, and a reflective texture to give the night colour and attributes. These are applied as one material to the object.
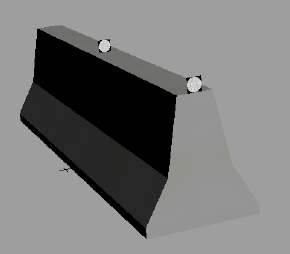
For example, a road barrier is made as a spline and requires white reflectors at regular distances along the spline, to light up at night. A light.tga file will define the day texture for a circular reflector, a light.bmp will make the opacity file to be used, and the reflective material can be a single colour .tga or .bmp texture, to be the night colour.
All texture files must be the same size, in this case 64 x 64. The image below shows the texture files:
To the left is the reflector.tga, the next is the opacity.bmp, and the third image is the light colour to show at night, this could be a whiter shade, but is left yellow so it shows better in this example image. It is placed in the Reflective material slot in 3dsmax/gmax. The last image is a circular gradient opacity.bmp texture that could also be used, to give softer edges to the circular night shape.
The yellow colour texture may cover the whole area, but a single pixel of colour may be used instead. This gives directional lighting - a pixel placed to the left of centre will light up the whole circular area, but the colour will only be seen from the right side of the object - you can experiment.
There are two important differences between the use of the opacity texture for reflection and when used for the normal transparency effects:
- - if the reflector object were made in 3dsmax/gmax using a square 2 poly plane, the opacity file will not "cut out" the circular shape of the reflector, as a circular opacity map might normally do. The black border will show in the day time. If you want the circular shape to be apparent in the day time, the object itself must be that shape; and
- - the opacity map acts differently, the reverse of transparency. The white area allows the yellow light to shine through, in a circular shape, the black area blocks the yellow light.
This technique can be applied to normal scenery objects, and does not require a nightwindow option, or can be used in addition to a nightwindow directory. It could be used to make a concrete area light up at night with pools of light, if the texture is tiled. Choose your colours carefully as the effect can show in the day time.
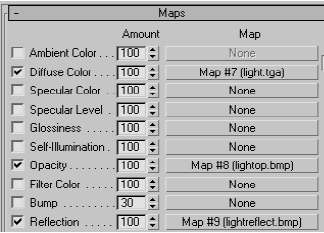
The following image is the 3DSMax maps rollout showing the texture files as entered in the three slots.
Opacity on Roads, Track and Bridges
- This technique is no longer recommended as it has undesirable effects in TS2009 onwards.
To blend a road or track model into the ground, track built-in to Trainz has used an opacity map as part of the ballast or road diffuse texture. The edges of the road or track are made transparent, blending into the opaque track or road texture.
Often a spline rail bridge is constructed with initiators and terminators. These may have a solid deck as part of the model. When using track with opacity mapping applied (Alpha channel) on a bridge, the transparency can "cut through" the textures of the bridge deck, and make it transparent when viewed from the track level.
Specify a track type that does not use transparency, such as the no ballast options available in Trainz, to fix the problem. Alternatively, model the track as part of the bridge deck, and use an invisible track as the spline for the model.
You could also use the Auran no ballast track across a truss bridge for instance, then model the track check rails as part of the bridge model.
Opacity Texture Bleeding
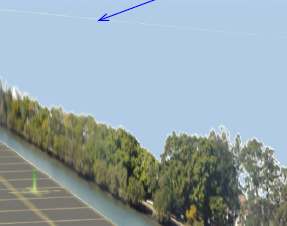
Opacity maps or Alpha channels may be used to make large areas of a plane transparent, for example making a scenery backdrop to place at the edge of the baseboard. A scenery picture is used for the texture, and the sky area above the tree line is made transparent using an opacity map as the Alpha channel. This allows the Trainz sky to show through the backdrop plane.
When viewed from some directions, often the top edge of the backdrop plane in the sky area shows a phantom line, being the texture colour bleeding from the bottom of the plane to the top. When exported, the texture.txt file for the plane has the Tile=st option. By changing this to Tile=s the line may become invisible. The s and the t options are related to the x and y axis, (tiling in the x or y direction) so experiment to find the correct option to delete.
| Phantom Line |
The plane may have transparency on the top and sides, so use the Tile=none option to turn off the tiling for both directions. Texture.txt example - a separate .bmp opacity map:
   Primary=river1.tga
   Alpha=river1.bmp
   Tile=none
Texture.txt example - an alpha channel within the .tga file:
   Primary=river1.tga
   Alpha=river1.tga
   Tile=none
If you re-export the model after changing these values, they will revert to the original Tile=st settings. You will need to amend the lines in the file again.
Texture Clarity
Sometimes when you are close to a model in Trainz, the texture on the surface appears blurry, even if it is a quality texture. Add the line Hint=Dynamic to the texture.txt for the material, and often the texture will be clearer.
Primary=wall.tga Tile=none Hint=Dynamic | 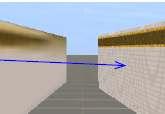
|
In TS2009 onwards, the use of "Hint=dynamic" is not recommended, as it increases GPU load. Use Anisotropy setting instead. See .texture.txt_Files
Textures for Tiling
Tiled textures are used to cover a large surface with a small high quality picture file. The tile is mapped multiple times across a surface. The tile needs to be seamless (the patterns match and repeat at the edges) so no distinct line is visible at the joins.
For a brick pattern, the brick shape and colour should match at the sides to make full bricks, and a mortar joint is placed only at the bottom or top of the tile, otherwise a double thickness mortar line will appear at every tile join.
|
Mortar at top only -
Half bricks match at sides - | 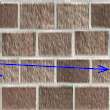
|
Previous Page . . . . Next Page
