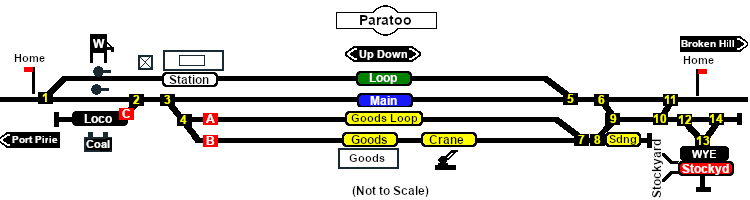
SAR Paratoo Switches
From TrainzOnline
(Difference between revisions)
m |
m |
||
| Line 20: | Line 20: | ||
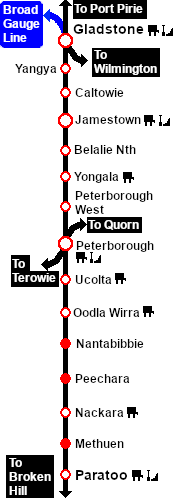
<td width=220 align="right">[[Image:SAR_PortPirie-BrokenHill_Line.png|link=SAR_Port_Pirie-Broken_Hill|alt=PortPirie-BrokenHill|Show Port Pirie-Broken Hill]]</td> | <td width=220 align="right">[[Image:SAR_PortPirie-BrokenHill_Line.png|link=SAR_Port_Pirie-Broken_Hill|alt=PortPirie-BrokenHill|Show Port Pirie-Broken Hill]]</td> | ||
<td width=110 align="center">[[Image:Next Left.png|link=|alt=]]<br>[[Image:SAR_Methuen_Name.png|link=SAR Methuen|alt=Methuen|Next Up Location]]</td> | <td width=110 align="center">[[Image:Next Left.png|link=|alt=]]<br>[[Image:SAR_Methuen_Name.png|link=SAR Methuen|alt=Methuen|Next Up Location]]</td> | ||
| − | <td width=90 align="center">[[Image:Location Index.png|link=SAR Index|alt=Location Index|Location Index]]</td> | + | <td width=90 align="center">[[Image:Location Index.png|link=SAR Index|alt=Location Index|Location Index]]<br>[[image:Scenario Index.png|link=SAR Peterborough Base Session|alt=Scenarios|Scenario Index]]</td> |
<td width=110 align="center"> </td> | <td width=110 align="center"> </td> | ||
<td width=220 align="right">[[Image:SAR_PortPirie-BrokenHill_Line.png|link=SAR_Port_Pirie-Broken_Hill|alt=PortPirie-BrokenHill|Show Port Pirie-Broken Hill]]</td> | <td width=220 align="right">[[Image:SAR_PortPirie-BrokenHill_Line.png|link=SAR_Port_Pirie-Broken_Hill|alt=PortPirie-BrokenHill|Show Port Pirie-Broken Hill]]</td> | ||
Revision as of 16:14, 19 February 2021
|
 |
||||||||||||||||||||||||||||||||||||||||||||||||||||||||||||||||||||||||||||||||||||||||||||||||||||||||||||||||||||||||||||||||||||||