SAR Paratoo Switches
From TrainzOnline
(Difference between revisions)
(Created page with "<table> <!-- BEGIN TOP TABLE --> <tr valign="top"> <td width=750> <table width=750> <!-- BEGIN TABBED link list with Switches page active--> <tr valign="top"> <td colspan=3...") |
|||
| Line 5: | Line 5: | ||
<table width=750> <!-- BEGIN TABBED link list with Switches page active--> | <table width=750> <!-- BEGIN TABBED link list with Switches page active--> | ||
<tr valign="top"> | <tr valign="top"> | ||
| − | <td | + | <td align="center">[[Image:line740.png|link=]]</td> |
</tr> | </tr> | ||
<tr valign="top"> | <tr valign="top"> | ||
| − | + | <td align="center">[[image:Tab_HM_Grey.png|link=SAR_Paratoo]] [[image:Tab_IN_Grey.png|link=SAR_Paratoo_Industry]] [[image:Tab_TM_Grey.png|link=SAR_Paratoo_TrackMarks]] [[image:Tab_PH_Grey.png|link=SAR_Paratoo_Paths]] [[image:Tab_SW_White.png|link=]]</td> | |
| − | <td align=" | + | </tr> |
| − | + | ||
<tr valign="top"> | <tr valign="top"> | ||
| − | <td | + | <td align="center">[[Image:line740.png|link=]]</td> |
</tr> | </tr> | ||
</table> <!-- END TABBED link list --> | </table> <!-- END TABBED link list --> | ||
| + | |||
| + | <table bgcolor="lightgrey" bordercolor="lightgrey" width=750> <!-- BEGIN Location link table with LINE and STATION NAMES --> | ||
| + | |||
| + | <tr valign="middle"> | ||
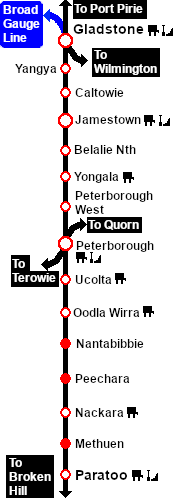
| + | <td width=220 align="right">[[Image:SAR_PortPirie-BrokenHill_Line.png|link=SAR_Port_Pirie-Broken_Hill|alt=PortPirie-BrokenHill|Show Port Pirie-Broken Hill]]</td> | ||
| + | <td width=110 align="center">[[Image:Next Left.png|link=|alt=]]<br>[[Image:SAR_Methuen_Name.png|link=SAR Methuen|alt=Methuen|Next Up Location]]</td> | ||
| + | <td width=90 align="center">[[Image:Location Index.png|link=SAR Index|alt=Location Index|Location Index]]</td> | ||
| + | <td width=110 align="center"> </td> | ||
| + | <td width=220 align="right">[[Image:SAR_PortPirie-BrokenHill_Line.png|link=SAR_Port_Pirie-Broken_Hill|alt=PortPirie-BrokenHill|Show Port Pirie-Broken Hill]]</td> | ||
| + | </tr> | ||
| + | |||
| + | </table> <!-- BEGIN Location link table with LINE and STATION NAMES --> | ||
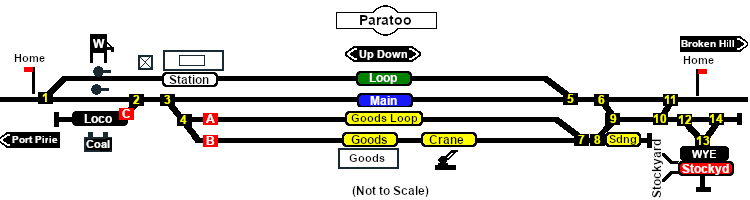
[[image:SAR_Paratoo_Basic.png|link=SAR_Paratoo_Switches|alt=Paratoo Switches map]] | [[image:SAR_Paratoo_Basic.png|link=SAR_Paratoo_Switches|alt=Paratoo Switches map]] | ||
Revision as of 13:49, 25 November 2020
|
 |
||||||||||||||||||||||||||||||||||||||||||||||||||||||||||||||||||||||||||||||||||||||||||||||||||||||||||||||||||||||||||||||