|
| From |
To |
EIT Paths |
Descriptions |
  |
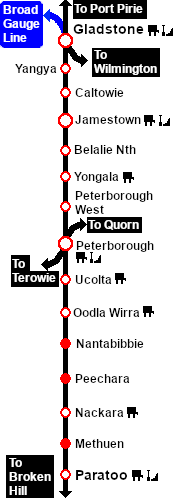
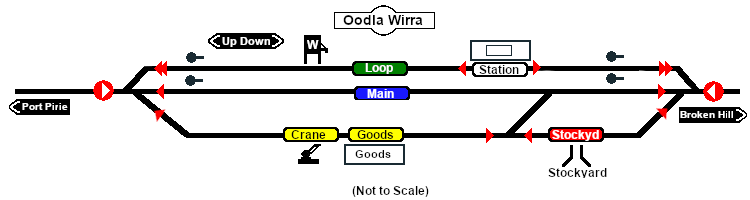
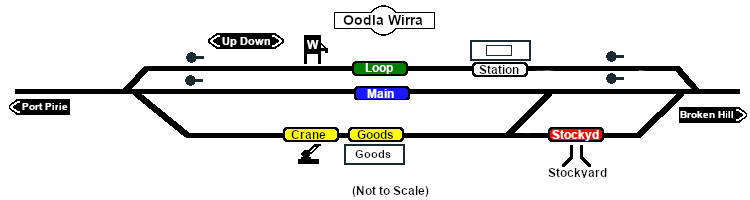
Port Pirie to Broken Hill |
Through (non stopping) service from Peterborough to Paratoo |
 |
Port Pirie to Station to Broken Hill |
Through service from Peterborough to Paratoo stopping at station |
 |
Port Pirie to Goods/Stockyard |
Arriving service from Peterborough to goods and stockyard |
 |
Port Pirie to Loop |
Arriving service from Peterborough to station loop |
 |
Goods to Broken Hill |
Departing service to Paratoo from goods |
 |
Stockyard to Broken Hill |
Departing service to Paratoo from stockyard |
 |
Loop to Broken Hill |
Departing service to Paratoo from station loop |
| All reverse paths (e.g. to ) are also available |
|
|
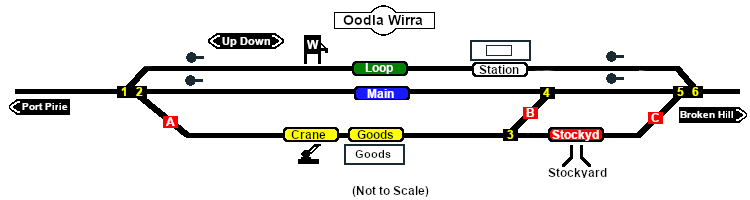
| Switches |
| No. |
Name |
Facing and L/R Directions
(default direction first) |
No. |
Name |
Facing and L/R Directions
(default direction first) |
|
 |
OW 1 |
Down (R) Main, (L) Loop/Station |
 |
OW 2 |
Down (L) Main, (R) Goods/Stockyard |
 |
OWCP A |
Up (L) Catchpoint , (R) Port Pirie |
 |
OW 3 |
Down (R) Stockyard, (L) Main Yard |
 |
OWCP B |
Down (R) Catchpoint , (L) Main Yard |
 |
OW 4 |
Up (R) Main, (L) Goods Shed |
 |
OWCP C |
Down (R) Catchpoint , (L) Broken Hill |
 |
OW 5 |
Up (R) Main Yard, (L) Stockyard |
 |
OW 6 |
Up (L) Main Yard, (R) Station/Loop |
' |
|
| Switch Sets |
| Port Pirie - Station Loop |
1 -L |
Broken Hill - Station Loop |
6 -R |
| Port Pirie - Main |
1 -R 2 -L ( 4 -R ) |
Broken Hill - Main |
6 -L 5 -R 4 -R |
| Port Pirie - Goods |
1 -R 2 -R A -R |
Broken Hill - Goods |
6 -L 5 -R 4 -L B -L 3 -R |
| |
Broken Hill - Stockyard |
6 -L 5 -L C -L |
|
| |
( ) = optional switches |
|