SAR Nantabibbie (Basic)
From TrainzOnline
(Difference between revisions)
(added trackmark information) |
(added trackmark information) |
||
| Line 36: | Line 36: | ||
<table bgcolor="LightYellow" width=750> <!-- BEGIN Track Markers table --> | <table bgcolor="LightYellow" width=750> <!-- BEGIN Track Markers table --> | ||
<tr valign="middle"> | <tr valign="middle"> | ||
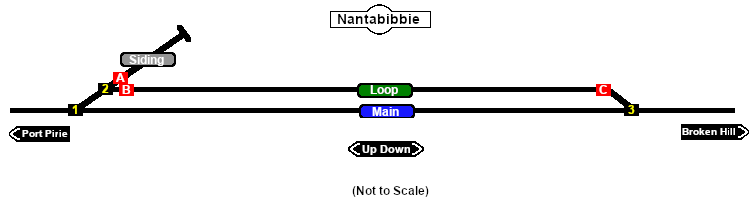
| − | <td colspan= | + | <td colspan=3 align="center"><span style="font-weight: 700;font-size: 17px; background-color: red; color: white;"> Track Markers </span></td> |
</tr> | </tr> | ||
<tr valign="middle"> | <tr valign="middle"> | ||
| − | <td colspan= | + | <td colspan=3 align="center"><span style="font-weight: 700;">Destinations for "Drive To Trackmark ..." commands</span></td> |
</tr> | </tr> | ||
<tr valign="middle"> | <tr valign="middle"> | ||
<td width=200><span style="font-weight: 700; background-color: black; color: white;"> Approach from Port Pirie </span> </td> | <td width=200><span style="font-weight: 700; background-color: black; color: white;"> Approach from Port Pirie </span> </td> | ||
| − | <td>[[image:Trackmark_Right.png|link=|alt=TM|10px]] <span style="font-weight: 700;">Nantabibbie Main Approach Dn</span></td> | + | <td colspan=2>[[image:Trackmark_Right.png|link=|alt=TM|10px]] <span style="font-weight: 700;">Nantabibbie Main Approach Dn</span></td> |
</tr> | </tr> | ||
<tr valign="middle"> | <tr valign="middle"> | ||
<td width=200><span style="font-weight: 700; background-color: black; color: white;"> Approach from Broken Hill </span> </td> | <td width=200><span style="font-weight: 700; background-color: black; color: white;"> Approach from Broken Hill </span> </td> | ||
| − | <td>[[image:Trackmark_Left.png|link=|alt=TM|10px]] <span style="font-weight: 700;">Nantabibbie Main Approach Up</span></td> | + | <td colspan=2>[[image:Trackmark_Left.png|link=|alt=TM|10px]] <span style="font-weight: 700;">Nantabibbie Main Approach Up</span></td> |
| + | </tr> | ||
| + | <tr valign="middle"> | ||
| + | <td width=200>[[image:Main_Label.png|link=|alt=Main]] </td> | ||
| + | <td>[[image:Trackmark_Left.png|link=|alt=TM|10px]] <span style="font-weight: 700;">Nantabibbie Main Up</span></td> | ||
| + | <td>[[image:Trackmark_Right.png|link=|alt=TM|10px]] <span style="font-weight: 700;">Nantabibbie Main Dn</span></td> | ||
| + | </tr> | ||
| + | <tr valign="middle"> | ||
| + | <td width=200>[[image:Loop_Label.png|link=|alt=Loop]] </td> | ||
| + | <td>[[image:Trackmark_Left.png|link=|alt=TM|10px]] <span style="font-weight: 700;">Nantabibbie Loop Up</span></td> | ||
| + | <td>[[image:Trackmark_Right.png|link=|alt=TM|10px]] <span style="font-weight: 700;">Nantabibbie Loop Dn</span></td> | ||
</tr> | </tr> | ||
</table> <!-- END Track Markers table --> | </table> <!-- END Track Markers table --> | ||
Revision as of 20:10, 12 October 2020
|
|
 |
|||||||||||||||||||||||||||||||||||||||||||||||||||||||||||||||||||||||||||||||||||||||||||||||||||||||||||